Account ID: {authData.accountId}
Username: {authData.username}
{error.message}
Text
", "giphyId": null, "lockedText": false, "isFree": true, "price": 0, "isMediaReady": true, "mediaCount": 0, "media": [], "previews": [], "isTip": false, "isReportedByMe": false, "isCouplePeopleMedia": false, "queueId": 123, "isMarkdownDisabled": true, "fanData": { "available": true, "last_updated_at": "2025-10-23 00:52:34", "spending": { "total": 50, "messages": 30, "subscribes": 10, "posts": 0, "tips": 20, "streams": 0 } }, "fromUser": { "view": "s", "avatar": "https://example.com", "avatarThumbs": { "c50": "https://example.com", "c144": "https://example.com" }, "header": null, "headerSize": null, "headerThumbs": null, "id": 123, "name": "Name", "username": "username", "canLookStory": true, "canCommentStory": true, "hasNotViewedStory": false, "isVerified": false, "canPayInternal": true, "hasScheduledStream": false, "hasStream": false, "hasStories": false, "tipsEnabled": false, "tipsTextEnabled": true, "tipsMin": 5, "tipsMinInternal": 1, "tipsMax": 200, "canEarn": false, "canAddSubscriber": false, "subscribePrice": 0, "displayName": "", "notice": "", "isRestricted": false, "canRestrict": true, "subscribedBy": true, "subscribedByExpire": false, "subscribedByExpireDate": "2034-12-22T00:38:29+00:00", "subscribedByAutoprolong": true, "subscribedIsExpiredNow": false, "currentSubscribePrice": 0, "subscribedOn": true, "subscribedOnExpiredNow": false, "subscribedOnDuration": "4 months", "listsStates": [ { "id": "fans", "type": "fans", "name": "Fans", "hasUser": true, "canAddUser": false, "cannotAddUserReason": "ALREADY_EXISTS" }, { "id": "following", "type": "following", "name": "Following", "hasUser": true, "canAddUser": false, "cannotAddUserReason": "ALREADY_EXISTS" }, { "id": "recent", "type": "recent", "name": "Recent (last 24 hours)", "hasUser": false, "canAddUser": false, "cannotAddUserReason": "SYSTEM_LIST" }, { "id": "muted", "type": "muted", "name": "Muted", "hasUser": false, "canAddUser": true, "cannotAddUserReason": null }, { "id": "tagged", "type": "tagged", "name": "Tagged", "hasUser": false, "canAddUser": false, "cannotAddUserReason": "SYSTEM_LIST" }, { "id": "friends", "type": "friends", "name": "Friends", "hasUser": false, "canAddUser": false, "cannotAddUserReason": "USER_NOT_PERFORMER" } ], "showMediaCount": true, "lastSeen": "2025-05-16T00:26:49+00:00", "canReport": true }, "isFromQueue": false, "id": 123, "isOpened": false, "isNew": true, "createdAt": "2025-05-16T00:27:25+00:00", "changedAt": "2025-05-16T00:27:25+00:00", "cancelSeconds": 120, "isLiked": false, "canPurchase": false, "canPurchaseReason": "free", "canReport": true, "canBePinned": true, "isPinned": false, "replyToMessage": { "responseType": "message", "text": "Text
", "giphyId": null, "lockedText": false, "isFree": true, "price": 0, "isMediaReady": true, "mediaCount": 0, "media": [], "previews": [], "isTip": false, "isReportedByMe": false, "isCouplePeopleMedia": false, "queueId": 123, "isMarkdownDisabled": true, "releaseForms": [], "fromUser": { "view": "s", "avatar": "https://example.com", "avatarThumbs": { "c50": "https://example.com", "c144": "https://example.com" }, "header": "https://example.com", "headerSize": { "width": 4800, "height": 1440 }, "headerThumbs": { "w480": "https://example.com", "w760": "https://example.com" }, "id": 123, "name": "Name", "username": "username", "canLookStory": true, "canCommentStory": true, "hasNotViewedStory": false, "isVerified": true, "canPayInternal": true, "hasScheduledStream": false, "hasStream": false, "hasStories": true, "tipsEnabled": true, "tipsTextEnabled": true, "tipsMin": 5, "tipsMinInternal": 1, "tipsMax": 200, "canEarn": true, "canAddSubscriber": false, "subscribePrice": 0, "hasStripe": false, "isStripeExist": false, "subscriptionBundles": [], "canSendChatToAll": true, "creditsMin": 10, "creditsMax": 200, "isPaywallPassed": true, "creditsMinAlternatives": 5, "canCreateLists": true, "showMediaCount": true, "lastSeen": "2025-05-16T00:24:06+00:00", "canReport": false, "subscribedOn": null }, "isFromQueue": true, "canUnsendQueue": true, "unsendSecondsQueue": 1000000, "id": 123, "isOpened": false, "isNew": false, "createdAt": "2025-05-15T22:53:57+00:00", "changedAt": "2025-05-15T22:53:57+00:00", "cancelSeconds": 80792, "isLiked": false, "canPurchase": false, "canPurchaseReason": "free", "canReport": false, "canBePinned": true, "isPinned": false } } } ``` ### `messages.sent` A new message has been sent from one of your OnlyFans accounts to a fan. ```json title="Example payload" { "event": "messages.sent", "account_id": "acct_123", "payload": { "responseType": "message", "text": "Text
", "giphyId": null, "lockedText": false, "isFree": true, "price": 0, "isMediaReady": true, "mediaCount": 1, "media": [ { "id": 123, "type": "photo", "convertedToVideo": false, "canView": true, "hasError": false, "createdAt": "2025-04-05T06:19:31+00:00", "isReady": true, "files": { "full": { "url": "https://example.com", "width": 3840, "height": 5215, "size": 0, "sources": [] }, "thumb": { "url": "https://example.com", "width": 300, "height": 300, "size": 0 }, "preview": { "url": "https://example.com", "width": 960, "height": 1304, "size": 0 }, "squarePreview": { "url": "https://example.com", "width": 960, "height": 960, "size": 0 } }, "duration": 0, "releaseForms": [], "hasCustomPreview": false, "videoSources": { "240": null, "720": null } } ], "previews": [], "isTip": false, "isReportedByMe": false, "isCouplePeopleMedia": false, "queueId": 123, "isMarkdownDisabled": true, "releaseForms": [], "isFromQueue": false, "id": 123, "isOpened": false, "isNew": true, "createdAt": "2025-05-15T23:37:24+00:00", "changedAt": "2025-05-15T23:37:24+00:00", "cancelSeconds": 86400, "isLiked": false, "canPurchase": false, "canPurchaseReason": "free", "canReport": false, "canBePinned": true, "isPinned": false, "toUser": { "view": "s", "avatar": null, "avatarThumbs": null, "header": null, "headerSize": null, "headerThumbs": null, "id": 123, "name": "Name", "username": "username", "canLookStory": false, "canCommentStory": false, "hasNotViewedStory": false, "isVerified": false, "canPayInternal": true, "hasScheduledStream": false, "hasStream": false, "hasStories": false, "tipsEnabled": false, "tipsTextEnabled": true, "tipsMin": 5, "tipsMinInternal": 1, "tipsMax": 200, "canEarn": false, "canAddSubscriber": true, "subscribePrice": 0, "displayName": "", "notice": "", "isRestricted": false, "canRestrict": true, "subscribedBy": false, "subscribedByExpire": null, "subscribedByExpireDate": null, "subscribedByAutoprolong": null, "subscribedIsExpiredNow": null, "currentSubscribePrice": null, "subscribedOn": true, "subscribedOnExpiredNow": false, "subscribedOnDuration": "", "listsStates": [ { "id": "fans", "type": "fans", "name": "Fans", "hasUser": true, "canAddUser": false, "cannotAddUserReason": "ALREADY_EXISTS" }, { "id": "following", "type": "following", "name": "Following", "hasUser": false, "canAddUser": false, "cannotAddUserReason": "SYSTEM_LIST" }, { "id": "recent", "type": "recent", "name": "Recent (last 24 hours)", "hasUser": true, "canAddUser": false, "cannotAddUserReason": "ALREADY_EXISTS" }, { "id": "muted", "type": "muted", "name": "Muted", "hasUser": false, "canAddUser": true, "cannotAddUserReason": null }, { "id": "tagged", "type": "tagged", "name": "Tagged", "hasUser": false, "canAddUser": false, "cannotAddUserReason": "SYSTEM_LIST" }, { "id": "friends", "type": "friends", "name": "Friends", "hasUser": false, "canAddUser": false, "cannotAddUserReason": "USER_NOT_PERFORMER" } ], "showMediaCount": true, "lastSeen": "2025-05-15T23:37:03+00:00", "canReport": false } } } ``` ### `messages.ppv.unlocked` A PPV message that you sent has been purchased by a fan. * `message_id` is the purchased message and `chat_id` is the chat it was sent in (OnlyFans uses the fan's user ID as the chat ID). * `amountGross` is the price as a number, and `amountNet` is your estimated earnings after the OnlyFans fee. The same fields appear on [`tips.received`](#tipsreceived). * `user_id` is the creator's OnlyFans ID. See [Identifying the creator and the fan](#identifying-the-creator-and-the-fan). ```json title="Example payload" { "event": "messages.ppv.unlocked", "account_id": "acct_123", "payload": { "id": "123", "type": "paided_message", "createdAt": "2025-05-05T22:18:00+00:00", "text": "has purchased your message for $5.00!", "replacePairs": { "{NAME}": "Name", "{MESSAGE_LINK}": "message", "{AMOUNT}": "$5.00" }, "subType": "subscriber_pay_for_chat_message", "user_id": "222222222", "message_id": "1234567890123", "chat_id": "123", "amountGross": 5, "amountNet": 4, "fan": { "id": "123", "username": "username", "name": "Name", "display_name": null, "avatar": null }, "isRead": false, "canGoToProfile": true, "fanData": { "available": true, "last_updated_at": "2026-01-02 17:12:00", "spending": { "total": 6.6, "messages": 4, "subscribes": 2.6, "posts": 0, "tips": 4, "streams": 0 } }, "user": { "avatar": null, "avatarThumbs": null, "header": null, "headerSize": null, "headerThumbs": null, "id": 123, "name": "Name", "username": "username", "canLookStory": false, "canCommentStory": false, "hasNotViewedStory": false, "isVerified": false, "canPayInternal": false, "hasScheduledStream": false, "hasStream": false, "hasStories": false, "tipsEnabled": false, "tipsTextEnabled": true, "tipsMin": 5, "tipsMinInternal": 1, "tipsMax": 200, "canEarn": false, "canAddSubscriber": false, "subscribePrice": 0, "subscribedBy": false, "subscribedOn": false, "canReceiveChatMessage": false, "hideChat": false, "lastSeen": "2025-05-05T22:17:29+00:00", "isPerformer": false, "isRealPerformer": false, "view": "mn", "canReport": true, "subscribedByData": null, "subscribedOnData": null, "isBlocked": false } } } ``` ### `messages.deleted` A chat message was deleted. ```json title="Example payload" { "event": "messages.deleted", "account_id": "acct_123", "payload": { "id": "123" } } ``` ### `messages.liked` A chat message was liked. This event is delivered when OnlyFans reports the reaction over the connected account's websocket. ```json title="Example payload" { "event": "messages.liked", "account_id": "acct_123", "payload": { "id": "1234567890123", "chat_id": "123", "fan_id": "123", "fan": { "id": "123", "username": "username", "name": "Name", "display_name": null, "avatar": null } } } ``` `payload.id` is the OnlyFans **message ID**, represented as a string. OnlyFans only reports the message ID, so we look up `chat_id`, `fan_id`, and `fan` from the messages we have stored for the account. They are `null` when we have no copy of the message, for example a message sent before the account was connected. Reaction events do not include the message contents or the time the reaction happened. If you need context for a message we could not resolve, use `account_id` and a message-to-chat mapping saved from your message history or [`messages.sent`](#messagessent) / [`messages.received`](#messagesreceived) events. Normalize message IDs to strings both when storing that mapping and when looking up a reaction, for example with `String(payload.id)`. Sent and received message payloads can contain numeric IDs, while reaction payloads contain strings; normalizing both avoids mismatched typed map keys. ### `messages.unliked` A like was removed from a chat message. Subscribe to both `messages.liked` and `messages.unliked` if you need to track changes to a message's reaction state. ```json title="Example payload" { "event": "messages.unliked", "account_id": "acct_123", "payload": { "id": "1234567890123", "chat_id": "123", "fan_id": "123", "fan": { "id": "123", "username": "username", "name": "Name", "display_name": null, "avatar": null } } } ``` The payload has the same fields and limitations as [`messages.liked`](#messagesliked).Text
", "giphyId": null, "lockedText": false, "isFree": true, "price": 0, "isMediaReady": true, "mediaCount": 0, "media": [], "previews": [], "isTip": false, "isReportedByMe": false, "isCouplePeopleMedia": false, "queueId": 123, "isMarkdownDisabled": true, "fromUser": { "view": "s", "avatar": "https://public.onlyfans.com/files/.../avatar.jpg", "avatarThumbs": { "c50": "https://thumbs.onlyfans.com/public/files/thumbs/c50/.../avatar.jpg", "c144": "https://thumbs.onlyfans.com/public/files/thumbs/c144/.../avatar.jpg" }, "header": "https://public.onlyfans.com/files/f/fn/fni/.../header.jpg", "headerSize": { "width": 4000, "height": 3000 }, "headerThumbs": { "w480": "https://thumbs.onlyfans.com/public/files/thumbs/w480/f/fn/fni/.../header.jpg", "w760": "https://thumbs.onlyfans.com/public/files/thumbs/w760/f/fn/fni/.../header.jpg" }, "id": 123, "name": "Name", "username": "username", "canLookStory": true, "canCommentStory": true, "hasNotViewedStory": false, "isVerified": false, "canPayInternal": true, "hasScheduledStream": false, "hasStream": false, "hasStories": false, "tipsEnabled": false, "tipsTextEnabled": true, "tipsMin": 5, "tipsMinInternal": 1, "tipsMax": 200, "canEarn": false, "canAddSubscriber": false, "subscribePrice": 0, "displayName": "Name", "notice": "", "isRestricted": false, "canRestrict": true, "subscribedBy": true, "subscribedByExpire": false, "subscribedByExpireDate": "2025-01-01T01:11:11+00:00", "subscribedByAutoprolong": true, "subscribedIsExpiredNow": false, "currentSubscribePrice": 0, "subscribedOn": null, "subscribedOnExpiredNow": true, "subscribedOnDuration": "1 month", "listsStates": [ { "id": "friends", "type": "friends", "name": "Amigos", "hasUser": false, "canAddUser": false, "cannotAddUserReason": "USER_NOT_PERFORMER" }, { "id": "muted", "type": "muted", "name": "Enmudecido", "hasUser": false, "canAddUser": true, "cannotAddUserReason": null }, { "id": "tagged", "type": "tagged", "name": "etiquetado", "hasUser": false, "canAddUser": false, "cannotAddUserReason": "SYSTEM_LIST" }, { "id": "rebill_on", "type": "rebill_on", "name": "Renovación de Facturación", "hasUser": false, "canAddUser": false, "cannotAddUserReason": null }, { "id": "recent", "type": "recent", "name": "Reciente (últimas 24 horas)", "hasUser": false, "canAddUser": false, "cannotAddUserReason": "SYSTEM_LIST" }, { "id": "fans", "type": "fans", "name": "Fans", "hasUser": false, "canAddUser": false, "cannotAddUserReason": null }, { "id": "rebill_off", "type": "rebill_off", "name": "Apagar Facturación", "hasUser": false, "canAddUser": false, "cannotAddUserReason": null }, { "id": "following", "type": "following", "name": "Siguiente", "hasUser": true, "canAddUser": false, "cannotAddUserReason": "ALREADY_EXISTS" } ], "showMediaCount": true, "lastSeen": "2025-01-01T01:11:11+00:0000", "canReport": true }, "isFromQueue": false, "id": 123, "isOpened": false, "isNew": true, "createdAt": "2025-01-01T01:11:11+00:00", "changedAt": "2025-01-01T01:11:11+00:00", "cancelSeconds": 119, "isLiked": false, "canPurchase": false, "canPurchaseReason": "free", "canReport": true, "canBePinned": true, "isPinned": false } } ``` ### 📤 Chat Message Sent A new message has been sent from one of your OnlyFans accounts to a fan. ```json title="Example data" { "event": "messages.sent", "account_id": "acct_abc123", "payload": { "responseType": "message", "text": "Text
", "giphyId": null, "lockedText": true, "isFree": true, "price": 0, "isMediaReady": true, "mediaCount": 0, "media": [], "previews": [], "isTip": false, "isReportedByMe": false, "isCouplePeopleMedia": false, "queueId": 123, "isMarkdownDisabled": true, "releaseForms": [], "isFromQueue": false, "id": 123, "isOpened": false, "isNew": true, "createdAt": "2025-07-02T00:00:00+00:00", "changedAt": "2025-07-02T00:00:00+00:00", "cancelSeconds": 86400, "isLiked": false, "canPurchase": false, "canPurchaseReason": "free", "canReport": false, "canBePinned": true, "isPinned": false, "toUser": { "view": "s", "avatar": null, "avatarThumbs": null, "header": null, "headerSize": null, "headerThumbs": null, "id": 123, "name": "Name", "username": "username", "canLookStory": false, "canCommentStory": false, "hasNotViewedStory": false, "isVerified": false, "canPayInternal": true, "hasScheduledStream": false, "hasStream": false, "hasStories": false, "tipsEnabled": false, "tipsTextEnabled": true, "tipsMin": 5, "tipsMinInternal": 1, "tipsMax": 200, "canEarn": false, "canAddSubscriber": true, "subscribePrice": 0, "displayName": "", "notice": "", "isRestricted": false, "canRestrict": true, "subscribedBy": false, "subscribedByExpire": null, "subscribedByExpireDate": null, "subscribedByAutoprolong": null, "subscribedIsExpiredNow": null, "currentSubscribePrice": null, "subscribedOn": true, "subscribedOnExpiredNow": false, "subscribedOnDuration": "1 month", "listsStates": [ { "id": "friends", "type": "friends", "name": "Friends", "hasUser": false, "canAddUser": false, "cannotAddUserReason": "USER_NOT_PERFORMER" }, { "id": "muted", "type": "muted", "name": "Muted", "hasUser": false, "canAddUser": true, "cannotAddUserReason": null }, { "id": "tagged", "type": "tagged", "name": "Tagged", "hasUser": false, "canAddUser": false, "cannotAddUserReason": "SYSTEM_LIST" }, { "id": "rebill_on", "type": "rebill_on", "name": "Renew On", "hasUser": false, "canAddUser": false, "cannotAddUserReason": null }, { "id": "recent", "type": "recent", "name": "Recent (last 24 hours)", "hasUser": false, "canAddUser": false, "cannotAddUserReason": "SYSTEM_LIST" }, { "id": "fans", "type": "fans", "name": "Fans", "hasUser": true, "canAddUser": false, "cannotAddUserReason": "ALREADY_EXISTS" }, { "id": "rebill_off", "type": "rebill_off", "name": "Renew Off", "hasUser": true, "canAddUser": false, "cannotAddUserReason": "ALREADY_EXISTS" }, { "id": "following", "type": "following", "name": "Following", "hasUser": false, "canAddUser": false, "cannotAddUserReason": "SYSTEM_LIST" } ], "showMediaCount": true, "lastSeen": "2025-07-02T00:00:00+00:00", "canReport": false } } } ``` ### 🎉 New Subscription A new fan has subscribed. ```json title="Example data" { "event": "subscriptions.new", "account_id": "acct_123", "payload": { "id": "123", "type": "subscribed", "createdAt": "2025-05-05T21:27:00+00:00", "text": "subscribed to your profile!", "replacePairs": { "{SUBSCRIBER_LINK}": "Name", "{PRICE}": "free" }, "subType": "new_subscriber", "user_id": "222222222", "isRead": false, "canGoToProfile": true, "user": { "avatar": "https://example.com", "avatarThumbs": { "c50": "https://example.com", "c144": "https://example.com" }, "header": "https://example.com", "headerSize": { "width": 767, "height": 1152 }, "headerThumbs": { "w480": "https://example.com", "w760": "https://example.com" }, "id": 123, "name": "Name", "username": "username", "canLookStory": false, "canCommentStory": false, "hasNotViewedStory": false, "isVerified": true, "canPayInternal": false, "hasScheduledStream": false, "hasStream": false, "hasStories": false, "tipsEnabled": true, "tipsTextEnabled": true, "tipsMin": 5, "tipsMinInternal": 1, "tipsMax": 200, "canEarn": true, "canAddSubscriber": false, "subscribePrice": 0, "subscribedBy": false, "subscribedOn": false, "canReceiveChatMessage": false, "hideChat": false, "lastSeen": "2025-05-05T21:26:04+00:00", "isPerformer": true, "isRealPerformer": true, "view": "mn", "canReport": true, "subscribedByData": null, "subscribedOnData": null, "isBlocked": false } } } ``` ### 🎉 Subscription renewed A fan has renewed their subscription. ```json title="Example data" { "event": "subscriptions.renewed", "account_id": "acct_123", "payload": { "id": "123", "type": "subscribed", "createdAt": "2025-05-05T21:27:00+00:00", "text": "Good news! u34547118 has Just restarted their monthly subscription to your OnlyFans profile!", "replacePairs": { "{SUBSCRIBER_LINK}": "u34547118", "{PRICE}": "$4.00" }, "subType": "returning_subscriber", "user_id": "222222222", "isRead": false, "canGoToProfile": true, "user": { "avatar": "https://example.com", "avatarThumbs": { "c50": "https://example.com", "c144": "https://example.com" }, "header": "https://example.com", "headerSize": { "width": 767, "height": 1152 }, "headerThumbs": { "w480": "https://example.com", "w760": "https://example.com" }, "id": 34547118, "name": "Name", "username": "username", "canLookStory": false, "canCommentStory": false, "hasNotViewedStory": false, "isVerified": true, "canPayInternal": false, "hasScheduledStream": false, "hasStream": false, "hasStories": false, "tipsEnabled": true, "tipsTextEnabled": true, "tipsMin": 5, "tipsMinInternal": 1, "tipsMax": 200, "canEarn": true, "canAddSubscriber": false, "subscribePrice": 0, "subscribedBy": false, "subscribedOn": false, "canReceiveChatMessage": false, "hideChat": false, "lastSeen": "2025-05-05T21:26:04+00:00", "isPerformer": true, "isRealPerformer": true, "view": "mn", "canReport": true, "subscribedByData": null, "subscribedOnData": null, "isBlocked": false } } } ``` ### ❤️ Post Liked A fan has liked one of your posts. ```json title="Example data" { "event": "posts.liked", "account_id": "acct_123", "payload": { "id": "123", "type": "favorited", "createdAt": "2025-05-05T22:22:00+00:00", "text": "liked your post", "replacePairs": { "{POST_LINK}": "post" }, "subType": "new_favorite", "user_id": "222222222", "isRead": false, "canGoToProfile": true, "user": { "avatar": null, "avatarThumbs": null, "header": null, "headerSize": null, "headerThumbs": null, "id": 123, "name": "Name", "username": "username", "canLookStory": false, "canCommentStory": false, "hasNotViewedStory": false, "isVerified": false, "canPayInternal": false, "hasScheduledStream": false, "hasStream": false, "hasStories": false, "tipsEnabled": false, "tipsTextEnabled": true, "tipsMin": 5, "tipsMinInternal": 1, "tipsMax": 200, "canEarn": false, "canAddSubscriber": false, "subscribePrice": 0, "subscribedBy": false, "subscribedOn": false, "canReceiveChatMessage": false, "hideChat": false, "lastSeen": null, "isPerformer": false, "isRealPerformer": false, "view": "mn", "canReport": true, "subscribedByData": null, "subscribedOnData": null, "isBlocked": false } } } ``` ### 💬 User is Typing A fan is typing a message. ```json title="Example data" { "event": "users.typing", "account_id": "acct_123", "payload": { "id": 123 } } ``` ### ℹ️ New Account Connected A new OnlyFans account was connected.About
", "email": "user@example.com", "wsUrl": "wss://ws2.onlyfans.com/ws3/01", "avatar": "https://public.onlyfans.com/.../avatar.jpg", "header": "https://public.onlyfans.com/.../header_image.jpg", "isAuth": true, "ivFlow": "default", "upload": { "geoUploadArgs": { "preset": "of_beta", "isDelay": true, "additional": { "user": "123" }, "needThumbs": true, "preset_png": "of_png", "protected_preset": "of_drm" } }, "canChat": true, "canEarn": true, "hasTags": false, "tipsMax": 200, "tipsMin": 5, "website": null, "advBlock": ["banners"], "hasLinks": false, "ivStatus": "approved", "joinDate": "2025-01-01T00:00:00+00:00", "lastSeen": "2025-01-21T00:00:00+00:00", "location": null, "paidFeed": false, "username": "username", "wishlist": null, "hasLabels": true, "hasStream": false, "hasStripe": false, "ivCountry": "US", "canAddCard": true, "canPinPost": true, "creditsMax": 200, "creditsMin": 10, "hasFriends": false, "hasStories": false, "headerSize": { "width": 4032, "height": 3024 }, "isVerified": true, "payoutType": "bank_ebics_sepa", "postsCount": 1, "unreadTips": 0, "audiosCount": 0, "canAddStory": true, "hasNewHints": true, "hasScenario": false, "isPerformer": true, "mediasCount": 1, "photosCount": 1, "tipsEnabled": false, "videosCount": 0, "wsAuthToken": "wsAuthToken", "avatarThumbs": { "c50": "https://thumbs.onlyfans.com/.../avatar.jpg", "c144": "https://thumbs.onlyfans.com/.../avatar.jpg" }, "canLookStory": true, "canStreaming": false, "canTrialSend": false, "hasNewAlerts": false, "headerThumbs": { "w480": "https://thumbs.onlyfans.com/.../header_image.jpg", "w760": "https://thumbs.onlyfans.com/.../header_image.jpg" }, "isOtpEnabled": true, "ivFailReason": null, "newTagsCount": 0, "postMaxPrice": 100, "postMinPrice": 3, "trialMaxDays": 7, "creditBalance": 0, "faceIdRegular": [], "isAgeVerified": false, "isAllowTweets": false, "isMakePayment": false, "isStripeExist": false, "isVatRequired": false, "needIVApprove": false, "vatNumberName": "VAT", "watermarkText": "OnlyFans.com/username", "canCreateLists": true, "canCreateTrial": true, "canPayInternal": true, "favoritedCount": 0, "favoritesCount": 0, "hasPinnedPosts": false, "isAdultContent": false, "isEmailChecked": true, "isWantComments": true, "showMediaCount": true, "subscribePrice": 4.99, "canCommentStory": true, "countPinnedChat": 0, "isEmailRequired": false, "isPaywallPassed": true, "isRealPerformer": true, "isVisibleOnline": true, "messageMaxPrice": 100, "messageMinPrice": 3, "showPostsInFeed": true, "subscribesCount": 123, "tipsMinInternal": 1, "tipsTextEnabled": true, "twitterUsername": "TwitterUsername", "canAddSubscriber": false, "canSendChatToAll": true, "isCountryWithVat": false, "isCreditsEnabled": true, "isVerifiedReason": false, "pinnedPostsCount": 0, "subscribedByData": null, "subscribedOnData": null, "subscribersCount": 123, "chatMessagesCount": 123, "countPriorityChat": 123, "hasNotViewedStory": false, "hasPurchasedPosts": false, "hasWatermarkPhoto": true, "hasWatermarkVideo": true, "isDeleteInitiated": false, "isReferrerAllowed": true, "isSpringConnected": false, "subscribeMaxPrice": 50, "subscribeMinPrice": 4.99, "watermarkPosition": "bottom_right", "archivedPostsCount": 0, "canCreatePromotion": true, "canMakeExpirePosts": true, "hasScheduledStream": false, "isSpotifyConnected": false, "isTwitterConnected": false, "notificationsCount": 0, "walletFirstRebills": false, "canConnectOfAccount": true, "connectedOfAccounts": [], "hasInternalPayments": false, "hasNewTicketReplies": { "open": false, "closed": false, "solved": false }, "isNeedConfirmPayout": false, "isRealCardConnected": true, "ivHideForPerformers": false, "maxPinnedPostsCount": 5, "subscriptionBundles": [], "trialMaxExpiresDays": 30, "canCreateFundRaising": false, "isPrivateRestriction": false, "isWalletAutorecharge": false, "maxFundRaisingTarget": 10000, "minFundRaisingTarget": 10, "showSubscribersCount": false, "canChangeContentPrice": true, "canReceiveChatMessage": false, "walletAutorechargeMin": 0, "canReceiveManualPayout": true, "canReceiveStripePayout": false, "firstPublishedPostDate": "2025-01-01T00:00:00+00:00", "hasSystemNotifications": false, "isCountryVatRefundable": false, "isLegalApprovedAllowed": true, "isPaymentCardConnected": true, "ageVerificationRequired": false, "payoutLegalApproveState": "approved", "walletAutorechargeAmount": 0, "canAlternativeWalletTopUp": false, "enabledImageEditorForChat": true, "isCountryVatNumberCollect": false, "isScheduledStreamsAllowed": false, "privateArchivedPostsCount": 0, "isMarkdownDisabledForAbout": true, "avatarHeaderConverterUpload": true, "hasNewChangedPriceSubscriptions": true } } ``` ### 💰 List Earnings (monetary values) Get the earnings in monetary values for a given period. E.g. `123.45` ```json title="Example data" { "date": "2025-01-01T00:00:00+00:00", "count": 123.45 } ``` ### 💰 List Earnings (transaction count) Get the transaction counts for a given period. E.g. `123` ```json title="Example data" { "date": "2025-01-01T00:00:00+00:00", "count": 123 } ``` ### 🔗 List Tracking Links List all tracking links & their revenue data for the account. ```json title="Example data" { "id": 123, "campaignCode": 1, "campaignName": "campaign-name", "campaignUrl": "https://onlyfans.com/username/c1", "subscribersCount": 123, "clicksCount": 123, "createdAt": "2025-05-23T16:19:38+00:00", "endDate": null, "revenue": { "total": 0, "revenuePerSubscriber": 0, "revenuePerClick": 0, "calculatedAt": "2025-05-23T16:45:36.000000Z", "isLoading": false }, "links": { "related": { "subscribers": "https://app.onlyfansapi.com/api/acct_123/tracking-links/123/subscribers" } } } ``` ### 🔗 List Tracking Link Subscribers Get list of subscribers who joined through a Tracking Link. ```json title="Example data" { "view": "s", "avatar": null, "avatarThumbs": null, "header": null, "headerSize": null, "headerThumbs": null, "id": 123, "name": "name", "username": "username", "canLookStory": false, "canCommentStory": false, "hasNotViewedStory": false, "isVerified": false, "canPayInternal": false, "hasScheduledStream": false, "hasStream": false, "hasStories": false, "tipsEnabled": false, "tipsTextEnabled": true, "tipsMin": 5, "tipsMinInternal": 1, "tipsMax": 200, "canEarn": false, "canAddSubscriber": false, "subscribePrice": 0, "displayName": "", "notice": "", "isRestricted": false, "canRestrict": true, "subscribedBy": true, "subscribedByExpire": false, "subscribedByExpireDate": "2025-01-01T00:00:00+00:00", "subscribedByAutoprolong": true, "subscribedIsExpiredNow": false, "currentSubscribePrice": 0, "subscribedOn": true, "subscribedOnExpiredNow": false, "subscribedOnDuration": "1 year", "showMediaCount": true, "lastSeen": null, "canReport": true } ``` ### 💳 List Transactions Get a paginated list of transactions for an Account. Newest transactions are first. ```json title="Example data" { "amount": 9.99, "vatAmount": 0.5, "taxAmount": 0, "net": 7.99, "fee": 2, "createdAt": "2025-05-26T00:00:00+00:00", "currency": "USD", "description": "Payment for message from User", "status": "loading", "user": { "view": "t", "id": 123, "name": "Name", "username": "username", "isVerified": false, "avatar": null, "avatarThumbs": null }, "payoutPendingDays": 7, "id": "exampleId" } ``` ### 🆓 List Trial Links List all trial links & their revenue data for the account. ```json title="Example data" { "id": 123, "trialLinkName": "My trial link", "url": "https://onlyfans.com/username/trial/abc123", "subscribeDays": 7, "subscribeCounts": 123, "claimCounts": 123, "expiredAt": null, "createdAt": "2025-01-01T00:00:00+00:00", "isFinished": false } ``` ## Universal ### Make a custom API call Call any OnlyFans API endpoint from Make.com. # Make.com & OnlyFans - Quickstart (/integrations/make) import { DownloadIcon } from "lucide-react"; import { Step, Steps } from "fumadocs-ui/components/steps"; import { Card } from "fumadocs-ui/components/card"; ## Prerequisites To get started, you must have: * An OnlyFans API account with a creator account connected * A [Make.com](https://www.make.com/en/register?pc=onlyfans) account ## Getting started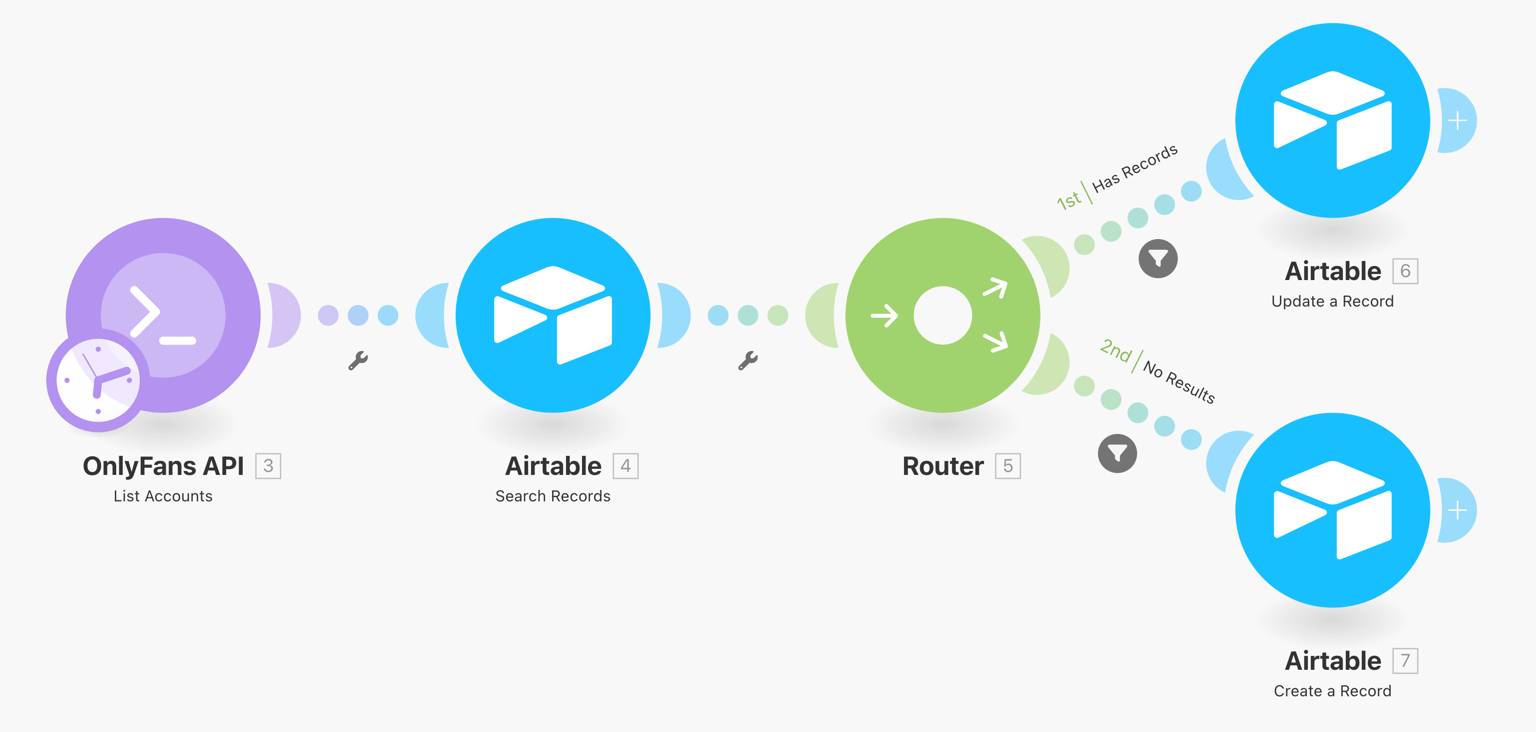 This scenario will synchronize your OnlyFans accounts with Airtable, and update the data once a day.
**Download scenario blueprint ›**
This scenario will synchronize your OnlyFans accounts with Airtable, and update the data once a day.
**Download scenario blueprint ›**
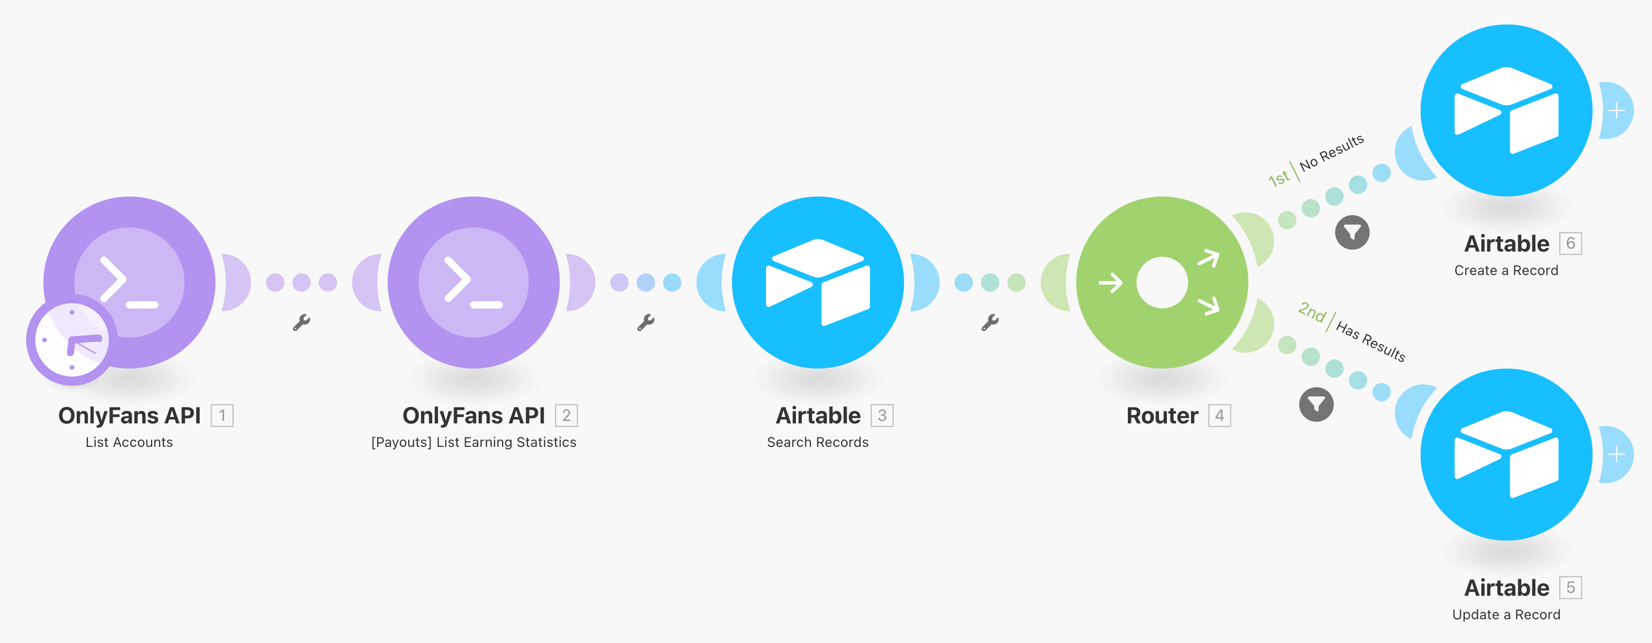 This scenario will synchronize your OnlyFans account revenue data with Airtable. Every account will have one record for each day, which updates hourly.
**Download scenario blueprint ›**
This scenario will synchronize your OnlyFans account revenue data with Airtable. Every account will have one record for each day, which updates hourly.
**Download scenario blueprint ›**
Text
", "giphyId": null, "lockedText": false, "isFree": true, "price": 0, "isMediaReady": true, "mediaCount": 0, "media": [ ], "previews": [ ], "isTip": false, "isReportedByMe": false, "isCouplePeopleMedia": false, "queueId": 123, "isMarkdownDisabled": true, "fromUser": { "view": "s", "avatar": "https://public.onlyfans.com/files/.../avatar.jpg", "avatarThumbs": { "c50": "https://thumbs.onlyfans.com/public/files/thumbs/c50/.../avatar.jpg", "c144": "https://thumbs.onlyfans.com/public/files/thumbs/c144/.../avatar.jpg" }, "header": "https://public.onlyfans.com/files/f/fn/fni/.../header.jpg", "headerSize": { "width": 4000, "height": 3000 }, "headerThumbs": { "w480": "https://thumbs.onlyfans.com/public/files/thumbs/w480/f/fn/fni/.../header.jpg", "w760": "https://thumbs.onlyfans.com/public/files/thumbs/w760/f/fn/fni/.../header.jpg" }, "id": 123, "name": "Name", "username": "username", "canLookStory": true, "canCommentStory": true, "hasNotViewedStory": false, "isVerified": false, "canPayInternal": true, "hasScheduledStream": false, "hasStream": false, "hasStories": false, "tipsEnabled": false, "tipsTextEnabled": true, "tipsMin": 5, "tipsMinInternal": 1, "tipsMax": 200, "canEarn": false, "canAddSubscriber": false, "subscribePrice": 0, "displayName": "Name", "notice": "", "isRestricted": false, "canRestrict": true, "subscribedBy": true, "subscribedByExpire": false, "subscribedByExpireDate": "2025-01-01T01:11:11+00:00", "subscribedByAutoprolong": true, "subscribedIsExpiredNow": false, "currentSubscribePrice": 0, "subscribedOn": null, "subscribedOnExpiredNow": true, "subscribedOnDuration": "1 month", "listsStates": [ { "id": "friends", "type": "friends", "name": "Amigos", "hasUser": false, "canAddUser": false, "cannotAddUserReason": "USER_NOT_PERFORMER" }, { "id": "muted", "type": "muted", "name": "Enmudecido", "hasUser": false, "canAddUser": true, "cannotAddUserReason": null }, { "id": "tagged", "type": "tagged", "name": "etiquetado", "hasUser": false, "canAddUser": false, "cannotAddUserReason": "SYSTEM_LIST" }, { "id": "rebill_on", "type": "rebill_on", "name": "Renovación de Facturación", "hasUser": false, "canAddUser": false, "cannotAddUserReason": null }, { "id": "recent", "type": "recent", "name": "Reciente (últimas 24 horas)", "hasUser": false, "canAddUser": false, "cannotAddUserReason": "SYSTEM_LIST" }, { "id": "fans", "type": "fans", "name": "Fans", "hasUser": false, "canAddUser": false, "cannotAddUserReason": null }, { "id": "rebill_off", "type": "rebill_off", "name": "Apagar Facturación", "hasUser": false, "canAddUser": false, "cannotAddUserReason": null }, { "id": "following", "type": "following", "name": "Siguiente", "hasUser": true, "canAddUser": false, "cannotAddUserReason": "ALREADY_EXISTS" } ], "showMediaCount": true, "lastSeen": "2025-01-01T01:11:11+00:0000", "canReport": true }, "isFromQueue": false, "id": 123, "isOpened": false, "isNew": true, "createdAt": "2025-01-01T01:11:11+00:00", "changedAt": "2025-01-01T01:11:11+00:00", "cancelSeconds": 119, "isLiked": false, "canPurchase": false, "canPurchaseReason": "free", "canReport": true, "canBePinned": true, "isPinned": false } } ``` ### 📤 Chat Message Sent A new message has been sent from one of your OnlyFans accounts to a fan. ```json title="Example data" { "event": "messages.sent", "account_id": "acct_abc123", "payload": { "responseType": "message", "text": "Text
", "giphyId": null, "lockedText": true, "isFree": true, "price": 0, "isMediaReady": true, "mediaCount": 0, "media": [ ], "previews": [ ], "isTip": false, "isReportedByMe": false, "isCouplePeopleMedia": false, "queueId": 123, "isMarkdownDisabled": true, "releaseForms": [ ], "isFromQueue": false, "id": 123, "isOpened": false, "isNew": true, "createdAt": "2025-07-02T00:00:00+00:00", "changedAt": "2025-07-02T00:00:00+00:00", "cancelSeconds": 86400, "isLiked": false, "canPurchase": false, "canPurchaseReason": "free", "canReport": false, "canBePinned": true, "isPinned": false, "toUser": { "view": "s", "avatar": null, "avatarThumbs": null, "header": null, "headerSize": null, "headerThumbs": null, "id": 123, "name": "Name", "username": "username", "canLookStory": false, "canCommentStory": false, "hasNotViewedStory": false, "isVerified": false, "canPayInternal": true, "hasScheduledStream": false, "hasStream": false, "hasStories": false, "tipsEnabled": false, "tipsTextEnabled": true, "tipsMin": 5, "tipsMinInternal": 1, "tipsMax": 200, "canEarn": false, "canAddSubscriber": true, "subscribePrice": 0, "displayName": "", "notice": "", "isRestricted": false, "canRestrict": true, "subscribedBy": false, "subscribedByExpire": null, "subscribedByExpireDate": null, "subscribedByAutoprolong": null, "subscribedIsExpiredNow": null, "currentSubscribePrice": null, "subscribedOn": true, "subscribedOnExpiredNow": false, "subscribedOnDuration": "1 month", "listsStates": [ { "id": "friends", "type": "friends", "name": "Friends", "hasUser": false, "canAddUser": false, "cannotAddUserReason": "USER_NOT_PERFORMER" }, { "id": "muted", "type": "muted", "name": "Muted", "hasUser": false, "canAddUser": true, "cannotAddUserReason": null }, { "id": "tagged", "type": "tagged", "name": "Tagged", "hasUser": false, "canAddUser": false, "cannotAddUserReason": "SYSTEM_LIST" }, { "id": "rebill_on", "type": "rebill_on", "name": "Renew On", "hasUser": false, "canAddUser": false, "cannotAddUserReason": null }, { "id": "recent", "type": "recent", "name": "Recent (last 24 hours)", "hasUser": false, "canAddUser": false, "cannotAddUserReason": "SYSTEM_LIST" }, { "id": "fans", "type": "fans", "name": "Fans", "hasUser": true, "canAddUser": false, "cannotAddUserReason": "ALREADY_EXISTS" }, { "id": "rebill_off", "type": "rebill_off", "name": "Renew Off", "hasUser": true, "canAddUser": false, "cannotAddUserReason": "ALREADY_EXISTS" }, { "id": "following", "type": "following", "name": "Following", "hasUser": false, "canAddUser": false, "cannotAddUserReason": "SYSTEM_LIST" } ], "showMediaCount": true, "lastSeen": "2025-07-02T00:00:00+00:00", "canReport": false } } } ``` ### 🎉 New Subscriber A new fan has subscribed. ```json title="Example data" { "event": "subscriptions.new", "account_id": "acct_123", "payload": { "id": "123", "type": "subscribed", "createdAt": "2025-05-05T21:27:00+00:00", "text": "subscribed to your profile!", "replacePairs": { "{SUBSCRIBER_LINK}": "Name", "{PRICE}": "free" }, "subType": "new_subscriber", "user_id": "222222222", "isRead": false, "canGoToProfile": true, "user": { "avatar": "https://example.com", "avatarThumbs": { "c50": "https://example.com", "c144": "https://example.com" }, "header": "https://example.com", "headerSize": { "width": 767, "height": 1152 }, "headerThumbs": { "w480": "https://example.com", "w760": "https://example.com" }, "id": 123, "name": "Name", "username": "username", "canLookStory": false, "canCommentStory": false, "hasNotViewedStory": false, "isVerified": true, "canPayInternal": false, "hasScheduledStream": false, "hasStream": false, "hasStories": false, "tipsEnabled": true, "tipsTextEnabled": true, "tipsMin": 5, "tipsMinInternal": 1, "tipsMax": 200, "canEarn": true, "canAddSubscriber": false, "subscribePrice": 0, "subscribedBy": false, "subscribedOn": false, "canReceiveChatMessage": false, "hideChat": false, "lastSeen": "2025-05-05T21:26:04+00:00", "isPerformer": true, "isRealPerformer": true, "view": "mn", "canReport": true, "subscribedByData": null, "subscribedOnData": null, "isBlocked": false } } } ``` ### 🎉 Subscription renewed A fan has renewed their subscription. ```json title="Example data" { "event": "subscriptions.renewed", "account_id": "acct_123", "payload": { "id": "123", "type": "subscribed", "createdAt": "2025-05-05T21:27:00+00:00", "text": "Good news! u34547118 has Just restarted their monthly subscription to your OnlyFans profile!", "replacePairs": { "{SUBSCRIBER_LINK}": "u34547118", "{PRICE}": "$4.00" }, "subType": "returning_subscriber", "user_id": "222222222", "isRead": false, "canGoToProfile": true, "user": { "avatar": "https://example.com", "avatarThumbs": { "c50": "https://example.com", "c144": "https://example.com" }, "header": "https://example.com", "headerSize": { "width": 767, "height": 1152 }, "headerThumbs": { "w480": "https://example.com", "w760": "https://example.com" }, "id": 34547118, "name": "Name", "username": "username", "canLookStory": false, "canCommentStory": false, "hasNotViewedStory": false, "isVerified": true, "canPayInternal": false, "hasScheduledStream": false, "hasStream": false, "hasStories": false, "tipsEnabled": true, "tipsTextEnabled": true, "tipsMin": 5, "tipsMinInternal": 1, "tipsMax": 200, "canEarn": true, "canAddSubscriber": false, "subscribePrice": 0, "subscribedBy": false, "subscribedOn": false, "canReceiveChatMessage": false, "hideChat": false, "lastSeen": "2025-05-05T21:26:04+00:00", "isPerformer": true, "isRealPerformer": true, "view": "mn", "canReport": true, "subscribedByData": null, "subscribedOnData": null, "isBlocked": false } } } ``` ### ❤️ Post Liked A fan has liked one of your posts. ```json title="Example data" { "event": "posts.liked", "account_id": "acct_123", "payload": { "id": "123", "type": "favorited", "createdAt": "2025-05-05T22:22:00+00:00", "text": "liked your post", "replacePairs": { "{POST_LINK}": "post" }, "subType": "new_favorite", "user_id": "222222222", "isRead": false, "canGoToProfile": true, "user": { "avatar": null, "avatarThumbs": null, "header": null, "headerSize": null, "headerThumbs": null, "id": 123, "name": "Name", "username": "username", "canLookStory": false, "canCommentStory": false, "hasNotViewedStory": false, "isVerified": false, "canPayInternal": false, "hasScheduledStream": false, "hasStream": false, "hasStories": false, "tipsEnabled": false, "tipsTextEnabled": true, "tipsMin": 5, "tipsMinInternal": 1, "tipsMax": 200, "canEarn": false, "canAddSubscriber": false, "subscribePrice": 0, "subscribedBy": false, "subscribedOn": false, "canReceiveChatMessage": false, "hideChat": false, "lastSeen": null, "isPerformer": false, "isRealPerformer": false, "view": "mn", "canReport": true, "subscribedByData": null, "subscribedOnData": null, "isBlocked": false } } } ``` ### 💬 Fan is Typing A fan is typing a message. ```json title="Example data" { "event": "users.typing", "account_id": "acct_123", "payload": { "id": 123 } } ``` ### ℹ️ Account Connected A new OnlyFans account was connected. ```json title="Example data" { "event": "accounts.connected", "account_id": "acct_123", "payload": { "state": "authenticated", "progress": "started", "latestAuthAttempt": { "started_at": "2025-05-13T20:26:56.000000Z", "completed_at": null, "success": false, "error_message": null, "needs_otp": false, "needs_face_otp": false, "otp_phone_ending": null } } } ``` ### ℹ️ Account Reconnected An OnlyFans account was reconnected. ```json title="Example data" { "event": "accounts.reconnected", "account_id": "acct_123", "payload": { "state": "authenticated", "progress": "started", "latestAuthAttempt": { "started_at": "2025-05-13T20:26:56.000000Z", "completed_at": null, "success": false, "error_message": null, "needs_otp": false, "needs_face_otp": false, "otp_phone_ending": null } } } ``` ### ℹ️ Account Connection Failed An OnlyFans account's connection has expired, and we couldn't automatically re-connect it using our system. ```json title="Example data" { "event": "accounts.authentication_failed", "account_id": "acct_123", "payload": { "state": "authenticated", "progress": "started", "latestAuthAttempt": { "started_at": "2025-05-13T20:26:56.000000Z", "completed_at": null, "success": false, "error_message": null, "needs_otp": false, "needs_face_otp": false, "otp_phone_ending": null } } } ``` ### ℹ️ Account Session Expired An OnlyFans account's connection has expired, but we're automatically re-connecting it using our system — you don't need to do anything. ```json title="Example data" { "event": "accounts.session_expired", "account_id": "acct_123", "payload": { "state": "authenticated", "progress": "started", "latestAuthAttempt": { "started_at": "2025-05-13T20:26:56.000000Z", "completed_at": null, "success": false, "error_message": null, "needs_otp": false, "needs_face_otp": false, "otp_phone_ending": null } } } ``` ### ℹ️ Account Requires Face Verification Face verification is required to connect one of your OnlyFans accounts ```json title="Example data" { "event": "accounts.face_otp_required", "account_id": "acct_123", "payload": { "state": "authenticated", "progress": "started", "face_otp_verification_url": "https://id.onlyfans.com/s?123", "latestAuthAttempt": { "started_at": "2025-05-13T20:26:56.000000Z", "completed_at": null, "success": false, "error_message": null, "needs_otp": false, "needs_face_otp": false, "otp_phone_ending": null } } } ``` ### ℹ️ Account Requires OTP (2FA) Code A two-factor authentication code is required to connect one of your OnlyFans accounts. ```json title="Example data" { "event": "accounts.otp_code_required", "account_id": "acct_123", "payload": { "state": "authenticated", "progress": "started", "latestAuthAttempt": { "started_at": "2025-05-13T20:26:56.000000Z", "completed_at": null, "success": false, "error_message": null, "needs_otp": false, "needs_face_otp": false, "otp_phone_ending": null } } } ``` # Zapier & OnlyFans - Quickstart (/integrations/zapier) import { DownloadIcon, ZapIcon } from "lucide-react"; import { Step, Steps } from "fumadocs-ui/components/steps"; import { Card } from "fumadocs-ui/components/card"; ## Prerequisites To get started, you must have: * An OnlyFans API account with a creator account connected * A [Zapier](https://zapier.com) account ## Getting started[https://app.onlyfansapi.com/api](https://app.onlyfansapi.com/api)
face\_otp\_verification\_url link in a regular browser on their phone or desktop
and complete the verification steps there. Alternatively, they can complete it through our [**Auth+ app**](#option-2-using-our-auth-iphone-app).
` tag. Example: ```html
Hi there! This is a message containing normal text
``` ## New lines To create a new line, you can use the `
Hi there! This is a message containing normal text
This is a new line!
Hi there! This is a message containing normal text This is the smallest text!
``` ### Small To create a small text, you can use the `` tag. Example: ```htmlHi there! This is a message containing normal text This is a small text!
``` ### Large To create a large text, you can use the `` tag. Example: ```htmlHi there! This is a message containing normal text This is a large text!
``` ### Largest To create the largest text, you can use the `` tag. Example: ```htmlHi there! This is a message containing normal text This is the largest text!
``` ## Text styles When using text styles like **bold** or *italic*, make sure that you wrap the text in a `` tag. Example: ```html Bold text Italic text ``` ### Bold To create bold text, you can use the `` tag. Example: ```htmlHi there! This is a message containing normal text This is bold text!
``` ### Italic To create italic text, you can use the `` tag. Example: ```htmlHi there! This is a message containing normal text This is italic text!
``` ## Text colors OnlyFans has three possible colors for text: * Gray (`#8a96a3`) * Blue 1 (`#00aff0`) * Blue 2 (`#1b98e0`)Hi there! This is a message containing normal text This is gray text!
``` ### Blue 1 To create blue 1 text, you can use the `` tag. Example: ```htmlHi there! This is a message containing normal text This is blue 1 text!
``` ### Blue 2 To create blue 2 text, you can use the `` tag. Example: ```htmlHi there! This is a message containing normal text This is blue 2 text!
``` # Connect your TikTok Pixel to OnlyFans API Smart Links (/introduction/guides/tiktok-pixel-smart-links) import { Step, Steps } from "fumadocs-ui/components/steps"; ## What is a TikTok Pixel? A TikTok Pixel is TikTok's conversion tracking tool. It tells TikTok when someone takes an action, such as subscribing or purchasing, after clicking your TikTok ad. **Why connect it to Smart Links?** OnlyFans doesn't support TikTok's pixel natively, and there's no way to install tracking code on OnlyFans pages. Smart Links can send the events you configure to TikTok's Events API without installing JavaScript on OnlyFans.about
email: type: string example: user@example.com wsUrl: type: string example: wss://ws2.onlyfans.com/ws3/03 avatar: type: string example: https://example.com header: type: string example: https://example.com isAuth: type: boolean example: true ivFlow: type: string example: default upload: type: object properties: geoUploadArgs: type: object properties: preset: type: string example: of_beta isDelay: type: boolean example: true additional: type: object properties: user: type: string example: "123" needThumbs: type: boolean example: true preset_png: type: string example: of_png protected_preset: type: string example: of_drm canChat: type: boolean example: true hasTags: type: boolean example: false website: type: string example: null nullable: true advBlock: type: array example: - subscribe_offers items: type: string ivStatus: type: string example: approved joinDate: type: string example: 2025-04-05T00:00:00+00:00 lastSeen: type: string example: 2025-05-16T10:09:48+00:00 location: type: string example: null nullable: true paidFeed: type: boolean example: false username: type: string example: user wishlist: type: string example: null nullable: true hasLabels: type: boolean example: false ivCountry: type: string example: US canAddCard: type: boolean example: true canPinPost: type: boolean example: true creditsMax: type: integer example: 200 creditsMin: type: integer example: 10 headerSize: type: object properties: width: type: integer example: 2126 height: type: integer example: 1535 isVerified: type: boolean example: false postsCount: type: integer example: 0 audiosCount: type: integer example: 0 hasNewHints: type: boolean example: true hasScenario: type: boolean example: true isPerformer: type: boolean example: false mediasCount: type: integer example: 0 photosCount: type: integer example: 0 videosCount: type: integer example: 0 wsAuthToken: type: string example: wsAuthToken avatarThumbs: type: object properties: c50: type: string example: https://example.com c144: type: string example: https://example.com canLookStory: type: boolean example: true hasNewAlerts: type: boolean example: false headerThumbs: type: object properties: w480: type: string example: https://example.com w760: type: string example: https://example.com isOtpEnabled: type: boolean example: true ivFailReason: type: string example: null nullable: true newTagsCount: type: integer example: 0 creditBalance: type: integer example: 0 faceIdRegular: type: array example: [] isAgeVerified: type: boolean example: false isAllowTweets: type: boolean example: false isMakePayment: type: boolean example: false needIVApprove: type: boolean example: false watermarkText: type: string example: OnlyFans.com/user canCreateLists: type: boolean example: true canPayInternal: type: boolean example: true favoritedCount: type: integer example: 0 favoritesCount: type: integer example: 0 hasPinnedPosts: type: boolean example: false isEmailChecked: type: boolean example: true isWantComments: type: boolean example: true canCommentStory: type: boolean example: true countPinnedChat: type: integer example: 0 isEmailRequired: type: boolean example: false isPaywallPassed: type: boolean example: true isRealPerformer: type: boolean example: false isVisibleOnline: type: boolean example: true showPostsInFeed: type: boolean example: true subscribesCount: type: integer example: 123 twitterUsername: type: string example: user canSendChatToAll: type: boolean example: false isCreditsEnabled: type: boolean example: true pinnedPostsCount: type: integer example: 0 subscribersCount: type: integer example: 123 chatMessagesCount: type: integer example: 123 countPriorityChat: type: integer example: 123 hasNotViewedStory: type: boolean example: false hasPurchasedPosts: type: boolean example: false hasWatermarkPhoto: type: boolean example: true hasWatermarkVideo: type: boolean example: true isDeleteInitiated: type: boolean example: false isReferrerAllowed: type: boolean example: false watermarkPosition: type: string example: bottom_right archivedPostsCount: type: integer example: 0 isSpotifyConnected: type: boolean example: false isTwitterConnected: type: boolean example: false notificationsCount: type: integer example: 123 walletFirstRebills: type: boolean example: false canConnectOfAccount: type: boolean example: true connectedOfAccounts: type: array example: [] hasInternalPayments: type: boolean example: false hasNewTicketReplies: type: object properties: open: type: boolean example: false closed: type: boolean example: false solved: type: boolean example: false isRealCardConnected: type: boolean example: true maxPinnedPostsCount: type: integer example: 5 isWalletAutorecharge: type: boolean example: false canReceiveChatMessage: type: boolean example: false walletAutorechargeMin: type: integer example: 0 hasSystemNotifications: type: boolean example: false isLegalApprovedAllowed: type: boolean example: true isPaymentCardConnected: type: boolean example: true ageVerificationRequired: type: boolean example: false payoutLegalApproveState: type: string example: rejected walletAutorechargeAmount: type: integer example: 0 canAlternativeWalletTopUp: type: boolean example: false enabledImageEditorForChat: type: boolean example: true privateArchivedPostsCount: type: integer example: 0 isMarkdownDisabledForAbout: type: boolean example: true avatarHeaderConverterUpload: type: boolean example: true hasNewChangedPriceSubscriptions: type: boolean example: false example: - id: acct_123 onlyfans_id: 123 onlyfans_username: user onlyfans_email: user@example.com is_authenticated: true authentication_progress: signed_in display_name: oft onlyfans_user_data: id: 123 ip: 127.0.0.1 csrf: csrf name: Name view: f about:about
email: user@example.com wsUrl: wss://ws2.onlyfans.com/ws3/03 avatar: https://example.com header: https://example.com isAuth: true ivFlow: default upload: geoUploadArgs: preset: of_beta isDelay: true additional: user: "123" needThumbs: true preset_png: of_png protected_preset: of_drm canChat: true hasTags: false website: null advBlock: - subscribe_offers ivStatus: approved joinDate: 2025-04-05T00:00:00+00:00 lastSeen: 2025-05-16T10:09:48+00:00 location: null paidFeed: false username: user wishlist: null hasLabels: false ivCountry: US canAddCard: true canPinPost: true creditsMax: 200 creditsMin: 10 headerSize: width: 2126 height: 1535 isVerified: false postsCount: 0 audiosCount: 0 hasNewHints: true hasScenario: true isPerformer: false mediasCount: 0 photosCount: 0 videosCount: 0 wsAuthToken: wsAuthToken avatarThumbs: c50: https://example.com c144: https://example.com canLookStory: true hasNewAlerts: false headerThumbs: w480: https://example.com w760: https://example.com isOtpEnabled: true ivFailReason: null newTagsCount: 0 creditBalance: 0 faceIdRegular: [] isAgeVerified: false isAllowTweets: false isMakePayment: false needIVApprove: false watermarkText: OnlyFans.com/user canCreateLists: true canPayInternal: true favoritedCount: 0 favoritesCount: 0 hasPinnedPosts: false isEmailChecked: true isWantComments: true canCommentStory: true countPinnedChat: 0 isEmailRequired: false isPaywallPassed: true isRealPerformer: false isVisibleOnline: true showPostsInFeed: true subscribesCount: 123 twitterUsername: user canSendChatToAll: false isCreditsEnabled: true pinnedPostsCount: 0 subscribersCount: 123 chatMessagesCount: 123 countPriorityChat: 123 hasNotViewedStory: false hasPurchasedPosts: false hasWatermarkPhoto: true hasWatermarkVideo: true isDeleteInitiated: false isReferrerAllowed: false watermarkPosition: bottom_right archivedPostsCount: 0 isSpotifyConnected: false isTwitterConnected: false notificationsCount: 123 walletFirstRebills: false canConnectOfAccount: true connectedOfAccounts: [] hasInternalPayments: false hasNewTicketReplies: open: false closed: false solved: false isRealCardConnected: true maxPinnedPostsCount: 5 isWalletAutorecharge: false canReceiveChatMessage: false walletAutorechargeMin: 0 hasSystemNotifications: false isLegalApprovedAllowed: true isPaymentCardConnected: true ageVerificationRequired: false payoutLegalApproveState: rejected walletAutorechargeAmount: 0 canAlternativeWalletTopUp: false enabledImageEditorForChat: true privateArchivedPostsCount: 0 isMarkdownDisabledForAbout: true avatarHeaderConverterUpload: true hasNewChangedPriceSubscriptions: false tags: - Account components: securitySchemes: default: type: http scheme: bearer description: Get your API Key from OnlyFansAPI Console - https://app.onlyfansapi.com/api-keys ```` # Get AI Voice Message Stats (/api-reference/ai-voice-messages/get-ai-voice-message-stats) Compare sent AI voice messages and reply rates across your permitted OnlyFans creator accounts. Deleted accounts are excluded; disconnected accounts and accounts with no sends are included. Dates filter when messages were sent, not when replies arrived. Omit dates for all time. A subsequent incoming fan message credits every preceding unreplied sent voice message in the chat, with no attribution time limit; this does not prove the voice message caused the reply. Rates are percentages, or null when no messages were sent. Totals cover only the accounts returned. ## OpenAPI ````yaml https://app.onlyfansapi.com/scribe-docs/openapi.yaml get /api/ai-voice-messages/stats openapi: 3.0.3 info: title: OnlyFans API description: "" version: 1.0.0 servers: - url: https://app.onlyfansapi.com security: - default: [] tags: - name: AI Voice Messages description: "" - name: API Keys description: "" - name: Account description: Endpoints for your linked accounts - name: Analytics - Financial description: APIs for retrieving financial analytics data - name: Analytics - Summary description: APIs for retrieving summary analytics data - name: Banking description: Operations related to user banking details, payout methods, legal and tax information, and account country settings. - name: Banned Words description: Reference list of OnlyFans banned words used by the `blockBannedWords` screening parameter - name: Blocked / Restricted Users description: APIs for listing the users an account has blocked or restricted - name: Chargebacks description: "" - name: Chat Messages description: "" - name: Chats description: "" - name: Client Sessions description: "" - name: Connect OnlyFans Account description: "" - name: Data Exports description: APIs for managing data exports - name: Engagement / Messages description: "" - name: Fans description: APIs for managing OnlyFans fans (subscribers) - name: Fans - AI Summary description: APIs for generating and retrieving AI-powered fan profile summaries - name: Following description: APIs for managing OnlyFans followings (people you're subscribed to) - name: Free Trial Links description: APIs for managing Free Trial Links. Revenue totals are net earnings after refunds and chargebacks. `revenue.chargebacks` (or `summary.chargebacks_total` in stats) is the positive cached net amount already excluded from revenue; do not subtract it again. Spender responses include chargebacks across all attributed periods for each fan with positive net revenue. - name: Giphy description: "" - name: Link Tags description: APIs for managing tags on free trial links, tracking links, and Smart Links - name: Mass Messaging description: "" - name: Media description: "" - name: Media Vault description: "" - name: Media Vault Lists description: "" - name: Notifications description: Endpoints for managingr account notifications - name: Payouts description: "" - name: Post Comments description: "" - name: Post Labels description: APIs for managing your post labels - name: Posts description: APIs for managing OnlyFans posts - name: Profile Content description: Read another user's profile content using your connected OnlyFans account. OnlyFans enforces subscription and purchase requirements; these endpoints do not unlock content. Response samples use captured OnlyFans payloads with anonymized IDs, text, and media URLs; OFAPI metadata values are illustrative. - name: Promotions description: "" - name: Public Profiles description: "" - name: Queue description: "" - name: Release Forms description: APIs for managing OnlyFans release forms - name: Saved For Later (Messages) description: "" - name: Saved For Later (Posts) description: "" - name: Settings description: "" - name: Shared Free Trial Links description: APIs for Free Trial Links that other OF creators have shared with this account. Revenue, cost, and spender data are not available for shared links. - name: Shared Tracking Links description: APIs for Tracking Links (campaigns) that other OF creators have shared with this account. Revenue, cost, and spender data are not available for shared campaigns. - name: Smart Link Postbacks description: APIs for managing Smart Link postback destinations - name: Smart Links description: APIs for managing Smart Links (Free Trial Links and Tracking Links with pooled inventory) - name: Statistics description: "" - name: Stored Free Trial Links description: Instant APIs for retrieving stored free trial links from the OnlyFansAPI Cache (free, no credits used). `revenue.total` is net earnings after refunds and chargebacks. `revenue.chargebacks` is the positive cached net amount already excluded from that total; do not subtract it again. - name: Stored Shared Free Trial Links description: Instant APIs for retrieving stored shared Free Trial Links from the OnlyFansAPI Cache (free, no credits used) - name: Stored Shared Tracking Links description: Instant APIs for retrieving stored shared Tracking Links (campaigns) from the OnlyFansAPI Cache (free, no credits used) - name: Stored Tracking Links description: Instant APIs for retrieving stored tracking links from the OnlyFansAPI Cache (free, no credits used). `revenue.total` is net earnings after refunds and chargebacks. `revenue.chargebacks` is the positive cached net amount already excluded from that total; do not subtract it again. - name: Stories description: APIs for managing OnlyFans stories - name: Story Highlights description: APIs for managing OnlyFans story highlights - name: Subscription Bundles description: "" - name: Tracking Links description: APIs for managing tracking links. Revenue totals are net earnings after refunds and chargebacks. `revenue.chargebacks` (or `summary.chargebacks_total` in stats) is the positive cached net amount already excluded from revenue; do not subtract it again. Spender responses include chargebacks across all attributed periods for each fan with positive net revenue. - name: Transactions description: APIs for managing OnlyFans transactions - name: Usage description: Credit usage reporting for your team - name: User List Collections description: "" - name: Users description: APIs for fetching OnlyFans users - name: Webhooks description: "" paths: /api/ai-voice-messages/stats: get: summary: Get AI Voice Message Stats operationId: getAIVoiceMessageStats description: Compare sent AI voice messages and reply rates across your permitted OnlyFans creator accounts. Deleted accounts are excluded; disconnected accounts and accounts with no sends are included. Dates filter when messages were sent, not when replies arrived. Omit dates for all time. A subsequent incoming fan message credits every preceding unreplied sent voice message in the chat, with no attribution time limit; this does not prove the voice message caused the reply. Rates are percentages, or null when no messages were sent. Totals cover only the accounts returned. parameters: - in: query name: account_id description: Optionally limit the report to one permitted account. example: acct_abc123 required: false schema: type: string description: Optionally limit the report to one permitted account. example: acct_abc123 - in: query name: start_date description: Inclusive UTC send date, in YYYY-MM-DD format. example: 2026-09-01 required: false schema: type: string description: Inclusive UTC send date, in YYYY-MM-DD format. example: 2026-09-01 - in: query name: end_date description: Inclusive UTC send date, in YYYY-MM-DD format. example: 2026-09-30 required: false schema: type: string description: Inclusive UTC send date, in YYYY-MM-DD format. example: 2026-09-30 responses: "200": description: "" content: application/json: schema: type: object example: data: - account_id: acct_abc123 name: Creator username: creator sent: 200 replied: 85 reply_rate: 42.5 totals: sent: 200 replied: 85 reply_rate: 42.5 meta: start_date: 2026-09-01 end_date: 2026-09-30 timezone: UTC snapshot_at: 2026-10-01T00:00:00+00:00 reply_rate_definition: Sent voice messages followed by an incoming fan message / sent voice messages × 100. No reply attribution time limit; one fan message can credit multiple voice messages. properties: data: type: array example: - account_id: acct_abc123 name: Creator username: creator sent: 200 replied: 85 reply_rate: 42.5 items: type: object properties: account_id: type: string example: acct_abc123 name: type: string example: Creator username: type: string example: creator nullable: true sent: type: integer example: 200 replied: type: integer example: 85 reply_rate: type: number example: 42.5 description: Percentage of sent voice messages followed by a fan reply; null when sent is zero. nullable: true required: - username - reply_rate totals: type: object properties: sent: type: integer example: 200 replied: type: integer example: 85 reply_rate: type: number example: 42.5 description: Total replied / total sent × 100; null when sent is zero. nullable: true required: - reply_rate meta: type: object properties: start_date: type: string example: 2026-09-01 nullable: true end_date: type: string example: 2026-09-30 nullable: true timezone: type: string example: UTC snapshot_at: type: string example: 2026-10-01T00:00:00+00:00 reply_rate_definition: type: string example: Sent voice messages followed by an incoming fan message / sent voice messages × 100. No reply attribution time limit; one fan message can credit multiple voice messages. required: - start_date - end_date tags: - AI Voice Messages components: securitySchemes: default: type: http scheme: bearer description: Get your API Key from OnlyFansAPI Console - https://app.onlyfansapi.com/api-keys ```` # Get Earnings Overview (/api-reference/analytics-summary/get-earnings-overview) Get earnings overview by category for selected accounts within a date range. Returns total earnings, subscriptions, posts, messages, tips, streams, and content stats. ## OpenAPI ````yaml https://app.onlyfansapi.com/scribe-docs/openapi.yaml post /api/analytics/summary/earnings openapi: 3.0.3 info: title: OnlyFans API description: "" version: 1.0.0 servers: - url: https://app.onlyfansapi.com security: - default: [] tags: - name: AI Voice Messages description: "" - name: API Keys description: "" - name: Account description: Endpoints for your linked accounts - name: Analytics - Financial description: APIs for retrieving financial analytics data - name: Analytics - Summary description: APIs for retrieving summary analytics data - name: Banking description: Operations related to user banking details, payout methods, legal and tax information, and account country settings. - name: Banned Words description: Reference list of OnlyFans banned words used by the `blockBannedWords` screening parameter - name: Blocked / Restricted Users description: APIs for listing the users an account has blocked or restricted - name: Chargebacks description: "" - name: Chat Messages description: "" - name: Chats description: "" - name: Client Sessions description: "" - name: Connect OnlyFans Account description: "" - name: Data Exports description: APIs for managing data exports - name: Engagement / Messages description: "" - name: Fans description: APIs for managing OnlyFans fans (subscribers) - name: Fans - AI Summary description: APIs for generating and retrieving AI-powered fan profile summaries - name: Following description: APIs for managing OnlyFans followings (people you're subscribed to) - name: Free Trial Links description: APIs for managing Free Trial Links. Revenue totals are net earnings after refunds and chargebacks. `revenue.chargebacks` (or `summary.chargebacks_total` in stats) is the positive cached net amount already excluded from revenue; do not subtract it again. Spender responses include chargebacks across all attributed periods for each fan with positive net revenue. - name: Giphy description: "" - name: Link Tags description: APIs for managing tags on free trial links, tracking links, and Smart Links - name: Mass Messaging description: "" - name: Media description: "" - name: Media Vault description: "" - name: Media Vault Lists description: "" - name: Notifications description: Endpoints for managingr account notifications - name: Payouts description: "" - name: Post Comments description: "" - name: Post Labels description: APIs for managing your post labels - name: Posts description: APIs for managing OnlyFans posts - name: Profile Content description: Read another user's profile content using your connected OnlyFans account. OnlyFans enforces subscription and purchase requirements; these endpoints do not unlock content. Response samples use captured OnlyFans payloads with anonymized IDs, text, and media URLs; OFAPI metadata values are illustrative. - name: Promotions description: "" - name: Public Profiles description: "" - name: Queue description: "" - name: Release Forms description: APIs for managing OnlyFans release forms - name: Saved For Later (Messages) description: "" - name: Saved For Later (Posts) description: "" - name: Settings description: "" - name: Shared Free Trial Links description: APIs for Free Trial Links that other OF creators have shared with this account. Revenue, cost, and spender data are not available for shared links. - name: Shared Tracking Links description: APIs for Tracking Links (campaigns) that other OF creators have shared with this account. Revenue, cost, and spender data are not available for shared campaigns. - name: Smart Link Postbacks description: APIs for managing Smart Link postback destinations - name: Smart Links description: APIs for managing Smart Links (Free Trial Links and Tracking Links with pooled inventory) - name: Statistics description: "" - name: Stored Free Trial Links description: Instant APIs for retrieving stored free trial links from the OnlyFansAPI Cache (free, no credits used). `revenue.total` is net earnings after refunds and chargebacks. `revenue.chargebacks` is the positive cached net amount already excluded from that total; do not subtract it again. - name: Stored Shared Free Trial Links description: Instant APIs for retrieving stored shared Free Trial Links from the OnlyFansAPI Cache (free, no credits used) - name: Stored Shared Tracking Links description: Instant APIs for retrieving stored shared Tracking Links (campaigns) from the OnlyFansAPI Cache (free, no credits used) - name: Stored Tracking Links description: Instant APIs for retrieving stored tracking links from the OnlyFansAPI Cache (free, no credits used). `revenue.total` is net earnings after refunds and chargebacks. `revenue.chargebacks` is the positive cached net amount already excluded from that total; do not subtract it again. - name: Stories description: APIs for managing OnlyFans stories - name: Story Highlights description: APIs for managing OnlyFans story highlights - name: Subscription Bundles description: "" - name: Tracking Links description: APIs for managing tracking links. Revenue totals are net earnings after refunds and chargebacks. `revenue.chargebacks` (or `summary.chargebacks_total` in stats) is the positive cached net amount already excluded from revenue; do not subtract it again. Spender responses include chargebacks across all attributed periods for each fan with positive net revenue. - name: Transactions description: APIs for managing OnlyFans transactions - name: Usage description: Credit usage reporting for your team - name: User List Collections description: "" - name: Users description: APIs for fetching OnlyFans users - name: Webhooks description: "" paths: /api/analytics/summary/earnings: post: summary: Get Earnings Overview operationId: getEarningsOverview description: Get earnings overview by category for selected accounts within a date range. Returns total earnings, subscriptions, posts, messages, tips, streams, and content stats. parameters: [] responses: "200": description: "" content: application/json: schema: type: object example: total_earnings: 15000.5 subscriptions: 8000 posts: 2500 messages: 3000 tips: 1300 streams: 200.5 total_accounts: 5 total_messages: 1250 total_images: 450 total_videos: 120 properties: total_earnings: type: number example: 15000.5 subscriptions: type: number example: 8000 posts: type: number example: 2500 messages: type: number example: 3000 tips: type: number example: 1300 streams: type: number example: 200.5 total_accounts: type: integer example: 5 total_messages: type: integer example: 1250 total_images: type: integer example: 450 total_videos: type: integer example: 120 tags: - Analytics - Summary requestBody: required: true content: application/json: schema: type: object properties: account_ids: type: array description: Array of account prefixed IDs to get earnings for example: - acc_abc123 - acc_def456 items: type: string start_date: type: string description: The start date (ISO 8601 format) example: 2024-01-01 end_date: type: string description: The end date (ISO 8601 format) example: 2024-12-31 required: - account_ids - start_date - end_date components: securitySchemes: default: type: http scheme: bearer description: Get your API Key from OnlyFansAPI Console - https://app.onlyfansapi.com/api-keys ```` # Get Historical Performance (/api-reference/analytics-summary/get-historical-performance) Get monthly historical earnings for unrestricted accounts accessible to the API key. Limited link scopes do not grant account-wide analytics access. ## OpenAPI ````yaml https://app.onlyfansapi.com/scribe-docs/openapi.yaml post /api/analytics/summary/historical openapi: 3.0.3 info: title: OnlyFans API description: "" version: 1.0.0 servers: - url: https://app.onlyfansapi.com security: - default: [] tags: - name: AI Voice Messages description: "" - name: API Keys description: "" - name: Account description: Endpoints for your linked accounts - name: Analytics - Financial description: APIs for retrieving financial analytics data - name: Analytics - Summary description: APIs for retrieving summary analytics data - name: Banking description: Operations related to user banking details, payout methods, legal and tax information, and account country settings. - name: Banned Words description: Reference list of OnlyFans banned words used by the `blockBannedWords` screening parameter - name: Blocked / Restricted Users description: APIs for listing the users an account has blocked or restricted - name: Chargebacks description: "" - name: Chat Messages description: "" - name: Chats description: "" - name: Client Sessions description: "" - name: Connect OnlyFans Account description: "" - name: Data Exports description: APIs for managing data exports - name: Engagement / Messages description: "" - name: Fans description: APIs for managing OnlyFans fans (subscribers) - name: Fans - AI Summary description: APIs for generating and retrieving AI-powered fan profile summaries - name: Following description: APIs for managing OnlyFans followings (people you're subscribed to) - name: Free Trial Links description: APIs for managing Free Trial Links. Revenue totals are net earnings after refunds and chargebacks. `revenue.chargebacks` (or `summary.chargebacks_total` in stats) is the positive cached net amount already excluded from revenue; do not subtract it again. Spender responses include chargebacks across all attributed periods for each fan with positive net revenue. - name: Giphy description: "" - name: Link Tags description: APIs for managing tags on free trial links, tracking links, and Smart Links - name: Mass Messaging description: "" - name: Media description: "" - name: Media Vault description: "" - name: Media Vault Lists description: "" - name: Notifications description: Endpoints for managingr account notifications - name: Payouts description: "" - name: Post Comments description: "" - name: Post Labels description: APIs for managing your post labels - name: Posts description: APIs for managing OnlyFans posts - name: Profile Content description: Read another user's profile content using your connected OnlyFans account. OnlyFans enforces subscription and purchase requirements; these endpoints do not unlock content. Response samples use captured OnlyFans payloads with anonymized IDs, text, and media URLs; OFAPI metadata values are illustrative. - name: Promotions description: "" - name: Public Profiles description: "" - name: Queue description: "" - name: Release Forms description: APIs for managing OnlyFans release forms - name: Saved For Later (Messages) description: "" - name: Saved For Later (Posts) description: "" - name: Settings description: "" - name: Shared Free Trial Links description: APIs for Free Trial Links that other OF creators have shared with this account. Revenue, cost, and spender data are not available for shared links. - name: Shared Tracking Links description: APIs for Tracking Links (campaigns) that other OF creators have shared with this account. Revenue, cost, and spender data are not available for shared campaigns. - name: Smart Link Postbacks description: APIs for managing Smart Link postback destinations - name: Smart Links description: APIs for managing Smart Links (Free Trial Links and Tracking Links with pooled inventory) - name: Statistics description: "" - name: Stored Free Trial Links description: Instant APIs for retrieving stored free trial links from the OnlyFansAPI Cache (free, no credits used). `revenue.total` is net earnings after refunds and chargebacks. `revenue.chargebacks` is the positive cached net amount already excluded from that total; do not subtract it again. - name: Stored Shared Free Trial Links description: Instant APIs for retrieving stored shared Free Trial Links from the OnlyFansAPI Cache (free, no credits used) - name: Stored Shared Tracking Links description: Instant APIs for retrieving stored shared Tracking Links (campaigns) from the OnlyFansAPI Cache (free, no credits used) - name: Stored Tracking Links description: Instant APIs for retrieving stored tracking links from the OnlyFansAPI Cache (free, no credits used). `revenue.total` is net earnings after refunds and chargebacks. `revenue.chargebacks` is the positive cached net amount already excluded from that total; do not subtract it again. - name: Stories description: APIs for managing OnlyFans stories - name: Story Highlights description: APIs for managing OnlyFans story highlights - name: Subscription Bundles description: "" - name: Tracking Links description: APIs for managing tracking links. Revenue totals are net earnings after refunds and chargebacks. `revenue.chargebacks` (or `summary.chargebacks_total` in stats) is the positive cached net amount already excluded from revenue; do not subtract it again. Spender responses include chargebacks across all attributed periods for each fan with positive net revenue. - name: Transactions description: APIs for managing OnlyFans transactions - name: Usage description: Credit usage reporting for your team - name: User List Collections description: "" - name: Users description: APIs for fetching OnlyFans users - name: Webhooks description: "" paths: /api/analytics/summary/historical: post: summary: Get Historical Performance operationId: getHistoricalPerformance description: Get monthly historical earnings for unrestricted accounts accessible to the API key. Limited link scopes do not grant account-wide analytics access. parameters: [] responses: "200": description: "" content: application/json: schema: type: array items: type: object properties: period: type: string example: 2024-01 value: type: number example: 5000 example: - period: 2024-01 value: 5000 - period: 2024-02 value: 5500 tags: - Analytics - Summary requestBody: required: false content: application/json: schema: type: object properties: time_range: type: string description: The time range for historical data example: 12m enum: - 3m - 6m - 12m - ytd - last-year components: securitySchemes: default: type: http scheme: bearer description: Get your API Key from OnlyFansAPI Console - https://app.onlyfansapi.com/api-keys ```` # Get Period Comparison (/api-reference/analytics-summary/get-period-comparison) Compare two time periods to analyze performance changes. Returns summary, breakdown, and chart data for the comparison. ## OpenAPI ````yaml https://app.onlyfansapi.com/scribe-docs/openapi.yaml post /api/analytics/summary/comparison openapi: 3.0.3 info: title: OnlyFans API description: "" version: 1.0.0 servers: - url: https://app.onlyfansapi.com security: - default: [] tags: - name: AI Voice Messages description: "" - name: API Keys description: "" - name: Account description: Endpoints for your linked accounts - name: Analytics - Financial description: APIs for retrieving financial analytics data - name: Analytics - Summary description: APIs for retrieving summary analytics data - name: Banking description: Operations related to user banking details, payout methods, legal and tax information, and account country settings. - name: Banned Words description: Reference list of OnlyFans banned words used by the `blockBannedWords` screening parameter - name: Blocked / Restricted Users description: APIs for listing the users an account has blocked or restricted - name: Chargebacks description: "" - name: Chat Messages description: "" - name: Chats description: "" - name: Client Sessions description: "" - name: Connect OnlyFans Account description: "" - name: Data Exports description: APIs for managing data exports - name: Engagement / Messages description: "" - name: Fans description: APIs for managing OnlyFans fans (subscribers) - name: Fans - AI Summary description: APIs for generating and retrieving AI-powered fan profile summaries - name: Following description: APIs for managing OnlyFans followings (people you're subscribed to) - name: Free Trial Links description: APIs for managing Free Trial Links. Revenue totals are net earnings after refunds and chargebacks. `revenue.chargebacks` (or `summary.chargebacks_total` in stats) is the positive cached net amount already excluded from revenue; do not subtract it again. Spender responses include chargebacks across all attributed periods for each fan with positive net revenue. - name: Giphy description: "" - name: Link Tags description: APIs for managing tags on free trial links, tracking links, and Smart Links - name: Mass Messaging description: "" - name: Media description: "" - name: Media Vault description: "" - name: Media Vault Lists description: "" - name: Notifications description: Endpoints for managingr account notifications - name: Payouts description: "" - name: Post Comments description: "" - name: Post Labels description: APIs for managing your post labels - name: Posts description: APIs for managing OnlyFans posts - name: Profile Content description: Read another user's profile content using your connected OnlyFans account. OnlyFans enforces subscription and purchase requirements; these endpoints do not unlock content. Response samples use captured OnlyFans payloads with anonymized IDs, text, and media URLs; OFAPI metadata values are illustrative. - name: Promotions description: "" - name: Public Profiles description: "" - name: Queue description: "" - name: Release Forms description: APIs for managing OnlyFans release forms - name: Saved For Later (Messages) description: "" - name: Saved For Later (Posts) description: "" - name: Settings description: "" - name: Shared Free Trial Links description: APIs for Free Trial Links that other OF creators have shared with this account. Revenue, cost, and spender data are not available for shared links. - name: Shared Tracking Links description: APIs for Tracking Links (campaigns) that other OF creators have shared with this account. Revenue, cost, and spender data are not available for shared campaigns. - name: Smart Link Postbacks description: APIs for managing Smart Link postback destinations - name: Smart Links description: APIs for managing Smart Links (Free Trial Links and Tracking Links with pooled inventory) - name: Statistics description: "" - name: Stored Free Trial Links description: Instant APIs for retrieving stored free trial links from the OnlyFansAPI Cache (free, no credits used). `revenue.total` is net earnings after refunds and chargebacks. `revenue.chargebacks` is the positive cached net amount already excluded from that total; do not subtract it again. - name: Stored Shared Free Trial Links description: Instant APIs for retrieving stored shared Free Trial Links from the OnlyFansAPI Cache (free, no credits used) - name: Stored Shared Tracking Links description: Instant APIs for retrieving stored shared Tracking Links (campaigns) from the OnlyFansAPI Cache (free, no credits used) - name: Stored Tracking Links description: Instant APIs for retrieving stored tracking links from the OnlyFansAPI Cache (free, no credits used). `revenue.total` is net earnings after refunds and chargebacks. `revenue.chargebacks` is the positive cached net amount already excluded from that total; do not subtract it again. - name: Stories description: APIs for managing OnlyFans stories - name: Story Highlights description: APIs for managing OnlyFans story highlights - name: Subscription Bundles description: "" - name: Tracking Links description: APIs for managing tracking links. Revenue totals are net earnings after refunds and chargebacks. `revenue.chargebacks` (or `summary.chargebacks_total` in stats) is the positive cached net amount already excluded from revenue; do not subtract it again. Spender responses include chargebacks across all attributed periods for each fan with positive net revenue. - name: Transactions description: APIs for managing OnlyFans transactions - name: Usage description: Credit usage reporting for your team - name: User List Collections description: "" - name: Users description: APIs for fetching OnlyFans users - name: Webhooks description: "" paths: /api/analytics/summary/comparison: post: summary: Get Period Comparison operationId: getPeriodComparison description: Compare two time periods to analyze performance changes. Returns summary, breakdown, and chart data for the comparison. parameters: [] responses: "200": description: "" content: application/json: schema: type: object example: summary: period_a_total: 15000 period_b_total: 18000 change: 3000 change_percentage: 20 breakdown: [] chart_data: [] period_a_label: Q1 2024 period_b_label: Q2 2024 properties: summary: type: object properties: period_a_total: type: number example: 15000 period_b_total: type: number example: 18000 change: type: number example: 3000 change_percentage: type: number example: 20 breakdown: type: array example: [] chart_data: type: array example: [] period_a_label: type: string example: Q1 2024 period_b_label: type: string example: Q2 2024 tags: - Analytics - Summary requestBody: required: true content: application/json: schema: type: object properties: account_ids: type: array description: Array of account prefixed IDs to compare example: - acc_abc123 - acc_def456 items: type: string period_a: type: object description: First period to compare example: start: 2024-01-01 end: 2024-03-31 properties: start: type: string description: Must be a valid date. example: 2026-10-13T10:09:34 end: type: string description: Must be a valid date. Must be a date after or equal toperiod_a.start.
example: 2078-04-25
required:
- start
- end
period_b:
type: object
description: Second period to compare
example:
start: 2024-04-01
end: 2024-06-30
properties:
start:
type: string
description: Must be a valid date.
example: 2026-10-13T10:09:34
end:
type: string
description: Must be a valid date. Must be a date after or equal to
period_b.start.
example: 2036-07-11
required:
- start
- end
granularity:
type: string
description: Comparison granularity
example: months
enum:
- months
- quarters
- half_years
- years
stat_type:
type: string
description: The statistic type to compare
example: totalEarnings
enum:
- totalEarnings
- subscriptions
- posts
- messages
- tips
- streams
required:
- account_ids
- period_a
- period_b
components:
securitySchemes:
default:
type: http
scheme: bearer
description: Get your API Key from OnlyFansAPI Console -
https://app.onlyfansapi.com/api-keys
````
# Get Profitability History (/api-reference/analytics-financial/get-profitability-history)
Get historical profitability data for a specific account over multiple months.
## OpenAPI
````yaml https://app.onlyfansapi.com/scribe-docs/openapi.yaml get /api/analytics/financial/profitability/{account}/history
openapi: 3.0.3
info:
title: OnlyFans API
description: ""
version: 1.0.0
servers:
- url: https://app.onlyfansapi.com
security:
- default: []
tags:
- name: AI Voice Messages
description: ""
- name: API Keys
description: ""
- name: Account
description: Endpoints for your linked accounts
- name: Analytics - Financial
description: APIs for retrieving financial analytics data
- name: Analytics - Summary
description: APIs for retrieving summary analytics data
- name: Banking
description: Operations related to user banking details, payout methods, legal
and tax information, and account country settings.
- name: Banned Words
description: Reference list of OnlyFans banned words used by the
`blockBannedWords` screening parameter
- name: Blocked / Restricted Users
description: APIs for listing the users an account has blocked or restricted
- name: Chargebacks
description: ""
- name: Chat Messages
description: ""
- name: Chats
description: ""
- name: Client Sessions
description: ""
- name: Connect OnlyFans Account
description: ""
- name: Data Exports
description: APIs for managing data exports
- name: Engagement / Messages
description: ""
- name: Fans
description: APIs for managing OnlyFans fans (subscribers)
- name: Fans - AI Summary
description: APIs for generating and retrieving AI-powered fan profile summaries
- name: Following
description: APIs for managing OnlyFans followings (people you're subscribed to)
- name: Free Trial Links
description: APIs for managing Free Trial Links. Revenue totals are net earnings
after refunds and chargebacks. `revenue.chargebacks` (or
`summary.chargebacks_total` in stats) is the positive cached net amount
already excluded from revenue; do not subtract it again. Spender responses
include chargebacks across all attributed periods for each fan with
positive net revenue.
- name: Giphy
description: ""
- name: Link Tags
description: APIs for managing tags on free trial links, tracking links, and Smart Links
- name: Mass Messaging
description: ""
- name: Media
description: ""
- name: Media Vault
description: ""
- name: Media Vault Lists
description: ""
- name: Notifications
description: Endpoints for managingr account notifications
- name: Payouts
description: ""
- name: Post Comments
description: ""
- name: Post Labels
description: APIs for managing your post labels
- name: Posts
description: APIs for managing OnlyFans posts
- name: Profile Content
description: Read another user's profile content using your connected OnlyFans
account. OnlyFans enforces subscription and purchase requirements; these
endpoints do not unlock content. Response samples use captured OnlyFans
payloads with anonymized IDs, text, and media URLs; OFAPI metadata values
are illustrative.
- name: Promotions
description: ""
- name: Public Profiles
description: ""
- name: Queue
description: ""
- name: Release Forms
description: APIs for managing OnlyFans release forms
- name: Saved For Later (Messages)
description: ""
- name: Saved For Later (Posts)
description: ""
- name: Settings
description: ""
- name: Shared Free Trial Links
description: APIs for Free Trial Links that other OF creators have shared with
this account. Revenue, cost, and spender data are not available for shared
links.
- name: Shared Tracking Links
description: APIs for Tracking Links (campaigns) that other OF creators have
shared with this account. Revenue, cost, and spender data are not
available for shared campaigns.
- name: Smart Link Postbacks
description: APIs for managing Smart Link postback destinations
- name: Smart Links
description: APIs for managing Smart Links (Free Trial Links and Tracking Links
with pooled inventory)
- name: Statistics
description: ""
- name: Stored Free Trial Links
description: Instant APIs for retrieving stored free trial links from the
OnlyFansAPI Cache (free, no credits used). `revenue.total` is net earnings
after refunds and chargebacks. `revenue.chargebacks` is the positive
cached net amount already excluded from that total; do not subtract it
again.
- name: Stored Shared Free Trial Links
description: Instant APIs for retrieving stored shared Free Trial Links from the
OnlyFansAPI Cache (free, no credits used)
- name: Stored Shared Tracking Links
description: Instant APIs for retrieving stored shared Tracking Links
(campaigns) from the OnlyFansAPI Cache (free, no credits used)
- name: Stored Tracking Links
description: Instant APIs for retrieving stored tracking links from the
OnlyFansAPI Cache (free, no credits used). `revenue.total` is net earnings
after refunds and chargebacks. `revenue.chargebacks` is the positive
cached net amount already excluded from that total; do not subtract it
again.
- name: Stories
description: APIs for managing OnlyFans stories
- name: Story Highlights
description: APIs for managing OnlyFans story highlights
- name: Subscription Bundles
description: ""
- name: Tracking Links
description: APIs for managing tracking links. Revenue totals are net earnings
after refunds and chargebacks. `revenue.chargebacks` (or
`summary.chargebacks_total` in stats) is the positive cached net amount
already excluded from revenue; do not subtract it again. Spender responses
include chargebacks across all attributed periods for each fan with
positive net revenue.
- name: Transactions
description: APIs for managing OnlyFans transactions
- name: Usage
description: Credit usage reporting for your team
- name: User List Collections
description: ""
- name: Users
description: APIs for fetching OnlyFans users
- name: Webhooks
description: ""
paths:
/api/analytics/financial/profitability/{account}/history:
parameters:
- in: path
name: account
description: The Account ID
example: acct_XXXXXXXXXXXXXXX
required: true
schema:
type: string
get:
summary: Get Profitability History
operationId: getProfitabilityHistory
description: Get historical profitability data for a specific account over
multiple months.
parameters:
- in: query
name: account_prefixed_id
description: The account prefixed ID.
example: acct_abc123
required: true
schema:
type: string
description: The account prefixed ID.
example: acct_abc123
- in: query
name: months
description: Number of months of history to retrieve (1-60, default 12). Must be
at least 1. Must not be greater than 60.
example: 12
required: false
schema:
type: integer
description: Number of months of history to retrieve (1-60, default 12). Must be
at least 1. Must not be greater than 60.
example: 12
responses:
"200":
description: ""
content:
application/json:
schema:
type: object
example:
data:
- onlyFansUserId: 12345
creatorName: Creator Name
year: 2024
month: 1
projectedNet: "10000.00"
commissionRate: "20.00"
commissionAmount: "2000.00"
costs: []
totalCosts: "500.00"
agencyEarnings: "2000.00"
profit: "1500.00"
marginPercentage: "75.00"
hasCommissionForPeriod: true
hasCostsForPeriod: true
activeMilestones: null
referralNote: null
ratePeriods: []
properties:
data:
type: array
example:
- onlyFansUserId: 12345
creatorName: Creator Name
year: 2024
month: 1
projectedNet: "10000.00"
commissionRate: "20.00"
commissionAmount: "2000.00"
costs: []
totalCosts: "500.00"
agencyEarnings: "2000.00"
profit: "1500.00"
marginPercentage: "75.00"
hasCommissionForPeriod: true
hasCostsForPeriod: true
activeMilestones: null
referralNote: null
ratePeriods: []
items:
type: object
properties:
onlyFansUserId:
type: integer
example: 12345
creatorName:
type: string
example: Creator Name
year:
type: integer
example: 2024
month:
type: integer
example: 1
projectedNet:
type: string
example: "10000.00"
commissionRate:
type: string
example: "20.00"
commissionAmount:
type: string
example: "2000.00"
costs:
type: array
example: []
totalCosts:
type: string
example: "500.00"
agencyEarnings:
type: string
example: "2000.00"
profit:
type: string
example: "1500.00"
marginPercentage:
type: string
example: "75.00"
hasCommissionForPeriod:
type: boolean
example: true
hasCostsForPeriod:
type: boolean
example: true
activeMilestones:
type: string
example: null
nullable: true
referralNote:
type: string
example: null
nullable: true
ratePeriods:
type: array
example: []
tags:
- Analytics - Financial
components:
securitySchemes:
default:
type: http
scheme: bearer
description: Get your API Key from OnlyFansAPI Console -
https://app.onlyfansapi.com/api-keys
````
# Get Profitability (/api-reference/analytics-financial/get-profitability)
Calculate profitability for creators including revenue, costs, commissions, and margins for a specific month.
## OpenAPI
````yaml https://app.onlyfansapi.com/scribe-docs/openapi.yaml post /api/analytics/financial/profitability
openapi: 3.0.3
info:
title: OnlyFans API
description: ""
version: 1.0.0
servers:
- url: https://app.onlyfansapi.com
security:
- default: []
tags:
- name: AI Voice Messages
description: ""
- name: API Keys
description: ""
- name: Account
description: Endpoints for your linked accounts
- name: Analytics - Financial
description: APIs for retrieving financial analytics data
- name: Analytics - Summary
description: APIs for retrieving summary analytics data
- name: Banking
description: Operations related to user banking details, payout methods, legal
and tax information, and account country settings.
- name: Banned Words
description: Reference list of OnlyFans banned words used by the
`blockBannedWords` screening parameter
- name: Blocked / Restricted Users
description: APIs for listing the users an account has blocked or restricted
- name: Chargebacks
description: ""
- name: Chat Messages
description: ""
- name: Chats
description: ""
- name: Client Sessions
description: ""
- name: Connect OnlyFans Account
description: ""
- name: Data Exports
description: APIs for managing data exports
- name: Engagement / Messages
description: ""
- name: Fans
description: APIs for managing OnlyFans fans (subscribers)
- name: Fans - AI Summary
description: APIs for generating and retrieving AI-powered fan profile summaries
- name: Following
description: APIs for managing OnlyFans followings (people you're subscribed to)
- name: Free Trial Links
description: APIs for managing Free Trial Links. Revenue totals are net earnings
after refunds and chargebacks. `revenue.chargebacks` (or
`summary.chargebacks_total` in stats) is the positive cached net amount
already excluded from revenue; do not subtract it again. Spender responses
include chargebacks across all attributed periods for each fan with
positive net revenue.
- name: Giphy
description: ""
- name: Link Tags
description: APIs for managing tags on free trial links, tracking links, and Smart Links
- name: Mass Messaging
description: ""
- name: Media
description: ""
- name: Media Vault
description: ""
- name: Media Vault Lists
description: ""
- name: Notifications
description: Endpoints for managingr account notifications
- name: Payouts
description: ""
- name: Post Comments
description: ""
- name: Post Labels
description: APIs for managing your post labels
- name: Posts
description: APIs for managing OnlyFans posts
- name: Profile Content
description: Read another user's profile content using your connected OnlyFans
account. OnlyFans enforces subscription and purchase requirements; these
endpoints do not unlock content. Response samples use captured OnlyFans
payloads with anonymized IDs, text, and media URLs; OFAPI metadata values
are illustrative.
- name: Promotions
description: ""
- name: Public Profiles
description: ""
- name: Queue
description: ""
- name: Release Forms
description: APIs for managing OnlyFans release forms
- name: Saved For Later (Messages)
description: ""
- name: Saved For Later (Posts)
description: ""
- name: Settings
description: ""
- name: Shared Free Trial Links
description: APIs for Free Trial Links that other OF creators have shared with
this account. Revenue, cost, and spender data are not available for shared
links.
- name: Shared Tracking Links
description: APIs for Tracking Links (campaigns) that other OF creators have
shared with this account. Revenue, cost, and spender data are not
available for shared campaigns.
- name: Smart Link Postbacks
description: APIs for managing Smart Link postback destinations
- name: Smart Links
description: APIs for managing Smart Links (Free Trial Links and Tracking Links
with pooled inventory)
- name: Statistics
description: ""
- name: Stored Free Trial Links
description: Instant APIs for retrieving stored free trial links from the
OnlyFansAPI Cache (free, no credits used). `revenue.total` is net earnings
after refunds and chargebacks. `revenue.chargebacks` is the positive
cached net amount already excluded from that total; do not subtract it
again.
- name: Stored Shared Free Trial Links
description: Instant APIs for retrieving stored shared Free Trial Links from the
OnlyFansAPI Cache (free, no credits used)
- name: Stored Shared Tracking Links
description: Instant APIs for retrieving stored shared Tracking Links
(campaigns) from the OnlyFansAPI Cache (free, no credits used)
- name: Stored Tracking Links
description: Instant APIs for retrieving stored tracking links from the
OnlyFansAPI Cache (free, no credits used). `revenue.total` is net earnings
after refunds and chargebacks. `revenue.chargebacks` is the positive
cached net amount already excluded from that total; do not subtract it
again.
- name: Stories
description: APIs for managing OnlyFans stories
- name: Story Highlights
description: APIs for managing OnlyFans story highlights
- name: Subscription Bundles
description: ""
- name: Tracking Links
description: APIs for managing tracking links. Revenue totals are net earnings
after refunds and chargebacks. `revenue.chargebacks` (or
`summary.chargebacks_total` in stats) is the positive cached net amount
already excluded from revenue; do not subtract it again. Spender responses
include chargebacks across all attributed periods for each fan with
positive net revenue.
- name: Transactions
description: APIs for managing OnlyFans transactions
- name: Usage
description: Credit usage reporting for your team
- name: User List Collections
description: ""
- name: Users
description: APIs for fetching OnlyFans users
- name: Webhooks
description: ""
paths:
/api/analytics/financial/profitability:
post:
summary: Get Profitability
operationId: getProfitability
description: Calculate profitability for creators including revenue, costs,
commissions, and margins for a specific month.
parameters: []
responses:
"200":
description: ""
content:
application/json:
schema:
type: object
example:
data:
- onlyFansUserId: 12345
creatorName: Creator Name
year: 2024
month: 6
projectedNet: "10000.00"
commissionRate: "20.00"
commissionAmount: "2000.00"
costs: []
totalCosts: "500.00"
agencyEarnings: "2000.00"
profit: "1500.00"
marginPercentage: "75.00"
hasCommissionForPeriod: true
hasCostsForPeriod: true
activeMilestones: null
referralNote: null
ratePeriods: []
properties:
data:
type: array
example:
- onlyFansUserId: 12345
creatorName: Creator Name
year: 2024
month: 6
projectedNet: "10000.00"
commissionRate: "20.00"
commissionAmount: "2000.00"
costs: []
totalCosts: "500.00"
agencyEarnings: "2000.00"
profit: "1500.00"
marginPercentage: "75.00"
hasCommissionForPeriod: true
hasCostsForPeriod: true
activeMilestones: null
referralNote: null
ratePeriods: []
items:
type: object
properties:
onlyFansUserId:
type: integer
example: 12345
creatorName:
type: string
example: Creator Name
year:
type: integer
example: 2024
month:
type: integer
example: 6
projectedNet:
type: string
example: "10000.00"
commissionRate:
type: string
example: "20.00"
commissionAmount:
type: string
example: "2000.00"
costs:
type: array
example: []
totalCosts:
type: string
example: "500.00"
agencyEarnings:
type: string
example: "2000.00"
profit:
type: string
example: "1500.00"
marginPercentage:
type: string
example: "75.00"
hasCommissionForPeriod:
type: boolean
example: true
hasCostsForPeriod:
type: boolean
example: true
activeMilestones:
type: string
example: null
nullable: true
referralNote:
type: string
example: null
nullable: true
ratePeriods:
type: array
example: []
tags:
- Analytics - Financial
requestBody:
required: true
content:
application/json:
schema:
type: object
properties:
account_ids:
type: array
description: Array of account prefixed IDs
example:
- acc_abc123
- acc_def456
items:
type: string
year:
type: integer
description: The year to calculate profitability for
example: 2024
month:
type: integer
description: The month to calculate profitability for (1-12)
example: 6
required:
- account_ids
- year
- month
components:
securitySchemes:
default:
type: http
scheme: bearer
description: Get your API Key from OnlyFansAPI Console -
https://app.onlyfansapi.com/api-keys
````
# Get Revenue Forecast (/api-reference/analytics-financial/get-revenue-forecast)
Generate revenue or churn forecasts using statistical models (Moving Average, Linear Regression, ARIMA, SARIMA).
## OpenAPI
````yaml https://app.onlyfansapi.com/scribe-docs/openapi.yaml post /api/analytics/financial/forecast
openapi: 3.0.3
info:
title: OnlyFans API
description: ""
version: 1.0.0
servers:
- url: https://app.onlyfansapi.com
security:
- default: []
tags:
- name: AI Voice Messages
description: ""
- name: API Keys
description: ""
- name: Account
description: Endpoints for your linked accounts
- name: Analytics - Financial
description: APIs for retrieving financial analytics data
- name: Analytics - Summary
description: APIs for retrieving summary analytics data
- name: Banking
description: Operations related to user banking details, payout methods, legal
and tax information, and account country settings.
- name: Banned Words
description: Reference list of OnlyFans banned words used by the
`blockBannedWords` screening parameter
- name: Blocked / Restricted Users
description: APIs for listing the users an account has blocked or restricted
- name: Chargebacks
description: ""
- name: Chat Messages
description: ""
- name: Chats
description: ""
- name: Client Sessions
description: ""
- name: Connect OnlyFans Account
description: ""
- name: Data Exports
description: APIs for managing data exports
- name: Engagement / Messages
description: ""
- name: Fans
description: APIs for managing OnlyFans fans (subscribers)
- name: Fans - AI Summary
description: APIs for generating and retrieving AI-powered fan profile summaries
- name: Following
description: APIs for managing OnlyFans followings (people you're subscribed to)
- name: Free Trial Links
description: APIs for managing Free Trial Links. Revenue totals are net earnings
after refunds and chargebacks. `revenue.chargebacks` (or
`summary.chargebacks_total` in stats) is the positive cached net amount
already excluded from revenue; do not subtract it again. Spender responses
include chargebacks across all attributed periods for each fan with
positive net revenue.
- name: Giphy
description: ""
- name: Link Tags
description: APIs for managing tags on free trial links, tracking links, and Smart Links
- name: Mass Messaging
description: ""
- name: Media
description: ""
- name: Media Vault
description: ""
- name: Media Vault Lists
description: ""
- name: Notifications
description: Endpoints for managingr account notifications
- name: Payouts
description: ""
- name: Post Comments
description: ""
- name: Post Labels
description: APIs for managing your post labels
- name: Posts
description: APIs for managing OnlyFans posts
- name: Profile Content
description: Read another user's profile content using your connected OnlyFans
account. OnlyFans enforces subscription and purchase requirements; these
endpoints do not unlock content. Response samples use captured OnlyFans
payloads with anonymized IDs, text, and media URLs; OFAPI metadata values
are illustrative.
- name: Promotions
description: ""
- name: Public Profiles
description: ""
- name: Queue
description: ""
- name: Release Forms
description: APIs for managing OnlyFans release forms
- name: Saved For Later (Messages)
description: ""
- name: Saved For Later (Posts)
description: ""
- name: Settings
description: ""
- name: Shared Free Trial Links
description: APIs for Free Trial Links that other OF creators have shared with
this account. Revenue, cost, and spender data are not available for shared
links.
- name: Shared Tracking Links
description: APIs for Tracking Links (campaigns) that other OF creators have
shared with this account. Revenue, cost, and spender data are not
available for shared campaigns.
- name: Smart Link Postbacks
description: APIs for managing Smart Link postback destinations
- name: Smart Links
description: APIs for managing Smart Links (Free Trial Links and Tracking Links
with pooled inventory)
- name: Statistics
description: ""
- name: Stored Free Trial Links
description: Instant APIs for retrieving stored free trial links from the
OnlyFansAPI Cache (free, no credits used). `revenue.total` is net earnings
after refunds and chargebacks. `revenue.chargebacks` is the positive
cached net amount already excluded from that total; do not subtract it
again.
- name: Stored Shared Free Trial Links
description: Instant APIs for retrieving stored shared Free Trial Links from the
OnlyFansAPI Cache (free, no credits used)
- name: Stored Shared Tracking Links
description: Instant APIs for retrieving stored shared Tracking Links
(campaigns) from the OnlyFansAPI Cache (free, no credits used)
- name: Stored Tracking Links
description: Instant APIs for retrieving stored tracking links from the
OnlyFansAPI Cache (free, no credits used). `revenue.total` is net earnings
after refunds and chargebacks. `revenue.chargebacks` is the positive
cached net amount already excluded from that total; do not subtract it
again.
- name: Stories
description: APIs for managing OnlyFans stories
- name: Story Highlights
description: APIs for managing OnlyFans story highlights
- name: Subscription Bundles
description: ""
- name: Tracking Links
description: APIs for managing tracking links. Revenue totals are net earnings
after refunds and chargebacks. `revenue.chargebacks` (or
`summary.chargebacks_total` in stats) is the positive cached net amount
already excluded from revenue; do not subtract it again. Spender responses
include chargebacks across all attributed periods for each fan with
positive net revenue.
- name: Transactions
description: APIs for managing OnlyFans transactions
- name: Usage
description: Credit usage reporting for your team
- name: User List Collections
description: ""
- name: Users
description: APIs for fetching OnlyFans users
- name: Webhooks
description: ""
paths:
/api/analytics/financial/forecast:
post:
summary: Get Revenue Forecast
operationId: getRevenueForecast
description: Generate revenue or churn forecasts using statistical models
(Moving Average, Linear Regression, ARIMA, SARIMA).
parameters: []
responses:
"200":
description: ""
content:
application/json:
schema:
type: object
example:
metric: revenue
model: linear_regression
historical:
- date: 2024-01-01
value: 500
forecast:
- date: 2024-02-01
value: 550
properties:
metric:
type: string
example: revenue
model:
type: string
example: linear_regression
historical:
type: array
example:
- date: 2024-01-01
value: 500
items:
type: object
properties:
date:
type: string
example: 2024-01-01
value:
type: number
example: 500
forecast:
type: array
example:
- date: 2024-02-01
value: 550
items:
type: object
properties:
date:
type: string
example: 2024-02-01
value:
type: number
example: 550
tags:
- Analytics - Financial
requestBody:
required: true
content:
application/json:
schema:
type: object
properties:
account_ids:
type: array
description: Array of account prefixed IDs
example:
- acc_abc123
- acc_def456
items:
type: string
metric:
type: string
description: The metric to forecast
example: revenue
enum:
- revenue
- churn_percentage
model:
type: string
description: The forecasting model to use
example: linear_regression
enum:
- moving_average
- linear_regression
- arima
- sarima
historical_days:
type: integer
description: Number of historical days to analyze (30-730)
example: 90
forecast_days:
type: integer
description: Number of days to forecast (7-365)
example: 30
required:
- account_ids
- metric
- model
- historical_days
- forecast_days
components:
securitySchemes:
default:
type: http
scheme: bearer
description: Get your API Key from OnlyFansAPI Console -
https://app.onlyfansapi.com/api-keys
````
# Get Transaction Summary (/api-reference/analytics-financial/get-transaction-summary)
Get transaction summary including counts for succeeded, refunded, and disputed transactions, plus gross, net, and fee totals.
## OpenAPI
````yaml https://app.onlyfansapi.com/scribe-docs/openapi.yaml post /api/analytics/financial/transactions/summary
openapi: 3.0.3
info:
title: OnlyFans API
description: ""
version: 1.0.0
servers:
- url: https://app.onlyfansapi.com
security:
- default: []
tags:
- name: AI Voice Messages
description: ""
- name: API Keys
description: ""
- name: Account
description: Endpoints for your linked accounts
- name: Analytics - Financial
description: APIs for retrieving financial analytics data
- name: Analytics - Summary
description: APIs for retrieving summary analytics data
- name: Banking
description: Operations related to user banking details, payout methods, legal
and tax information, and account country settings.
- name: Banned Words
description: Reference list of OnlyFans banned words used by the
`blockBannedWords` screening parameter
- name: Blocked / Restricted Users
description: APIs for listing the users an account has blocked or restricted
- name: Chargebacks
description: ""
- name: Chat Messages
description: ""
- name: Chats
description: ""
- name: Client Sessions
description: ""
- name: Connect OnlyFans Account
description: ""
- name: Data Exports
description: APIs for managing data exports
- name: Engagement / Messages
description: ""
- name: Fans
description: APIs for managing OnlyFans fans (subscribers)
- name: Fans - AI Summary
description: APIs for generating and retrieving AI-powered fan profile summaries
- name: Following
description: APIs for managing OnlyFans followings (people you're subscribed to)
- name: Free Trial Links
description: APIs for managing Free Trial Links. Revenue totals are net earnings
after refunds and chargebacks. `revenue.chargebacks` (or
`summary.chargebacks_total` in stats) is the positive cached net amount
already excluded from revenue; do not subtract it again. Spender responses
include chargebacks across all attributed periods for each fan with
positive net revenue.
- name: Giphy
description: ""
- name: Link Tags
description: APIs for managing tags on free trial links, tracking links, and Smart Links
- name: Mass Messaging
description: ""
- name: Media
description: ""
- name: Media Vault
description: ""
- name: Media Vault Lists
description: ""
- name: Notifications
description: Endpoints for managingr account notifications
- name: Payouts
description: ""
- name: Post Comments
description: ""
- name: Post Labels
description: APIs for managing your post labels
- name: Posts
description: APIs for managing OnlyFans posts
- name: Profile Content
description: Read another user's profile content using your connected OnlyFans
account. OnlyFans enforces subscription and purchase requirements; these
endpoints do not unlock content. Response samples use captured OnlyFans
payloads with anonymized IDs, text, and media URLs; OFAPI metadata values
are illustrative.
- name: Promotions
description: ""
- name: Public Profiles
description: ""
- name: Queue
description: ""
- name: Release Forms
description: APIs for managing OnlyFans release forms
- name: Saved For Later (Messages)
description: ""
- name: Saved For Later (Posts)
description: ""
- name: Settings
description: ""
- name: Shared Free Trial Links
description: APIs for Free Trial Links that other OF creators have shared with
this account. Revenue, cost, and spender data are not available for shared
links.
- name: Shared Tracking Links
description: APIs for Tracking Links (campaigns) that other OF creators have
shared with this account. Revenue, cost, and spender data are not
available for shared campaigns.
- name: Smart Link Postbacks
description: APIs for managing Smart Link postback destinations
- name: Smart Links
description: APIs for managing Smart Links (Free Trial Links and Tracking Links
with pooled inventory)
- name: Statistics
description: ""
- name: Stored Free Trial Links
description: Instant APIs for retrieving stored free trial links from the
OnlyFansAPI Cache (free, no credits used). `revenue.total` is net earnings
after refunds and chargebacks. `revenue.chargebacks` is the positive
cached net amount already excluded from that total; do not subtract it
again.
- name: Stored Shared Free Trial Links
description: Instant APIs for retrieving stored shared Free Trial Links from the
OnlyFansAPI Cache (free, no credits used)
- name: Stored Shared Tracking Links
description: Instant APIs for retrieving stored shared Tracking Links
(campaigns) from the OnlyFansAPI Cache (free, no credits used)
- name: Stored Tracking Links
description: Instant APIs for retrieving stored tracking links from the
OnlyFansAPI Cache (free, no credits used). `revenue.total` is net earnings
after refunds and chargebacks. `revenue.chargebacks` is the positive
cached net amount already excluded from that total; do not subtract it
again.
- name: Stories
description: APIs for managing OnlyFans stories
- name: Story Highlights
description: APIs for managing OnlyFans story highlights
- name: Subscription Bundles
description: ""
- name: Tracking Links
description: APIs for managing tracking links. Revenue totals are net earnings
after refunds and chargebacks. `revenue.chargebacks` (or
`summary.chargebacks_total` in stats) is the positive cached net amount
already excluded from revenue; do not subtract it again. Spender responses
include chargebacks across all attributed periods for each fan with
positive net revenue.
- name: Transactions
description: APIs for managing OnlyFans transactions
- name: Usage
description: Credit usage reporting for your team
- name: User List Collections
description: ""
- name: Users
description: APIs for fetching OnlyFans users
- name: Webhooks
description: ""
paths:
/api/analytics/financial/transactions/summary:
post:
summary: Get Transaction Summary
operationId: getTransactionSummary
description: Get transaction summary including counts for succeeded, refunded,
and disputed transactions, plus gross, net, and fee totals.
parameters: []
responses:
"200":
description: ""
content:
application/json:
schema:
type: object
example:
succeeded_count: 150
refunded_count: 5
disputed_count: 2
total_gross: 20000
total_net: 16000
total_fees: 4000
properties:
succeeded_count:
type: integer
example: 150
refunded_count:
type: integer
example: 5
disputed_count:
type: integer
example: 2
total_gross:
type: number
example: 20000
total_net:
type: number
example: 16000
total_fees:
type: number
example: 4000
tags:
- Analytics - Financial
requestBody:
required: true
content:
application/json:
schema:
type: object
properties:
account_ids:
type: array
description: Array of account prefixed IDs
example:
- acc_abc123
- acc_def456
items:
type: string
start_date:
type: string
description: The start date (ISO 8601 format)
example: 2024-01-01
end_date:
type: string
description: The end date (ISO 8601 format)
example: 2024-12-31
required:
- account_ids
- start_date
- end_date
components:
securitySchemes:
default:
type: http
scheme: bearer
description: Get your API Key from OnlyFansAPI Console -
https://app.onlyfansapi.com/api-keys
````
# Get Transactions By Type (/api-reference/analytics-financial/get-transactions-by-type)
Get transaction totals grouped by transaction type (subscriptions, tips, messages, etc.).
## OpenAPI
````yaml https://app.onlyfansapi.com/scribe-docs/openapi.yaml post /api/analytics/financial/transactions/by-type
openapi: 3.0.3
info:
title: OnlyFans API
description: ""
version: 1.0.0
servers:
- url: https://app.onlyfansapi.com
security:
- default: []
tags:
- name: AI Voice Messages
description: ""
- name: API Keys
description: ""
- name: Account
description: Endpoints for your linked accounts
- name: Analytics - Financial
description: APIs for retrieving financial analytics data
- name: Analytics - Summary
description: APIs for retrieving summary analytics data
- name: Banking
description: Operations related to user banking details, payout methods, legal
and tax information, and account country settings.
- name: Banned Words
description: Reference list of OnlyFans banned words used by the
`blockBannedWords` screening parameter
- name: Blocked / Restricted Users
description: APIs for listing the users an account has blocked or restricted
- name: Chargebacks
description: ""
- name: Chat Messages
description: ""
- name: Chats
description: ""
- name: Client Sessions
description: ""
- name: Connect OnlyFans Account
description: ""
- name: Data Exports
description: APIs for managing data exports
- name: Engagement / Messages
description: ""
- name: Fans
description: APIs for managing OnlyFans fans (subscribers)
- name: Fans - AI Summary
description: APIs for generating and retrieving AI-powered fan profile summaries
- name: Following
description: APIs for managing OnlyFans followings (people you're subscribed to)
- name: Free Trial Links
description: APIs for managing Free Trial Links. Revenue totals are net earnings
after refunds and chargebacks. `revenue.chargebacks` (or
`summary.chargebacks_total` in stats) is the positive cached net amount
already excluded from revenue; do not subtract it again. Spender responses
include chargebacks across all attributed periods for each fan with
positive net revenue.
- name: Giphy
description: ""
- name: Link Tags
description: APIs for managing tags on free trial links, tracking links, and Smart Links
- name: Mass Messaging
description: ""
- name: Media
description: ""
- name: Media Vault
description: ""
- name: Media Vault Lists
description: ""
- name: Notifications
description: Endpoints for managingr account notifications
- name: Payouts
description: ""
- name: Post Comments
description: ""
- name: Post Labels
description: APIs for managing your post labels
- name: Posts
description: APIs for managing OnlyFans posts
- name: Profile Content
description: Read another user's profile content using your connected OnlyFans
account. OnlyFans enforces subscription and purchase requirements; these
endpoints do not unlock content. Response samples use captured OnlyFans
payloads with anonymized IDs, text, and media URLs; OFAPI metadata values
are illustrative.
- name: Promotions
description: ""
- name: Public Profiles
description: ""
- name: Queue
description: ""
- name: Release Forms
description: APIs for managing OnlyFans release forms
- name: Saved For Later (Messages)
description: ""
- name: Saved For Later (Posts)
description: ""
- name: Settings
description: ""
- name: Shared Free Trial Links
description: APIs for Free Trial Links that other OF creators have shared with
this account. Revenue, cost, and spender data are not available for shared
links.
- name: Shared Tracking Links
description: APIs for Tracking Links (campaigns) that other OF creators have
shared with this account. Revenue, cost, and spender data are not
available for shared campaigns.
- name: Smart Link Postbacks
description: APIs for managing Smart Link postback destinations
- name: Smart Links
description: APIs for managing Smart Links (Free Trial Links and Tracking Links
with pooled inventory)
- name: Statistics
description: ""
- name: Stored Free Trial Links
description: Instant APIs for retrieving stored free trial links from the
OnlyFansAPI Cache (free, no credits used). `revenue.total` is net earnings
after refunds and chargebacks. `revenue.chargebacks` is the positive
cached net amount already excluded from that total; do not subtract it
again.
- name: Stored Shared Free Trial Links
description: Instant APIs for retrieving stored shared Free Trial Links from the
OnlyFansAPI Cache (free, no credits used)
- name: Stored Shared Tracking Links
description: Instant APIs for retrieving stored shared Tracking Links
(campaigns) from the OnlyFansAPI Cache (free, no credits used)
- name: Stored Tracking Links
description: Instant APIs for retrieving stored tracking links from the
OnlyFansAPI Cache (free, no credits used). `revenue.total` is net earnings
after refunds and chargebacks. `revenue.chargebacks` is the positive
cached net amount already excluded from that total; do not subtract it
again.
- name: Stories
description: APIs for managing OnlyFans stories
- name: Story Highlights
description: APIs for managing OnlyFans story highlights
- name: Subscription Bundles
description: ""
- name: Tracking Links
description: APIs for managing tracking links. Revenue totals are net earnings
after refunds and chargebacks. `revenue.chargebacks` (or
`summary.chargebacks_total` in stats) is the positive cached net amount
already excluded from revenue; do not subtract it again. Spender responses
include chargebacks across all attributed periods for each fan with
positive net revenue.
- name: Transactions
description: APIs for managing OnlyFans transactions
- name: Usage
description: Credit usage reporting for your team
- name: User List Collections
description: ""
- name: Users
description: APIs for fetching OnlyFans users
- name: Webhooks
description: ""
paths:
/api/analytics/financial/transactions/by-type:
post:
summary: Get Transactions By Type
operationId: getTransactionsByType
description: Get transaction totals grouped by transaction type (subscriptions,
tips, messages, etc.).
parameters: []
responses:
"200":
description: ""
content:
application/json:
schema:
type: array
items:
type: object
properties:
type:
type: string
example: subscription
count:
type: integer
example: 100
total:
type: number
example: 5000
example:
- type: subscription
count: 100
total: 5000
- type: tip
count: 50
total: 2500
tags:
- Analytics - Financial
requestBody:
required: true
content:
application/json:
schema:
type: object
properties:
account_ids:
type: array
description: Array of account prefixed IDs
example:
- acc_abc123
- acc_def456
items:
type: string
start_date:
type: string
description: The start date (ISO 8601 format)
example: 2024-01-01
end_date:
type: string
description: The end date (ISO 8601 format)
example: 2024-12-31
required:
- account_ids
- start_date
- end_date
components:
securitySchemes:
default:
type: http
scheme: bearer
description: Get your API Key from OnlyFansAPI Console -
https://app.onlyfansapi.com/api-keys
````
# Whoami (/api-reference/api-keys/whoami)
Get details about the currently used API Key & the relevant Team
## OpenAPI
````yaml https://app.onlyfansapi.com/scribe-docs/openapi.yaml get /api/whoami
openapi: 3.0.3
info:
title: OnlyFans API
description: ""
version: 1.0.0
servers:
- url: https://app.onlyfansapi.com
security:
- default: []
tags:
- name: AI Voice Messages
description: ""
- name: API Keys
description: ""
- name: Account
description: Endpoints for your linked accounts
- name: Analytics - Financial
description: APIs for retrieving financial analytics data
- name: Analytics - Summary
description: APIs for retrieving summary analytics data
- name: Banking
description: Operations related to user banking details, payout methods, legal
and tax information, and account country settings.
- name: Banned Words
description: Reference list of OnlyFans banned words used by the
`blockBannedWords` screening parameter
- name: Blocked / Restricted Users
description: APIs for listing the users an account has blocked or restricted
- name: Chargebacks
description: ""
- name: Chat Messages
description: ""
- name: Chats
description: ""
- name: Client Sessions
description: ""
- name: Connect OnlyFans Account
description: ""
- name: Data Exports
description: APIs for managing data exports
- name: Engagement / Messages
description: ""
- name: Fans
description: APIs for managing OnlyFans fans (subscribers)
- name: Fans - AI Summary
description: APIs for generating and retrieving AI-powered fan profile summaries
- name: Following
description: APIs for managing OnlyFans followings (people you're subscribed to)
- name: Free Trial Links
description: APIs for managing Free Trial Links. Revenue totals are net earnings
after refunds and chargebacks. `revenue.chargebacks` (or
`summary.chargebacks_total` in stats) is the positive cached net amount
already excluded from revenue; do not subtract it again. Spender responses
include chargebacks across all attributed periods for each fan with
positive net revenue.
- name: Giphy
description: ""
- name: Link Tags
description: APIs for managing tags on free trial links, tracking links, and Smart Links
- name: Mass Messaging
description: ""
- name: Media
description: ""
- name: Media Vault
description: ""
- name: Media Vault Lists
description: ""
- name: Notifications
description: Endpoints for managingr account notifications
- name: Payouts
description: ""
- name: Post Comments
description: ""
- name: Post Labels
description: APIs for managing your post labels
- name: Posts
description: APIs for managing OnlyFans posts
- name: Profile Content
description: Read another user's profile content using your connected OnlyFans
account. OnlyFans enforces subscription and purchase requirements; these
endpoints do not unlock content. Response samples use captured OnlyFans
payloads with anonymized IDs, text, and media URLs; OFAPI metadata values
are illustrative.
- name: Promotions
description: ""
- name: Public Profiles
description: ""
- name: Queue
description: ""
- name: Release Forms
description: APIs for managing OnlyFans release forms
- name: Saved For Later (Messages)
description: ""
- name: Saved For Later (Posts)
description: ""
- name: Settings
description: ""
- name: Shared Free Trial Links
description: APIs for Free Trial Links that other OF creators have shared with
this account. Revenue, cost, and spender data are not available for shared
links.
- name: Shared Tracking Links
description: APIs for Tracking Links (campaigns) that other OF creators have
shared with this account. Revenue, cost, and spender data are not
available for shared campaigns.
- name: Smart Link Postbacks
description: APIs for managing Smart Link postback destinations
- name: Smart Links
description: APIs for managing Smart Links (Free Trial Links and Tracking Links
with pooled inventory)
- name: Statistics
description: ""
- name: Stored Free Trial Links
description: Instant APIs for retrieving stored free trial links from the
OnlyFansAPI Cache (free, no credits used). `revenue.total` is net earnings
after refunds and chargebacks. `revenue.chargebacks` is the positive
cached net amount already excluded from that total; do not subtract it
again.
- name: Stored Shared Free Trial Links
description: Instant APIs for retrieving stored shared Free Trial Links from the
OnlyFansAPI Cache (free, no credits used)
- name: Stored Shared Tracking Links
description: Instant APIs for retrieving stored shared Tracking Links
(campaigns) from the OnlyFansAPI Cache (free, no credits used)
- name: Stored Tracking Links
description: Instant APIs for retrieving stored tracking links from the
OnlyFansAPI Cache (free, no credits used). `revenue.total` is net earnings
after refunds and chargebacks. `revenue.chargebacks` is the positive
cached net amount already excluded from that total; do not subtract it
again.
- name: Stories
description: APIs for managing OnlyFans stories
- name: Story Highlights
description: APIs for managing OnlyFans story highlights
- name: Subscription Bundles
description: ""
- name: Tracking Links
description: APIs for managing tracking links. Revenue totals are net earnings
after refunds and chargebacks. `revenue.chargebacks` (or
`summary.chargebacks_total` in stats) is the positive cached net amount
already excluded from revenue; do not subtract it again. Spender responses
include chargebacks across all attributed periods for each fan with
positive net revenue.
- name: Transactions
description: APIs for managing OnlyFans transactions
- name: Usage
description: Credit usage reporting for your team
- name: User List Collections
description: ""
- name: Users
description: APIs for fetching OnlyFans users
- name: Webhooks
description: ""
paths:
/api/whoami:
get:
summary: Whoami
operationId: whoami
description: Get details about the currently used API Key & the relevant Team
parameters: []
responses:
"200":
description: Success
content:
application/json:
schema:
type: object
example:
api_key:
name: Onboarding
last_used_at: 2025-05-23T15:51:52.000000Z
created_at: 2025-04-20T16:27:45.000000Z
team:
name: Personal Team
slug: personal-team-123
properties:
api_key:
type: object
properties:
name:
type: string
example: Onboarding
last_used_at:
type: string
example: 2025-05-23T15:51:52.000000Z
created_at:
type: string
example: 2025-04-20T16:27:45.000000Z
team:
type: object
properties:
name:
type: string
example: Personal Team
slug:
type: string
example: personal-team-123
tags:
- API Keys
components:
securitySchemes:
default:
type: http
scheme: bearer
description: Get your API Key from OnlyFansAPI Console -
https://app.onlyfansapi.com/api-keys
````
# Get Account Country Details (/api-reference/banking/get-account-country-details)
Returns the account owner's country details for banking, including country code, name, whether the country has states and zip codes, payout eligibility, and W9 form availability.
## OpenAPI
````yaml https://app.onlyfansapi.com/scribe-docs/openapi.yaml get /api/{account}/banking/details/account-country
openapi: 3.0.3
info:
title: OnlyFans API
description: ""
version: 1.0.0
servers:
- url: https://app.onlyfansapi.com
security:
- default: []
tags:
- name: AI Voice Messages
description: ""
- name: API Keys
description: ""
- name: Account
description: Endpoints for your linked accounts
- name: Analytics - Financial
description: APIs for retrieving financial analytics data
- name: Analytics - Summary
description: APIs for retrieving summary analytics data
- name: Banking
description: Operations related to user banking details, payout methods, legal
and tax information, and account country settings.
- name: Banned Words
description: Reference list of OnlyFans banned words used by the
`blockBannedWords` screening parameter
- name: Blocked / Restricted Users
description: APIs for listing the users an account has blocked or restricted
- name: Chargebacks
description: ""
- name: Chat Messages
description: ""
- name: Chats
description: ""
- name: Client Sessions
description: ""
- name: Connect OnlyFans Account
description: ""
- name: Data Exports
description: APIs for managing data exports
- name: Engagement / Messages
description: ""
- name: Fans
description: APIs for managing OnlyFans fans (subscribers)
- name: Fans - AI Summary
description: APIs for generating and retrieving AI-powered fan profile summaries
- name: Following
description: APIs for managing OnlyFans followings (people you're subscribed to)
- name: Free Trial Links
description: APIs for managing Free Trial Links. Revenue totals are net earnings
after refunds and chargebacks. `revenue.chargebacks` (or
`summary.chargebacks_total` in stats) is the positive cached net amount
already excluded from revenue; do not subtract it again. Spender responses
include chargebacks across all attributed periods for each fan with
positive net revenue.
- name: Giphy
description: ""
- name: Link Tags
description: APIs for managing tags on free trial links, tracking links, and Smart Links
- name: Mass Messaging
description: ""
- name: Media
description: ""
- name: Media Vault
description: ""
- name: Media Vault Lists
description: ""
- name: Notifications
description: Endpoints for managingr account notifications
- name: Payouts
description: ""
- name: Post Comments
description: ""
- name: Post Labels
description: APIs for managing your post labels
- name: Posts
description: APIs for managing OnlyFans posts
- name: Profile Content
description: Read another user's profile content using your connected OnlyFans
account. OnlyFans enforces subscription and purchase requirements; these
endpoints do not unlock content. Response samples use captured OnlyFans
payloads with anonymized IDs, text, and media URLs; OFAPI metadata values
are illustrative.
- name: Promotions
description: ""
- name: Public Profiles
description: ""
- name: Queue
description: ""
- name: Release Forms
description: APIs for managing OnlyFans release forms
- name: Saved For Later (Messages)
description: ""
- name: Saved For Later (Posts)
description: ""
- name: Settings
description: ""
- name: Shared Free Trial Links
description: APIs for Free Trial Links that other OF creators have shared with
this account. Revenue, cost, and spender data are not available for shared
links.
- name: Shared Tracking Links
description: APIs for Tracking Links (campaigns) that other OF creators have
shared with this account. Revenue, cost, and spender data are not
available for shared campaigns.
- name: Smart Link Postbacks
description: APIs for managing Smart Link postback destinations
- name: Smart Links
description: APIs for managing Smart Links (Free Trial Links and Tracking Links
with pooled inventory)
- name: Statistics
description: ""
- name: Stored Free Trial Links
description: Instant APIs for retrieving stored free trial links from the
OnlyFansAPI Cache (free, no credits used). `revenue.total` is net earnings
after refunds and chargebacks. `revenue.chargebacks` is the positive
cached net amount already excluded from that total; do not subtract it
again.
- name: Stored Shared Free Trial Links
description: Instant APIs for retrieving stored shared Free Trial Links from the
OnlyFansAPI Cache (free, no credits used)
- name: Stored Shared Tracking Links
description: Instant APIs for retrieving stored shared Tracking Links
(campaigns) from the OnlyFansAPI Cache (free, no credits used)
- name: Stored Tracking Links
description: Instant APIs for retrieving stored tracking links from the
OnlyFansAPI Cache (free, no credits used). `revenue.total` is net earnings
after refunds and chargebacks. `revenue.chargebacks` is the positive
cached net amount already excluded from that total; do not subtract it
again.
- name: Stories
description: APIs for managing OnlyFans stories
- name: Story Highlights
description: APIs for managing OnlyFans story highlights
- name: Subscription Bundles
description: ""
- name: Tracking Links
description: APIs for managing tracking links. Revenue totals are net earnings
after refunds and chargebacks. `revenue.chargebacks` (or
`summary.chargebacks_total` in stats) is the positive cached net amount
already excluded from revenue; do not subtract it again. Spender responses
include chargebacks across all attributed periods for each fan with
positive net revenue.
- name: Transactions
description: APIs for managing OnlyFans transactions
- name: Usage
description: Credit usage reporting for your team
- name: User List Collections
description: ""
- name: Users
description: APIs for fetching OnlyFans users
- name: Webhooks
description: ""
paths:
/api/{account}/banking/details/account-country:
parameters:
- in: path
name: account
description: The Account ID
example: acct_XXXXXXXXXXXXXXX
required: true
schema:
type: string
get:
summary: Get Account Country Details
operationId: getAccountCountryDetails
description: Returns the account owner's country details for banking, including
country code, name, whether the country has states and zip codes, payout
eligibility, and W9 form availability.
parameters: []
responses:
"200":
description: Success
content:
application/json:
schema:
type: object
example:
data:
id: 212
code: US
name: United States of America
hasStates: true
hasZip: true
canPay: true
canHasW9Form: true
_meta:
_credits:
used: 1
balance: 1000000008
note: Always
_cache:
is_cached: false
note: Cache disabled for this endpoint
_rate_limits:
limit_minute: 10000000
limit_day: 50000
remaining_minute: 9999999
remaining_day: 49956
properties:
data:
type: object
properties:
id:
type: integer
example: 212
code:
type: string
example: US
name:
type: string
example: United States of America
hasStates:
type: boolean
example: true
hasZip:
type: boolean
example: true
canPay:
type: boolean
example: true
canHasW9Form:
type: boolean
example: true
_meta:
type: object
properties:
_credits:
type: object
properties:
used:
type: integer
example: 1
balance:
type: integer
example: 1000000008
note:
type: string
example: Always
_cache:
type: object
properties:
is_cached:
type: boolean
example: false
note:
type: string
example: Cache disabled for this endpoint
_rate_limits:
type: object
properties:
limit_minute:
type: integer
example: 10000000
limit_day:
type: integer
example: 50000
remaining_minute:
type: integer
example: 9999999
remaining_day:
type: integer
example: 49956
tags:
- Banking
components:
securitySchemes:
default:
type: http
scheme: bearer
description: Get your API Key from OnlyFansAPI Console -
https://app.onlyfansapi.com/api-keys
````
# Get Bank Payout Details (/api-reference/banking/get-bank-payout-details)
Returns the account owner's bank payout details, including whether payout data is filled, available payout methods with their descriptions, and required bank fields.
## OpenAPI
````yaml https://app.onlyfansapi.com/scribe-docs/openapi.yaml get /api/{account}/banking/details/bank
openapi: 3.0.3
info:
title: OnlyFans API
description: ""
version: 1.0.0
servers:
- url: https://app.onlyfansapi.com
security:
- default: []
tags:
- name: AI Voice Messages
description: ""
- name: API Keys
description: ""
- name: Account
description: Endpoints for your linked accounts
- name: Analytics - Financial
description: APIs for retrieving financial analytics data
- name: Analytics - Summary
description: APIs for retrieving summary analytics data
- name: Banking
description: Operations related to user banking details, payout methods, legal
and tax information, and account country settings.
- name: Banned Words
description: Reference list of OnlyFans banned words used by the
`blockBannedWords` screening parameter
- name: Blocked / Restricted Users
description: APIs for listing the users an account has blocked or restricted
- name: Chargebacks
description: ""
- name: Chat Messages
description: ""
- name: Chats
description: ""
- name: Client Sessions
description: ""
- name: Connect OnlyFans Account
description: ""
- name: Data Exports
description: APIs for managing data exports
- name: Engagement / Messages
description: ""
- name: Fans
description: APIs for managing OnlyFans fans (subscribers)
- name: Fans - AI Summary
description: APIs for generating and retrieving AI-powered fan profile summaries
- name: Following
description: APIs for managing OnlyFans followings (people you're subscribed to)
- name: Free Trial Links
description: APIs for managing Free Trial Links. Revenue totals are net earnings
after refunds and chargebacks. `revenue.chargebacks` (or
`summary.chargebacks_total` in stats) is the positive cached net amount
already excluded from revenue; do not subtract it again. Spender responses
include chargebacks across all attributed periods for each fan with
positive net revenue.
- name: Giphy
description: ""
- name: Link Tags
description: APIs for managing tags on free trial links, tracking links, and Smart Links
- name: Mass Messaging
description: ""
- name: Media
description: ""
- name: Media Vault
description: ""
- name: Media Vault Lists
description: ""
- name: Notifications
description: Endpoints for managingr account notifications
- name: Payouts
description: ""
- name: Post Comments
description: ""
- name: Post Labels
description: APIs for managing your post labels
- name: Posts
description: APIs for managing OnlyFans posts
- name: Profile Content
description: Read another user's profile content using your connected OnlyFans
account. OnlyFans enforces subscription and purchase requirements; these
endpoints do not unlock content. Response samples use captured OnlyFans
payloads with anonymized IDs, text, and media URLs; OFAPI metadata values
are illustrative.
- name: Promotions
description: ""
- name: Public Profiles
description: ""
- name: Queue
description: ""
- name: Release Forms
description: APIs for managing OnlyFans release forms
- name: Saved For Later (Messages)
description: ""
- name: Saved For Later (Posts)
description: ""
- name: Settings
description: ""
- name: Shared Free Trial Links
description: APIs for Free Trial Links that other OF creators have shared with
this account. Revenue, cost, and spender data are not available for shared
links.
- name: Shared Tracking Links
description: APIs for Tracking Links (campaigns) that other OF creators have
shared with this account. Revenue, cost, and spender data are not
available for shared campaigns.
- name: Smart Link Postbacks
description: APIs for managing Smart Link postback destinations
- name: Smart Links
description: APIs for managing Smart Links (Free Trial Links and Tracking Links
with pooled inventory)
- name: Statistics
description: ""
- name: Stored Free Trial Links
description: Instant APIs for retrieving stored free trial links from the
OnlyFansAPI Cache (free, no credits used). `revenue.total` is net earnings
after refunds and chargebacks. `revenue.chargebacks` is the positive
cached net amount already excluded from that total; do not subtract it
again.
- name: Stored Shared Free Trial Links
description: Instant APIs for retrieving stored shared Free Trial Links from the
OnlyFansAPI Cache (free, no credits used)
- name: Stored Shared Tracking Links
description: Instant APIs for retrieving stored shared Tracking Links
(campaigns) from the OnlyFansAPI Cache (free, no credits used)
- name: Stored Tracking Links
description: Instant APIs for retrieving stored tracking links from the
OnlyFansAPI Cache (free, no credits used). `revenue.total` is net earnings
after refunds and chargebacks. `revenue.chargebacks` is the positive
cached net amount already excluded from that total; do not subtract it
again.
- name: Stories
description: APIs for managing OnlyFans stories
- name: Story Highlights
description: APIs for managing OnlyFans story highlights
- name: Subscription Bundles
description: ""
- name: Tracking Links
description: APIs for managing tracking links. Revenue totals are net earnings
after refunds and chargebacks. `revenue.chargebacks` (or
`summary.chargebacks_total` in stats) is the positive cached net amount
already excluded from revenue; do not subtract it again. Spender responses
include chargebacks across all attributed periods for each fan with
positive net revenue.
- name: Transactions
description: APIs for managing OnlyFans transactions
- name: Usage
description: Credit usage reporting for your team
- name: User List Collections
description: ""
- name: Users
description: APIs for fetching OnlyFans users
- name: Webhooks
description: ""
paths:
/api/{account}/banking/details/bank:
parameters:
- in: path
name: account
description: The Account ID
example: acct_XXXXXXXXXXXXXXX
required: true
schema:
type: string
get:
summary: Get Bank Payout Details
operationId: getBankPayoutDetails
description: Returns the account owner's bank payout details, including whether
payout data is filled, available payout methods with their descriptions,
and required bank fields.
parameters: []
responses:
"200":
description: Success
content:
application/json:
schema:
type: object
example:
data:
isPayoutDataFilled: true
payouts:
- code: bank_ebics_sepa
title: International Transfer (SEPA)
subtitle: Receive payouts directly to your bank account via SEPA payments
minPayoutSumm: 20
payoutTime: 1-3 business days
description: >-
No limits on number of daily withdrawals (No maximum)
Payouts are paid directly into your bank account via
the SEPA banking system
Any SEPA bank account
fields:
first_name:
readonly: true
value: "********"
label:
key: bank_recipient_name_title
maxlength: 255
oninput:
replace:
pattern: "[^ a-zA-Z0-9_-]"
flag: g
last_name:
readonly: true
value: "********"
label:
key: bank_recipient_last_name_title
maxlength: 255
oninput:
replace:
pattern: "[^ a-zA-Z0-9_-]"
flag: g
iban:
required: true
label:
key: bank_iban_title
regex:
pattern: ^[A-Za-z0-9]{1,34}$
flag: g
value: "********1234"
bic:
required: true
label:
key: bank_bic_swift_title
maxlength: 70
value: "********"
bank_name:
required: true
label:
key: bank_bank_name_title_new
maxlength: 70
value: Bank name
country:
label:
key: country_label
readonly: true
uionly: true
value: Country
address:
required: true
label:
key: bank_user_address_title
maxlength: 255
value: "********"
city:
required: true
label:
key: bank_user_city_title
maxlength: 255
value: City value
postal:
required: true
label:
key: bank_user_postal_zip_title
maxlength: 255
value: "********"
fieldsOrder:
- first_name
- last_name
- iban
- bic
- bank_name
- country
- address
- city
- postal
uiMapping:
title:
key: add_bank_page_title
alert:
text:
key: payout_add_bank_paxum_hint
class: info
btn_submit:
key: save_payout_details_button
payoutCode: bank_ebics_sepa
_meta:
_credits:
used: 1
balance: 1000000006
note: Always
_cache:
is_cached: false
note: Cache disabled for this endpoint
_rate_limits:
limit_minute: 10000000
limit_day: 50000
remaining_minute: 9999999
remaining_day: 49954
properties:
data:
type: object
properties:
isPayoutDataFilled:
type: boolean
example: true
payouts:
type: array
example:
- code: bank_ebics_sepa
title: International Transfer (SEPA)
subtitle: Receive payouts directly to your bank account via SEPA payments
minPayoutSumm: 20
payoutTime: 1-3 business days
description: >-
No limits on number of daily withdrawals (No
maximum)
Payouts are paid directly into your bank account
via the SEPA banking system
Any SEPA bank account
fields:
first_name:
readonly: true
value: "********"
label:
key: bank_recipient_name_title
maxlength: 255
oninput:
replace:
pattern: "[^ a-zA-Z0-9_-]"
flag: g
last_name:
readonly: true
value: "********"
label:
key: bank_recipient_last_name_title
maxlength: 255
oninput:
replace:
pattern: "[^ a-zA-Z0-9_-]"
flag: g
iban:
required: true
label:
key: bank_iban_title
regex:
pattern: ^[A-Za-z0-9]{1,34}$
flag: g
value: "********1234"
bic:
required: true
label:
key: bank_bic_swift_title
maxlength: 70
value: "********"
bank_name:
required: true
label:
key: bank_bank_name_title_new
maxlength: 70
value: Bank name
country:
label:
key: country_label
readonly: true
uionly: true
value: Country
address:
required: true
label:
key: bank_user_address_title
maxlength: 255
value: "********"
city:
required: true
label:
key: bank_user_city_title
maxlength: 255
value: City value
postal:
required: true
label:
key: bank_user_postal_zip_title
maxlength: 255
value: "********"
fieldsOrder:
- first_name
- last_name
- iban
- bic
- bank_name
- country
- address
- city
- postal
uiMapping:
title:
key: add_bank_page_title
alert:
text:
key: payout_add_bank_paxum_hint
class: info
btn_submit:
key: save_payout_details_button
items:
type: object
properties:
code:
type: string
example: bank_ebics_sepa
title:
type: string
example: International Transfer (SEPA)
subtitle:
type: string
example: Receive payouts directly to your bank account via SEPA payments
minPayoutSumm:
type: integer
example: 20
payoutTime:
type: string
example: 1-3 business days
description:
type: string
example: >-
No limits on number of daily withdrawals (No
maximum)
Payouts are paid directly into your bank account
via the SEPA banking system
Any SEPA bank account
fields:
type: object
properties:
first_name:
type: object
properties:
readonly:
type: boolean
example: true
value:
type: string
example: "********"
label:
type: object
properties:
key:
type: string
example: bank_recipient_name_title
maxlength:
type: integer
example: 255
oninput:
type: object
properties:
replace:
type: object
properties:
pattern:
type: string
example: "[^ a-zA-Z0-9_-]"
flag:
type: string
example: g
last_name:
type: object
properties:
readonly:
type: boolean
example: true
value:
type: string
example: "********"
label:
type: object
properties:
key:
type: string
example: bank_recipient_last_name_title
maxlength:
type: integer
example: 255
oninput:
type: object
properties:
replace:
type: object
properties:
pattern:
type: string
example: "[^ a-zA-Z0-9_-]"
flag:
type: string
example: g
iban:
type: object
properties:
required:
type: boolean
example: true
label:
type: object
properties:
key:
type: string
example: bank_iban_title
regex:
type: object
properties:
pattern:
type: string
example: ^[A-Za-z0-9]{1,34}$
flag:
type: string
example: g
value:
type: string
example: "********1234"
bic:
type: object
properties:
required:
type: boolean
example: true
label:
type: object
properties:
key:
type: string
example: bank_bic_swift_title
maxlength:
type: integer
example: 70
value:
type: string
example: "********"
bank_name:
type: object
properties:
required:
type: boolean
example: true
label:
type: object
properties:
key:
type: string
example: bank_bank_name_title_new
maxlength:
type: integer
example: 70
value:
type: string
example: Bank name
country:
type: object
properties:
label:
type: object
properties:
key:
type: string
example: country_label
readonly:
type: boolean
example: true
uionly:
type: boolean
example: true
value:
type: string
example: Country
address:
type: object
properties:
required:
type: boolean
example: true
label:
type: object
properties:
key:
type: string
example: bank_user_address_title
maxlength:
type: integer
example: 255
value:
type: string
example: "********"
city:
type: object
properties:
required:
type: boolean
example: true
label:
type: object
properties:
key:
type: string
example: bank_user_city_title
maxlength:
type: integer
example: 255
value:
type: string
example: City value
postal:
type: object
properties:
required:
type: boolean
example: true
label:
type: object
properties:
key:
type: string
example: bank_user_postal_zip_title
maxlength:
type: integer
example: 255
value:
type: string
example: "********"
fieldsOrder:
type: array
example:
- first_name
- last_name
- iban
- bic
- bank_name
- country
- address
- city
- postal
items:
type: string
uiMapping:
type: object
properties:
title:
type: object
properties:
key:
type: string
example: add_bank_page_title
alert:
type: object
properties:
text:
type: object
properties:
key:
type: string
example: payout_add_bank_paxum_hint
class:
type: string
example: info
btn_submit:
type: object
properties:
key:
type: string
example: save_payout_details_button
payoutCode:
type: string
example: bank_ebics_sepa
_meta:
type: object
properties:
_credits:
type: object
properties:
used:
type: integer
example: 1
balance:
type: integer
example: 1000000006
note:
type: string
example: Always
_cache:
type: object
properties:
is_cached:
type: boolean
example: false
note:
type: string
example: Cache disabled for this endpoint
_rate_limits:
type: object
properties:
limit_minute:
type: integer
example: 10000000
limit_day:
type: integer
example: 50000
remaining_minute:
type: integer
example: 9999999
remaining_day:
type: integer
example: 49954
tags:
- Banking
components:
securitySchemes:
default:
type: http
scheme: bearer
description: Get your API Key from OnlyFansAPI Console -
https://app.onlyfansapi.com/api-keys
````
# Get DAC7 Form Details (/api-reference/banking/get-dac7form-details)
If available, returns the account owner's DAC7 form information required for tax reporting, including personal details, address, tax identification, country information, and DAC7 status.
## OpenAPI
````yaml https://app.onlyfansapi.com/scribe-docs/openapi.yaml get /api/{account}/banking/details/dac7-form
openapi: 3.0.3
info:
title: OnlyFans API
description: ""
version: 1.0.0
servers:
- url: https://app.onlyfansapi.com
security:
- default: []
tags:
- name: AI Voice Messages
description: ""
- name: API Keys
description: ""
- name: Account
description: Endpoints for your linked accounts
- name: Analytics - Financial
description: APIs for retrieving financial analytics data
- name: Analytics - Summary
description: APIs for retrieving summary analytics data
- name: Banking
description: Operations related to user banking details, payout methods, legal
and tax information, and account country settings.
- name: Banned Words
description: Reference list of OnlyFans banned words used by the
`blockBannedWords` screening parameter
- name: Blocked / Restricted Users
description: APIs for listing the users an account has blocked or restricted
- name: Chargebacks
description: ""
- name: Chat Messages
description: ""
- name: Chats
description: ""
- name: Client Sessions
description: ""
- name: Connect OnlyFans Account
description: ""
- name: Data Exports
description: APIs for managing data exports
- name: Engagement / Messages
description: ""
- name: Fans
description: APIs for managing OnlyFans fans (subscribers)
- name: Fans - AI Summary
description: APIs for generating and retrieving AI-powered fan profile summaries
- name: Following
description: APIs for managing OnlyFans followings (people you're subscribed to)
- name: Free Trial Links
description: APIs for managing Free Trial Links. Revenue totals are net earnings
after refunds and chargebacks. `revenue.chargebacks` (or
`summary.chargebacks_total` in stats) is the positive cached net amount
already excluded from revenue; do not subtract it again. Spender responses
include chargebacks across all attributed periods for each fan with
positive net revenue.
- name: Giphy
description: ""
- name: Link Tags
description: APIs for managing tags on free trial links, tracking links, and Smart Links
- name: Mass Messaging
description: ""
- name: Media
description: ""
- name: Media Vault
description: ""
- name: Media Vault Lists
description: ""
- name: Notifications
description: Endpoints for managingr account notifications
- name: Payouts
description: ""
- name: Post Comments
description: ""
- name: Post Labels
description: APIs for managing your post labels
- name: Posts
description: APIs for managing OnlyFans posts
- name: Profile Content
description: Read another user's profile content using your connected OnlyFans
account. OnlyFans enforces subscription and purchase requirements; these
endpoints do not unlock content. Response samples use captured OnlyFans
payloads with anonymized IDs, text, and media URLs; OFAPI metadata values
are illustrative.
- name: Promotions
description: ""
- name: Public Profiles
description: ""
- name: Queue
description: ""
- name: Release Forms
description: APIs for managing OnlyFans release forms
- name: Saved For Later (Messages)
description: ""
- name: Saved For Later (Posts)
description: ""
- name: Settings
description: ""
- name: Shared Free Trial Links
description: APIs for Free Trial Links that other OF creators have shared with
this account. Revenue, cost, and spender data are not available for shared
links.
- name: Shared Tracking Links
description: APIs for Tracking Links (campaigns) that other OF creators have
shared with this account. Revenue, cost, and spender data are not
available for shared campaigns.
- name: Smart Link Postbacks
description: APIs for managing Smart Link postback destinations
- name: Smart Links
description: APIs for managing Smart Links (Free Trial Links and Tracking Links
with pooled inventory)
- name: Statistics
description: ""
- name: Stored Free Trial Links
description: Instant APIs for retrieving stored free trial links from the
OnlyFansAPI Cache (free, no credits used). `revenue.total` is net earnings
after refunds and chargebacks. `revenue.chargebacks` is the positive
cached net amount already excluded from that total; do not subtract it
again.
- name: Stored Shared Free Trial Links
description: Instant APIs for retrieving stored shared Free Trial Links from the
OnlyFansAPI Cache (free, no credits used)
- name: Stored Shared Tracking Links
description: Instant APIs for retrieving stored shared Tracking Links
(campaigns) from the OnlyFansAPI Cache (free, no credits used)
- name: Stored Tracking Links
description: Instant APIs for retrieving stored tracking links from the
OnlyFansAPI Cache (free, no credits used). `revenue.total` is net earnings
after refunds and chargebacks. `revenue.chargebacks` is the positive
cached net amount already excluded from that total; do not subtract it
again.
- name: Stories
description: APIs for managing OnlyFans stories
- name: Story Highlights
description: APIs for managing OnlyFans story highlights
- name: Subscription Bundles
description: ""
- name: Tracking Links
description: APIs for managing tracking links. Revenue totals are net earnings
after refunds and chargebacks. `revenue.chargebacks` (or
`summary.chargebacks_total` in stats) is the positive cached net amount
already excluded from revenue; do not subtract it again. Spender responses
include chargebacks across all attributed periods for each fan with
positive net revenue.
- name: Transactions
description: APIs for managing OnlyFans transactions
- name: Usage
description: Credit usage reporting for your team
- name: User List Collections
description: ""
- name: Users
description: APIs for fetching OnlyFans users
- name: Webhooks
description: ""
paths:
/api/{account}/banking/details/dac7-form:
parameters:
- in: path
name: account
description: The Account ID
example: acct_XXXXXXXXXXXXXXX
required: true
schema:
type: string
get:
summary: Get DAC7 Form Details
operationId: getDAC7FormDetails
description: If available, returns the account owner's DAC7 form information
required for tax reporting, including personal details, address, tax
identification, country information, and DAC7 status.
parameters: []
responses:
"200":
description: Success
content:
application/json:
schema:
type: object
example:
data:
status: success
type: personal
firstName: FIRST NAME
lastName: LAST NAME
address: 123 Address
city: City
state: State
zip: "1234"
countryId: 123
taxId: "1234"
issuingCountryId: 123
vatNumber: "123"
DOB: 2000-01-01
cityOfBirth: CityOfBirth
countryOfBirthId: 123
countryOfResidenceId: 123
_meta:
_credits:
used: 1
balance: 999999999
note: Always
_cache:
is_cached: false
note: Cache disabled for this endpoint
_rate_limits:
limit_minute: 10000000
limit_day: 50000
remaining_minute: 9999996
remaining_day: 49947
properties:
data:
type: object
properties:
status:
type: string
example: success
type:
type: string
example: personal
firstName:
type: string
example: FIRST NAME
lastName:
type: string
example: LAST NAME
address:
type: string
example: 123 Address
city:
type: string
example: City
state:
type: string
example: State
zip:
type: string
example: "1234"
countryId:
type: integer
example: 123
taxId:
type: string
example: "1234"
issuingCountryId:
type: integer
example: 123
vatNumber:
type: string
example: "123"
DOB:
type: string
example: 2000-01-01
cityOfBirth:
type: string
example: CityOfBirth
countryOfBirthId:
type: integer
example: 123
countryOfResidenceId:
type: integer
example: 123
_meta:
type: object
properties:
_credits:
type: object
properties:
used:
type: integer
example: 1
balance:
type: integer
example: 999999999
note:
type: string
example: Always
_cache:
type: object
properties:
is_cached:
type: boolean
example: false
note:
type: string
example: Cache disabled for this endpoint
_rate_limits:
type: object
properties:
limit_minute:
type: integer
example: 10000000
limit_day:
type: integer
example: 50000
remaining_minute:
type: integer
example: 9999996
remaining_day:
type: integer
example: 49947
tags:
- Banking
components:
securitySchemes:
default:
type: http
scheme: bearer
description: Get your API Key from OnlyFansAPI Console -
https://app.onlyfansapi.com/api-keys
````
# Get Legal and Tax Status (/api-reference/banking/get-legal-and-tax-status)
Returns the account owner's legal and tax status required for banking and payout configuration, including W9 requirements, identity verification status, DAC7 compliance, and tax information.
## OpenAPI
````yaml https://app.onlyfansapi.com/scribe-docs/openapi.yaml get /api/{account}/banking/details/legal-info
openapi: 3.0.3
info:
title: OnlyFans API
description: ""
version: 1.0.0
servers:
- url: https://app.onlyfansapi.com
security:
- default: []
tags:
- name: AI Voice Messages
description: ""
- name: API Keys
description: ""
- name: Account
description: Endpoints for your linked accounts
- name: Analytics - Financial
description: APIs for retrieving financial analytics data
- name: Analytics - Summary
description: APIs for retrieving summary analytics data
- name: Banking
description: Operations related to user banking details, payout methods, legal
and tax information, and account country settings.
- name: Banned Words
description: Reference list of OnlyFans banned words used by the
`blockBannedWords` screening parameter
- name: Blocked / Restricted Users
description: APIs for listing the users an account has blocked or restricted
- name: Chargebacks
description: ""
- name: Chat Messages
description: ""
- name: Chats
description: ""
- name: Client Sessions
description: ""
- name: Connect OnlyFans Account
description: ""
- name: Data Exports
description: APIs for managing data exports
- name: Engagement / Messages
description: ""
- name: Fans
description: APIs for managing OnlyFans fans (subscribers)
- name: Fans - AI Summary
description: APIs for generating and retrieving AI-powered fan profile summaries
- name: Following
description: APIs for managing OnlyFans followings (people you're subscribed to)
- name: Free Trial Links
description: APIs for managing Free Trial Links. Revenue totals are net earnings
after refunds and chargebacks. `revenue.chargebacks` (or
`summary.chargebacks_total` in stats) is the positive cached net amount
already excluded from revenue; do not subtract it again. Spender responses
include chargebacks across all attributed periods for each fan with
positive net revenue.
- name: Giphy
description: ""
- name: Link Tags
description: APIs for managing tags on free trial links, tracking links, and Smart Links
- name: Mass Messaging
description: ""
- name: Media
description: ""
- name: Media Vault
description: ""
- name: Media Vault Lists
description: ""
- name: Notifications
description: Endpoints for managingr account notifications
- name: Payouts
description: ""
- name: Post Comments
description: ""
- name: Post Labels
description: APIs for managing your post labels
- name: Posts
description: APIs for managing OnlyFans posts
- name: Profile Content
description: Read another user's profile content using your connected OnlyFans
account. OnlyFans enforces subscription and purchase requirements; these
endpoints do not unlock content. Response samples use captured OnlyFans
payloads with anonymized IDs, text, and media URLs; OFAPI metadata values
are illustrative.
- name: Promotions
description: ""
- name: Public Profiles
description: ""
- name: Queue
description: ""
- name: Release Forms
description: APIs for managing OnlyFans release forms
- name: Saved For Later (Messages)
description: ""
- name: Saved For Later (Posts)
description: ""
- name: Settings
description: ""
- name: Shared Free Trial Links
description: APIs for Free Trial Links that other OF creators have shared with
this account. Revenue, cost, and spender data are not available for shared
links.
- name: Shared Tracking Links
description: APIs for Tracking Links (campaigns) that other OF creators have
shared with this account. Revenue, cost, and spender data are not
available for shared campaigns.
- name: Smart Link Postbacks
description: APIs for managing Smart Link postback destinations
- name: Smart Links
description: APIs for managing Smart Links (Free Trial Links and Tracking Links
with pooled inventory)
- name: Statistics
description: ""
- name: Stored Free Trial Links
description: Instant APIs for retrieving stored free trial links from the
OnlyFansAPI Cache (free, no credits used). `revenue.total` is net earnings
after refunds and chargebacks. `revenue.chargebacks` is the positive
cached net amount already excluded from that total; do not subtract it
again.
- name: Stored Shared Free Trial Links
description: Instant APIs for retrieving stored shared Free Trial Links from the
OnlyFansAPI Cache (free, no credits used)
- name: Stored Shared Tracking Links
description: Instant APIs for retrieving stored shared Tracking Links
(campaigns) from the OnlyFansAPI Cache (free, no credits used)
- name: Stored Tracking Links
description: Instant APIs for retrieving stored tracking links from the
OnlyFansAPI Cache (free, no credits used). `revenue.total` is net earnings
after refunds and chargebacks. `revenue.chargebacks` is the positive
cached net amount already excluded from that total; do not subtract it
again.
- name: Stories
description: APIs for managing OnlyFans stories
- name: Story Highlights
description: APIs for managing OnlyFans story highlights
- name: Subscription Bundles
description: ""
- name: Tracking Links
description: APIs for managing tracking links. Revenue totals are net earnings
after refunds and chargebacks. `revenue.chargebacks` (or
`summary.chargebacks_total` in stats) is the positive cached net amount
already excluded from revenue; do not subtract it again. Spender responses
include chargebacks across all attributed periods for each fan with
positive net revenue.
- name: Transactions
description: APIs for managing OnlyFans transactions
- name: Usage
description: Credit usage reporting for your team
- name: User List Collections
description: ""
- name: Users
description: APIs for fetching OnlyFans users
- name: Webhooks
description: ""
paths:
/api/{account}/banking/details/legal-info:
parameters:
- in: path
name: account
description: The Account ID
example: acct_XXXXXXXXXXXXXXX
required: true
schema:
type: string
get:
summary: Get Legal and Tax Status
operationId: getLegalAndTaxStatus
description: Returns the account owner's legal and tax status required for
banking and payout configuration, including W9 requirements, identity
verification status, DAC7 compliance, and tax information.
parameters: []
responses:
"200":
description: Success
content:
application/json:
schema:
type: object
example:
data:
isXXX: true
isW9Required: true
isW9Exist: true
needShowEditW9: true
isRealIdImage: true
canChangePayoutType: true
ivStatus: approved
ivFailReason: null
showIvButton: true
canShowLegalForm: true
payoutLegalApproveRejectReason: null
hideBanking: true
DAC7:
required: true
type: personal
state: success
error: null
countryIds:
- 123
tax:
isBankingDisabled: false
countryCode: AA
editable: false
_meta:
_credits:
used: 1
balance: 1000000004
note: Always
_cache:
is_cached: false
note: Cache disabled for this endpoint
_rate_limits:
limit_minute: 10000000
limit_day: 50000
remaining_minute: 9999999
remaining_day: 49952
properties:
data:
type: object
properties:
isXXX:
type: boolean
example: true
isW9Required:
type: boolean
example: true
isW9Exist:
type: boolean
example: true
needShowEditW9:
type: boolean
example: true
isRealIdImage:
type: boolean
example: true
canChangePayoutType:
type: boolean
example: true
ivStatus:
type: string
example: approved
ivFailReason:
type: string
example: null
nullable: true
showIvButton:
type: boolean
example: true
canShowLegalForm:
type: boolean
example: true
payoutLegalApproveRejectReason:
type: string
example: null
nullable: true
hideBanking:
type: boolean
example: true
DAC7:
type: object
properties:
required:
type: boolean
example: true
type:
type: string
example: personal
state:
type: string
example: success
error:
type: string
example: null
nullable: true
countryIds:
type: array
example:
- 123
items:
type: integer
tax:
type: object
properties:
isBankingDisabled:
type: boolean
example: false
countryCode:
type: string
example: AA
editable:
type: boolean
example: false
_meta:
type: object
properties:
_credits:
type: object
properties:
used:
type: integer
example: 1
balance:
type: integer
example: 1000000004
note:
type: string
example: Always
_cache:
type: object
properties:
is_cached:
type: boolean
example: false
note:
type: string
example: Cache disabled for this endpoint
_rate_limits:
type: object
properties:
limit_minute:
type: integer
example: 10000000
limit_day:
type: integer
example: 50000
remaining_minute:
type: integer
example: 9999999
remaining_day:
type: integer
example: 49952
tags:
- Banking
components:
securitySchemes:
default:
type: http
scheme: bearer
description: Get your API Key from OnlyFansAPI Console -
https://app.onlyfansapi.com/api-keys
````
# Get Legal Form Details (/api-reference/banking/get-legal-form-details)
Returns the account owner's legal form details for banking, including personal or business name, address, social media links, date of birth, and available document types for identity verification.
## OpenAPI
````yaml https://app.onlyfansapi.com/scribe-docs/openapi.yaml get /api/{account}/banking/details/legal-form
openapi: 3.0.3
info:
title: OnlyFans API
description: ""
version: 1.0.0
servers:
- url: https://app.onlyfansapi.com
security:
- default: []
tags:
- name: AI Voice Messages
description: ""
- name: API Keys
description: ""
- name: Account
description: Endpoints for your linked accounts
- name: Analytics - Financial
description: APIs for retrieving financial analytics data
- name: Analytics - Summary
description: APIs for retrieving summary analytics data
- name: Banking
description: Operations related to user banking details, payout methods, legal
and tax information, and account country settings.
- name: Banned Words
description: Reference list of OnlyFans banned words used by the
`blockBannedWords` screening parameter
- name: Blocked / Restricted Users
description: APIs for listing the users an account has blocked or restricted
- name: Chargebacks
description: ""
- name: Chat Messages
description: ""
- name: Chats
description: ""
- name: Client Sessions
description: ""
- name: Connect OnlyFans Account
description: ""
- name: Data Exports
description: APIs for managing data exports
- name: Engagement / Messages
description: ""
- name: Fans
description: APIs for managing OnlyFans fans (subscribers)
- name: Fans - AI Summary
description: APIs for generating and retrieving AI-powered fan profile summaries
- name: Following
description: APIs for managing OnlyFans followings (people you're subscribed to)
- name: Free Trial Links
description: APIs for managing Free Trial Links. Revenue totals are net earnings
after refunds and chargebacks. `revenue.chargebacks` (or
`summary.chargebacks_total` in stats) is the positive cached net amount
already excluded from revenue; do not subtract it again. Spender responses
include chargebacks across all attributed periods for each fan with
positive net revenue.
- name: Giphy
description: ""
- name: Link Tags
description: APIs for managing tags on free trial links, tracking links, and Smart Links
- name: Mass Messaging
description: ""
- name: Media
description: ""
- name: Media Vault
description: ""
- name: Media Vault Lists
description: ""
- name: Notifications
description: Endpoints for managingr account notifications
- name: Payouts
description: ""
- name: Post Comments
description: ""
- name: Post Labels
description: APIs for managing your post labels
- name: Posts
description: APIs for managing OnlyFans posts
- name: Profile Content
description: Read another user's profile content using your connected OnlyFans
account. OnlyFans enforces subscription and purchase requirements; these
endpoints do not unlock content. Response samples use captured OnlyFans
payloads with anonymized IDs, text, and media URLs; OFAPI metadata values
are illustrative.
- name: Promotions
description: ""
- name: Public Profiles
description: ""
- name: Queue
description: ""
- name: Release Forms
description: APIs for managing OnlyFans release forms
- name: Saved For Later (Messages)
description: ""
- name: Saved For Later (Posts)
description: ""
- name: Settings
description: ""
- name: Shared Free Trial Links
description: APIs for Free Trial Links that other OF creators have shared with
this account. Revenue, cost, and spender data are not available for shared
links.
- name: Shared Tracking Links
description: APIs for Tracking Links (campaigns) that other OF creators have
shared with this account. Revenue, cost, and spender data are not
available for shared campaigns.
- name: Smart Link Postbacks
description: APIs for managing Smart Link postback destinations
- name: Smart Links
description: APIs for managing Smart Links (Free Trial Links and Tracking Links
with pooled inventory)
- name: Statistics
description: ""
- name: Stored Free Trial Links
description: Instant APIs for retrieving stored free trial links from the
OnlyFansAPI Cache (free, no credits used). `revenue.total` is net earnings
after refunds and chargebacks. `revenue.chargebacks` is the positive
cached net amount already excluded from that total; do not subtract it
again.
- name: Stored Shared Free Trial Links
description: Instant APIs for retrieving stored shared Free Trial Links from the
OnlyFansAPI Cache (free, no credits used)
- name: Stored Shared Tracking Links
description: Instant APIs for retrieving stored shared Tracking Links
(campaigns) from the OnlyFansAPI Cache (free, no credits used)
- name: Stored Tracking Links
description: Instant APIs for retrieving stored tracking links from the
OnlyFansAPI Cache (free, no credits used). `revenue.total` is net earnings
after refunds and chargebacks. `revenue.chargebacks` is the positive
cached net amount already excluded from that total; do not subtract it
again.
- name: Stories
description: APIs for managing OnlyFans stories
- name: Story Highlights
description: APIs for managing OnlyFans story highlights
- name: Subscription Bundles
description: ""
- name: Tracking Links
description: APIs for managing tracking links. Revenue totals are net earnings
after refunds and chargebacks. `revenue.chargebacks` (or
`summary.chargebacks_total` in stats) is the positive cached net amount
already excluded from revenue; do not subtract it again. Spender responses
include chargebacks across all attributed periods for each fan with
positive net revenue.
- name: Transactions
description: APIs for managing OnlyFans transactions
- name: Usage
description: Credit usage reporting for your team
- name: User List Collections
description: ""
- name: Users
description: APIs for fetching OnlyFans users
- name: Webhooks
description: ""
paths:
/api/{account}/banking/details/legal-form:
parameters:
- in: path
name: account
description: The Account ID
example: acct_XXXXXXXXXXXXXXX
required: true
schema:
type: string
get:
summary: Get Legal Form Details
operationId: getLegalFormDetails
description: Returns the account owner's legal form details for banking,
including personal or business name, address, social media links, date
of birth, and available document types for identity verification.
parameters: []
responses:
"200":
description: Success
content:
application/json:
schema:
type: object
example:
data:
realFirstName: first name
realLastName: last name
realBusinessName: business name
realAddress: 123 Street Name
realCity: city name
realState: AA
realPostal: "12345"
realTwitter: TwitterUsername
realInstagram: https://www.instagram.com/instagram
privateWebsite: https://example.com
dateOfBirth: 2000-01-01T00:00:00+00:00
documentType:
values:
- code: passport
name: Passport
- code: id_card
name: ID Card
- code: drivers_license
name: Drivers License
isAllowedDL: true
_meta:
_credits:
used: 1
balance: 1000000005
note: Always
_cache:
is_cached: false
note: Cache disabled for this endpoint
_rate_limits:
limit_minute: 10000000
limit_day: 50000
remaining_minute: 9999999
remaining_day: 49953
properties:
data:
type: object
properties:
realFirstName:
type: string
example: first name
realLastName:
type: string
example: last name
realBusinessName:
type: string
example: business name
realAddress:
type: string
example: 123 Street Name
realCity:
type: string
example: city name
realState:
type: string
example: AA
realPostal:
type: string
example: "12345"
realTwitter:
type: string
example: TwitterUsername
realInstagram:
type: string
example: https://www.instagram.com/instagram
privateWebsite:
type: string
example: https://example.com
dateOfBirth:
type: string
example: 2000-01-01T00:00:00+00:00
documentType:
type: object
properties:
values:
type: array
example:
- code: passport
name: Passport
- code: id_card
name: ID Card
- code: drivers_license
name: Drivers License
items:
type: object
properties:
code:
type: string
example: passport
name:
type: string
example: Passport
isAllowedDL:
type: boolean
example: true
_meta:
type: object
properties:
_credits:
type: object
properties:
used:
type: integer
example: 1
balance:
type: integer
example: 1000000005
note:
type: string
example: Always
_cache:
type: object
properties:
is_cached:
type: boolean
example: false
note:
type: string
example: Cache disabled for this endpoint
_rate_limits:
type: object
properties:
limit_minute:
type: integer
example: 10000000
limit_day:
type: integer
example: 50000
remaining_minute:
type: integer
example: 9999999
remaining_day:
type: integer
example: 49953
tags:
- Banking
components:
securitySchemes:
default:
type: http
scheme: bearer
description: Get your API Key from OnlyFansAPI Console -
https://app.onlyfansapi.com/api-keys
````
# List Available Payout Systems (/api-reference/banking/list-available-payout-systems)
Returns a list of available payout systems for the account, including details such as payout method codes, titles, descriptions, minimum payout amounts, processing times, and the currently selected payout method.
## OpenAPI
````yaml https://app.onlyfansapi.com/scribe-docs/openapi.yaml get /api/{account}/banking/available-payout-systems
openapi: 3.0.3
info:
title: OnlyFans API
description: ""
version: 1.0.0
servers:
- url: https://app.onlyfansapi.com
security:
- default: []
tags:
- name: AI Voice Messages
description: ""
- name: API Keys
description: ""
- name: Account
description: Endpoints for your linked accounts
- name: Analytics - Financial
description: APIs for retrieving financial analytics data
- name: Analytics - Summary
description: APIs for retrieving summary analytics data
- name: Banking
description: Operations related to user banking details, payout methods, legal
and tax information, and account country settings.
- name: Banned Words
description: Reference list of OnlyFans banned words used by the
`blockBannedWords` screening parameter
- name: Blocked / Restricted Users
description: APIs for listing the users an account has blocked or restricted
- name: Chargebacks
description: ""
- name: Chat Messages
description: ""
- name: Chats
description: ""
- name: Client Sessions
description: ""
- name: Connect OnlyFans Account
description: ""
- name: Data Exports
description: APIs for managing data exports
- name: Engagement / Messages
description: ""
- name: Fans
description: APIs for managing OnlyFans fans (subscribers)
- name: Fans - AI Summary
description: APIs for generating and retrieving AI-powered fan profile summaries
- name: Following
description: APIs for managing OnlyFans followings (people you're subscribed to)
- name: Free Trial Links
description: APIs for managing Free Trial Links. Revenue totals are net earnings
after refunds and chargebacks. `revenue.chargebacks` (or
`summary.chargebacks_total` in stats) is the positive cached net amount
already excluded from revenue; do not subtract it again. Spender responses
include chargebacks across all attributed periods for each fan with
positive net revenue.
- name: Giphy
description: ""
- name: Link Tags
description: APIs for managing tags on free trial links, tracking links, and Smart Links
- name: Mass Messaging
description: ""
- name: Media
description: ""
- name: Media Vault
description: ""
- name: Media Vault Lists
description: ""
- name: Notifications
description: Endpoints for managingr account notifications
- name: Payouts
description: ""
- name: Post Comments
description: ""
- name: Post Labels
description: APIs for managing your post labels
- name: Posts
description: APIs for managing OnlyFans posts
- name: Profile Content
description: Read another user's profile content using your connected OnlyFans
account. OnlyFans enforces subscription and purchase requirements; these
endpoints do not unlock content. Response samples use captured OnlyFans
payloads with anonymized IDs, text, and media URLs; OFAPI metadata values
are illustrative.
- name: Promotions
description: ""
- name: Public Profiles
description: ""
- name: Queue
description: ""
- name: Release Forms
description: APIs for managing OnlyFans release forms
- name: Saved For Later (Messages)
description: ""
- name: Saved For Later (Posts)
description: ""
- name: Settings
description: ""
- name: Shared Free Trial Links
description: APIs for Free Trial Links that other OF creators have shared with
this account. Revenue, cost, and spender data are not available for shared
links.
- name: Shared Tracking Links
description: APIs for Tracking Links (campaigns) that other OF creators have
shared with this account. Revenue, cost, and spender data are not
available for shared campaigns.
- name: Smart Link Postbacks
description: APIs for managing Smart Link postback destinations
- name: Smart Links
description: APIs for managing Smart Links (Free Trial Links and Tracking Links
with pooled inventory)
- name: Statistics
description: ""
- name: Stored Free Trial Links
description: Instant APIs for retrieving stored free trial links from the
OnlyFansAPI Cache (free, no credits used). `revenue.total` is net earnings
after refunds and chargebacks. `revenue.chargebacks` is the positive
cached net amount already excluded from that total; do not subtract it
again.
- name: Stored Shared Free Trial Links
description: Instant APIs for retrieving stored shared Free Trial Links from the
OnlyFansAPI Cache (free, no credits used)
- name: Stored Shared Tracking Links
description: Instant APIs for retrieving stored shared Tracking Links
(campaigns) from the OnlyFansAPI Cache (free, no credits used)
- name: Stored Tracking Links
description: Instant APIs for retrieving stored tracking links from the
OnlyFansAPI Cache (free, no credits used). `revenue.total` is net earnings
after refunds and chargebacks. `revenue.chargebacks` is the positive
cached net amount already excluded from that total; do not subtract it
again.
- name: Stories
description: APIs for managing OnlyFans stories
- name: Story Highlights
description: APIs for managing OnlyFans story highlights
- name: Subscription Bundles
description: ""
- name: Tracking Links
description: APIs for managing tracking links. Revenue totals are net earnings
after refunds and chargebacks. `revenue.chargebacks` (or
`summary.chargebacks_total` in stats) is the positive cached net amount
already excluded from revenue; do not subtract it again. Spender responses
include chargebacks across all attributed periods for each fan with
positive net revenue.
- name: Transactions
description: APIs for managing OnlyFans transactions
- name: Usage
description: Credit usage reporting for your team
- name: User List Collections
description: ""
- name: Users
description: APIs for fetching OnlyFans users
- name: Webhooks
description: ""
paths:
/api/{account}/banking/available-payout-systems:
parameters:
- in: path
name: account
description: The Account ID
example: acct_XXXXXXXXXXXXXXX
required: true
schema:
type: string
get:
summary: List Available Payout Systems
operationId: listAvailablePayoutSystems
description: Returns a list of available payout systems for the account,
including details such as payout method codes, titles, descriptions,
minimum payout amounts, processing times, and the currently selected
payout method.
parameters: []
responses:
"200":
description: Success
content:
application/json:
schema:
type: object
example:
data:
payouts:
- code: paxum
title: Paxum (e-wallet)
subtitle: Receive payouts to a Paxum wallet
minPayoutSumm: 20
payoutTime: 1 business day
description: |-
No limits on number of daily withdrawals (No maximum)
Withdraw money from your Paxum wallet either via bank transfer or on to a Paxum Prepaid Mastercard
click here
fields: {}
fieldsOrder: []
uiMapping: {}
- code: cosmopayment
title: Cosmo Payment
subtitle: Receive payouts directly to your Cosmo Prepaid Mastercard
minPayoutSumm: 20
payoutTime: 1 Business day
description: >-
No limits on number of daily withdrawals (No maximum)
Withdraw money from your Cosmo Prepaid Mastercard
For more information on Cosmo Payment, go to
www.cosmopayment.com/getpaid
fields: {}
fieldsOrder: []
uiMapping: {}
- code: securionpay
title: VISA Direct Transfer
subtitle: Receive payouts directly to your VISA debit or credit card
minPayoutSumm: 50
payoutTime: 1-2 business days
description: "Payouts are transferred directly to your VISA Credit or VISA Debit
card. "
fields: {}
fieldsOrder: []
uiMapping: {}
- code: bank_ebics_sepa
title: International Transfer (SEPA)
subtitle: Receive payouts directly to your bank account via SEPA payments
minPayoutSumm: 20
payoutTime: 1-3 business days
description: >-
No limits on number of daily withdrawals (No maximum)
Payouts are paid directly into your bank account via
the SEPA banking system
Any SEPA bank account
fields: {}
fieldsOrder: []
uiMapping: {}
- code: skrill
title: Receive your funds via Skrill
subtitle: Receive payouts to your Skrill account
minPayoutSumm: 20
payoutTime: 1 business day
description: Receive your funds via Skrill
fields: {}
fieldsOrder: []
uiMapping: {}
payoutCode: bank_ebics_sepa
_meta:
_credits:
used: 1
balance: 999999996
note: Always
_cache:
is_cached: false
note: Cache disabled for this endpoint
_rate_limits:
limit_minute: 10000000
limit_day: 50000
remaining_minute: 9999999
remaining_day: 49944
properties:
data:
type: object
properties:
payouts:
type: array
example:
- code: paxum
title: Paxum (e-wallet)
subtitle: Receive payouts to a Paxum wallet
minPayoutSumm: 20
payoutTime: 1 business day
description: |-
No limits on number of daily withdrawals (No maximum)
Withdraw money from your Paxum wallet either via bank transfer or on to a Paxum Prepaid Mastercard
click here
fields: []
fieldsOrder: []
uiMapping: []
- code: cosmopayment
title: Cosmo Payment
subtitle: Receive payouts directly to your Cosmo Prepaid Mastercard
minPayoutSumm: 20
payoutTime: 1 Business day
description: >-
No limits on number of daily withdrawals (No
maximum)
Withdraw money from your Cosmo Prepaid Mastercard
For more information on Cosmo Payment, go to
www.cosmopayment.com/getpaid
fields: []
fieldsOrder: []
uiMapping: []
- code: securionpay
title: VISA Direct Transfer
subtitle: Receive payouts directly to your VISA debit or credit card
minPayoutSumm: 50
payoutTime: 1-2 business days
description: "Payouts are transferred directly to your VISA Credit or VISA Debit
card. "
fields: []
fieldsOrder: []
uiMapping: []
- code: bank_ebics_sepa
title: International Transfer (SEPA)
subtitle: Receive payouts directly to your bank account via SEPA payments
minPayoutSumm: 20
payoutTime: 1-3 business days
description: >-
No limits on number of daily withdrawals (No
maximum)
Payouts are paid directly into your bank account
via the SEPA banking system
Any SEPA bank account
fields: []
fieldsOrder: []
uiMapping: []
- code: skrill
title: Receive your funds via Skrill
subtitle: Receive payouts to your Skrill account
minPayoutSumm: 20
payoutTime: 1 business day
description: Receive your funds via Skrill
fields: []
fieldsOrder: []
uiMapping: []
items:
type: object
properties:
code:
type: string
example: paxum
title:
type: string
example: Paxum (e-wallet)
subtitle:
type: string
example: Receive payouts to a Paxum wallet
minPayoutSumm:
type: integer
example: 20
payoutTime:
type: string
example: 1 business day
description:
type: string
example: |-
No limits on number of daily withdrawals (No maximum)
Withdraw money from your Paxum wallet either via bank transfer or on to a Paxum Prepaid Mastercard
click here
fields:
type: object
properties: {}
fieldsOrder:
type: array
example: []
uiMapping:
type: object
properties: {}
payoutCode:
type: string
example: bank_ebics_sepa
_meta:
type: object
properties:
_credits:
type: object
properties:
used:
type: integer
example: 1
balance:
type: integer
example: 999999996
note:
type: string
example: Always
_cache:
type: object
properties:
is_cached:
type: boolean
example: false
note:
type: string
example: Cache disabled for this endpoint
_rate_limits:
type: object
properties:
limit_minute:
type: integer
example: 10000000
limit_day:
type: integer
example: 50000
remaining_minute:
type: integer
example: 9999999
remaining_day:
type: integer
example: 49944
tags:
- Banking
components:
securitySchemes:
default:
type: http
scheme: bearer
description: Get your API Key from OnlyFansAPI Console -
https://app.onlyfansapi.com/api-keys
````
# List Countries (/api-reference/banking/list-countries)
List countries, their internal OnlyFans IDs, and their payment & tax information.
## OpenAPI
````yaml https://app.onlyfansapi.com/scribe-docs/openapi.yaml get /api/{account}/banking/countries
openapi: 3.0.3
info:
title: OnlyFans API
description: ""
version: 1.0.0
servers:
- url: https://app.onlyfansapi.com
security:
- default: []
tags:
- name: AI Voice Messages
description: ""
- name: API Keys
description: ""
- name: Account
description: Endpoints for your linked accounts
- name: Analytics - Financial
description: APIs for retrieving financial analytics data
- name: Analytics - Summary
description: APIs for retrieving summary analytics data
- name: Banking
description: Operations related to user banking details, payout methods, legal
and tax information, and account country settings.
- name: Banned Words
description: Reference list of OnlyFans banned words used by the
`blockBannedWords` screening parameter
- name: Blocked / Restricted Users
description: APIs for listing the users an account has blocked or restricted
- name: Chargebacks
description: ""
- name: Chat Messages
description: ""
- name: Chats
description: ""
- name: Client Sessions
description: ""
- name: Connect OnlyFans Account
description: ""
- name: Data Exports
description: APIs for managing data exports
- name: Engagement / Messages
description: ""
- name: Fans
description: APIs for managing OnlyFans fans (subscribers)
- name: Fans - AI Summary
description: APIs for generating and retrieving AI-powered fan profile summaries
- name: Following
description: APIs for managing OnlyFans followings (people you're subscribed to)
- name: Free Trial Links
description: APIs for managing Free Trial Links. Revenue totals are net earnings
after refunds and chargebacks. `revenue.chargebacks` (or
`summary.chargebacks_total` in stats) is the positive cached net amount
already excluded from revenue; do not subtract it again. Spender responses
include chargebacks across all attributed periods for each fan with
positive net revenue.
- name: Giphy
description: ""
- name: Link Tags
description: APIs for managing tags on free trial links, tracking links, and Smart Links
- name: Mass Messaging
description: ""
- name: Media
description: ""
- name: Media Vault
description: ""
- name: Media Vault Lists
description: ""
- name: Notifications
description: Endpoints for managingr account notifications
- name: Payouts
description: ""
- name: Post Comments
description: ""
- name: Post Labels
description: APIs for managing your post labels
- name: Posts
description: APIs for managing OnlyFans posts
- name: Profile Content
description: Read another user's profile content using your connected OnlyFans
account. OnlyFans enforces subscription and purchase requirements; these
endpoints do not unlock content. Response samples use captured OnlyFans
payloads with anonymized IDs, text, and media URLs; OFAPI metadata values
are illustrative.
- name: Promotions
description: ""
- name: Public Profiles
description: ""
- name: Queue
description: ""
- name: Release Forms
description: APIs for managing OnlyFans release forms
- name: Saved For Later (Messages)
description: ""
- name: Saved For Later (Posts)
description: ""
- name: Settings
description: ""
- name: Shared Free Trial Links
description: APIs for Free Trial Links that other OF creators have shared with
this account. Revenue, cost, and spender data are not available for shared
links.
- name: Shared Tracking Links
description: APIs for Tracking Links (campaigns) that other OF creators have
shared with this account. Revenue, cost, and spender data are not
available for shared campaigns.
- name: Smart Link Postbacks
description: APIs for managing Smart Link postback destinations
- name: Smart Links
description: APIs for managing Smart Links (Free Trial Links and Tracking Links
with pooled inventory)
- name: Statistics
description: ""
- name: Stored Free Trial Links
description: Instant APIs for retrieving stored free trial links from the
OnlyFansAPI Cache (free, no credits used). `revenue.total` is net earnings
after refunds and chargebacks. `revenue.chargebacks` is the positive
cached net amount already excluded from that total; do not subtract it
again.
- name: Stored Shared Free Trial Links
description: Instant APIs for retrieving stored shared Free Trial Links from the
OnlyFansAPI Cache (free, no credits used)
- name: Stored Shared Tracking Links
description: Instant APIs for retrieving stored shared Tracking Links
(campaigns) from the OnlyFansAPI Cache (free, no credits used)
- name: Stored Tracking Links
description: Instant APIs for retrieving stored tracking links from the
OnlyFansAPI Cache (free, no credits used). `revenue.total` is net earnings
after refunds and chargebacks. `revenue.chargebacks` is the positive
cached net amount already excluded from that total; do not subtract it
again.
- name: Stories
description: APIs for managing OnlyFans stories
- name: Story Highlights
description: APIs for managing OnlyFans story highlights
- name: Subscription Bundles
description: ""
- name: Tracking Links
description: APIs for managing tracking links. Revenue totals are net earnings
after refunds and chargebacks. `revenue.chargebacks` (or
`summary.chargebacks_total` in stats) is the positive cached net amount
already excluded from revenue; do not subtract it again. Spender responses
include chargebacks across all attributed periods for each fan with
positive net revenue.
- name: Transactions
description: APIs for managing OnlyFans transactions
- name: Usage
description: Credit usage reporting for your team
- name: User List Collections
description: ""
- name: Users
description: APIs for fetching OnlyFans users
- name: Webhooks
description: ""
paths:
/api/{account}/banking/countries:
parameters:
- in: path
name: account
description: The Account ID
example: acct_XXXXXXXXXXXXXXX
required: true
schema:
type: string
get:
summary: List Countries
operationId: listCountries
description: List countries, their internal OnlyFans IDs, and their payment &
tax information.
parameters: []
responses:
"200":
description: Success
content:
application/json:
schema:
type: object
example:
data:
- id: 212
code: US
name: United States of America
hasStates: true
hasZip: true
canPay: true
canHasW9Form: false
- id: 211
code: GB
name: United Kingdom
hasStates: false
hasZip: true
canPay: true
canHasW9Form: false
- id: 1
code: AF
name: Afghanistan
hasStates: false
hasZip: true
canPay: false
canHasW9Form: false
- id: 2
code: AL
name: Albania
hasStates: false
hasZip: true
canPay: true
canHasW9Form: false
- id: 3
code: DZ
name: Algeria
hasStates: false
hasZip: true
canPay: true
canHasW9Form: false
- id: 4
code: AS
name: American Samoa
hasStates: false
hasZip: true
canPay: true
canHasW9Form: false
- id: 5
code: AD
name: Andorra
hasStates: false
hasZip: true
canPay: true
canHasW9Form: false
- id: 6
code: AO
name: Angola
hasStates: false
hasZip: false
canPay: true
canHasW9Form: false
- id: 7
code: AI
name: Anguilla
hasStates: false
hasZip: true
canPay: true
canHasW9Form: false
- id: 8
code: AG
name: Antigua and Barbuda
hasStates: false
hasZip: false
canPay: true
canHasW9Form: false
- id: 9
code: AR
name: Argentina
hasStates: false
hasZip: true
canPay: true
canHasW9Form: false
- id: 10
code: AM
name: Armenia
hasStates: false
hasZip: true
canPay: true
canHasW9Form: false
- id: 11
code: AW
name: Aruba
hasStates: false
hasZip: false
canPay: true
canHasW9Form: false
- id: 12
code: AU
name: Australia
hasStates: true
hasZip: true
canPay: true
canHasW9Form: false
- id: 13
code: AT
name: Austria
hasStates: false
hasZip: true
canPay: true
canHasW9Form: false
- id: 14
code: AZ
name: Azerbaijan
hasStates: false
hasZip: true
canPay: true
canHasW9Form: false
- id: 15
code: BS
name: Bahamas
hasStates: false
hasZip: false
canPay: true
canHasW9Form: false
- id: 16
code: BH
name: Bahrain
hasStates: false
hasZip: true
canPay: true
canHasW9Form: false
- id: 17
code: BD
name: Bangladesh
hasStates: false
hasZip: true
canPay: true
canHasW9Form: false
- id: 18
code: BB
name: Barbados
hasStates: false
hasZip: true
canPay: true
canHasW9Form: false
- id: 19
code: BY
name: Belarus
hasStates: false
hasZip: true
canPay: false
canHasW9Form: false
- id: 20
code: BE
name: Belgium
hasStates: false
hasZip: true
canPay: true
canHasW9Form: false
- id: 21
code: BZ
name: Belize
hasStates: false
hasZip: false
canPay: true
canHasW9Form: false
- id: 22
code: BJ
name: Benin
hasStates: false
hasZip: false
canPay: true
canHasW9Form: false
- id: 23
code: BM
name: Bermuda
hasStates: false
hasZip: true
canPay: true
canHasW9Form: false
- id: 24
code: BT
name: Bhutan
hasStates: false
hasZip: true
canPay: true
canHasW9Form: false
- id: 25
code: BO
name: Bolivia
hasStates: false
hasZip: true
canPay: true
canHasW9Form: false
- id: 26
code: BA
name: Bosnia and Herzegovina
hasStates: false
hasZip: true
canPay: true
canHasW9Form: false
- id: 27
code: BW
name: Botswana
hasStates: false
hasZip: false
canPay: true
canHasW9Form: false
- id: 28
code: BR
name: Brazil
hasStates: false
hasZip: true
canPay: true
canHasW9Form: false
- id: 29
code: VG
name: British Virgin Islands
hasStates: false
hasZip: true
canPay: true
canHasW9Form: false
- id: 30
code: BN
name: Brunei
hasStates: false
hasZip: true
canPay: true
canHasW9Form: false
- id: 31
code: BG
name: Bulgaria
hasStates: false
hasZip: true
canPay: true
canHasW9Form: false
- id: 32
code: BF
name: Burkina Faso
hasStates: false
hasZip: false
canPay: true
canHasW9Form: false
- id: 33
code: BI
name: Burundi
hasStates: false
hasZip: false
canPay: false
canHasW9Form: false
- id: 34
code: KH
name: Cambodia
hasStates: false
hasZip: true
canPay: true
canHasW9Form: false
- id: 35
code: CM
name: Cameroon
hasStates: false
hasZip: false
canPay: true
canHasW9Form: false
- id: 36
code: CA
name: Canada
hasStates: true
hasZip: true
canPay: true
canHasW9Form: false
- id: 37
code: CV
name: Cape Verde
hasStates: false
hasZip: true
canPay: true
canHasW9Form: false
- id: 38
code: KY
name: Cayman Islands
hasStates: false
hasZip: true
canPay: true
canHasW9Form: false
- id: 39
code: CF
name: Central African Republic
hasStates: false
hasZip: false
canPay: false
canHasW9Form: false
- id: 40
code: TD
name: Chad
hasStates: false
hasZip: true
canPay: true
canHasW9Form: false
- id: 41
code: CL
name: Chile
hasStates: false
hasZip: true
canPay: true
canHasW9Form: false
- id: 42
code: CN
name: China
hasStates: false
hasZip: true
canPay: true
canHasW9Form: false
- id: 43
code: CX
name: Christmas Island
hasStates: false
hasZip: true
canPay: true
canHasW9Form: false
- id: 44
code: CO
name: Colombia
hasStates: false
hasZip: true
canPay: true
canHasW9Form: false
- id: 45
code: KM
name: Comoros
hasStates: false
hasZip: false
canPay: true
canHasW9Form: false
- id: 46
code: CK
name: Cook Islands
hasStates: false
hasZip: false
canPay: true
canHasW9Form: false
- id: 47
code: CR
name: Costa Rica
hasStates: false
hasZip: true
canPay: true
canHasW9Form: false
- id: 48
code: CI
name: Côte d'Ivoire
hasStates: false
hasZip: false
canPay: true
canHasW9Form: false
- id: 49
code: HR
name: Croatia
hasStates: false
hasZip: true
canPay: true
canHasW9Form: false
- id: 50
code: CU
name: Cuba
hasStates: false
hasZip: true
canPay: false
canHasW9Form: false
- id: 51
code: CY
name: Cyprus
hasStates: false
hasZip: true
canPay: true
canHasW9Form: false
- id: 52
code: CZ
name: Czech Republic
hasStates: false
hasZip: true
canPay: true
canHasW9Form: false
- id: 53
code: CD
name: Democratic Republic of the Congo
hasStates: false
hasZip: false
canPay: false
canHasW9Form: false
- id: 54
code: DK
name: Denmark
hasStates: false
hasZip: true
canPay: true
canHasW9Form: false
- id: 55
code: DJ
name: Djibouti
hasStates: false
hasZip: false
canPay: true
canHasW9Form: false
- id: 57
code: DM
name: Dominica
hasStates: false
hasZip: false
canPay: true
canHasW9Form: false
- id: 56
code: DO
name: Dominican Republic
hasStates: false
hasZip: true
canPay: true
canHasW9Form: false
- id: 58
code: EC
name: Ecuador
hasStates: false
hasZip: true
canPay: true
canHasW9Form: false
- id: 59
code: EG
name: Egypt
hasStates: false
hasZip: true
canPay: true
canHasW9Form: false
- id: 60
code: SV
name: El Salvador
hasStates: false
hasZip: true
canPay: true
canHasW9Form: false
- id: 61
code: GQ
name: Equatorial Guinea
hasStates: false
hasZip: false
canPay: true
canHasW9Form: false
- id: 62
code: ER
name: Eritrea
hasStates: false
hasZip: false
canPay: true
canHasW9Form: false
- id: 63
code: EE
name: Estonia
hasStates: false
hasZip: true
canPay: true
canHasW9Form: false
- id: 64
code: ET
name: Ethiopia
hasStates: false
hasZip: true
canPay: true
canHasW9Form: false
- id: 65
code: FK
name: Falkland Islands
hasStates: false
hasZip: true
canPay: true
canHasW9Form: false
- id: 66
code: FO
name: Faroe Islands
hasStates: false
hasZip: true
canPay: true
canHasW9Form: false
- id: 67
code: FJ
name: Fiji
hasStates: false
hasZip: false
canPay: true
canHasW9Form: false
- id: 68
code: FI
name: Finland
hasStates: false
hasZip: true
canPay: true
canHasW9Form: false
- id: 69
code: FR
name: France
hasStates: false
hasZip: true
canPay: true
canHasW9Form: false
- id: 70
code: PF
name: French Polynesia
hasStates: false
hasZip: true
canPay: true
canHasW9Form: false
- id: 71
code: GA
name: Gabon
hasStates: false
hasZip: true
canPay: true
canHasW9Form: false
- id: 72
code: GM
name: Gambia
hasStates: false
hasZip: false
canPay: true
canHasW9Form: false
- id: 73
code: GE
name: Georgia
hasStates: false
hasZip: true
canPay: true
canHasW9Form: false
- id: 74
code: DE
name: Germany
hasStates: false
hasZip: true
canPay: true
canHasW9Form: false
- id: 75
code: GH
name: Ghana
hasStates: false
hasZip: false
canPay: true
canHasW9Form: false
- id: 76
code: GI
name: Gibraltar
hasStates: false
hasZip: true
canPay: true
canHasW9Form: false
- id: 77
code: GR
name: Greece
hasStates: false
hasZip: true
canPay: true
canHasW9Form: false
- id: 78
code: GL
name: Greenland
hasStates: false
hasZip: true
canPay: true
canHasW9Form: false
- id: 79
code: GD
name: Grenada
hasStates: false
hasZip: false
canPay: true
canHasW9Form: false
- id: 80
code: GU
name: Guam
hasStates: false
hasZip: true
canPay: true
canHasW9Form: false
- id: 81
code: GT
name: Guatemala
hasStates: false
hasZip: true
canPay: true
canHasW9Form: false
- id: 227
code: GG
name: Guernsey
hasStates: false
hasZip: true
canPay: true
canHasW9Form: false
- id: 83
code: GN
name: Guinea
hasStates: false
hasZip: false
canPay: true
canHasW9Form: false
- id: 82
code: GW
name: Guinea Bissau
hasStates: false
hasZip: true
canPay: true
canHasW9Form: false
- id: 84
code: GY
name: Guyana
hasStates: false
hasZip: false
canPay: true
canHasW9Form: false
- id: 85
code: HT
name: Haiti
hasStates: false
hasZip: true
canPay: true
canHasW9Form: false
- id: 86
code: HN
name: Honduras
hasStates: false
hasZip: true
canPay: true
canHasW9Form: false
- id: 87
code: HK
name: Hong Kong
hasStates: false
hasZip: false
canPay: true
canHasW9Form: false
- id: 88
code: HU
name: Hungary
hasStates: false
hasZip: true
canPay: true
canHasW9Form: false
- id: 89
code: IS
name: Iceland
hasStates: false
hasZip: true
canPay: true
canHasW9Form: false
- id: 90
code: IN
name: India
hasStates: false
hasZip: true
canPay: true
canHasW9Form: false
- id: 91
code: ID
name: Indonesia
hasStates: false
hasZip: true
canPay: true
canHasW9Form: false
- id: 92
code: IR
name: Iran
hasStates: false
hasZip: true
canPay: false
canHasW9Form: false
- id: 93
code: IQ
name: Iraq
hasStates: false
hasZip: true
canPay: false
canHasW9Form: false
- id: 94
code: IE
name: Ireland
hasStates: true
hasZip: false
canPay: true
canHasW9Form: false
- id: 228
code: IM
name: Isle of Man
hasStates: false
hasZip: true
canPay: true
canHasW9Form: false
- id: 95
code: IL
name: Israel
hasStates: false
hasZip: true
canPay: true
canHasW9Form: false
- id: 96
code: IT
name: Italy
hasStates: false
hasZip: true
canPay: true
canHasW9Form: false
- id: 97
code: JM
name: Jamaica
hasStates: false
hasZip: false
canPay: true
canHasW9Form: false
- id: 98
code: JP
name: Japan
hasStates: false
hasZip: true
canPay: true
canHasW9Form: false
- id: 225
code: JE
name: Jersey
hasStates: false
hasZip: true
canPay: true
canHasW9Form: false
- id: 99
code: JO
name: Jordan
hasStates: false
hasZip: true
canPay: true
canHasW9Form: false
- id: 100
code: KZ
name: Kazakhstan
hasStates: false
hasZip: true
canPay: true
canHasW9Form: false
- id: 101
code: KE
name: Kenya
hasStates: false
hasZip: false
canPay: true
canHasW9Form: false
- id: 102
code: KI
name: Kiribati
hasStates: false
hasZip: false
canPay: true
canHasW9Form: false
- id: 226
code: XK
name: Kosovo
hasStates: false
hasZip: true
canPay: true
canHasW9Form: false
- id: 103
code: KW
name: Kuwait
hasStates: false
hasZip: true
canPay: true
canHasW9Form: false
- id: 104
code: KG
name: Kyrgyzstan
hasStates: false
hasZip: true
canPay: true
canHasW9Form: false
- id: 105
code: LA
name: Laos
hasStates: false
hasZip: true
canPay: true
canHasW9Form: false
- id: 106
code: LV
name: Latvia
hasStates: false
hasZip: true
canPay: true
canHasW9Form: false
- id: 107
code: LB
name: Lebanon
hasStates: false
hasZip: true
canPay: false
canHasW9Form: false
- id: 108
code: LS
name: Lesotho
hasStates: false
hasZip: true
canPay: true
canHasW9Form: false
- id: 109
code: LR
name: Liberia
hasStates: false
hasZip: true
canPay: true
canHasW9Form: false
- id: 110
code: LY
name: Libya
hasStates: false
hasZip: true
canPay: false
canHasW9Form: false
- id: 111
code: LI
name: Liechtenstein
hasStates: false
hasZip: true
canPay: true
canHasW9Form: false
- id: 112
code: LT
name: Lithuania
hasStates: false
hasZip: true
canPay: true
canHasW9Form: false
- id: 113
code: LU
name: Luxembourg
hasStates: false
hasZip: true
canPay: true
canHasW9Form: false
- id: 114
code: MO
name: Macao
hasStates: false
hasZip: false
canPay: true
canHasW9Form: false
- id: 115
code: MK
name: Macedonia
hasStates: false
hasZip: true
canPay: true
canHasW9Form: false
- id: 116
code: MG
name: Madagascar
hasStates: false
hasZip: true
canPay: true
canHasW9Form: false
- id: 117
code: MW
name: Malawi
hasStates: false
hasZip: false
canPay: true
canHasW9Form: false
- id: 118
code: MY
name: Malaysia
hasStates: false
hasZip: true
canPay: true
canHasW9Form: false
- id: 119
code: MV
name: Maldives
hasStates: false
hasZip: true
canPay: true
canHasW9Form: false
- id: 120
code: ML
name: Mali
hasStates: false
hasZip: false
canPay: true
canHasW9Form: false
- id: 121
code: MT
name: Malta
hasStates: false
hasZip: true
canPay: true
canHasW9Form: false
- id: 122
code: MH
name: Marshall Islands
hasStates: false
hasZip: true
canPay: true
canHasW9Form: false
- id: 123
code: MQ
name: Martinique
hasStates: false
hasZip: true
canPay: true
canHasW9Form: false
- id: 124
code: MR
name: Mauritania
hasStates: false
hasZip: false
canPay: true
canHasW9Form: false
- id: 125
code: MU
name: Mauritius
hasStates: false
hasZip: false
canPay: true
canHasW9Form: false
- id: 126
code: MX
name: Mexico
hasStates: false
hasZip: true
canPay: true
canHasW9Form: false
- id: 127
code: FM
name: Micronesia
hasStates: false
hasZip: true
canPay: true
canHasW9Form: false
- id: 128
code: MD
name: Moldova
hasStates: false
hasZip: true
canPay: true
canHasW9Form: false
- id: 129
code: MC
name: Monaco
hasStates: false
hasZip: true
canPay: true
canHasW9Form: false
- id: 130
code: MN
name: Mongolia
hasStates: false
hasZip: true
canPay: true
canHasW9Form: false
- id: 224
code: ME
name: Montenegro
hasStates: false
hasZip: true
canPay: true
canHasW9Form: false
- id: 131
code: MS
name: Montserrat
hasStates: false
hasZip: false
canPay: true
canHasW9Form: false
- id: 132
code: MA
name: Morocco
hasStates: false
hasZip: true
canPay: true
canHasW9Form: false
- id: 133
code: MZ
name: Mozambique
hasStates: false
hasZip: true
canPay: true
canHasW9Form: false
- id: 134
code: MM
name: Myanmar
hasStates: false
hasZip: true
canPay: true
canHasW9Form: false
- id: 135
code: NA
name: Namibia
hasStates: false
hasZip: true
canPay: true
canHasW9Form: false
- id: 136
code: NR
name: Nauru
hasStates: false
hasZip: false
canPay: true
canHasW9Form: false
- id: 137
code: NP
name: Nepal
hasStates: false
hasZip: true
canPay: true
canHasW9Form: false
- id: 139
code: NL
name: Netherlands
hasStates: false
hasZip: true
canPay: true
canHasW9Form: false
- id: 138
code: AN
name: Netherlands Antilles
hasStates: false
hasZip: false
canPay: true
canHasW9Form: false
- id: 140
code: NZ
name: New Zealand
hasStates: false
hasZip: true
canPay: true
canHasW9Form: false
- id: 141
code: NI
name: Nicaragua
hasStates: false
hasZip: true
canPay: false
canHasW9Form: false
- id: 143
code: NE
name: Niger
hasStates: false
hasZip: true
canPay: true
canHasW9Form: false
- id: 142
code: NG
name: Nigeria
hasStates: false
hasZip: true
canPay: true
canHasW9Form: false
- id: 144
code: NU
name: Niue
hasStates: false
hasZip: false
canPay: true
canHasW9Form: false
- id: 145
code: NF
name: Norfolk Island
hasStates: false
hasZip: true
canPay: true
canHasW9Form: false
- id: 146
code: KP
name: North Korea
hasStates: false
hasZip: false
canPay: false
canHasW9Form: false
- id: 147
code: NO
name: Norway
hasStates: false
hasZip: true
canPay: true
canHasW9Form: false
- id: 148
code: OM
name: Oman
hasStates: false
hasZip: true
canPay: true
canHasW9Form: false
- id: 149
code: PK
name: Pakistan
hasStates: false
hasZip: true
canPay: true
canHasW9Form: false
- id: 150
code: PW
name: Palau
hasStates: false
hasZip: true
canPay: true
canHasW9Form: false
- id: 151
code: PA
name: Panama
hasStates: false
hasZip: false
canPay: true
canHasW9Form: false
- id: 152
code: PG
name: Papua New Guinea
hasStates: false
hasZip: true
canPay: true
canHasW9Form: false
- id: 153
code: PY
name: Paraguay
hasStates: false
hasZip: true
canPay: true
canHasW9Form: false
- id: 154
code: PE
name: Peru
hasStates: false
hasZip: true
canPay: true
canHasW9Form: false
- id: 155
code: PH
name: Philippines
hasStates: false
hasZip: true
canPay: true
canHasW9Form: false
- id: 156
code: PN
name: Pitcairn Islands
hasStates: false
hasZip: true
canPay: true
canHasW9Form: false
- id: 157
code: PL
name: Poland
hasStates: false
hasZip: true
canPay: true
canHasW9Form: false
- id: 158
code: PT
name: Portugal
hasStates: false
hasZip: true
canPay: true
canHasW9Form: false
- id: 159
code: PR
name: Puerto Rico
hasStates: false
hasZip: true
canPay: true
canHasW9Form: false
- id: 160
code: QA
name: Qatar
hasStates: false
hasZip: false
canPay: true
canHasW9Form: false
- id: 161
code: CG
name: Republic of the Congo
hasStates: false
hasZip: false
canPay: false
canHasW9Form: false
- id: 162
code: RO
name: Romania
hasStates: false
hasZip: true
canPay: true
canHasW9Form: false
- id: 163
code: RU
name: Russian Federation
hasStates: false
hasZip: true
canPay: false
canHasW9Form: false
- id: 164
code: RW
name: Rwanda
hasStates: false
hasZip: false
canPay: true
canHasW9Form: false
- id: 165
code: KN
name: Saint Kitts and Nevis
hasStates: false
hasZip: false
canPay: true
canHasW9Form: false
- id: 166
code: LC
name: Saint Lucia
hasStates: false
hasZip: false
canPay: true
canHasW9Form: false
- id: 167
code: PM
name: Saint Pierre
hasStates: false
hasZip: true
canPay: true
canHasW9Form: false
- id: 168
code: VC
name: Saint Vincent and the Grenadines
hasStates: false
hasZip: true
canPay: true
canHasW9Form: false
- id: 169
code: WS
name: Samoa
hasStates: false
hasZip: true
canPay: true
canHasW9Form: false
- id: 170
code: SM
name: San Marino
hasStates: false
hasZip: true
canPay: true
canHasW9Form: false
- id: 171
code: ST
name: Sao Tomé and Príncipe
hasStates: false
hasZip: false
canPay: true
canHasW9Form: false
- id: 172
code: SA
name: Saudi Arabia
hasStates: false
hasZip: true
canPay: true
canHasW9Form: false
- id: 173
code: SN
name: Senegal
hasStates: false
hasZip: true
canPay: true
canHasW9Form: false
- id: 174
code: RS
name: Serbia
hasStates: false
hasZip: true
canPay: true
canHasW9Form: false
- id: 175
code: SC
name: Seychelles
hasStates: false
hasZip: false
canPay: true
canHasW9Form: false
- id: 176
code: SL
name: Sierra Leone
hasStates: false
hasZip: false
canPay: true
canHasW9Form: false
- id: 177
code: SG
name: Singapore
hasStates: false
hasZip: true
canPay: true
canHasW9Form: false
- id: 178
code: SK
name: Slovakia
hasStates: false
hasZip: true
canPay: true
canHasW9Form: false
- id: 179
code: SI
name: Slovenia
hasStates: false
hasZip: true
canPay: true
canHasW9Form: false
- id: 180
code: SB
name: Solomon Islands
hasStates: false
hasZip: false
canPay: true
canHasW9Form: false
- id: 181
code: SO
name: Somalia
hasStates: false
hasZip: false
canPay: false
canHasW9Form: false
- id: 182
code: ZA
name: South Africa
hasStates: false
hasZip: false
canPay: true
canHasW9Form: false
- id: 183
code: GS
name: South Georgia
hasStates: false
hasZip: true
canPay: true
canHasW9Form: false
- id: 184
code: KR
name: South Korea
hasStates: false
hasZip: true
canPay: true
canHasW9Form: false
- id: 186
code: ES
name: Spain
hasStates: true
hasZip: true
canPay: true
canHasW9Form: false
- id: 187
code: LK
name: Sri Lanka
hasStates: false
hasZip: true
canPay: true
canHasW9Form: false
- id: 188
code: SD
name: Sudan
hasStates: false
hasZip: true
canPay: false
canHasW9Form: false
- id: 189
code: SR
name: Suriname
hasStates: false
hasZip: false
canPay: true
canHasW9Form: false
- id: 190
code: SZ
name: Swaziland
hasStates: false
hasZip: true
canPay: true
canHasW9Form: false
- id: 191
code: SE
name: Sweden
hasStates: false
hasZip: true
canPay: true
canHasW9Form: false
- id: 192
code: CH
name: Switzerland
hasStates: false
hasZip: true
canPay: true
canHasW9Form: false
- id: 193
code: SY
name: Syria
hasStates: false
hasZip: false
canPay: false
canHasW9Form: false
- id: 194
code: TW
name: Taiwan
hasStates: false
hasZip: true
canPay: true
canHasW9Form: false
- id: 195
code: TJ
name: Tajikistan
hasStates: false
hasZip: true
canPay: true
canHasW9Form: false
- id: 196
code: TZ
name: Tanzania
hasStates: false
hasZip: false
canPay: true
canHasW9Form: false
- id: 197
code: TH
name: Thailand
hasStates: false
hasZip: true
canPay: true
canHasW9Form: false
- id: 198
code: TB
name: Tibet
hasStates: false
hasZip: true
canPay: true
canHasW9Form: false
- id: 199
code: TL
name: Timor-Leste
hasStates: false
hasZip: false
canPay: true
canHasW9Form: false
- id: 200
code: TG
name: Togo
hasStates: false
hasZip: true
canPay: true
canHasW9Form: false
- id: 201
code: TO
name: Tonga
hasStates: false
hasZip: false
canPay: true
canHasW9Form: false
- id: 202
code: TT
name: Trinidad and Tobago
hasStates: false
hasZip: false
canPay: true
canHasW9Form: false
- id: 203
code: TN
name: Tunisia
hasStates: false
hasZip: true
canPay: true
canHasW9Form: false
- id: 204
code: TR
name: Turkey
hasStates: false
hasZip: true
canPay: true
canHasW9Form: false
- id: 205
code: TM
name: Turkmenistan
hasStates: false
hasZip: true
canPay: true
canHasW9Form: false
- id: 206
code: TC
name: Turks and Caicos Islands
hasStates: false
hasZip: true
canPay: true
canHasW9Form: false
- id: 207
code: TV
name: Tuvalu
hasStates: false
hasZip: false
canPay: true
canHasW9Form: false
- id: 208
code: AE
name: UAE
hasStates: true
hasZip: false
canPay: true
canHasW9Form: false
- id: 209
code: UG
name: Uganda
hasStates: false
hasZip: false
canPay: true
canHasW9Form: false
- id: 210
code: UA
name: Ukraine
hasStates: false
hasZip: true
canPay: true
canHasW9Form: false
- id: 213
code: UY
name: Uruguay
hasStates: false
hasZip: true
canPay: true
canHasW9Form: false
- id: 214
code: VI
name: US Virgin Islands
hasStates: false
hasZip: true
canPay: true
canHasW9Form: false
- id: 215
code: UZ
name: Uzbekistan
hasStates: false
hasZip: true
canPay: true
canHasW9Form: false
- id: 216
code: VU
name: Vanuatu
hasStates: false
hasZip: false
canPay: true
canHasW9Form: false
- id: 217
code: VA
name: Vatican City
hasStates: false
hasZip: true
canPay: true
canHasW9Form: false
- id: 218
code: VE
name: Venezuela
hasStates: false
hasZip: true
canPay: false
canHasW9Form: false
- id: 219
code: VN
name: Vietnam
hasStates: false
hasZip: true
canPay: true
canHasW9Form: false
- id: 220
code: WF
name: Wallis and Futuna
hasStates: false
hasZip: true
canPay: true
canHasW9Form: false
- id: 221
code: YE
name: Yemen
hasStates: false
hasZip: false
canPay: false
canHasW9Form: false
- id: 222
code: ZM
name: Zambia
hasStates: false
hasZip: true
canPay: true
canHasW9Form: false
- id: 223
code: ZW
name: Zimbabwe
hasStates: false
hasZip: false
canPay: false
canHasW9Form: false
_meta:
_credits:
used: 1
balance: 999999997
note: Always
_cache:
is_cached: false
note: Cache disabled for this endpoint
_rate_limits:
limit_minute: 10000000
limit_day: 50000
remaining_minute: 9999999
remaining_day: 49945
properties:
data:
type: array
example:
- id: 212
code: US
name: United States of America
hasStates: true
hasZip: true
canPay: true
canHasW9Form: false
- id: 211
code: GB
name: United Kingdom
hasStates: false
hasZip: true
canPay: true
canHasW9Form: false
- id: 1
code: AF
name: Afghanistan
hasStates: false
hasZip: true
canPay: false
canHasW9Form: false
- id: 2
code: AL
name: Albania
hasStates: false
hasZip: true
canPay: true
canHasW9Form: false
- id: 3
code: DZ
name: Algeria
hasStates: false
hasZip: true
canPay: true
canHasW9Form: false
- id: 4
code: AS
name: American Samoa
hasStates: false
hasZip: true
canPay: true
canHasW9Form: false
- id: 5
code: AD
name: Andorra
hasStates: false
hasZip: true
canPay: true
canHasW9Form: false
- id: 6
code: AO
name: Angola
hasStates: false
hasZip: false
canPay: true
canHasW9Form: false
- id: 7
code: AI
name: Anguilla
hasStates: false
hasZip: true
canPay: true
canHasW9Form: false
- id: 8
code: AG
name: Antigua and Barbuda
hasStates: false
hasZip: false
canPay: true
canHasW9Form: false
- id: 9
code: AR
name: Argentina
hasStates: false
hasZip: true
canPay: true
canHasW9Form: false
- id: 10
code: AM
name: Armenia
hasStates: false
hasZip: true
canPay: true
canHasW9Form: false
- id: 11
code: AW
name: Aruba
hasStates: false
hasZip: false
canPay: true
canHasW9Form: false
- id: 12
code: AU
name: Australia
hasStates: true
hasZip: true
canPay: true
canHasW9Form: false
- id: 13
code: AT
name: Austria
hasStates: false
hasZip: true
canPay: true
canHasW9Form: false
- id: 14
code: AZ
name: Azerbaijan
hasStates: false
hasZip: true
canPay: true
canHasW9Form: false
- id: 15
code: BS
name: Bahamas
hasStates: false
hasZip: false
canPay: true
canHasW9Form: false
- id: 16
code: BH
name: Bahrain
hasStates: false
hasZip: true
canPay: true
canHasW9Form: false
- id: 17
code: BD
name: Bangladesh
hasStates: false
hasZip: true
canPay: true
canHasW9Form: false
- id: 18
code: BB
name: Barbados
hasStates: false
hasZip: true
canPay: true
canHasW9Form: false
- id: 19
code: BY
name: Belarus
hasStates: false
hasZip: true
canPay: false
canHasW9Form: false
- id: 20
code: BE
name: Belgium
hasStates: false
hasZip: true
canPay: true
canHasW9Form: false
- id: 21
code: BZ
name: Belize
hasStates: false
hasZip: false
canPay: true
canHasW9Form: false
- id: 22
code: BJ
name: Benin
hasStates: false
hasZip: false
canPay: true
canHasW9Form: false
- id: 23
code: BM
name: Bermuda
hasStates: false
hasZip: true
canPay: true
canHasW9Form: false
- id: 24
code: BT
name: Bhutan
hasStates: false
hasZip: true
canPay: true
canHasW9Form: false
- id: 25
code: BO
name: Bolivia
hasStates: false
hasZip: true
canPay: true
canHasW9Form: false
- id: 26
code: BA
name: Bosnia and Herzegovina
hasStates: false
hasZip: true
canPay: true
canHasW9Form: false
- id: 27
code: BW
name: Botswana
hasStates: false
hasZip: false
canPay: true
canHasW9Form: false
- id: 28
code: BR
name: Brazil
hasStates: false
hasZip: true
canPay: true
canHasW9Form: false
- id: 29
code: VG
name: British Virgin Islands
hasStates: false
hasZip: true
canPay: true
canHasW9Form: false
- id: 30
code: BN
name: Brunei
hasStates: false
hasZip: true
canPay: true
canHasW9Form: false
- id: 31
code: BG
name: Bulgaria
hasStates: false
hasZip: true
canPay: true
canHasW9Form: false
- id: 32
code: BF
name: Burkina Faso
hasStates: false
hasZip: false
canPay: true
canHasW9Form: false
- id: 33
code: BI
name: Burundi
hasStates: false
hasZip: false
canPay: false
canHasW9Form: false
- id: 34
code: KH
name: Cambodia
hasStates: false
hasZip: true
canPay: true
canHasW9Form: false
- id: 35
code: CM
name: Cameroon
hasStates: false
hasZip: false
canPay: true
canHasW9Form: false
- id: 36
code: CA
name: Canada
hasStates: true
hasZip: true
canPay: true
canHasW9Form: false
- id: 37
code: CV
name: Cape Verde
hasStates: false
hasZip: true
canPay: true
canHasW9Form: false
- id: 38
code: KY
name: Cayman Islands
hasStates: false
hasZip: true
canPay: true
canHasW9Form: false
- id: 39
code: CF
name: Central African Republic
hasStates: false
hasZip: false
canPay: false
canHasW9Form: false
- id: 40
code: TD
name: Chad
hasStates: false
hasZip: true
canPay: true
canHasW9Form: false
- id: 41
code: CL
name: Chile
hasStates: false
hasZip: true
canPay: true
canHasW9Form: false
- id: 42
code: CN
name: China
hasStates: false
hasZip: true
canPay: true
canHasW9Form: false
- id: 43
code: CX
name: Christmas Island
hasStates: false
hasZip: true
canPay: true
canHasW9Form: false
- id: 44
code: CO
name: Colombia
hasStates: false
hasZip: true
canPay: true
canHasW9Form: false
- id: 45
code: KM
name: Comoros
hasStates: false
hasZip: false
canPay: true
canHasW9Form: false
- id: 46
code: CK
name: Cook Islands
hasStates: false
hasZip: false
canPay: true
canHasW9Form: false
- id: 47
code: CR
name: Costa Rica
hasStates: false
hasZip: true
canPay: true
canHasW9Form: false
- id: 48
code: CI
name: Côte d'Ivoire
hasStates: false
hasZip: false
canPay: true
canHasW9Form: false
- id: 49
code: HR
name: Croatia
hasStates: false
hasZip: true
canPay: true
canHasW9Form: false
- id: 50
code: CU
name: Cuba
hasStates: false
hasZip: true
canPay: false
canHasW9Form: false
- id: 51
code: CY
name: Cyprus
hasStates: false
hasZip: true
canPay: true
canHasW9Form: false
- id: 52
code: CZ
name: Czech Republic
hasStates: false
hasZip: true
canPay: true
canHasW9Form: false
- id: 53
code: CD
name: Democratic Republic of the Congo
hasStates: false
hasZip: false
canPay: false
canHasW9Form: false
- id: 54
code: DK
name: Denmark
hasStates: false
hasZip: true
canPay: true
canHasW9Form: false
- id: 55
code: DJ
name: Djibouti
hasStates: false
hasZip: false
canPay: true
canHasW9Form: false
- id: 57
code: DM
name: Dominica
hasStates: false
hasZip: false
canPay: true
canHasW9Form: false
- id: 56
code: DO
name: Dominican Republic
hasStates: false
hasZip: true
canPay: true
canHasW9Form: false
- id: 58
code: EC
name: Ecuador
hasStates: false
hasZip: true
canPay: true
canHasW9Form: false
- id: 59
code: EG
name: Egypt
hasStates: false
hasZip: true
canPay: true
canHasW9Form: false
- id: 60
code: SV
name: El Salvador
hasStates: false
hasZip: true
canPay: true
canHasW9Form: false
- id: 61
code: GQ
name: Equatorial Guinea
hasStates: false
hasZip: false
canPay: true
canHasW9Form: false
- id: 62
code: ER
name: Eritrea
hasStates: false
hasZip: false
canPay: true
canHasW9Form: false
- id: 63
code: EE
name: Estonia
hasStates: false
hasZip: true
canPay: true
canHasW9Form: false
- id: 64
code: ET
name: Ethiopia
hasStates: false
hasZip: true
canPay: true
canHasW9Form: false
- id: 65
code: FK
name: Falkland Islands
hasStates: false
hasZip: true
canPay: true
canHasW9Form: false
- id: 66
code: FO
name: Faroe Islands
hasStates: false
hasZip: true
canPay: true
canHasW9Form: false
- id: 67
code: FJ
name: Fiji
hasStates: false
hasZip: false
canPay: true
canHasW9Form: false
- id: 68
code: FI
name: Finland
hasStates: false
hasZip: true
canPay: true
canHasW9Form: false
- id: 69
code: FR
name: France
hasStates: false
hasZip: true
canPay: true
canHasW9Form: false
- id: 70
code: PF
name: French Polynesia
hasStates: false
hasZip: true
canPay: true
canHasW9Form: false
- id: 71
code: GA
name: Gabon
hasStates: false
hasZip: true
canPay: true
canHasW9Form: false
- id: 72
code: GM
name: Gambia
hasStates: false
hasZip: false
canPay: true
canHasW9Form: false
- id: 73
code: GE
name: Georgia
hasStates: false
hasZip: true
canPay: true
canHasW9Form: false
- id: 74
code: DE
name: Germany
hasStates: false
hasZip: true
canPay: true
canHasW9Form: false
- id: 75
code: GH
name: Ghana
hasStates: false
hasZip: false
canPay: true
canHasW9Form: false
- id: 76
code: GI
name: Gibraltar
hasStates: false
hasZip: true
canPay: true
canHasW9Form: false
- id: 77
code: GR
name: Greece
hasStates: false
hasZip: true
canPay: true
canHasW9Form: false
- id: 78
code: GL
name: Greenland
hasStates: false
hasZip: true
canPay: true
canHasW9Form: false
- id: 79
code: GD
name: Grenada
hasStates: false
hasZip: false
canPay: true
canHasW9Form: false
- id: 80
code: GU
name: Guam
hasStates: false
hasZip: true
canPay: true
canHasW9Form: false
- id: 81
code: GT
name: Guatemala
hasStates: false
hasZip: true
canPay: true
canHasW9Form: false
- id: 227
code: GG
name: Guernsey
hasStates: false
hasZip: true
canPay: true
canHasW9Form: false
- id: 83
code: GN
name: Guinea
hasStates: false
hasZip: false
canPay: true
canHasW9Form: false
- id: 82
code: GW
name: Guinea Bissau
hasStates: false
hasZip: true
canPay: true
canHasW9Form: false
- id: 84
code: GY
name: Guyana
hasStates: false
hasZip: false
canPay: true
canHasW9Form: false
- id: 85
code: HT
name: Haiti
hasStates: false
hasZip: true
canPay: true
canHasW9Form: false
- id: 86
code: HN
name: Honduras
hasStates: false
hasZip: true
canPay: true
canHasW9Form: false
- id: 87
code: HK
name: Hong Kong
hasStates: false
hasZip: false
canPay: true
canHasW9Form: false
- id: 88
code: HU
name: Hungary
hasStates: false
hasZip: true
canPay: true
canHasW9Form: false
- id: 89
code: IS
name: Iceland
hasStates: false
hasZip: true
canPay: true
canHasW9Form: false
- id: 90
code: IN
name: India
hasStates: false
hasZip: true
canPay: true
canHasW9Form: false
- id: 91
code: ID
name: Indonesia
hasStates: false
hasZip: true
canPay: true
canHasW9Form: false
- id: 92
code: IR
name: Iran
hasStates: false
hasZip: true
canPay: false
canHasW9Form: false
- id: 93
code: IQ
name: Iraq
hasStates: false
hasZip: true
canPay: false
canHasW9Form: false
- id: 94
code: IE
name: Ireland
hasStates: true
hasZip: false
canPay: true
canHasW9Form: false
- id: 228
code: IM
name: Isle of Man
hasStates: false
hasZip: true
canPay: true
canHasW9Form: false
- id: 95
code: IL
name: Israel
hasStates: false
hasZip: true
canPay: true
canHasW9Form: false
- id: 96
code: IT
name: Italy
hasStates: false
hasZip: true
canPay: true
canHasW9Form: false
- id: 97
code: JM
name: Jamaica
hasStates: false
hasZip: false
canPay: true
canHasW9Form: false
- id: 98
code: JP
name: Japan
hasStates: false
hasZip: true
canPay: true
canHasW9Form: false
- id: 225
code: JE
name: Jersey
hasStates: false
hasZip: true
canPay: true
canHasW9Form: false
- id: 99
code: JO
name: Jordan
hasStates: false
hasZip: true
canPay: true
canHasW9Form: false
- id: 100
code: KZ
name: Kazakhstan
hasStates: false
hasZip: true
canPay: true
canHasW9Form: false
- id: 101
code: KE
name: Kenya
hasStates: false
hasZip: false
canPay: true
canHasW9Form: false
- id: 102
code: KI
name: Kiribati
hasStates: false
hasZip: false
canPay: true
canHasW9Form: false
- id: 226
code: XK
name: Kosovo
hasStates: false
hasZip: true
canPay: true
canHasW9Form: false
- id: 103
code: KW
name: Kuwait
hasStates: false
hasZip: true
canPay: true
canHasW9Form: false
- id: 104
code: KG
name: Kyrgyzstan
hasStates: false
hasZip: true
canPay: true
canHasW9Form: false
- id: 105
code: LA
name: Laos
hasStates: false
hasZip: true
canPay: true
canHasW9Form: false
- id: 106
code: LV
name: Latvia
hasStates: false
hasZip: true
canPay: true
canHasW9Form: false
- id: 107
code: LB
name: Lebanon
hasStates: false
hasZip: true
canPay: false
canHasW9Form: false
- id: 108
code: LS
name: Lesotho
hasStates: false
hasZip: true
canPay: true
canHasW9Form: false
- id: 109
code: LR
name: Liberia
hasStates: false
hasZip: true
canPay: true
canHasW9Form: false
- id: 110
code: LY
name: Libya
hasStates: false
hasZip: true
canPay: false
canHasW9Form: false
- id: 111
code: LI
name: Liechtenstein
hasStates: false
hasZip: true
canPay: true
canHasW9Form: false
- id: 112
code: LT
name: Lithuania
hasStates: false
hasZip: true
canPay: true
canHasW9Form: false
- id: 113
code: LU
name: Luxembourg
hasStates: false
hasZip: true
canPay: true
canHasW9Form: false
- id: 114
code: MO
name: Macao
hasStates: false
hasZip: false
canPay: true
canHasW9Form: false
- id: 115
code: MK
name: Macedonia
hasStates: false
hasZip: true
canPay: true
canHasW9Form: false
- id: 116
code: MG
name: Madagascar
hasStates: false
hasZip: true
canPay: true
canHasW9Form: false
- id: 117
code: MW
name: Malawi
hasStates: false
hasZip: false
canPay: true
canHasW9Form: false
- id: 118
code: MY
name: Malaysia
hasStates: false
hasZip: true
canPay: true
canHasW9Form: false
- id: 119
code: MV
name: Maldives
hasStates: false
hasZip: true
canPay: true
canHasW9Form: false
- id: 120
code: ML
name: Mali
hasStates: false
hasZip: false
canPay: true
canHasW9Form: false
- id: 121
code: MT
name: Malta
hasStates: false
hasZip: true
canPay: true
canHasW9Form: false
- id: 122
code: MH
name: Marshall Islands
hasStates: false
hasZip: true
canPay: true
canHasW9Form: false
- id: 123
code: MQ
name: Martinique
hasStates: false
hasZip: true
canPay: true
canHasW9Form: false
- id: 124
code: MR
name: Mauritania
hasStates: false
hasZip: false
canPay: true
canHasW9Form: false
- id: 125
code: MU
name: Mauritius
hasStates: false
hasZip: false
canPay: true
canHasW9Form: false
- id: 126
code: MX
name: Mexico
hasStates: false
hasZip: true
canPay: true
canHasW9Form: false
- id: 127
code: FM
name: Micronesia
hasStates: false
hasZip: true
canPay: true
canHasW9Form: false
- id: 128
code: MD
name: Moldova
hasStates: false
hasZip: true
canPay: true
canHasW9Form: false
- id: 129
code: MC
name: Monaco
hasStates: false
hasZip: true
canPay: true
canHasW9Form: false
- id: 130
code: MN
name: Mongolia
hasStates: false
hasZip: true
canPay: true
canHasW9Form: false
- id: 224
code: ME
name: Montenegro
hasStates: false
hasZip: true
canPay: true
canHasW9Form: false
- id: 131
code: MS
name: Montserrat
hasStates: false
hasZip: false
canPay: true
canHasW9Form: false
- id: 132
code: MA
name: Morocco
hasStates: false
hasZip: true
canPay: true
canHasW9Form: false
- id: 133
code: MZ
name: Mozambique
hasStates: false
hasZip: true
canPay: true
canHasW9Form: false
- id: 134
code: MM
name: Myanmar
hasStates: false
hasZip: true
canPay: true
canHasW9Form: false
- id: 135
code: NA
name: Namibia
hasStates: false
hasZip: true
canPay: true
canHasW9Form: false
- id: 136
code: NR
name: Nauru
hasStates: false
hasZip: false
canPay: true
canHasW9Form: false
- id: 137
code: NP
name: Nepal
hasStates: false
hasZip: true
canPay: true
canHasW9Form: false
- id: 139
code: NL
name: Netherlands
hasStates: false
hasZip: true
canPay: true
canHasW9Form: false
- id: 138
code: AN
name: Netherlands Antilles
hasStates: false
hasZip: false
canPay: true
canHasW9Form: false
- id: 140
code: NZ
name: New Zealand
hasStates: false
hasZip: true
canPay: true
canHasW9Form: false
- id: 141
code: NI
name: Nicaragua
hasStates: false
hasZip: true
canPay: false
canHasW9Form: false
- id: 143
code: NE
name: Niger
hasStates: false
hasZip: true
canPay: true
canHasW9Form: false
- id: 142
code: NG
name: Nigeria
hasStates: false
hasZip: true
canPay: true
canHasW9Form: false
- id: 144
code: NU
name: Niue
hasStates: false
hasZip: false
canPay: true
canHasW9Form: false
- id: 145
code: NF
name: Norfolk Island
hasStates: false
hasZip: true
canPay: true
canHasW9Form: false
- id: 146
code: KP
name: North Korea
hasStates: false
hasZip: false
canPay: false
canHasW9Form: false
- id: 147
code: NO
name: Norway
hasStates: false
hasZip: true
canPay: true
canHasW9Form: false
- id: 148
code: OM
name: Oman
hasStates: false
hasZip: true
canPay: true
canHasW9Form: false
- id: 149
code: PK
name: Pakistan
hasStates: false
hasZip: true
canPay: true
canHasW9Form: false
- id: 150
code: PW
name: Palau
hasStates: false
hasZip: true
canPay: true
canHasW9Form: false
- id: 151
code: PA
name: Panama
hasStates: false
hasZip: false
canPay: true
canHasW9Form: false
- id: 152
code: PG
name: Papua New Guinea
hasStates: false
hasZip: true
canPay: true
canHasW9Form: false
- id: 153
code: PY
name: Paraguay
hasStates: false
hasZip: true
canPay: true
canHasW9Form: false
- id: 154
code: PE
name: Peru
hasStates: false
hasZip: true
canPay: true
canHasW9Form: false
- id: 155
code: PH
name: Philippines
hasStates: false
hasZip: true
canPay: true
canHasW9Form: false
- id: 156
code: PN
name: Pitcairn Islands
hasStates: false
hasZip: true
canPay: true
canHasW9Form: false
- id: 157
code: PL
name: Poland
hasStates: false
hasZip: true
canPay: true
canHasW9Form: false
- id: 158
code: PT
name: Portugal
hasStates: false
hasZip: true
canPay: true
canHasW9Form: false
- id: 159
code: PR
name: Puerto Rico
hasStates: false
hasZip: true
canPay: true
canHasW9Form: false
- id: 160
code: QA
name: Qatar
hasStates: false
hasZip: false
canPay: true
canHasW9Form: false
- id: 161
code: CG
name: Republic of the Congo
hasStates: false
hasZip: false
canPay: false
canHasW9Form: false
- id: 162
code: RO
name: Romania
hasStates: false
hasZip: true
canPay: true
canHasW9Form: false
- id: 163
code: RU
name: Russian Federation
hasStates: false
hasZip: true
canPay: false
canHasW9Form: false
- id: 164
code: RW
name: Rwanda
hasStates: false
hasZip: false
canPay: true
canHasW9Form: false
- id: 165
code: KN
name: Saint Kitts and Nevis
hasStates: false
hasZip: false
canPay: true
canHasW9Form: false
- id: 166
code: LC
name: Saint Lucia
hasStates: false
hasZip: false
canPay: true
canHasW9Form: false
- id: 167
code: PM
name: Saint Pierre
hasStates: false
hasZip: true
canPay: true
canHasW9Form: false
- id: 168
code: VC
name: Saint Vincent and the Grenadines
hasStates: false
hasZip: true
canPay: true
canHasW9Form: false
- id: 169
code: WS
name: Samoa
hasStates: false
hasZip: true
canPay: true
canHasW9Form: false
- id: 170
code: SM
name: San Marino
hasStates: false
hasZip: true
canPay: true
canHasW9Form: false
- id: 171
code: ST
name: Sao Tomé and Príncipe
hasStates: false
hasZip: false
canPay: true
canHasW9Form: false
- id: 172
code: SA
name: Saudi Arabia
hasStates: false
hasZip: true
canPay: true
canHasW9Form: false
- id: 173
code: SN
name: Senegal
hasStates: false
hasZip: true
canPay: true
canHasW9Form: false
- id: 174
code: RS
name: Serbia
hasStates: false
hasZip: true
canPay: true
canHasW9Form: false
- id: 175
code: SC
name: Seychelles
hasStates: false
hasZip: false
canPay: true
canHasW9Form: false
- id: 176
code: SL
name: Sierra Leone
hasStates: false
hasZip: false
canPay: true
canHasW9Form: false
- id: 177
code: SG
name: Singapore
hasStates: false
hasZip: true
canPay: true
canHasW9Form: false
- id: 178
code: SK
name: Slovakia
hasStates: false
hasZip: true
canPay: true
canHasW9Form: false
- id: 179
code: SI
name: Slovenia
hasStates: false
hasZip: true
canPay: true
canHasW9Form: false
- id: 180
code: SB
name: Solomon Islands
hasStates: false
hasZip: false
canPay: true
canHasW9Form: false
- id: 181
code: SO
name: Somalia
hasStates: false
hasZip: false
canPay: false
canHasW9Form: false
- id: 182
code: ZA
name: South Africa
hasStates: false
hasZip: false
canPay: true
canHasW9Form: false
- id: 183
code: GS
name: South Georgia
hasStates: false
hasZip: true
canPay: true
canHasW9Form: false
- id: 184
code: KR
name: South Korea
hasStates: false
hasZip: true
canPay: true
canHasW9Form: false
- id: 186
code: ES
name: Spain
hasStates: true
hasZip: true
canPay: true
canHasW9Form: false
- id: 187
code: LK
name: Sri Lanka
hasStates: false
hasZip: true
canPay: true
canHasW9Form: false
- id: 188
code: SD
name: Sudan
hasStates: false
hasZip: true
canPay: false
canHasW9Form: false
- id: 189
code: SR
name: Suriname
hasStates: false
hasZip: false
canPay: true
canHasW9Form: false
- id: 190
code: SZ
name: Swaziland
hasStates: false
hasZip: true
canPay: true
canHasW9Form: false
- id: 191
code: SE
name: Sweden
hasStates: false
hasZip: true
canPay: true
canHasW9Form: false
- id: 192
code: CH
name: Switzerland
hasStates: false
hasZip: true
canPay: true
canHasW9Form: false
- id: 193
code: SY
name: Syria
hasStates: false
hasZip: false
canPay: false
canHasW9Form: false
- id: 194
code: TW
name: Taiwan
hasStates: false
hasZip: true
canPay: true
canHasW9Form: false
- id: 195
code: TJ
name: Tajikistan
hasStates: false
hasZip: true
canPay: true
canHasW9Form: false
- id: 196
code: TZ
name: Tanzania
hasStates: false
hasZip: false
canPay: true
canHasW9Form: false
- id: 197
code: TH
name: Thailand
hasStates: false
hasZip: true
canPay: true
canHasW9Form: false
- id: 198
code: TB
name: Tibet
hasStates: false
hasZip: true
canPay: true
canHasW9Form: false
- id: 199
code: TL
name: Timor-Leste
hasStates: false
hasZip: false
canPay: true
canHasW9Form: false
- id: 200
code: TG
name: Togo
hasStates: false
hasZip: true
canPay: true
canHasW9Form: false
- id: 201
code: TO
name: Tonga
hasStates: false
hasZip: false
canPay: true
canHasW9Form: false
- id: 202
code: TT
name: Trinidad and Tobago
hasStates: false
hasZip: false
canPay: true
canHasW9Form: false
- id: 203
code: TN
name: Tunisia
hasStates: false
hasZip: true
canPay: true
canHasW9Form: false
- id: 204
code: TR
name: Turkey
hasStates: false
hasZip: true
canPay: true
canHasW9Form: false
- id: 205
code: TM
name: Turkmenistan
hasStates: false
hasZip: true
canPay: true
canHasW9Form: false
- id: 206
code: TC
name: Turks and Caicos Islands
hasStates: false
hasZip: true
canPay: true
canHasW9Form: false
- id: 207
code: TV
name: Tuvalu
hasStates: false
hasZip: false
canPay: true
canHasW9Form: false
- id: 208
code: AE
name: UAE
hasStates: true
hasZip: false
canPay: true
canHasW9Form: false
- id: 209
code: UG
name: Uganda
hasStates: false
hasZip: false
canPay: true
canHasW9Form: false
- id: 210
code: UA
name: Ukraine
hasStates: false
hasZip: true
canPay: true
canHasW9Form: false
- id: 213
code: UY
name: Uruguay
hasStates: false
hasZip: true
canPay: true
canHasW9Form: false
- id: 214
code: VI
name: US Virgin Islands
hasStates: false
hasZip: true
canPay: true
canHasW9Form: false
- id: 215
code: UZ
name: Uzbekistan
hasStates: false
hasZip: true
canPay: true
canHasW9Form: false
- id: 216
code: VU
name: Vanuatu
hasStates: false
hasZip: false
canPay: true
canHasW9Form: false
- id: 217
code: VA
name: Vatican City
hasStates: false
hasZip: true
canPay: true
canHasW9Form: false
- id: 218
code: VE
name: Venezuela
hasStates: false
hasZip: true
canPay: false
canHasW9Form: false
- id: 219
code: VN
name: Vietnam
hasStates: false
hasZip: true
canPay: true
canHasW9Form: false
- id: 220
code: WF
name: Wallis and Futuna
hasStates: false
hasZip: true
canPay: true
canHasW9Form: false
- id: 221
code: YE
name: Yemen
hasStates: false
hasZip: false
canPay: false
canHasW9Form: false
- id: 222
code: ZM
name: Zambia
hasStates: false
hasZip: true
canPay: true
canHasW9Form: false
- id: 223
code: ZW
name: Zimbabwe
hasStates: false
hasZip: false
canPay: false
canHasW9Form: false
items:
type: object
properties:
id:
type: integer
example: 212
code:
type: string
example: US
name:
type: string
example: United States of America
hasStates:
type: boolean
example: true
hasZip:
type: boolean
example: true
canPay:
type: boolean
example: true
canHasW9Form:
type: boolean
example: false
_meta:
type: object
properties:
_credits:
type: object
properties:
used:
type: integer
example: 1
balance:
type: integer
example: 999999997
note:
type: string
example: Always
_cache:
type: object
properties:
is_cached:
type: boolean
example: false
note:
type: string
example: Cache disabled for this endpoint
_rate_limits:
type: object
properties:
limit_minute:
type: integer
example: 10000000
limit_day:
type: integer
example: 50000
remaining_minute:
type: integer
example: 9999999
remaining_day:
type: integer
example: 49945
tags:
- Banking
components:
securitySchemes:
default:
type: http
scheme: bearer
description: Get your API Key from OnlyFansAPI Console -
https://app.onlyfansapi.com/api-keys
````
# List Banned Words (/api-reference/banned-words/list-banned-words)
Get a paginated, filterable list of the OnlyFans banned words OFAPI screens against. Use the `risk_level` values (`strict_ban`, `risky`, `replace_soften`) with the `blockBannedWords` parameter on the send/edit message, post, and mass-message endpoints.
## OpenAPI
````yaml https://app.onlyfansapi.com/scribe-docs/openapi.yaml get /api/banned-words
openapi: 3.0.3
info:
title: OnlyFans API
description: ""
version: 1.0.0
servers:
- url: https://app.onlyfansapi.com
security:
- default: []
tags:
- name: AI Voice Messages
description: ""
- name: API Keys
description: ""
- name: Account
description: Endpoints for your linked accounts
- name: Analytics - Financial
description: APIs for retrieving financial analytics data
- name: Analytics - Summary
description: APIs for retrieving summary analytics data
- name: Banking
description: Operations related to user banking details, payout methods, legal
and tax information, and account country settings.
- name: Banned Words
description: Reference list of OnlyFans banned words used by the
`blockBannedWords` screening parameter
- name: Blocked / Restricted Users
description: APIs for listing the users an account has blocked or restricted
- name: Chargebacks
description: ""
- name: Chat Messages
description: ""
- name: Chats
description: ""
- name: Client Sessions
description: ""
- name: Connect OnlyFans Account
description: ""
- name: Data Exports
description: APIs for managing data exports
- name: Engagement / Messages
description: ""
- name: Fans
description: APIs for managing OnlyFans fans (subscribers)
- name: Fans - AI Summary
description: APIs for generating and retrieving AI-powered fan profile summaries
- name: Following
description: APIs for managing OnlyFans followings (people you're subscribed to)
- name: Free Trial Links
description: APIs for managing Free Trial Links. Revenue totals are net earnings
after refunds and chargebacks. `revenue.chargebacks` (or
`summary.chargebacks_total` in stats) is the positive cached net amount
already excluded from revenue; do not subtract it again. Spender responses
include chargebacks across all attributed periods for each fan with
positive net revenue.
- name: Giphy
description: ""
- name: Link Tags
description: APIs for managing tags on free trial links, tracking links, and Smart Links
- name: Mass Messaging
description: ""
- name: Media
description: ""
- name: Media Vault
description: ""
- name: Media Vault Lists
description: ""
- name: Notifications
description: Endpoints for managingr account notifications
- name: Payouts
description: ""
- name: Post Comments
description: ""
- name: Post Labels
description: APIs for managing your post labels
- name: Posts
description: APIs for managing OnlyFans posts
- name: Profile Content
description: Read another user's profile content using your connected OnlyFans
account. OnlyFans enforces subscription and purchase requirements; these
endpoints do not unlock content. Response samples use captured OnlyFans
payloads with anonymized IDs, text, and media URLs; OFAPI metadata values
are illustrative.
- name: Promotions
description: ""
- name: Public Profiles
description: ""
- name: Queue
description: ""
- name: Release Forms
description: APIs for managing OnlyFans release forms
- name: Saved For Later (Messages)
description: ""
- name: Saved For Later (Posts)
description: ""
- name: Settings
description: ""
- name: Shared Free Trial Links
description: APIs for Free Trial Links that other OF creators have shared with
this account. Revenue, cost, and spender data are not available for shared
links.
- name: Shared Tracking Links
description: APIs for Tracking Links (campaigns) that other OF creators have
shared with this account. Revenue, cost, and spender data are not
available for shared campaigns.
- name: Smart Link Postbacks
description: APIs for managing Smart Link postback destinations
- name: Smart Links
description: APIs for managing Smart Links (Free Trial Links and Tracking Links
with pooled inventory)
- name: Statistics
description: ""
- name: Stored Free Trial Links
description: Instant APIs for retrieving stored free trial links from the
OnlyFansAPI Cache (free, no credits used). `revenue.total` is net earnings
after refunds and chargebacks. `revenue.chargebacks` is the positive
cached net amount already excluded from that total; do not subtract it
again.
- name: Stored Shared Free Trial Links
description: Instant APIs for retrieving stored shared Free Trial Links from the
OnlyFansAPI Cache (free, no credits used)
- name: Stored Shared Tracking Links
description: Instant APIs for retrieving stored shared Tracking Links
(campaigns) from the OnlyFansAPI Cache (free, no credits used)
- name: Stored Tracking Links
description: Instant APIs for retrieving stored tracking links from the
OnlyFansAPI Cache (free, no credits used). `revenue.total` is net earnings
after refunds and chargebacks. `revenue.chargebacks` is the positive
cached net amount already excluded from that total; do not subtract it
again.
- name: Stories
description: APIs for managing OnlyFans stories
- name: Story Highlights
description: APIs for managing OnlyFans story highlights
- name: Subscription Bundles
description: ""
- name: Tracking Links
description: APIs for managing tracking links. Revenue totals are net earnings
after refunds and chargebacks. `revenue.chargebacks` (or
`summary.chargebacks_total` in stats) is the positive cached net amount
already excluded from revenue; do not subtract it again. Spender responses
include chargebacks across all attributed periods for each fan with
positive net revenue.
- name: Transactions
description: APIs for managing OnlyFans transactions
- name: Usage
description: Credit usage reporting for your team
- name: User List Collections
description: ""
- name: Users
description: APIs for fetching OnlyFans users
- name: Webhooks
description: ""
paths:
/api/banned-words:
get:
summary: List Banned Words
operationId: listBannedWords
description: Get a paginated, filterable list of the OnlyFans banned words OFAPI
screens against. Use the `risk_level` values (`strict_ban`, `risky`,
`replace_soften`) with the `blockBannedWords` parameter on the send/edit
message, post, and mass-message endpoints.
parameters:
- in: query
name: category
description: Filter by exact category, e.g. "Non-consensual acts". Must not be
greater than 255 characters.
example: null
required: false
schema:
type: string
description: Filter by exact category, e.g. "Non-consensual acts". Must not be
greater than 255 characters.
example: null
nullable: true
- in: query
name: risk_level
description: "Filter by risk level: `strict_ban`, `risky`, or `replace_soften`."
example: strict_ban
required: false
schema:
type: string
description: "Filter by risk level: `strict_ban`, `risky`, or `replace_soften`."
example: strict_ban
enum:
- strict_ban
- risky
- replace_soften
nullable: true
- in: query
name: search
description: Search within the word or its base form. Must not be greater than
255 characters.
example: null
required: false
schema:
type: string
description: Search within the word or its base form. Must not be greater than
255 characters.
example: null
nullable: true
- in: query
name: per_page
description: Number of words to return per page (1-100, default 50). Must be at
least 1. Must not be greater than 100.
example: 50
required: false
schema:
type: integer
description: Number of words to return per page (1-100, default 50). Must be at
least 1. Must not be greater than 100.
example: 50
responses:
"200":
description: Success
content:
application/json:
schema:
type: object
example:
data:
- word: abduct
base: abduct
category: Non-consensual acts
risk_level: strict_ban
safe_alternatives: Avoid entirely. If needed, use “consensual roleplay,”
“fantasy scenario,” “dominant/submissive (consensual).”
notes: null
regex_pattern: "[aA@4][^a-zA-Z0-9_]{0,2}[bB8][^a-zA-Z0-9_]{0,2}[dD][^a-zA-Z0-9_\
]{0,2}[uUvV][^a-zA-Z0-9_]{0,2}[cC\\(][^a-zA-Z0-9_]{0,2}\
[tT7+]"
- word: ballbusting
base: ballbusting
category: BDSM & fetish terms (violent/extreme)
risk_level: risky
safe_alternatives: Use “impact play (consensual),” “intense roleplay.”
notes: null
regex_pattern: null
- word: drink
base: drink
category: Substances/intoxication
risk_level: replace_soften
safe_alternatives: Use “relaxed,” “wind-down,” “chill night.”
notes: null
regex_pattern: null
links:
first: https://app.onlyfansapi.com/api/banned-words?page=1
last: https://app.onlyfansapi.com/api/banned-words?page=34
prev: null
next: https://app.onlyfansapi.com/api/banned-words?page=2
meta:
current_page: 1
from: 1
last_page: 34
path: https://app.onlyfansapi.com/api/banned-words
per_page: 50
to: 50
total: 1668
properties:
data:
type: array
example:
- word: abduct
base: abduct
category: Non-consensual acts
risk_level: strict_ban
safe_alternatives: Avoid entirely. If needed, use “consensual roleplay,”
“fantasy scenario,” “dominant/submissive
(consensual).”
notes: null
regex_pattern: "[aA@4][^a-zA-Z0-9_]{0,2}[bB8][^a-zA-Z0-9_]{0,2}[dD][^a-zA-Z0-9_\
]{0,2}[uUvV][^a-zA-Z0-9_]{0,2}[cC\\(][^a-zA-Z0-9_]{0,\
2}[tT7+]"
- word: ballbusting
base: ballbusting
category: BDSM & fetish terms (violent/extreme)
risk_level: risky
safe_alternatives: Use “impact play (consensual),” “intense roleplay.”
notes: null
regex_pattern: null
- word: drink
base: drink
category: Substances/intoxication
risk_level: replace_soften
safe_alternatives: Use “relaxed,” “wind-down,” “chill night.”
notes: null
regex_pattern: null
items:
type: object
properties:
word:
type: string
example: abduct
base:
type: string
example: abduct
category:
type: string
example: Non-consensual acts
risk_level:
type: string
example: strict_ban
safe_alternatives:
type: string
example: Avoid entirely. If needed, use “consensual roleplay,” “fantasy
scenario,” “dominant/submissive (consensual).”
notes:
type: string
example: null
nullable: true
regex_pattern:
type: string
example: "[aA@4][^a-zA-Z0-9_]{0,2}[bB8][^a-zA-Z0-9_]{0,2}[dD][^a-zA-Z0-9_]{0,2}\
[uUvV][^a-zA-Z0-9_]{0,2}[cC\\(][^a-zA-Z0-9_]{0,2}[t\
T7+]"
links:
type: object
properties:
first:
type: string
example: https://app.onlyfansapi.com/api/banned-words?page=1
last:
type: string
example: https://app.onlyfansapi.com/api/banned-words?page=34
prev:
type: string
example: null
nullable: true
next:
type: string
example: https://app.onlyfansapi.com/api/banned-words?page=2
meta:
type: object
properties:
current_page:
type: integer
example: 1
from:
type: integer
example: 1
last_page:
type: integer
example: 34
path:
type: string
example: https://app.onlyfansapi.com/api/banned-words
per_page:
type: integer
example: 50
to:
type: integer
example: 50
total:
type: integer
example: 1668
tags:
- Banned Words
components:
securitySchemes:
default:
type: http
scheme: bearer
description: Get your API Key from OnlyFansAPI Console -
https://app.onlyfansapi.com/api-keys
````
# Calculate Chargeback Ratio (/api-reference/chargebacks/calculate-chargeback-ratio)
The Chargeback Ratio reflects the number of chargebacks compared to the total number of payments as a percentage. Ideally, your Chargeback Ratio should be under 1%.
## OpenAPI
````yaml https://app.onlyfansapi.com/scribe-docs/openapi.yaml get /api/{account}/chargebacks/ratio
openapi: 3.0.3
info:
title: OnlyFans API
description: ""
version: 1.0.0
servers:
- url: https://app.onlyfansapi.com
security:
- default: []
tags:
- name: AI Voice Messages
description: ""
- name: API Keys
description: ""
- name: Account
description: Endpoints for your linked accounts
- name: Analytics - Financial
description: APIs for retrieving financial analytics data
- name: Analytics - Summary
description: APIs for retrieving summary analytics data
- name: Banking
description: Operations related to user banking details, payout methods, legal
and tax information, and account country settings.
- name: Banned Words
description: Reference list of OnlyFans banned words used by the
`blockBannedWords` screening parameter
- name: Blocked / Restricted Users
description: APIs for listing the users an account has blocked or restricted
- name: Chargebacks
description: ""
- name: Chat Messages
description: ""
- name: Chats
description: ""
- name: Client Sessions
description: ""
- name: Connect OnlyFans Account
description: ""
- name: Data Exports
description: APIs for managing data exports
- name: Engagement / Messages
description: ""
- name: Fans
description: APIs for managing OnlyFans fans (subscribers)
- name: Fans - AI Summary
description: APIs for generating and retrieving AI-powered fan profile summaries
- name: Following
description: APIs for managing OnlyFans followings (people you're subscribed to)
- name: Free Trial Links
description: APIs for managing Free Trial Links. Revenue totals are net earnings
after refunds and chargebacks. `revenue.chargebacks` (or
`summary.chargebacks_total` in stats) is the positive cached net amount
already excluded from revenue; do not subtract it again. Spender responses
include chargebacks across all attributed periods for each fan with
positive net revenue.
- name: Giphy
description: ""
- name: Link Tags
description: APIs for managing tags on free trial links, tracking links, and Smart Links
- name: Mass Messaging
description: ""
- name: Media
description: ""
- name: Media Vault
description: ""
- name: Media Vault Lists
description: ""
- name: Notifications
description: Endpoints for managingr account notifications
- name: Payouts
description: ""
- name: Post Comments
description: ""
- name: Post Labels
description: APIs for managing your post labels
- name: Posts
description: APIs for managing OnlyFans posts
- name: Profile Content
description: Read another user's profile content using your connected OnlyFans
account. OnlyFans enforces subscription and purchase requirements; these
endpoints do not unlock content. Response samples use captured OnlyFans
payloads with anonymized IDs, text, and media URLs; OFAPI metadata values
are illustrative.
- name: Promotions
description: ""
- name: Public Profiles
description: ""
- name: Queue
description: ""
- name: Release Forms
description: APIs for managing OnlyFans release forms
- name: Saved For Later (Messages)
description: ""
- name: Saved For Later (Posts)
description: ""
- name: Settings
description: ""
- name: Shared Free Trial Links
description: APIs for Free Trial Links that other OF creators have shared with
this account. Revenue, cost, and spender data are not available for shared
links.
- name: Shared Tracking Links
description: APIs for Tracking Links (campaigns) that other OF creators have
shared with this account. Revenue, cost, and spender data are not
available for shared campaigns.
- name: Smart Link Postbacks
description: APIs for managing Smart Link postback destinations
- name: Smart Links
description: APIs for managing Smart Links (Free Trial Links and Tracking Links
with pooled inventory)
- name: Statistics
description: ""
- name: Stored Free Trial Links
description: Instant APIs for retrieving stored free trial links from the
OnlyFansAPI Cache (free, no credits used). `revenue.total` is net earnings
after refunds and chargebacks. `revenue.chargebacks` is the positive
cached net amount already excluded from that total; do not subtract it
again.
- name: Stored Shared Free Trial Links
description: Instant APIs for retrieving stored shared Free Trial Links from the
OnlyFansAPI Cache (free, no credits used)
- name: Stored Shared Tracking Links
description: Instant APIs for retrieving stored shared Tracking Links
(campaigns) from the OnlyFansAPI Cache (free, no credits used)
- name: Stored Tracking Links
description: Instant APIs for retrieving stored tracking links from the
OnlyFansAPI Cache (free, no credits used). `revenue.total` is net earnings
after refunds and chargebacks. `revenue.chargebacks` is the positive
cached net amount already excluded from that total; do not subtract it
again.
- name: Stories
description: APIs for managing OnlyFans stories
- name: Story Highlights
description: APIs for managing OnlyFans story highlights
- name: Subscription Bundles
description: ""
- name: Tracking Links
description: APIs for managing tracking links. Revenue totals are net earnings
after refunds and chargebacks. `revenue.chargebacks` (or
`summary.chargebacks_total` in stats) is the positive cached net amount
already excluded from revenue; do not subtract it again. Spender responses
include chargebacks across all attributed periods for each fan with
positive net revenue.
- name: Transactions
description: APIs for managing OnlyFans transactions
- name: Usage
description: Credit usage reporting for your team
- name: User List Collections
description: ""
- name: Users
description: APIs for fetching OnlyFans users
- name: Webhooks
description: ""
paths:
/api/{account}/chargebacks/ratio:
parameters:
- in: path
name: account
description: The Account ID
example: acct_XXXXXXXXXXXXXXX
required: true
schema:
type: string
get:
summary: Calculate Chargeback Ratio
operationId: calculateChargebackRatio
description: The Chargeback Ratio reflects the number of chargebacks compared to
the total number of payments as a percentage. Ideally, your Chargeback
Ratio should be under 1%.
parameters:
- in: query
name: start_date
description: The start date for the chargeback ratio. Keep empty to get all.
example: 2025-01-01 00:00:00
required: false
schema:
type: string
description: The start date for the chargeback ratio. Keep empty to get all.
example: 2025-01-01 00:00:00
- in: query
name: end_date
description: The end date for the chargeback ratio. Keep empty to get all.
example: 2025-03-31 23:59:59
required: false
schema:
type: string
description: The end date for the chargeback ratio. Keep empty to get all.
example: 2025-03-31 23:59:59
responses:
"200":
description: ""
content:
application/json:
schema:
type: object
example:
data:
chargebacksRatio: 0.08
_meta:
_credits:
used: 1
balance: 999964320
note: Always
_cache:
is_cached: false
note: Cache disabled for this endpoint
_rate_limits:
limit_minute: 1000
limit_day: 50000
remaining_minute: 999
remaining_day: 49992
properties:
data:
type: object
properties:
chargebacksRatio:
type: number
example: 0.08
_meta:
type: object
properties:
_credits:
type: object
properties:
used:
type: integer
example: 1
balance:
type: integer
example: 999964320
note:
type: string
example: Always
_cache:
type: object
properties:
is_cached:
type: boolean
example: false
note:
type: string
example: Cache disabled for this endpoint
_rate_limits:
type: object
properties:
limit_minute:
type: integer
example: 1000
limit_day:
type: integer
example: 50000
remaining_minute:
type: integer
example: 999
remaining_day:
type: integer
example: 49992
tags:
- Chargebacks
components:
securitySchemes:
default:
type: http
scheme: bearer
description: Get your API Key from OnlyFansAPI Console -
https://app.onlyfansapi.com/api-keys
````
# List Chargeback Statistics (/api-reference/chargebacks/list-chargeback-statistics)
List chargeback counts & amounts per hour, day or month.
## OpenAPI
````yaml https://app.onlyfansapi.com/scribe-docs/openapi.yaml get /api/{account}/chargebacks/statistics
openapi: 3.0.3
info:
title: OnlyFans API
description: ""
version: 1.0.0
servers:
- url: https://app.onlyfansapi.com
security:
- default: []
tags:
- name: AI Voice Messages
description: ""
- name: API Keys
description: ""
- name: Account
description: Endpoints for your linked accounts
- name: Analytics - Financial
description: APIs for retrieving financial analytics data
- name: Analytics - Summary
description: APIs for retrieving summary analytics data
- name: Banking
description: Operations related to user banking details, payout methods, legal
and tax information, and account country settings.
- name: Banned Words
description: Reference list of OnlyFans banned words used by the
`blockBannedWords` screening parameter
- name: Blocked / Restricted Users
description: APIs for listing the users an account has blocked or restricted
- name: Chargebacks
description: ""
- name: Chat Messages
description: ""
- name: Chats
description: ""
- name: Client Sessions
description: ""
- name: Connect OnlyFans Account
description: ""
- name: Data Exports
description: APIs for managing data exports
- name: Engagement / Messages
description: ""
- name: Fans
description: APIs for managing OnlyFans fans (subscribers)
- name: Fans - AI Summary
description: APIs for generating and retrieving AI-powered fan profile summaries
- name: Following
description: APIs for managing OnlyFans followings (people you're subscribed to)
- name: Free Trial Links
description: APIs for managing Free Trial Links. Revenue totals are net earnings
after refunds and chargebacks. `revenue.chargebacks` (or
`summary.chargebacks_total` in stats) is the positive cached net amount
already excluded from revenue; do not subtract it again. Spender responses
include chargebacks across all attributed periods for each fan with
positive net revenue.
- name: Giphy
description: ""
- name: Link Tags
description: APIs for managing tags on free trial links, tracking links, and Smart Links
- name: Mass Messaging
description: ""
- name: Media
description: ""
- name: Media Vault
description: ""
- name: Media Vault Lists
description: ""
- name: Notifications
description: Endpoints for managingr account notifications
- name: Payouts
description: ""
- name: Post Comments
description: ""
- name: Post Labels
description: APIs for managing your post labels
- name: Posts
description: APIs for managing OnlyFans posts
- name: Profile Content
description: Read another user's profile content using your connected OnlyFans
account. OnlyFans enforces subscription and purchase requirements; these
endpoints do not unlock content. Response samples use captured OnlyFans
payloads with anonymized IDs, text, and media URLs; OFAPI metadata values
are illustrative.
- name: Promotions
description: ""
- name: Public Profiles
description: ""
- name: Queue
description: ""
- name: Release Forms
description: APIs for managing OnlyFans release forms
- name: Saved For Later (Messages)
description: ""
- name: Saved For Later (Posts)
description: ""
- name: Settings
description: ""
- name: Shared Free Trial Links
description: APIs for Free Trial Links that other OF creators have shared with
this account. Revenue, cost, and spender data are not available for shared
links.
- name: Shared Tracking Links
description: APIs for Tracking Links (campaigns) that other OF creators have
shared with this account. Revenue, cost, and spender data are not
available for shared campaigns.
- name: Smart Link Postbacks
description: APIs for managing Smart Link postback destinations
- name: Smart Links
description: APIs for managing Smart Links (Free Trial Links and Tracking Links
with pooled inventory)
- name: Statistics
description: ""
- name: Stored Free Trial Links
description: Instant APIs for retrieving stored free trial links from the
OnlyFansAPI Cache (free, no credits used). `revenue.total` is net earnings
after refunds and chargebacks. `revenue.chargebacks` is the positive
cached net amount already excluded from that total; do not subtract it
again.
- name: Stored Shared Free Trial Links
description: Instant APIs for retrieving stored shared Free Trial Links from the
OnlyFansAPI Cache (free, no credits used)
- name: Stored Shared Tracking Links
description: Instant APIs for retrieving stored shared Tracking Links
(campaigns) from the OnlyFansAPI Cache (free, no credits used)
- name: Stored Tracking Links
description: Instant APIs for retrieving stored tracking links from the
OnlyFansAPI Cache (free, no credits used). `revenue.total` is net earnings
after refunds and chargebacks. `revenue.chargebacks` is the positive
cached net amount already excluded from that total; do not subtract it
again.
- name: Stories
description: APIs for managing OnlyFans stories
- name: Story Highlights
description: APIs for managing OnlyFans story highlights
- name: Subscription Bundles
description: ""
- name: Tracking Links
description: APIs for managing tracking links. Revenue totals are net earnings
after refunds and chargebacks. `revenue.chargebacks` (or
`summary.chargebacks_total` in stats) is the positive cached net amount
already excluded from revenue; do not subtract it again. Spender responses
include chargebacks across all attributed periods for each fan with
positive net revenue.
- name: Transactions
description: APIs for managing OnlyFans transactions
- name: Usage
description: Credit usage reporting for your team
- name: User List Collections
description: ""
- name: Users
description: APIs for fetching OnlyFans users
- name: Webhooks
description: ""
paths:
/api/{account}/chargebacks/statistics:
parameters:
- in: path
name: account
description: The Account ID
example: acct_XXXXXXXXXXXXXXX
required: true
schema:
type: string
get:
summary: List Chargeback Statistics
operationId: listChargebackStatistics
description: List chargeback counts & amounts per hour, day or month.
parameters:
- in: query
name: start_date
description: The start date for the chargebacks. Keep empty to get all.
example: 2025-01-01 00:00:00
required: false
schema:
type: string
description: The start date for the chargebacks. Keep empty to get all.
example: 2025-01-01 00:00:00
- in: query
name: end_date
description: The end date for the chargebacks. Keep empty to get all.
example: 2025-03-31 23:59:59
required: false
schema:
type: string
description: The end date for the chargebacks. Keep empty to get all.
example: 2025-03-31 23:59:59
responses:
"200":
description: ""
content:
application/json:
schema:
type: object
example:
data:
chartAmount:
- date: 2025-01-01T00:00:00+00:00
count: 123.45
chartCount:
- date: 2025-01-01T00:00:00+00:00
count: 123
total: 123.45
delta: 100
_meta:
_credits:
used: 1
balance: 999964316
note: Always
_cache:
is_cached: false
note: Cache disabled for this endpoint
_rate_limits:
limit_minute: 1000
limit_day: 50000
remaining_minute: 996
remaining_day: 49988
properties:
data:
type: object
properties:
chartAmount:
type: array
example:
- date: 2025-01-01T00:00:00+00:00
count: 123.45
items:
type: object
properties:
date:
type: string
example: 2025-01-01T00:00:00+00:00
count:
type: number
example: 123.45
chartCount:
type: array
example:
- date: 2025-01-01T00:00:00+00:00
count: 123
items:
type: object
properties:
date:
type: string
example: 2025-01-01T00:00:00+00:00
count:
type: integer
example: 123
total:
type: number
example: 123.45
delta:
type: integer
example: 100
_meta:
type: object
properties:
_credits:
type: object
properties:
used:
type: integer
example: 1
balance:
type: integer
example: 999964316
note:
type: string
example: Always
_cache:
type: object
properties:
is_cached:
type: boolean
example: false
note:
type: string
example: Cache disabled for this endpoint
_rate_limits:
type: object
properties:
limit_minute:
type: integer
example: 1000
limit_day:
type: integer
example: 50000
remaining_minute:
type: integer
example: 996
remaining_day:
type: integer
example: 49988
tags:
- Chargebacks
components:
securitySchemes:
default:
type: http
scheme: bearer
description: Get your API Key from OnlyFansAPI Console -
https://app.onlyfansapi.com/api-keys
````
# List Chargebacks (/api-reference/chargebacks/list-chargebacks)
Retrieve a list of chargebacks within a specified date range. Possible statuses are `loading`, `done`, `undo`.
## OpenAPI
````yaml https://app.onlyfansapi.com/scribe-docs/openapi.yaml get /api/{account}/chargebacks
openapi: 3.0.3
info:
title: OnlyFans API
description: ""
version: 1.0.0
servers:
- url: https://app.onlyfansapi.com
security:
- default: []
tags:
- name: AI Voice Messages
description: ""
- name: API Keys
description: ""
- name: Account
description: Endpoints for your linked accounts
- name: Analytics - Financial
description: APIs for retrieving financial analytics data
- name: Analytics - Summary
description: APIs for retrieving summary analytics data
- name: Banking
description: Operations related to user banking details, payout methods, legal
and tax information, and account country settings.
- name: Banned Words
description: Reference list of OnlyFans banned words used by the
`blockBannedWords` screening parameter
- name: Blocked / Restricted Users
description: APIs for listing the users an account has blocked or restricted
- name: Chargebacks
description: ""
- name: Chat Messages
description: ""
- name: Chats
description: ""
- name: Client Sessions
description: ""
- name: Connect OnlyFans Account
description: ""
- name: Data Exports
description: APIs for managing data exports
- name: Engagement / Messages
description: ""
- name: Fans
description: APIs for managing OnlyFans fans (subscribers)
- name: Fans - AI Summary
description: APIs for generating and retrieving AI-powered fan profile summaries
- name: Following
description: APIs for managing OnlyFans followings (people you're subscribed to)
- name: Free Trial Links
description: APIs for managing Free Trial Links. Revenue totals are net earnings
after refunds and chargebacks. `revenue.chargebacks` (or
`summary.chargebacks_total` in stats) is the positive cached net amount
already excluded from revenue; do not subtract it again. Spender responses
include chargebacks across all attributed periods for each fan with
positive net revenue.
- name: Giphy
description: ""
- name: Link Tags
description: APIs for managing tags on free trial links, tracking links, and Smart Links
- name: Mass Messaging
description: ""
- name: Media
description: ""
- name: Media Vault
description: ""
- name: Media Vault Lists
description: ""
- name: Notifications
description: Endpoints for managingr account notifications
- name: Payouts
description: ""
- name: Post Comments
description: ""
- name: Post Labels
description: APIs for managing your post labels
- name: Posts
description: APIs for managing OnlyFans posts
- name: Profile Content
description: Read another user's profile content using your connected OnlyFans
account. OnlyFans enforces subscription and purchase requirements; these
endpoints do not unlock content. Response samples use captured OnlyFans
payloads with anonymized IDs, text, and media URLs; OFAPI metadata values
are illustrative.
- name: Promotions
description: ""
- name: Public Profiles
description: ""
- name: Queue
description: ""
- name: Release Forms
description: APIs for managing OnlyFans release forms
- name: Saved For Later (Messages)
description: ""
- name: Saved For Later (Posts)
description: ""
- name: Settings
description: ""
- name: Shared Free Trial Links
description: APIs for Free Trial Links that other OF creators have shared with
this account. Revenue, cost, and spender data are not available for shared
links.
- name: Shared Tracking Links
description: APIs for Tracking Links (campaigns) that other OF creators have
shared with this account. Revenue, cost, and spender data are not
available for shared campaigns.
- name: Smart Link Postbacks
description: APIs for managing Smart Link postback destinations
- name: Smart Links
description: APIs for managing Smart Links (Free Trial Links and Tracking Links
with pooled inventory)
- name: Statistics
description: ""
- name: Stored Free Trial Links
description: Instant APIs for retrieving stored free trial links from the
OnlyFansAPI Cache (free, no credits used). `revenue.total` is net earnings
after refunds and chargebacks. `revenue.chargebacks` is the positive
cached net amount already excluded from that total; do not subtract it
again.
- name: Stored Shared Free Trial Links
description: Instant APIs for retrieving stored shared Free Trial Links from the
OnlyFansAPI Cache (free, no credits used)
- name: Stored Shared Tracking Links
description: Instant APIs for retrieving stored shared Tracking Links
(campaigns) from the OnlyFansAPI Cache (free, no credits used)
- name: Stored Tracking Links
description: Instant APIs for retrieving stored tracking links from the
OnlyFansAPI Cache (free, no credits used). `revenue.total` is net earnings
after refunds and chargebacks. `revenue.chargebacks` is the positive
cached net amount already excluded from that total; do not subtract it
again.
- name: Stories
description: APIs for managing OnlyFans stories
- name: Story Highlights
description: APIs for managing OnlyFans story highlights
- name: Subscription Bundles
description: ""
- name: Tracking Links
description: APIs for managing tracking links. Revenue totals are net earnings
after refunds and chargebacks. `revenue.chargebacks` (or
`summary.chargebacks_total` in stats) is the positive cached net amount
already excluded from revenue; do not subtract it again. Spender responses
include chargebacks across all attributed periods for each fan with
positive net revenue.
- name: Transactions
description: APIs for managing OnlyFans transactions
- name: Usage
description: Credit usage reporting for your team
- name: User List Collections
description: ""
- name: Users
description: APIs for fetching OnlyFans users
- name: Webhooks
description: ""
paths:
/api/{account}/chargebacks:
parameters:
- in: path
name: account
description: The Account ID
example: acct_XXXXXXXXXXXXXXX
required: true
schema:
type: string
get:
summary: List Chargebacks
operationId: listChargebacks
description: Retrieve a list of chargebacks within a specified date range.
Possible statuses are `loading`, `done`, `undo`.
parameters:
- in: query
name: start_date
description: The start date for the chargebacks. Keep empty to get all.
example: 2025-01-01 00:00:00
required: false
schema:
type: string
description: The start date for the chargebacks. Keep empty to get all.
example: 2025-01-01 00:00:00
- in: query
name: end_date
description: The end date for the chargebacks. Keep empty to get all.
example: 2025-03-31 23:59:59
required: false
schema:
type: string
description: The end date for the chargebacks. Keep empty to get all.
example: 2025-03-31 23:59:59
- in: query
name: limit
description: Number of chargebacks to return (1-100). Default = 10
example: 50
required: false
schema:
type: string
description: Number of chargebacks to return (1-100). Default = 10
example: 50
nullable: true
- in: query
name: offset
description: Number of chargebacks to skip, used for pagination.
example: 0
required: false
schema:
type: string
description: Number of chargebacks to skip, used for pagination.
example: 0
nullable: true
responses:
"200":
description: ""
content:
application/json:
schema:
type: object
example:
data:
list:
- id: 0
createdAt: 2025-01-01T00:00:00+00:00
paymentType: tips
payment:
amount: 12.34
vatAmount: 0
taxAmount: 0
mediaTaxAmount: 0
net: 12.34
fee: 5
createdAt: 2025-01-01T00:00:00+00:00
currency: USD
description: Tip from Name
status: undo
user:
view: t
id: 123
name: Name
username: username
isVerified: false
avatar: null
avatarThumbs: null
payoutPendingDays: 7
id: abc123
marker: 123
_meta:
_credits:
used: 1
balance: 999964322
note: Always
_cache:
is_cached: false
note: Cache disabled for this endpoint
_rate_limits:
limit_minute: 1000
limit_day: 50000
remaining_minute: 999
remaining_day: 49994
properties:
data:
type: object
properties:
list:
type: array
example:
- id: 0
createdAt: 2025-01-01T00:00:00+00:00
paymentType: tips
payment:
amount: 12.34
vatAmount: 0
taxAmount: 0
mediaTaxAmount: 0
net: 12.34
fee: 5
createdAt: 2025-01-01T00:00:00+00:00
currency: USD
description: Tip from Name
status: undo
user:
view: t
id: 123
name: Name
username: username
isVerified: false
avatar: null
avatarThumbs: null
payoutPendingDays: 7
id: abc123
items:
type: object
properties:
id:
type: integer
example: 0
createdAt:
type: string
example: 2025-01-01T00:00:00+00:00
paymentType:
type: string
example: tips
payment:
type: object
properties:
amount:
type: number
example: 12.34
vatAmount:
type: integer
example: 0
taxAmount:
type: integer
example: 0
mediaTaxAmount:
type: integer
example: 0
net:
type: number
example: 12.34
fee:
type: integer
example: 5
createdAt:
type: string
example: 2025-01-01T00:00:00+00:00
currency:
type: string
example: USD
description:
type: string
example: Tip from Name
status:
type: string
example: undo
user:
type: object
properties:
view:
type: string
example: t
id:
type: integer
example: 123
name:
type: string
example: Name
username:
type: string
example: username
isVerified:
type: boolean
example: false
avatar:
type: string
example: null
nullable: true
avatarThumbs:
type: string
example: null
nullable: true
payoutPendingDays:
type: integer
example: 7
id:
type: string
example: abc123
marker:
type: integer
example: 123
_meta:
type: object
properties:
_credits:
type: object
properties:
used:
type: integer
example: 1
balance:
type: integer
example: 999964322
note:
type: string
example: Always
_cache:
type: object
properties:
is_cached:
type: boolean
example: false
note:
type: string
example: Cache disabled for this endpoint
_rate_limits:
type: object
properties:
limit_minute:
type: integer
example: 1000
limit_day:
type: integer
example: 50000
remaining_minute:
type: integer
example: 999
remaining_day:
type: integer
example: 49994
tags:
- Chargebacks
components:
securitySchemes:
default:
type: http
scheme: bearer
description: Get your API Key from OnlyFansAPI Console -
https://app.onlyfansapi.com/api-keys
````
# List Blocked Users (/api-reference/blocked-restricted-users/list-blocked-users)
Get a paginated list of users the account has blocked. Optionally search with `query`.
## OpenAPI
````yaml https://app.onlyfansapi.com/scribe-docs/openapi.yaml get /api/{account}/users/blocked
openapi: 3.0.3
info:
title: OnlyFans API
description: ""
version: 1.0.0
servers:
- url: https://app.onlyfansapi.com
security:
- default: []
tags:
- name: AI Voice Messages
description: ""
- name: API Keys
description: ""
- name: Account
description: Endpoints for your linked accounts
- name: Analytics - Financial
description: APIs for retrieving financial analytics data
- name: Analytics - Summary
description: APIs for retrieving summary analytics data
- name: Banking
description: Operations related to user banking details, payout methods, legal
and tax information, and account country settings.
- name: Banned Words
description: Reference list of OnlyFans banned words used by the
`blockBannedWords` screening parameter
- name: Blocked / Restricted Users
description: APIs for listing the users an account has blocked or restricted
- name: Chargebacks
description: ""
- name: Chat Messages
description: ""
- name: Chats
description: ""
- name: Client Sessions
description: ""
- name: Connect OnlyFans Account
description: ""
- name: Data Exports
description: APIs for managing data exports
- name: Engagement / Messages
description: ""
- name: Fans
description: APIs for managing OnlyFans fans (subscribers)
- name: Fans - AI Summary
description: APIs for generating and retrieving AI-powered fan profile summaries
- name: Following
description: APIs for managing OnlyFans followings (people you're subscribed to)
- name: Free Trial Links
description: APIs for managing Free Trial Links. Revenue totals are net earnings
after refunds and chargebacks. `revenue.chargebacks` (or
`summary.chargebacks_total` in stats) is the positive cached net amount
already excluded from revenue; do not subtract it again. Spender responses
include chargebacks across all attributed periods for each fan with
positive net revenue.
- name: Giphy
description: ""
- name: Link Tags
description: APIs for managing tags on free trial links, tracking links, and Smart Links
- name: Mass Messaging
description: ""
- name: Media
description: ""
- name: Media Vault
description: ""
- name: Media Vault Lists
description: ""
- name: Notifications
description: Endpoints for managingr account notifications
- name: Payouts
description: ""
- name: Post Comments
description: ""
- name: Post Labels
description: APIs for managing your post labels
- name: Posts
description: APIs for managing OnlyFans posts
- name: Profile Content
description: Read another user's profile content using your connected OnlyFans
account. OnlyFans enforces subscription and purchase requirements; these
endpoints do not unlock content. Response samples use captured OnlyFans
payloads with anonymized IDs, text, and media URLs; OFAPI metadata values
are illustrative.
- name: Promotions
description: ""
- name: Public Profiles
description: ""
- name: Queue
description: ""
- name: Release Forms
description: APIs for managing OnlyFans release forms
- name: Saved For Later (Messages)
description: ""
- name: Saved For Later (Posts)
description: ""
- name: Settings
description: ""
- name: Shared Free Trial Links
description: APIs for Free Trial Links that other OF creators have shared with
this account. Revenue, cost, and spender data are not available for shared
links.
- name: Shared Tracking Links
description: APIs for Tracking Links (campaigns) that other OF creators have
shared with this account. Revenue, cost, and spender data are not
available for shared campaigns.
- name: Smart Link Postbacks
description: APIs for managing Smart Link postback destinations
- name: Smart Links
description: APIs for managing Smart Links (Free Trial Links and Tracking Links
with pooled inventory)
- name: Statistics
description: ""
- name: Stored Free Trial Links
description: Instant APIs for retrieving stored free trial links from the
OnlyFansAPI Cache (free, no credits used). `revenue.total` is net earnings
after refunds and chargebacks. `revenue.chargebacks` is the positive
cached net amount already excluded from that total; do not subtract it
again.
- name: Stored Shared Free Trial Links
description: Instant APIs for retrieving stored shared Free Trial Links from the
OnlyFansAPI Cache (free, no credits used)
- name: Stored Shared Tracking Links
description: Instant APIs for retrieving stored shared Tracking Links
(campaigns) from the OnlyFansAPI Cache (free, no credits used)
- name: Stored Tracking Links
description: Instant APIs for retrieving stored tracking links from the
OnlyFansAPI Cache (free, no credits used). `revenue.total` is net earnings
after refunds and chargebacks. `revenue.chargebacks` is the positive
cached net amount already excluded from that total; do not subtract it
again.
- name: Stories
description: APIs for managing OnlyFans stories
- name: Story Highlights
description: APIs for managing OnlyFans story highlights
- name: Subscription Bundles
description: ""
- name: Tracking Links
description: APIs for managing tracking links. Revenue totals are net earnings
after refunds and chargebacks. `revenue.chargebacks` (or
`summary.chargebacks_total` in stats) is the positive cached net amount
already excluded from revenue; do not subtract it again. Spender responses
include chargebacks across all attributed periods for each fan with
positive net revenue.
- name: Transactions
description: APIs for managing OnlyFans transactions
- name: Usage
description: Credit usage reporting for your team
- name: User List Collections
description: ""
- name: Users
description: APIs for fetching OnlyFans users
- name: Webhooks
description: ""
paths:
/api/{account}/users/blocked:
parameters:
- in: path
name: account
description: The Account ID
example: acct_XXXXXXXXXXXXXXX
required: true
schema:
type: string
get:
summary: List Blocked Users
operationId: listBlockedUsers
description: Get a paginated list of users the account has blocked. Optionally
search with `query`.
parameters:
- in: query
name: limit
description: Number of users to return per page (1-50). Must be at least 1. Must
not be greater than 50.
example: 10
required: false
schema:
type: integer
description: Number of users to return per page (1-50). Must be at least 1. Must
not be greater than 50.
example: 10
- in: query
name: offset
description: Number of users to skip for pagination. Must be at least 0.
example: 0
required: false
schema:
type: integer
description: Number of users to skip for pagination. Must be at least 0.
example: 0
- in: query
name: query
description: Search within the user name or username.
example: null
required: false
schema:
type: string
description: Search within the user name or username.
example: null
nullable: true
responses:
"200":
description: ""
content:
application/json:
schema:
type: object
example:
data:
list:
- view: x
avatar: https://public.onlyfans.com/files/example/200000001/avatar.jpg
avatarThumbs:
c50: https://thumbs.onlyfans.com/public/files/thumbs/c50/example/200000001/avatar.jpg
c144: https://thumbs.onlyfans.com/public/files/thumbs/c144/example/200000001/avatar.jpg
header: https://public.onlyfans.com/files/example/200000001/header_image.jpg
headerSize:
width: 4028
height: 1250
headerThumbs:
w480: https://thumbs.onlyfans.com/public/files/thumbs/w480/example/200000001/header_image.jpg
w760: https://thumbs.onlyfans.com/public/files/thumbs/w760/example/200000001/header_image.jpg
id: 200000001
name: Example User
username: exampleuser
canLookStory: false
canCommentStory: false
hasNotViewedStory: false
isVerified: true
canPayInternal: false
hasScheduledStream: false
hasStream: false
hasStories: false
tipsEnabled: false
tipsTextEnabled: true
tipsMin: 5
tipsMinInternal: 1
tipsMax: 200
canEarn: true
canAddSubscriber: false
subscribePrice: 0
isPaywallRequired: true
isActive: true
isRestricted: false
canRestrict: true
subscribedBy: false
subscribedByExpire: null
subscribedByExpireDate: null
subscribedByAutoprolong: null
subscribedIsExpiredNow: null
currentSubscribePrice: null
subscribedOn: false
subscribedOnExpire: null
subscribedOnExpiredNow: null
subscribedOnDuration: null
listsStates:
- id: following
type: following
name: Following
hasUser: false
canAddUser: false
cannotAddUserReason: SYSTEM_LIST
- id: fans
type: fans
name: Fans
hasUser: false
canAddUser: false
cannotAddUserReason: null
- id: recent
type: recent
name: Recent (last 24 hours)
hasUser: false
canAddUser: false
cannotAddUserReason: SYSTEM_LIST
- id: muted
type: muted
name: Muted
hasUser: false
canAddUser: false
cannotAddUserReason: ALREADY_EXISTS
canReport: false
canReceiveChatMessage: false
hideChat: false
lastSeen: 2026-06-26T16:17:08+00:00
isPerformer: true
isRealPerformer: true
subscribedByData: null
subscribedOnData: null
canTrialSend: false
isBlocked: true
promoOffers: []
hasMore: true
nextOffset: 10
_pagination:
next_page: https://app.onlyfansapi.com/api/acct_abc123/users/blocked?offset=10&limit=10
_meta:
_credits:
used: 1
balance: 999999839
note: Always
_cache:
is_cached: false
note: Cache disabled for this endpoint
_rate_limits:
limit_minute: 10000000
limit_day: 50000
remaining_minute: 9999999
remaining_day: 49997
properties:
data:
type: object
properties:
list:
type: array
example:
- view: x
avatar: https://public.onlyfans.com/files/example/200000001/avatar.jpg
avatarThumbs:
c50: https://thumbs.onlyfans.com/public/files/thumbs/c50/example/200000001/avatar.jpg
c144: https://thumbs.onlyfans.com/public/files/thumbs/c144/example/200000001/avatar.jpg
header: https://public.onlyfans.com/files/example/200000001/header_image.jpg
headerSize:
width: 4028
height: 1250
headerThumbs:
w480: https://thumbs.onlyfans.com/public/files/thumbs/w480/example/200000001/header_image.jpg
w760: https://thumbs.onlyfans.com/public/files/thumbs/w760/example/200000001/header_image.jpg
id: 200000001
name: Example User
username: exampleuser
canLookStory: false
canCommentStory: false
hasNotViewedStory: false
isVerified: true
canPayInternal: false
hasScheduledStream: false
hasStream: false
hasStories: false
tipsEnabled: false
tipsTextEnabled: true
tipsMin: 5
tipsMinInternal: 1
tipsMax: 200
canEarn: true
canAddSubscriber: false
subscribePrice: 0
isPaywallRequired: true
isActive: true
isRestricted: false
canRestrict: true
subscribedBy: false
subscribedByExpire: null
subscribedByExpireDate: null
subscribedByAutoprolong: null
subscribedIsExpiredNow: null
currentSubscribePrice: null
subscribedOn: false
subscribedOnExpire: null
subscribedOnExpiredNow: null
subscribedOnDuration: null
listsStates:
- id: following
type: following
name: Following
hasUser: false
canAddUser: false
cannotAddUserReason: SYSTEM_LIST
- id: fans
type: fans
name: Fans
hasUser: false
canAddUser: false
cannotAddUserReason: null
- id: recent
type: recent
name: Recent (last 24 hours)
hasUser: false
canAddUser: false
cannotAddUserReason: SYSTEM_LIST
- id: muted
type: muted
name: Muted
hasUser: false
canAddUser: false
cannotAddUserReason: ALREADY_EXISTS
canReport: false
canReceiveChatMessage: false
hideChat: false
lastSeen: 2026-06-26T16:17:08+00:00
isPerformer: true
isRealPerformer: true
subscribedByData: null
subscribedOnData: null
canTrialSend: false
isBlocked: true
promoOffers: []
items:
type: object
properties:
view:
type: string
example: x
avatar:
type: string
example: https://public.onlyfans.com/files/example/200000001/avatar.jpg
avatarThumbs:
type: object
properties:
c50:
type: string
example: https://thumbs.onlyfans.com/public/files/thumbs/c50/example/200000001/avatar.jpg
c144:
type: string
example: https://thumbs.onlyfans.com/public/files/thumbs/c144/example/200000001/avatar.jpg
header:
type: string
example: https://public.onlyfans.com/files/example/200000001/header_image.jpg
headerSize:
type: object
properties:
width:
type: integer
example: 4028
height:
type: integer
example: 1250
headerThumbs:
type: object
properties:
w480:
type: string
example: https://thumbs.onlyfans.com/public/files/thumbs/w480/example/200000001/header_image.jpg
w760:
type: string
example: https://thumbs.onlyfans.com/public/files/thumbs/w760/example/200000001/header_image.jpg
id:
type: integer
example: 200000001
name:
type: string
example: Example User
username:
type: string
example: exampleuser
canLookStory:
type: boolean
example: false
canCommentStory:
type: boolean
example: false
hasNotViewedStory:
type: boolean
example: false
isVerified:
type: boolean
example: true
canPayInternal:
type: boolean
example: false
hasScheduledStream:
type: boolean
example: false
hasStream:
type: boolean
example: false
hasStories:
type: boolean
example: false
tipsEnabled:
type: boolean
example: false
tipsTextEnabled:
type: boolean
example: true
tipsMin:
type: integer
example: 5
tipsMinInternal:
type: integer
example: 1
tipsMax:
type: integer
example: 200
canEarn:
type: boolean
example: true
canAddSubscriber:
type: boolean
example: false
subscribePrice:
type: integer
example: 0
isPaywallRequired:
type: boolean
example: true
isActive:
type: boolean
example: true
isRestricted:
type: boolean
example: false
canRestrict:
type: boolean
example: true
subscribedBy:
type: boolean
example: false
subscribedByExpire:
type: string
example: null
nullable: true
subscribedByExpireDate:
type: string
example: null
nullable: true
subscribedByAutoprolong:
type: string
example: null
nullable: true
subscribedIsExpiredNow:
type: string
example: null
nullable: true
currentSubscribePrice:
type: string
example: null
nullable: true
subscribedOn:
type: boolean
example: false
subscribedOnExpire:
type: string
example: null
nullable: true
subscribedOnExpiredNow:
type: string
example: null
nullable: true
subscribedOnDuration:
type: string
example: null
nullable: true
listsStates:
type: array
example:
- id: following
type: following
name: Following
hasUser: false
canAddUser: false
cannotAddUserReason: SYSTEM_LIST
- id: fans
type: fans
name: Fans
hasUser: false
canAddUser: false
cannotAddUserReason: null
- id: recent
type: recent
name: Recent (last 24 hours)
hasUser: false
canAddUser: false
cannotAddUserReason: SYSTEM_LIST
- id: muted
type: muted
name: Muted
hasUser: false
canAddUser: false
cannotAddUserReason: ALREADY_EXISTS
items:
type: object
properties:
id:
type: string
example: following
type:
type: string
example: following
name:
type: string
example: Following
hasUser:
type: boolean
example: false
canAddUser:
type: boolean
example: false
cannotAddUserReason:
type: string
example: SYSTEM_LIST
canReport:
type: boolean
example: false
canReceiveChatMessage:
type: boolean
example: false
hideChat:
type: boolean
example: false
lastSeen:
type: string
example: 2026-06-26T16:17:08+00:00
isPerformer:
type: boolean
example: true
isRealPerformer:
type: boolean
example: true
subscribedByData:
type: string
example: null
nullable: true
subscribedOnData:
type: string
example: null
nullable: true
canTrialSend:
type: boolean
example: false
isBlocked:
type: boolean
example: true
promoOffers:
type: array
example: []
hasMore:
type: boolean
example: true
nextOffset:
type: integer
example: 10
_pagination:
type: object
properties:
next_page:
type: string
example: https://app.onlyfansapi.com/api/acct_abc123/users/blocked?offset=10&limit=10
_meta:
type: object
properties:
_credits:
type: object
properties:
used:
type: integer
example: 1
balance:
type: integer
example: 999999839
note:
type: string
example: Always
_cache:
type: object
properties:
is_cached:
type: boolean
example: false
note:
type: string
example: Cache disabled for this endpoint
_rate_limits:
type: object
properties:
limit_minute:
type: integer
example: 10000000
limit_day:
type: integer
example: 50000
remaining_minute:
type: integer
example: 9999999
remaining_day:
type: integer
example: 49997
tags:
- Blocked / Restricted Users
components:
securitySchemes:
default:
type: http
scheme: bearer
description: Get your API Key from OnlyFansAPI Console -
https://app.onlyfansapi.com/api-keys
````
# List Restricted Users (/api-reference/blocked-restricted-users/list-restricted-users)
Get a paginated list of users the account has restricted. Optionally search with `query`.
## OpenAPI
````yaml https://app.onlyfansapi.com/scribe-docs/openapi.yaml get /api/{account}/users/restricted
openapi: 3.0.3
info:
title: OnlyFans API
description: ""
version: 1.0.0
servers:
- url: https://app.onlyfansapi.com
security:
- default: []
tags:
- name: AI Voice Messages
description: ""
- name: API Keys
description: ""
- name: Account
description: Endpoints for your linked accounts
- name: Analytics - Financial
description: APIs for retrieving financial analytics data
- name: Analytics - Summary
description: APIs for retrieving summary analytics data
- name: Banking
description: Operations related to user banking details, payout methods, legal
and tax information, and account country settings.
- name: Banned Words
description: Reference list of OnlyFans banned words used by the
`blockBannedWords` screening parameter
- name: Blocked / Restricted Users
description: APIs for listing the users an account has blocked or restricted
- name: Chargebacks
description: ""
- name: Chat Messages
description: ""
- name: Chats
description: ""
- name: Client Sessions
description: ""
- name: Connect OnlyFans Account
description: ""
- name: Data Exports
description: APIs for managing data exports
- name: Engagement / Messages
description: ""
- name: Fans
description: APIs for managing OnlyFans fans (subscribers)
- name: Fans - AI Summary
description: APIs for generating and retrieving AI-powered fan profile summaries
- name: Following
description: APIs for managing OnlyFans followings (people you're subscribed to)
- name: Free Trial Links
description: APIs for managing Free Trial Links. Revenue totals are net earnings
after refunds and chargebacks. `revenue.chargebacks` (or
`summary.chargebacks_total` in stats) is the positive cached net amount
already excluded from revenue; do not subtract it again. Spender responses
include chargebacks across all attributed periods for each fan with
positive net revenue.
- name: Giphy
description: ""
- name: Link Tags
description: APIs for managing tags on free trial links, tracking links, and Smart Links
- name: Mass Messaging
description: ""
- name: Media
description: ""
- name: Media Vault
description: ""
- name: Media Vault Lists
description: ""
- name: Notifications
description: Endpoints for managingr account notifications
- name: Payouts
description: ""
- name: Post Comments
description: ""
- name: Post Labels
description: APIs for managing your post labels
- name: Posts
description: APIs for managing OnlyFans posts
- name: Profile Content
description: Read another user's profile content using your connected OnlyFans
account. OnlyFans enforces subscription and purchase requirements; these
endpoints do not unlock content. Response samples use captured OnlyFans
payloads with anonymized IDs, text, and media URLs; OFAPI metadata values
are illustrative.
- name: Promotions
description: ""
- name: Public Profiles
description: ""
- name: Queue
description: ""
- name: Release Forms
description: APIs for managing OnlyFans release forms
- name: Saved For Later (Messages)
description: ""
- name: Saved For Later (Posts)
description: ""
- name: Settings
description: ""
- name: Shared Free Trial Links
description: APIs for Free Trial Links that other OF creators have shared with
this account. Revenue, cost, and spender data are not available for shared
links.
- name: Shared Tracking Links
description: APIs for Tracking Links (campaigns) that other OF creators have
shared with this account. Revenue, cost, and spender data are not
available for shared campaigns.
- name: Smart Link Postbacks
description: APIs for managing Smart Link postback destinations
- name: Smart Links
description: APIs for managing Smart Links (Free Trial Links and Tracking Links
with pooled inventory)
- name: Statistics
description: ""
- name: Stored Free Trial Links
description: Instant APIs for retrieving stored free trial links from the
OnlyFansAPI Cache (free, no credits used). `revenue.total` is net earnings
after refunds and chargebacks. `revenue.chargebacks` is the positive
cached net amount already excluded from that total; do not subtract it
again.
- name: Stored Shared Free Trial Links
description: Instant APIs for retrieving stored shared Free Trial Links from the
OnlyFansAPI Cache (free, no credits used)
- name: Stored Shared Tracking Links
description: Instant APIs for retrieving stored shared Tracking Links
(campaigns) from the OnlyFansAPI Cache (free, no credits used)
- name: Stored Tracking Links
description: Instant APIs for retrieving stored tracking links from the
OnlyFansAPI Cache (free, no credits used). `revenue.total` is net earnings
after refunds and chargebacks. `revenue.chargebacks` is the positive
cached net amount already excluded from that total; do not subtract it
again.
- name: Stories
description: APIs for managing OnlyFans stories
- name: Story Highlights
description: APIs for managing OnlyFans story highlights
- name: Subscription Bundles
description: ""
- name: Tracking Links
description: APIs for managing tracking links. Revenue totals are net earnings
after refunds and chargebacks. `revenue.chargebacks` (or
`summary.chargebacks_total` in stats) is the positive cached net amount
already excluded from revenue; do not subtract it again. Spender responses
include chargebacks across all attributed periods for each fan with
positive net revenue.
- name: Transactions
description: APIs for managing OnlyFans transactions
- name: Usage
description: Credit usage reporting for your team
- name: User List Collections
description: ""
- name: Users
description: APIs for fetching OnlyFans users
- name: Webhooks
description: ""
paths:
/api/{account}/users/restricted:
parameters:
- in: path
name: account
description: The Account ID
example: acct_XXXXXXXXXXXXXXX
required: true
schema:
type: string
get:
summary: List Restricted Users
operationId: listRestrictedUsers
description: Get a paginated list of users the account has restricted.
Optionally search with `query`.
parameters:
- in: query
name: limit
description: Number of users to return per page (1-50). Must be at least 1. Must
not be greater than 50.
example: 10
required: false
schema:
type: integer
description: Number of users to return per page (1-50). Must be at least 1. Must
not be greater than 50.
example: 10
- in: query
name: offset
description: Number of users to skip for pagination. Must be at least 0.
example: 0
required: false
schema:
type: integer
description: Number of users to skip for pagination. Must be at least 0.
example: 0
- in: query
name: query
description: Search within the user name or username.
example: null
required: false
schema:
type: string
description: Search within the user name or username.
example: null
nullable: true
responses:
"200":
description: ""
content:
application/json:
schema:
type: object
example:
data:
list:
- view: x
avatar: https://public.onlyfans.com/files/example/200000002/avatar.jpg
avatarThumbs:
c50: https://thumbs.onlyfans.com/public/files/thumbs/c50/example/200000002/avatar.jpg
c144: https://thumbs.onlyfans.com/public/files/thumbs/c144/example/200000002/avatar.jpg
header: https://public.onlyfans.com/files/example/200000002/header_image.jpg
headerSize:
width: 4028
height: 1250
headerThumbs:
w480: https://thumbs.onlyfans.com/public/files/thumbs/w480/example/200000002/header_image.jpg
w760: https://thumbs.onlyfans.com/public/files/thumbs/w760/example/200000002/header_image.jpg
id: 200000002
name: Another User
username: anotheruser
canLookStory: false
canCommentStory: false
hasNotViewedStory: false
isVerified: true
canPayInternal: true
hasScheduledStream: false
hasStream: false
hasStories: false
tipsEnabled: false
tipsTextEnabled: false
tipsMin: 5
tipsMinInternal: 1
tipsMax: 200
canEarn: true
canAddSubscriber: true
subscribePrice: 0
isPaywallRequired: true
isActive: true
isRestricted: true
canRestrict: false
subscribedBy: false
subscribedByExpire: null
subscribedByExpireDate: null
subscribedByAutoprolong: null
subscribedIsExpiredNow: null
currentSubscribePrice: null
subscribedOn: false
subscribedOnExpire: null
subscribedOnExpiredNow: null
subscribedOnDuration: null
listsStates:
- id: following
type: following
name: Following
hasUser: false
canAddUser: false
cannotAddUserReason: SYSTEM_LIST
- id: fans
type: fans
name: Fans
hasUser: false
canAddUser: false
cannotAddUserReason: null
- id: recent
type: recent
name: Recent (last 24 hours)
hasUser: false
canAddUser: false
cannotAddUserReason: SYSTEM_LIST
- id: muted
type: muted
name: Muted
hasUser: false
canAddUser: true
cannotAddUserReason: null
canReport: false
canReceiveChatMessage: false
hideChat: false
lastSeen: 2026-06-26T16:37:48+00:00
isPerformer: true
isRealPerformer: true
subscribedByData: null
subscribedOnData: null
canTrialSend: false
isBlocked: false
hasMore: true
nextOffset: 10
_pagination:
next_page: https://app.onlyfansapi.com/api/acct_abc123/users/restrict?offset=10&limit=10
_meta:
_credits:
used: 1
balance: 999999839
note: Always
_cache:
is_cached: false
note: Cache disabled for this endpoint
_rate_limits:
limit_minute: 10000000
limit_day: 50000
remaining_minute: 9999999
remaining_day: 49997
properties:
data:
type: object
properties:
list:
type: array
example:
- view: x
avatar: https://public.onlyfans.com/files/example/200000002/avatar.jpg
avatarThumbs:
c50: https://thumbs.onlyfans.com/public/files/thumbs/c50/example/200000002/avatar.jpg
c144: https://thumbs.onlyfans.com/public/files/thumbs/c144/example/200000002/avatar.jpg
header: https://public.onlyfans.com/files/example/200000002/header_image.jpg
headerSize:
width: 4028
height: 1250
headerThumbs:
w480: https://thumbs.onlyfans.com/public/files/thumbs/w480/example/200000002/header_image.jpg
w760: https://thumbs.onlyfans.com/public/files/thumbs/w760/example/200000002/header_image.jpg
id: 200000002
name: Another User
username: anotheruser
canLookStory: false
canCommentStory: false
hasNotViewedStory: false
isVerified: true
canPayInternal: true
hasScheduledStream: false
hasStream: false
hasStories: false
tipsEnabled: false
tipsTextEnabled: false
tipsMin: 5
tipsMinInternal: 1
tipsMax: 200
canEarn: true
canAddSubscriber: true
subscribePrice: 0
isPaywallRequired: true
isActive: true
isRestricted: true
canRestrict: false
subscribedBy: false
subscribedByExpire: null
subscribedByExpireDate: null
subscribedByAutoprolong: null
subscribedIsExpiredNow: null
currentSubscribePrice: null
subscribedOn: false
subscribedOnExpire: null
subscribedOnExpiredNow: null
subscribedOnDuration: null
listsStates:
- id: following
type: following
name: Following
hasUser: false
canAddUser: false
cannotAddUserReason: SYSTEM_LIST
- id: fans
type: fans
name: Fans
hasUser: false
canAddUser: false
cannotAddUserReason: null
- id: recent
type: recent
name: Recent (last 24 hours)
hasUser: false
canAddUser: false
cannotAddUserReason: SYSTEM_LIST
- id: muted
type: muted
name: Muted
hasUser: false
canAddUser: true
cannotAddUserReason: null
canReport: false
canReceiveChatMessage: false
hideChat: false
lastSeen: 2026-06-26T16:37:48+00:00
isPerformer: true
isRealPerformer: true
subscribedByData: null
subscribedOnData: null
canTrialSend: false
isBlocked: false
items:
type: object
properties:
view:
type: string
example: x
avatar:
type: string
example: https://public.onlyfans.com/files/example/200000002/avatar.jpg
avatarThumbs:
type: object
properties:
c50:
type: string
example: https://thumbs.onlyfans.com/public/files/thumbs/c50/example/200000002/avatar.jpg
c144:
type: string
example: https://thumbs.onlyfans.com/public/files/thumbs/c144/example/200000002/avatar.jpg
header:
type: string
example: https://public.onlyfans.com/files/example/200000002/header_image.jpg
headerSize:
type: object
properties:
width:
type: integer
example: 4028
height:
type: integer
example: 1250
headerThumbs:
type: object
properties:
w480:
type: string
example: https://thumbs.onlyfans.com/public/files/thumbs/w480/example/200000002/header_image.jpg
w760:
type: string
example: https://thumbs.onlyfans.com/public/files/thumbs/w760/example/200000002/header_image.jpg
id:
type: integer
example: 200000002
name:
type: string
example: Another User
username:
type: string
example: anotheruser
canLookStory:
type: boolean
example: false
canCommentStory:
type: boolean
example: false
hasNotViewedStory:
type: boolean
example: false
isVerified:
type: boolean
example: true
canPayInternal:
type: boolean
example: true
hasScheduledStream:
type: boolean
example: false
hasStream:
type: boolean
example: false
hasStories:
type: boolean
example: false
tipsEnabled:
type: boolean
example: false
tipsTextEnabled:
type: boolean
example: false
tipsMin:
type: integer
example: 5
tipsMinInternal:
type: integer
example: 1
tipsMax:
type: integer
example: 200
canEarn:
type: boolean
example: true
canAddSubscriber:
type: boolean
example: true
subscribePrice:
type: integer
example: 0
isPaywallRequired:
type: boolean
example: true
isActive:
type: boolean
example: true
isRestricted:
type: boolean
example: true
canRestrict:
type: boolean
example: false
subscribedBy:
type: boolean
example: false
subscribedByExpire:
type: string
example: null
nullable: true
subscribedByExpireDate:
type: string
example: null
nullable: true
subscribedByAutoprolong:
type: string
example: null
nullable: true
subscribedIsExpiredNow:
type: string
example: null
nullable: true
currentSubscribePrice:
type: string
example: null
nullable: true
subscribedOn:
type: boolean
example: false
subscribedOnExpire:
type: string
example: null
nullable: true
subscribedOnExpiredNow:
type: string
example: null
nullable: true
subscribedOnDuration:
type: string
example: null
nullable: true
listsStates:
type: array
example:
- id: following
type: following
name: Following
hasUser: false
canAddUser: false
cannotAddUserReason: SYSTEM_LIST
- id: fans
type: fans
name: Fans
hasUser: false
canAddUser: false
cannotAddUserReason: null
- id: recent
type: recent
name: Recent (last 24 hours)
hasUser: false
canAddUser: false
cannotAddUserReason: SYSTEM_LIST
- id: muted
type: muted
name: Muted
hasUser: false
canAddUser: true
cannotAddUserReason: null
items:
type: object
properties:
id:
type: string
example: following
type:
type: string
example: following
name:
type: string
example: Following
hasUser:
type: boolean
example: false
canAddUser:
type: boolean
example: false
cannotAddUserReason:
type: string
example: SYSTEM_LIST
canReport:
type: boolean
example: false
canReceiveChatMessage:
type: boolean
example: false
hideChat:
type: boolean
example: false
lastSeen:
type: string
example: 2026-06-26T16:37:48+00:00
isPerformer:
type: boolean
example: true
isRealPerformer:
type: boolean
example: true
subscribedByData:
type: string
example: null
nullable: true
subscribedOnData:
type: string
example: null
nullable: true
canTrialSend:
type: boolean
example: false
isBlocked:
type: boolean
example: false
hasMore:
type: boolean
example: true
nextOffset:
type: integer
example: 10
_pagination:
type: object
properties:
next_page:
type: string
example: https://app.onlyfansapi.com/api/acct_abc123/users/restrict?offset=10&limit=10
_meta:
type: object
properties:
_credits:
type: object
properties:
used:
type: integer
example: 1
balance:
type: integer
example: 999999839
note:
type: string
example: Always
_cache:
type: object
properties:
is_cached:
type: boolean
example: false
note:
type: string
example: Cache disabled for this endpoint
_rate_limits:
type: object
properties:
limit_minute:
type: integer
example: 10000000
limit_day:
type: integer
example: 50000
remaining_minute:
type: integer
example: 9999999
remaining_day:
type: integer
example: 49997
tags:
- Blocked / Restricted Users
components:
securitySchemes:
default:
type: http
scheme: bearer
description: Get your API Key from OnlyFansAPI Console -
https://app.onlyfansapi.com/api-keys
````
# Attach Tags (Release Forms) to Message (/api-reference/chat-messages/attach-tags-release-forms-to-message)
Attach Tags (Release Forms) to a message that has already been sent. Please note, that this is a "sync" operation - for example, if you provide empty `rfTag` it will remove all existing tags already attached to the message.
## OpenAPI
````yaml https://app.onlyfansapi.com/scribe-docs/openapi.yaml post /api/{account}/messages/{queue_id}/attach-tags
openapi: 3.0.3
info:
title: OnlyFans API
description: ""
version: 1.0.0
servers:
- url: https://app.onlyfansapi.com
security:
- default: []
tags:
- name: AI Voice Messages
description: ""
- name: API Keys
description: ""
- name: Account
description: Endpoints for your linked accounts
- name: Analytics - Financial
description: APIs for retrieving financial analytics data
- name: Analytics - Summary
description: APIs for retrieving summary analytics data
- name: Banking
description: Operations related to user banking details, payout methods, legal
and tax information, and account country settings.
- name: Banned Words
description: Reference list of OnlyFans banned words used by the
`blockBannedWords` screening parameter
- name: Blocked / Restricted Users
description: APIs for listing the users an account has blocked or restricted
- name: Chargebacks
description: ""
- name: Chat Messages
description: ""
- name: Chats
description: ""
- name: Client Sessions
description: ""
- name: Connect OnlyFans Account
description: ""
- name: Data Exports
description: APIs for managing data exports
- name: Engagement / Messages
description: ""
- name: Fans
description: APIs for managing OnlyFans fans (subscribers)
- name: Fans - AI Summary
description: APIs for generating and retrieving AI-powered fan profile summaries
- name: Following
description: APIs for managing OnlyFans followings (people you're subscribed to)
- name: Free Trial Links
description: APIs for managing Free Trial Links. Revenue totals are net earnings
after refunds and chargebacks. `revenue.chargebacks` (or
`summary.chargebacks_total` in stats) is the positive cached net amount
already excluded from revenue; do not subtract it again. Spender responses
include chargebacks across all attributed periods for each fan with
positive net revenue.
- name: Giphy
description: ""
- name: Link Tags
description: APIs for managing tags on free trial links, tracking links, and Smart Links
- name: Mass Messaging
description: ""
- name: Media
description: ""
- name: Media Vault
description: ""
- name: Media Vault Lists
description: ""
- name: Notifications
description: Endpoints for managingr account notifications
- name: Payouts
description: ""
- name: Post Comments
description: ""
- name: Post Labels
description: APIs for managing your post labels
- name: Posts
description: APIs for managing OnlyFans posts
- name: Profile Content
description: Read another user's profile content using your connected OnlyFans
account. OnlyFans enforces subscription and purchase requirements; these
endpoints do not unlock content. Response samples use captured OnlyFans
payloads with anonymized IDs, text, and media URLs; OFAPI metadata values
are illustrative.
- name: Promotions
description: ""
- name: Public Profiles
description: ""
- name: Queue
description: ""
- name: Release Forms
description: APIs for managing OnlyFans release forms
- name: Saved For Later (Messages)
description: ""
- name: Saved For Later (Posts)
description: ""
- name: Settings
description: ""
- name: Shared Free Trial Links
description: APIs for Free Trial Links that other OF creators have shared with
this account. Revenue, cost, and spender data are not available for shared
links.
- name: Shared Tracking Links
description: APIs for Tracking Links (campaigns) that other OF creators have
shared with this account. Revenue, cost, and spender data are not
available for shared campaigns.
- name: Smart Link Postbacks
description: APIs for managing Smart Link postback destinations
- name: Smart Links
description: APIs for managing Smart Links (Free Trial Links and Tracking Links
with pooled inventory)
- name: Statistics
description: ""
- name: Stored Free Trial Links
description: Instant APIs for retrieving stored free trial links from the
OnlyFansAPI Cache (free, no credits used). `revenue.total` is net earnings
after refunds and chargebacks. `revenue.chargebacks` is the positive
cached net amount already excluded from that total; do not subtract it
again.
- name: Stored Shared Free Trial Links
description: Instant APIs for retrieving stored shared Free Trial Links from the
OnlyFansAPI Cache (free, no credits used)
- name: Stored Shared Tracking Links
description: Instant APIs for retrieving stored shared Tracking Links
(campaigns) from the OnlyFansAPI Cache (free, no credits used)
- name: Stored Tracking Links
description: Instant APIs for retrieving stored tracking links from the
OnlyFansAPI Cache (free, no credits used). `revenue.total` is net earnings
after refunds and chargebacks. `revenue.chargebacks` is the positive
cached net amount already excluded from that total; do not subtract it
again.
- name: Stories
description: APIs for managing OnlyFans stories
- name: Story Highlights
description: APIs for managing OnlyFans story highlights
- name: Subscription Bundles
description: ""
- name: Tracking Links
description: APIs for managing tracking links. Revenue totals are net earnings
after refunds and chargebacks. `revenue.chargebacks` (or
`summary.chargebacks_total` in stats) is the positive cached net amount
already excluded from revenue; do not subtract it again. Spender responses
include chargebacks across all attributed periods for each fan with
positive net revenue.
- name: Transactions
description: APIs for managing OnlyFans transactions
- name: Usage
description: Credit usage reporting for your team
- name: User List Collections
description: ""
- name: Users
description: APIs for fetching OnlyFans users
- name: Webhooks
description: ""
paths:
/api/{account}/messages/{queue_id}/attach-tags:
parameters:
- in: path
name: account
description: The Account ID
example: acct_XXXXXXXXXXXXXXX
required: true
schema:
type: string
- in: path
name: queue_id
description: The message's `queueId` (NOT its `id`). Every message in the List
Chat Messages response exposes both an `id` and a `queueId` - this
endpoint requires the `queueId`. Must be a message sent by the
creator. Passing the message `id` instead returns a 400 "Entity type
is not allowed or not exists" from OnlyFans.
example: "40627236721"
required: true
schema:
type: string
post:
summary: Attach Tags (Release Forms) to Message
operationId: attachTagsReleaseFormsToMessage
description: Attach Tags (Release Forms) to a message that has already been
sent. Please note, that this is a "sync" operation - for example, if you
provide empty `rfTag` it will remove all existing tags already attached
to the message.
parameters: []
responses:
"200":
description: Success
content:
application/json:
schema:
type: object
example:
data:
success: true
_meta:
_credits:
used: 1
balance: 9976
note: Always
_cache:
is_cached: false
note: Cache disabled for this endpoint
_rate_limits:
limit_minute: 1000
limit_day: 50000
remaining_minute: 999
remaining_day: 49990
properties:
data:
type: object
properties:
success:
type: boolean
example: true
_meta:
type: object
properties:
_credits:
type: object
properties:
used:
type: integer
example: 1
balance:
type: integer
example: 9976
note:
type: string
example: Always
_cache:
type: object
properties:
is_cached:
type: boolean
example: false
note:
type: string
example: Cache disabled for this endpoint
_rate_limits:
type: object
properties:
limit_minute:
type: integer
example: 1000
limit_day:
type: integer
example: 50000
remaining_minute:
type: integer
example: 999
remaining_day:
type: integer
example: 49990
tags:
- Chat Messages
requestBody:
required: false
content:
application/json:
schema:
type: object
properties:
rfTag:
type: string
description: Array of OnlyFans Creator User IDs to tag in your message
example: null
rfPartner:
type: string
description: Array of OnlyFans Release Form Partners IDs to tag in your message
example: null
rfGuest:
type: string
description: Array of OnlyFans Release Form Guest IDs to tag in your message
example: null
components:
securitySchemes:
default:
type: http
scheme: bearer
description: Get your API Key from OnlyFansAPI Console -
https://app.onlyfansapi.com/api-keys
````
# Delete Message (/api-reference/chat-messages/delete-message)
Delete a message from a chat. Please note that ONLY messages sent less than 24 hours ago can be deleted.
## OpenAPI
````yaml https://app.onlyfansapi.com/scribe-docs/openapi.yaml delete /api/{account}/chats/{chat_id}/messages/{message_id}
openapi: 3.0.3
info:
title: OnlyFans API
description: ""
version: 1.0.0
servers:
- url: https://app.onlyfansapi.com
security:
- default: []
tags:
- name: AI Voice Messages
description: ""
- name: API Keys
description: ""
- name: Account
description: Endpoints for your linked accounts
- name: Analytics - Financial
description: APIs for retrieving financial analytics data
- name: Analytics - Summary
description: APIs for retrieving summary analytics data
- name: Banking
description: Operations related to user banking details, payout methods, legal
and tax information, and account country settings.
- name: Banned Words
description: Reference list of OnlyFans banned words used by the
`blockBannedWords` screening parameter
- name: Blocked / Restricted Users
description: APIs for listing the users an account has blocked or restricted
- name: Chargebacks
description: ""
- name: Chat Messages
description: ""
- name: Chats
description: ""
- name: Client Sessions
description: ""
- name: Connect OnlyFans Account
description: ""
- name: Data Exports
description: APIs for managing data exports
- name: Engagement / Messages
description: ""
- name: Fans
description: APIs for managing OnlyFans fans (subscribers)
- name: Fans - AI Summary
description: APIs for generating and retrieving AI-powered fan profile summaries
- name: Following
description: APIs for managing OnlyFans followings (people you're subscribed to)
- name: Free Trial Links
description: APIs for managing Free Trial Links. Revenue totals are net earnings
after refunds and chargebacks. `revenue.chargebacks` (or
`summary.chargebacks_total` in stats) is the positive cached net amount
already excluded from revenue; do not subtract it again. Spender responses
include chargebacks across all attributed periods for each fan with
positive net revenue.
- name: Giphy
description: ""
- name: Link Tags
description: APIs for managing tags on free trial links, tracking links, and Smart Links
- name: Mass Messaging
description: ""
- name: Media
description: ""
- name: Media Vault
description: ""
- name: Media Vault Lists
description: ""
- name: Notifications
description: Endpoints for managingr account notifications
- name: Payouts
description: ""
- name: Post Comments
description: ""
- name: Post Labels
description: APIs for managing your post labels
- name: Posts
description: APIs for managing OnlyFans posts
- name: Profile Content
description: Read another user's profile content using your connected OnlyFans
account. OnlyFans enforces subscription and purchase requirements; these
endpoints do not unlock content. Response samples use captured OnlyFans
payloads with anonymized IDs, text, and media URLs; OFAPI metadata values
are illustrative.
- name: Promotions
description: ""
- name: Public Profiles
description: ""
- name: Queue
description: ""
- name: Release Forms
description: APIs for managing OnlyFans release forms
- name: Saved For Later (Messages)
description: ""
- name: Saved For Later (Posts)
description: ""
- name: Settings
description: ""
- name: Shared Free Trial Links
description: APIs for Free Trial Links that other OF creators have shared with
this account. Revenue, cost, and spender data are not available for shared
links.
- name: Shared Tracking Links
description: APIs for Tracking Links (campaigns) that other OF creators have
shared with this account. Revenue, cost, and spender data are not
available for shared campaigns.
- name: Smart Link Postbacks
description: APIs for managing Smart Link postback destinations
- name: Smart Links
description: APIs for managing Smart Links (Free Trial Links and Tracking Links
with pooled inventory)
- name: Statistics
description: ""
- name: Stored Free Trial Links
description: Instant APIs for retrieving stored free trial links from the
OnlyFansAPI Cache (free, no credits used). `revenue.total` is net earnings
after refunds and chargebacks. `revenue.chargebacks` is the positive
cached net amount already excluded from that total; do not subtract it
again.
- name: Stored Shared Free Trial Links
description: Instant APIs for retrieving stored shared Free Trial Links from the
OnlyFansAPI Cache (free, no credits used)
- name: Stored Shared Tracking Links
description: Instant APIs for retrieving stored shared Tracking Links
(campaigns) from the OnlyFansAPI Cache (free, no credits used)
- name: Stored Tracking Links
description: Instant APIs for retrieving stored tracking links from the
OnlyFansAPI Cache (free, no credits used). `revenue.total` is net earnings
after refunds and chargebacks. `revenue.chargebacks` is the positive
cached net amount already excluded from that total; do not subtract it
again.
- name: Stories
description: APIs for managing OnlyFans stories
- name: Story Highlights
description: APIs for managing OnlyFans story highlights
- name: Subscription Bundles
description: ""
- name: Tracking Links
description: APIs for managing tracking links. Revenue totals are net earnings
after refunds and chargebacks. `revenue.chargebacks` (or
`summary.chargebacks_total` in stats) is the positive cached net amount
already excluded from revenue; do not subtract it again. Spender responses
include chargebacks across all attributed periods for each fan with
positive net revenue.
- name: Transactions
description: APIs for managing OnlyFans transactions
- name: Usage
description: Credit usage reporting for your team
- name: User List Collections
description: ""
- name: Users
description: APIs for fetching OnlyFans users
- name: Webhooks
description: ""
paths:
/api/{account}/chats/{chat_id}/messages/{message_id}:
parameters:
- in: path
name: account
description: The Account ID
example: acct_XXXXXXXXXXXXXXX
required: true
schema:
type: string
- in: path
name: chat_id
description: The ID of the chat (usually a fan's OnlyFans User ID)
example: "123"
required: true
schema:
type: string
- in: path
name: message_id
description: The ID of the message to retrieve
example: "69696969"
required: true
schema:
type: string
delete:
summary: Delete Message
operationId: deleteMessage
description: Delete a message from a chat. Please note that ONLY messages sent
less than 24 hours ago can be deleted.
parameters: []
responses:
"200":
description: Success
content:
application/json:
schema:
type: object
example:
data:
success: true
_meta:
_credits:
used: 1
balance: 9976
note: Always
_cache:
is_cached: false
note: Cache disabled for this endpoint
_rate_limits:
limit_minute: 1000
limit_day: 50000
remaining_minute: 999
remaining_day: 49990
properties:
data:
type: object
properties:
success:
type: boolean
example: true
_meta:
type: object
properties:
_credits:
type: object
properties:
used:
type: integer
example: 1
balance:
type: integer
example: 9976
note:
type: string
example: Always
_cache:
type: object
properties:
is_cached:
type: boolean
example: false
note:
type: string
example: Cache disabled for this endpoint
_rate_limits:
type: object
properties:
limit_minute:
type: integer
example: 1000
limit_day:
type: integer
example: 50000
remaining_minute:
type: integer
example: 999
remaining_day:
type: integer
example: 49990
tags:
- Chat Messages
components:
securitySchemes:
default:
type: http
scheme: bearer
description: Get your API Key from OnlyFansAPI Console -
https://app.onlyfansapi.com/api-keys
````
# Get Specific Chat Message (/api-reference/chat-messages/get-specific-chat-message)
Get a single chat message by its ID. Returns a 404 if the message does not exist in the chat.
## OpenAPI
````yaml https://app.onlyfansapi.com/scribe-docs/openapi.yaml get /api/{account}/chats/{chat_id}/messages/{message_id}
openapi: 3.0.3
info:
title: OnlyFans API
description: ""
version: 1.0.0
servers:
- url: https://app.onlyfansapi.com
security:
- default: []
tags:
- name: AI Voice Messages
description: ""
- name: API Keys
description: ""
- name: Account
description: Endpoints for your linked accounts
- name: Analytics - Financial
description: APIs for retrieving financial analytics data
- name: Analytics - Summary
description: APIs for retrieving summary analytics data
- name: Banking
description: Operations related to user banking details, payout methods, legal
and tax information, and account country settings.
- name: Banned Words
description: Reference list of OnlyFans banned words used by the
`blockBannedWords` screening parameter
- name: Blocked / Restricted Users
description: APIs for listing the users an account has blocked or restricted
- name: Chargebacks
description: ""
- name: Chat Messages
description: ""
- name: Chats
description: ""
- name: Client Sessions
description: ""
- name: Connect OnlyFans Account
description: ""
- name: Data Exports
description: APIs for managing data exports
- name: Engagement / Messages
description: ""
- name: Fans
description: APIs for managing OnlyFans fans (subscribers)
- name: Fans - AI Summary
description: APIs for generating and retrieving AI-powered fan profile summaries
- name: Following
description: APIs for managing OnlyFans followings (people you're subscribed to)
- name: Free Trial Links
description: APIs for managing Free Trial Links. Revenue totals are net earnings
after refunds and chargebacks. `revenue.chargebacks` (or
`summary.chargebacks_total` in stats) is the positive cached net amount
already excluded from revenue; do not subtract it again. Spender responses
include chargebacks across all attributed periods for each fan with
positive net revenue.
- name: Giphy
description: ""
- name: Link Tags
description: APIs for managing tags on free trial links, tracking links, and Smart Links
- name: Mass Messaging
description: ""
- name: Media
description: ""
- name: Media Vault
description: ""
- name: Media Vault Lists
description: ""
- name: Notifications
description: Endpoints for managingr account notifications
- name: Payouts
description: ""
- name: Post Comments
description: ""
- name: Post Labels
description: APIs for managing your post labels
- name: Posts
description: APIs for managing OnlyFans posts
- name: Profile Content
description: Read another user's profile content using your connected OnlyFans
account. OnlyFans enforces subscription and purchase requirements; these
endpoints do not unlock content. Response samples use captured OnlyFans
payloads with anonymized IDs, text, and media URLs; OFAPI metadata values
are illustrative.
- name: Promotions
description: ""
- name: Public Profiles
description: ""
- name: Queue
description: ""
- name: Release Forms
description: APIs for managing OnlyFans release forms
- name: Saved For Later (Messages)
description: ""
- name: Saved For Later (Posts)
description: ""
- name: Settings
description: ""
- name: Shared Free Trial Links
description: APIs for Free Trial Links that other OF creators have shared with
this account. Revenue, cost, and spender data are not available for shared
links.
- name: Shared Tracking Links
description: APIs for Tracking Links (campaigns) that other OF creators have
shared with this account. Revenue, cost, and spender data are not
available for shared campaigns.
- name: Smart Link Postbacks
description: APIs for managing Smart Link postback destinations
- name: Smart Links
description: APIs for managing Smart Links (Free Trial Links and Tracking Links
with pooled inventory)
- name: Statistics
description: ""
- name: Stored Free Trial Links
description: Instant APIs for retrieving stored free trial links from the
OnlyFansAPI Cache (free, no credits used). `revenue.total` is net earnings
after refunds and chargebacks. `revenue.chargebacks` is the positive
cached net amount already excluded from that total; do not subtract it
again.
- name: Stored Shared Free Trial Links
description: Instant APIs for retrieving stored shared Free Trial Links from the
OnlyFansAPI Cache (free, no credits used)
- name: Stored Shared Tracking Links
description: Instant APIs for retrieving stored shared Tracking Links
(campaigns) from the OnlyFansAPI Cache (free, no credits used)
- name: Stored Tracking Links
description: Instant APIs for retrieving stored tracking links from the
OnlyFansAPI Cache (free, no credits used). `revenue.total` is net earnings
after refunds and chargebacks. `revenue.chargebacks` is the positive
cached net amount already excluded from that total; do not subtract it
again.
- name: Stories
description: APIs for managing OnlyFans stories
- name: Story Highlights
description: APIs for managing OnlyFans story highlights
- name: Subscription Bundles
description: ""
- name: Tracking Links
description: APIs for managing tracking links. Revenue totals are net earnings
after refunds and chargebacks. `revenue.chargebacks` (or
`summary.chargebacks_total` in stats) is the positive cached net amount
already excluded from revenue; do not subtract it again. Spender responses
include chargebacks across all attributed periods for each fan with
positive net revenue.
- name: Transactions
description: APIs for managing OnlyFans transactions
- name: Usage
description: Credit usage reporting for your team
- name: User List Collections
description: ""
- name: Users
description: APIs for fetching OnlyFans users
- name: Webhooks
description: ""
paths:
/api/{account}/chats/{chat_id}/messages/{message_id}:
parameters:
- in: path
name: account
description: The Account ID
example: acct_XXXXXXXXXXXXXXX
required: true
schema:
type: string
- in: path
name: chat_id
description: The ID of the chat (usually a fan's OnlyFans User ID)
example: "123"
required: true
schema:
type: string
- in: path
name: message_id
description: The ID of the message to retrieve
example: "69696969"
required: true
schema:
type: string
get:
summary: Get Specific Chat Message
operationId: getSpecificChatMessage
description: Get a single chat message by its ID. Returns a 404 if the message
does not exist in the chat.
parameters: []
responses:
"200":
description: Success
content:
application/json:
schema:
type: object
example:
data:
responseType: message
text: I am so glad you’re here🫶🏻
giphyId: null
lockedText: false
isFree: true
price: 0
isMediaReady: true
mediaCount: 0
media: []
previews: []
isTip: false
isReportedByMe: false
isCouplePeopleMedia: false
queueId: 123
isMarkdownDisabled: true
releaseForms: []
fromUser:
id: 123
_view: s
isFromQueue: false
id: 69696969
isOpened: false
isNew: false
createdAt: 2025-02-03T23:29:53+00:00
changedAt: 2025-02-03T23:29:53+00:00
cancelSeconds: 0
isLiked: false
canPurchase: false
canPurchaseReason: free
canReport: false
canBePinned: true
isPinned: false
isSentByMe: true
_meta:
_credits:
used: 1
balance: 999964357
note: Always
_cache:
is_cached: false
note: Cache disabled for this endpoint
_rate_limits:
limit_minute: 1000
limit_day: 50000
remaining_minute: 997
remaining_day: 49997
properties:
data:
type: object
properties:
responseType:
type: string
example: message
text:
type: string
example: I am so glad you’re here🫶🏻
giphyId:
type: string
example: null
nullable: true
lockedText:
type: boolean
example: false
isFree:
type: boolean
example: true
price:
type: integer
example: 0
isMediaReady:
type: boolean
example: true
mediaCount:
type: integer
example: 0
media:
type: array
example: []
previews:
type: array
example: []
isTip:
type: boolean
example: false
isReportedByMe:
type: boolean
example: false
isCouplePeopleMedia:
type: boolean
example: false
queueId:
type: integer
example: 123
isMarkdownDisabled:
type: boolean
example: true
releaseForms:
type: array
example: []
fromUser:
type: object
properties:
id:
type: integer
example: 123
_view:
type: string
example: s
isFromQueue:
type: boolean
example: false
id:
type: integer
example: 69696969
isOpened:
type: boolean
example: false
isNew:
type: boolean
example: false
createdAt:
type: string
example: 2025-02-03T23:29:53+00:00
changedAt:
type: string
example: 2025-02-03T23:29:53+00:00
cancelSeconds:
type: integer
example: 0
isLiked:
type: boolean
example: false
canPurchase:
type: boolean
example: false
canPurchaseReason:
type: string
example: free
canReport:
type: boolean
example: false
canBePinned:
type: boolean
example: true
isPinned:
type: boolean
example: false
isSentByMe:
type: boolean
example: true
_meta:
type: object
properties:
_credits:
type: object
properties:
used:
type: integer
example: 1
balance:
type: integer
example: 999964357
note:
type: string
example: Always
_cache:
type: object
properties:
is_cached:
type: boolean
example: false
note:
type: string
example: Cache disabled for this endpoint
_rate_limits:
type: object
properties:
limit_minute:
type: integer
example: 1000
limit_day:
type: integer
example: 50000
remaining_minute:
type: integer
example: 997
remaining_day:
type: integer
example: 49997
"404":
description: Message Not Found
content:
application/json:
schema:
type: object
example:
error: ONLYFANS_COM_ERROR
message: The requested OnlyFans resource was not found.
description: This error happened while our servers tried to communicate with
OnlyFans.com in real time
onlyfans_response:
status: 200
body:
list: []
hasMore: false
properties:
error:
type: string
example: ONLYFANS_COM_ERROR
message:
type: string
example: The requested OnlyFans resource was not found.
description:
type: string
example: This error happened while our servers tried to communicate with
OnlyFans.com in real time
onlyfans_response:
type: object
properties:
status:
type: integer
example: 200
body:
type: object
properties:
list:
type: array
example: []
hasMore:
type: boolean
example: false
tags:
- Chat Messages
components:
securitySchemes:
default:
type: http
scheme: bearer
description: Get your API Key from OnlyFansAPI Console -
https://app.onlyfansapi.com/api-keys
````
# Like Message (/api-reference/chat-messages/like-message)
Like a chat message.
## OpenAPI
````yaml https://app.onlyfansapi.com/scribe-docs/openapi.yaml post /api/{account}/chats/{chat_id}/messages/{message_id}/like
openapi: 3.0.3
info:
title: OnlyFans API
description: ""
version: 1.0.0
servers:
- url: https://app.onlyfansapi.com
security:
- default: []
tags:
- name: AI Voice Messages
description: ""
- name: API Keys
description: ""
- name: Account
description: Endpoints for your linked accounts
- name: Analytics - Financial
description: APIs for retrieving financial analytics data
- name: Analytics - Summary
description: APIs for retrieving summary analytics data
- name: Banking
description: Operations related to user banking details, payout methods, legal
and tax information, and account country settings.
- name: Banned Words
description: Reference list of OnlyFans banned words used by the
`blockBannedWords` screening parameter
- name: Blocked / Restricted Users
description: APIs for listing the users an account has blocked or restricted
- name: Chargebacks
description: ""
- name: Chat Messages
description: ""
- name: Chats
description: ""
- name: Client Sessions
description: ""
- name: Connect OnlyFans Account
description: ""
- name: Data Exports
description: APIs for managing data exports
- name: Engagement / Messages
description: ""
- name: Fans
description: APIs for managing OnlyFans fans (subscribers)
- name: Fans - AI Summary
description: APIs for generating and retrieving AI-powered fan profile summaries
- name: Following
description: APIs for managing OnlyFans followings (people you're subscribed to)
- name: Free Trial Links
description: APIs for managing Free Trial Links. Revenue totals are net earnings
after refunds and chargebacks. `revenue.chargebacks` (or
`summary.chargebacks_total` in stats) is the positive cached net amount
already excluded from revenue; do not subtract it again. Spender responses
include chargebacks across all attributed periods for each fan with
positive net revenue.
- name: Giphy
description: ""
- name: Link Tags
description: APIs for managing tags on free trial links, tracking links, and Smart Links
- name: Mass Messaging
description: ""
- name: Media
description: ""
- name: Media Vault
description: ""
- name: Media Vault Lists
description: ""
- name: Notifications
description: Endpoints for managingr account notifications
- name: Payouts
description: ""
- name: Post Comments
description: ""
- name: Post Labels
description: APIs for managing your post labels
- name: Posts
description: APIs for managing OnlyFans posts
- name: Profile Content
description: Read another user's profile content using your connected OnlyFans
account. OnlyFans enforces subscription and purchase requirements; these
endpoints do not unlock content. Response samples use captured OnlyFans
payloads with anonymized IDs, text, and media URLs; OFAPI metadata values
are illustrative.
- name: Promotions
description: ""
- name: Public Profiles
description: ""
- name: Queue
description: ""
- name: Release Forms
description: APIs for managing OnlyFans release forms
- name: Saved For Later (Messages)
description: ""
- name: Saved For Later (Posts)
description: ""
- name: Settings
description: ""
- name: Shared Free Trial Links
description: APIs for Free Trial Links that other OF creators have shared with
this account. Revenue, cost, and spender data are not available for shared
links.
- name: Shared Tracking Links
description: APIs for Tracking Links (campaigns) that other OF creators have
shared with this account. Revenue, cost, and spender data are not
available for shared campaigns.
- name: Smart Link Postbacks
description: APIs for managing Smart Link postback destinations
- name: Smart Links
description: APIs for managing Smart Links (Free Trial Links and Tracking Links
with pooled inventory)
- name: Statistics
description: ""
- name: Stored Free Trial Links
description: Instant APIs for retrieving stored free trial links from the
OnlyFansAPI Cache (free, no credits used). `revenue.total` is net earnings
after refunds and chargebacks. `revenue.chargebacks` is the positive
cached net amount already excluded from that total; do not subtract it
again.
- name: Stored Shared Free Trial Links
description: Instant APIs for retrieving stored shared Free Trial Links from the
OnlyFansAPI Cache (free, no credits used)
- name: Stored Shared Tracking Links
description: Instant APIs for retrieving stored shared Tracking Links
(campaigns) from the OnlyFansAPI Cache (free, no credits used)
- name: Stored Tracking Links
description: Instant APIs for retrieving stored tracking links from the
OnlyFansAPI Cache (free, no credits used). `revenue.total` is net earnings
after refunds and chargebacks. `revenue.chargebacks` is the positive
cached net amount already excluded from that total; do not subtract it
again.
- name: Stories
description: APIs for managing OnlyFans stories
- name: Story Highlights
description: APIs for managing OnlyFans story highlights
- name: Subscription Bundles
description: ""
- name: Tracking Links
description: APIs for managing tracking links. Revenue totals are net earnings
after refunds and chargebacks. `revenue.chargebacks` (or
`summary.chargebacks_total` in stats) is the positive cached net amount
already excluded from revenue; do not subtract it again. Spender responses
include chargebacks across all attributed periods for each fan with
positive net revenue.
- name: Transactions
description: APIs for managing OnlyFans transactions
- name: Usage
description: Credit usage reporting for your team
- name: User List Collections
description: ""
- name: Users
description: APIs for fetching OnlyFans users
- name: Webhooks
description: ""
paths:
/api/{account}/chats/{chat_id}/messages/{message_id}/like:
parameters:
- in: path
name: account
description: The Account ID
example: acct_XXXXXXXXXXXXXXX
required: true
schema:
type: string
- in: path
name: chat_id
description: The ID of the chat, usually a fan's OnlyFans User ID
example: "123"
required: true
schema:
type: string
- in: path
name: message_id
description: The ID of the message to like
example: "123456789"
required: true
schema:
type: string
post:
summary: Like Message
operationId: likeMessage
description: Like a chat message.
parameters: []
responses:
"200":
description: Success
content:
application/json:
schema:
type: object
example:
data:
success: true
isLiked: true
_meta:
_credits:
used: 1
balance: 999964351
note: Always
_cache:
is_cached: false
note: Cache disabled for this endpoint
_rate_limits:
limit_minute: 1000
limit_day: 50000
remaining_minute: 999
remaining_day: 49991
properties:
data:
type: object
properties:
success:
type: boolean
example: true
isLiked:
type: boolean
example: true
_meta:
type: object
properties:
_credits:
type: object
properties:
used:
type: integer
example: 1
balance:
type: integer
example: 999964351
note:
type: string
example: Always
_cache:
type: object
properties:
is_cached:
type: boolean
example: false
note:
type: string
example: Cache disabled for this endpoint
_rate_limits:
type: object
properties:
limit_minute:
type: integer
example: 1000
limit_day:
type: integer
example: 50000
remaining_minute:
type: integer
example: 999
remaining_day:
type: integer
example: 49991
tags:
- Chat Messages
components:
securitySchemes:
default:
type: http
scheme: bearer
description: Get your API Key from OnlyFansAPI Console -
https://app.onlyfansapi.com/api-keys
````
# List Chat Messages (/api-reference/chat-messages/list-chat-messages)
Get messages from a specific chat. Use `filter=pinned` or [List Pinned Chat Messages](https://docs.onlyfansapi.com/api-reference/chat-messages/list-pinned-chat-messages) to retrieve only pinned messages. Follow `_pagination.next_page` until it is null; a short page can still have more results.
## OpenAPI
````yaml https://app.onlyfansapi.com/scribe-docs/openapi.yaml get /api/{account}/chats/{chat_id}/messages
openapi: 3.0.3
info:
title: OnlyFans API
description: ""
version: 1.0.0
servers:
- url: https://app.onlyfansapi.com
security:
- default: []
tags:
- name: AI Voice Messages
description: ""
- name: API Keys
description: ""
- name: Account
description: Endpoints for your linked accounts
- name: Analytics - Financial
description: APIs for retrieving financial analytics data
- name: Analytics - Summary
description: APIs for retrieving summary analytics data
- name: Banking
description: Operations related to user banking details, payout methods, legal
and tax information, and account country settings.
- name: Banned Words
description: Reference list of OnlyFans banned words used by the
`blockBannedWords` screening parameter
- name: Blocked / Restricted Users
description: APIs for listing the users an account has blocked or restricted
- name: Chargebacks
description: ""
- name: Chat Messages
description: ""
- name: Chats
description: ""
- name: Client Sessions
description: ""
- name: Connect OnlyFans Account
description: ""
- name: Data Exports
description: APIs for managing data exports
- name: Engagement / Messages
description: ""
- name: Fans
description: APIs for managing OnlyFans fans (subscribers)
- name: Fans - AI Summary
description: APIs for generating and retrieving AI-powered fan profile summaries
- name: Following
description: APIs for managing OnlyFans followings (people you're subscribed to)
- name: Free Trial Links
description: APIs for managing Free Trial Links. Revenue totals are net earnings
after refunds and chargebacks. `revenue.chargebacks` (or
`summary.chargebacks_total` in stats) is the positive cached net amount
already excluded from revenue; do not subtract it again. Spender responses
include chargebacks across all attributed periods for each fan with
positive net revenue.
- name: Giphy
description: ""
- name: Link Tags
description: APIs for managing tags on free trial links, tracking links, and Smart Links
- name: Mass Messaging
description: ""
- name: Media
description: ""
- name: Media Vault
description: ""
- name: Media Vault Lists
description: ""
- name: Notifications
description: Endpoints for managingr account notifications
- name: Payouts
description: ""
- name: Post Comments
description: ""
- name: Post Labels
description: APIs for managing your post labels
- name: Posts
description: APIs for managing OnlyFans posts
- name: Profile Content
description: Read another user's profile content using your connected OnlyFans
account. OnlyFans enforces subscription and purchase requirements; these
endpoints do not unlock content. Response samples use captured OnlyFans
payloads with anonymized IDs, text, and media URLs; OFAPI metadata values
are illustrative.
- name: Promotions
description: ""
- name: Public Profiles
description: ""
- name: Queue
description: ""
- name: Release Forms
description: APIs for managing OnlyFans release forms
- name: Saved For Later (Messages)
description: ""
- name: Saved For Later (Posts)
description: ""
- name: Settings
description: ""
- name: Shared Free Trial Links
description: APIs for Free Trial Links that other OF creators have shared with
this account. Revenue, cost, and spender data are not available for shared
links.
- name: Shared Tracking Links
description: APIs for Tracking Links (campaigns) that other OF creators have
shared with this account. Revenue, cost, and spender data are not
available for shared campaigns.
- name: Smart Link Postbacks
description: APIs for managing Smart Link postback destinations
- name: Smart Links
description: APIs for managing Smart Links (Free Trial Links and Tracking Links
with pooled inventory)
- name: Statistics
description: ""
- name: Stored Free Trial Links
description: Instant APIs for retrieving stored free trial links from the
OnlyFansAPI Cache (free, no credits used). `revenue.total` is net earnings
after refunds and chargebacks. `revenue.chargebacks` is the positive
cached net amount already excluded from that total; do not subtract it
again.
- name: Stored Shared Free Trial Links
description: Instant APIs for retrieving stored shared Free Trial Links from the
OnlyFansAPI Cache (free, no credits used)
- name: Stored Shared Tracking Links
description: Instant APIs for retrieving stored shared Tracking Links
(campaigns) from the OnlyFansAPI Cache (free, no credits used)
- name: Stored Tracking Links
description: Instant APIs for retrieving stored tracking links from the
OnlyFansAPI Cache (free, no credits used). `revenue.total` is net earnings
after refunds and chargebacks. `revenue.chargebacks` is the positive
cached net amount already excluded from that total; do not subtract it
again.
- name: Stories
description: APIs for managing OnlyFans stories
- name: Story Highlights
description: APIs for managing OnlyFans story highlights
- name: Subscription Bundles
description: ""
- name: Tracking Links
description: APIs for managing tracking links. Revenue totals are net earnings
after refunds and chargebacks. `revenue.chargebacks` (or
`summary.chargebacks_total` in stats) is the positive cached net amount
already excluded from revenue; do not subtract it again. Spender responses
include chargebacks across all attributed periods for each fan with
positive net revenue.
- name: Transactions
description: APIs for managing OnlyFans transactions
- name: Usage
description: Credit usage reporting for your team
- name: User List Collections
description: ""
- name: Users
description: APIs for fetching OnlyFans users
- name: Webhooks
description: ""
paths:
/api/{account}/chats/{chat_id}/messages:
parameters:
- in: path
name: account
description: The Account ID
example: acct_XXXXXXXXXXXXXXX
required: true
schema:
type: string
- in: path
name: chat_id
description: The ID of the chat (usually a fan's OnlyFans User ID)
example: "123"
required: true
schema:
type: string
get:
summary: List Chat Messages
operationId: listChatMessages
description: Get messages from a specific chat. Use `filter=pinned` or [List
Pinned Chat
Messages](https://docs.onlyfansapi.com/api-reference/chat-messages/list-pinned-chat-messages)
to retrieve only pinned messages. Follow `_pagination.next_page` until
it is null; a short page can still have more results.
parameters:
- in: query
name: limit
description: The number of messages to return (default = 10, max = 100)
example: 10
required: false
schema:
type: string
description: The number of messages to return (default = 10, max = 100)
example: 10
- in: query
name: filter
description: Filter by certain messages. Currently, only pins are filterable.
example: pinned
required: false
schema:
type: string
description: Filter by certain messages. Currently, only pins are filterable.
example: pinned
enum:
- pinned
- in: query
name: first_id
description: Use for pagination when `order=desc` (newest to oldest). Pass the
last message ID from the previous page to retrieve older messages,
excluding that cursor message.
example: 123
required: false
schema:
type: string
description: Use for pagination when `order=desc` (newest to oldest). Pass the
last message ID from the previous page to retrieve older messages,
excluding that cursor message.
example: 123
nullable: true
- in: query
name: last_id
description: Use for pagination when `order=asc` (oldest to newest). Include
this message ID as the first message in the results. WARNING! The
response list of messages will also be inverted (oldest messages
will be first, opposite to default where `order=desc`).
example: 123
required: false
schema:
type: string
description: Use for pagination when `order=asc` (oldest to newest). Include
this message ID as the first message in the results. WARNING! The
response list of messages will also be inverted (oldest messages
will be first, opposite to default where `order=desc`).
example: 123
nullable: true
- in: query
name: order
description: Sort order for messages (desc or asc)
example: desc
required: false
schema:
type: string
description: Sort order for messages (desc or asc)
example: desc
- in: query
name: skip_users
description: Whether to skip user details (`all` or `none`).
example: all
required: false
schema:
type: string
description: Whether to skip user details (`all` or `none`).
example: all
responses:
"200":
description: Success
content:
application/json:
schema:
type: object
example:
data:
- responseType: message
text: yes lets do it
giphyId: null lockedText: false isFree: true price: 0 isMediaReady: true mediaCount: 0 media: [] previews: [] isTip: false isReportedByMe: false isCouplePeopleMedia: false queueId: 12345678901 isMarkdownDisabled: true releaseForms: [] fromUser: id: 987654321 _view: s isFromQueue: false id: 1234567890123 isOpened: false isNew: true createdAt: 2025-09-02T21:02:18+00:00 changedAt: 2025-09-02T21:02:18+00:00 cancelSeconds: 86396 isLiked: false canPurchase: false canPurchaseReason: free canReport: false canBePinned: true isPinned: false isSentByMe: true - responseType: message text:Are you ready for video call now ?
giphyId: null lockedText: false isFree: true price: 0 isMediaReady: true mediaCount: 1 media: - id: 9876543210 type: video convertedToVideo: false canView: true hasError: false createdAt: null isReady: true files: full: url: null width: 480 height: 848 size: 0 sources: [] thumb: url: https://cdn2.onlyfans.com/files/ANONYMIZED_PATH/300x300_ANONYMIZED_FILENAME.jpg?Tag=2&u=987654321&Policy=ANONYMIZED_POLICY&Signature=ANONYMIZED_SIGNATURE&Key-Pair-Id=ANONYMIZED_KEY_PAIR_ID width: 300 height: 300 size: 0 preview: url: https://cdn2.onlyfans.com/files/ANONYMIZED_PATH/480x848_ANONYMIZED_FILENAME.jpg?Tag=2&u=987654321&Policy=ANONYMIZED_POLICY&Signature=ANONYMIZED_SIGNATURE&Key-Pair-Id=ANONYMIZED_KEY_PAIR_ID width: 480 height: 848 size: 0 squarePreview: url: https://cdn2.onlyfans.com/files/ANONYMIZED_PATH/960x960_ANONYMIZED_FILENAME.jpg?Tag=2&u=987654321&Policy=ANONYMIZED_POLICY&Signature=ANONYMIZED_SIGNATURE&Key-Pair-Id=ANONYMIZED_KEY_PAIR_ID width: 960 height: 960 size: 0 drm: manifest: hls: https://cdn3.onlyfans.com/hls/files/ANONYMIZED_PATH/ANONYMIZED_FILENAME.m3u8 dash: https://cdn3.onlyfans.com/dash/files/ANONYMIZED_PATH/ANONYMIZED_FILENAME.mpd signature: hls: CloudFront-Policy: ANONYMIZED_CLOUDFRONT_POLICY CloudFront-Signature: ANONYMIZED_CLOUDFRONT_SIGNATURE CloudFront-Key-Pair-Id: ANONYMIZED_CLOUDFRONT_KEY_PAIR_ID dash: CloudFront-Policy: ANONYMIZED_CLOUDFRONT_POLICY CloudFront-Signature: ANONYMIZED_CLOUDFRONT_SIGNATURE CloudFront-Key-Pair-Id: ANONYMIZED_CLOUDFRONT_KEY_PAIR_ID duration: 9 hasCustomPreview: false videoSources: "240": null "720": null previews: [] isTip: false isReportedByMe: false isCouplePeopleMedia: false queueId: 12345678902 isMarkdownDisabled: true fromUser: id: 123456789 _view: s isFromQueue: true canUnsendQueue: true unsendSecondsQueue: 1000000 id: 1234567890124 isOpened: false isNew: false createdAt: 2025-09-02T20:35:13+00:00 changedAt: 2025-09-02T20:35:13+00:00 cancelSeconds: 85047 isLiked: false canPurchase: false canPurchaseReason: free canReport: true canBePinned: true isPinned: false isSentByMe: false _pagination: next_page: https://app.onlyfansapi.com/api/acct_ANONYMIZED_ACCOUNT_ID/chats/987654321/messages?order=desc&skip_users=all&id=1234567890125 _meta: _credits: used: 1 balance: 224891 note: Always _cache: is_cached: false note: Cache disabled for this endpoint _rate_limits: limit_minute: 1000 limit_day: 50000 remaining_minute: 999 remaining_day: 49984 properties: data: type: array example: - responseType: message text:yes lets do it
giphyId: null lockedText: false isFree: true price: 0 isMediaReady: true mediaCount: 0 media: [] previews: [] isTip: false isReportedByMe: false isCouplePeopleMedia: false queueId: 12345678901 isMarkdownDisabled: true releaseForms: [] fromUser: id: 987654321 _view: s isFromQueue: false id: 1234567890123 isOpened: false isNew: true createdAt: 2025-09-02T21:02:18+00:00 changedAt: 2025-09-02T21:02:18+00:00 cancelSeconds: 86396 isLiked: false canPurchase: false canPurchaseReason: free canReport: false canBePinned: true isPinned: false isSentByMe: true - responseType: message text:Are you ready for video call now ?
giphyId: null lockedText: false isFree: true price: 0 isMediaReady: true mediaCount: 1 media: - id: 9876543210 type: video convertedToVideo: false canView: true hasError: false createdAt: null isReady: true files: full: url: null width: 480 height: 848 size: 0 sources: [] thumb: url: https://cdn2.onlyfans.com/files/ANONYMIZED_PATH/300x300_ANONYMIZED_FILENAME.jpg?Tag=2&u=987654321&Policy=ANONYMIZED_POLICY&Signature=ANONYMIZED_SIGNATURE&Key-Pair-Id=ANONYMIZED_KEY_PAIR_ID width: 300 height: 300 size: 0 preview: url: https://cdn2.onlyfans.com/files/ANONYMIZED_PATH/480x848_ANONYMIZED_FILENAME.jpg?Tag=2&u=987654321&Policy=ANONYMIZED_POLICY&Signature=ANONYMIZED_SIGNATURE&Key-Pair-Id=ANONYMIZED_KEY_PAIR_ID width: 480 height: 848 size: 0 squarePreview: url: https://cdn2.onlyfans.com/files/ANONYMIZED_PATH/960x960_ANONYMIZED_FILENAME.jpg?Tag=2&u=987654321&Policy=ANONYMIZED_POLICY&Signature=ANONYMIZED_SIGNATURE&Key-Pair-Id=ANONYMIZED_KEY_PAIR_ID width: 960 height: 960 size: 0 drm: manifest: hls: https://cdn3.onlyfans.com/hls/files/ANONYMIZED_PATH/ANONYMIZED_FILENAME.m3u8 dash: https://cdn3.onlyfans.com/dash/files/ANONYMIZED_PATH/ANONYMIZED_FILENAME.mpd signature: hls: CloudFront-Policy: ANONYMIZED_CLOUDFRONT_POLICY CloudFront-Signature: ANONYMIZED_CLOUDFRONT_SIGNATURE CloudFront-Key-Pair-Id: ANONYMIZED_CLOUDFRONT_KEY_PAIR_ID dash: CloudFront-Policy: ANONYMIZED_CLOUDFRONT_POLICY CloudFront-Signature: ANONYMIZED_CLOUDFRONT_SIGNATURE CloudFront-Key-Pair-Id: ANONYMIZED_CLOUDFRONT_KEY_PAIR_ID duration: 9 hasCustomPreview: false videoSources: "240": null "720": null previews: [] isTip: false isReportedByMe: false isCouplePeopleMedia: false queueId: 12345678902 isMarkdownDisabled: true fromUser: id: 123456789 _view: s isFromQueue: true canUnsendQueue: true unsendSecondsQueue: 1000000 id: 1234567890124 isOpened: false isNew: false createdAt: 2025-09-02T20:35:13+00:00 changedAt: 2025-09-02T20:35:13+00:00 cancelSeconds: 85047 isLiked: false canPurchase: false canPurchaseReason: free canReport: true canBePinned: true isPinned: false isSentByMe: false items: type: object properties: responseType: type: string example: message text: type: string example:yes lets do it
giphyId: type: string example: null nullable: true lockedText: type: boolean example: false isFree: type: boolean example: true price: type: integer example: 0 isMediaReady: type: boolean example: true mediaCount: type: integer example: 0 media: type: array example: [] previews: type: array example: [] isTip: type: boolean example: false isReportedByMe: type: boolean example: false isCouplePeopleMedia: type: boolean example: false queueId: type: integer example: 12345678901 isMarkdownDisabled: type: boolean example: true releaseForms: type: array example: [] fromUser: type: object properties: id: type: integer example: 987654321 _view: type: string example: s isFromQueue: type: boolean example: false id: type: integer example: 1234567890123 isOpened: type: boolean example: false isNew: type: boolean example: true createdAt: type: string example: 2025-09-02T21:02:18+00:00 changedAt: type: string example: 2025-09-02T21:02:18+00:00 cancelSeconds: type: integer example: 86396 isLiked: type: boolean example: false canPurchase: type: boolean example: false canPurchaseReason: type: string example: free canReport: type: boolean example: false canBePinned: type: boolean example: true isPinned: type: boolean example: false isSentByMe: type: boolean example: true _pagination: type: object properties: next_page: type: string example: https://app.onlyfansapi.com/api/acct_ANONYMIZED_ACCOUNT_ID/chats/987654321/messages?order=desc&skip_users=all&id=1234567890125 _meta: type: object properties: _credits: type: object properties: used: type: integer example: 1 balance: type: integer example: 224891 note: type: string example: Always _cache: type: object properties: is_cached: type: boolean example: false note: type: string example: Cache disabled for this endpoint _rate_limits: type: object properties: limit_minute: type: integer example: 1000 limit_day: type: integer example: 50000 remaining_minute: type: integer example: 999 remaining_day: type: integer example: 49984 tags: - Chat Messages components: securitySchemes: default: type: http scheme: bearer description: Get your API Key from OnlyFansAPI Console - https://app.onlyfansapi.com/api-keys ```` # List Pinned Chat Messages (/api-reference/chat-messages/list-pinned-chat-messages) Get pinned messages from a specific chat. Requires API-key read permission. Returns the same message objects and pagination as [List Chat Messages](https://docs.onlyfansapi.com/api-reference/chat-messages/list-chat-messages). The pinned filter is always applied and cannot be overridden. The original `filter=pinned` listing remains supported. Use `isPinned` for the current pin state and `canBePinned` for pin eligibility in the standard message response. Follow `_pagination.next_page` until it is null; a short page can still have more results. Use [Pin Message](https://docs.onlyfansapi.com/api-reference/chat-messages/pin-message) or [Unpin Message](https://docs.onlyfansapi.com/api-reference/chat-messages/unpin-message) to change the pin state. ## OpenAPI ````yaml https://app.onlyfansapi.com/scribe-docs/openapi.yaml get /api/{account}/chats/{chat_id}/messages/pinned openapi: 3.0.3 info: title: OnlyFans API description: "" version: 1.0.0 servers: - url: https://app.onlyfansapi.com security: - default: [] tags: - name: AI Voice Messages description: "" - name: API Keys description: "" - name: Account description: Endpoints for your linked accounts - name: Analytics - Financial description: APIs for retrieving financial analytics data - name: Analytics - Summary description: APIs for retrieving summary analytics data - name: Banking description: Operations related to user banking details, payout methods, legal and tax information, and account country settings. - name: Banned Words description: Reference list of OnlyFans banned words used by the `blockBannedWords` screening parameter - name: Blocked / Restricted Users description: APIs for listing the users an account has blocked or restricted - name: Chargebacks description: "" - name: Chat Messages description: "" - name: Chats description: "" - name: Client Sessions description: "" - name: Connect OnlyFans Account description: "" - name: Data Exports description: APIs for managing data exports - name: Engagement / Messages description: "" - name: Fans description: APIs for managing OnlyFans fans (subscribers) - name: Fans - AI Summary description: APIs for generating and retrieving AI-powered fan profile summaries - name: Following description: APIs for managing OnlyFans followings (people you're subscribed to) - name: Free Trial Links description: APIs for managing Free Trial Links. Revenue totals are net earnings after refunds and chargebacks. `revenue.chargebacks` (or `summary.chargebacks_total` in stats) is the positive cached net amount already excluded from revenue; do not subtract it again. Spender responses include chargebacks across all attributed periods for each fan with positive net revenue. - name: Giphy description: "" - name: Link Tags description: APIs for managing tags on free trial links, tracking links, and Smart Links - name: Mass Messaging description: "" - name: Media description: "" - name: Media Vault description: "" - name: Media Vault Lists description: "" - name: Notifications description: Endpoints for managingr account notifications - name: Payouts description: "" - name: Post Comments description: "" - name: Post Labels description: APIs for managing your post labels - name: Posts description: APIs for managing OnlyFans posts - name: Profile Content description: Read another user's profile content using your connected OnlyFans account. OnlyFans enforces subscription and purchase requirements; these endpoints do not unlock content. Response samples use captured OnlyFans payloads with anonymized IDs, text, and media URLs; OFAPI metadata values are illustrative. - name: Promotions description: "" - name: Public Profiles description: "" - name: Queue description: "" - name: Release Forms description: APIs for managing OnlyFans release forms - name: Saved For Later (Messages) description: "" - name: Saved For Later (Posts) description: "" - name: Settings description: "" - name: Shared Free Trial Links description: APIs for Free Trial Links that other OF creators have shared with this account. Revenue, cost, and spender data are not available for shared links. - name: Shared Tracking Links description: APIs for Tracking Links (campaigns) that other OF creators have shared with this account. Revenue, cost, and spender data are not available for shared campaigns. - name: Smart Link Postbacks description: APIs for managing Smart Link postback destinations - name: Smart Links description: APIs for managing Smart Links (Free Trial Links and Tracking Links with pooled inventory) - name: Statistics description: "" - name: Stored Free Trial Links description: Instant APIs for retrieving stored free trial links from the OnlyFansAPI Cache (free, no credits used). `revenue.total` is net earnings after refunds and chargebacks. `revenue.chargebacks` is the positive cached net amount already excluded from that total; do not subtract it again. - name: Stored Shared Free Trial Links description: Instant APIs for retrieving stored shared Free Trial Links from the OnlyFansAPI Cache (free, no credits used) - name: Stored Shared Tracking Links description: Instant APIs for retrieving stored shared Tracking Links (campaigns) from the OnlyFansAPI Cache (free, no credits used) - name: Stored Tracking Links description: Instant APIs for retrieving stored tracking links from the OnlyFansAPI Cache (free, no credits used). `revenue.total` is net earnings after refunds and chargebacks. `revenue.chargebacks` is the positive cached net amount already excluded from that total; do not subtract it again. - name: Stories description: APIs for managing OnlyFans stories - name: Story Highlights description: APIs for managing OnlyFans story highlights - name: Subscription Bundles description: "" - name: Tracking Links description: APIs for managing tracking links. Revenue totals are net earnings after refunds and chargebacks. `revenue.chargebacks` (or `summary.chargebacks_total` in stats) is the positive cached net amount already excluded from revenue; do not subtract it again. Spender responses include chargebacks across all attributed periods for each fan with positive net revenue. - name: Transactions description: APIs for managing OnlyFans transactions - name: Usage description: Credit usage reporting for your team - name: User List Collections description: "" - name: Users description: APIs for fetching OnlyFans users - name: Webhooks description: "" paths: /api/{account}/chats/{chat_id}/messages/pinned: parameters: - in: path name: account description: The Account ID example: acct_XXXXXXXXXXXXXXX required: true schema: type: string - in: path name: chat_id description: The ID of the chat (usually a fan's OnlyFans User ID) example: "123" required: true schema: type: string get: summary: List Pinned Chat Messages operationId: listPinnedChatMessages description: |- Get pinned messages from a specific chat. Requires API-key read permission. Returns the same message objects and pagination as [List Chat Messages](https://docs.onlyfansapi.com/api-reference/chat-messages/list-chat-messages). The pinned filter is always applied and cannot be overridden. The original `filter=pinned` listing remains supported. Use `isPinned` for the current pin state and `canBePinned` for pin eligibility in the standard message response. Follow `_pagination.next_page` until it is null; a short page can still have more results. Use [Pin Message](https://docs.onlyfansapi.com/api-reference/chat-messages/pin-message) or [Unpin Message](https://docs.onlyfansapi.com/api-reference/chat-messages/unpin-message) to change the pin state. parameters: - in: query name: limit description: The number of messages to return (default = 10, max = 100) example: 10 required: false schema: type: string description: The number of messages to return (default = 10, max = 100) example: 10 - in: query name: first_id description: Use for pagination when `order=desc` (newest to oldest). Pass the last message ID from the previous page to retrieve older messages, excluding that cursor message. example: 123 required: false schema: type: string description: Use for pagination when `order=desc` (newest to oldest). Pass the last message ID from the previous page to retrieve older messages, excluding that cursor message. example: 123 nullable: true - in: query name: last_id description: Use for pagination when `order=asc` (oldest to newest). Include this message ID as the first message in the results. The response is ordered oldest first. example: 123 required: false schema: type: string description: Use for pagination when `order=asc` (oldest to newest). Include this message ID as the first message in the results. The response is ordered oldest first. example: 123 nullable: true - in: query name: order description: Sort order for messages (desc or asc) example: desc required: false schema: type: string description: Sort order for messages (desc or asc) example: desc - in: query name: skip_users description: Whether to skip user details (`all` or `none`). example: all required: false schema: type: string description: Whether to skip user details (`all` or `none`). example: all responses: "200": description: Success content: application/json: schema: type: object example: data: - responseType: message text:Example pinned message
giphyId: null lockedText: false isFree: true price: 0 isMediaReady: true mediaCount: 0 media: [] previews: [] isTip: false isReportedByMe: false isCouplePeopleMedia: false queueId: null isMarkdownDisabled: true releaseForms: [] fromUser: id: 987654321 _view: s isFromQueue: false id: 1234567890123 isOpened: false isNew: true createdAt: 2025-09-02T21:02:18+00:00 changedAt: 2025-09-02T21:02:18+00:00 cancelSeconds: 0 isLiked: false canPurchase: false canPurchaseReason: free canReport: false canBePinned: true isPinned: true isSentByMe: true _pagination: next_page: https://app.onlyfansapi.com/api/acct_ANONYMIZED_ACCOUNT_ID/chats/987654321/messages/pinned?limit=10&order=desc&first_id=1234567890123 _meta: _credits: used: 1 balance: 224891 note: Always _cache: is_cached: false note: Cache disabled for this endpoint _rate_limits: limit_minute: 1000 limit_day: 50000 remaining_minute: 999 remaining_day: 49984 properties: data: type: array example: - responseType: message text:Example pinned message
giphyId: null lockedText: false isFree: true price: 0 isMediaReady: true mediaCount: 0 media: [] previews: [] isTip: false isReportedByMe: false isCouplePeopleMedia: false queueId: null isMarkdownDisabled: true releaseForms: [] fromUser: id: 987654321 _view: s isFromQueue: false id: 1234567890123 isOpened: false isNew: true createdAt: 2025-09-02T21:02:18+00:00 changedAt: 2025-09-02T21:02:18+00:00 cancelSeconds: 0 isLiked: false canPurchase: false canPurchaseReason: free canReport: false canBePinned: true isPinned: true isSentByMe: true items: type: object properties: responseType: type: string example: message text: type: string example:Example pinned message
giphyId: type: string example: null nullable: true lockedText: type: boolean example: false isFree: type: boolean example: true price: type: integer example: 0 isMediaReady: type: boolean example: true mediaCount: type: integer example: 0 media: type: array example: [] previews: type: array example: [] isTip: type: boolean example: false isReportedByMe: type: boolean example: false isCouplePeopleMedia: type: boolean example: false queueId: type: string example: null nullable: true isMarkdownDisabled: type: boolean example: true releaseForms: type: array example: [] fromUser: type: object properties: id: type: integer example: 987654321 _view: type: string example: s isFromQueue: type: boolean example: false id: type: integer example: 1234567890123 isOpened: type: boolean example: false isNew: type: boolean example: true createdAt: type: string example: 2025-09-02T21:02:18+00:00 changedAt: type: string example: 2025-09-02T21:02:18+00:00 cancelSeconds: type: integer example: 0 isLiked: type: boolean example: false canPurchase: type: boolean example: false canPurchaseReason: type: string example: free canReport: type: boolean example: false canBePinned: type: boolean example: true isPinned: type: boolean example: true isSentByMe: type: boolean example: true _pagination: type: object properties: next_page: type: string example: https://app.onlyfansapi.com/api/acct_ANONYMIZED_ACCOUNT_ID/chats/987654321/messages/pinned?limit=10&order=desc&first_id=1234567890123 _meta: type: object properties: _credits: type: object properties: used: type: integer example: 1 balance: type: integer example: 224891 note: type: string example: Always _cache: type: object properties: is_cached: type: boolean example: false note: type: string example: Cache disabled for this endpoint _rate_limits: type: object properties: limit_minute: type: integer example: 1000 limit_day: type: integer example: 50000 remaining_minute: type: integer example: 999 remaining_day: type: integer example: 49984 tags: - Chat Messages components: securitySchemes: default: type: http scheme: bearer description: Get your API Key from OnlyFansAPI Console - https://app.onlyfansapi.com/api-keys ```` # Pin Message (/api-reference/chat-messages/pin-message) Pin a message from a chat. Requires API-key write permission. No request body is needed. Use [List Pinned Chat Messages](https://docs.onlyfansapi.com/api-reference/chat-messages/list-pinned-chat-messages) to read the current pins. ## OpenAPI ````yaml https://app.onlyfansapi.com/scribe-docs/openapi.yaml post /api/{account}/chats/{chat_id}/messages/{message_id}/pin openapi: 3.0.3 info: title: OnlyFans API description: "" version: 1.0.0 servers: - url: https://app.onlyfansapi.com security: - default: [] tags: - name: AI Voice Messages description: "" - name: API Keys description: "" - name: Account description: Endpoints for your linked accounts - name: Analytics - Financial description: APIs for retrieving financial analytics data - name: Analytics - Summary description: APIs for retrieving summary analytics data - name: Banking description: Operations related to user banking details, payout methods, legal and tax information, and account country settings. - name: Banned Words description: Reference list of OnlyFans banned words used by the `blockBannedWords` screening parameter - name: Blocked / Restricted Users description: APIs for listing the users an account has blocked or restricted - name: Chargebacks description: "" - name: Chat Messages description: "" - name: Chats description: "" - name: Client Sessions description: "" - name: Connect OnlyFans Account description: "" - name: Data Exports description: APIs for managing data exports - name: Engagement / Messages description: "" - name: Fans description: APIs for managing OnlyFans fans (subscribers) - name: Fans - AI Summary description: APIs for generating and retrieving AI-powered fan profile summaries - name: Following description: APIs for managing OnlyFans followings (people you're subscribed to) - name: Free Trial Links description: APIs for managing Free Trial Links. Revenue totals are net earnings after refunds and chargebacks. `revenue.chargebacks` (or `summary.chargebacks_total` in stats) is the positive cached net amount already excluded from revenue; do not subtract it again. Spender responses include chargebacks across all attributed periods for each fan with positive net revenue. - name: Giphy description: "" - name: Link Tags description: APIs for managing tags on free trial links, tracking links, and Smart Links - name: Mass Messaging description: "" - name: Media description: "" - name: Media Vault description: "" - name: Media Vault Lists description: "" - name: Notifications description: Endpoints for managingr account notifications - name: Payouts description: "" - name: Post Comments description: "" - name: Post Labels description: APIs for managing your post labels - name: Posts description: APIs for managing OnlyFans posts - name: Profile Content description: Read another user's profile content using your connected OnlyFans account. OnlyFans enforces subscription and purchase requirements; these endpoints do not unlock content. Response samples use captured OnlyFans payloads with anonymized IDs, text, and media URLs; OFAPI metadata values are illustrative. - name: Promotions description: "" - name: Public Profiles description: "" - name: Queue description: "" - name: Release Forms description: APIs for managing OnlyFans release forms - name: Saved For Later (Messages) description: "" - name: Saved For Later (Posts) description: "" - name: Settings description: "" - name: Shared Free Trial Links description: APIs for Free Trial Links that other OF creators have shared with this account. Revenue, cost, and spender data are not available for shared links. - name: Shared Tracking Links description: APIs for Tracking Links (campaigns) that other OF creators have shared with this account. Revenue, cost, and spender data are not available for shared campaigns. - name: Smart Link Postbacks description: APIs for managing Smart Link postback destinations - name: Smart Links description: APIs for managing Smart Links (Free Trial Links and Tracking Links with pooled inventory) - name: Statistics description: "" - name: Stored Free Trial Links description: Instant APIs for retrieving stored free trial links from the OnlyFansAPI Cache (free, no credits used). `revenue.total` is net earnings after refunds and chargebacks. `revenue.chargebacks` is the positive cached net amount already excluded from that total; do not subtract it again. - name: Stored Shared Free Trial Links description: Instant APIs for retrieving stored shared Free Trial Links from the OnlyFansAPI Cache (free, no credits used) - name: Stored Shared Tracking Links description: Instant APIs for retrieving stored shared Tracking Links (campaigns) from the OnlyFansAPI Cache (free, no credits used) - name: Stored Tracking Links description: Instant APIs for retrieving stored tracking links from the OnlyFansAPI Cache (free, no credits used). `revenue.total` is net earnings after refunds and chargebacks. `revenue.chargebacks` is the positive cached net amount already excluded from that total; do not subtract it again. - name: Stories description: APIs for managing OnlyFans stories - name: Story Highlights description: APIs for managing OnlyFans story highlights - name: Subscription Bundles description: "" - name: Tracking Links description: APIs for managing tracking links. Revenue totals are net earnings after refunds and chargebacks. `revenue.chargebacks` (or `summary.chargebacks_total` in stats) is the positive cached net amount already excluded from revenue; do not subtract it again. Spender responses include chargebacks across all attributed periods for each fan with positive net revenue. - name: Transactions description: APIs for managing OnlyFans transactions - name: Usage description: Credit usage reporting for your team - name: User List Collections description: "" - name: Users description: APIs for fetching OnlyFans users - name: Webhooks description: "" paths: /api/{account}/chats/{chat_id}/messages/{message_id}/pin: parameters: - in: path name: account description: The Account ID example: acct_XXXXXXXXXXXXXXX required: true schema: type: string - in: path name: chat_id description: The ID of the chat, usually a fan's OnlyFans User ID example: "123" required: true schema: type: string - in: path name: message_id description: The ID of the message to pin example: "123456789" required: true schema: type: string post: summary: Pin Message operationId: pinMessage description: Pin a message from a chat. Requires API-key write permission. No request body is needed. Use [List Pinned Chat Messages](https://docs.onlyfansapi.com/api-reference/chat-messages/list-pinned-chat-messages) to read the current pins. parameters: [] responses: "200": description: Success content: application/json: schema: type: object example: data: success: true _meta: _credits: used: 1 balance: 999964357 note: Always _cache: is_cached: false note: Cache disabled for this endpoint _rate_limits: limit_minute: 1000 limit_day: 50000 remaining_minute: 997 remaining_day: 49997 properties: data: type: object properties: success: type: boolean example: true _meta: type: object properties: _credits: type: object properties: used: type: integer example: 1 balance: type: integer example: 999964357 note: type: string example: Always _cache: type: object properties: is_cached: type: boolean example: false note: type: string example: Cache disabled for this endpoint _rate_limits: type: object properties: limit_minute: type: integer example: 1000 limit_day: type: integer example: 50000 remaining_minute: type: integer example: 997 remaining_day: type: integer example: 49997 tags: - Chat Messages components: securitySchemes: default: type: http scheme: bearer description: Get your API Key from OnlyFansAPI Console - https://app.onlyfansapi.com/api-keys ```` # Search Chat Messages (/api-reference/chat-messages/search-chat-messages) Search messages in a specific chat. Returns a list of message IDs matching the search query. ## OpenAPI ````yaml https://app.onlyfansapi.com/scribe-docs/openapi.yaml get /api/{account}/chats/{chat_id}/messages/search openapi: 3.0.3 info: title: OnlyFans API description: "" version: 1.0.0 servers: - url: https://app.onlyfansapi.com security: - default: [] tags: - name: AI Voice Messages description: "" - name: API Keys description: "" - name: Account description: Endpoints for your linked accounts - name: Analytics - Financial description: APIs for retrieving financial analytics data - name: Analytics - Summary description: APIs for retrieving summary analytics data - name: Banking description: Operations related to user banking details, payout methods, legal and tax information, and account country settings. - name: Banned Words description: Reference list of OnlyFans banned words used by the `blockBannedWords` screening parameter - name: Blocked / Restricted Users description: APIs for listing the users an account has blocked or restricted - name: Chargebacks description: "" - name: Chat Messages description: "" - name: Chats description: "" - name: Client Sessions description: "" - name: Connect OnlyFans Account description: "" - name: Data Exports description: APIs for managing data exports - name: Engagement / Messages description: "" - name: Fans description: APIs for managing OnlyFans fans (subscribers) - name: Fans - AI Summary description: APIs for generating and retrieving AI-powered fan profile summaries - name: Following description: APIs for managing OnlyFans followings (people you're subscribed to) - name: Free Trial Links description: APIs for managing Free Trial Links. Revenue totals are net earnings after refunds and chargebacks. `revenue.chargebacks` (or `summary.chargebacks_total` in stats) is the positive cached net amount already excluded from revenue; do not subtract it again. Spender responses include chargebacks across all attributed periods for each fan with positive net revenue. - name: Giphy description: "" - name: Link Tags description: APIs for managing tags on free trial links, tracking links, and Smart Links - name: Mass Messaging description: "" - name: Media description: "" - name: Media Vault description: "" - name: Media Vault Lists description: "" - name: Notifications description: Endpoints for managingr account notifications - name: Payouts description: "" - name: Post Comments description: "" - name: Post Labels description: APIs for managing your post labels - name: Posts description: APIs for managing OnlyFans posts - name: Profile Content description: Read another user's profile content using your connected OnlyFans account. OnlyFans enforces subscription and purchase requirements; these endpoints do not unlock content. Response samples use captured OnlyFans payloads with anonymized IDs, text, and media URLs; OFAPI metadata values are illustrative. - name: Promotions description: "" - name: Public Profiles description: "" - name: Queue description: "" - name: Release Forms description: APIs for managing OnlyFans release forms - name: Saved For Later (Messages) description: "" - name: Saved For Later (Posts) description: "" - name: Settings description: "" - name: Shared Free Trial Links description: APIs for Free Trial Links that other OF creators have shared with this account. Revenue, cost, and spender data are not available for shared links. - name: Shared Tracking Links description: APIs for Tracking Links (campaigns) that other OF creators have shared with this account. Revenue, cost, and spender data are not available for shared campaigns. - name: Smart Link Postbacks description: APIs for managing Smart Link postback destinations - name: Smart Links description: APIs for managing Smart Links (Free Trial Links and Tracking Links with pooled inventory) - name: Statistics description: "" - name: Stored Free Trial Links description: Instant APIs for retrieving stored free trial links from the OnlyFansAPI Cache (free, no credits used). `revenue.total` is net earnings after refunds and chargebacks. `revenue.chargebacks` is the positive cached net amount already excluded from that total; do not subtract it again. - name: Stored Shared Free Trial Links description: Instant APIs for retrieving stored shared Free Trial Links from the OnlyFansAPI Cache (free, no credits used) - name: Stored Shared Tracking Links description: Instant APIs for retrieving stored shared Tracking Links (campaigns) from the OnlyFansAPI Cache (free, no credits used) - name: Stored Tracking Links description: Instant APIs for retrieving stored tracking links from the OnlyFansAPI Cache (free, no credits used). `revenue.total` is net earnings after refunds and chargebacks. `revenue.chargebacks` is the positive cached net amount already excluded from that total; do not subtract it again. - name: Stories description: APIs for managing OnlyFans stories - name: Story Highlights description: APIs for managing OnlyFans story highlights - name: Subscription Bundles description: "" - name: Tracking Links description: APIs for managing tracking links. Revenue totals are net earnings after refunds and chargebacks. `revenue.chargebacks` (or `summary.chargebacks_total` in stats) is the positive cached net amount already excluded from revenue; do not subtract it again. Spender responses include chargebacks across all attributed periods for each fan with positive net revenue. - name: Transactions description: APIs for managing OnlyFans transactions - name: Usage description: Credit usage reporting for your team - name: User List Collections description: "" - name: Users description: APIs for fetching OnlyFans users - name: Webhooks description: "" paths: /api/{account}/chats/{chat_id}/messages/search: parameters: - in: path name: account description: The Account ID example: acct_XXXXXXXXXXXXXXX required: true schema: type: string - in: path name: chat_id description: The ID of the chat (usually a fan's OnlyFans User ID) example: "123" required: true schema: type: string get: summary: Search Chat Messages operationId: searchChatMessages description: Search messages in a specific chat. Returns a list of message IDs matching the search query. parameters: - in: query name: query description: The query search in messages. example: Hello required: true schema: type: string description: The query search in messages. example: Hello responses: "200": description: Success content: application/json: schema: type: object example: data: - 123 - 456 - 789 _meta: _credits: used: 1 balance: 999999892 note: Always _cache: is_cached: false note: Cache disabled for this endpoint _rate_limits: limit_minute: 1000 limit_day: 50000 remaining_minute: 999 remaining_day: 49979 properties: data: type: array example: - 123 - 456 - 789 items: type: integer _meta: type: object properties: _credits: type: object properties: used: type: integer example: 1 balance: type: integer example: 999999892 note: type: string example: Always _cache: type: object properties: is_cached: type: boolean example: false note: type: string example: Cache disabled for this endpoint _rate_limits: type: object properties: limit_minute: type: integer example: 1000 limit_day: type: integer example: 50000 remaining_minute: type: integer example: 999 remaining_day: type: integer example: 49979 tags: - Chat Messages components: securitySchemes: default: type: http scheme: bearer description: Get your API Key from OnlyFansAPI Console - https://app.onlyfansapi.com/api-keys ```` # Send Message (/api-reference/chat-messages/send-message) Send a new message to a chat. **Idempotency.** Pass an `Idempotency-Key` header to make retries safe. The first request with a given key is executed normally and its response is stored for **24 hours**; any later request with the same key returns that stored response, plus an `Idempotent-Replayed: true` header, without contacting OnlyFans and without consuming credits. The replayed body is the original response with its `_meta._credits` block rewritten to show `used: 0` and your current balance. Keys are scoped to your team, this endpoint and the account in the URL, so the same value can be reused safely against a different account. Use a fresh, unique value (a UUID works well) for each message you send; it must be 1-255 printable ASCII characters. * `400 IDEMPOTENCY_KEY_INVALID` — the header value is empty, too long, or contains non-ASCII characters. * `409 IDEMPOTENCY_CONFLICT` — an earlier request with this key is still running. Retry once it finishes. * `422 IDEMPOTENCY_KEY_MISMATCH` — this key was already used with a different request body or chat. Responses with a `5xx` status (and `408`/`429`) are never stored, so a failed send can be retried with the same key. The header is optional: omit it and the endpoint behaves exactly as before. ## OpenAPI ````yaml https://app.onlyfansapi.com/scribe-docs/openapi.yaml post /api/{account}/chats/{chat_id}/messages openapi: 3.0.3 info: title: OnlyFans API description: "" version: 1.0.0 servers: - url: https://app.onlyfansapi.com security: - default: [] tags: - name: AI Voice Messages description: "" - name: API Keys description: "" - name: Account description: Endpoints for your linked accounts - name: Analytics - Financial description: APIs for retrieving financial analytics data - name: Analytics - Summary description: APIs for retrieving summary analytics data - name: Banking description: Operations related to user banking details, payout methods, legal and tax information, and account country settings. - name: Banned Words description: Reference list of OnlyFans banned words used by the `blockBannedWords` screening parameter - name: Blocked / Restricted Users description: APIs for listing the users an account has blocked or restricted - name: Chargebacks description: "" - name: Chat Messages description: "" - name: Chats description: "" - name: Client Sessions description: "" - name: Connect OnlyFans Account description: "" - name: Data Exports description: APIs for managing data exports - name: Engagement / Messages description: "" - name: Fans description: APIs for managing OnlyFans fans (subscribers) - name: Fans - AI Summary description: APIs for generating and retrieving AI-powered fan profile summaries - name: Following description: APIs for managing OnlyFans followings (people you're subscribed to) - name: Free Trial Links description: APIs for managing Free Trial Links. Revenue totals are net earnings after refunds and chargebacks. `revenue.chargebacks` (or `summary.chargebacks_total` in stats) is the positive cached net amount already excluded from revenue; do not subtract it again. Spender responses include chargebacks across all attributed periods for each fan with positive net revenue. - name: Giphy description: "" - name: Link Tags description: APIs for managing tags on free trial links, tracking links, and Smart Links - name: Mass Messaging description: "" - name: Media description: "" - name: Media Vault description: "" - name: Media Vault Lists description: "" - name: Notifications description: Endpoints for managingr account notifications - name: Payouts description: "" - name: Post Comments description: "" - name: Post Labels description: APIs for managing your post labels - name: Posts description: APIs for managing OnlyFans posts - name: Profile Content description: Read another user's profile content using your connected OnlyFans account. OnlyFans enforces subscription and purchase requirements; these endpoints do not unlock content. Response samples use captured OnlyFans payloads with anonymized IDs, text, and media URLs; OFAPI metadata values are illustrative. - name: Promotions description: "" - name: Public Profiles description: "" - name: Queue description: "" - name: Release Forms description: APIs for managing OnlyFans release forms - name: Saved For Later (Messages) description: "" - name: Saved For Later (Posts) description: "" - name: Settings description: "" - name: Shared Free Trial Links description: APIs for Free Trial Links that other OF creators have shared with this account. Revenue, cost, and spender data are not available for shared links. - name: Shared Tracking Links description: APIs for Tracking Links (campaigns) that other OF creators have shared with this account. Revenue, cost, and spender data are not available for shared campaigns. - name: Smart Link Postbacks description: APIs for managing Smart Link postback destinations - name: Smart Links description: APIs for managing Smart Links (Free Trial Links and Tracking Links with pooled inventory) - name: Statistics description: "" - name: Stored Free Trial Links description: Instant APIs for retrieving stored free trial links from the OnlyFansAPI Cache (free, no credits used). `revenue.total` is net earnings after refunds and chargebacks. `revenue.chargebacks` is the positive cached net amount already excluded from that total; do not subtract it again. - name: Stored Shared Free Trial Links description: Instant APIs for retrieving stored shared Free Trial Links from the OnlyFansAPI Cache (free, no credits used) - name: Stored Shared Tracking Links description: Instant APIs for retrieving stored shared Tracking Links (campaigns) from the OnlyFansAPI Cache (free, no credits used) - name: Stored Tracking Links description: Instant APIs for retrieving stored tracking links from the OnlyFansAPI Cache (free, no credits used). `revenue.total` is net earnings after refunds and chargebacks. `revenue.chargebacks` is the positive cached net amount already excluded from that total; do not subtract it again. - name: Stories description: APIs for managing OnlyFans stories - name: Story Highlights description: APIs for managing OnlyFans story highlights - name: Subscription Bundles description: "" - name: Tracking Links description: APIs for managing tracking links. Revenue totals are net earnings after refunds and chargebacks. `revenue.chargebacks` (or `summary.chargebacks_total` in stats) is the positive cached net amount already excluded from revenue; do not subtract it again. Spender responses include chargebacks across all attributed periods for each fan with positive net revenue. - name: Transactions description: APIs for managing OnlyFans transactions - name: Usage description: Credit usage reporting for your team - name: User List Collections description: "" - name: Users description: APIs for fetching OnlyFans users - name: Webhooks description: "" paths: /api/{account}/chats/{chat_id}/messages: parameters: - in: path name: account description: The Account ID example: acct_XXXXXXXXXXXXXXX required: true schema: type: string - in: path name: chat_id description: The ID of the chat (usually a fan's OnlyFans User ID) example: "123" required: true schema: type: string post: summary: Send Message operationId: sendMessage description: >- Send a new message to a chat. **Idempotency.** Pass an `Idempotency-Key` header to make retries safe. The first request with a given key is executed normally and its response is stored for **24 hours**; any later request with the same key returns that stored response, plus an `Idempotent-Replayed: true` header, without contacting OnlyFans and without consuming credits. The replayed body is the original response with its `_meta._credits` block rewritten to show `used: 0` and your current balance. Keys are scoped to your team, this endpoint and the account in the URL, so the same value can be reused safely against a different account. Use a fresh, unique value (a UUID works well) for each message you send; it must be 1-255 printable ASCII characters. - `400 IDEMPOTENCY_KEY_INVALID` — the header value is empty, too long, or contains non-ASCII characters. - `409 IDEMPOTENCY_CONFLICT` — an earlier request with this key is still running. Retry once it finishes. - `422 IDEMPOTENCY_KEY_MISMATCH` — this key was already used with a different request body or chat. Responses with a `5xx` status (and `408`/`429`) are never stored, so a failed send can be retried with the same key. The header is optional: omit it and the endpoint behaves exactly as before. parameters: - in: header name: Idempotency-Key description: "" example: a1b2c3d4-5e6f-4789-a0b1-c2d3e4f5a6b7 schema: type: string responses: "200": description: Success content: application/json: schema: type: object example: data: responseType: message text:Message text
giphyId: null lockedText: true isFree: true price: 0 isMediaReady: true mediaCount: 0 media: [] previews: [] isTip: false isReportedByMe: false isCouplePeopleMedia: false queueId: 123 isMarkdownDisabled: true releaseForms: [] fromUser: id: 339543013 _view: s isFromQueue: false id: 123 isOpened: false isNew: true createdAt: 2025-02-03T23:29:53+00:00 changedAt: 2025-02-03T23:29:53+00:00 cancelSeconds: 119 isLiked: false canPurchase: false canPurchaseReason: free canReport: false canBePinned: true isPinned: false _pagination: next_page: https://app.onlyfansapi.com/api/acct_XXXXXXXXXXX/chats/XXXXXXXXX/messages?limit=10&id=XXXXXXXXX _meta: _credits: used: 1 balance: 1 note: Always _cache: is_cached: false note: Cache disabled for this endpoint _rate_limits: limit_minute: 1000 limit_day: 50000 remaining_minute: 999 remaining_day: 49999 properties: data: type: object properties: responseType: type: string example: message text: type: string example:Message text
giphyId: type: string example: null nullable: true lockedText: type: boolean example: true isFree: type: boolean example: true price: type: integer example: 0 isMediaReady: type: boolean example: true mediaCount: type: integer example: 0 media: type: array example: [] previews: type: array example: [] isTip: type: boolean example: false isReportedByMe: type: boolean example: false isCouplePeopleMedia: type: boolean example: false queueId: type: integer example: 123 isMarkdownDisabled: type: boolean example: true releaseForms: type: array example: [] fromUser: type: object properties: id: type: integer example: 339543013 _view: type: string example: s isFromQueue: type: boolean example: false id: type: integer example: 123 isOpened: type: boolean example: false isNew: type: boolean example: true createdAt: type: string example: 2025-02-03T23:29:53+00:00 changedAt: type: string example: 2025-02-03T23:29:53+00:00 cancelSeconds: type: integer example: 119 isLiked: type: boolean example: false canPurchase: type: boolean example: false canPurchaseReason: type: string example: free canReport: type: boolean example: false canBePinned: type: boolean example: true isPinned: type: boolean example: false _pagination: type: object properties: next_page: type: string example: https://app.onlyfansapi.com/api/acct_XXXXXXXXXXX/chats/XXXXXXXXX/messages?limit=10&id=XXXXXXXXX _meta: type: object properties: _credits: type: object properties: used: type: integer example: 1 balance: type: integer example: 1 note: type: string example: Always _cache: type: object properties: is_cached: type: boolean example: false note: type: string example: Cache disabled for this endpoint _rate_limits: type: object properties: limit_minute: type: integer example: 1000 limit_day: type: integer example: 50000 remaining_minute: type: integer example: 999 remaining_day: type: integer example: 49999 "409": description: Idempotency Key In Progress content: application/json: schema: type: object example: error: IDEMPOTENCY_CONFLICT message: A request with this Idempotency-Key is already in progress. description: An earlier request using this Idempotency-Key has not finished yet. Wait for it to complete, then retry with the same key to receive the original response. properties: error: type: string example: IDEMPOTENCY_CONFLICT message: type: string example: A request with this Idempotency-Key is already in progress. description: type: string example: An earlier request using this Idempotency-Key has not finished yet. Wait for it to complete, then retry with the same key to receive the original response. "422": description: Validation Error content: application/json: schema: type: object example: error: VALIDATION_ERROR message: The text field is required. description: The request parameters failed validation. errors: text: - The text field is required. _meta: _credits: used: 0 balance: 9554 note: Always _cache: is_cached: false note: Cache disabled for this endpoint _rate_limits: limit_minute: 1000 limit_day: 50000 remaining_minute: 999 remaining_day: 49999 properties: error: type: string example: VALIDATION_ERROR message: type: string example: The text field is required. description: type: string example: The request parameters failed validation. errors: type: object properties: text: type: array example: - The text field is required. items: type: string _meta: type: object properties: _credits: type: object properties: used: type: integer example: 0 balance: type: integer example: 9554 note: type: string example: Always _cache: type: object properties: is_cached: type: boolean example: false note: type: string example: Cache disabled for this endpoint _rate_limits: type: object properties: limit_minute: type: integer example: 1000 limit_day: type: integer example: 50000 remaining_minute: type: integer example: 999 remaining_day: type: integer example: 49999 tags: - Chat Messages requestBody: required: false content: application/json: schema: type: object properties: text: type: string description: The message text content. Required unless a media file is present. example: Hello! replyToMessageId: type: integer description: Mark this message as a reply to another (can be either your own, or the recipient's) example: 123456789 lockedText: type: boolean description: Set to true to hide the text until the message is purchased. Allows paid text without media. example: true price: type: number description: Price for paid content in USD (0 or between 3-200). A paid message requires **mediaFiles** unless **lockedText** is true. example: 6.97 mediaFiles: type: array description: Direct file uploads, OFAPI `ofapi_media_` IDs, or OF vault IDs. Will be hidden if `price` is provided. example: - ofapi_media_abc123 - 1234567890 items: type: file[]|string previews: type: array description: Direct file uploads, OFAPI `ofapi_media_` IDs, OF vault IDs, or integer indices referencing uploaded files in `mediaFiles`. Will be shown if `price` is provided. example: - ofapi_media_abc123 - 1234567890 items: type: file[]|string[]|int giphyId: type: string description: The ID of the Giphy GIF to attach to the message. Get IDs from the Giphy listing endpoints (`/giphy/trending`, `/giphy/search`). example: WAGC3LeqJvXglm5H7a rfTag: type: string description: Array of OnlyFans Creator User IDs to tag in your message example: null rfPartner: type: string description: Array of OnlyFans Release Form Partners IDs to tag in your message example: null rfGuest: type: string description: Array of OnlyFans Release Form Guest IDs to tag in your message example: null blockBannedWords: type: string description: Screen `text` for OnlyFans banned words and block the send if any are found (returns a 422 listing the offending words). `strict_ban` blocks all tiers, `risky` blocks Risky + Replace/soften, `replace_soften` blocks Replace/soften only. Omit to disable screening. example: strict_ban enum: - strict_ban - risky - replace_soften components: securitySchemes: default: type: http scheme: bearer description: Get your API Key from OnlyFansAPI Console - https://app.onlyfansapi.com/api-keys ```` # Unlike Message (/api-reference/chat-messages/unlike-message) Unlike a chat message. ## OpenAPI ````yaml https://app.onlyfansapi.com/scribe-docs/openapi.yaml delete /api/{account}/chats/{chat_id}/messages/{message_id}/unlike openapi: 3.0.3 info: title: OnlyFans API description: "" version: 1.0.0 servers: - url: https://app.onlyfansapi.com security: - default: [] tags: - name: AI Voice Messages description: "" - name: API Keys description: "" - name: Account description: Endpoints for your linked accounts - name: Analytics - Financial description: APIs for retrieving financial analytics data - name: Analytics - Summary description: APIs for retrieving summary analytics data - name: Banking description: Operations related to user banking details, payout methods, legal and tax information, and account country settings. - name: Banned Words description: Reference list of OnlyFans banned words used by the `blockBannedWords` screening parameter - name: Blocked / Restricted Users description: APIs for listing the users an account has blocked or restricted - name: Chargebacks description: "" - name: Chat Messages description: "" - name: Chats description: "" - name: Client Sessions description: "" - name: Connect OnlyFans Account description: "" - name: Data Exports description: APIs for managing data exports - name: Engagement / Messages description: "" - name: Fans description: APIs for managing OnlyFans fans (subscribers) - name: Fans - AI Summary description: APIs for generating and retrieving AI-powered fan profile summaries - name: Following description: APIs for managing OnlyFans followings (people you're subscribed to) - name: Free Trial Links description: APIs for managing Free Trial Links. Revenue totals are net earnings after refunds and chargebacks. `revenue.chargebacks` (or `summary.chargebacks_total` in stats) is the positive cached net amount already excluded from revenue; do not subtract it again. Spender responses include chargebacks across all attributed periods for each fan with positive net revenue. - name: Giphy description: "" - name: Link Tags description: APIs for managing tags on free trial links, tracking links, and Smart Links - name: Mass Messaging description: "" - name: Media description: "" - name: Media Vault description: "" - name: Media Vault Lists description: "" - name: Notifications description: Endpoints for managingr account notifications - name: Payouts description: "" - name: Post Comments description: "" - name: Post Labels description: APIs for managing your post labels - name: Posts description: APIs for managing OnlyFans posts - name: Profile Content description: Read another user's profile content using your connected OnlyFans account. OnlyFans enforces subscription and purchase requirements; these endpoints do not unlock content. Response samples use captured OnlyFans payloads with anonymized IDs, text, and media URLs; OFAPI metadata values are illustrative. - name: Promotions description: "" - name: Public Profiles description: "" - name: Queue description: "" - name: Release Forms description: APIs for managing OnlyFans release forms - name: Saved For Later (Messages) description: "" - name: Saved For Later (Posts) description: "" - name: Settings description: "" - name: Shared Free Trial Links description: APIs for Free Trial Links that other OF creators have shared with this account. Revenue, cost, and spender data are not available for shared links. - name: Shared Tracking Links description: APIs for Tracking Links (campaigns) that other OF creators have shared with this account. Revenue, cost, and spender data are not available for shared campaigns. - name: Smart Link Postbacks description: APIs for managing Smart Link postback destinations - name: Smart Links description: APIs for managing Smart Links (Free Trial Links and Tracking Links with pooled inventory) - name: Statistics description: "" - name: Stored Free Trial Links description: Instant APIs for retrieving stored free trial links from the OnlyFansAPI Cache (free, no credits used). `revenue.total` is net earnings after refunds and chargebacks. `revenue.chargebacks` is the positive cached net amount already excluded from that total; do not subtract it again. - name: Stored Shared Free Trial Links description: Instant APIs for retrieving stored shared Free Trial Links from the OnlyFansAPI Cache (free, no credits used) - name: Stored Shared Tracking Links description: Instant APIs for retrieving stored shared Tracking Links (campaigns) from the OnlyFansAPI Cache (free, no credits used) - name: Stored Tracking Links description: Instant APIs for retrieving stored tracking links from the OnlyFansAPI Cache (free, no credits used). `revenue.total` is net earnings after refunds and chargebacks. `revenue.chargebacks` is the positive cached net amount already excluded from that total; do not subtract it again. - name: Stories description: APIs for managing OnlyFans stories - name: Story Highlights description: APIs for managing OnlyFans story highlights - name: Subscription Bundles description: "" - name: Tracking Links description: APIs for managing tracking links. Revenue totals are net earnings after refunds and chargebacks. `revenue.chargebacks` (or `summary.chargebacks_total` in stats) is the positive cached net amount already excluded from revenue; do not subtract it again. Spender responses include chargebacks across all attributed periods for each fan with positive net revenue. - name: Transactions description: APIs for managing OnlyFans transactions - name: Usage description: Credit usage reporting for your team - name: User List Collections description: "" - name: Users description: APIs for fetching OnlyFans users - name: Webhooks description: "" paths: /api/{account}/chats/{chat_id}/messages/{message_id}/unlike: parameters: - in: path name: account description: The Account ID example: acct_XXXXXXXXXXXXXXX required: true schema: type: string - in: path name: chat_id description: The ID of the chat, usually a fan's OnlyFans User ID example: "123" required: true schema: type: string - in: path name: message_id description: The ID of the message to unlike example: "123456789" required: true schema: type: string delete: summary: Unlike Message operationId: unlikeMessage description: Unlike a chat message. parameters: [] responses: "200": description: Success content: application/json: schema: type: object example: data: success: true isLiked: false _meta: _credits: used: 1 balance: 999964348 note: Always _cache: is_cached: false note: Cache disabled for this endpoint _rate_limits: limit_minute: 1000 limit_day: 50000 remaining_minute: 998 remaining_day: 49988 properties: data: type: object properties: success: type: boolean example: true isLiked: type: boolean example: false _meta: type: object properties: _credits: type: object properties: used: type: integer example: 1 balance: type: integer example: 999964348 note: type: string example: Always _cache: type: object properties: is_cached: type: boolean example: false note: type: string example: Cache disabled for this endpoint _rate_limits: type: object properties: limit_minute: type: integer example: 1000 limit_day: type: integer example: 50000 remaining_minute: type: integer example: 998 remaining_day: type: integer example: 49988 tags: - Chat Messages components: securitySchemes: default: type: http scheme: bearer description: Get your API Key from OnlyFansAPI Console - https://app.onlyfansapi.com/api-keys ```` # Unpin Message (/api-reference/chat-messages/unpin-message) Unpin a message from a chat. Requires API-key delete permission; a read\_write key cannot unpin. No request body is needed. Use [List Pinned Chat Messages](https://docs.onlyfansapi.com/api-reference/chat-messages/list-pinned-chat-messages) to read the current pins. ## OpenAPI ````yaml https://app.onlyfansapi.com/scribe-docs/openapi.yaml delete /api/{account}/chats/{chat_id}/messages/{message_id}/unpin openapi: 3.0.3 info: title: OnlyFans API description: "" version: 1.0.0 servers: - url: https://app.onlyfansapi.com security: - default: [] tags: - name: AI Voice Messages description: "" - name: API Keys description: "" - name: Account description: Endpoints for your linked accounts - name: Analytics - Financial description: APIs for retrieving financial analytics data - name: Analytics - Summary description: APIs for retrieving summary analytics data - name: Banking description: Operations related to user banking details, payout methods, legal and tax information, and account country settings. - name: Banned Words description: Reference list of OnlyFans banned words used by the `blockBannedWords` screening parameter - name: Blocked / Restricted Users description: APIs for listing the users an account has blocked or restricted - name: Chargebacks description: "" - name: Chat Messages description: "" - name: Chats description: "" - name: Client Sessions description: "" - name: Connect OnlyFans Account description: "" - name: Data Exports description: APIs for managing data exports - name: Engagement / Messages description: "" - name: Fans description: APIs for managing OnlyFans fans (subscribers) - name: Fans - AI Summary description: APIs for generating and retrieving AI-powered fan profile summaries - name: Following description: APIs for managing OnlyFans followings (people you're subscribed to) - name: Free Trial Links description: APIs for managing Free Trial Links. Revenue totals are net earnings after refunds and chargebacks. `revenue.chargebacks` (or `summary.chargebacks_total` in stats) is the positive cached net amount already excluded from revenue; do not subtract it again. Spender responses include chargebacks across all attributed periods for each fan with positive net revenue. - name: Giphy description: "" - name: Link Tags description: APIs for managing tags on free trial links, tracking links, and Smart Links - name: Mass Messaging description: "" - name: Media description: "" - name: Media Vault description: "" - name: Media Vault Lists description: "" - name: Notifications description: Endpoints for managingr account notifications - name: Payouts description: "" - name: Post Comments description: "" - name: Post Labels description: APIs for managing your post labels - name: Posts description: APIs for managing OnlyFans posts - name: Profile Content description: Read another user's profile content using your connected OnlyFans account. OnlyFans enforces subscription and purchase requirements; these endpoints do not unlock content. Response samples use captured OnlyFans payloads with anonymized IDs, text, and media URLs; OFAPI metadata values are illustrative. - name: Promotions description: "" - name: Public Profiles description: "" - name: Queue description: "" - name: Release Forms description: APIs for managing OnlyFans release forms - name: Saved For Later (Messages) description: "" - name: Saved For Later (Posts) description: "" - name: Settings description: "" - name: Shared Free Trial Links description: APIs for Free Trial Links that other OF creators have shared with this account. Revenue, cost, and spender data are not available for shared links. - name: Shared Tracking Links description: APIs for Tracking Links (campaigns) that other OF creators have shared with this account. Revenue, cost, and spender data are not available for shared campaigns. - name: Smart Link Postbacks description: APIs for managing Smart Link postback destinations - name: Smart Links description: APIs for managing Smart Links (Free Trial Links and Tracking Links with pooled inventory) - name: Statistics description: "" - name: Stored Free Trial Links description: Instant APIs for retrieving stored free trial links from the OnlyFansAPI Cache (free, no credits used). `revenue.total` is net earnings after refunds and chargebacks. `revenue.chargebacks` is the positive cached net amount already excluded from that total; do not subtract it again. - name: Stored Shared Free Trial Links description: Instant APIs for retrieving stored shared Free Trial Links from the OnlyFansAPI Cache (free, no credits used) - name: Stored Shared Tracking Links description: Instant APIs for retrieving stored shared Tracking Links (campaigns) from the OnlyFansAPI Cache (free, no credits used) - name: Stored Tracking Links description: Instant APIs for retrieving stored tracking links from the OnlyFansAPI Cache (free, no credits used). `revenue.total` is net earnings after refunds and chargebacks. `revenue.chargebacks` is the positive cached net amount already excluded from that total; do not subtract it again. - name: Stories description: APIs for managing OnlyFans stories - name: Story Highlights description: APIs for managing OnlyFans story highlights - name: Subscription Bundles description: "" - name: Tracking Links description: APIs for managing tracking links. Revenue totals are net earnings after refunds and chargebacks. `revenue.chargebacks` (or `summary.chargebacks_total` in stats) is the positive cached net amount already excluded from revenue; do not subtract it again. Spender responses include chargebacks across all attributed periods for each fan with positive net revenue. - name: Transactions description: APIs for managing OnlyFans transactions - name: Usage description: Credit usage reporting for your team - name: User List Collections description: "" - name: Users description: APIs for fetching OnlyFans users - name: Webhooks description: "" paths: /api/{account}/chats/{chat_id}/messages/{message_id}/unpin: parameters: - in: path name: account description: The Account ID example: acct_XXXXXXXXXXXXXXX required: true schema: type: string - in: path name: chat_id description: The ID of the chat, usually a fan's OnlyFans User ID example: "123" required: true schema: type: string - in: path name: message_id description: The ID of the message to unpin example: "123456789" required: true schema: type: string delete: summary: Unpin Message operationId: unpinMessage description: Unpin a message from a chat. Requires API-key delete permission; a read_write key cannot unpin. No request body is needed. Use [List Pinned Chat Messages](https://docs.onlyfansapi.com/api-reference/chat-messages/list-pinned-chat-messages) to read the current pins. parameters: [] responses: "200": description: Success content: application/json: schema: type: object example: data: success: true _meta: _credits: used: 1 balance: 999964356 note: Always _cache: is_cached: false note: Cache disabled for this endpoint _rate_limits: limit_minute: 1000 limit_day: 50000 remaining_minute: 999 remaining_day: 49996 properties: data: type: object properties: success: type: boolean example: true _meta: type: object properties: _credits: type: object properties: used: type: integer example: 1 balance: type: integer example: 999964356 note: type: string example: Always _cache: type: object properties: is_cached: type: boolean example: false note: type: string example: Cache disabled for this endpoint _rate_limits: type: object properties: limit_minute: type: integer example: 1000 limit_day: type: integer example: 50000 remaining_minute: type: integer example: 999 remaining_day: type: integer example: 49996 tags: - Chat Messages components: securitySchemes: default: type: http scheme: bearer description: Get your API Key from OnlyFansAPI Console - https://app.onlyfansapi.com/api-keys ```` # Create Client Session (/api-reference/client-sessions/create-client-session) Create Client Session Token for later use in embedded auth components - eg. via @onlyfansapi/auth npm package. ## OpenAPI ````yaml https://app.onlyfansapi.com/scribe-docs/openapi.yaml post /api/client-sessions openapi: 3.0.3 info: title: OnlyFans API description: "" version: 1.0.0 servers: - url: https://app.onlyfansapi.com security: - default: [] tags: - name: AI Voice Messages description: "" - name: API Keys description: "" - name: Account description: Endpoints for your linked accounts - name: Analytics - Financial description: APIs for retrieving financial analytics data - name: Analytics - Summary description: APIs for retrieving summary analytics data - name: Banking description: Operations related to user banking details, payout methods, legal and tax information, and account country settings. - name: Banned Words description: Reference list of OnlyFans banned words used by the `blockBannedWords` screening parameter - name: Blocked / Restricted Users description: APIs for listing the users an account has blocked or restricted - name: Chargebacks description: "" - name: Chat Messages description: "" - name: Chats description: "" - name: Client Sessions description: "" - name: Connect OnlyFans Account description: "" - name: Data Exports description: APIs for managing data exports - name: Engagement / Messages description: "" - name: Fans description: APIs for managing OnlyFans fans (subscribers) - name: Fans - AI Summary description: APIs for generating and retrieving AI-powered fan profile summaries - name: Following description: APIs for managing OnlyFans followings (people you're subscribed to) - name: Free Trial Links description: APIs for managing Free Trial Links. Revenue totals are net earnings after refunds and chargebacks. `revenue.chargebacks` (or `summary.chargebacks_total` in stats) is the positive cached net amount already excluded from revenue; do not subtract it again. Spender responses include chargebacks across all attributed periods for each fan with positive net revenue. - name: Giphy description: "" - name: Link Tags description: APIs for managing tags on free trial links, tracking links, and Smart Links - name: Mass Messaging description: "" - name: Media description: "" - name: Media Vault description: "" - name: Media Vault Lists description: "" - name: Notifications description: Endpoints for managingr account notifications - name: Payouts description: "" - name: Post Comments description: "" - name: Post Labels description: APIs for managing your post labels - name: Posts description: APIs for managing OnlyFans posts - name: Profile Content description: Read another user's profile content using your connected OnlyFans account. OnlyFans enforces subscription and purchase requirements; these endpoints do not unlock content. Response samples use captured OnlyFans payloads with anonymized IDs, text, and media URLs; OFAPI metadata values are illustrative. - name: Promotions description: "" - name: Public Profiles description: "" - name: Queue description: "" - name: Release Forms description: APIs for managing OnlyFans release forms - name: Saved For Later (Messages) description: "" - name: Saved For Later (Posts) description: "" - name: Settings description: "" - name: Shared Free Trial Links description: APIs for Free Trial Links that other OF creators have shared with this account. Revenue, cost, and spender data are not available for shared links. - name: Shared Tracking Links description: APIs for Tracking Links (campaigns) that other OF creators have shared with this account. Revenue, cost, and spender data are not available for shared campaigns. - name: Smart Link Postbacks description: APIs for managing Smart Link postback destinations - name: Smart Links description: APIs for managing Smart Links (Free Trial Links and Tracking Links with pooled inventory) - name: Statistics description: "" - name: Stored Free Trial Links description: Instant APIs for retrieving stored free trial links from the OnlyFansAPI Cache (free, no credits used). `revenue.total` is net earnings after refunds and chargebacks. `revenue.chargebacks` is the positive cached net amount already excluded from that total; do not subtract it again. - name: Stored Shared Free Trial Links description: Instant APIs for retrieving stored shared Free Trial Links from the OnlyFansAPI Cache (free, no credits used) - name: Stored Shared Tracking Links description: Instant APIs for retrieving stored shared Tracking Links (campaigns) from the OnlyFansAPI Cache (free, no credits used) - name: Stored Tracking Links description: Instant APIs for retrieving stored tracking links from the OnlyFansAPI Cache (free, no credits used). `revenue.total` is net earnings after refunds and chargebacks. `revenue.chargebacks` is the positive cached net amount already excluded from that total; do not subtract it again. - name: Stories description: APIs for managing OnlyFans stories - name: Story Highlights description: APIs for managing OnlyFans story highlights - name: Subscription Bundles description: "" - name: Tracking Links description: APIs for managing tracking links. Revenue totals are net earnings after refunds and chargebacks. `revenue.chargebacks` (or `summary.chargebacks_total` in stats) is the positive cached net amount already excluded from revenue; do not subtract it again. Spender responses include chargebacks across all attributed periods for each fan with positive net revenue. - name: Transactions description: APIs for managing OnlyFans transactions - name: Usage description: Credit usage reporting for your team - name: User List Collections description: "" - name: Users description: APIs for fetching OnlyFans users - name: Webhooks description: "" paths: /api/client-sessions: post: summary: Create Client Session operationId: createClientSession description: Create Client Session Token for later use in embedded auth components - eg. via @onlyfansapi/auth npm package. parameters: [] responses: "200": description: Success content: application/json: schema: type: object example: data: token: ofapi_cs_OriR8Sdocp0f97eFOdbMMZtiz4Aw5FLX display_name: "STRLCxGLVC Agency / Model: Stella" client_reference_id: my_crm_model_12345 _meta: _credits: used: 0 balance: 224907 note: Always _cache: is_cached: false note: Cache disabled for this endpoint _rate_limits: limit_minute: 1000 limit_day: 50000 remaining_minute: 999 remaining_day: 49999 properties: data: type: object properties: token: type: string example: ofapi_cs_OriR8Sdocp0f97eFOdbMMZtiz4Aw5FLX display_name: type: string example: "STRLCxGLVC Agency / Model: Stella" client_reference_id: type: string example: my_crm_model_12345 _meta: type: object properties: _credits: type: object properties: used: type: integer example: 0 balance: type: integer example: 224907 note: type: string example: Always _cache: type: object properties: is_cached: type: boolean example: false note: type: string example: Cache disabled for this endpoint _rate_limits: type: object properties: limit_minute: type: integer example: 1000 limit_day: type: integer example: 50000 remaining_minute: type: integer example: 999 remaining_day: type: integer example: 49999 tags: - Client Sessions requestBody: required: true content: application/json: schema: type: object properties: display_name: type: string description: Display Name of the account visible in your OnlyFansAPI Console Dashboard. example: "STRLCxGLVC Agency / Model: Stella" client_reference_id: type: string description: Your Internal Reference ID for the connected account. example: my_crm_model_12345 proxy_country: type: string description: "" example: us enum: - us - uk - gb nullable: true scopes: type: array description: Account access scopes. Defaults to ["*"] for full access. account.read is always included in limited access. example: - tracking-links.read - trial-links.read - smart-links.read items: type: string app_name: type: string description: App name shown on the access screen. Required when scopes is not ["*"]. example: OnlySearch required: - display_name components: securitySchemes: default: type: http scheme: bearer description: Get your API Key from OnlyFansAPI Console - https://app.onlyfansapi.com/api-keys ```` # Poll Authentication Status (/api-reference/connect-onlyfans-account/poll-authentication-status) Poll the status of the authentication process. Eg. if 2FA is required, we will ask you for the code using the `twoFactorPending = true` in the response body. For `mobile_app` auth, the response includes `mobile_auth_session_deeplink` while the session is pending. ## OpenAPI ````yaml https://app.onlyfansapi.com/scribe-docs/openapi.yaml get /api/authenticate/{attempt_id} openapi: 3.0.3 info: title: OnlyFans API description: "" version: 1.0.0 servers: - url: https://app.onlyfansapi.com security: - default: [] tags: - name: AI Voice Messages description: "" - name: API Keys description: "" - name: Account description: Endpoints for your linked accounts - name: Analytics - Financial description: APIs for retrieving financial analytics data - name: Analytics - Summary description: APIs for retrieving summary analytics data - name: Banking description: Operations related to user banking details, payout methods, legal and tax information, and account country settings. - name: Banned Words description: Reference list of OnlyFans banned words used by the `blockBannedWords` screening parameter - name: Blocked / Restricted Users description: APIs for listing the users an account has blocked or restricted - name: Chargebacks description: "" - name: Chat Messages description: "" - name: Chats description: "" - name: Client Sessions description: "" - name: Connect OnlyFans Account description: "" - name: Data Exports description: APIs for managing data exports - name: Engagement / Messages description: "" - name: Fans description: APIs for managing OnlyFans fans (subscribers) - name: Fans - AI Summary description: APIs for generating and retrieving AI-powered fan profile summaries - name: Following description: APIs for managing OnlyFans followings (people you're subscribed to) - name: Free Trial Links description: APIs for managing Free Trial Links. Revenue totals are net earnings after refunds and chargebacks. `revenue.chargebacks` (or `summary.chargebacks_total` in stats) is the positive cached net amount already excluded from revenue; do not subtract it again. Spender responses include chargebacks across all attributed periods for each fan with positive net revenue. - name: Giphy description: "" - name: Link Tags description: APIs for managing tags on free trial links, tracking links, and Smart Links - name: Mass Messaging description: "" - name: Media description: "" - name: Media Vault description: "" - name: Media Vault Lists description: "" - name: Notifications description: Endpoints for managingr account notifications - name: Payouts description: "" - name: Post Comments description: "" - name: Post Labels description: APIs for managing your post labels - name: Posts description: APIs for managing OnlyFans posts - name: Profile Content description: Read another user's profile content using your connected OnlyFans account. OnlyFans enforces subscription and purchase requirements; these endpoints do not unlock content. Response samples use captured OnlyFans payloads with anonymized IDs, text, and media URLs; OFAPI metadata values are illustrative. - name: Promotions description: "" - name: Public Profiles description: "" - name: Queue description: "" - name: Release Forms description: APIs for managing OnlyFans release forms - name: Saved For Later (Messages) description: "" - name: Saved For Later (Posts) description: "" - name: Settings description: "" - name: Shared Free Trial Links description: APIs for Free Trial Links that other OF creators have shared with this account. Revenue, cost, and spender data are not available for shared links. - name: Shared Tracking Links description: APIs for Tracking Links (campaigns) that other OF creators have shared with this account. Revenue, cost, and spender data are not available for shared campaigns. - name: Smart Link Postbacks description: APIs for managing Smart Link postback destinations - name: Smart Links description: APIs for managing Smart Links (Free Trial Links and Tracking Links with pooled inventory) - name: Statistics description: "" - name: Stored Free Trial Links description: Instant APIs for retrieving stored free trial links from the OnlyFansAPI Cache (free, no credits used). `revenue.total` is net earnings after refunds and chargebacks. `revenue.chargebacks` is the positive cached net amount already excluded from that total; do not subtract it again. - name: Stored Shared Free Trial Links description: Instant APIs for retrieving stored shared Free Trial Links from the OnlyFansAPI Cache (free, no credits used) - name: Stored Shared Tracking Links description: Instant APIs for retrieving stored shared Tracking Links (campaigns) from the OnlyFansAPI Cache (free, no credits used) - name: Stored Tracking Links description: Instant APIs for retrieving stored tracking links from the OnlyFansAPI Cache (free, no credits used). `revenue.total` is net earnings after refunds and chargebacks. `revenue.chargebacks` is the positive cached net amount already excluded from that total; do not subtract it again. - name: Stories description: APIs for managing OnlyFans stories - name: Story Highlights description: APIs for managing OnlyFans story highlights - name: Subscription Bundles description: "" - name: Tracking Links description: APIs for managing tracking links. Revenue totals are net earnings after refunds and chargebacks. `revenue.chargebacks` (or `summary.chargebacks_total` in stats) is the positive cached net amount already excluded from revenue; do not subtract it again. Spender responses include chargebacks across all attributed periods for each fan with positive net revenue. - name: Transactions description: APIs for managing OnlyFans transactions - name: Usage description: Credit usage reporting for your team - name: User List Collections description: "" - name: Users description: APIs for fetching OnlyFans users - name: Webhooks description: "" paths: /api/authenticate/{attempt_id}: parameters: - in: path name: attempt_id description: The attempt ID of the authentication process example: auth_XXXXXXX required: true schema: type: string get: summary: Poll Authentication Status operationId: pollAuthenticationStatus description: Poll the status of the authentication process. Eg. if 2FA is required, we will ask you for the code using the `twoFactorPending = true` in the response body. For `mobile_app` auth, the response includes `mobile_auth_session_deeplink` while the session is pending. parameters: [] responses: "200": description: "" content: application/json: schema: type: object example: account: id: acct_4d3fa20f055b4cbababab0d7e400550d display_name: ipgod@gmail.com onlyfans_data: id: 123456789 ip: 127.0.0.1 csrf: abcdef123456789 name: Demo User view: f about: null email: demo@example.com wsUrl: wss://ws2.onlyfans.com/ws3/00 avatar: null header: null isAuth: true ivFlow: default upload: geoUploadArgs: preset: of_beta isDelay: true additional: user: "123456789" needThumbs: true preset_png: of_png protected_preset: of_drm canChat: true hasTags: true website: null advBlock: - subscribe_offers ivStatus: null joinDate: 2022-01-01T00:00:00+00:00 lastSeen: 2025-01-01T12:00:00+00:00 location: null paidFeed: false username: demouser123 wishlist: null hasLabels: false ivCountry: null canAddCard: true canPinPost: true creditsMax: 200 creditsMin: 10 headerSize: null isVerified: false postsCount: 0 audiosCount: 0 hasNewHints: true hasScenario: true isPerformer: false mediasCount: 0 photosCount: 0 videosCount: 0 wsAuthToken: dummy.jwt.token avatarThumbs: null canLookStory: true hasNewAlerts: false headerThumbs: null isOtpEnabled: false ivFailReason: Verification failed newTagsCount: 0 creditBalance: 0 faceIdRegular: [] isAgeVerified: true isAllowTweets: false isMakePayment: false needIVApprove: false watermarkText: OnlyFans.com/demouser123 canCreateLists: true canPayInternal: true favoritedCount: 0 favoritesCount: 0 hasPinnedPosts: false isEmailChecked: false isWantComments: true canCommentStory: true countPinnedChat: 0 isEmailRequired: false isPaywallPassed: false isRealPerformer: false isVisibleOnline: true showPostsInFeed: true subscribesCount: 0 twitterUsername: null canSendChatToAll: false isCreditsEnabled: true pinnedPostsCount: 0 subscribersCount: 0 chatMessagesCount: 0 countPriorityChat: 0 hasNotViewedStory: false hasPurchasedPosts: false hasWatermarkPhoto: true hasWatermarkVideo: true isDeleteInitiated: false isReferrerAllowed: false watermarkPosition: bottom_right archivedPostsCount: 0 isSpotifyConnected: false isTwitterConnected: false notificationsCount: 0 walletFirstRebills: false canConnectOfAccount: false connectedOfAccounts: [] hasInternalPayments: false hasNewTicketReplies: open: false closed: false solved: false isRealCardConnected: false maxPinnedPostsCount: 5 isWalletAutorecharge: false canReceiveChatMessage: false walletAutorechargeMin: 0 ageVerificationSession: url: https://age.yoti.com/age-estimation?sessionId=dummy-session-id&sdkId=dummy-sdk-id status: complete apiFlow: of3 expiredAt: 2022-11-15T00:54:42+00:00 hasSystemNotifications: false isLegalApprovedAllowed: false isPaymentCardConnected: false ageVerificationRequired: false payoutLegalApproveState: none walletAutorechargeAmount: 0 canAlternativeWalletTopUp: false enabledImageEditorForChat: true privateArchivedPostsCount: 0 isMarkdownDisabledForAbout: false avatarHeaderConverterUpload: true hasNewChangedPriceSubscriptions: false state: authenticated progress: signed_in lastAttempt: started_at: 2025-03-30T19:40:09.000000Z completed_at: 2025-03-30T19:41:44.000000Z success: true error_message: null error_code: null needs_otp: false otp_phone_ending: null properties: account: type: object properties: id: type: string example: acct_4d3fa20f055b4cbababab0d7e400550d display_name: type: string example: ipgod@gmail.com onlyfans_data: type: object properties: id: type: integer example: 123456789 ip: type: string example: 127.0.0.1 csrf: type: string example: abcdef123456789 name: type: string example: Demo User view: type: string example: f about: type: string example: null nullable: true email: type: string example: demo@example.com wsUrl: type: string example: wss://ws2.onlyfans.com/ws3/00 avatar: type: string example: null nullable: true header: type: string example: null nullable: true isAuth: type: boolean example: true ivFlow: type: string example: default upload: type: object properties: geoUploadArgs: type: object properties: preset: type: string example: of_beta isDelay: type: boolean example: true additional: type: object properties: user: type: string example: "123456789" needThumbs: type: boolean example: true preset_png: type: string example: of_png protected_preset: type: string example: of_drm canChat: type: boolean example: true hasTags: type: boolean example: true website: type: string example: null nullable: true advBlock: type: array example: - subscribe_offers items: type: string ivStatus: type: string example: null nullable: true joinDate: type: string example: 2022-01-01T00:00:00+00:00 lastSeen: type: string example: 2025-01-01T12:00:00+00:00 location: type: string example: null nullable: true paidFeed: type: boolean example: false username: type: string example: demouser123 wishlist: type: string example: null nullable: true hasLabels: type: boolean example: false ivCountry: type: string example: null nullable: true canAddCard: type: boolean example: true canPinPost: type: boolean example: true creditsMax: type: integer example: 200 creditsMin: type: integer example: 10 headerSize: type: string example: null nullable: true isVerified: type: boolean example: false postsCount: type: integer example: 0 audiosCount: type: integer example: 0 hasNewHints: type: boolean example: true hasScenario: type: boolean example: true isPerformer: type: boolean example: false mediasCount: type: integer example: 0 photosCount: type: integer example: 0 videosCount: type: integer example: 0 wsAuthToken: type: string example: dummy.jwt.token avatarThumbs: type: string example: null nullable: true canLookStory: type: boolean example: true hasNewAlerts: type: boolean example: false headerThumbs: type: string example: null nullable: true isOtpEnabled: type: boolean example: false ivFailReason: type: string example: Verification failed newTagsCount: type: integer example: 0 creditBalance: type: integer example: 0 faceIdRegular: type: array example: [] isAgeVerified: type: boolean example: true isAllowTweets: type: boolean example: false isMakePayment: type: boolean example: false needIVApprove: type: boolean example: false watermarkText: type: string example: OnlyFans.com/demouser123 canCreateLists: type: boolean example: true canPayInternal: type: boolean example: true favoritedCount: type: integer example: 0 favoritesCount: type: integer example: 0 hasPinnedPosts: type: boolean example: false isEmailChecked: type: boolean example: false isWantComments: type: boolean example: true canCommentStory: type: boolean example: true countPinnedChat: type: integer example: 0 isEmailRequired: type: boolean example: false isPaywallPassed: type: boolean example: false isRealPerformer: type: boolean example: false isVisibleOnline: type: boolean example: true showPostsInFeed: type: boolean example: true subscribesCount: type: integer example: 0 twitterUsername: type: string example: null nullable: true canSendChatToAll: type: boolean example: false isCreditsEnabled: type: boolean example: true pinnedPostsCount: type: integer example: 0 subscribersCount: type: integer example: 0 chatMessagesCount: type: integer example: 0 countPriorityChat: type: integer example: 0 hasNotViewedStory: type: boolean example: false hasPurchasedPosts: type: boolean example: false hasWatermarkPhoto: type: boolean example: true hasWatermarkVideo: type: boolean example: true isDeleteInitiated: type: boolean example: false isReferrerAllowed: type: boolean example: false watermarkPosition: type: string example: bottom_right archivedPostsCount: type: integer example: 0 isSpotifyConnected: type: boolean example: false isTwitterConnected: type: boolean example: false notificationsCount: type: integer example: 0 walletFirstRebills: type: boolean example: false canConnectOfAccount: type: boolean example: false connectedOfAccounts: type: array example: [] hasInternalPayments: type: boolean example: false hasNewTicketReplies: type: object properties: open: type: boolean example: false closed: type: boolean example: false solved: type: boolean example: false isRealCardConnected: type: boolean example: false maxPinnedPostsCount: type: integer example: 5 isWalletAutorecharge: type: boolean example: false canReceiveChatMessage: type: boolean example: false walletAutorechargeMin: type: integer example: 0 ageVerificationSession: type: object properties: url: type: string example: https://age.yoti.com/age-estimation?sessionId=dummy-session-id&sdkId=dummy-sdk-id status: type: string example: complete apiFlow: type: string example: of3 expiredAt: type: string example: 2022-11-15T00:54:42+00:00 hasSystemNotifications: type: boolean example: false isLegalApprovedAllowed: type: boolean example: false isPaymentCardConnected: type: boolean example: false ageVerificationRequired: type: boolean example: false payoutLegalApproveState: type: string example: none walletAutorechargeAmount: type: integer example: 0 canAlternativeWalletTopUp: type: boolean example: false enabledImageEditorForChat: type: boolean example: true privateArchivedPostsCount: type: integer example: 0 isMarkdownDisabledForAbout: type: boolean example: false avatarHeaderConverterUpload: type: boolean example: true hasNewChangedPriceSubscriptions: type: boolean example: false state: type: string example: authenticated progress: type: string example: signed_in lastAttempt: type: object properties: started_at: type: string example: 2025-03-30T19:40:09.000000Z completed_at: type: string example: 2025-03-30T19:41:44.000000Z success: type: boolean example: true error_message: type: string example: null nullable: true error_code: type: string example: null nullable: true needs_otp: type: boolean example: false otp_phone_ending: type: string example: null nullable: true tags: - Connect OnlyFans Account components: securitySchemes: default: type: http scheme: bearer description: Get your API Key from OnlyFansAPI Console - https://app.onlyfansapi.com/api-keys ```` # Re-authenticate Account (/api-reference/connect-onlyfans-account/re-authenticate-account) Trigger account reauthentication without the need to submit email & password again. ## OpenAPI ````yaml https://app.onlyfansapi.com/scribe-docs/openapi.yaml post /api/authenticate/{account_id}/reauthenticate openapi: 3.0.3 info: title: OnlyFans API description: "" version: 1.0.0 servers: - url: https://app.onlyfansapi.com security: - default: [] tags: - name: AI Voice Messages description: "" - name: API Keys description: "" - name: Account description: Endpoints for your linked accounts - name: Analytics - Financial description: APIs for retrieving financial analytics data - name: Analytics - Summary description: APIs for retrieving summary analytics data - name: Banking description: Operations related to user banking details, payout methods, legal and tax information, and account country settings. - name: Banned Words description: Reference list of OnlyFans banned words used by the `blockBannedWords` screening parameter - name: Blocked / Restricted Users description: APIs for listing the users an account has blocked or restricted - name: Chargebacks description: "" - name: Chat Messages description: "" - name: Chats description: "" - name: Client Sessions description: "" - name: Connect OnlyFans Account description: "" - name: Data Exports description: APIs for managing data exports - name: Engagement / Messages description: "" - name: Fans description: APIs for managing OnlyFans fans (subscribers) - name: Fans - AI Summary description: APIs for generating and retrieving AI-powered fan profile summaries - name: Following description: APIs for managing OnlyFans followings (people you're subscribed to) - name: Free Trial Links description: APIs for managing Free Trial Links. Revenue totals are net earnings after refunds and chargebacks. `revenue.chargebacks` (or `summary.chargebacks_total` in stats) is the positive cached net amount already excluded from revenue; do not subtract it again. Spender responses include chargebacks across all attributed periods for each fan with positive net revenue. - name: Giphy description: "" - name: Link Tags description: APIs for managing tags on free trial links, tracking links, and Smart Links - name: Mass Messaging description: "" - name: Media description: "" - name: Media Vault description: "" - name: Media Vault Lists description: "" - name: Notifications description: Endpoints for managingr account notifications - name: Payouts description: "" - name: Post Comments description: "" - name: Post Labels description: APIs for managing your post labels - name: Posts description: APIs for managing OnlyFans posts - name: Profile Content description: Read another user's profile content using your connected OnlyFans account. OnlyFans enforces subscription and purchase requirements; these endpoints do not unlock content. Response samples use captured OnlyFans payloads with anonymized IDs, text, and media URLs; OFAPI metadata values are illustrative. - name: Promotions description: "" - name: Public Profiles description: "" - name: Queue description: "" - name: Release Forms description: APIs for managing OnlyFans release forms - name: Saved For Later (Messages) description: "" - name: Saved For Later (Posts) description: "" - name: Settings description: "" - name: Shared Free Trial Links description: APIs for Free Trial Links that other OF creators have shared with this account. Revenue, cost, and spender data are not available for shared links. - name: Shared Tracking Links description: APIs for Tracking Links (campaigns) that other OF creators have shared with this account. Revenue, cost, and spender data are not available for shared campaigns. - name: Smart Link Postbacks description: APIs for managing Smart Link postback destinations - name: Smart Links description: APIs for managing Smart Links (Free Trial Links and Tracking Links with pooled inventory) - name: Statistics description: "" - name: Stored Free Trial Links description: Instant APIs for retrieving stored free trial links from the OnlyFansAPI Cache (free, no credits used). `revenue.total` is net earnings after refunds and chargebacks. `revenue.chargebacks` is the positive cached net amount already excluded from that total; do not subtract it again. - name: Stored Shared Free Trial Links description: Instant APIs for retrieving stored shared Free Trial Links from the OnlyFansAPI Cache (free, no credits used) - name: Stored Shared Tracking Links description: Instant APIs for retrieving stored shared Tracking Links (campaigns) from the OnlyFansAPI Cache (free, no credits used) - name: Stored Tracking Links description: Instant APIs for retrieving stored tracking links from the OnlyFansAPI Cache (free, no credits used). `revenue.total` is net earnings after refunds and chargebacks. `revenue.chargebacks` is the positive cached net amount already excluded from that total; do not subtract it again. - name: Stories description: APIs for managing OnlyFans stories - name: Story Highlights description: APIs for managing OnlyFans story highlights - name: Subscription Bundles description: "" - name: Tracking Links description: APIs for managing tracking links. Revenue totals are net earnings after refunds and chargebacks. `revenue.chargebacks` (or `summary.chargebacks_total` in stats) is the positive cached net amount already excluded from revenue; do not subtract it again. Spender responses include chargebacks across all attributed periods for each fan with positive net revenue. - name: Transactions description: APIs for managing OnlyFans transactions - name: Usage description: Credit usage reporting for your team - name: User List Collections description: "" - name: Users description: APIs for fetching OnlyFans users - name: Webhooks description: "" paths: /api/authenticate/{account_id}/reauthenticate: parameters: - in: path name: account_id description: The Account ID of the authentication process example: acct_XXXXXXXXXX required: true schema: type: string post: summary: Re-authenticate Account operationId: reAuthenticateAccount description: Trigger account reauthentication without the need to submit email & password again. parameters: [] responses: "200": description: Re-authentication started content: application/json: schema: type: object example: success: true message: Re-authentication started. polling_url: https://app.onlyfansapi.com/api/authenticate/auth_XXXXXXX properties: success: type: boolean example: true message: type: string example: Re-authentication started. polling_url: type: string example: https://app.onlyfansapi.com/api/authenticate/auth_XXXXXXX "400": description: When re-authentication is not possible content: application/json: schema: type: object example: message: Can't re-authenticate account at this time. reason: Account is already successfully authenticated properties: message: type: string example: Can't re-authenticate account at this time. reason: type: string example: Account is already successfully authenticated tags: - Connect OnlyFans Account components: securitySchemes: default: type: http scheme: bearer description: Get your API Key from OnlyFansAPI Console - https://app.onlyfansapi.com/api-keys ```` # Send 2FA E-mail to Creator (/api-reference/connect-onlyfans-account/send2fae-mail-to-creator) Send 2FA verification e-mail to the creator's email so they can verify login on their device without your input. The e-mail will be sent to the e-mail address used for signing into OnlyFans. ## OpenAPI ````yaml https://app.onlyfansapi.com/scribe-docs/openapi.yaml post /api/authenticate/{attempt_id}/send-email-to-creator openapi: 3.0.3 info: title: OnlyFans API description: "" version: 1.0.0 servers: - url: https://app.onlyfansapi.com security: - default: [] tags: - name: AI Voice Messages description: "" - name: API Keys description: "" - name: Account description: Endpoints for your linked accounts - name: Analytics - Financial description: APIs for retrieving financial analytics data - name: Analytics - Summary description: APIs for retrieving summary analytics data - name: Banking description: Operations related to user banking details, payout methods, legal and tax information, and account country settings. - name: Banned Words description: Reference list of OnlyFans banned words used by the `blockBannedWords` screening parameter - name: Blocked / Restricted Users description: APIs for listing the users an account has blocked or restricted - name: Chargebacks description: "" - name: Chat Messages description: "" - name: Chats description: "" - name: Client Sessions description: "" - name: Connect OnlyFans Account description: "" - name: Data Exports description: APIs for managing data exports - name: Engagement / Messages description: "" - name: Fans description: APIs for managing OnlyFans fans (subscribers) - name: Fans - AI Summary description: APIs for generating and retrieving AI-powered fan profile summaries - name: Following description: APIs for managing OnlyFans followings (people you're subscribed to) - name: Free Trial Links description: APIs for managing Free Trial Links. Revenue totals are net earnings after refunds and chargebacks. `revenue.chargebacks` (or `summary.chargebacks_total` in stats) is the positive cached net amount already excluded from revenue; do not subtract it again. Spender responses include chargebacks across all attributed periods for each fan with positive net revenue. - name: Giphy description: "" - name: Link Tags description: APIs for managing tags on free trial links, tracking links, and Smart Links - name: Mass Messaging description: "" - name: Media description: "" - name: Media Vault description: "" - name: Media Vault Lists description: "" - name: Notifications description: Endpoints for managingr account notifications - name: Payouts description: "" - name: Post Comments description: "" - name: Post Labels description: APIs for managing your post labels - name: Posts description: APIs for managing OnlyFans posts - name: Profile Content description: Read another user's profile content using your connected OnlyFans account. OnlyFans enforces subscription and purchase requirements; these endpoints do not unlock content. Response samples use captured OnlyFans payloads with anonymized IDs, text, and media URLs; OFAPI metadata values are illustrative. - name: Promotions description: "" - name: Public Profiles description: "" - name: Queue description: "" - name: Release Forms description: APIs for managing OnlyFans release forms - name: Saved For Later (Messages) description: "" - name: Saved For Later (Posts) description: "" - name: Settings description: "" - name: Shared Free Trial Links description: APIs for Free Trial Links that other OF creators have shared with this account. Revenue, cost, and spender data are not available for shared links. - name: Shared Tracking Links description: APIs for Tracking Links (campaigns) that other OF creators have shared with this account. Revenue, cost, and spender data are not available for shared campaigns. - name: Smart Link Postbacks description: APIs for managing Smart Link postback destinations - name: Smart Links description: APIs for managing Smart Links (Free Trial Links and Tracking Links with pooled inventory) - name: Statistics description: "" - name: Stored Free Trial Links description: Instant APIs for retrieving stored free trial links from the OnlyFansAPI Cache (free, no credits used). `revenue.total` is net earnings after refunds and chargebacks. `revenue.chargebacks` is the positive cached net amount already excluded from that total; do not subtract it again. - name: Stored Shared Free Trial Links description: Instant APIs for retrieving stored shared Free Trial Links from the OnlyFansAPI Cache (free, no credits used) - name: Stored Shared Tracking Links description: Instant APIs for retrieving stored shared Tracking Links (campaigns) from the OnlyFansAPI Cache (free, no credits used) - name: Stored Tracking Links description: Instant APIs for retrieving stored tracking links from the OnlyFansAPI Cache (free, no credits used). `revenue.total` is net earnings after refunds and chargebacks. `revenue.chargebacks` is the positive cached net amount already excluded from that total; do not subtract it again. - name: Stories description: APIs for managing OnlyFans stories - name: Story Highlights description: APIs for managing OnlyFans story highlights - name: Subscription Bundles description: "" - name: Tracking Links description: APIs for managing tracking links. Revenue totals are net earnings after refunds and chargebacks. `revenue.chargebacks` (or `summary.chargebacks_total` in stats) is the positive cached net amount already excluded from revenue; do not subtract it again. Spender responses include chargebacks across all attributed periods for each fan with positive net revenue. - name: Transactions description: APIs for managing OnlyFans transactions - name: Usage description: Credit usage reporting for your team - name: User List Collections description: "" - name: Users description: APIs for fetching OnlyFans users - name: Webhooks description: "" paths: /api/authenticate/{attempt_id}/send-email-to-creator: parameters: - in: path name: attempt_id description: The attempt ID of the authentication process example: auth_XXXXXXX required: true schema: type: string post: summary: Send 2FA E-mail to Creator operationId: send2FAEMailToCreator description: Send 2FA verification e-mail to the creator's email so they can verify login on their device without your input. The e-mail will be sent to the e-mail address used for signing into OnlyFans. parameters: [] responses: "200": description: "" content: application/json: schema: type: object example: success: true message: E-mail sent to creator-123@gmail.com properties: success: type: boolean example: true message: type: string example: E-mail sent to creator-123@gmail.com tags: - Connect OnlyFans Account components: securitySchemes: default: type: http scheme: bearer description: Get your API Key from OnlyFansAPI Console - https://app.onlyfansapi.com/api-keys ```` # Start Authentication (/api-reference/connect-onlyfans-account/start-authentication) Start the authentication process for a new account. Supports three methods: email/password (default), cookies & headers (raw\_data), or FansAPI Auth+ mobile app (mobile\_app). For email/password, our systems will bypass Captcha and ask you for 2FA if required. For raw\_data, provide session cookies directly for instant authentication. For mobile\_app, the response includes a `mobile_auth_session_deeplink` that the creator opens on their phone (or scans as a QR code) to complete authentication via the FansAPI Auth+ mobile app. All credentials are stored securely and encrypted at rest. ## OpenAPI ````yaml https://app.onlyfansapi.com/scribe-docs/openapi.yaml post /api/authenticate openapi: 3.0.3 info: title: OnlyFans API description: "" version: 1.0.0 servers: - url: https://app.onlyfansapi.com security: - default: [] tags: - name: AI Voice Messages description: "" - name: API Keys description: "" - name: Account description: Endpoints for your linked accounts - name: Analytics - Financial description: APIs for retrieving financial analytics data - name: Analytics - Summary description: APIs for retrieving summary analytics data - name: Banking description: Operations related to user banking details, payout methods, legal and tax information, and account country settings. - name: Banned Words description: Reference list of OnlyFans banned words used by the `blockBannedWords` screening parameter - name: Blocked / Restricted Users description: APIs for listing the users an account has blocked or restricted - name: Chargebacks description: "" - name: Chat Messages description: "" - name: Chats description: "" - name: Client Sessions description: "" - name: Connect OnlyFans Account description: "" - name: Data Exports description: APIs for managing data exports - name: Engagement / Messages description: "" - name: Fans description: APIs for managing OnlyFans fans (subscribers) - name: Fans - AI Summary description: APIs for generating and retrieving AI-powered fan profile summaries - name: Following description: APIs for managing OnlyFans followings (people you're subscribed to) - name: Free Trial Links description: APIs for managing Free Trial Links. Revenue totals are net earnings after refunds and chargebacks. `revenue.chargebacks` (or `summary.chargebacks_total` in stats) is the positive cached net amount already excluded from revenue; do not subtract it again. Spender responses include chargebacks across all attributed periods for each fan with positive net revenue. - name: Giphy description: "" - name: Link Tags description: APIs for managing tags on free trial links, tracking links, and Smart Links - name: Mass Messaging description: "" - name: Media description: "" - name: Media Vault description: "" - name: Media Vault Lists description: "" - name: Notifications description: Endpoints for managingr account notifications - name: Payouts description: "" - name: Post Comments description: "" - name: Post Labels description: APIs for managing your post labels - name: Posts description: APIs for managing OnlyFans posts - name: Profile Content description: Read another user's profile content using your connected OnlyFans account. OnlyFans enforces subscription and purchase requirements; these endpoints do not unlock content. Response samples use captured OnlyFans payloads with anonymized IDs, text, and media URLs; OFAPI metadata values are illustrative. - name: Promotions description: "" - name: Public Profiles description: "" - name: Queue description: "" - name: Release Forms description: APIs for managing OnlyFans release forms - name: Saved For Later (Messages) description: "" - name: Saved For Later (Posts) description: "" - name: Settings description: "" - name: Shared Free Trial Links description: APIs for Free Trial Links that other OF creators have shared with this account. Revenue, cost, and spender data are not available for shared links. - name: Shared Tracking Links description: APIs for Tracking Links (campaigns) that other OF creators have shared with this account. Revenue, cost, and spender data are not available for shared campaigns. - name: Smart Link Postbacks description: APIs for managing Smart Link postback destinations - name: Smart Links description: APIs for managing Smart Links (Free Trial Links and Tracking Links with pooled inventory) - name: Statistics description: "" - name: Stored Free Trial Links description: Instant APIs for retrieving stored free trial links from the OnlyFansAPI Cache (free, no credits used). `revenue.total` is net earnings after refunds and chargebacks. `revenue.chargebacks` is the positive cached net amount already excluded from that total; do not subtract it again. - name: Stored Shared Free Trial Links description: Instant APIs for retrieving stored shared Free Trial Links from the OnlyFansAPI Cache (free, no credits used) - name: Stored Shared Tracking Links description: Instant APIs for retrieving stored shared Tracking Links (campaigns) from the OnlyFansAPI Cache (free, no credits used) - name: Stored Tracking Links description: Instant APIs for retrieving stored tracking links from the OnlyFansAPI Cache (free, no credits used). `revenue.total` is net earnings after refunds and chargebacks. `revenue.chargebacks` is the positive cached net amount already excluded from that total; do not subtract it again. - name: Stories description: APIs for managing OnlyFans stories - name: Story Highlights description: APIs for managing OnlyFans story highlights - name: Subscription Bundles description: "" - name: Tracking Links description: APIs for managing tracking links. Revenue totals are net earnings after refunds and chargebacks. `revenue.chargebacks` (or `summary.chargebacks_total` in stats) is the positive cached net amount already excluded from revenue; do not subtract it again. Spender responses include chargebacks across all attributed periods for each fan with positive net revenue. - name: Transactions description: APIs for managing OnlyFans transactions - name: Usage description: Credit usage reporting for your team - name: User List Collections description: "" - name: Users description: APIs for fetching OnlyFans users - name: Webhooks description: "" paths: /api/authenticate: post: summary: Start Authentication operationId: startAuthentication description: "Start the authentication process for a new account. Supports three methods: email/password (default), cookies & headers (raw_data), or FansAPI Auth+ mobile app (mobile_app). For email/password, our systems will bypass Captcha and ask you for 2FA if required. For raw_data, provide session cookies directly for instant authentication. For mobile_app, the response includes a `mobile_auth_session_deeplink` that the creator opens on their phone (or scans as a QR code) to complete authentication via the FansAPI Auth+ mobile app. All credentials are stored securely and encrypted at rest." parameters: [] responses: "200": description: "" content: application/json: schema: oneOf: - description: For email_password or raw_data auth types type: object example: attempt_id: auth_XXXXXXXXXXXXXXXXXXXXX message: Authentication process started. Query the polling_url to check the progress. polling_url: https://app.onlyfansapi.com/api/authenticate/auth_XXXXXXXXXXXXXXXXXXXXX properties: attempt_id: type: string example: auth_XXXXXXXXXXXXXXXXXXXXX message: type: string example: Authentication process started. Query the polling_url to check the progress. polling_url: type: string example: https://app.onlyfansapi.com/api/authenticate/auth_XXXXXXXXXXXXXXXXXXXXX - description: For mobile_app auth type — includes the session code to scan with the FansAPI Auth+ app type: object example: attempt_id: auth_XXXXXXXXXXXXXXXXXXXXX message: Authentication process started. Query the polling_url to check the progress. polling_url: https://app.onlyfansapi.com/api/authenticate/auth_XXXXXXXXXXXXXXXXXXXXX mobile_auth_session_deeplink: fansapiauth://auth/fansapi_auth_XXXXXXXXXXXXXXXXXXXXXXXXXXXXXXXX properties: attempt_id: type: string example: auth_XXXXXXXXXXXXXXXXXXXXX message: type: string example: Authentication process started. Query the polling_url to check the progress. polling_url: type: string example: https://app.onlyfansapi.com/api/authenticate/auth_XXXXXXXXXXXXXXXXXXXXX mobile_auth_session_deeplink: type: string example: fansapiauth://auth/fansapi_auth_XXXXXXXXXXXXXXXXXXXXXXXXXXXXXXXX tags: - Connect OnlyFans Account requestBody: required: false content: application/json: schema: type: object properties: auth_type: type: string description: The authentication method to use. Defaults to `email_password` if omitted. Use `mobile_app` to authenticate via the FansAPI Auth+ mobile app (no credential fields required). example: email_password enum: - email_password - raw_data - mobile_app name: type: string description: A display name for the account. If omitted, defaults to the email address or auth_id. example: consectetur email: type: string description: The email address of the OnlyFans account. Required when auth_type is `email_password`. example: aufderhar.sadye@example.net password: type: string description: The password of the OnlyFans account. Required when auth_type is `email_password`. example: L]C@!P#W\irZ9 auth_id: type: string description: The auth_id from OnlyFans session cookies. Required when auth_type is `raw_data`. example: minima cookies: type: string description: The full cookie string (semicolon-separated). Required when auth_type is `raw_data`. example: molestiae xbc: type: string description: The X-BC token from request headers. Required when auth_type is `raw_data`. example: ut user_agent: type: string description: The browser User-Agent string. Required when auth_type is `raw_data`. example: impedit proxyCountry: type: string description: The country of the managed proxy server you want to use. Eg. "us" for United States. Cannot be used together with customProxy. example: uk enum: - us - uk - gb customProxy: type: object description: Custom proxy configuration. Cannot be used together with proxyCountry. example: [] properties: host: type: string description: The hostname or IP address of your custom proxy server example: proxy.example.com port: type: integer description: The port number of your custom proxy server (1-65535) example: 8080 username: type: string description: The username for proxy authentication (optional) example: amet password: type: string description: The password for proxy authentication (optional) example: ?*i8{tY7'iS}>cW force_connect: type: boolean description: Set to true to connect the account even if it already exists example: true components: securitySchemes: default: type: http scheme: bearer description: Get your API Key from OnlyFansAPI Console - https://app.onlyfansapi.com/api-keys ```` # Submit 2FA (/api-reference/connect-onlyfans-account/submit2fa) Submit the 2FA code, or Selfie Verification status, for the authentication process. ## OpenAPI ````yaml https://app.onlyfansapi.com/scribe-docs/openapi.yaml put /api/authenticate/{attempt_id} openapi: 3.0.3 info: title: OnlyFans API description: "" version: 1.0.0 servers: - url: https://app.onlyfansapi.com security: - default: [] tags: - name: AI Voice Messages description: "" - name: API Keys description: "" - name: Account description: Endpoints for your linked accounts - name: Analytics - Financial description: APIs for retrieving financial analytics data - name: Analytics - Summary description: APIs for retrieving summary analytics data - name: Banking description: Operations related to user banking details, payout methods, legal and tax information, and account country settings. - name: Banned Words description: Reference list of OnlyFans banned words used by the `blockBannedWords` screening parameter - name: Blocked / Restricted Users description: APIs for listing the users an account has blocked or restricted - name: Chargebacks description: "" - name: Chat Messages description: "" - name: Chats description: "" - name: Client Sessions description: "" - name: Connect OnlyFans Account description: "" - name: Data Exports description: APIs for managing data exports - name: Engagement / Messages description: "" - name: Fans description: APIs for managing OnlyFans fans (subscribers) - name: Fans - AI Summary description: APIs for generating and retrieving AI-powered fan profile summaries - name: Following description: APIs for managing OnlyFans followings (people you're subscribed to) - name: Free Trial Links description: APIs for managing Free Trial Links. Revenue totals are net earnings after refunds and chargebacks. `revenue.chargebacks` (or `summary.chargebacks_total` in stats) is the positive cached net amount already excluded from revenue; do not subtract it again. Spender responses include chargebacks across all attributed periods for each fan with positive net revenue. - name: Giphy description: "" - name: Link Tags description: APIs for managing tags on free trial links, tracking links, and Smart Links - name: Mass Messaging description: "" - name: Media description: "" - name: Media Vault description: "" - name: Media Vault Lists description: "" - name: Notifications description: Endpoints for managingr account notifications - name: Payouts description: "" - name: Post Comments description: "" - name: Post Labels description: APIs for managing your post labels - name: Posts description: APIs for managing OnlyFans posts - name: Profile Content description: Read another user's profile content using your connected OnlyFans account. OnlyFans enforces subscription and purchase requirements; these endpoints do not unlock content. Response samples use captured OnlyFans payloads with anonymized IDs, text, and media URLs; OFAPI metadata values are illustrative. - name: Promotions description: "" - name: Public Profiles description: "" - name: Queue description: "" - name: Release Forms description: APIs for managing OnlyFans release forms - name: Saved For Later (Messages) description: "" - name: Saved For Later (Posts) description: "" - name: Settings description: "" - name: Shared Free Trial Links description: APIs for Free Trial Links that other OF creators have shared with this account. Revenue, cost, and spender data are not available for shared links. - name: Shared Tracking Links description: APIs for Tracking Links (campaigns) that other OF creators have shared with this account. Revenue, cost, and spender data are not available for shared campaigns. - name: Smart Link Postbacks description: APIs for managing Smart Link postback destinations - name: Smart Links description: APIs for managing Smart Links (Free Trial Links and Tracking Links with pooled inventory) - name: Statistics description: "" - name: Stored Free Trial Links description: Instant APIs for retrieving stored free trial links from the OnlyFansAPI Cache (free, no credits used). `revenue.total` is net earnings after refunds and chargebacks. `revenue.chargebacks` is the positive cached net amount already excluded from that total; do not subtract it again. - name: Stored Shared Free Trial Links description: Instant APIs for retrieving stored shared Free Trial Links from the OnlyFansAPI Cache (free, no credits used) - name: Stored Shared Tracking Links description: Instant APIs for retrieving stored shared Tracking Links (campaigns) from the OnlyFansAPI Cache (free, no credits used) - name: Stored Tracking Links description: Instant APIs for retrieving stored tracking links from the OnlyFansAPI Cache (free, no credits used). `revenue.total` is net earnings after refunds and chargebacks. `revenue.chargebacks` is the positive cached net amount already excluded from that total; do not subtract it again. - name: Stories description: APIs for managing OnlyFans stories - name: Story Highlights description: APIs for managing OnlyFans story highlights - name: Subscription Bundles description: "" - name: Tracking Links description: APIs for managing tracking links. Revenue totals are net earnings after refunds and chargebacks. `revenue.chargebacks` (or `summary.chargebacks_total` in stats) is the positive cached net amount already excluded from revenue; do not subtract it again. Spender responses include chargebacks across all attributed periods for each fan with positive net revenue. - name: Transactions description: APIs for managing OnlyFans transactions - name: Usage description: Credit usage reporting for your team - name: User List Collections description: "" - name: Users description: APIs for fetching OnlyFans users - name: Webhooks description: "" paths: /api/authenticate/{attempt_id}: parameters: - in: path name: attempt_id description: The attempt ID of the authentication process example: auth_XXXXXXX required: true schema: type: string put: summary: Submit 2FA operationId: submit2FA description: Submit the 2FA code, or Selfie Verification status, for the authentication process. parameters: [] responses: "200": description: "" content: application/json: schema: type: object example: message: OTP submitted successfully properties: message: type: string example: OTP submitted successfully tags: - Connect OnlyFans Account requestBody: required: false content: application/json: schema: type: object properties: code: type: string description: The 2FA code you received on your phone. Must be empty if `selfie_verification_completed` is `true`. example: "12345" selfie_verification_completed: type: boolean description: This field is required whencode is not present.
example: "true"
enum:
- "true"
components:
securitySchemes:
default:
type: http
scheme: bearer
description: Get your API Key from OnlyFansAPI Console -
https://app.onlyfansapi.com/api-keys
````
# Update Authentication Credentials (/api-reference/connect-onlyfans-account/update-authentication-credentials)
Replace the authentication credentials of an existing connected account and trigger a re-authentication. Supports the same three methods as Start Authentication: email/password (default), cookies & headers (raw\_data), or FansAPI Auth+ mobile app (mobile\_app). You can also switch an account from one method to another (e.g. from email\_password to raw\_data). The new credentials are stored securely and encrypted at rest, and re-authentication is started immediately regardless of the account's current session state — running workflows are stopped and API requests return 503 until re-authentication completes. For mobile\_app, the response includes a `mobile_auth_session_deeplink` that the creator opens on their phone to complete authentication.
## OpenAPI
````yaml https://app.onlyfansapi.com/scribe-docs/openapi.yaml put /api/authenticate/{account_id}/credentials
openapi: 3.0.3
info:
title: OnlyFans API
description: ""
version: 1.0.0
servers:
- url: https://app.onlyfansapi.com
security:
- default: []
tags:
- name: AI Voice Messages
description: ""
- name: API Keys
description: ""
- name: Account
description: Endpoints for your linked accounts
- name: Analytics - Financial
description: APIs for retrieving financial analytics data
- name: Analytics - Summary
description: APIs for retrieving summary analytics data
- name: Banking
description: Operations related to user banking details, payout methods, legal
and tax information, and account country settings.
- name: Banned Words
description: Reference list of OnlyFans banned words used by the
`blockBannedWords` screening parameter
- name: Blocked / Restricted Users
description: APIs for listing the users an account has blocked or restricted
- name: Chargebacks
description: ""
- name: Chat Messages
description: ""
- name: Chats
description: ""
- name: Client Sessions
description: ""
- name: Connect OnlyFans Account
description: ""
- name: Data Exports
description: APIs for managing data exports
- name: Engagement / Messages
description: ""
- name: Fans
description: APIs for managing OnlyFans fans (subscribers)
- name: Fans - AI Summary
description: APIs for generating and retrieving AI-powered fan profile summaries
- name: Following
description: APIs for managing OnlyFans followings (people you're subscribed to)
- name: Free Trial Links
description: APIs for managing Free Trial Links. Revenue totals are net earnings
after refunds and chargebacks. `revenue.chargebacks` (or
`summary.chargebacks_total` in stats) is the positive cached net amount
already excluded from revenue; do not subtract it again. Spender responses
include chargebacks across all attributed periods for each fan with
positive net revenue.
- name: Giphy
description: ""
- name: Link Tags
description: APIs for managing tags on free trial links, tracking links, and Smart Links
- name: Mass Messaging
description: ""
- name: Media
description: ""
- name: Media Vault
description: ""
- name: Media Vault Lists
description: ""
- name: Notifications
description: Endpoints for managingr account notifications
- name: Payouts
description: ""
- name: Post Comments
description: ""
- name: Post Labels
description: APIs for managing your post labels
- name: Posts
description: APIs for managing OnlyFans posts
- name: Profile Content
description: Read another user's profile content using your connected OnlyFans
account. OnlyFans enforces subscription and purchase requirements; these
endpoints do not unlock content. Response samples use captured OnlyFans
payloads with anonymized IDs, text, and media URLs; OFAPI metadata values
are illustrative.
- name: Promotions
description: ""
- name: Public Profiles
description: ""
- name: Queue
description: ""
- name: Release Forms
description: APIs for managing OnlyFans release forms
- name: Saved For Later (Messages)
description: ""
- name: Saved For Later (Posts)
description: ""
- name: Settings
description: ""
- name: Shared Free Trial Links
description: APIs for Free Trial Links that other OF creators have shared with
this account. Revenue, cost, and spender data are not available for shared
links.
- name: Shared Tracking Links
description: APIs for Tracking Links (campaigns) that other OF creators have
shared with this account. Revenue, cost, and spender data are not
available for shared campaigns.
- name: Smart Link Postbacks
description: APIs for managing Smart Link postback destinations
- name: Smart Links
description: APIs for managing Smart Links (Free Trial Links and Tracking Links
with pooled inventory)
- name: Statistics
description: ""
- name: Stored Free Trial Links
description: Instant APIs for retrieving stored free trial links from the
OnlyFansAPI Cache (free, no credits used). `revenue.total` is net earnings
after refunds and chargebacks. `revenue.chargebacks` is the positive
cached net amount already excluded from that total; do not subtract it
again.
- name: Stored Shared Free Trial Links
description: Instant APIs for retrieving stored shared Free Trial Links from the
OnlyFansAPI Cache (free, no credits used)
- name: Stored Shared Tracking Links
description: Instant APIs for retrieving stored shared Tracking Links
(campaigns) from the OnlyFansAPI Cache (free, no credits used)
- name: Stored Tracking Links
description: Instant APIs for retrieving stored tracking links from the
OnlyFansAPI Cache (free, no credits used). `revenue.total` is net earnings
after refunds and chargebacks. `revenue.chargebacks` is the positive
cached net amount already excluded from that total; do not subtract it
again.
- name: Stories
description: APIs for managing OnlyFans stories
- name: Story Highlights
description: APIs for managing OnlyFans story highlights
- name: Subscription Bundles
description: ""
- name: Tracking Links
description: APIs for managing tracking links. Revenue totals are net earnings
after refunds and chargebacks. `revenue.chargebacks` (or
`summary.chargebacks_total` in stats) is the positive cached net amount
already excluded from revenue; do not subtract it again. Spender responses
include chargebacks across all attributed periods for each fan with
positive net revenue.
- name: Transactions
description: APIs for managing OnlyFans transactions
- name: Usage
description: Credit usage reporting for your team
- name: User List Collections
description: ""
- name: Users
description: APIs for fetching OnlyFans users
- name: Webhooks
description: ""
paths:
/api/authenticate/{account_id}/credentials:
parameters:
- in: path
name: account_id
description: The Account ID whose credentials should be updated
example: acct_XXXXXXXXXX
required: true
schema:
type: string
put:
summary: Update Authentication Credentials
operationId: updateAuthenticationCredentials
description: "Replace the authentication credentials of an existing connected
account and trigger a re-authentication. Supports the same three methods
as Start Authentication: email/password (default), cookies & headers
(raw_data), or FansAPI Auth+ mobile app (mobile_app). You can also
switch an account from one method to another (e.g. from email_password
to raw_data). The new credentials are stored securely and encrypted at
rest, and re-authentication is started immediately regardless of the
account's current session state — running workflows are stopped and API
requests return 503 until re-authentication completes. For mobile_app,
the response includes a `mobile_auth_session_deeplink` that the creator
opens on their phone to complete authentication."
parameters: []
responses:
"200":
description: ""
content:
application/json:
schema:
oneOf:
- description: For email_password or raw_data auth types
type: object
example:
attempt_id: auth_XXXXXXXXXXXXXXXXXXXXX
message: Authentication credentials updated. Re-authentication started. Query
the polling_url to check the progress.
polling_url: https://app.onlyfansapi.com/api/authenticate/auth_XXXXXXXXXXXXXXXXXXXXX
properties:
attempt_id:
type: string
example: auth_XXXXXXXXXXXXXXXXXXXXX
message:
type: string
example: Authentication credentials updated. Re-authentication started. Query
the polling_url to check the progress.
polling_url:
type: string
example: https://app.onlyfansapi.com/api/authenticate/auth_XXXXXXXXXXXXXXXXXXXXX
- description: For mobile_app auth type — includes the session code to scan with
the FansAPI Auth+ app
type: object
example:
attempt_id: auth_XXXXXXXXXXXXXXXXXXXXX
message: Authentication credentials updated. Re-authentication started. Query
the polling_url to check the progress.
polling_url: https://app.onlyfansapi.com/api/authenticate/auth_XXXXXXXXXXXXXXXXXXXXX
mobile_auth_session_deeplink: fansapiauth://auth/fansapi_auth_XXXXXXXXXXXXXXXXXXXXXXXXXXXXXXXX
properties:
attempt_id:
type: string
example: auth_XXXXXXXXXXXXXXXXXXXXX
message:
type: string
example: Authentication credentials updated. Re-authentication started. Query
the polling_url to check the progress.
polling_url:
type: string
example: https://app.onlyfansapi.com/api/authenticate/auth_XXXXXXXXXXXXXXXXXXXXX
mobile_auth_session_deeplink:
type: string
example: fansapiauth://auth/fansapi_auth_XXXXXXXXXXXXXXXXXXXXXXXXXXXXXXXX
tags:
- Connect OnlyFans Account
requestBody:
required: false
content:
application/json:
schema:
type: object
properties:
auth_type:
type: string
description: The authentication method to use. Defaults to `email_password` if
omitted.
example: email_password
enum:
- email_password
- raw_data
- mobile_app
email:
type: string
description: The email address of the OnlyFans account. Required when auth_type
is `email_password`.
example: bonita98@example.org
password:
type: string
description: The password of the OnlyFans account. Required when auth_type is
`email_password`.
example: JmwSpG1Y3-u\
auth_id:
type: string
description: The auth_id from OnlyFans session cookies. Required when auth_type
is `raw_data`.
example: officia
cookies:
type: string
description: The full cookie string (semicolon-separated). Required when
auth_type is `raw_data`.
example: natus
xbc:
type: string
description: The X-BC token from request headers. Required when auth_type is
`raw_data`.
example: quas
user_agent:
type: string
description: The browser User-Agent string. Required when auth_type is
`raw_data`.
example: quaerat
components:
securitySchemes:
default:
type: http
scheme: bearer
description: Get your API Key from OnlyFansAPI Console -
https://app.onlyfansapi.com/api-keys
````
# Delete Chat (/api-reference/chats/delete-chat)
Delete a specific chat.
## OpenAPI
````yaml https://app.onlyfansapi.com/scribe-docs/openapi.yaml delete /api/{account}/chats/{chat_id}
openapi: 3.0.3
info:
title: OnlyFans API
description: ""
version: 1.0.0
servers:
- url: https://app.onlyfansapi.com
security:
- default: []
tags:
- name: AI Voice Messages
description: ""
- name: API Keys
description: ""
- name: Account
description: Endpoints for your linked accounts
- name: Analytics - Financial
description: APIs for retrieving financial analytics data
- name: Analytics - Summary
description: APIs for retrieving summary analytics data
- name: Banking
description: Operations related to user banking details, payout methods, legal
and tax information, and account country settings.
- name: Banned Words
description: Reference list of OnlyFans banned words used by the
`blockBannedWords` screening parameter
- name: Blocked / Restricted Users
description: APIs for listing the users an account has blocked or restricted
- name: Chargebacks
description: ""
- name: Chat Messages
description: ""
- name: Chats
description: ""
- name: Client Sessions
description: ""
- name: Connect OnlyFans Account
description: ""
- name: Data Exports
description: APIs for managing data exports
- name: Engagement / Messages
description: ""
- name: Fans
description: APIs for managing OnlyFans fans (subscribers)
- name: Fans - AI Summary
description: APIs for generating and retrieving AI-powered fan profile summaries
- name: Following
description: APIs for managing OnlyFans followings (people you're subscribed to)
- name: Free Trial Links
description: APIs for managing Free Trial Links. Revenue totals are net earnings
after refunds and chargebacks. `revenue.chargebacks` (or
`summary.chargebacks_total` in stats) is the positive cached net amount
already excluded from revenue; do not subtract it again. Spender responses
include chargebacks across all attributed periods for each fan with
positive net revenue.
- name: Giphy
description: ""
- name: Link Tags
description: APIs for managing tags on free trial links, tracking links, and Smart Links
- name: Mass Messaging
description: ""
- name: Media
description: ""
- name: Media Vault
description: ""
- name: Media Vault Lists
description: ""
- name: Notifications
description: Endpoints for managingr account notifications
- name: Payouts
description: ""
- name: Post Comments
description: ""
- name: Post Labels
description: APIs for managing your post labels
- name: Posts
description: APIs for managing OnlyFans posts
- name: Profile Content
description: Read another user's profile content using your connected OnlyFans
account. OnlyFans enforces subscription and purchase requirements; these
endpoints do not unlock content. Response samples use captured OnlyFans
payloads with anonymized IDs, text, and media URLs; OFAPI metadata values
are illustrative.
- name: Promotions
description: ""
- name: Public Profiles
description: ""
- name: Queue
description: ""
- name: Release Forms
description: APIs for managing OnlyFans release forms
- name: Saved For Later (Messages)
description: ""
- name: Saved For Later (Posts)
description: ""
- name: Settings
description: ""
- name: Shared Free Trial Links
description: APIs for Free Trial Links that other OF creators have shared with
this account. Revenue, cost, and spender data are not available for shared
links.
- name: Shared Tracking Links
description: APIs for Tracking Links (campaigns) that other OF creators have
shared with this account. Revenue, cost, and spender data are not
available for shared campaigns.
- name: Smart Link Postbacks
description: APIs for managing Smart Link postback destinations
- name: Smart Links
description: APIs for managing Smart Links (Free Trial Links and Tracking Links
with pooled inventory)
- name: Statistics
description: ""
- name: Stored Free Trial Links
description: Instant APIs for retrieving stored free trial links from the
OnlyFansAPI Cache (free, no credits used). `revenue.total` is net earnings
after refunds and chargebacks. `revenue.chargebacks` is the positive
cached net amount already excluded from that total; do not subtract it
again.
- name: Stored Shared Free Trial Links
description: Instant APIs for retrieving stored shared Free Trial Links from the
OnlyFansAPI Cache (free, no credits used)
- name: Stored Shared Tracking Links
description: Instant APIs for retrieving stored shared Tracking Links
(campaigns) from the OnlyFansAPI Cache (free, no credits used)
- name: Stored Tracking Links
description: Instant APIs for retrieving stored tracking links from the
OnlyFansAPI Cache (free, no credits used). `revenue.total` is net earnings
after refunds and chargebacks. `revenue.chargebacks` is the positive
cached net amount already excluded from that total; do not subtract it
again.
- name: Stories
description: APIs for managing OnlyFans stories
- name: Story Highlights
description: APIs for managing OnlyFans story highlights
- name: Subscription Bundles
description: ""
- name: Tracking Links
description: APIs for managing tracking links. Revenue totals are net earnings
after refunds and chargebacks. `revenue.chargebacks` (or
`summary.chargebacks_total` in stats) is the positive cached net amount
already excluded from revenue; do not subtract it again. Spender responses
include chargebacks across all attributed periods for each fan with
positive net revenue.
- name: Transactions
description: APIs for managing OnlyFans transactions
- name: Usage
description: Credit usage reporting for your team
- name: User List Collections
description: ""
- name: Users
description: APIs for fetching OnlyFans users
- name: Webhooks
description: ""
paths:
/api/{account}/chats/{chat_id}:
parameters:
- in: path
name: account
description: The Account ID
example: acct_XXXXXXXXXXXXXXX
required: true
schema:
type: string
- in: path
name: chat_id
description: The ID of the chat to delete, usually a fan's OnlyFans User ID
example: "123"
required: true
schema:
type: string
delete:
summary: Delete Chat
operationId: deleteChat
description: Delete a specific chat.
parameters: []
responses:
"200":
description: Success
content:
application/json:
schema:
type: object
example:
data:
success: true
_meta:
_credits:
used: 1
balance: 999999884
note: Always
_cache:
is_cached: false
note: Cache disabled for this endpoint
_rate_limits:
limit_minute: 1000
limit_day: 50000
remaining_minute: 999
remaining_day: 49971
properties:
data:
type: object
properties:
success:
type: boolean
example: true
_meta:
type: object
properties:
_credits:
type: object
properties:
used:
type: integer
example: 1
balance:
type: integer
example: 999999884
note:
type: string
example: Always
_cache:
type: object
properties:
is_cached:
type: boolean
example: false
note:
type: string
example: Cache disabled for this endpoint
_rate_limits:
type: object
properties:
limit_minute:
type: integer
example: 1000
limit_day:
type: integer
example: 50000
remaining_minute:
type: integer
example: 999
remaining_day:
type: integer
example: 49971
tags:
- Chats
components:
securitySchemes:
default:
type: http
scheme: bearer
description: Get your API Key from OnlyFansAPI Console -
https://app.onlyfansapi.com/api-keys
````
# Hide Chat (/api-reference/chats/hide-chat)
Hide a specific chat from the chat list. To unhide this chat, send a new message to the user.
## OpenAPI
````yaml https://app.onlyfansapi.com/scribe-docs/openapi.yaml post /api/{account}/chats/{chat_id}/hide
openapi: 3.0.3
info:
title: OnlyFans API
description: ""
version: 1.0.0
servers:
- url: https://app.onlyfansapi.com
security:
- default: []
tags:
- name: AI Voice Messages
description: ""
- name: API Keys
description: ""
- name: Account
description: Endpoints for your linked accounts
- name: Analytics - Financial
description: APIs for retrieving financial analytics data
- name: Analytics - Summary
description: APIs for retrieving summary analytics data
- name: Banking
description: Operations related to user banking details, payout methods, legal
and tax information, and account country settings.
- name: Banned Words
description: Reference list of OnlyFans banned words used by the
`blockBannedWords` screening parameter
- name: Blocked / Restricted Users
description: APIs for listing the users an account has blocked or restricted
- name: Chargebacks
description: ""
- name: Chat Messages
description: ""
- name: Chats
description: ""
- name: Client Sessions
description: ""
- name: Connect OnlyFans Account
description: ""
- name: Data Exports
description: APIs for managing data exports
- name: Engagement / Messages
description: ""
- name: Fans
description: APIs for managing OnlyFans fans (subscribers)
- name: Fans - AI Summary
description: APIs for generating and retrieving AI-powered fan profile summaries
- name: Following
description: APIs for managing OnlyFans followings (people you're subscribed to)
- name: Free Trial Links
description: APIs for managing Free Trial Links. Revenue totals are net earnings
after refunds and chargebacks. `revenue.chargebacks` (or
`summary.chargebacks_total` in stats) is the positive cached net amount
already excluded from revenue; do not subtract it again. Spender responses
include chargebacks across all attributed periods for each fan with
positive net revenue.
- name: Giphy
description: ""
- name: Link Tags
description: APIs for managing tags on free trial links, tracking links, and Smart Links
- name: Mass Messaging
description: ""
- name: Media
description: ""
- name: Media Vault
description: ""
- name: Media Vault Lists
description: ""
- name: Notifications
description: Endpoints for managingr account notifications
- name: Payouts
description: ""
- name: Post Comments
description: ""
- name: Post Labels
description: APIs for managing your post labels
- name: Posts
description: APIs for managing OnlyFans posts
- name: Profile Content
description: Read another user's profile content using your connected OnlyFans
account. OnlyFans enforces subscription and purchase requirements; these
endpoints do not unlock content. Response samples use captured OnlyFans
payloads with anonymized IDs, text, and media URLs; OFAPI metadata values
are illustrative.
- name: Promotions
description: ""
- name: Public Profiles
description: ""
- name: Queue
description: ""
- name: Release Forms
description: APIs for managing OnlyFans release forms
- name: Saved For Later (Messages)
description: ""
- name: Saved For Later (Posts)
description: ""
- name: Settings
description: ""
- name: Shared Free Trial Links
description: APIs for Free Trial Links that other OF creators have shared with
this account. Revenue, cost, and spender data are not available for shared
links.
- name: Shared Tracking Links
description: APIs for Tracking Links (campaigns) that other OF creators have
shared with this account. Revenue, cost, and spender data are not
available for shared campaigns.
- name: Smart Link Postbacks
description: APIs for managing Smart Link postback destinations
- name: Smart Links
description: APIs for managing Smart Links (Free Trial Links and Tracking Links
with pooled inventory)
- name: Statistics
description: ""
- name: Stored Free Trial Links
description: Instant APIs for retrieving stored free trial links from the
OnlyFansAPI Cache (free, no credits used). `revenue.total` is net earnings
after refunds and chargebacks. `revenue.chargebacks` is the positive
cached net amount already excluded from that total; do not subtract it
again.
- name: Stored Shared Free Trial Links
description: Instant APIs for retrieving stored shared Free Trial Links from the
OnlyFansAPI Cache (free, no credits used)
- name: Stored Shared Tracking Links
description: Instant APIs for retrieving stored shared Tracking Links
(campaigns) from the OnlyFansAPI Cache (free, no credits used)
- name: Stored Tracking Links
description: Instant APIs for retrieving stored tracking links from the
OnlyFansAPI Cache (free, no credits used). `revenue.total` is net earnings
after refunds and chargebacks. `revenue.chargebacks` is the positive
cached net amount already excluded from that total; do not subtract it
again.
- name: Stories
description: APIs for managing OnlyFans stories
- name: Story Highlights
description: APIs for managing OnlyFans story highlights
- name: Subscription Bundles
description: ""
- name: Tracking Links
description: APIs for managing tracking links. Revenue totals are net earnings
after refunds and chargebacks. `revenue.chargebacks` (or
`summary.chargebacks_total` in stats) is the positive cached net amount
already excluded from revenue; do not subtract it again. Spender responses
include chargebacks across all attributed periods for each fan with
positive net revenue.
- name: Transactions
description: APIs for managing OnlyFans transactions
- name: Usage
description: Credit usage reporting for your team
- name: User List Collections
description: ""
- name: Users
description: APIs for fetching OnlyFans users
- name: Webhooks
description: ""
paths:
/api/{account}/chats/{chat_id}/hide:
parameters:
- in: path
name: account
description: The Account ID
example: acct_XXXXXXXXXXXXXXX
required: true
schema:
type: string
- in: path
name: chat_id
description: The ID of the chat to hide, usually a fan's OnlyFans User ID
example: "123"
required: true
schema:
type: string
post:
summary: Hide Chat
operationId: hideChat
description: Hide a specific chat from the chat list. To unhide this chat, send
a new message to the user.
parameters: []
responses:
"200":
description: Success
content:
application/json:
schema:
type: object
example:
data:
success: true
_meta:
_credits:
used: 1
balance: 999999884
note: Always
_cache:
is_cached: false
note: Cache disabled for this endpoint
_rate_limits:
limit_minute: 1000
limit_day: 50000
remaining_minute: 999
remaining_day: 49971
properties:
data:
type: object
properties:
success:
type: boolean
example: true
_meta:
type: object
properties:
_credits:
type: object
properties:
used:
type: integer
example: 1
balance:
type: integer
example: 999999884
note:
type: string
example: Always
_cache:
type: object
properties:
is_cached:
type: boolean
example: false
note:
type: string
example: Cache disabled for this endpoint
_rate_limits:
type: object
properties:
limit_minute:
type: integer
example: 1000
limit_day:
type: integer
example: 50000
remaining_minute:
type: integer
example: 999
remaining_day:
type: integer
example: 49971
tags:
- Chats
components:
securitySchemes:
default:
type: http
scheme: bearer
description: Get your API Key from OnlyFansAPI Console -
https://app.onlyfansapi.com/api-keys
````
# List Chat Media (Gallery) (/api-reference/chats/list-chat-media-gallery)
List media files shared in a specific chat.
## OpenAPI
````yaml https://app.onlyfansapi.com/scribe-docs/openapi.yaml get /api/{account}/chats/{chat_id}/media
openapi: 3.0.3
info:
title: OnlyFans API
description: ""
version: 1.0.0
servers:
- url: https://app.onlyfansapi.com
security:
- default: []
tags:
- name: AI Voice Messages
description: ""
- name: API Keys
description: ""
- name: Account
description: Endpoints for your linked accounts
- name: Analytics - Financial
description: APIs for retrieving financial analytics data
- name: Analytics - Summary
description: APIs for retrieving summary analytics data
- name: Banking
description: Operations related to user banking details, payout methods, legal
and tax information, and account country settings.
- name: Banned Words
description: Reference list of OnlyFans banned words used by the
`blockBannedWords` screening parameter
- name: Blocked / Restricted Users
description: APIs for listing the users an account has blocked or restricted
- name: Chargebacks
description: ""
- name: Chat Messages
description: ""
- name: Chats
description: ""
- name: Client Sessions
description: ""
- name: Connect OnlyFans Account
description: ""
- name: Data Exports
description: APIs for managing data exports
- name: Engagement / Messages
description: ""
- name: Fans
description: APIs for managing OnlyFans fans (subscribers)
- name: Fans - AI Summary
description: APIs for generating and retrieving AI-powered fan profile summaries
- name: Following
description: APIs for managing OnlyFans followings (people you're subscribed to)
- name: Free Trial Links
description: APIs for managing Free Trial Links. Revenue totals are net earnings
after refunds and chargebacks. `revenue.chargebacks` (or
`summary.chargebacks_total` in stats) is the positive cached net amount
already excluded from revenue; do not subtract it again. Spender responses
include chargebacks across all attributed periods for each fan with
positive net revenue.
- name: Giphy
description: ""
- name: Link Tags
description: APIs for managing tags on free trial links, tracking links, and Smart Links
- name: Mass Messaging
description: ""
- name: Media
description: ""
- name: Media Vault
description: ""
- name: Media Vault Lists
description: ""
- name: Notifications
description: Endpoints for managingr account notifications
- name: Payouts
description: ""
- name: Post Comments
description: ""
- name: Post Labels
description: APIs for managing your post labels
- name: Posts
description: APIs for managing OnlyFans posts
- name: Profile Content
description: Read another user's profile content using your connected OnlyFans
account. OnlyFans enforces subscription and purchase requirements; these
endpoints do not unlock content. Response samples use captured OnlyFans
payloads with anonymized IDs, text, and media URLs; OFAPI metadata values
are illustrative.
- name: Promotions
description: ""
- name: Public Profiles
description: ""
- name: Queue
description: ""
- name: Release Forms
description: APIs for managing OnlyFans release forms
- name: Saved For Later (Messages)
description: ""
- name: Saved For Later (Posts)
description: ""
- name: Settings
description: ""
- name: Shared Free Trial Links
description: APIs for Free Trial Links that other OF creators have shared with
this account. Revenue, cost, and spender data are not available for shared
links.
- name: Shared Tracking Links
description: APIs for Tracking Links (campaigns) that other OF creators have
shared with this account. Revenue, cost, and spender data are not
available for shared campaigns.
- name: Smart Link Postbacks
description: APIs for managing Smart Link postback destinations
- name: Smart Links
description: APIs for managing Smart Links (Free Trial Links and Tracking Links
with pooled inventory)
- name: Statistics
description: ""
- name: Stored Free Trial Links
description: Instant APIs for retrieving stored free trial links from the
OnlyFansAPI Cache (free, no credits used). `revenue.total` is net earnings
after refunds and chargebacks. `revenue.chargebacks` is the positive
cached net amount already excluded from that total; do not subtract it
again.
- name: Stored Shared Free Trial Links
description: Instant APIs for retrieving stored shared Free Trial Links from the
OnlyFansAPI Cache (free, no credits used)
- name: Stored Shared Tracking Links
description: Instant APIs for retrieving stored shared Tracking Links
(campaigns) from the OnlyFansAPI Cache (free, no credits used)
- name: Stored Tracking Links
description: Instant APIs for retrieving stored tracking links from the
OnlyFansAPI Cache (free, no credits used). `revenue.total` is net earnings
after refunds and chargebacks. `revenue.chargebacks` is the positive
cached net amount already excluded from that total; do not subtract it
again.
- name: Stories
description: APIs for managing OnlyFans stories
- name: Story Highlights
description: APIs for managing OnlyFans story highlights
- name: Subscription Bundles
description: ""
- name: Tracking Links
description: APIs for managing tracking links. Revenue totals are net earnings
after refunds and chargebacks. `revenue.chargebacks` (or
`summary.chargebacks_total` in stats) is the positive cached net amount
already excluded from revenue; do not subtract it again. Spender responses
include chargebacks across all attributed periods for each fan with
positive net revenue.
- name: Transactions
description: APIs for managing OnlyFans transactions
- name: Usage
description: Credit usage reporting for your team
- name: User List Collections
description: ""
- name: Users
description: APIs for fetching OnlyFans users
- name: Webhooks
description: ""
paths:
/api/{account}/chats/{chat_id}/media:
parameters:
- in: path
name: account
description: The Account ID
example: acct_XXXXXXXXXXXXXXX
required: true
schema:
type: string
- in: path
name: chat_id
description: The ID of the chat to get media from, usually a fan's OnlyFans User ID
example: "123"
required: true
schema:
type: string
get:
summary: List Chat Media (Gallery)
operationId: listChatMediaGallery
description: List media files shared in a specific chat.
parameters:
- in: query
name: type
description: Filter by specific media types. Keep empty to return all.
example: claims
required: false
schema:
type: string
description: Filter by specific media types. Keep empty to return all.
example: claims
enum:
- photos
- videos
- audios
nullable: true
- in: query
name: limit
description: Number of medias to return. Default = 20
example: 20
required: false
schema:
type: string
description: Number of medias to return. Default = 20
example: 20
- in: query
name: offset
description: Number of medias to skip for pagination
example: 0
required: false
schema:
type: string
description: Number of medias to skip for pagination
example: 0
- in: query
name: skip_users
description: Whether to skip user details in the response (`all` or `none`).
Defaults to `all`.
example: all
required: false
schema:
type: string
description: Whether to skip user details in the response (`all` or `none`).
Defaults to `all`.
example: all
responses:
"200":
description: Success
content:
application/json:
schema:
type: object
example:
data:
list:
- responseType: message
text: Text message!
giphyId: null
lockedText: true
isFree: true
price: 0
isMediaReady: true
mediaCount: 1
media:
- id: 123
type: photo
convertedToVideo: false
canView: true
hasError: false
createdAt: 2025-01-01T00:00:00+00:00
isReady: true
files:
full:
url: https://cdn2.onlyfans.com/files/...
width: 2048
height: 1360
size: 0
sources: []
thumb:
url: https://cdn2.onlyfans.com/files/...
width: 300
height: 300
size: 0
preview:
url: https://cdn2.onlyfans.com/files/...
width: 960
height: 638
size: 0
squarePreview:
url: https://cdn2.onlyfans.com/files/...
width: 960
height: 960
size: 0
duration: 0
hasCustomPreview: false
videoSources:
"240": null
"720": null
previews: []
isTip: false
isReportedByMe: false
isCouplePeopleMedia: false
queueId: 123
isMarkdownDisabled: true
releaseForms: []
fromUser:
id: 123
_view: t
isFromQueue: false
id: 123
isOpened: false
isNew: false
createdAt: 2025-01-01T00:00:00+00:00
changedAt: 2025-01-01T00:00:00+00:00
cancelSeconds: 0
isLiked: false
canPurchase: false
canPurchaseReason: free
canReport: false
canBePinned: true
isPinned: false
hasMore: false
nextLastId: "123"
_meta:
_credits:
used: 1
balance: 999964345
note: Always
_cache:
is_cached: false
note: Cache disabled for this endpoint
_rate_limits:
limit_minute: 1000
limit_day: 50000
remaining_minute: 999
remaining_day: 49985
properties:
data:
type: object
properties:
list:
type: array
example:
- responseType: message
text: Text message!
giphyId: null
lockedText: true
isFree: true
price: 0
isMediaReady: true
mediaCount: 1
media:
- id: 123
type: photo
convertedToVideo: false
canView: true
hasError: false
createdAt: 2025-01-01T00:00:00+00:00
isReady: true
files:
full:
url: https://cdn2.onlyfans.com/files/...
width: 2048
height: 1360
size: 0
sources: []
thumb:
url: https://cdn2.onlyfans.com/files/...
width: 300
height: 300
size: 0
preview:
url: https://cdn2.onlyfans.com/files/...
width: 960
height: 638
size: 0
squarePreview:
url: https://cdn2.onlyfans.com/files/...
width: 960
height: 960
size: 0
duration: 0
hasCustomPreview: false
videoSources:
"240": null
"720": null
previews: []
isTip: false
isReportedByMe: false
isCouplePeopleMedia: false
queueId: 123
isMarkdownDisabled: true
releaseForms: []
fromUser:
id: 123
_view: t
isFromQueue: false
id: 123
isOpened: false
isNew: false
createdAt: 2025-01-01T00:00:00+00:00
changedAt: 2025-01-01T00:00:00+00:00
cancelSeconds: 0
isLiked: false
canPurchase: false
canPurchaseReason: free
canReport: false
canBePinned: true
isPinned: false
items:
type: object
properties:
responseType:
type: string
example: message
text:
type: string
example: Text message!
giphyId:
type: string
example: null
nullable: true
lockedText:
type: boolean
example: true
isFree:
type: boolean
example: true
price:
type: integer
example: 0
isMediaReady:
type: boolean
example: true
mediaCount:
type: integer
example: 1
media:
type: array
example:
- id: 123
type: photo
convertedToVideo: false
canView: true
hasError: false
createdAt: 2025-01-01T00:00:00+00:00
isReady: true
files:
full:
url: https://cdn2.onlyfans.com/files/...
width: 2048
height: 1360
size: 0
sources: []
thumb:
url: https://cdn2.onlyfans.com/files/...
width: 300
height: 300
size: 0
preview:
url: https://cdn2.onlyfans.com/files/...
width: 960
height: 638
size: 0
squarePreview:
url: https://cdn2.onlyfans.com/files/...
width: 960
height: 960
size: 0
duration: 0
hasCustomPreview: false
videoSources:
"240": null
"720": null
items:
type: object
properties:
id:
type: integer
example: 123
type:
type: string
example: photo
convertedToVideo:
type: boolean
example: false
canView:
type: boolean
example: true
hasError:
type: boolean
example: false
createdAt:
type: string
example: 2025-01-01T00:00:00+00:00
isReady:
type: boolean
example: true
files:
type: object
properties:
full:
type: object
properties:
url:
type: string
example: https://cdn2.onlyfans.com/files/...
width:
type: integer
example: 2048
height:
type: integer
example: 1360
size:
type: integer
example: 0
sources:
type: array
example: []
thumb:
type: object
properties:
url:
type: string
example: https://cdn2.onlyfans.com/files/...
width:
type: integer
example: 300
height:
type: integer
example: 300
size:
type: integer
example: 0
preview:
type: object
properties:
url:
type: string
example: https://cdn2.onlyfans.com/files/...
width:
type: integer
example: 960
height:
type: integer
example: 638
size:
type: integer
example: 0
squarePreview:
type: object
properties:
url:
type: string
example: https://cdn2.onlyfans.com/files/...
width:
type: integer
example: 960
height:
type: integer
example: 960
size:
type: integer
example: 0
duration:
type: integer
example: 0
hasCustomPreview:
type: boolean
example: false
videoSources:
type: object
properties:
"240":
type: string
example: null
nullable: true
"720":
type: string
example: null
nullable: true
previews:
type: array
example: []
isTip:
type: boolean
example: false
isReportedByMe:
type: boolean
example: false
isCouplePeopleMedia:
type: boolean
example: false
queueId:
type: integer
example: 123
isMarkdownDisabled:
type: boolean
example: true
releaseForms:
type: array
example: []
fromUser:
type: object
properties:
id:
type: integer
example: 123
_view:
type: string
example: t
isFromQueue:
type: boolean
example: false
id:
type: integer
example: 123
isOpened:
type: boolean
example: false
isNew:
type: boolean
example: false
createdAt:
type: string
example: 2025-01-01T00:00:00+00:00
changedAt:
type: string
example: 2025-01-01T00:00:00+00:00
cancelSeconds:
type: integer
example: 0
isLiked:
type: boolean
example: false
canPurchase:
type: boolean
example: false
canPurchaseReason:
type: string
example: free
canReport:
type: boolean
example: false
canBePinned:
type: boolean
example: true
isPinned:
type: boolean
example: false
hasMore:
type: boolean
example: false
nextLastId:
type: string
example: "123"
_meta:
type: object
properties:
_credits:
type: object
properties:
used:
type: integer
example: 1
balance:
type: integer
example: 999964345
note:
type: string
example: Always
_cache:
type: object
properties:
is_cached:
type: boolean
example: false
note:
type: string
example: Cache disabled for this endpoint
_rate_limits:
type: object
properties:
limit_minute:
type: integer
example: 1000
limit_day:
type: integer
example: 50000
remaining_minute:
type: integer
example: 999
remaining_day:
type: integer
example: 49985
tags:
- Chats
components:
securitySchemes:
default:
type: http
scheme: bearer
description: Get your API Key from OnlyFansAPI Console -
https://app.onlyfansapi.com/api-keys
````
# List Chats (/api-reference/chats/list-chats)
Get the list of chats for an Account.
## OpenAPI
````yaml https://app.onlyfansapi.com/scribe-docs/openapi.yaml get /api/{account}/chats
openapi: 3.0.3
info:
title: OnlyFans API
description: ""
version: 1.0.0
servers:
- url: https://app.onlyfansapi.com
security:
- default: []
tags:
- name: AI Voice Messages
description: ""
- name: API Keys
description: ""
- name: Account
description: Endpoints for your linked accounts
- name: Analytics - Financial
description: APIs for retrieving financial analytics data
- name: Analytics - Summary
description: APIs for retrieving summary analytics data
- name: Banking
description: Operations related to user banking details, payout methods, legal
and tax information, and account country settings.
- name: Banned Words
description: Reference list of OnlyFans banned words used by the
`blockBannedWords` screening parameter
- name: Blocked / Restricted Users
description: APIs for listing the users an account has blocked or restricted
- name: Chargebacks
description: ""
- name: Chat Messages
description: ""
- name: Chats
description: ""
- name: Client Sessions
description: ""
- name: Connect OnlyFans Account
description: ""
- name: Data Exports
description: APIs for managing data exports
- name: Engagement / Messages
description: ""
- name: Fans
description: APIs for managing OnlyFans fans (subscribers)
- name: Fans - AI Summary
description: APIs for generating and retrieving AI-powered fan profile summaries
- name: Following
description: APIs for managing OnlyFans followings (people you're subscribed to)
- name: Free Trial Links
description: APIs for managing Free Trial Links. Revenue totals are net earnings
after refunds and chargebacks. `revenue.chargebacks` (or
`summary.chargebacks_total` in stats) is the positive cached net amount
already excluded from revenue; do not subtract it again. Spender responses
include chargebacks across all attributed periods for each fan with
positive net revenue.
- name: Giphy
description: ""
- name: Link Tags
description: APIs for managing tags on free trial links, tracking links, and Smart Links
- name: Mass Messaging
description: ""
- name: Media
description: ""
- name: Media Vault
description: ""
- name: Media Vault Lists
description: ""
- name: Notifications
description: Endpoints for managingr account notifications
- name: Payouts
description: ""
- name: Post Comments
description: ""
- name: Post Labels
description: APIs for managing your post labels
- name: Posts
description: APIs for managing OnlyFans posts
- name: Profile Content
description: Read another user's profile content using your connected OnlyFans
account. OnlyFans enforces subscription and purchase requirements; these
endpoints do not unlock content. Response samples use captured OnlyFans
payloads with anonymized IDs, text, and media URLs; OFAPI metadata values
are illustrative.
- name: Promotions
description: ""
- name: Public Profiles
description: ""
- name: Queue
description: ""
- name: Release Forms
description: APIs for managing OnlyFans release forms
- name: Saved For Later (Messages)
description: ""
- name: Saved For Later (Posts)
description: ""
- name: Settings
description: ""
- name: Shared Free Trial Links
description: APIs for Free Trial Links that other OF creators have shared with
this account. Revenue, cost, and spender data are not available for shared
links.
- name: Shared Tracking Links
description: APIs for Tracking Links (campaigns) that other OF creators have
shared with this account. Revenue, cost, and spender data are not
available for shared campaigns.
- name: Smart Link Postbacks
description: APIs for managing Smart Link postback destinations
- name: Smart Links
description: APIs for managing Smart Links (Free Trial Links and Tracking Links
with pooled inventory)
- name: Statistics
description: ""
- name: Stored Free Trial Links
description: Instant APIs for retrieving stored free trial links from the
OnlyFansAPI Cache (free, no credits used). `revenue.total` is net earnings
after refunds and chargebacks. `revenue.chargebacks` is the positive
cached net amount already excluded from that total; do not subtract it
again.
- name: Stored Shared Free Trial Links
description: Instant APIs for retrieving stored shared Free Trial Links from the
OnlyFansAPI Cache (free, no credits used)
- name: Stored Shared Tracking Links
description: Instant APIs for retrieving stored shared Tracking Links
(campaigns) from the OnlyFansAPI Cache (free, no credits used)
- name: Stored Tracking Links
description: Instant APIs for retrieving stored tracking links from the
OnlyFansAPI Cache (free, no credits used). `revenue.total` is net earnings
after refunds and chargebacks. `revenue.chargebacks` is the positive
cached net amount already excluded from that total; do not subtract it
again.
- name: Stories
description: APIs for managing OnlyFans stories
- name: Story Highlights
description: APIs for managing OnlyFans story highlights
- name: Subscription Bundles
description: ""
- name: Tracking Links
description: APIs for managing tracking links. Revenue totals are net earnings
after refunds and chargebacks. `revenue.chargebacks` (or
`summary.chargebacks_total` in stats) is the positive cached net amount
already excluded from revenue; do not subtract it again. Spender responses
include chargebacks across all attributed periods for each fan with
positive net revenue.
- name: Transactions
description: APIs for managing OnlyFans transactions
- name: Usage
description: Credit usage reporting for your team
- name: User List Collections
description: ""
- name: Users
description: APIs for fetching OnlyFans users
- name: Webhooks
description: ""
paths:
/api/{account}/chats:
parameters:
- in: path
name: account
description: The Account ID
example: acct_XXXXXXXXXXXXXXX
required: true
schema:
type: string
get:
summary: List Chats
operationId: listChats
description: Get the list of chats for an Account.
parameters:
- in: query
name: limit
description: Number of chats to return (1 - 100). Default = 10
example: 10
required: false
schema:
type: string
description: Number of chats to return (1 - 100). Default = 10
example: 10
- in: query
name: offset
description: Number of chats to skip for pagination
example: 0
required: false
schema:
type: string
description: Number of chats to skip for pagination
example: 0
- in: query
name: skip_users
description: Whether to skip user details in the response (`all` or `none`).
Defaults to `all`.
example: all
required: false
schema:
type: string
description: Whether to skip user details in the response (`all` or `none`).
Defaults to `all`.
example: all
enum:
- all
- none
- in: query
name: order
description: Sort order for chats (recent or old). Default = recent
example: recent
required: false
schema:
type: string
description: Sort order for chats (recent or old). Default = recent
example: recent
enum:
- recent
- old
- in: query
name: filter
description: Optionally, filter the chats by type.
example: with_tips
required: false
schema:
type: string
description: Optionally, filter the chats by type.
example: with_tips
enum:
- pinned
- priority
- unread
- with_tips
- unread_with_tips
- in: query
name: query
description: Search query to filter chats
example: John
required: false
schema:
type: string
description: Search query to filter chats
example: John
responses:
"200":
description: Success
content:
application/json:
schema:
type: object
example:
data:
- canNotSendReason: false
canSendMessage: true
canGoToProfile: true
unreadMessagesCount: 1
hasUnreadTips: false
isMutedNotifications: false
lastMessage:
responseType: message
text: Message text
giphyId: null lockedText: false isFree: true price: 0 isMediaReady: true mediaCount: 0 media: [] previews: [] isTip: false isReportedByMe: false isCouplePeopleMedia: false queueId: 123 isMarkdownDisabled: true fromUser: id: 123 _view: i isFromQueue: true canUnsendQueue: true unsendSecondsQueue: 1000000 id: 123 isOpened: false isNew: true createdAt: 2025-01-01T01:01:01+00:00 changedAt: 2025-01-01T01:01:01+00:00 cancelSeconds: 86268 isLiked: false canPurchase: false canPurchaseReason: free canReport: true canBePinned: true isPinned: false lastReadMessageId: 0 hasPurchasedFeed: false countPinnedMessages: 0 fan: id: 123 name: Name view: f about:About
avatar: https://public.onlyfans.com/files/.../avatar.jpg header: https://public.onlyfans.com/files/.../header.jpg notice: "" canChat: true canEarn: true tipsMax: 200 tipsMin: 5 website: null hasLinks: false isFriend: false joinDate: 2025-01-01T01:01:01+00:00 lastSeen: 2025-01-01T01:01:01+00:00 location: Location username: username wishlist: null canReport: true hasLabels: true hasStream: false isBlocked: false hasFriends: false hasStories: false headerSize: width: 767 height: 1152 isVerified: true postsCount: 123 audiosCount: 0 canRestrict: true displayName: "" isPerformer: true listsStates: - id: following name: Following type: following hasUser: true canAddUser: false cannotAddUserReason: ALREADY_EXISTS - id: fans name: Fans type: fans hasUser: true canAddUser: false cannotAddUserReason: ALREADY_EXISTS - id: rebill_off name: Renew Off type: rebill_off hasUser: false canAddUser: false cannotAddUserReason: null - id: rebill_on name: Renew On type: rebill_on hasUser: true canAddUser: false cannotAddUserReason: ALREADY_EXISTS - id: recent name: Recent (last 24 hours) type: recent hasUser: false canAddUser: false cannotAddUserReason: SYSTEM_LIST - id: friends name: Friends type: friends hasUser: false canAddUser: true cannotAddUserReason: null - id: muted name: Muted type: muted hasUser: false canAddUser: true cannotAddUserReason: null - id: tagged name: Tagged type: tagged hasUser: false canAddUser: false cannotAddUserReason: SYSTEM_LIST mediasCount: 123 photosCount: 123 tipsEnabled: true videosCount: 123 avatarThumbs: c50: https://thumbs.onlyfans.com/.../avatar.jpg c144: https://thumbs.onlyfans.com/.../avatar.jpg canLookStory: true canTrialSend: false headerThumbs: w480: https://thumbs.onlyfans.com/.../header.jpg w760: https://thumbs.onlyfans.com/.../header.jpg isRestricted: false subscribedBy: true subscribedOn: true canCreateTrial: false canPayInternal: true canUnsubscribe: true favoritedCount: 123 favoritesCount: 123 hasPinnedPosts: false isAdultContent: false showMediaCount: true subscribePrice: 0 canCommentStory: true hasSavedStreams: false isRealPerformer: true showPostsInFeed: true tipsMinInternal: 1 tipsTextEnabled: true canAddSubscriber: false subscribedByData: price: 0 status: null isMuted: false duration: 22 days newPrice: 0 expiredAt: 2025-01-01T01:01:01+00:00 renewedAt: 2025-01-01T01:01:01+00:00 subscribes: - id: 123 date: 2025-01-01T01:01:01+00:00 type: regular price: 0 action: subscribe userId: 123 discount: 0 duration: 123 offerEnd: null earningId: 0 isCurrent: true startDate: 2025-01-01T01:01:01+00:00 cancelDate: null expireDate: 2025-01-01T01:01:01+00:00 offerStart: null regularPrice: 0 subscriberId: 123 subscribeAt: 2025-01-01T01:01:01+00:00 regularPrice: 0 discountPeriod: 1 subscribePrice: 0 discountPercent: 0 showPostsInFeed: true discountStartedAt: null unsubscribeReason: No reason given discountFinishedAt: null hasActivePaidSubscriptions: false subscribedOnData: price: 0 status: null isMuted: false duration: 22 days newPrice: 0 tipsSumm: 0 expiredAt: 2025-01-01T01:01:01+00:00 postsSumm: 0 renewedAt: 2025-01-01T01:01:01+00:00 totalSumm: 0 subscribes: - id: 123 date: 2025-01-01T01:01:01+00:00 type: auto price: 0 action: subscribe userId: 123 discount: 0 duration: 123 offerEnd: null earningId: 0 isCurrent: true startDate: 2025-01-01T01:01:01+00:00 cancelDate: null expireDate: 2025-01-01T01:01:01+00:00 offerStart: null regularPrice: 0 subscriberId: 123 streamsSumm: 0 subscribeAt: 2025-01-01T01:01:01+00:00 messagesSumm: 0 regularPrice: 4.99 discountPeriod: 1 subscribePrice: 4.99 subscribesSumm: 0 discountPercent: 0 discountStartedAt: null unsubscribeReason: No reason given discountFinishedAt: null hasActivePaidSubscriptions: false subscribersCount: null hasNotViewedStory: false isPaywallRequired: true isReferrerAllowed: true isSpringConnected: false archivedPostsCount: 0 canCreatePromotion: false hasScheduledStream: false isSpotifyConnected: false subscribedByExpire: false finishedStreamsCount: 0 isPendingAutoprolong: false isPrivateRestriction: false showSubscribersCount: false subscribedOnDuration: 22 days canReceiveChatMessage: true currentSubscribePrice: 0 firstPublishedPostDate: 2025-01-01T01:01:01+00:00 subscribedByExpireDate: 2025-01-01T01:01:01+00:00 subscribedIsExpiredNow: false subscribedOnExpiredNow: false subscribedByAutoprolong: true privateArchivedPostsCount: 0 shouldShowFinishedStreams: false isMarkdownDisabledForAbout: true avatarHeaderConverterUpload: true _pagination: next_page: https://app.onlyfansapi.com/api/acct_XXXXXXXXXXX/chats?offset=10&limit=10 _meta: _credits: used: 1 balance: 1 note: Always _cache: is_cached: false note: Cache disabled for this endpoint _rate_limits: limit_minute: 1000 limit_day: 50000 remaining_minute: 999 remaining_day: 49999 properties: data: type: array example: - canNotSendReason: false canSendMessage: true canGoToProfile: true unreadMessagesCount: 1 hasUnreadTips: false isMutedNotifications: false lastMessage: responseType: message text:Message text
giphyId: null lockedText: false isFree: true price: 0 isMediaReady: true mediaCount: 0 media: [] previews: [] isTip: false isReportedByMe: false isCouplePeopleMedia: false queueId: 123 isMarkdownDisabled: true fromUser: id: 123 _view: i isFromQueue: true canUnsendQueue: true unsendSecondsQueue: 1000000 id: 123 isOpened: false isNew: true createdAt: 2025-01-01T01:01:01+00:00 changedAt: 2025-01-01T01:01:01+00:00 cancelSeconds: 86268 isLiked: false canPurchase: false canPurchaseReason: free canReport: true canBePinned: true isPinned: false lastReadMessageId: 0 hasPurchasedFeed: false countPinnedMessages: 0 fan: id: 123 name: Name view: f about:About
avatar: https://public.onlyfans.com/files/.../avatar.jpg header: https://public.onlyfans.com/files/.../header.jpg notice: "" canChat: true canEarn: true tipsMax: 200 tipsMin: 5 website: null hasLinks: false isFriend: false joinDate: 2025-01-01T01:01:01+00:00 lastSeen: 2025-01-01T01:01:01+00:00 location: Location username: username wishlist: null canReport: true hasLabels: true hasStream: false isBlocked: false hasFriends: false hasStories: false headerSize: width: 767 height: 1152 isVerified: true postsCount: 123 audiosCount: 0 canRestrict: true displayName: "" isPerformer: true listsStates: - id: following name: Following type: following hasUser: true canAddUser: false cannotAddUserReason: ALREADY_EXISTS - id: fans name: Fans type: fans hasUser: true canAddUser: false cannotAddUserReason: ALREADY_EXISTS - id: rebill_off name: Renew Off type: rebill_off hasUser: false canAddUser: false cannotAddUserReason: null - id: rebill_on name: Renew On type: rebill_on hasUser: true canAddUser: false cannotAddUserReason: ALREADY_EXISTS - id: recent name: Recent (last 24 hours) type: recent hasUser: false canAddUser: false cannotAddUserReason: SYSTEM_LIST - id: friends name: Friends type: friends hasUser: false canAddUser: true cannotAddUserReason: null - id: muted name: Muted type: muted hasUser: false canAddUser: true cannotAddUserReason: null - id: tagged name: Tagged type: tagged hasUser: false canAddUser: false cannotAddUserReason: SYSTEM_LIST mediasCount: 123 photosCount: 123 tipsEnabled: true videosCount: 123 avatarThumbs: c50: https://thumbs.onlyfans.com/.../avatar.jpg c144: https://thumbs.onlyfans.com/.../avatar.jpg canLookStory: true canTrialSend: false headerThumbs: w480: https://thumbs.onlyfans.com/.../header.jpg w760: https://thumbs.onlyfans.com/.../header.jpg isRestricted: false subscribedBy: true subscribedOn: true canCreateTrial: false canPayInternal: true canUnsubscribe: true favoritedCount: 123 favoritesCount: 123 hasPinnedPosts: false isAdultContent: false showMediaCount: true subscribePrice: 0 canCommentStory: true hasSavedStreams: false isRealPerformer: true showPostsInFeed: true tipsMinInternal: 1 tipsTextEnabled: true canAddSubscriber: false subscribedByData: price: 0 status: null isMuted: false duration: 22 days newPrice: 0 expiredAt: 2025-01-01T01:01:01+00:00 renewedAt: 2025-01-01T01:01:01+00:00 subscribes: - id: 123 date: 2025-01-01T01:01:01+00:00 type: regular price: 0 action: subscribe userId: 123 discount: 0 duration: 123 offerEnd: null earningId: 0 isCurrent: true startDate: 2025-01-01T01:01:01+00:00 cancelDate: null expireDate: 2025-01-01T01:01:01+00:00 offerStart: null regularPrice: 0 subscriberId: 123 subscribeAt: 2025-01-01T01:01:01+00:00 regularPrice: 0 discountPeriod: 1 subscribePrice: 0 discountPercent: 0 showPostsInFeed: true discountStartedAt: null unsubscribeReason: No reason given discountFinishedAt: null hasActivePaidSubscriptions: false subscribedOnData: price: 0 status: null isMuted: false duration: 22 days newPrice: 0 tipsSumm: 0 expiredAt: 2025-01-01T01:01:01+00:00 postsSumm: 0 renewedAt: 2025-01-01T01:01:01+00:00 totalSumm: 0 subscribes: - id: 123 date: 2025-01-01T01:01:01+00:00 type: auto price: 0 action: subscribe userId: 123 discount: 0 duration: 123 offerEnd: null earningId: 0 isCurrent: true startDate: 2025-01-01T01:01:01+00:00 cancelDate: null expireDate: 2025-01-01T01:01:01+00:00 offerStart: null regularPrice: 0 subscriberId: 123 streamsSumm: 0 subscribeAt: 2025-01-01T01:01:01+00:00 messagesSumm: 0 regularPrice: 4.99 discountPeriod: 1 subscribePrice: 4.99 subscribesSumm: 0 discountPercent: 0 discountStartedAt: null unsubscribeReason: No reason given discountFinishedAt: null hasActivePaidSubscriptions: false subscribersCount: null hasNotViewedStory: false isPaywallRequired: true isReferrerAllowed: true isSpringConnected: false archivedPostsCount: 0 canCreatePromotion: false hasScheduledStream: false isSpotifyConnected: false subscribedByExpire: false finishedStreamsCount: 0 isPendingAutoprolong: false isPrivateRestriction: false showSubscribersCount: false subscribedOnDuration: 22 days canReceiveChatMessage: true currentSubscribePrice: 0 firstPublishedPostDate: 2025-01-01T01:01:01+00:00 subscribedByExpireDate: 2025-01-01T01:01:01+00:00 subscribedIsExpiredNow: false subscribedOnExpiredNow: false subscribedByAutoprolong: true privateArchivedPostsCount: 0 shouldShowFinishedStreams: false isMarkdownDisabledForAbout: true avatarHeaderConverterUpload: true items: type: object properties: canNotSendReason: type: boolean example: false canSendMessage: type: boolean example: true canGoToProfile: type: boolean example: true unreadMessagesCount: type: integer example: 1 hasUnreadTips: type: boolean example: false isMutedNotifications: type: boolean example: false lastMessage: type: object properties: responseType: type: string example: message text: type: string example:Message text
giphyId: type: string example: null nullable: true lockedText: type: boolean example: false isFree: type: boolean example: true price: type: integer example: 0 isMediaReady: type: boolean example: true mediaCount: type: integer example: 0 media: type: array example: [] previews: type: array example: [] isTip: type: boolean example: false isReportedByMe: type: boolean example: false isCouplePeopleMedia: type: boolean example: false queueId: type: integer example: 123 isMarkdownDisabled: type: boolean example: true fromUser: type: object properties: id: type: integer example: 123 _view: type: string example: i isFromQueue: type: boolean example: true canUnsendQueue: type: boolean example: true unsendSecondsQueue: type: integer example: 1000000 id: type: integer example: 123 isOpened: type: boolean example: false isNew: type: boolean example: true createdAt: type: string example: 2025-01-01T01:01:01+00:00 changedAt: type: string example: 2025-01-01T01:01:01+00:00 cancelSeconds: type: integer example: 86268 isLiked: type: boolean example: false canPurchase: type: boolean example: false canPurchaseReason: type: string example: free canReport: type: boolean example: true canBePinned: type: boolean example: true isPinned: type: boolean example: false lastReadMessageId: type: integer example: 0 hasPurchasedFeed: type: boolean example: false countPinnedMessages: type: integer example: 0 fan: type: object properties: id: type: integer example: 123 name: type: string example: Name view: type: string example: f about: type: string example:About
avatar: type: string example: https://public.onlyfans.com/files/.../avatar.jpg header: type: string example: https://public.onlyfans.com/files/.../header.jpg notice: type: string example: "" canChat: type: boolean example: true canEarn: type: boolean example: true tipsMax: type: integer example: 200 tipsMin: type: integer example: 5 website: type: string example: null nullable: true hasLinks: type: boolean example: false isFriend: type: boolean example: false joinDate: type: string example: 2025-01-01T01:01:01+00:00 lastSeen: type: string example: 2025-01-01T01:01:01+00:00 location: type: string example: Location username: type: string example: username wishlist: type: string example: null nullable: true canReport: type: boolean example: true hasLabels: type: boolean example: true hasStream: type: boolean example: false isBlocked: type: boolean example: false hasFriends: type: boolean example: false hasStories: type: boolean example: false headerSize: type: object properties: width: type: integer example: 767 height: type: integer example: 1152 isVerified: type: boolean example: true postsCount: type: integer example: 123 audiosCount: type: integer example: 0 canRestrict: type: boolean example: true displayName: type: string example: "" isPerformer: type: boolean example: true listsStates: type: array example: - id: following name: Following type: following hasUser: true canAddUser: false cannotAddUserReason: ALREADY_EXISTS - id: fans name: Fans type: fans hasUser: true canAddUser: false cannotAddUserReason: ALREADY_EXISTS - id: rebill_off name: Renew Off type: rebill_off hasUser: false canAddUser: false cannotAddUserReason: null - id: rebill_on name: Renew On type: rebill_on hasUser: true canAddUser: false cannotAddUserReason: ALREADY_EXISTS - id: recent name: Recent (last 24 hours) type: recent hasUser: false canAddUser: false cannotAddUserReason: SYSTEM_LIST - id: friends name: Friends type: friends hasUser: false canAddUser: true cannotAddUserReason: null - id: muted name: Muted type: muted hasUser: false canAddUser: true cannotAddUserReason: null - id: tagged name: Tagged type: tagged hasUser: false canAddUser: false cannotAddUserReason: SYSTEM_LIST items: type: object properties: id: type: string example: following name: type: string example: Following type: type: string example: following hasUser: type: boolean example: true canAddUser: type: boolean example: false cannotAddUserReason: type: string example: ALREADY_EXISTS mediasCount: type: integer example: 123 photosCount: type: integer example: 123 tipsEnabled: type: boolean example: true videosCount: type: integer example: 123 avatarThumbs: type: object properties: c50: type: string example: https://thumbs.onlyfans.com/.../avatar.jpg c144: type: string example: https://thumbs.onlyfans.com/.../avatar.jpg canLookStory: type: boolean example: true canTrialSend: type: boolean example: false headerThumbs: type: object properties: w480: type: string example: https://thumbs.onlyfans.com/.../header.jpg w760: type: string example: https://thumbs.onlyfans.com/.../header.jpg isRestricted: type: boolean example: false subscribedBy: type: boolean example: true subscribedOn: type: boolean example: true canCreateTrial: type: boolean example: false canPayInternal: type: boolean example: true canUnsubscribe: type: boolean example: true favoritedCount: type: integer example: 123 favoritesCount: type: integer example: 123 hasPinnedPosts: type: boolean example: false isAdultContent: type: boolean example: false showMediaCount: type: boolean example: true subscribePrice: type: integer example: 0 canCommentStory: type: boolean example: true hasSavedStreams: type: boolean example: false isRealPerformer: type: boolean example: true showPostsInFeed: type: boolean example: true tipsMinInternal: type: integer example: 1 tipsTextEnabled: type: boolean example: true canAddSubscriber: type: boolean example: false subscribedByData: type: object properties: price: type: integer example: 0 status: type: string example: null nullable: true isMuted: type: boolean example: false duration: type: string example: 22 days newPrice: type: integer example: 0 expiredAt: type: string example: 2025-01-01T01:01:01+00:00 renewedAt: type: string example: 2025-01-01T01:01:01+00:00 subscribes: type: array example: - id: 123 date: 2025-01-01T01:01:01+00:00 type: regular price: 0 action: subscribe userId: 123 discount: 0 duration: 123 offerEnd: null earningId: 0 isCurrent: true startDate: 2025-01-01T01:01:01+00:00 cancelDate: null expireDate: 2025-01-01T01:01:01+00:00 offerStart: null regularPrice: 0 subscriberId: 123 items: type: object properties: id: type: integer example: 123 date: type: string example: 2025-01-01T01:01:01+00:00 type: type: string example: regular price: type: integer example: 0 action: type: string example: subscribe userId: type: integer example: 123 discount: type: integer example: 0 duration: type: integer example: 123 offerEnd: type: string example: null nullable: true earningId: type: integer example: 0 isCurrent: type: boolean example: true startDate: type: string example: 2025-01-01T01:01:01+00:00 cancelDate: type: string example: null nullable: true expireDate: type: string example: 2025-01-01T01:01:01+00:00 offerStart: type: string example: null nullable: true regularPrice: type: integer example: 0 subscriberId: type: integer example: 123 subscribeAt: type: string example: 2025-01-01T01:01:01+00:00 regularPrice: type: integer example: 0 discountPeriod: type: integer example: 1 subscribePrice: type: integer example: 0 discountPercent: type: integer example: 0 showPostsInFeed: type: boolean example: true discountStartedAt: type: string example: null nullable: true unsubscribeReason: type: string example: No reason given discountFinishedAt: type: string example: null nullable: true hasActivePaidSubscriptions: type: boolean example: false subscribedOnData: type: object properties: price: type: integer example: 0 status: type: string example: null nullable: true isMuted: type: boolean example: false duration: type: string example: 22 days newPrice: type: integer example: 0 tipsSumm: type: integer example: 0 expiredAt: type: string example: 2025-01-01T01:01:01+00:00 postsSumm: type: integer example: 0 renewedAt: type: string example: 2025-01-01T01:01:01+00:00 totalSumm: type: integer example: 0 subscribes: type: array example: - id: 123 date: 2025-01-01T01:01:01+00:00 type: auto price: 0 action: subscribe userId: 123 discount: 0 duration: 123 offerEnd: null earningId: 0 isCurrent: true startDate: 2025-01-01T01:01:01+00:00 cancelDate: null expireDate: 2025-01-01T01:01:01+00:00 offerStart: null regularPrice: 0 subscriberId: 123 items: type: object properties: id: type: integer example: 123 date: type: string example: 2025-01-01T01:01:01+00:00 type: type: string example: auto price: type: integer example: 0 action: type: string example: subscribe userId: type: integer example: 123 discount: type: integer example: 0 duration: type: integer example: 123 offerEnd: type: string example: null nullable: true earningId: type: integer example: 0 isCurrent: type: boolean example: true startDate: type: string example: 2025-01-01T01:01:01+00:00 cancelDate: type: string example: null nullable: true expireDate: type: string example: 2025-01-01T01:01:01+00:00 offerStart: type: string example: null nullable: true regularPrice: type: integer example: 0 subscriberId: type: integer example: 123 streamsSumm: type: integer example: 0 subscribeAt: type: string example: 2025-01-01T01:01:01+00:00 messagesSumm: type: integer example: 0 regularPrice: type: number example: 4.99 discountPeriod: type: integer example: 1 subscribePrice: type: number example: 4.99 subscribesSumm: type: integer example: 0 discountPercent: type: integer example: 0 discountStartedAt: type: string example: null nullable: true unsubscribeReason: type: string example: No reason given discountFinishedAt: type: string example: null nullable: true hasActivePaidSubscriptions: type: boolean example: false subscribersCount: type: string example: null nullable: true hasNotViewedStory: type: boolean example: false isPaywallRequired: type: boolean example: true isReferrerAllowed: type: boolean example: true isSpringConnected: type: boolean example: false archivedPostsCount: type: integer example: 0 canCreatePromotion: type: boolean example: false hasScheduledStream: type: boolean example: false isSpotifyConnected: type: boolean example: false subscribedByExpire: type: boolean example: false finishedStreamsCount: type: integer example: 0 isPendingAutoprolong: type: boolean example: false isPrivateRestriction: type: boolean example: false showSubscribersCount: type: boolean example: false subscribedOnDuration: type: string example: 22 days canReceiveChatMessage: type: boolean example: true currentSubscribePrice: type: integer example: 0 firstPublishedPostDate: type: string example: 2025-01-01T01:01:01+00:00 subscribedByExpireDate: type: string example: 2025-01-01T01:01:01+00:00 subscribedIsExpiredNow: type: boolean example: false subscribedOnExpiredNow: type: boolean example: false subscribedByAutoprolong: type: boolean example: true privateArchivedPostsCount: type: integer example: 0 shouldShowFinishedStreams: type: boolean example: false isMarkdownDisabledForAbout: type: boolean example: true avatarHeaderConverterUpload: type: boolean example: true _pagination: type: object properties: next_page: type: string example: https://app.onlyfansapi.com/api/acct_XXXXXXXXXXX/chats?offset=10&limit=10 _meta: type: object properties: _credits: type: object properties: used: type: integer example: 1 balance: type: integer example: 1 note: type: string example: Always _cache: type: object properties: is_cached: type: boolean example: false note: type: string example: Cache disabled for this endpoint _rate_limits: type: object properties: limit_minute: type: integer example: 1000 limit_day: type: integer example: 50000 remaining_minute: type: integer example: 999 remaining_day: type: integer example: 49999 tags: - Chats components: securitySchemes: default: type: http scheme: bearer description: Get your API Key from OnlyFansAPI Console - https://app.onlyfansapi.com/api-keys ```` # Mark All Chats as Read (/api-reference/chats/mark-all-chats-as-read) Mark all chats as read. ## OpenAPI ````yaml https://app.onlyfansapi.com/scribe-docs/openapi.yaml post /api/{account}/chats/mark-as-read openapi: 3.0.3 info: title: OnlyFans API description: "" version: 1.0.0 servers: - url: https://app.onlyfansapi.com security: - default: [] tags: - name: AI Voice Messages description: "" - name: API Keys description: "" - name: Account description: Endpoints for your linked accounts - name: Analytics - Financial description: APIs for retrieving financial analytics data - name: Analytics - Summary description: APIs for retrieving summary analytics data - name: Banking description: Operations related to user banking details, payout methods, legal and tax information, and account country settings. - name: Banned Words description: Reference list of OnlyFans banned words used by the `blockBannedWords` screening parameter - name: Blocked / Restricted Users description: APIs for listing the users an account has blocked or restricted - name: Chargebacks description: "" - name: Chat Messages description: "" - name: Chats description: "" - name: Client Sessions description: "" - name: Connect OnlyFans Account description: "" - name: Data Exports description: APIs for managing data exports - name: Engagement / Messages description: "" - name: Fans description: APIs for managing OnlyFans fans (subscribers) - name: Fans - AI Summary description: APIs for generating and retrieving AI-powered fan profile summaries - name: Following description: APIs for managing OnlyFans followings (people you're subscribed to) - name: Free Trial Links description: APIs for managing Free Trial Links. Revenue totals are net earnings after refunds and chargebacks. `revenue.chargebacks` (or `summary.chargebacks_total` in stats) is the positive cached net amount already excluded from revenue; do not subtract it again. Spender responses include chargebacks across all attributed periods for each fan with positive net revenue. - name: Giphy description: "" - name: Link Tags description: APIs for managing tags on free trial links, tracking links, and Smart Links - name: Mass Messaging description: "" - name: Media description: "" - name: Media Vault description: "" - name: Media Vault Lists description: "" - name: Notifications description: Endpoints for managingr account notifications - name: Payouts description: "" - name: Post Comments description: "" - name: Post Labels description: APIs for managing your post labels - name: Posts description: APIs for managing OnlyFans posts - name: Profile Content description: Read another user's profile content using your connected OnlyFans account. OnlyFans enforces subscription and purchase requirements; these endpoints do not unlock content. Response samples use captured OnlyFans payloads with anonymized IDs, text, and media URLs; OFAPI metadata values are illustrative. - name: Promotions description: "" - name: Public Profiles description: "" - name: Queue description: "" - name: Release Forms description: APIs for managing OnlyFans release forms - name: Saved For Later (Messages) description: "" - name: Saved For Later (Posts) description: "" - name: Settings description: "" - name: Shared Free Trial Links description: APIs for Free Trial Links that other OF creators have shared with this account. Revenue, cost, and spender data are not available for shared links. - name: Shared Tracking Links description: APIs for Tracking Links (campaigns) that other OF creators have shared with this account. Revenue, cost, and spender data are not available for shared campaigns. - name: Smart Link Postbacks description: APIs for managing Smart Link postback destinations - name: Smart Links description: APIs for managing Smart Links (Free Trial Links and Tracking Links with pooled inventory) - name: Statistics description: "" - name: Stored Free Trial Links description: Instant APIs for retrieving stored free trial links from the OnlyFansAPI Cache (free, no credits used). `revenue.total` is net earnings after refunds and chargebacks. `revenue.chargebacks` is the positive cached net amount already excluded from that total; do not subtract it again. - name: Stored Shared Free Trial Links description: Instant APIs for retrieving stored shared Free Trial Links from the OnlyFansAPI Cache (free, no credits used) - name: Stored Shared Tracking Links description: Instant APIs for retrieving stored shared Tracking Links (campaigns) from the OnlyFansAPI Cache (free, no credits used) - name: Stored Tracking Links description: Instant APIs for retrieving stored tracking links from the OnlyFansAPI Cache (free, no credits used). `revenue.total` is net earnings after refunds and chargebacks. `revenue.chargebacks` is the positive cached net amount already excluded from that total; do not subtract it again. - name: Stories description: APIs for managing OnlyFans stories - name: Story Highlights description: APIs for managing OnlyFans story highlights - name: Subscription Bundles description: "" - name: Tracking Links description: APIs for managing tracking links. Revenue totals are net earnings after refunds and chargebacks. `revenue.chargebacks` (or `summary.chargebacks_total` in stats) is the positive cached net amount already excluded from revenue; do not subtract it again. Spender responses include chargebacks across all attributed periods for each fan with positive net revenue. - name: Transactions description: APIs for managing OnlyFans transactions - name: Usage description: Credit usage reporting for your team - name: User List Collections description: "" - name: Users description: APIs for fetching OnlyFans users - name: Webhooks description: "" paths: /api/{account}/chats/mark-as-read: parameters: - in: path name: account description: The Account ID example: acct_XXXXXXXXXXXXXXX required: true schema: type: string post: summary: Mark All Chats as Read operationId: markAllChatsAsRead description: Mark all chats as read. parameters: [] responses: "200": description: Success content: application/json: schema: type: object example: data: success: true _meta: _credits: used: 1 balance: 999999884 note: Always _cache: is_cached: false note: Cache disabled for this endpoint _rate_limits: limit_minute: 1000 limit_day: 50000 remaining_minute: 999 remaining_day: 49971 properties: data: type: object properties: success: type: boolean example: true _meta: type: object properties: _credits: type: object properties: used: type: integer example: 1 balance: type: integer example: 999999884 note: type: string example: Always _cache: type: object properties: is_cached: type: boolean example: false note: type: string example: Cache disabled for this endpoint _rate_limits: type: object properties: limit_minute: type: integer example: 1000 limit_day: type: integer example: 50000 remaining_minute: type: integer example: 999 remaining_day: type: integer example: 49971 tags: - Chats components: securitySchemes: default: type: http scheme: bearer description: Get your API Key from OnlyFansAPI Console - https://app.onlyfansapi.com/api-keys ```` # Mark Chat as Read (/api-reference/chats/mark-chat-as-read) Mark a specific chat as read. Alternative to List Chat Messages endpoint, if you just want to mark the chat as read without fetching messages. ## OpenAPI ````yaml https://app.onlyfansapi.com/scribe-docs/openapi.yaml post /api/{account}/chats/{chat_id}/mark-as-read openapi: 3.0.3 info: title: OnlyFans API description: "" version: 1.0.0 servers: - url: https://app.onlyfansapi.com security: - default: [] tags: - name: AI Voice Messages description: "" - name: API Keys description: "" - name: Account description: Endpoints for your linked accounts - name: Analytics - Financial description: APIs for retrieving financial analytics data - name: Analytics - Summary description: APIs for retrieving summary analytics data - name: Banking description: Operations related to user banking details, payout methods, legal and tax information, and account country settings. - name: Banned Words description: Reference list of OnlyFans banned words used by the `blockBannedWords` screening parameter - name: Blocked / Restricted Users description: APIs for listing the users an account has blocked or restricted - name: Chargebacks description: "" - name: Chat Messages description: "" - name: Chats description: "" - name: Client Sessions description: "" - name: Connect OnlyFans Account description: "" - name: Data Exports description: APIs for managing data exports - name: Engagement / Messages description: "" - name: Fans description: APIs for managing OnlyFans fans (subscribers) - name: Fans - AI Summary description: APIs for generating and retrieving AI-powered fan profile summaries - name: Following description: APIs for managing OnlyFans followings (people you're subscribed to) - name: Free Trial Links description: APIs for managing Free Trial Links. Revenue totals are net earnings after refunds and chargebacks. `revenue.chargebacks` (or `summary.chargebacks_total` in stats) is the positive cached net amount already excluded from revenue; do not subtract it again. Spender responses include chargebacks across all attributed periods for each fan with positive net revenue. - name: Giphy description: "" - name: Link Tags description: APIs for managing tags on free trial links, tracking links, and Smart Links - name: Mass Messaging description: "" - name: Media description: "" - name: Media Vault description: "" - name: Media Vault Lists description: "" - name: Notifications description: Endpoints for managingr account notifications - name: Payouts description: "" - name: Post Comments description: "" - name: Post Labels description: APIs for managing your post labels - name: Posts description: APIs for managing OnlyFans posts - name: Profile Content description: Read another user's profile content using your connected OnlyFans account. OnlyFans enforces subscription and purchase requirements; these endpoints do not unlock content. Response samples use captured OnlyFans payloads with anonymized IDs, text, and media URLs; OFAPI metadata values are illustrative. - name: Promotions description: "" - name: Public Profiles description: "" - name: Queue description: "" - name: Release Forms description: APIs for managing OnlyFans release forms - name: Saved For Later (Messages) description: "" - name: Saved For Later (Posts) description: "" - name: Settings description: "" - name: Shared Free Trial Links description: APIs for Free Trial Links that other OF creators have shared with this account. Revenue, cost, and spender data are not available for shared links. - name: Shared Tracking Links description: APIs for Tracking Links (campaigns) that other OF creators have shared with this account. Revenue, cost, and spender data are not available for shared campaigns. - name: Smart Link Postbacks description: APIs for managing Smart Link postback destinations - name: Smart Links description: APIs for managing Smart Links (Free Trial Links and Tracking Links with pooled inventory) - name: Statistics description: "" - name: Stored Free Trial Links description: Instant APIs for retrieving stored free trial links from the OnlyFansAPI Cache (free, no credits used). `revenue.total` is net earnings after refunds and chargebacks. `revenue.chargebacks` is the positive cached net amount already excluded from that total; do not subtract it again. - name: Stored Shared Free Trial Links description: Instant APIs for retrieving stored shared Free Trial Links from the OnlyFansAPI Cache (free, no credits used) - name: Stored Shared Tracking Links description: Instant APIs for retrieving stored shared Tracking Links (campaigns) from the OnlyFansAPI Cache (free, no credits used) - name: Stored Tracking Links description: Instant APIs for retrieving stored tracking links from the OnlyFansAPI Cache (free, no credits used). `revenue.total` is net earnings after refunds and chargebacks. `revenue.chargebacks` is the positive cached net amount already excluded from that total; do not subtract it again. - name: Stories description: APIs for managing OnlyFans stories - name: Story Highlights description: APIs for managing OnlyFans story highlights - name: Subscription Bundles description: "" - name: Tracking Links description: APIs for managing tracking links. Revenue totals are net earnings after refunds and chargebacks. `revenue.chargebacks` (or `summary.chargebacks_total` in stats) is the positive cached net amount already excluded from revenue; do not subtract it again. Spender responses include chargebacks across all attributed periods for each fan with positive net revenue. - name: Transactions description: APIs for managing OnlyFans transactions - name: Usage description: Credit usage reporting for your team - name: User List Collections description: "" - name: Users description: APIs for fetching OnlyFans users - name: Webhooks description: "" paths: /api/{account}/chats/{chat_id}/mark-as-read: parameters: - in: path name: account description: The Account ID example: acct_XXXXXXXXXXXXXXX required: true schema: type: string - in: path name: chat_id description: The ID of the chat to mark as read, usually a fan's OnlyFans User ID example: "123" required: true schema: type: string post: summary: Mark Chat as Read operationId: markChatAsRead description: Mark a specific chat as read. Alternative to List Chat Messages endpoint, if you just want to mark the chat as read without fetching messages. parameters: [] responses: "200": description: Success content: application/json: schema: type: object example: data: success: true _meta: _credits: used: 1 balance: 999999884 note: Always _cache: is_cached: false note: Cache disabled for this endpoint _rate_limits: limit_minute: 1000 limit_day: 50000 remaining_minute: 999 remaining_day: 49971 properties: data: type: object properties: success: type: boolean example: true _meta: type: object properties: _credits: type: object properties: used: type: integer example: 1 balance: type: integer example: 999999884 note: type: string example: Always _cache: type: object properties: is_cached: type: boolean example: false note: type: string example: Cache disabled for this endpoint _rate_limits: type: object properties: limit_minute: type: integer example: 1000 limit_day: type: integer example: 50000 remaining_minute: type: integer example: 999 remaining_day: type: integer example: 49971 tags: - Chats components: securitySchemes: default: type: http scheme: bearer description: Get your API Key from OnlyFansAPI Console - https://app.onlyfansapi.com/api-keys ```` # Mark Chat as Unread (/api-reference/chats/mark-chat-as-unread) Mark a specific chat as unread. ## OpenAPI ````yaml https://app.onlyfansapi.com/scribe-docs/openapi.yaml post /api/{account}/chats/{chat_id}/mark-as-unread openapi: 3.0.3 info: title: OnlyFans API description: "" version: 1.0.0 servers: - url: https://app.onlyfansapi.com security: - default: [] tags: - name: AI Voice Messages description: "" - name: API Keys description: "" - name: Account description: Endpoints for your linked accounts - name: Analytics - Financial description: APIs for retrieving financial analytics data - name: Analytics - Summary description: APIs for retrieving summary analytics data - name: Banking description: Operations related to user banking details, payout methods, legal and tax information, and account country settings. - name: Banned Words description: Reference list of OnlyFans banned words used by the `blockBannedWords` screening parameter - name: Blocked / Restricted Users description: APIs for listing the users an account has blocked or restricted - name: Chargebacks description: "" - name: Chat Messages description: "" - name: Chats description: "" - name: Client Sessions description: "" - name: Connect OnlyFans Account description: "" - name: Data Exports description: APIs for managing data exports - name: Engagement / Messages description: "" - name: Fans description: APIs for managing OnlyFans fans (subscribers) - name: Fans - AI Summary description: APIs for generating and retrieving AI-powered fan profile summaries - name: Following description: APIs for managing OnlyFans followings (people you're subscribed to) - name: Free Trial Links description: APIs for managing Free Trial Links. Revenue totals are net earnings after refunds and chargebacks. `revenue.chargebacks` (or `summary.chargebacks_total` in stats) is the positive cached net amount already excluded from revenue; do not subtract it again. Spender responses include chargebacks across all attributed periods for each fan with positive net revenue. - name: Giphy description: "" - name: Link Tags description: APIs for managing tags on free trial links, tracking links, and Smart Links - name: Mass Messaging description: "" - name: Media description: "" - name: Media Vault description: "" - name: Media Vault Lists description: "" - name: Notifications description: Endpoints for managingr account notifications - name: Payouts description: "" - name: Post Comments description: "" - name: Post Labels description: APIs for managing your post labels - name: Posts description: APIs for managing OnlyFans posts - name: Profile Content description: Read another user's profile content using your connected OnlyFans account. OnlyFans enforces subscription and purchase requirements; these endpoints do not unlock content. Response samples use captured OnlyFans payloads with anonymized IDs, text, and media URLs; OFAPI metadata values are illustrative. - name: Promotions description: "" - name: Public Profiles description: "" - name: Queue description: "" - name: Release Forms description: APIs for managing OnlyFans release forms - name: Saved For Later (Messages) description: "" - name: Saved For Later (Posts) description: "" - name: Settings description: "" - name: Shared Free Trial Links description: APIs for Free Trial Links that other OF creators have shared with this account. Revenue, cost, and spender data are not available for shared links. - name: Shared Tracking Links description: APIs for Tracking Links (campaigns) that other OF creators have shared with this account. Revenue, cost, and spender data are not available for shared campaigns. - name: Smart Link Postbacks description: APIs for managing Smart Link postback destinations - name: Smart Links description: APIs for managing Smart Links (Free Trial Links and Tracking Links with pooled inventory) - name: Statistics description: "" - name: Stored Free Trial Links description: Instant APIs for retrieving stored free trial links from the OnlyFansAPI Cache (free, no credits used). `revenue.total` is net earnings after refunds and chargebacks. `revenue.chargebacks` is the positive cached net amount already excluded from that total; do not subtract it again. - name: Stored Shared Free Trial Links description: Instant APIs for retrieving stored shared Free Trial Links from the OnlyFansAPI Cache (free, no credits used) - name: Stored Shared Tracking Links description: Instant APIs for retrieving stored shared Tracking Links (campaigns) from the OnlyFansAPI Cache (free, no credits used) - name: Stored Tracking Links description: Instant APIs for retrieving stored tracking links from the OnlyFansAPI Cache (free, no credits used). `revenue.total` is net earnings after refunds and chargebacks. `revenue.chargebacks` is the positive cached net amount already excluded from that total; do not subtract it again. - name: Stories description: APIs for managing OnlyFans stories - name: Story Highlights description: APIs for managing OnlyFans story highlights - name: Subscription Bundles description: "" - name: Tracking Links description: APIs for managing tracking links. Revenue totals are net earnings after refunds and chargebacks. `revenue.chargebacks` (or `summary.chargebacks_total` in stats) is the positive cached net amount already excluded from revenue; do not subtract it again. Spender responses include chargebacks across all attributed periods for each fan with positive net revenue. - name: Transactions description: APIs for managing OnlyFans transactions - name: Usage description: Credit usage reporting for your team - name: User List Collections description: "" - name: Users description: APIs for fetching OnlyFans users - name: Webhooks description: "" paths: /api/{account}/chats/{chat_id}/mark-as-unread: parameters: - in: path name: account description: The Account ID example: acct_XXXXXXXXXXXXXXX required: true schema: type: string - in: path name: chat_id description: The ID of the chat to mark as read, usually a fan's OnlyFans User ID example: "123" required: true schema: type: string post: summary: Mark Chat as Unread operationId: markChatAsUnread description: Mark a specific chat as unread. parameters: [] responses: "200": description: Success content: application/json: schema: type: object example: data: success: true _meta: _credits: used: 1 balance: 9998195 note: Always _cache: is_cached: false note: Cache disabled for this endpoint _rate_limits: limit_minute: 5000 limit_day: null remaining_minute: 4995 remaining_day: null notice: We have decided to remove our daily rate limits. Please remove any references to these in your integrations. properties: data: type: object properties: success: type: boolean example: true _meta: type: object properties: _credits: type: object properties: used: type: integer example: 1 balance: type: integer example: 9998195 note: type: string example: Always _cache: type: object properties: is_cached: type: boolean example: false note: type: string example: Cache disabled for this endpoint _rate_limits: type: object properties: limit_minute: type: integer example: 5000 limit_day: type: string example: null nullable: true remaining_minute: type: integer example: 4995 remaining_day: type: string example: null nullable: true notice: type: string example: We have decided to remove our daily rate limits. Please remove any references to these in your integrations. tags: - Chats components: securitySchemes: default: type: http scheme: bearer description: Get your API Key from OnlyFansAPI Console - https://app.onlyfansapi.com/api-keys ```` # Mute Chat Notifications (/api-reference/chats/mute-chat-notifications) Mute notifications for a specific chat. ## OpenAPI ````yaml https://app.onlyfansapi.com/scribe-docs/openapi.yaml post /api/{account}/chats/{chat_id}/mute openapi: 3.0.3 info: title: OnlyFans API description: "" version: 1.0.0 servers: - url: https://app.onlyfansapi.com security: - default: [] tags: - name: AI Voice Messages description: "" - name: API Keys description: "" - name: Account description: Endpoints for your linked accounts - name: Analytics - Financial description: APIs for retrieving financial analytics data - name: Analytics - Summary description: APIs for retrieving summary analytics data - name: Banking description: Operations related to user banking details, payout methods, legal and tax information, and account country settings. - name: Banned Words description: Reference list of OnlyFans banned words used by the `blockBannedWords` screening parameter - name: Blocked / Restricted Users description: APIs for listing the users an account has blocked or restricted - name: Chargebacks description: "" - name: Chat Messages description: "" - name: Chats description: "" - name: Client Sessions description: "" - name: Connect OnlyFans Account description: "" - name: Data Exports description: APIs for managing data exports - name: Engagement / Messages description: "" - name: Fans description: APIs for managing OnlyFans fans (subscribers) - name: Fans - AI Summary description: APIs for generating and retrieving AI-powered fan profile summaries - name: Following description: APIs for managing OnlyFans followings (people you're subscribed to) - name: Free Trial Links description: APIs for managing Free Trial Links. Revenue totals are net earnings after refunds and chargebacks. `revenue.chargebacks` (or `summary.chargebacks_total` in stats) is the positive cached net amount already excluded from revenue; do not subtract it again. Spender responses include chargebacks across all attributed periods for each fan with positive net revenue. - name: Giphy description: "" - name: Link Tags description: APIs for managing tags on free trial links, tracking links, and Smart Links - name: Mass Messaging description: "" - name: Media description: "" - name: Media Vault description: "" - name: Media Vault Lists description: "" - name: Notifications description: Endpoints for managingr account notifications - name: Payouts description: "" - name: Post Comments description: "" - name: Post Labels description: APIs for managing your post labels - name: Posts description: APIs for managing OnlyFans posts - name: Profile Content description: Read another user's profile content using your connected OnlyFans account. OnlyFans enforces subscription and purchase requirements; these endpoints do not unlock content. Response samples use captured OnlyFans payloads with anonymized IDs, text, and media URLs; OFAPI metadata values are illustrative. - name: Promotions description: "" - name: Public Profiles description: "" - name: Queue description: "" - name: Release Forms description: APIs for managing OnlyFans release forms - name: Saved For Later (Messages) description: "" - name: Saved For Later (Posts) description: "" - name: Settings description: "" - name: Shared Free Trial Links description: APIs for Free Trial Links that other OF creators have shared with this account. Revenue, cost, and spender data are not available for shared links. - name: Shared Tracking Links description: APIs for Tracking Links (campaigns) that other OF creators have shared with this account. Revenue, cost, and spender data are not available for shared campaigns. - name: Smart Link Postbacks description: APIs for managing Smart Link postback destinations - name: Smart Links description: APIs for managing Smart Links (Free Trial Links and Tracking Links with pooled inventory) - name: Statistics description: "" - name: Stored Free Trial Links description: Instant APIs for retrieving stored free trial links from the OnlyFansAPI Cache (free, no credits used). `revenue.total` is net earnings after refunds and chargebacks. `revenue.chargebacks` is the positive cached net amount already excluded from that total; do not subtract it again. - name: Stored Shared Free Trial Links description: Instant APIs for retrieving stored shared Free Trial Links from the OnlyFansAPI Cache (free, no credits used) - name: Stored Shared Tracking Links description: Instant APIs for retrieving stored shared Tracking Links (campaigns) from the OnlyFansAPI Cache (free, no credits used) - name: Stored Tracking Links description: Instant APIs for retrieving stored tracking links from the OnlyFansAPI Cache (free, no credits used). `revenue.total` is net earnings after refunds and chargebacks. `revenue.chargebacks` is the positive cached net amount already excluded from that total; do not subtract it again. - name: Stories description: APIs for managing OnlyFans stories - name: Story Highlights description: APIs for managing OnlyFans story highlights - name: Subscription Bundles description: "" - name: Tracking Links description: APIs for managing tracking links. Revenue totals are net earnings after refunds and chargebacks. `revenue.chargebacks` (or `summary.chargebacks_total` in stats) is the positive cached net amount already excluded from revenue; do not subtract it again. Spender responses include chargebacks across all attributed periods for each fan with positive net revenue. - name: Transactions description: APIs for managing OnlyFans transactions - name: Usage description: Credit usage reporting for your team - name: User List Collections description: "" - name: Users description: APIs for fetching OnlyFans users - name: Webhooks description: "" paths: /api/{account}/chats/{chat_id}/mute: parameters: - in: path name: account description: The Account ID example: acct_XXXXXXXXXXXXXXX required: true schema: type: string - in: path name: chat_id description: The ID of the chat to mute, usually a fan's OnlyFans User ID example: "123" required: true schema: type: string post: summary: Mute Chat Notifications operationId: muteChatNotifications description: Mute notifications for a specific chat. parameters: [] responses: "200": description: Success content: application/json: schema: type: object example: data: success: true _meta: _credits: used: 1 balance: 999964347 note: Always _cache: is_cached: false note: Cache disabled for this endpoint _rate_limits: limit_minute: 1000 limit_day: 50000 remaining_minute: 999 remaining_day: 49987 properties: data: type: object properties: success: type: boolean example: true _meta: type: object properties: _credits: type: object properties: used: type: integer example: 1 balance: type: integer example: 999964347 note: type: string example: Always _cache: type: object properties: is_cached: type: boolean example: false note: type: string example: Cache disabled for this endpoint _rate_limits: type: object properties: limit_minute: type: integer example: 1000 limit_day: type: integer example: 50000 remaining_minute: type: integer example: 999 remaining_day: type: integer example: 49987 tags: - Chats components: securitySchemes: default: type: http scheme: bearer description: Get your API Key from OnlyFansAPI Console - https://app.onlyfansapi.com/api-keys ```` # Start Typing Indicator (/api-reference/chats/start-typing-indicator) Calling this endpoint will show the target fan a "Model is typing..." note in the chat for \~4 seconds. Duplicate calls for the same account and chat are coalesced during that window. ## OpenAPI ````yaml https://app.onlyfansapi.com/scribe-docs/openapi.yaml post /api/{account}/chats/{chat_id}/typing openapi: 3.0.3 info: title: OnlyFans API description: "" version: 1.0.0 servers: - url: https://app.onlyfansapi.com security: - default: [] tags: - name: AI Voice Messages description: "" - name: API Keys description: "" - name: Account description: Endpoints for your linked accounts - name: Analytics - Financial description: APIs for retrieving financial analytics data - name: Analytics - Summary description: APIs for retrieving summary analytics data - name: Banking description: Operations related to user banking details, payout methods, legal and tax information, and account country settings. - name: Banned Words description: Reference list of OnlyFans banned words used by the `blockBannedWords` screening parameter - name: Blocked / Restricted Users description: APIs for listing the users an account has blocked or restricted - name: Chargebacks description: "" - name: Chat Messages description: "" - name: Chats description: "" - name: Client Sessions description: "" - name: Connect OnlyFans Account description: "" - name: Data Exports description: APIs for managing data exports - name: Engagement / Messages description: "" - name: Fans description: APIs for managing OnlyFans fans (subscribers) - name: Fans - AI Summary description: APIs for generating and retrieving AI-powered fan profile summaries - name: Following description: APIs for managing OnlyFans followings (people you're subscribed to) - name: Free Trial Links description: APIs for managing Free Trial Links. Revenue totals are net earnings after refunds and chargebacks. `revenue.chargebacks` (or `summary.chargebacks_total` in stats) is the positive cached net amount already excluded from revenue; do not subtract it again. Spender responses include chargebacks across all attributed periods for each fan with positive net revenue. - name: Giphy description: "" - name: Link Tags description: APIs for managing tags on free trial links, tracking links, and Smart Links - name: Mass Messaging description: "" - name: Media description: "" - name: Media Vault description: "" - name: Media Vault Lists description: "" - name: Notifications description: Endpoints for managingr account notifications - name: Payouts description: "" - name: Post Comments description: "" - name: Post Labels description: APIs for managing your post labels - name: Posts description: APIs for managing OnlyFans posts - name: Profile Content description: Read another user's profile content using your connected OnlyFans account. OnlyFans enforces subscription and purchase requirements; these endpoints do not unlock content. Response samples use captured OnlyFans payloads with anonymized IDs, text, and media URLs; OFAPI metadata values are illustrative. - name: Promotions description: "" - name: Public Profiles description: "" - name: Queue description: "" - name: Release Forms description: APIs for managing OnlyFans release forms - name: Saved For Later (Messages) description: "" - name: Saved For Later (Posts) description: "" - name: Settings description: "" - name: Shared Free Trial Links description: APIs for Free Trial Links that other OF creators have shared with this account. Revenue, cost, and spender data are not available for shared links. - name: Shared Tracking Links description: APIs for Tracking Links (campaigns) that other OF creators have shared with this account. Revenue, cost, and spender data are not available for shared campaigns. - name: Smart Link Postbacks description: APIs for managing Smart Link postback destinations - name: Smart Links description: APIs for managing Smart Links (Free Trial Links and Tracking Links with pooled inventory) - name: Statistics description: "" - name: Stored Free Trial Links description: Instant APIs for retrieving stored free trial links from the OnlyFansAPI Cache (free, no credits used). `revenue.total` is net earnings after refunds and chargebacks. `revenue.chargebacks` is the positive cached net amount already excluded from that total; do not subtract it again. - name: Stored Shared Free Trial Links description: Instant APIs for retrieving stored shared Free Trial Links from the OnlyFansAPI Cache (free, no credits used) - name: Stored Shared Tracking Links description: Instant APIs for retrieving stored shared Tracking Links (campaigns) from the OnlyFansAPI Cache (free, no credits used) - name: Stored Tracking Links description: Instant APIs for retrieving stored tracking links from the OnlyFansAPI Cache (free, no credits used). `revenue.total` is net earnings after refunds and chargebacks. `revenue.chargebacks` is the positive cached net amount already excluded from that total; do not subtract it again. - name: Stories description: APIs for managing OnlyFans stories - name: Story Highlights description: APIs for managing OnlyFans story highlights - name: Subscription Bundles description: "" - name: Tracking Links description: APIs for managing tracking links. Revenue totals are net earnings after refunds and chargebacks. `revenue.chargebacks` (or `summary.chargebacks_total` in stats) is the positive cached net amount already excluded from revenue; do not subtract it again. Spender responses include chargebacks across all attributed periods for each fan with positive net revenue. - name: Transactions description: APIs for managing OnlyFans transactions - name: Usage description: Credit usage reporting for your team - name: User List Collections description: "" - name: Users description: APIs for fetching OnlyFans users - name: Webhooks description: "" paths: /api/{account}/chats/{chat_id}/typing: parameters: - in: path name: account description: The Account ID example: acct_XXXXXXXXXXXXXXX required: true schema: type: string - in: path name: chat_id description: The ID of the chat (usually a fan's OnlyFans User ID) example: "123" required: true schema: type: string post: summary: Start Typing Indicator operationId: startTypingIndicator description: Calling this endpoint will show the target fan a "Model is typing..." note in the chat for ~4 seconds. Duplicate calls for the same account and chat are coalesced during that window. parameters: [] responses: "200": description: Success content: application/json: schema: type: object example: data: success: true _meta: _credits: used: 0 balance: 224884 note: Always _cache: is_cached: false note: Cache disabled for this endpoint _rate_limits: limit_minute: 1000 limit_day: 50000 remaining_minute: 999 remaining_day: 49958 properties: data: type: object properties: success: type: boolean example: true _meta: type: object properties: _credits: type: object properties: used: type: integer example: 0 balance: type: integer example: 224884 note: type: string example: Always _cache: type: object properties: is_cached: type: boolean example: false note: type: string example: Cache disabled for this endpoint _rate_limits: type: object properties: limit_minute: type: integer example: 1000 limit_day: type: integer example: 50000 remaining_minute: type: integer example: 999 remaining_day: type: integer example: 49958 tags: - Chats components: securitySchemes: default: type: http scheme: bearer description: Get your API Key from OnlyFansAPI Console - https://app.onlyfansapi.com/api-keys ```` # Unmute Chat Notifications (/api-reference/chats/unmute-chat-notifications) Unmute notifications for a specific chat. ## OpenAPI ````yaml https://app.onlyfansapi.com/scribe-docs/openapi.yaml delete /api/{account}/chats/{chat_id}/unmute openapi: 3.0.3 info: title: OnlyFans API description: "" version: 1.0.0 servers: - url: https://app.onlyfansapi.com security: - default: [] tags: - name: AI Voice Messages description: "" - name: API Keys description: "" - name: Account description: Endpoints for your linked accounts - name: Analytics - Financial description: APIs for retrieving financial analytics data - name: Analytics - Summary description: APIs for retrieving summary analytics data - name: Banking description: Operations related to user banking details, payout methods, legal and tax information, and account country settings. - name: Banned Words description: Reference list of OnlyFans banned words used by the `blockBannedWords` screening parameter - name: Blocked / Restricted Users description: APIs for listing the users an account has blocked or restricted - name: Chargebacks description: "" - name: Chat Messages description: "" - name: Chats description: "" - name: Client Sessions description: "" - name: Connect OnlyFans Account description: "" - name: Data Exports description: APIs for managing data exports - name: Engagement / Messages description: "" - name: Fans description: APIs for managing OnlyFans fans (subscribers) - name: Fans - AI Summary description: APIs for generating and retrieving AI-powered fan profile summaries - name: Following description: APIs for managing OnlyFans followings (people you're subscribed to) - name: Free Trial Links description: APIs for managing Free Trial Links. Revenue totals are net earnings after refunds and chargebacks. `revenue.chargebacks` (or `summary.chargebacks_total` in stats) is the positive cached net amount already excluded from revenue; do not subtract it again. Spender responses include chargebacks across all attributed periods for each fan with positive net revenue. - name: Giphy description: "" - name: Link Tags description: APIs for managing tags on free trial links, tracking links, and Smart Links - name: Mass Messaging description: "" - name: Media description: "" - name: Media Vault description: "" - name: Media Vault Lists description: "" - name: Notifications description: Endpoints for managingr account notifications - name: Payouts description: "" - name: Post Comments description: "" - name: Post Labels description: APIs for managing your post labels - name: Posts description: APIs for managing OnlyFans posts - name: Profile Content description: Read another user's profile content using your connected OnlyFans account. OnlyFans enforces subscription and purchase requirements; these endpoints do not unlock content. Response samples use captured OnlyFans payloads with anonymized IDs, text, and media URLs; OFAPI metadata values are illustrative. - name: Promotions description: "" - name: Public Profiles description: "" - name: Queue description: "" - name: Release Forms description: APIs for managing OnlyFans release forms - name: Saved For Later (Messages) description: "" - name: Saved For Later (Posts) description: "" - name: Settings description: "" - name: Shared Free Trial Links description: APIs for Free Trial Links that other OF creators have shared with this account. Revenue, cost, and spender data are not available for shared links. - name: Shared Tracking Links description: APIs for Tracking Links (campaigns) that other OF creators have shared with this account. Revenue, cost, and spender data are not available for shared campaigns. - name: Smart Link Postbacks description: APIs for managing Smart Link postback destinations - name: Smart Links description: APIs for managing Smart Links (Free Trial Links and Tracking Links with pooled inventory) - name: Statistics description: "" - name: Stored Free Trial Links description: Instant APIs for retrieving stored free trial links from the OnlyFansAPI Cache (free, no credits used). `revenue.total` is net earnings after refunds and chargebacks. `revenue.chargebacks` is the positive cached net amount already excluded from that total; do not subtract it again. - name: Stored Shared Free Trial Links description: Instant APIs for retrieving stored shared Free Trial Links from the OnlyFansAPI Cache (free, no credits used) - name: Stored Shared Tracking Links description: Instant APIs for retrieving stored shared Tracking Links (campaigns) from the OnlyFansAPI Cache (free, no credits used) - name: Stored Tracking Links description: Instant APIs for retrieving stored tracking links from the OnlyFansAPI Cache (free, no credits used). `revenue.total` is net earnings after refunds and chargebacks. `revenue.chargebacks` is the positive cached net amount already excluded from that total; do not subtract it again. - name: Stories description: APIs for managing OnlyFans stories - name: Story Highlights description: APIs for managing OnlyFans story highlights - name: Subscription Bundles description: "" - name: Tracking Links description: APIs for managing tracking links. Revenue totals are net earnings after refunds and chargebacks. `revenue.chargebacks` (or `summary.chargebacks_total` in stats) is the positive cached net amount already excluded from revenue; do not subtract it again. Spender responses include chargebacks across all attributed periods for each fan with positive net revenue. - name: Transactions description: APIs for managing OnlyFans transactions - name: Usage description: Credit usage reporting for your team - name: User List Collections description: "" - name: Users description: APIs for fetching OnlyFans users - name: Webhooks description: "" paths: /api/{account}/chats/{chat_id}/unmute: parameters: - in: path name: account description: The Account ID example: acct_XXXXXXXXXXXXXXX required: true schema: type: string - in: path name: chat_id description: The ID of the chat to unmute, usually a fan's OnlyFans User ID example: "123" required: true schema: type: string delete: summary: Unmute Chat Notifications operationId: unmuteChatNotifications description: Unmute notifications for a specific chat. parameters: [] responses: "200": description: Success content: application/json: schema: type: object example: data: success: true _meta: _credits: used: 1 balance: 999957 note: Always _cache: is_cached: false note: Cache disabled for this endpoint _rate_limits: limit_minute: 5000 limit_day: null remaining_minute: 4997 remaining_day: null notice: We have decided to remove our daily rate limits. Please remove any references to these in your integrations. properties: data: type: object properties: success: type: boolean example: true _meta: type: object properties: _credits: type: object properties: used: type: integer example: 1 balance: type: integer example: 999957 note: type: string example: Always _cache: type: object properties: is_cached: type: boolean example: false note: type: string example: Cache disabled for this endpoint _rate_limits: type: object properties: limit_minute: type: integer example: 5000 limit_day: type: string example: null nullable: true remaining_minute: type: integer example: 4997 remaining_day: type: string example: null nullable: true notice: type: string example: We have decided to remove our daily rate limits. Please remove any references to these in your integrations. tags: - Chats components: securitySchemes: default: type: http scheme: bearer description: Get your API Key from OnlyFansAPI Console - https://app.onlyfansapi.com/api-keys ```` # Cancel Data Export (/api-reference/data-exports/cancel-data-export) Cancel a running data export. Only exports with status `pending` or `in_progress` can be cancelled. ## OpenAPI ````yaml https://app.onlyfansapi.com/scribe-docs/openapi.yaml delete /api/data-exports/{data_export_id} openapi: 3.0.3 info: title: OnlyFans API description: "" version: 1.0.0 servers: - url: https://app.onlyfansapi.com security: - default: [] tags: - name: AI Voice Messages description: "" - name: API Keys description: "" - name: Account description: Endpoints for your linked accounts - name: Analytics - Financial description: APIs for retrieving financial analytics data - name: Analytics - Summary description: APIs for retrieving summary analytics data - name: Banking description: Operations related to user banking details, payout methods, legal and tax information, and account country settings. - name: Banned Words description: Reference list of OnlyFans banned words used by the `blockBannedWords` screening parameter - name: Blocked / Restricted Users description: APIs for listing the users an account has blocked or restricted - name: Chargebacks description: "" - name: Chat Messages description: "" - name: Chats description: "" - name: Client Sessions description: "" - name: Connect OnlyFans Account description: "" - name: Data Exports description: APIs for managing data exports - name: Engagement / Messages description: "" - name: Fans description: APIs for managing OnlyFans fans (subscribers) - name: Fans - AI Summary description: APIs for generating and retrieving AI-powered fan profile summaries - name: Following description: APIs for managing OnlyFans followings (people you're subscribed to) - name: Free Trial Links description: APIs for managing Free Trial Links. Revenue totals are net earnings after refunds and chargebacks. `revenue.chargebacks` (or `summary.chargebacks_total` in stats) is the positive cached net amount already excluded from revenue; do not subtract it again. Spender responses include chargebacks across all attributed periods for each fan with positive net revenue. - name: Giphy description: "" - name: Link Tags description: APIs for managing tags on free trial links, tracking links, and Smart Links - name: Mass Messaging description: "" - name: Media description: "" - name: Media Vault description: "" - name: Media Vault Lists description: "" - name: Notifications description: Endpoints for managingr account notifications - name: Payouts description: "" - name: Post Comments description: "" - name: Post Labels description: APIs for managing your post labels - name: Posts description: APIs for managing OnlyFans posts - name: Profile Content description: Read another user's profile content using your connected OnlyFans account. OnlyFans enforces subscription and purchase requirements; these endpoints do not unlock content. Response samples use captured OnlyFans payloads with anonymized IDs, text, and media URLs; OFAPI metadata values are illustrative. - name: Promotions description: "" - name: Public Profiles description: "" - name: Queue description: "" - name: Release Forms description: APIs for managing OnlyFans release forms - name: Saved For Later (Messages) description: "" - name: Saved For Later (Posts) description: "" - name: Settings description: "" - name: Shared Free Trial Links description: APIs for Free Trial Links that other OF creators have shared with this account. Revenue, cost, and spender data are not available for shared links. - name: Shared Tracking Links description: APIs for Tracking Links (campaigns) that other OF creators have shared with this account. Revenue, cost, and spender data are not available for shared campaigns. - name: Smart Link Postbacks description: APIs for managing Smart Link postback destinations - name: Smart Links description: APIs for managing Smart Links (Free Trial Links and Tracking Links with pooled inventory) - name: Statistics description: "" - name: Stored Free Trial Links description: Instant APIs for retrieving stored free trial links from the OnlyFansAPI Cache (free, no credits used). `revenue.total` is net earnings after refunds and chargebacks. `revenue.chargebacks` is the positive cached net amount already excluded from that total; do not subtract it again. - name: Stored Shared Free Trial Links description: Instant APIs for retrieving stored shared Free Trial Links from the OnlyFansAPI Cache (free, no credits used) - name: Stored Shared Tracking Links description: Instant APIs for retrieving stored shared Tracking Links (campaigns) from the OnlyFansAPI Cache (free, no credits used) - name: Stored Tracking Links description: Instant APIs for retrieving stored tracking links from the OnlyFansAPI Cache (free, no credits used). `revenue.total` is net earnings after refunds and chargebacks. `revenue.chargebacks` is the positive cached net amount already excluded from that total; do not subtract it again. - name: Stories description: APIs for managing OnlyFans stories - name: Story Highlights description: APIs for managing OnlyFans story highlights - name: Subscription Bundles description: "" - name: Tracking Links description: APIs for managing tracking links. Revenue totals are net earnings after refunds and chargebacks. `revenue.chargebacks` (or `summary.chargebacks_total` in stats) is the positive cached net amount already excluded from revenue; do not subtract it again. Spender responses include chargebacks across all attributed periods for each fan with positive net revenue. - name: Transactions description: APIs for managing OnlyFans transactions - name: Usage description: Credit usage reporting for your team - name: User List Collections description: "" - name: Users description: APIs for fetching OnlyFans users - name: Webhooks description: "" paths: /api/data-exports/{data_export_id}: parameters: - in: path name: data_export_id description: The prefixed ID of the data export example: data_export_abc123 required: true schema: type: string delete: summary: Cancel Data Export operationId: cancelDataExport description: Cancel a running data export. Only exports with status `pending` or `in_progress` can be cancelled. parameters: [] responses: "200": description: Success content: application/json: schema: type: object example: data: id: data_export_abc123xyz789 status: cancelled message: Data export has been cancelled. _meta: _credits: used: 0 balance: 9500 note: Always _cache: is_cached: false note: Cache disabled for this endpoint _rate_limits: limit_minute: 5000 limit_day: null remaining_minute: 4998 remaining_day: null notice: We have decided to remove our daily rate limits. Please remove any references to these in your integrations. properties: data: type: object properties: id: type: string example: data_export_abc123xyz789 status: type: string example: cancelled message: type: string example: Data export has been cancelled. _meta: type: object properties: _credits: type: object properties: used: type: integer example: 0 balance: type: integer example: 9500 note: type: string example: Always _cache: type: object properties: is_cached: type: boolean example: false note: type: string example: Cache disabled for this endpoint _rate_limits: type: object properties: limit_minute: type: integer example: 5000 limit_day: type: string example: null nullable: true remaining_minute: type: integer example: 4998 remaining_day: type: string example: null nullable: true notice: type: string example: We have decided to remove our daily rate limits. Please remove any references to these in your integrations. tags: - Data Exports components: securitySchemes: default: type: http scheme: bearer description: Get your API Key from OnlyFansAPI Console - https://app.onlyfansapi.com/api-keys ```` # Create Data Export (/api-reference/data-exports/create-data-export) Create a new data export request. This will calculate the required credits and prepare the export for starting. ## OpenAPI ````yaml https://app.onlyfansapi.com/scribe-docs/openapi.yaml post /api/data-exports openapi: 3.0.3 info: title: OnlyFans API description: "" version: 1.0.0 servers: - url: https://app.onlyfansapi.com security: - default: [] tags: - name: AI Voice Messages description: "" - name: API Keys description: "" - name: Account description: Endpoints for your linked accounts - name: Analytics - Financial description: APIs for retrieving financial analytics data - name: Analytics - Summary description: APIs for retrieving summary analytics data - name: Banking description: Operations related to user banking details, payout methods, legal and tax information, and account country settings. - name: Banned Words description: Reference list of OnlyFans banned words used by the `blockBannedWords` screening parameter - name: Blocked / Restricted Users description: APIs for listing the users an account has blocked or restricted - name: Chargebacks description: "" - name: Chat Messages description: "" - name: Chats description: "" - name: Client Sessions description: "" - name: Connect OnlyFans Account description: "" - name: Data Exports description: APIs for managing data exports - name: Engagement / Messages description: "" - name: Fans description: APIs for managing OnlyFans fans (subscribers) - name: Fans - AI Summary description: APIs for generating and retrieving AI-powered fan profile summaries - name: Following description: APIs for managing OnlyFans followings (people you're subscribed to) - name: Free Trial Links description: APIs for managing Free Trial Links. Revenue totals are net earnings after refunds and chargebacks. `revenue.chargebacks` (or `summary.chargebacks_total` in stats) is the positive cached net amount already excluded from revenue; do not subtract it again. Spender responses include chargebacks across all attributed periods for each fan with positive net revenue. - name: Giphy description: "" - name: Link Tags description: APIs for managing tags on free trial links, tracking links, and Smart Links - name: Mass Messaging description: "" - name: Media description: "" - name: Media Vault description: "" - name: Media Vault Lists description: "" - name: Notifications description: Endpoints for managingr account notifications - name: Payouts description: "" - name: Post Comments description: "" - name: Post Labels description: APIs for managing your post labels - name: Posts description: APIs for managing OnlyFans posts - name: Profile Content description: Read another user's profile content using your connected OnlyFans account. OnlyFans enforces subscription and purchase requirements; these endpoints do not unlock content. Response samples use captured OnlyFans payloads with anonymized IDs, text, and media URLs; OFAPI metadata values are illustrative. - name: Promotions description: "" - name: Public Profiles description: "" - name: Queue description: "" - name: Release Forms description: APIs for managing OnlyFans release forms - name: Saved For Later (Messages) description: "" - name: Saved For Later (Posts) description: "" - name: Settings description: "" - name: Shared Free Trial Links description: APIs for Free Trial Links that other OF creators have shared with this account. Revenue, cost, and spender data are not available for shared links. - name: Shared Tracking Links description: APIs for Tracking Links (campaigns) that other OF creators have shared with this account. Revenue, cost, and spender data are not available for shared campaigns. - name: Smart Link Postbacks description: APIs for managing Smart Link postback destinations - name: Smart Links description: APIs for managing Smart Links (Free Trial Links and Tracking Links with pooled inventory) - name: Statistics description: "" - name: Stored Free Trial Links description: Instant APIs for retrieving stored free trial links from the OnlyFansAPI Cache (free, no credits used). `revenue.total` is net earnings after refunds and chargebacks. `revenue.chargebacks` is the positive cached net amount already excluded from that total; do not subtract it again. - name: Stored Shared Free Trial Links description: Instant APIs for retrieving stored shared Free Trial Links from the OnlyFansAPI Cache (free, no credits used) - name: Stored Shared Tracking Links description: Instant APIs for retrieving stored shared Tracking Links (campaigns) from the OnlyFansAPI Cache (free, no credits used) - name: Stored Tracking Links description: Instant APIs for retrieving stored tracking links from the OnlyFansAPI Cache (free, no credits used). `revenue.total` is net earnings after refunds and chargebacks. `revenue.chargebacks` is the positive cached net amount already excluded from that total; do not subtract it again. - name: Stories description: APIs for managing OnlyFans stories - name: Story Highlights description: APIs for managing OnlyFans story highlights - name: Subscription Bundles description: "" - name: Tracking Links description: APIs for managing tracking links. Revenue totals are net earnings after refunds and chargebacks. `revenue.chargebacks` (or `summary.chargebacks_total` in stats) is the positive cached net amount already excluded from revenue; do not subtract it again. Spender responses include chargebacks across all attributed periods for each fan with positive net revenue. - name: Transactions description: APIs for managing OnlyFans transactions - name: Usage description: Credit usage reporting for your team - name: User List Collections description: "" - name: Users description: APIs for fetching OnlyFans users - name: Webhooks description: "" paths: /api/data-exports: post: summary: Create Data Export operationId: createDataExport description: Create a new data export request. This will calculate the required credits and prepare the export for starting. parameters: [] responses: "200": description: Success content: application/json: schema: type: object example: data: id: data_export_abc123xyz789 type: chat_messages status: calculating_credits start_date: 2024-01-01T00:00:00+00:00 end_date: 2024-12-31T23:59:59+00:00 file_type: csv created_at: 2024-12-02T12:00:00+00:00 requires_scraping: true credit_calculation_note: This export type requires data scraping. Credits will be calculated and charged after scraping completes. _meta: _credits: used: 0 balance: 9500 note: Always _cache: is_cached: false note: Cache disabled for this endpoint _rate_limits: limit_minute: 60 limit_day: null remaining_minute: 56 remaining_day: null notice: "" properties: data: type: object properties: id: type: string example: data_export_abc123xyz789 type: type: string example: chat_messages status: type: string example: calculating_credits start_date: type: string example: 2024-01-01T00:00:00+00:00 end_date: type: string example: 2024-12-31T23:59:59+00:00 file_type: type: string example: csv created_at: type: string example: 2024-12-02T12:00:00+00:00 requires_scraping: type: boolean example: true credit_calculation_note: type: string example: This export type requires data scraping. Credits will be calculated and charged after scraping completes. _meta: type: object properties: _credits: type: object properties: used: type: integer example: 0 balance: type: integer example: 9500 note: type: string example: Always _cache: type: object properties: is_cached: type: boolean example: false note: type: string example: Cache disabled for this endpoint _rate_limits: type: object properties: limit_minute: type: integer example: 60 limit_day: type: string example: null nullable: true remaining_minute: type: integer example: 56 remaining_day: type: string example: null nullable: true notice: type: string example: "" tags: - Data Exports requestBody: required: true content: application/json: schema: type: object properties: type: type: string description: The type of data to export. Use `fansly_chat_messages` to export Fansly chat messages (all other types are OnlyFans). `profile_visitors` returns one row per account per day, scraped one day at a time so the daily numbers are not aggregated away by OnlyFans. example: transactions enum: - transactions - chat_messages - media_vault - trial_links - tracking_links - smart_links - payouts - chargebacks - public_profiles - fans - followings - profile_visitors - fansly_chat_messages account_ids: type: array description: Array of account prefixed IDs to export data from. Not required for `public_profiles` type. For `fansly_chat_messages`, pass Fansly account prefixed IDs (`fansly_acct_...`); all other types take OnlyFans account IDs. example: - acc_abc123 - acc_def456 items: type: string start_date: type: string description: The start date for the export (ISO 8601 format). example: 2024-01-01T00:00:00Z end_date: type: string description: The end date for the export (ISO 8601 format). example: 2024-12-31T23:59:59Z export_columns: type: array description: Array of column names to include in the export (optional, defaults to all columns for the export type) example: - transaction_id - amount - created_at items: type: string file_type: type: string description: "The output file format. Supported formats vary by export type: `csv` or `xlsx` for transactions, chat_messages, fansly_chat_messages, trial_links, tracking_links, smart_links, payouts, chargebacks, public_profiles, fans, followings, profile_visitors; `zip` for media_vault." example: csv enum: - csv - xlsx - zip options: type: object description: "Type-specific export options. For `chat_messages`: `maxMessages` (required per account, max 10,000,000), `maxChats` (optional per-account chat scrape limit), `skipMassMessages` (optional, bool), `chatIds` (optional array of numeric fan/chat IDs; filters output and can drastically reduce totals). For `fansly_chat_messages`: `maxMessages` (required per account, max 10,000,000), `maxChats` (optional per-account chat scrape limit), `chatIds` (optional array of Fansly group ID strings; filters output and can drastically reduce totals). For `media_vault`: `mediaType` (required, one of: `all`, `photo`, `gif`, `video`, `audio`). For `fans`: `type` (required, one of: `all`, `active`, `expired`, `latest`). For `followings`: `type` (required, one of: `all`, `active`, `expired`). For `public_profiles`: `query` (optional, full-text search), `gender` (optional, filter: male, female, trans, couple), `minSubscribePrice` (optional, USD), `maxSubscribePrice` (optional, USD), `location` (optional), `minPostsCount` (optional, minimum posts), `minPhotosCount` (optional, minimum photos), `minVideosCount` (optional, minimum videos), `minSubscribersCount` (optional, minimum subscribers), `maxSubscribersCount` (optional, maximum subscribers), `minJoinDate` (optional, ISO 8601 date), `minLastSeenAt` (optional, ISO 8601 date), `createdAtFrom` (optional, ISO 8601 date, profile added to DB after), `createdAtTo` (optional, ISO 8601 date, profile added to DB before), `instagram` (optional), `twitter` (optional), `tiktok` (optional), `maxResults` (optional, limit results)." example: maxChats: 100 maxMessages: 50000 skipMassMessages: false properties: {} auto_start: type: boolean description: When true, automatically starts the export after creation. example: true required: - type - start_date - end_date - file_type components: securitySchemes: default: type: http scheme: bearer description: Get your API Key from OnlyFansAPI Console - https://app.onlyfansapi.com/api-keys ```` # Get Data Export Status (/api-reference/data-exports/get-data-export-status) Get the current status and progress of a data export. A completed chat messages export can carry `failed_chats` above 0: chats the platform kept refusing were given up on so the rest of the export could complete, so their messages in the file may be incomplete; the per-account `failed_chats` says which account they belong to. ## OpenAPI ````yaml https://app.onlyfansapi.com/scribe-docs/openapi.yaml get /api/data-exports/{data_export_id} openapi: 3.0.3 info: title: OnlyFans API description: "" version: 1.0.0 servers: - url: https://app.onlyfansapi.com security: - default: [] tags: - name: AI Voice Messages description: "" - name: API Keys description: "" - name: Account description: Endpoints for your linked accounts - name: Analytics - Financial description: APIs for retrieving financial analytics data - name: Analytics - Summary description: APIs for retrieving summary analytics data - name: Banking description: Operations related to user banking details, payout methods, legal and tax information, and account country settings. - name: Banned Words description: Reference list of OnlyFans banned words used by the `blockBannedWords` screening parameter - name: Blocked / Restricted Users description: APIs for listing the users an account has blocked or restricted - name: Chargebacks description: "" - name: Chat Messages description: "" - name: Chats description: "" - name: Client Sessions description: "" - name: Connect OnlyFans Account description: "" - name: Data Exports description: APIs for managing data exports - name: Engagement / Messages description: "" - name: Fans description: APIs for managing OnlyFans fans (subscribers) - name: Fans - AI Summary description: APIs for generating and retrieving AI-powered fan profile summaries - name: Following description: APIs for managing OnlyFans followings (people you're subscribed to) - name: Free Trial Links description: APIs for managing Free Trial Links. Revenue totals are net earnings after refunds and chargebacks. `revenue.chargebacks` (or `summary.chargebacks_total` in stats) is the positive cached net amount already excluded from revenue; do not subtract it again. Spender responses include chargebacks across all attributed periods for each fan with positive net revenue. - name: Giphy description: "" - name: Link Tags description: APIs for managing tags on free trial links, tracking links, and Smart Links - name: Mass Messaging description: "" - name: Media description: "" - name: Media Vault description: "" - name: Media Vault Lists description: "" - name: Notifications description: Endpoints for managingr account notifications - name: Payouts description: "" - name: Post Comments description: "" - name: Post Labels description: APIs for managing your post labels - name: Posts description: APIs for managing OnlyFans posts - name: Profile Content description: Read another user's profile content using your connected OnlyFans account. OnlyFans enforces subscription and purchase requirements; these endpoints do not unlock content. Response samples use captured OnlyFans payloads with anonymized IDs, text, and media URLs; OFAPI metadata values are illustrative. - name: Promotions description: "" - name: Public Profiles description: "" - name: Queue description: "" - name: Release Forms description: APIs for managing OnlyFans release forms - name: Saved For Later (Messages) description: "" - name: Saved For Later (Posts) description: "" - name: Settings description: "" - name: Shared Free Trial Links description: APIs for Free Trial Links that other OF creators have shared with this account. Revenue, cost, and spender data are not available for shared links. - name: Shared Tracking Links description: APIs for Tracking Links (campaigns) that other OF creators have shared with this account. Revenue, cost, and spender data are not available for shared campaigns. - name: Smart Link Postbacks description: APIs for managing Smart Link postback destinations - name: Smart Links description: APIs for managing Smart Links (Free Trial Links and Tracking Links with pooled inventory) - name: Statistics description: "" - name: Stored Free Trial Links description: Instant APIs for retrieving stored free trial links from the OnlyFansAPI Cache (free, no credits used). `revenue.total` is net earnings after refunds and chargebacks. `revenue.chargebacks` is the positive cached net amount already excluded from that total; do not subtract it again. - name: Stored Shared Free Trial Links description: Instant APIs for retrieving stored shared Free Trial Links from the OnlyFansAPI Cache (free, no credits used) - name: Stored Shared Tracking Links description: Instant APIs for retrieving stored shared Tracking Links (campaigns) from the OnlyFansAPI Cache (free, no credits used) - name: Stored Tracking Links description: Instant APIs for retrieving stored tracking links from the OnlyFansAPI Cache (free, no credits used). `revenue.total` is net earnings after refunds and chargebacks. `revenue.chargebacks` is the positive cached net amount already excluded from that total; do not subtract it again. - name: Stories description: APIs for managing OnlyFans stories - name: Story Highlights description: APIs for managing OnlyFans story highlights - name: Subscription Bundles description: "" - name: Tracking Links description: APIs for managing tracking links. Revenue totals are net earnings after refunds and chargebacks. `revenue.chargebacks` (or `summary.chargebacks_total` in stats) is the positive cached net amount already excluded from revenue; do not subtract it again. Spender responses include chargebacks across all attributed periods for each fan with positive net revenue. - name: Transactions description: APIs for managing OnlyFans transactions - name: Usage description: Credit usage reporting for your team - name: User List Collections description: "" - name: Users description: APIs for fetching OnlyFans users - name: Webhooks description: "" paths: /api/data-exports/{data_export_id}: parameters: - in: path name: data_export_id description: The prefixed ID of the data export example: data_export_abc123 required: true schema: type: string get: summary: Get Data Export Status operationId: getDataExportStatus description: "Get the current status and progress of a data export. A completed chat messages export can carry `failed_chats` above 0: chats the platform kept refusing were given up on so the rest of the export could complete, so their messages in the file may be incomplete; the per-account `failed_chats` says which account they belong to." parameters: - in: query name: download_url_expires_in description: Number of minutes until the download URL expires. Min `1`, max `60`, default `5`. example: 15 required: false schema: type: integer description: Number of minutes until the download URL expires. Min `1`, max `60`, default `5`. example: 15 responses: "200": description: Success content: application/json: schema: type: object example: data: id: data_export_abc123xyz789 type: transactions status: in_progress start_date: 2024-01-01T00:00:00+00:00 end_date: 2024-12-31T23:59:59+00:00 file_type: csv total_rows: 5000 rows_processed: 2500 failed_downloads: 0 failed_chats: 0 progress_percentage: 50 credit_cost: 500 export_columns: - transaction_id - type - amount - net_amount - currency - created_at accounts: - id: acct_xyz789abc123 display_name: Main Account created_at: 2024-12-02T12:00:00+00:00 completed_at: null failed_at: null failed_reason: null _meta: _credits: used: 0 balance: 9500 note: Always _cache: is_cached: false note: Cache disabled for this endpoint _rate_limits: limit_minute: 60 limit_day: null remaining_minute: 56 remaining_day: null notice: "" properties: data: type: object properties: id: type: string example: data_export_abc123xyz789 type: type: string example: transactions status: type: string example: in_progress start_date: type: string example: 2024-01-01T00:00:00+00:00 end_date: type: string example: 2024-12-31T23:59:59+00:00 file_type: type: string example: csv total_rows: type: integer example: 5000 rows_processed: type: integer example: 2500 failed_downloads: type: integer example: 0 failed_chats: type: integer example: 0 progress_percentage: type: integer example: 50 credit_cost: type: integer example: 500 export_columns: type: array example: - transaction_id - type - amount - net_amount - currency - created_at items: type: string accounts: type: array example: - id: acct_xyz789abc123 display_name: Main Account items: type: object properties: id: type: string example: acct_xyz789abc123 display_name: type: string example: Main Account created_at: type: string example: 2024-12-02T12:00:00+00:00 completed_at: type: string example: null nullable: true failed_at: type: string example: null nullable: true failed_reason: type: string example: null nullable: true _meta: type: object properties: _credits: type: object properties: used: type: integer example: 0 balance: type: integer example: 9500 note: type: string example: Always _cache: type: object properties: is_cached: type: boolean example: false note: type: string example: Cache disabled for this endpoint _rate_limits: type: object properties: limit_minute: type: integer example: 60 limit_day: type: string example: null nullable: true remaining_minute: type: integer example: 56 remaining_day: type: string example: null nullable: true notice: type: string example: "" tags: - Data Exports components: securitySchemes: default: type: http scheme: bearer description: Get your API Key from OnlyFansAPI Console - https://app.onlyfansapi.com/api-keys ```` # List Data Exports (/api-reference/data-exports/list-data-exports) Get a paginated list of data exports for the team ## OpenAPI ````yaml https://app.onlyfansapi.com/scribe-docs/openapi.yaml get /api/data-exports openapi: 3.0.3 info: title: OnlyFans API description: "" version: 1.0.0 servers: - url: https://app.onlyfansapi.com security: - default: [] tags: - name: AI Voice Messages description: "" - name: API Keys description: "" - name: Account description: Endpoints for your linked accounts - name: Analytics - Financial description: APIs for retrieving financial analytics data - name: Analytics - Summary description: APIs for retrieving summary analytics data - name: Banking description: Operations related to user banking details, payout methods, legal and tax information, and account country settings. - name: Banned Words description: Reference list of OnlyFans banned words used by the `blockBannedWords` screening parameter - name: Blocked / Restricted Users description: APIs for listing the users an account has blocked or restricted - name: Chargebacks description: "" - name: Chat Messages description: "" - name: Chats description: "" - name: Client Sessions description: "" - name: Connect OnlyFans Account description: "" - name: Data Exports description: APIs for managing data exports - name: Engagement / Messages description: "" - name: Fans description: APIs for managing OnlyFans fans (subscribers) - name: Fans - AI Summary description: APIs for generating and retrieving AI-powered fan profile summaries - name: Following description: APIs for managing OnlyFans followings (people you're subscribed to) - name: Free Trial Links description: APIs for managing Free Trial Links. Revenue totals are net earnings after refunds and chargebacks. `revenue.chargebacks` (or `summary.chargebacks_total` in stats) is the positive cached net amount already excluded from revenue; do not subtract it again. Spender responses include chargebacks across all attributed periods for each fan with positive net revenue. - name: Giphy description: "" - name: Link Tags description: APIs for managing tags on free trial links, tracking links, and Smart Links - name: Mass Messaging description: "" - name: Media description: "" - name: Media Vault description: "" - name: Media Vault Lists description: "" - name: Notifications description: Endpoints for managingr account notifications - name: Payouts description: "" - name: Post Comments description: "" - name: Post Labels description: APIs for managing your post labels - name: Posts description: APIs for managing OnlyFans posts - name: Profile Content description: Read another user's profile content using your connected OnlyFans account. OnlyFans enforces subscription and purchase requirements; these endpoints do not unlock content. Response samples use captured OnlyFans payloads with anonymized IDs, text, and media URLs; OFAPI metadata values are illustrative. - name: Promotions description: "" - name: Public Profiles description: "" - name: Queue description: "" - name: Release Forms description: APIs for managing OnlyFans release forms - name: Saved For Later (Messages) description: "" - name: Saved For Later (Posts) description: "" - name: Settings description: "" - name: Shared Free Trial Links description: APIs for Free Trial Links that other OF creators have shared with this account. Revenue, cost, and spender data are not available for shared links. - name: Shared Tracking Links description: APIs for Tracking Links (campaigns) that other OF creators have shared with this account. Revenue, cost, and spender data are not available for shared campaigns. - name: Smart Link Postbacks description: APIs for managing Smart Link postback destinations - name: Smart Links description: APIs for managing Smart Links (Free Trial Links and Tracking Links with pooled inventory) - name: Statistics description: "" - name: Stored Free Trial Links description: Instant APIs for retrieving stored free trial links from the OnlyFansAPI Cache (free, no credits used). `revenue.total` is net earnings after refunds and chargebacks. `revenue.chargebacks` is the positive cached net amount already excluded from that total; do not subtract it again. - name: Stored Shared Free Trial Links description: Instant APIs for retrieving stored shared Free Trial Links from the OnlyFansAPI Cache (free, no credits used) - name: Stored Shared Tracking Links description: Instant APIs for retrieving stored shared Tracking Links (campaigns) from the OnlyFansAPI Cache (free, no credits used) - name: Stored Tracking Links description: Instant APIs for retrieving stored tracking links from the OnlyFansAPI Cache (free, no credits used). `revenue.total` is net earnings after refunds and chargebacks. `revenue.chargebacks` is the positive cached net amount already excluded from that total; do not subtract it again. - name: Stories description: APIs for managing OnlyFans stories - name: Story Highlights description: APIs for managing OnlyFans story highlights - name: Subscription Bundles description: "" - name: Tracking Links description: APIs for managing tracking links. Revenue totals are net earnings after refunds and chargebacks. `revenue.chargebacks` (or `summary.chargebacks_total` in stats) is the positive cached net amount already excluded from revenue; do not subtract it again. Spender responses include chargebacks across all attributed periods for each fan with positive net revenue. - name: Transactions description: APIs for managing OnlyFans transactions - name: Usage description: Credit usage reporting for your team - name: User List Collections description: "" - name: Users description: APIs for fetching OnlyFans users - name: Webhooks description: "" paths: /api/data-exports: get: summary: List Data Exports operationId: listDataExports description: Get a paginated list of data exports for the team parameters: - in: query name: per_page description: Number of results per page. Default `15`, max `100` example: 15 required: false schema: type: integer description: Number of results per page. Default `15`, max `100` example: 15 - in: query name: page description: Page number for pagination. Default `1` example: 1 required: false schema: type: integer description: Page number for pagination. Default `1` example: 1 - in: query name: status description: Filter by status example: completed required: false schema: type: string description: Filter by status example: completed enum: - calculating_credits - calculating_credits_failed - calculating_credits_completed - pending - in_progress - completed - failed - in: query name: type description: Filter by export type example: transactions required: false schema: type: string description: Filter by export type example: transactions enum: - transactions - chat_messages - media_vault - trial_links - tracking_links - smart_links - payouts - chargebacks - public_profiles - fans - followings - profile_visitors - fansly_chat_messages - in: query name: download_url_expires_in description: Number of minutes until download URLs expire. Min `1`, max `60`, default `5`. example: 15 required: false schema: type: integer description: Number of minutes until download URLs expire. Min `1`, max `60`, default `5`. example: 15 responses: "200": description: Success content: application/json: schema: type: object example: data: data: - id: data_export_abc123xyz789 type: transactions status: completed start_date: 2024-01-01T00:00:00+00:00 end_date: 2024-12-31T23:59:59+00:00 file_type: csv total_rows: 5000 rows_processed: 5000 failed_downloads: 0 failed_chats: 0 progress_percentage: 100 credit_cost: 500 export_columns: - transaction_id - type - amount - net_amount - currency - created_at accounts: - id: acct_xyz789abc123 display_name: Main Account created_at: 2024-12-01T10:00:00+00:00 completed_at: 2024-12-01T10:05:00+00:00 failed_at: null failed_reason: null download_url: https://example-bucket.s3.amazonaws.com/data-exports/team-slug/data_export_abc123xyz789.csv?X-Amz-Signature=... download_url_expires_at: 2024-12-02T12:05:00+00:00 - id: data_export_def456uvw012 type: chat_messages status: in_progress start_date: 2024-06-01T00:00:00+00:00 end_date: 2024-12-31T23:59:59+00:00 file_type: xlsx total_rows: 15000 rows_processed: 7500 failed_downloads: 0 failed_chats: 0 progress_percentage: 50 credit_cost: 1500 export_columns: - chat_id - message_id - message_text - fan_username - onlyfans_created_at accounts: - id: acct_xyz789abc123 display_name: Main Account - id: acct_mno345pqr678 display_name: Secondary Account created_at: 2024-12-02T11:30:00+00:00 completed_at: null failed_at: null failed_reason: null - id: data_export_ghi789rst345 type: media_vault status: completed start_date: 2024-01-01T00:00:00+00:00 end_date: 2024-12-31T23:59:59+00:00 file_type: zip total_rows: 79 rows_processed: 79 failed_downloads: 0 failed_chats: 0 progress_percentage: 100 credit_cost: 4 export_columns: [] accounts: - id: acct_xyz789abc123 display_name: Main Account created_at: 2024-12-01T09:00:00+00:00 completed_at: 2024-12-01T09:08:00+00:00 failed_at: null failed_reason: null download_url: https://example-bucket.s3.amazonaws.com/data-exports/team-slug/data_export_ghi789rst345.zip?X-Amz-Signature=... download_url_expires_at: 2024-12-02T12:05:00+00:00 meta: current_page: 1 last_page: 3 per_page: 15 total: 42 _meta: _credits: used: 0 balance: 9500 note: Always _cache: is_cached: false note: Cache disabled for this endpoint _rate_limits: limit_minute: 60 limit_day: null remaining_minute: 56 remaining_day: null notice: "" properties: data: type: object properties: data: type: array example: - id: data_export_abc123xyz789 type: transactions status: completed start_date: 2024-01-01T00:00:00+00:00 end_date: 2024-12-31T23:59:59+00:00 file_type: csv total_rows: 5000 rows_processed: 5000 failed_downloads: 0 failed_chats: 0 progress_percentage: 100 credit_cost: 500 export_columns: - transaction_id - type - amount - net_amount - currency - created_at accounts: - id: acct_xyz789abc123 display_name: Main Account created_at: 2024-12-01T10:00:00+00:00 completed_at: 2024-12-01T10:05:00+00:00 failed_at: null failed_reason: null download_url: https://example-bucket.s3.amazonaws.com/data-exports/team-slug/data_export_abc123xyz789.csv?X-Amz-Signature=... download_url_expires_at: 2024-12-02T12:05:00+00:00 - id: data_export_def456uvw012 type: chat_messages status: in_progress start_date: 2024-06-01T00:00:00+00:00 end_date: 2024-12-31T23:59:59+00:00 file_type: xlsx total_rows: 15000 rows_processed: 7500 failed_downloads: 0 failed_chats: 0 progress_percentage: 50 credit_cost: 1500 export_columns: - chat_id - message_id - message_text - fan_username - onlyfans_created_at accounts: - id: acct_xyz789abc123 display_name: Main Account - id: acct_mno345pqr678 display_name: Secondary Account created_at: 2024-12-02T11:30:00+00:00 completed_at: null failed_at: null failed_reason: null - id: data_export_ghi789rst345 type: media_vault status: completed start_date: 2024-01-01T00:00:00+00:00 end_date: 2024-12-31T23:59:59+00:00 file_type: zip total_rows: 79 rows_processed: 79 failed_downloads: 0 failed_chats: 0 progress_percentage: 100 credit_cost: 4 export_columns: [] accounts: - id: acct_xyz789abc123 display_name: Main Account created_at: 2024-12-01T09:00:00+00:00 completed_at: 2024-12-01T09:08:00+00:00 failed_at: null failed_reason: null download_url: https://example-bucket.s3.amazonaws.com/data-exports/team-slug/data_export_ghi789rst345.zip?X-Amz-Signature=... download_url_expires_at: 2024-12-02T12:05:00+00:00 items: type: object properties: id: type: string example: data_export_abc123xyz789 type: type: string example: transactions status: type: string example: completed start_date: type: string example: 2024-01-01T00:00:00+00:00 end_date: type: string example: 2024-12-31T23:59:59+00:00 file_type: type: string example: csv total_rows: type: integer example: 5000 rows_processed: type: integer example: 5000 failed_downloads: type: integer example: 0 failed_chats: type: integer example: 0 progress_percentage: type: integer example: 100 credit_cost: type: integer example: 500 export_columns: type: array example: - transaction_id - type - amount - net_amount - currency - created_at items: type: string accounts: type: array example: - id: acct_xyz789abc123 display_name: Main Account items: type: object properties: id: type: string example: acct_xyz789abc123 display_name: type: string example: Main Account created_at: type: string example: 2024-12-01T10:00:00+00:00 completed_at: type: string example: 2024-12-01T10:05:00+00:00 failed_at: type: string example: null nullable: true failed_reason: type: string example: null nullable: true download_url: type: string example: https://example-bucket.s3.amazonaws.com/data-exports/team-slug/data_export_abc123xyz789.csv?X-Amz-Signature=... download_url_expires_at: type: string example: 2024-12-02T12:05:00+00:00 meta: type: object properties: current_page: type: integer example: 1 last_page: type: integer example: 3 per_page: type: integer example: 15 total: type: integer example: 42 _meta: type: object properties: _credits: type: object properties: used: type: integer example: 0 balance: type: integer example: 9500 note: type: string example: Always _cache: type: object properties: is_cached: type: boolean example: false note: type: string example: Cache disabled for this endpoint _rate_limits: type: object properties: limit_minute: type: integer example: 60 limit_day: type: string example: null nullable: true remaining_minute: type: integer example: 56 remaining_day: type: string example: null nullable: true notice: type: string example: "" tags: - Data Exports components: securitySchemes: default: type: http scheme: bearer description: Get your API Key from OnlyFansAPI Console - https://app.onlyfansapi.com/api-keys ```` # Retry Failed Data Export (/api-reference/data-exports/retry-failed-data-export) Create a new data export with the same parameters as a failed export and automatically start it. ## OpenAPI ````yaml https://app.onlyfansapi.com/scribe-docs/openapi.yaml post /api/data-exports/{data_export_id}/retry openapi: 3.0.3 info: title: OnlyFans API description: "" version: 1.0.0 servers: - url: https://app.onlyfansapi.com security: - default: [] tags: - name: AI Voice Messages description: "" - name: API Keys description: "" - name: Account description: Endpoints for your linked accounts - name: Analytics - Financial description: APIs for retrieving financial analytics data - name: Analytics - Summary description: APIs for retrieving summary analytics data - name: Banking description: Operations related to user banking details, payout methods, legal and tax information, and account country settings. - name: Banned Words description: Reference list of OnlyFans banned words used by the `blockBannedWords` screening parameter - name: Blocked / Restricted Users description: APIs for listing the users an account has blocked or restricted - name: Chargebacks description: "" - name: Chat Messages description: "" - name: Chats description: "" - name: Client Sessions description: "" - name: Connect OnlyFans Account description: "" - name: Data Exports description: APIs for managing data exports - name: Engagement / Messages description: "" - name: Fans description: APIs for managing OnlyFans fans (subscribers) - name: Fans - AI Summary description: APIs for generating and retrieving AI-powered fan profile summaries - name: Following description: APIs for managing OnlyFans followings (people you're subscribed to) - name: Free Trial Links description: APIs for managing Free Trial Links. Revenue totals are net earnings after refunds and chargebacks. `revenue.chargebacks` (or `summary.chargebacks_total` in stats) is the positive cached net amount already excluded from revenue; do not subtract it again. Spender responses include chargebacks across all attributed periods for each fan with positive net revenue. - name: Giphy description: "" - name: Link Tags description: APIs for managing tags on free trial links, tracking links, and Smart Links - name: Mass Messaging description: "" - name: Media description: "" - name: Media Vault description: "" - name: Media Vault Lists description: "" - name: Notifications description: Endpoints for managingr account notifications - name: Payouts description: "" - name: Post Comments description: "" - name: Post Labels description: APIs for managing your post labels - name: Posts description: APIs for managing OnlyFans posts - name: Profile Content description: Read another user's profile content using your connected OnlyFans account. OnlyFans enforces subscription and purchase requirements; these endpoints do not unlock content. Response samples use captured OnlyFans payloads with anonymized IDs, text, and media URLs; OFAPI metadata values are illustrative. - name: Promotions description: "" - name: Public Profiles description: "" - name: Queue description: "" - name: Release Forms description: APIs for managing OnlyFans release forms - name: Saved For Later (Messages) description: "" - name: Saved For Later (Posts) description: "" - name: Settings description: "" - name: Shared Free Trial Links description: APIs for Free Trial Links that other OF creators have shared with this account. Revenue, cost, and spender data are not available for shared links. - name: Shared Tracking Links description: APIs for Tracking Links (campaigns) that other OF creators have shared with this account. Revenue, cost, and spender data are not available for shared campaigns. - name: Smart Link Postbacks description: APIs for managing Smart Link postback destinations - name: Smart Links description: APIs for managing Smart Links (Free Trial Links and Tracking Links with pooled inventory) - name: Statistics description: "" - name: Stored Free Trial Links description: Instant APIs for retrieving stored free trial links from the OnlyFansAPI Cache (free, no credits used). `revenue.total` is net earnings after refunds and chargebacks. `revenue.chargebacks` is the positive cached net amount already excluded from that total; do not subtract it again. - name: Stored Shared Free Trial Links description: Instant APIs for retrieving stored shared Free Trial Links from the OnlyFansAPI Cache (free, no credits used) - name: Stored Shared Tracking Links description: Instant APIs for retrieving stored shared Tracking Links (campaigns) from the OnlyFansAPI Cache (free, no credits used) - name: Stored Tracking Links description: Instant APIs for retrieving stored tracking links from the OnlyFansAPI Cache (free, no credits used). `revenue.total` is net earnings after refunds and chargebacks. `revenue.chargebacks` is the positive cached net amount already excluded from that total; do not subtract it again. - name: Stories description: APIs for managing OnlyFans stories - name: Story Highlights description: APIs for managing OnlyFans story highlights - name: Subscription Bundles description: "" - name: Tracking Links description: APIs for managing tracking links. Revenue totals are net earnings after refunds and chargebacks. `revenue.chargebacks` (or `summary.chargebacks_total` in stats) is the positive cached net amount already excluded from revenue; do not subtract it again. Spender responses include chargebacks across all attributed periods for each fan with positive net revenue. - name: Transactions description: APIs for managing OnlyFans transactions - name: Usage description: Credit usage reporting for your team - name: User List Collections description: "" - name: Users description: APIs for fetching OnlyFans users - name: Webhooks description: "" paths: /api/data-exports/{data_export_id}/retry: parameters: - in: path name: data_export_id description: The prefixed ID of the failed data export example: data_export_abc123 required: true schema: type: string post: summary: Retry Failed Data Export operationId: retryFailedDataExport description: Create a new data export with the same parameters as a failed export and automatically start it. parameters: [] responses: "200": description: Success content: application/json: schema: type: object example: data: id: data_export_new456def original_id: data_export_abc123xyz789 type: transactions status: pending message: A new export has been created from the failed export. _meta: _credits: used: 0 balance: 9500 note: Always _cache: is_cached: false note: Cache disabled for this endpoint _rate_limits: limit_minute: 60 limit_day: null remaining_minute: 56 remaining_day: null notice: "" properties: data: type: object properties: id: type: string example: data_export_new456def original_id: type: string example: data_export_abc123xyz789 type: type: string example: transactions status: type: string example: pending message: type: string example: A new export has been created from the failed export. _meta: type: object properties: _credits: type: object properties: used: type: integer example: 0 balance: type: integer example: 9500 note: type: string example: Always _cache: type: object properties: is_cached: type: boolean example: false note: type: string example: Cache disabled for this endpoint _rate_limits: type: object properties: limit_minute: type: integer example: 60 limit_day: type: string example: null nullable: true remaining_minute: type: integer example: 56 remaining_day: type: string example: null nullable: true notice: type: string example: "" tags: - Data Exports components: securitySchemes: default: type: http scheme: bearer description: Get your API Key from OnlyFansAPI Console - https://app.onlyfansapi.com/api-keys ```` # Start Data Export (/api-reference/data-exports/start-data-export) Start processing a data export that has completed credit calculation. This will begin the actual export process and charge credits. ## OpenAPI ````yaml https://app.onlyfansapi.com/scribe-docs/openapi.yaml post /api/data-exports/{data_export_id}/start openapi: 3.0.3 info: title: OnlyFans API description: "" version: 1.0.0 servers: - url: https://app.onlyfansapi.com security: - default: [] tags: - name: AI Voice Messages description: "" - name: API Keys description: "" - name: Account description: Endpoints for your linked accounts - name: Analytics - Financial description: APIs for retrieving financial analytics data - name: Analytics - Summary description: APIs for retrieving summary analytics data - name: Banking description: Operations related to user banking details, payout methods, legal and tax information, and account country settings. - name: Banned Words description: Reference list of OnlyFans banned words used by the `blockBannedWords` screening parameter - name: Blocked / Restricted Users description: APIs for listing the users an account has blocked or restricted - name: Chargebacks description: "" - name: Chat Messages description: "" - name: Chats description: "" - name: Client Sessions description: "" - name: Connect OnlyFans Account description: "" - name: Data Exports description: APIs for managing data exports - name: Engagement / Messages description: "" - name: Fans description: APIs for managing OnlyFans fans (subscribers) - name: Fans - AI Summary description: APIs for generating and retrieving AI-powered fan profile summaries - name: Following description: APIs for managing OnlyFans followings (people you're subscribed to) - name: Free Trial Links description: APIs for managing Free Trial Links. Revenue totals are net earnings after refunds and chargebacks. `revenue.chargebacks` (or `summary.chargebacks_total` in stats) is the positive cached net amount already excluded from revenue; do not subtract it again. Spender responses include chargebacks across all attributed periods for each fan with positive net revenue. - name: Giphy description: "" - name: Link Tags description: APIs for managing tags on free trial links, tracking links, and Smart Links - name: Mass Messaging description: "" - name: Media description: "" - name: Media Vault description: "" - name: Media Vault Lists description: "" - name: Notifications description: Endpoints for managingr account notifications - name: Payouts description: "" - name: Post Comments description: "" - name: Post Labels description: APIs for managing your post labels - name: Posts description: APIs for managing OnlyFans posts - name: Profile Content description: Read another user's profile content using your connected OnlyFans account. OnlyFans enforces subscription and purchase requirements; these endpoints do not unlock content. Response samples use captured OnlyFans payloads with anonymized IDs, text, and media URLs; OFAPI metadata values are illustrative. - name: Promotions description: "" - name: Public Profiles description: "" - name: Queue description: "" - name: Release Forms description: APIs for managing OnlyFans release forms - name: Saved For Later (Messages) description: "" - name: Saved For Later (Posts) description: "" - name: Settings description: "" - name: Shared Free Trial Links description: APIs for Free Trial Links that other OF creators have shared with this account. Revenue, cost, and spender data are not available for shared links. - name: Shared Tracking Links description: APIs for Tracking Links (campaigns) that other OF creators have shared with this account. Revenue, cost, and spender data are not available for shared campaigns. - name: Smart Link Postbacks description: APIs for managing Smart Link postback destinations - name: Smart Links description: APIs for managing Smart Links (Free Trial Links and Tracking Links with pooled inventory) - name: Statistics description: "" - name: Stored Free Trial Links description: Instant APIs for retrieving stored free trial links from the OnlyFansAPI Cache (free, no credits used). `revenue.total` is net earnings after refunds and chargebacks. `revenue.chargebacks` is the positive cached net amount already excluded from that total; do not subtract it again. - name: Stored Shared Free Trial Links description: Instant APIs for retrieving stored shared Free Trial Links from the OnlyFansAPI Cache (free, no credits used) - name: Stored Shared Tracking Links description: Instant APIs for retrieving stored shared Tracking Links (campaigns) from the OnlyFansAPI Cache (free, no credits used) - name: Stored Tracking Links description: Instant APIs for retrieving stored tracking links from the OnlyFansAPI Cache (free, no credits used). `revenue.total` is net earnings after refunds and chargebacks. `revenue.chargebacks` is the positive cached net amount already excluded from that total; do not subtract it again. - name: Stories description: APIs for managing OnlyFans stories - name: Story Highlights description: APIs for managing OnlyFans story highlights - name: Subscription Bundles description: "" - name: Tracking Links description: APIs for managing tracking links. Revenue totals are net earnings after refunds and chargebacks. `revenue.chargebacks` (or `summary.chargebacks_total` in stats) is the positive cached net amount already excluded from revenue; do not subtract it again. Spender responses include chargebacks across all attributed periods for each fan with positive net revenue. - name: Transactions description: APIs for managing OnlyFans transactions - name: Usage description: Credit usage reporting for your team - name: User List Collections description: "" - name: Users description: APIs for fetching OnlyFans users - name: Webhooks description: "" paths: /api/data-exports/{data_export_id}/start: parameters: - in: path name: data_export_id description: The prefixed ID of the data export example: data_export_abc123 required: true schema: type: string post: summary: Start Data Export operationId: startDataExport description: Start processing a data export that has completed credit calculation. This will begin the actual export process and charge credits. parameters: [] responses: "200": description: Success content: application/json: schema: type: object example: data: id: data_export_abc123xyz789 status: pending message: Data export has been started. _meta: _credits: used: 0 balance: 9500 note: Always _cache: is_cached: false note: Cache disabled for this endpoint _rate_limits: limit_minute: 60 limit_day: null remaining_minute: 56 remaining_day: null notice: "" properties: data: type: object properties: id: type: string example: data_export_abc123xyz789 status: type: string example: pending message: type: string example: Data export has been started. _meta: type: object properties: _credits: type: object properties: used: type: integer example: 0 balance: type: integer example: 9500 note: type: string example: Always _cache: type: object properties: is_cached: type: boolean example: false note: type: string example: Cache disabled for this endpoint _rate_limits: type: object properties: limit_minute: type: integer example: 60 limit_day: type: string example: null nullable: true remaining_minute: type: integer example: 56 remaining_day: type: string example: null nullable: true notice: type: string example: "" tags: - Data Exports components: securitySchemes: default: type: http scheme: bearer description: Get your API Key from OnlyFansAPI Console - https://app.onlyfansapi.com/api-keys ```` # List All Link Tags (/api-reference/link-tags/list-all-link-tags) Get all existing tags that have been used on free trial links, tracking links, and/or Smart Links for this account. This is a free endpoint. ## OpenAPI ````yaml https://app.onlyfansapi.com/scribe-docs/openapi.yaml get /api/link-tags openapi: 3.0.3 info: title: OnlyFans API description: "" version: 1.0.0 servers: - url: https://app.onlyfansapi.com security: - default: [] tags: - name: AI Voice Messages description: "" - name: API Keys description: "" - name: Account description: Endpoints for your linked accounts - name: Analytics - Financial description: APIs for retrieving financial analytics data - name: Analytics - Summary description: APIs for retrieving summary analytics data - name: Banking description: Operations related to user banking details, payout methods, legal and tax information, and account country settings. - name: Banned Words description: Reference list of OnlyFans banned words used by the `blockBannedWords` screening parameter - name: Blocked / Restricted Users description: APIs for listing the users an account has blocked or restricted - name: Chargebacks description: "" - name: Chat Messages description: "" - name: Chats description: "" - name: Client Sessions description: "" - name: Connect OnlyFans Account description: "" - name: Data Exports description: APIs for managing data exports - name: Engagement / Messages description: "" - name: Fans description: APIs for managing OnlyFans fans (subscribers) - name: Fans - AI Summary description: APIs for generating and retrieving AI-powered fan profile summaries - name: Following description: APIs for managing OnlyFans followings (people you're subscribed to) - name: Free Trial Links description: APIs for managing Free Trial Links. Revenue totals are net earnings after refunds and chargebacks. `revenue.chargebacks` (or `summary.chargebacks_total` in stats) is the positive cached net amount already excluded from revenue; do not subtract it again. Spender responses include chargebacks across all attributed periods for each fan with positive net revenue. - name: Giphy description: "" - name: Link Tags description: APIs for managing tags on free trial links, tracking links, and Smart Links - name: Mass Messaging description: "" - name: Media description: "" - name: Media Vault description: "" - name: Media Vault Lists description: "" - name: Notifications description: Endpoints for managingr account notifications - name: Payouts description: "" - name: Post Comments description: "" - name: Post Labels description: APIs for managing your post labels - name: Posts description: APIs for managing OnlyFans posts - name: Profile Content description: Read another user's profile content using your connected OnlyFans account. OnlyFans enforces subscription and purchase requirements; these endpoints do not unlock content. Response samples use captured OnlyFans payloads with anonymized IDs, text, and media URLs; OFAPI metadata values are illustrative. - name: Promotions description: "" - name: Public Profiles description: "" - name: Queue description: "" - name: Release Forms description: APIs for managing OnlyFans release forms - name: Saved For Later (Messages) description: "" - name: Saved For Later (Posts) description: "" - name: Settings description: "" - name: Shared Free Trial Links description: APIs for Free Trial Links that other OF creators have shared with this account. Revenue, cost, and spender data are not available for shared links. - name: Shared Tracking Links description: APIs for Tracking Links (campaigns) that other OF creators have shared with this account. Revenue, cost, and spender data are not available for shared campaigns. - name: Smart Link Postbacks description: APIs for managing Smart Link postback destinations - name: Smart Links description: APIs for managing Smart Links (Free Trial Links and Tracking Links with pooled inventory) - name: Statistics description: "" - name: Stored Free Trial Links description: Instant APIs for retrieving stored free trial links from the OnlyFansAPI Cache (free, no credits used). `revenue.total` is net earnings after refunds and chargebacks. `revenue.chargebacks` is the positive cached net amount already excluded from that total; do not subtract it again. - name: Stored Shared Free Trial Links description: Instant APIs for retrieving stored shared Free Trial Links from the OnlyFansAPI Cache (free, no credits used) - name: Stored Shared Tracking Links description: Instant APIs for retrieving stored shared Tracking Links (campaigns) from the OnlyFansAPI Cache (free, no credits used) - name: Stored Tracking Links description: Instant APIs for retrieving stored tracking links from the OnlyFansAPI Cache (free, no credits used). `revenue.total` is net earnings after refunds and chargebacks. `revenue.chargebacks` is the positive cached net amount already excluded from that total; do not subtract it again. - name: Stories description: APIs for managing OnlyFans stories - name: Story Highlights description: APIs for managing OnlyFans story highlights - name: Subscription Bundles description: "" - name: Tracking Links description: APIs for managing tracking links. Revenue totals are net earnings after refunds and chargebacks. `revenue.chargebacks` (or `summary.chargebacks_total` in stats) is the positive cached net amount already excluded from revenue; do not subtract it again. Spender responses include chargebacks across all attributed periods for each fan with positive net revenue. - name: Transactions description: APIs for managing OnlyFans transactions - name: Usage description: Credit usage reporting for your team - name: User List Collections description: "" - name: Users description: APIs for fetching OnlyFans users - name: Webhooks description: "" paths: /api/link-tags: get: summary: List All Link Tags operationId: listAllLinkTags description: Get all existing tags that have been used on free trial links, tracking links, and/or Smart Links for this account. This is a free endpoint. parameters: - in: query name: type description: Filter by link type. If not provided, returns tags for all types. example: trial_links required: false schema: type: string description: Filter by link type. If not provided, returns tags for all types. example: trial_links enum: - trial_links - tracking_links - smart_links responses: "200": description: Success content: application/json: schema: type: object example: data: tags: - Instagram - TikTok - Twitter _meta: _credits: used: 0 balance: 9529 note: Free endpoint _cache: is_cached: false note: Cache disabled for this endpoint _rate_limits: limit_minute: 5000 limit_day: null remaining_minute: 4999 remaining_day: null properties: data: type: object properties: tags: type: array example: - Instagram - TikTok - Twitter items: type: string _meta: type: object properties: _credits: type: object properties: used: type: integer example: 0 balance: type: integer example: 9529 note: type: string example: Free endpoint _cache: type: object properties: is_cached: type: boolean example: false note: type: string example: Cache disabled for this endpoint _rate_limits: type: object properties: limit_minute: type: integer example: 5000 limit_day: type: string example: null nullable: true remaining_minute: type: integer example: 4999 remaining_day: type: string example: null nullable: true tags: - Link Tags components: securitySchemes: default: type: http scheme: bearer description: Get your API Key from OnlyFansAPI Console - https://app.onlyfansapi.com/api-keys ```` # List Trending GIFs (/api-reference/giphy/list-trending-gi-fs) Get trending GIFs from the OnlyFans Giphy proxy. Use the returned `id` as the `giphyId` body param when sending a chat or mass message. ## OpenAPI ````yaml https://app.onlyfansapi.com/scribe-docs/openapi.yaml get /api/{account}/giphy/trending openapi: 3.0.3 info: title: OnlyFans API description: "" version: 1.0.0 servers: - url: https://app.onlyfansapi.com security: - default: [] tags: - name: AI Voice Messages description: "" - name: API Keys description: "" - name: Account description: Endpoints for your linked accounts - name: Analytics - Financial description: APIs for retrieving financial analytics data - name: Analytics - Summary description: APIs for retrieving summary analytics data - name: Banking description: Operations related to user banking details, payout methods, legal and tax information, and account country settings. - name: Banned Words description: Reference list of OnlyFans banned words used by the `blockBannedWords` screening parameter - name: Blocked / Restricted Users description: APIs for listing the users an account has blocked or restricted - name: Chargebacks description: "" - name: Chat Messages description: "" - name: Chats description: "" - name: Client Sessions description: "" - name: Connect OnlyFans Account description: "" - name: Data Exports description: APIs for managing data exports - name: Engagement / Messages description: "" - name: Fans description: APIs for managing OnlyFans fans (subscribers) - name: Fans - AI Summary description: APIs for generating and retrieving AI-powered fan profile summaries - name: Following description: APIs for managing OnlyFans followings (people you're subscribed to) - name: Free Trial Links description: APIs for managing Free Trial Links. Revenue totals are net earnings after refunds and chargebacks. `revenue.chargebacks` (or `summary.chargebacks_total` in stats) is the positive cached net amount already excluded from revenue; do not subtract it again. Spender responses include chargebacks across all attributed periods for each fan with positive net revenue. - name: Giphy description: "" - name: Link Tags description: APIs for managing tags on free trial links, tracking links, and Smart Links - name: Mass Messaging description: "" - name: Media description: "" - name: Media Vault description: "" - name: Media Vault Lists description: "" - name: Notifications description: Endpoints for managingr account notifications - name: Payouts description: "" - name: Post Comments description: "" - name: Post Labels description: APIs for managing your post labels - name: Posts description: APIs for managing OnlyFans posts - name: Profile Content description: Read another user's profile content using your connected OnlyFans account. OnlyFans enforces subscription and purchase requirements; these endpoints do not unlock content. Response samples use captured OnlyFans payloads with anonymized IDs, text, and media URLs; OFAPI metadata values are illustrative. - name: Promotions description: "" - name: Public Profiles description: "" - name: Queue description: "" - name: Release Forms description: APIs for managing OnlyFans release forms - name: Saved For Later (Messages) description: "" - name: Saved For Later (Posts) description: "" - name: Settings description: "" - name: Shared Free Trial Links description: APIs for Free Trial Links that other OF creators have shared with this account. Revenue, cost, and spender data are not available for shared links. - name: Shared Tracking Links description: APIs for Tracking Links (campaigns) that other OF creators have shared with this account. Revenue, cost, and spender data are not available for shared campaigns. - name: Smart Link Postbacks description: APIs for managing Smart Link postback destinations - name: Smart Links description: APIs for managing Smart Links (Free Trial Links and Tracking Links with pooled inventory) - name: Statistics description: "" - name: Stored Free Trial Links description: Instant APIs for retrieving stored free trial links from the OnlyFansAPI Cache (free, no credits used). `revenue.total` is net earnings after refunds and chargebacks. `revenue.chargebacks` is the positive cached net amount already excluded from that total; do not subtract it again. - name: Stored Shared Free Trial Links description: Instant APIs for retrieving stored shared Free Trial Links from the OnlyFansAPI Cache (free, no credits used) - name: Stored Shared Tracking Links description: Instant APIs for retrieving stored shared Tracking Links (campaigns) from the OnlyFansAPI Cache (free, no credits used) - name: Stored Tracking Links description: Instant APIs for retrieving stored tracking links from the OnlyFansAPI Cache (free, no credits used). `revenue.total` is net earnings after refunds and chargebacks. `revenue.chargebacks` is the positive cached net amount already excluded from that total; do not subtract it again. - name: Stories description: APIs for managing OnlyFans stories - name: Story Highlights description: APIs for managing OnlyFans story highlights - name: Subscription Bundles description: "" - name: Tracking Links description: APIs for managing tracking links. Revenue totals are net earnings after refunds and chargebacks. `revenue.chargebacks` (or `summary.chargebacks_total` in stats) is the positive cached net amount already excluded from revenue; do not subtract it again. Spender responses include chargebacks across all attributed periods for each fan with positive net revenue. - name: Transactions description: APIs for managing OnlyFans transactions - name: Usage description: Credit usage reporting for your team - name: User List Collections description: "" - name: Users description: APIs for fetching OnlyFans users - name: Webhooks description: "" paths: /api/{account}/giphy/trending: parameters: - in: path name: account description: The Account ID example: acct_XXXXXXXXXXXXXXX required: true schema: type: string get: summary: List Trending GIFs operationId: listTrendingGIFs description: Get trending GIFs from the OnlyFans Giphy proxy. Use the returned `id` as the `giphyId` body param when sending a chat or mass message. parameters: - in: query name: limit description: Number of GIFs to return (default = 10, max = 50) example: 10 required: false schema: type: integer description: Number of GIFs to return (default = 10, max = 50) example: 10 - in: query name: offset description: Number of GIFs to skip for pagination (default = 0) example: 0 required: false schema: type: integer description: Number of GIFs to skip for pagination (default = 0) example: 0 responses: "200": description: Success content: application/json: schema: type: object example: data: - type: gif id: WAGC3LeqJvXglm5H7a url: https://giphy.com/gifs/wwe-raw-smackdown-WAGC3LeqJvXglm5H7a slug: wwe-raw-smackdown-WAGC3LeqJvXglm5H7a title: Roman Reigns Indecisiveness GIF by WWE rating: g username: wwe embed_url: https://giphy.com/embed/WAGC3LeqJvXglm5H7a images: original: height: "480" width: "480" url: https://media0.giphy.com/media/WAGC3LeqJvXglm5H7a/giphy.gif mp4: https://media0.giphy.com/media/WAGC3LeqJvXglm5H7a/giphy.mp4 webp: https://media0.giphy.com/media/WAGC3LeqJvXglm5H7a/giphy.webp fixed_height: height: "200" width: "200" url: https://media0.giphy.com/media/WAGC3LeqJvXglm5H7a/200.gif - type: gif id: fUQ4rhUZJYiQsas6WD url: https://giphy.com/gifs/muppetwiki-sesame-street-muppets-elmo-fUQ4rhUZJYiQsas6WD slug: muppetwiki-sesame-street-muppets-elmo-fUQ4rhUZJYiQsas6WD title: Happy Sesame Street GIF by Muppet Wiki rating: g username: muppetwiki embed_url: https://giphy.com/embed/fUQ4rhUZJYiQsas6WD images: original: height: "300" width: "400" url: https://media4.giphy.com/media/fUQ4rhUZJYiQsas6WD/giphy.gif mp4: https://media4.giphy.com/media/fUQ4rhUZJYiQsas6WD/giphy.mp4 webp: https://media4.giphy.com/media/fUQ4rhUZJYiQsas6WD/giphy.webp fixed_height: height: "200" width: "266" url: https://media4.giphy.com/media/fUQ4rhUZJYiQsas6WD/200.gif _meta: _credits: used: 1 balance: 999999999 note: Always _cache: is_cached: false note: Cache disabled for this endpoint _rate_limits: limit_minute: 1000 limit_day: 50000 remaining_minute: 999 remaining_day: 49999 properties: data: type: array example: - type: gif id: WAGC3LeqJvXglm5H7a url: https://giphy.com/gifs/wwe-raw-smackdown-WAGC3LeqJvXglm5H7a slug: wwe-raw-smackdown-WAGC3LeqJvXglm5H7a title: Roman Reigns Indecisiveness GIF by WWE rating: g username: wwe embed_url: https://giphy.com/embed/WAGC3LeqJvXglm5H7a images: original: height: "480" width: "480" url: https://media0.giphy.com/media/WAGC3LeqJvXglm5H7a/giphy.gif mp4: https://media0.giphy.com/media/WAGC3LeqJvXglm5H7a/giphy.mp4 webp: https://media0.giphy.com/media/WAGC3LeqJvXglm5H7a/giphy.webp fixed_height: height: "200" width: "200" url: https://media0.giphy.com/media/WAGC3LeqJvXglm5H7a/200.gif - type: gif id: fUQ4rhUZJYiQsas6WD url: https://giphy.com/gifs/muppetwiki-sesame-street-muppets-elmo-fUQ4rhUZJYiQsas6WD slug: muppetwiki-sesame-street-muppets-elmo-fUQ4rhUZJYiQsas6WD title: Happy Sesame Street GIF by Muppet Wiki rating: g username: muppetwiki embed_url: https://giphy.com/embed/fUQ4rhUZJYiQsas6WD images: original: height: "300" width: "400" url: https://media4.giphy.com/media/fUQ4rhUZJYiQsas6WD/giphy.gif mp4: https://media4.giphy.com/media/fUQ4rhUZJYiQsas6WD/giphy.mp4 webp: https://media4.giphy.com/media/fUQ4rhUZJYiQsas6WD/giphy.webp fixed_height: height: "200" width: "266" url: https://media4.giphy.com/media/fUQ4rhUZJYiQsas6WD/200.gif items: type: object properties: type: type: string example: gif id: type: string example: WAGC3LeqJvXglm5H7a url: type: string example: https://giphy.com/gifs/wwe-raw-smackdown-WAGC3LeqJvXglm5H7a slug: type: string example: wwe-raw-smackdown-WAGC3LeqJvXglm5H7a title: type: string example: Roman Reigns Indecisiveness GIF by WWE rating: type: string example: g username: type: string example: wwe embed_url: type: string example: https://giphy.com/embed/WAGC3LeqJvXglm5H7a images: type: object properties: original: type: object properties: height: type: string example: "480" width: type: string example: "480" url: type: string example: https://media0.giphy.com/media/WAGC3LeqJvXglm5H7a/giphy.gif mp4: type: string example: https://media0.giphy.com/media/WAGC3LeqJvXglm5H7a/giphy.mp4 webp: type: string example: https://media0.giphy.com/media/WAGC3LeqJvXglm5H7a/giphy.webp fixed_height: type: object properties: height: type: string example: "200" width: type: string example: "200" url: type: string example: https://media0.giphy.com/media/WAGC3LeqJvXglm5H7a/200.gif _meta: type: object properties: _credits: type: object properties: used: type: integer example: 1 balance: type: integer example: 999999999 note: type: string example: Always _cache: type: object properties: is_cached: type: boolean example: false note: type: string example: Cache disabled for this endpoint _rate_limits: type: object properties: limit_minute: type: integer example: 1000 limit_day: type: integer example: 50000 remaining_minute: type: integer example: 999 remaining_day: type: integer example: 49999 tags: - Giphy components: securitySchemes: default: type: http scheme: bearer description: Get your API Key from OnlyFansAPI Console - https://app.onlyfansapi.com/api-keys ```` # Search GIFs (/api-reference/giphy/search-gi-fs) Search GIFs from the OnlyFans Giphy proxy. Use the returned `id` as the `giphyId` body param when sending a chat or mass message. ## OpenAPI ````yaml https://app.onlyfansapi.com/scribe-docs/openapi.yaml get /api/{account}/giphy/search openapi: 3.0.3 info: title: OnlyFans API description: "" version: 1.0.0 servers: - url: https://app.onlyfansapi.com security: - default: [] tags: - name: AI Voice Messages description: "" - name: API Keys description: "" - name: Account description: Endpoints for your linked accounts - name: Analytics - Financial description: APIs for retrieving financial analytics data - name: Analytics - Summary description: APIs for retrieving summary analytics data - name: Banking description: Operations related to user banking details, payout methods, legal and tax information, and account country settings. - name: Banned Words description: Reference list of OnlyFans banned words used by the `blockBannedWords` screening parameter - name: Blocked / Restricted Users description: APIs for listing the users an account has blocked or restricted - name: Chargebacks description: "" - name: Chat Messages description: "" - name: Chats description: "" - name: Client Sessions description: "" - name: Connect OnlyFans Account description: "" - name: Data Exports description: APIs for managing data exports - name: Engagement / Messages description: "" - name: Fans description: APIs for managing OnlyFans fans (subscribers) - name: Fans - AI Summary description: APIs for generating and retrieving AI-powered fan profile summaries - name: Following description: APIs for managing OnlyFans followings (people you're subscribed to) - name: Free Trial Links description: APIs for managing Free Trial Links. Revenue totals are net earnings after refunds and chargebacks. `revenue.chargebacks` (or `summary.chargebacks_total` in stats) is the positive cached net amount already excluded from revenue; do not subtract it again. Spender responses include chargebacks across all attributed periods for each fan with positive net revenue. - name: Giphy description: "" - name: Link Tags description: APIs for managing tags on free trial links, tracking links, and Smart Links - name: Mass Messaging description: "" - name: Media description: "" - name: Media Vault description: "" - name: Media Vault Lists description: "" - name: Notifications description: Endpoints for managingr account notifications - name: Payouts description: "" - name: Post Comments description: "" - name: Post Labels description: APIs for managing your post labels - name: Posts description: APIs for managing OnlyFans posts - name: Profile Content description: Read another user's profile content using your connected OnlyFans account. OnlyFans enforces subscription and purchase requirements; these endpoints do not unlock content. Response samples use captured OnlyFans payloads with anonymized IDs, text, and media URLs; OFAPI metadata values are illustrative. - name: Promotions description: "" - name: Public Profiles description: "" - name: Queue description: "" - name: Release Forms description: APIs for managing OnlyFans release forms - name: Saved For Later (Messages) description: "" - name: Saved For Later (Posts) description: "" - name: Settings description: "" - name: Shared Free Trial Links description: APIs for Free Trial Links that other OF creators have shared with this account. Revenue, cost, and spender data are not available for shared links. - name: Shared Tracking Links description: APIs for Tracking Links (campaigns) that other OF creators have shared with this account. Revenue, cost, and spender data are not available for shared campaigns. - name: Smart Link Postbacks description: APIs for managing Smart Link postback destinations - name: Smart Links description: APIs for managing Smart Links (Free Trial Links and Tracking Links with pooled inventory) - name: Statistics description: "" - name: Stored Free Trial Links description: Instant APIs for retrieving stored free trial links from the OnlyFansAPI Cache (free, no credits used). `revenue.total` is net earnings after refunds and chargebacks. `revenue.chargebacks` is the positive cached net amount already excluded from that total; do not subtract it again. - name: Stored Shared Free Trial Links description: Instant APIs for retrieving stored shared Free Trial Links from the OnlyFansAPI Cache (free, no credits used) - name: Stored Shared Tracking Links description: Instant APIs for retrieving stored shared Tracking Links (campaigns) from the OnlyFansAPI Cache (free, no credits used) - name: Stored Tracking Links description: Instant APIs for retrieving stored tracking links from the OnlyFansAPI Cache (free, no credits used). `revenue.total` is net earnings after refunds and chargebacks. `revenue.chargebacks` is the positive cached net amount already excluded from that total; do not subtract it again. - name: Stories description: APIs for managing OnlyFans stories - name: Story Highlights description: APIs for managing OnlyFans story highlights - name: Subscription Bundles description: "" - name: Tracking Links description: APIs for managing tracking links. Revenue totals are net earnings after refunds and chargebacks. `revenue.chargebacks` (or `summary.chargebacks_total` in stats) is the positive cached net amount already excluded from revenue; do not subtract it again. Spender responses include chargebacks across all attributed periods for each fan with positive net revenue. - name: Transactions description: APIs for managing OnlyFans transactions - name: Usage description: Credit usage reporting for your team - name: User List Collections description: "" - name: Users description: APIs for fetching OnlyFans users - name: Webhooks description: "" paths: /api/{account}/giphy/search: parameters: - in: path name: account description: The Account ID example: acct_XXXXXXXXXXXXXXX required: true schema: type: string get: summary: Search GIFs operationId: searchGIFs description: Search GIFs from the OnlyFans Giphy proxy. Use the returned `id` as the `giphyId` body param when sending a chat or mass message. parameters: - in: query name: q description: The search query. example: hello required: true schema: type: string description: The search query. example: hello - in: query name: limit description: Number of GIFs to return (default = 10, max = 50) example: 10 required: false schema: type: integer description: Number of GIFs to return (default = 10, max = 50) example: 10 - in: query name: offset description: Number of GIFs to skip for pagination (default = 0) example: 0 required: false schema: type: integer description: Number of GIFs to skip for pagination (default = 0) example: 0 responses: "200": description: Success content: application/json: schema: type: object example: data: - type: gif id: fUQ4rhUZJYiQsas6WD url: https://giphy.com/gifs/muppetwiki-sesame-street-muppets-elmo-fUQ4rhUZJYiQsas6WD slug: muppetwiki-sesame-street-muppets-elmo-fUQ4rhUZJYiQsas6WD title: Happy Sesame Street GIF by Muppet Wiki rating: g username: muppetwiki embed_url: https://giphy.com/embed/fUQ4rhUZJYiQsas6WD images: original: height: "300" width: "400" url: https://media4.giphy.com/media/fUQ4rhUZJYiQsas6WD/giphy.gif mp4: https://media4.giphy.com/media/fUQ4rhUZJYiQsas6WD/giphy.mp4 webp: https://media4.giphy.com/media/fUQ4rhUZJYiQsas6WD/giphy.webp fixed_height: height: "200" width: "266" url: https://media4.giphy.com/media/fUQ4rhUZJYiQsas6WD/200.gif _meta: _credits: used: 1 balance: 999999999 note: Always _cache: is_cached: false note: Cache disabled for this endpoint _rate_limits: limit_minute: 1000 limit_day: 50000 remaining_minute: 999 remaining_day: 49999 properties: data: type: array example: - type: gif id: fUQ4rhUZJYiQsas6WD url: https://giphy.com/gifs/muppetwiki-sesame-street-muppets-elmo-fUQ4rhUZJYiQsas6WD slug: muppetwiki-sesame-street-muppets-elmo-fUQ4rhUZJYiQsas6WD title: Happy Sesame Street GIF by Muppet Wiki rating: g username: muppetwiki embed_url: https://giphy.com/embed/fUQ4rhUZJYiQsas6WD images: original: height: "300" width: "400" url: https://media4.giphy.com/media/fUQ4rhUZJYiQsas6WD/giphy.gif mp4: https://media4.giphy.com/media/fUQ4rhUZJYiQsas6WD/giphy.mp4 webp: https://media4.giphy.com/media/fUQ4rhUZJYiQsas6WD/giphy.webp fixed_height: height: "200" width: "266" url: https://media4.giphy.com/media/fUQ4rhUZJYiQsas6WD/200.gif items: type: object properties: type: type: string example: gif id: type: string example: fUQ4rhUZJYiQsas6WD url: type: string example: https://giphy.com/gifs/muppetwiki-sesame-street-muppets-elmo-fUQ4rhUZJYiQsas6WD slug: type: string example: muppetwiki-sesame-street-muppets-elmo-fUQ4rhUZJYiQsas6WD title: type: string example: Happy Sesame Street GIF by Muppet Wiki rating: type: string example: g username: type: string example: muppetwiki embed_url: type: string example: https://giphy.com/embed/fUQ4rhUZJYiQsas6WD images: type: object properties: original: type: object properties: height: type: string example: "300" width: type: string example: "400" url: type: string example: https://media4.giphy.com/media/fUQ4rhUZJYiQsas6WD/giphy.gif mp4: type: string example: https://media4.giphy.com/media/fUQ4rhUZJYiQsas6WD/giphy.mp4 webp: type: string example: https://media4.giphy.com/media/fUQ4rhUZJYiQsas6WD/giphy.webp fixed_height: type: object properties: height: type: string example: "200" width: type: string example: "266" url: type: string example: https://media4.giphy.com/media/fUQ4rhUZJYiQsas6WD/200.gif _meta: type: object properties: _credits: type: object properties: used: type: integer example: 1 balance: type: integer example: 999999999 note: type: string example: Always _cache: type: object properties: is_cached: type: boolean example: false note: type: string example: Cache disabled for this endpoint _rate_limits: type: object properties: limit_minute: type: integer example: 1000 limit_day: type: integer example: 50000 remaining_minute: type: integer example: 999 remaining_day: type: integer example: 49999 tags: - Giphy components: securitySchemes: default: type: http scheme: bearer description: Get your API Key from OnlyFansAPI Console - https://app.onlyfansapi.com/api-keys ```` # List Active Followings (/api-reference/following/list-active-followings) Get a paginated list of followings for an Account. By default OnlyFans returns this list newest-first, sorted by `subscribedByData.subscribeAt` descending. The expired list does not share this order, so do not assume it applies there. Pass `sort` (optionally with `sortDirection`) to reorder the list — see the parameter description for the caveat that OnlyFans persists the chosen order account-wide. An empty page is not the end of the list: OnlyFans applies `offset` to the whole following collection before filtering it down to the requested list, so a page can come back empty while more results follow. Keep following `_pagination.next_page` until it is `null` instead of stopping at the first empty page. ## OpenAPI ````yaml https://app.onlyfansapi.com/scribe-docs/openapi.yaml get /api/{account}/following/active openapi: 3.0.3 info: title: OnlyFans API description: "" version: 1.0.0 servers: - url: https://app.onlyfansapi.com security: - default: [] tags: - name: AI Voice Messages description: "" - name: API Keys description: "" - name: Account description: Endpoints for your linked accounts - name: Analytics - Financial description: APIs for retrieving financial analytics data - name: Analytics - Summary description: APIs for retrieving summary analytics data - name: Banking description: Operations related to user banking details, payout methods, legal and tax information, and account country settings. - name: Banned Words description: Reference list of OnlyFans banned words used by the `blockBannedWords` screening parameter - name: Blocked / Restricted Users description: APIs for listing the users an account has blocked or restricted - name: Chargebacks description: "" - name: Chat Messages description: "" - name: Chats description: "" - name: Client Sessions description: "" - name: Connect OnlyFans Account description: "" - name: Data Exports description: APIs for managing data exports - name: Engagement / Messages description: "" - name: Fans description: APIs for managing OnlyFans fans (subscribers) - name: Fans - AI Summary description: APIs for generating and retrieving AI-powered fan profile summaries - name: Following description: APIs for managing OnlyFans followings (people you're subscribed to) - name: Free Trial Links description: APIs for managing Free Trial Links. Revenue totals are net earnings after refunds and chargebacks. `revenue.chargebacks` (or `summary.chargebacks_total` in stats) is the positive cached net amount already excluded from revenue; do not subtract it again. Spender responses include chargebacks across all attributed periods for each fan with positive net revenue. - name: Giphy description: "" - name: Link Tags description: APIs for managing tags on free trial links, tracking links, and Smart Links - name: Mass Messaging description: "" - name: Media description: "" - name: Media Vault description: "" - name: Media Vault Lists description: "" - name: Notifications description: Endpoints for managingr account notifications - name: Payouts description: "" - name: Post Comments description: "" - name: Post Labels description: APIs for managing your post labels - name: Posts description: APIs for managing OnlyFans posts - name: Profile Content description: Read another user's profile content using your connected OnlyFans account. OnlyFans enforces subscription and purchase requirements; these endpoints do not unlock content. Response samples use captured OnlyFans payloads with anonymized IDs, text, and media URLs; OFAPI metadata values are illustrative. - name: Promotions description: "" - name: Public Profiles description: "" - name: Queue description: "" - name: Release Forms description: APIs for managing OnlyFans release forms - name: Saved For Later (Messages) description: "" - name: Saved For Later (Posts) description: "" - name: Settings description: "" - name: Shared Free Trial Links description: APIs for Free Trial Links that other OF creators have shared with this account. Revenue, cost, and spender data are not available for shared links. - name: Shared Tracking Links description: APIs for Tracking Links (campaigns) that other OF creators have shared with this account. Revenue, cost, and spender data are not available for shared campaigns. - name: Smart Link Postbacks description: APIs for managing Smart Link postback destinations - name: Smart Links description: APIs for managing Smart Links (Free Trial Links and Tracking Links with pooled inventory) - name: Statistics description: "" - name: Stored Free Trial Links description: Instant APIs for retrieving stored free trial links from the OnlyFansAPI Cache (free, no credits used). `revenue.total` is net earnings after refunds and chargebacks. `revenue.chargebacks` is the positive cached net amount already excluded from that total; do not subtract it again. - name: Stored Shared Free Trial Links description: Instant APIs for retrieving stored shared Free Trial Links from the OnlyFansAPI Cache (free, no credits used) - name: Stored Shared Tracking Links description: Instant APIs for retrieving stored shared Tracking Links (campaigns) from the OnlyFansAPI Cache (free, no credits used) - name: Stored Tracking Links description: Instant APIs for retrieving stored tracking links from the OnlyFansAPI Cache (free, no credits used). `revenue.total` is net earnings after refunds and chargebacks. `revenue.chargebacks` is the positive cached net amount already excluded from that total; do not subtract it again. - name: Stories description: APIs for managing OnlyFans stories - name: Story Highlights description: APIs for managing OnlyFans story highlights - name: Subscription Bundles description: "" - name: Tracking Links description: APIs for managing tracking links. Revenue totals are net earnings after refunds and chargebacks. `revenue.chargebacks` (or `summary.chargebacks_total` in stats) is the positive cached net amount already excluded from revenue; do not subtract it again. Spender responses include chargebacks across all attributed periods for each fan with positive net revenue. - name: Transactions description: APIs for managing OnlyFans transactions - name: Usage description: Credit usage reporting for your team - name: User List Collections description: "" - name: Users description: APIs for fetching OnlyFans users - name: Webhooks description: "" paths: /api/{account}/following/active: parameters: - in: path name: account description: The Account ID example: acct_XXXXXXXXXXXXXXX required: true schema: type: string get: summary: List Active Followings operationId: listActiveFollowings description: "Get a paginated list of followings for an Account. By default OnlyFans returns this list newest-first, sorted by `subscribedByData.subscribeAt` descending. The expired list does not share this order, so do not assume it applies there. Pass `sort` (optionally with `sortDirection`) to reorder the list — see the parameter description for the caveat that OnlyFans persists the chosen order account-wide. An empty page is not the end of the list: OnlyFans applies `offset` to the whole following collection before filtering it down to the requested list, so a page can come back empty while more results follow. Keep following `_pagination.next_page` until it is `null` instead of stopping at the first empty page." parameters: - in: query name: limit description: Number of followings to return (1-50). Must be at least 1. Must not be greater than 50. example: 10 required: false schema: type: integer description: Number of followings to return (1-50). Must be at least 1. Must not be greater than 50. example: 10 - in: query name: offset description: Pagination offset. Must be at least 0. example: 0 required: false schema: type: integer description: Pagination offset. Must be at least 0. example: 0 - in: query name: query description: Search within following name/username. example: john required: false schema: type: string description: Search within following name/username. example: john nullable: true - in: query name: filter description: "" example: [] required: false schema: type: object description: "" example: [] properties: {} - in: query name: filter.online description: Filter by online status (1 for online, 0 for offline, null for all). example: 1 required: false schema: type: integer description: Filter by online status (1 for online, 0 for offline, null for all). example: 1 enum: - 1 - 0 nullable: true - in: query name: filter.paid description: Filter by paid status (1 for paid, 0 for free, null for all). example: 1 required: false schema: type: integer description: Filter by paid status (1 for paid, 0 for free, null for all). example: 1 enum: - 1 - 0 nullable: true - in: query name: sort description: "Order the list by `last_activity` (the followed creator's last activity), `expire_date` (subscription expiry), `subscribe_date` (subscription start) or `is_expired` (expired first — OnlyFans only offers this one on the expired list). Omit it to keep whichever order is currently stored for the account. **Note:** OnlyFans persists this order account-wide, so it also applies to later requests that omit `sort` and to the creator's own onlyfans.com UI, until it is changed again. **Expired list:** OnlyFans applies `offset` to the whole following collection and only then filters it down to expired subscriptions, so ordering by expiry descending puts the still-active subscriptions first and moves the expired rows to the tail of the collection — the first several hundred offsets then come back empty. Use `sortDirection=asc` or `sort=is_expired` to get expired-first results. For that reason `sort=expire_date` on the expired list defaults to `asc` instead of `desc` when you do not pass `sortDirection`. Whatever order you pick, an empty page is **not** the end of the list: keep following `_pagination.next_page` until it is `null` rather than stopping at the first empty page. This field is required whensortDirection is present."
example: subscribe_date
required: false
schema:
type: string
description: "Order the list by `last_activity` (the followed creator's last
activity), `expire_date` (subscription expiry), `subscribe_date`
(subscription start) or `is_expired` (expired first — OnlyFans
only offers this one on the expired list). Omit it to keep
whichever order is currently stored for the account. **Note:**
OnlyFans persists this order account-wide, so it also applies to
later requests that omit `sort` and to the creator's own
onlyfans.com UI, until it is changed again. **Expired list:**
OnlyFans applies `offset` to the whole following collection and
only then filters it down to expired subscriptions, so ordering by
expiry descending puts the still-active subscriptions first and
moves the expired rows to the tail of the collection — the first
several hundred offsets then come back empty. Use
`sortDirection=asc` or `sort=is_expired` to get expired-first
results. For that reason `sort=expire_date` on the expired list
defaults to `asc` instead of `desc` when you do not pass
`sortDirection`. Whatever order you pick, an empty page is **not**
the end of the list: keep following `_pagination.next_page` until
it is `null` rather than stopping at the first empty page. This
field is required when sortDirection is present."
example: subscribe_date
enum:
- last_activity
- expire_date
- subscribe_date
- is_expired
nullable: true
- in: query
name: sortDirection
description: "Direction for `sort`: `desc` (default) or `asc`. Requires `sort`
to be set. Exception: `sort=expire_date` on the expired list
defaults to `asc`, because `desc` moves the expired rows to the tail
of the underlying collection and leaves the early pages empty.
Passing `sortDirection` explicitly always wins."
example: desc
required: false
schema:
type: string
description: "Direction for `sort`: `desc` (default) or `asc`. Requires `sort`
to be set. Exception: `sort=expire_date` on the expired list
defaults to `asc`, because `desc` moves the expired rows to the
tail of the underlying collection and leaves the early pages
empty. Passing `sortDirection` explicitly always wins."
example: desc
enum:
- asc
- desc
nullable: true
responses:
"200":
description: ""
content:
application/json:
schema:
type: object
example:
data:
list:
- view: x
avatar: https://public.onlyfans.com/files/j/jr/jrh/jrhrmrkcgwyldumcgfgsij7h9hncsf3b1640855614/avatar.jpg
avatarThumbs:
c50: https://thumbs.onlyfans.com/public/files/thumbs/c50/j/jr/jrh/jrhrmrkcgwyldumcgfgsij7h9hncsf3b1640855614/avatar.jpg
c144: https://thumbs.onlyfans.com/public/files/thumbs/c144/j/jr/jrh/jrhrmrkcgwyldumcgfgsij7h9hncsf3b1640855614/avatar.jpg
header: https://public.onlyfans.com/files/x/xl/xlu/xlusgobxpcebctdptohj7bogxvl9flfu1671047829/254/header.jpg
headerSize:
width: 4868
height: 851
headerThumbs:
w480: https://thumbs.onlyfans.com/public/files/thumbs/w480/x/xl/xlu/xlusgobxpcebctdptohj7bogxvl9flfu1671047829/254/header.jpg
w760: https://thumbs.onlyfans.com/public/files/thumbs/w760/x/xl/xlu/xlusgobxpcebctdptohj7bogxvl9flfu1671047829/254/header.jpg
id: 254
name: OnlyFans Creators
username: onlyfanscreators
canLookStory: true
canCommentStory: false
hasNotViewedStory: false
isVerified: true
canPayInternal: true
hasScheduledStream: false
hasStream: false
hasStories: false
tipsEnabled: true
tipsTextEnabled: false
tipsMin: 5
tipsMinInternal: 1
tipsMax: 200
canEarn: true
canAddSubscriber: false
subscribePrice: 0
isPaywallRequired: true
isRestricted: false
canRestrict: true
subscribedBy: true
subscribedByExpire: false
subscribedByExpireDate: 2025-01-01T00:00:00+00:00
subscribedByAutoprolong: true
subscribedIsExpiredNow: false
currentSubscribePrice: 0
subscribedOn: false
subscribedOnExpiredNow: null
subscribedOnDuration: null
listsStates:
- id: following
type: following
name: Following
hasUser: true
canAddUser: false
cannotAddUserReason: ALREADY_EXISTS
canReport: false
canReceiveChatMessage: false
hideChat: false
lastSeen: null
isPerformer: true
isRealPerformer: true
subscribedByData:
price: 0
newPrice: 0
regularPrice: 0
subscribePrice: 0
discountPercent: 0
discountPeriod: 1
subscribeAt: 2025-01-01T00:00:00+00:00
expiredAt: 2025-01-01T00:00:00+00:00
renewedAt: 2025-01-01T00:00:00+00:00
discountFinishedAt: null
discountStartedAt: null
status: null
isMuted: false
unsubscribeReason: No reason given
duration: 4 months
showPostsInFeed: true
subscribes:
- id: 123
userId: 254
subscriberId: 123
date: 2025-01-01T00:00:00+00:00
duration: 3652
startDate: 2025-01-01T00:00:00+00:00
expireDate: 2025-01-01T00:00:00+00:00
cancelDate: null
price: 0
regularPrice: 0
discount: 0
earningId: 0
action: subscribe
type: auto
offerStart: null
offerEnd: null
isCurrent: true
hasActivePaidSubscriptions: false
subscribedOnData: null
canTrialSend: false
isBlocked: false
canUnsubscribe: true
isPendingAutoprolong: false
hasMore: true
_pagination:
next_page: https://app.onlyfansapi.com/api/acct_abc123/following/active?offset=10&limit=10
_meta:
_credits:
used: 1
balance: 999971
note: Always
_cache:
is_cached: false
note: Cache disabled for this endpoint
_rate_limits:
limit_minute: 1000
limit_day: 50000
remaining_minute: 999
remaining_day: 49994
properties:
data:
type: object
properties:
list:
type: array
example:
- view: x
avatar: https://public.onlyfans.com/files/j/jr/jrh/jrhrmrkcgwyldumcgfgsij7h9hncsf3b1640855614/avatar.jpg
avatarThumbs:
c50: https://thumbs.onlyfans.com/public/files/thumbs/c50/j/jr/jrh/jrhrmrkcgwyldumcgfgsij7h9hncsf3b1640855614/avatar.jpg
c144: https://thumbs.onlyfans.com/public/files/thumbs/c144/j/jr/jrh/jrhrmrkcgwyldumcgfgsij7h9hncsf3b1640855614/avatar.jpg
header: https://public.onlyfans.com/files/x/xl/xlu/xlusgobxpcebctdptohj7bogxvl9flfu1671047829/254/header.jpg
headerSize:
width: 4868
height: 851
headerThumbs:
w480: https://thumbs.onlyfans.com/public/files/thumbs/w480/x/xl/xlu/xlusgobxpcebctdptohj7bogxvl9flfu1671047829/254/header.jpg
w760: https://thumbs.onlyfans.com/public/files/thumbs/w760/x/xl/xlu/xlusgobxpcebctdptohj7bogxvl9flfu1671047829/254/header.jpg
id: 254
name: OnlyFans Creators
username: onlyfanscreators
canLookStory: true
canCommentStory: false
hasNotViewedStory: false
isVerified: true
canPayInternal: true
hasScheduledStream: false
hasStream: false
hasStories: false
tipsEnabled: true
tipsTextEnabled: false
tipsMin: 5
tipsMinInternal: 1
tipsMax: 200
canEarn: true
canAddSubscriber: false
subscribePrice: 0
isPaywallRequired: true
isRestricted: false
canRestrict: true
subscribedBy: true
subscribedByExpire: false
subscribedByExpireDate: 2025-01-01T00:00:00+00:00
subscribedByAutoprolong: true
subscribedIsExpiredNow: false
currentSubscribePrice: 0
subscribedOn: false
subscribedOnExpiredNow: null
subscribedOnDuration: null
listsStates:
- id: following
type: following
name: Following
hasUser: true
canAddUser: false
cannotAddUserReason: ALREADY_EXISTS
canReport: false
canReceiveChatMessage: false
hideChat: false
lastSeen: null
isPerformer: true
isRealPerformer: true
subscribedByData:
price: 0
newPrice: 0
regularPrice: 0
subscribePrice: 0
discountPercent: 0
discountPeriod: 1
subscribeAt: 2025-01-01T00:00:00+00:00
expiredAt: 2025-01-01T00:00:00+00:00
renewedAt: 2025-01-01T00:00:00+00:00
discountFinishedAt: null
discountStartedAt: null
status: null
isMuted: false
unsubscribeReason: No reason given
duration: 4 months
showPostsInFeed: true
subscribes:
- id: 123
userId: 254
subscriberId: 123
date: 2025-01-01T00:00:00+00:00
duration: 3652
startDate: 2025-01-01T00:00:00+00:00
expireDate: 2025-01-01T00:00:00+00:00
cancelDate: null
price: 0
regularPrice: 0
discount: 0
earningId: 0
action: subscribe
type: auto
offerStart: null
offerEnd: null
isCurrent: true
hasActivePaidSubscriptions: false
subscribedOnData: null
canTrialSend: false
isBlocked: false
canUnsubscribe: true
isPendingAutoprolong: false
items:
type: object
properties:
view:
type: string
example: x
avatar:
type: string
example: https://public.onlyfans.com/files/j/jr/jrh/jrhrmrkcgwyldumcgfgsij7h9hncsf3b1640855614/avatar.jpg
avatarThumbs:
type: object
properties:
c50:
type: string
example: https://thumbs.onlyfans.com/public/files/thumbs/c50/j/jr/jrh/jrhrmrkcgwyldumcgfgsij7h9hncsf3b1640855614/avatar.jpg
c144:
type: string
example: https://thumbs.onlyfans.com/public/files/thumbs/c144/j/jr/jrh/jrhrmrkcgwyldumcgfgsij7h9hncsf3b1640855614/avatar.jpg
header:
type: string
example: https://public.onlyfans.com/files/x/xl/xlu/xlusgobxpcebctdptohj7bogxvl9flfu1671047829/254/header.jpg
headerSize:
type: object
properties:
width:
type: integer
example: 4868
height:
type: integer
example: 851
headerThumbs:
type: object
properties:
w480:
type: string
example: https://thumbs.onlyfans.com/public/files/thumbs/w480/x/xl/xlu/xlusgobxpcebctdptohj7bogxvl9flfu1671047829/254/header.jpg
w760:
type: string
example: https://thumbs.onlyfans.com/public/files/thumbs/w760/x/xl/xlu/xlusgobxpcebctdptohj7bogxvl9flfu1671047829/254/header.jpg
id:
type: integer
example: 254
name:
type: string
example: OnlyFans Creators
username:
type: string
example: onlyfanscreators
canLookStory:
type: boolean
example: true
canCommentStory:
type: boolean
example: false
hasNotViewedStory:
type: boolean
example: false
isVerified:
type: boolean
example: true
canPayInternal:
type: boolean
example: true
hasScheduledStream:
type: boolean
example: false
hasStream:
type: boolean
example: false
hasStories:
type: boolean
example: false
tipsEnabled:
type: boolean
example: true
tipsTextEnabled:
type: boolean
example: false
tipsMin:
type: integer
example: 5
tipsMinInternal:
type: integer
example: 1
tipsMax:
type: integer
example: 200
canEarn:
type: boolean
example: true
canAddSubscriber:
type: boolean
example: false
subscribePrice:
type: integer
example: 0
isPaywallRequired:
type: boolean
example: true
isRestricted:
type: boolean
example: false
canRestrict:
type: boolean
example: true
subscribedBy:
type: boolean
example: true
subscribedByExpire:
type: boolean
example: false
subscribedByExpireDate:
type: string
example: 2025-01-01T00:00:00+00:00
subscribedByAutoprolong:
type: boolean
example: true
subscribedIsExpiredNow:
type: boolean
example: false
currentSubscribePrice:
type: integer
example: 0
subscribedOn:
type: boolean
example: false
subscribedOnExpiredNow:
type: string
example: null
nullable: true
subscribedOnDuration:
type: string
example: null
nullable: true
listsStates:
type: array
example:
- id: following
type: following
name: Following
hasUser: true
canAddUser: false
cannotAddUserReason: ALREADY_EXISTS
items:
type: object
properties:
id:
type: string
example: following
type:
type: string
example: following
name:
type: string
example: Following
hasUser:
type: boolean
example: true
canAddUser:
type: boolean
example: false
cannotAddUserReason:
type: string
example: ALREADY_EXISTS
canReport:
type: boolean
example: false
canReceiveChatMessage:
type: boolean
example: false
hideChat:
type: boolean
example: false
lastSeen:
type: string
example: null
nullable: true
isPerformer:
type: boolean
example: true
isRealPerformer:
type: boolean
example: true
subscribedByData:
type: object
properties:
price:
type: integer
example: 0
newPrice:
type: integer
example: 0
regularPrice:
type: integer
example: 0
subscribePrice:
type: integer
example: 0
discountPercent:
type: integer
example: 0
discountPeriod:
type: integer
example: 1
subscribeAt:
type: string
example: 2025-01-01T00:00:00+00:00
expiredAt:
type: string
example: 2025-01-01T00:00:00+00:00
renewedAt:
type: string
example: 2025-01-01T00:00:00+00:00
discountFinishedAt:
type: string
example: null
nullable: true
discountStartedAt:
type: string
example: null
nullable: true
status:
type: string
example: null
nullable: true
isMuted:
type: boolean
example: false
unsubscribeReason:
type: string
example: No reason given
duration:
type: string
example: 4 months
showPostsInFeed:
type: boolean
example: true
subscribes:
type: array
example:
- id: 123
userId: 254
subscriberId: 123
date: 2025-01-01T00:00:00+00:00
duration: 3652
startDate: 2025-01-01T00:00:00+00:00
expireDate: 2025-01-01T00:00:00+00:00
cancelDate: null
price: 0
regularPrice: 0
discount: 0
earningId: 0
action: subscribe
type: auto
offerStart: null
offerEnd: null
isCurrent: true
items:
type: object
properties:
id:
type: integer
example: 123
userId:
type: integer
example: 254
subscriberId:
type: integer
example: 123
date:
type: string
example: 2025-01-01T00:00:00+00:00
duration:
type: integer
example: 3652
startDate:
type: string
example: 2025-01-01T00:00:00+00:00
expireDate:
type: string
example: 2025-01-01T00:00:00+00:00
cancelDate:
type: string
example: null
nullable: true
price:
type: integer
example: 0
regularPrice:
type: integer
example: 0
discount:
type: integer
example: 0
earningId:
type: integer
example: 0
action:
type: string
example: subscribe
type:
type: string
example: auto
offerStart:
type: string
example: null
nullable: true
offerEnd:
type: string
example: null
nullable: true
isCurrent:
type: boolean
example: true
hasActivePaidSubscriptions:
type: boolean
example: false
subscribedOnData:
type: string
example: null
nullable: true
canTrialSend:
type: boolean
example: false
isBlocked:
type: boolean
example: false
canUnsubscribe:
type: boolean
example: true
isPendingAutoprolong:
type: boolean
example: false
hasMore:
type: boolean
example: true
_pagination:
type: object
properties:
next_page:
type: string
example: https://app.onlyfansapi.com/api/acct_abc123/following/active?offset=10&limit=10
_meta:
type: object
properties:
_credits:
type: object
properties:
used:
type: integer
example: 1
balance:
type: integer
example: 999971
note:
type: string
example: Always
_cache:
type: object
properties:
is_cached:
type: boolean
example: false
note:
type: string
example: Cache disabled for this endpoint
_rate_limits:
type: object
properties:
limit_minute:
type: integer
example: 1000
limit_day:
type: integer
example: 50000
remaining_minute:
type: integer
example: 999
remaining_day:
type: integer
example: 49994
tags:
- Following
components:
securitySchemes:
default:
type: http
scheme: bearer
description: Get your API Key from OnlyFansAPI Console -
https://app.onlyfansapi.com/api-keys
````
# List All Followings (/api-reference/following/list-all-followings)
Get a paginated list of followings for an Account. By default OnlyFans returns this list newest-first, sorted by `subscribedByData.subscribeAt` descending. The expired list does not share this order, so do not assume it applies there. Pass `sort` (optionally with `sortDirection`) to reorder the list — see the parameter description for the caveat that OnlyFans persists the chosen order account-wide. An empty page is not the end of the list: OnlyFans applies `offset` to the whole following collection before filtering it down to the requested list, so a page can come back empty while more results follow. Keep following `_pagination.next_page` until it is `null` instead of stopping at the first empty page.
## OpenAPI
````yaml https://app.onlyfansapi.com/scribe-docs/openapi.yaml get /api/{account}/following/all
openapi: 3.0.3
info:
title: OnlyFans API
description: ""
version: 1.0.0
servers:
- url: https://app.onlyfansapi.com
security:
- default: []
tags:
- name: AI Voice Messages
description: ""
- name: API Keys
description: ""
- name: Account
description: Endpoints for your linked accounts
- name: Analytics - Financial
description: APIs for retrieving financial analytics data
- name: Analytics - Summary
description: APIs for retrieving summary analytics data
- name: Banking
description: Operations related to user banking details, payout methods, legal
and tax information, and account country settings.
- name: Banned Words
description: Reference list of OnlyFans banned words used by the
`blockBannedWords` screening parameter
- name: Blocked / Restricted Users
description: APIs for listing the users an account has blocked or restricted
- name: Chargebacks
description: ""
- name: Chat Messages
description: ""
- name: Chats
description: ""
- name: Client Sessions
description: ""
- name: Connect OnlyFans Account
description: ""
- name: Data Exports
description: APIs for managing data exports
- name: Engagement / Messages
description: ""
- name: Fans
description: APIs for managing OnlyFans fans (subscribers)
- name: Fans - AI Summary
description: APIs for generating and retrieving AI-powered fan profile summaries
- name: Following
description: APIs for managing OnlyFans followings (people you're subscribed to)
- name: Free Trial Links
description: APIs for managing Free Trial Links. Revenue totals are net earnings
after refunds and chargebacks. `revenue.chargebacks` (or
`summary.chargebacks_total` in stats) is the positive cached net amount
already excluded from revenue; do not subtract it again. Spender responses
include chargebacks across all attributed periods for each fan with
positive net revenue.
- name: Giphy
description: ""
- name: Link Tags
description: APIs for managing tags on free trial links, tracking links, and Smart Links
- name: Mass Messaging
description: ""
- name: Media
description: ""
- name: Media Vault
description: ""
- name: Media Vault Lists
description: ""
- name: Notifications
description: Endpoints for managingr account notifications
- name: Payouts
description: ""
- name: Post Comments
description: ""
- name: Post Labels
description: APIs for managing your post labels
- name: Posts
description: APIs for managing OnlyFans posts
- name: Profile Content
description: Read another user's profile content using your connected OnlyFans
account. OnlyFans enforces subscription and purchase requirements; these
endpoints do not unlock content. Response samples use captured OnlyFans
payloads with anonymized IDs, text, and media URLs; OFAPI metadata values
are illustrative.
- name: Promotions
description: ""
- name: Public Profiles
description: ""
- name: Queue
description: ""
- name: Release Forms
description: APIs for managing OnlyFans release forms
- name: Saved For Later (Messages)
description: ""
- name: Saved For Later (Posts)
description: ""
- name: Settings
description: ""
- name: Shared Free Trial Links
description: APIs for Free Trial Links that other OF creators have shared with
this account. Revenue, cost, and spender data are not available for shared
links.
- name: Shared Tracking Links
description: APIs for Tracking Links (campaigns) that other OF creators have
shared with this account. Revenue, cost, and spender data are not
available for shared campaigns.
- name: Smart Link Postbacks
description: APIs for managing Smart Link postback destinations
- name: Smart Links
description: APIs for managing Smart Links (Free Trial Links and Tracking Links
with pooled inventory)
- name: Statistics
description: ""
- name: Stored Free Trial Links
description: Instant APIs for retrieving stored free trial links from the
OnlyFansAPI Cache (free, no credits used). `revenue.total` is net earnings
after refunds and chargebacks. `revenue.chargebacks` is the positive
cached net amount already excluded from that total; do not subtract it
again.
- name: Stored Shared Free Trial Links
description: Instant APIs for retrieving stored shared Free Trial Links from the
OnlyFansAPI Cache (free, no credits used)
- name: Stored Shared Tracking Links
description: Instant APIs for retrieving stored shared Tracking Links
(campaigns) from the OnlyFansAPI Cache (free, no credits used)
- name: Stored Tracking Links
description: Instant APIs for retrieving stored tracking links from the
OnlyFansAPI Cache (free, no credits used). `revenue.total` is net earnings
after refunds and chargebacks. `revenue.chargebacks` is the positive
cached net amount already excluded from that total; do not subtract it
again.
- name: Stories
description: APIs for managing OnlyFans stories
- name: Story Highlights
description: APIs for managing OnlyFans story highlights
- name: Subscription Bundles
description: ""
- name: Tracking Links
description: APIs for managing tracking links. Revenue totals are net earnings
after refunds and chargebacks. `revenue.chargebacks` (or
`summary.chargebacks_total` in stats) is the positive cached net amount
already excluded from revenue; do not subtract it again. Spender responses
include chargebacks across all attributed periods for each fan with
positive net revenue.
- name: Transactions
description: APIs for managing OnlyFans transactions
- name: Usage
description: Credit usage reporting for your team
- name: User List Collections
description: ""
- name: Users
description: APIs for fetching OnlyFans users
- name: Webhooks
description: ""
paths:
/api/{account}/following/all:
parameters:
- in: path
name: account
description: The Account ID
example: acct_XXXXXXXXXXXXXXX
required: true
schema:
type: string
get:
summary: List All Followings
operationId: listAllFollowings
description: "Get a paginated list of followings for an Account. By default
OnlyFans returns this list newest-first, sorted by
`subscribedByData.subscribeAt` descending. The expired list does not
share this order, so do not assume it applies there. Pass `sort`
(optionally with `sortDirection`) to reorder the list — see the
parameter description for the caveat that OnlyFans persists the chosen
order account-wide. An empty page is not the end of the list: OnlyFans
applies `offset` to the whole following collection before filtering it
down to the requested list, so a page can come back empty while more
results follow. Keep following `_pagination.next_page` until it is
`null` instead of stopping at the first empty page."
parameters:
- in: query
name: limit
description: Number of followings to return (1-50). Must be at least 1. Must not
be greater than 50.
example: 10
required: false
schema:
type: integer
description: Number of followings to return (1-50). Must be at least 1. Must not
be greater than 50.
example: 10
- in: query
name: offset
description: Pagination offset. Must be at least 0.
example: 0
required: false
schema:
type: integer
description: Pagination offset. Must be at least 0.
example: 0
- in: query
name: query
description: Search within following name/username.
example: john
required: false
schema:
type: string
description: Search within following name/username.
example: john
nullable: true
- in: query
name: filter
description: ""
example: []
required: false
schema:
type: object
description: ""
example: []
properties: {}
- in: query
name: filter.online
description: Filter by online status (1 for online, 0 for offline, null for all).
example: 1
required: false
schema:
type: integer
description: Filter by online status (1 for online, 0 for offline, null for
all).
example: 1
enum:
- 1
- 0
nullable: true
- in: query
name: filter.paid
description: Filter by paid status (1 for paid, 0 for free, null for all).
example: 1
required: false
schema:
type: integer
description: Filter by paid status (1 for paid, 0 for free, null for all).
example: 1
enum:
- 1
- 0
nullable: true
- in: query
name: sort
description: "Order the list by `last_activity` (the followed creator's last
activity), `expire_date` (subscription expiry), `subscribe_date`
(subscription start) or `is_expired` (expired first — OnlyFans only
offers this one on the expired list). Omit it to keep whichever
order is currently stored for the account. **Note:** OnlyFans
persists this order account-wide, so it also applies to later
requests that omit `sort` and to the creator's own onlyfans.com UI,
until it is changed again. **Expired list:** OnlyFans applies
`offset` to the whole following collection and only then filters it
down to expired subscriptions, so ordering by expiry descending puts
the still-active subscriptions first and moves the expired rows to
the tail of the collection — the first several hundred offsets then
come back empty. Use `sortDirection=asc` or `sort=is_expired` to get
expired-first results. For that reason `sort=expire_date` on the
expired list defaults to `asc` instead of `desc` when you do not
pass `sortDirection`. Whatever order you pick, an empty page is
**not** the end of the list: keep following `_pagination.next_page`
until it is `null` rather than stopping at the first empty page.
This field is required when sortDirection is present."
example: subscribe_date
required: false
schema:
type: string
description: "Order the list by `last_activity` (the followed creator's last
activity), `expire_date` (subscription expiry), `subscribe_date`
(subscription start) or `is_expired` (expired first — OnlyFans
only offers this one on the expired list). Omit it to keep
whichever order is currently stored for the account. **Note:**
OnlyFans persists this order account-wide, so it also applies to
later requests that omit `sort` and to the creator's own
onlyfans.com UI, until it is changed again. **Expired list:**
OnlyFans applies `offset` to the whole following collection and
only then filters it down to expired subscriptions, so ordering by
expiry descending puts the still-active subscriptions first and
moves the expired rows to the tail of the collection — the first
several hundred offsets then come back empty. Use
`sortDirection=asc` or `sort=is_expired` to get expired-first
results. For that reason `sort=expire_date` on the expired list
defaults to `asc` instead of `desc` when you do not pass
`sortDirection`. Whatever order you pick, an empty page is **not**
the end of the list: keep following `_pagination.next_page` until
it is `null` rather than stopping at the first empty page. This
field is required when sortDirection is present."
example: subscribe_date
enum:
- last_activity
- expire_date
- subscribe_date
- is_expired
nullable: true
- in: query
name: sortDirection
description: "Direction for `sort`: `desc` (default) or `asc`. Requires `sort`
to be set. Exception: `sort=expire_date` on the expired list
defaults to `asc`, because `desc` moves the expired rows to the tail
of the underlying collection and leaves the early pages empty.
Passing `sortDirection` explicitly always wins."
example: desc
required: false
schema:
type: string
description: "Direction for `sort`: `desc` (default) or `asc`. Requires `sort`
to be set. Exception: `sort=expire_date` on the expired list
defaults to `asc`, because `desc` moves the expired rows to the
tail of the underlying collection and leaves the early pages
empty. Passing `sortDirection` explicitly always wins."
example: desc
enum:
- asc
- desc
nullable: true
responses:
"200":
description: ""
content:
application/json:
schema:
type: object
example:
data:
list:
- view: x
avatar: https://public.onlyfans.com/files/j/jr/jrh/jrhrmrkcgwyldumcgfgsij7h9hncsf3b1640855614/avatar.jpg
avatarThumbs:
c50: https://thumbs.onlyfans.com/public/files/thumbs/c50/j/jr/jrh/jrhrmrkcgwyldumcgfgsij7h9hncsf3b1640855614/avatar.jpg
c144: https://thumbs.onlyfans.com/public/files/thumbs/c144/j/jr/jrh/jrhrmrkcgwyldumcgfgsij7h9hncsf3b1640855614/avatar.jpg
header: https://public.onlyfans.com/files/x/xl/xlu/xlusgobxpcebctdptohj7bogxvl9flfu1671047829/254/header.jpg
headerSize:
width: 4868
height: 851
headerThumbs:
w480: https://thumbs.onlyfans.com/public/files/thumbs/w480/x/xl/xlu/xlusgobxpcebctdptohj7bogxvl9flfu1671047829/254/header.jpg
w760: https://thumbs.onlyfans.com/public/files/thumbs/w760/x/xl/xlu/xlusgobxpcebctdptohj7bogxvl9flfu1671047829/254/header.jpg
id: 254
name: OnlyFans Creators
username: onlyfanscreators
canLookStory: true
canCommentStory: false
hasNotViewedStory: false
isVerified: true
canPayInternal: true
hasScheduledStream: false
hasStream: false
hasStories: false
tipsEnabled: true
tipsTextEnabled: false
tipsMin: 5
tipsMinInternal: 1
tipsMax: 200
canEarn: true
canAddSubscriber: false
subscribePrice: 0
isPaywallRequired: true
isRestricted: false
canRestrict: true
subscribedBy: true
subscribedByExpire: false
subscribedByExpireDate: 2025-01-01T00:00:00+00:00
subscribedByAutoprolong: true
subscribedIsExpiredNow: false
currentSubscribePrice: 0
subscribedOn: false
subscribedOnExpiredNow: null
subscribedOnDuration: null
listsStates:
- id: following
type: following
name: Following
hasUser: true
canAddUser: false
cannotAddUserReason: ALREADY_EXISTS
canReport: false
canReceiveChatMessage: false
hideChat: false
lastSeen: null
isPerformer: true
isRealPerformer: true
subscribedByData:
price: 0
newPrice: 0
regularPrice: 0
subscribePrice: 0
discountPercent: 0
discountPeriod: 1
subscribeAt: 2025-01-01T00:00:00+00:00
expiredAt: 2025-01-01T00:00:00+00:00
renewedAt: 2025-01-01T00:00:00+00:00
discountFinishedAt: null
discountStartedAt: null
status: null
isMuted: false
unsubscribeReason: No reason given
duration: 4 months
showPostsInFeed: true
subscribes:
- id: 123
userId: 254
subscriberId: 123
date: 2025-01-01T00:00:00+00:00
duration: 3652
startDate: 2025-01-01T00:00:00+00:00
expireDate: 2025-01-01T00:00:00+00:00
cancelDate: null
price: 0
regularPrice: 0
discount: 0
earningId: 0
action: subscribe
type: auto
offerStart: null
offerEnd: null
isCurrent: true
hasActivePaidSubscriptions: false
subscribedOnData: null
canTrialSend: false
isBlocked: false
canUnsubscribe: true
isPendingAutoprolong: false
hasMore: true
_pagination:
next_page: https://app.onlyfansapi.com/api/acct_abc123/following/all?offset=10&limit=10
_meta:
_credits:
used: 1
balance: 999999988
note: Always
_cache:
is_cached: false
note: Cache disabled for this endpoint
_rate_limits:
limit_minute: 1000
limit_day: 50000
remaining_minute: 999
remaining_day: 49942
properties:
data:
type: object
properties:
list:
type: array
example:
- view: x
avatar: https://public.onlyfans.com/files/j/jr/jrh/jrhrmrkcgwyldumcgfgsij7h9hncsf3b1640855614/avatar.jpg
avatarThumbs:
c50: https://thumbs.onlyfans.com/public/files/thumbs/c50/j/jr/jrh/jrhrmrkcgwyldumcgfgsij7h9hncsf3b1640855614/avatar.jpg
c144: https://thumbs.onlyfans.com/public/files/thumbs/c144/j/jr/jrh/jrhrmrkcgwyldumcgfgsij7h9hncsf3b1640855614/avatar.jpg
header: https://public.onlyfans.com/files/x/xl/xlu/xlusgobxpcebctdptohj7bogxvl9flfu1671047829/254/header.jpg
headerSize:
width: 4868
height: 851
headerThumbs:
w480: https://thumbs.onlyfans.com/public/files/thumbs/w480/x/xl/xlu/xlusgobxpcebctdptohj7bogxvl9flfu1671047829/254/header.jpg
w760: https://thumbs.onlyfans.com/public/files/thumbs/w760/x/xl/xlu/xlusgobxpcebctdptohj7bogxvl9flfu1671047829/254/header.jpg
id: 254
name: OnlyFans Creators
username: onlyfanscreators
canLookStory: true
canCommentStory: false
hasNotViewedStory: false
isVerified: true
canPayInternal: true
hasScheduledStream: false
hasStream: false
hasStories: false
tipsEnabled: true
tipsTextEnabled: false
tipsMin: 5
tipsMinInternal: 1
tipsMax: 200
canEarn: true
canAddSubscriber: false
subscribePrice: 0
isPaywallRequired: true
isRestricted: false
canRestrict: true
subscribedBy: true
subscribedByExpire: false
subscribedByExpireDate: 2025-01-01T00:00:00+00:00
subscribedByAutoprolong: true
subscribedIsExpiredNow: false
currentSubscribePrice: 0
subscribedOn: false
subscribedOnExpiredNow: null
subscribedOnDuration: null
listsStates:
- id: following
type: following
name: Following
hasUser: true
canAddUser: false
cannotAddUserReason: ALREADY_EXISTS
canReport: false
canReceiveChatMessage: false
hideChat: false
lastSeen: null
isPerformer: true
isRealPerformer: true
subscribedByData:
price: 0
newPrice: 0
regularPrice: 0
subscribePrice: 0
discountPercent: 0
discountPeriod: 1
subscribeAt: 2025-01-01T00:00:00+00:00
expiredAt: 2025-01-01T00:00:00+00:00
renewedAt: 2025-01-01T00:00:00+00:00
discountFinishedAt: null
discountStartedAt: null
status: null
isMuted: false
unsubscribeReason: No reason given
duration: 4 months
showPostsInFeed: true
subscribes:
- id: 123
userId: 254
subscriberId: 123
date: 2025-01-01T00:00:00+00:00
duration: 3652
startDate: 2025-01-01T00:00:00+00:00
expireDate: 2025-01-01T00:00:00+00:00
cancelDate: null
price: 0
regularPrice: 0
discount: 0
earningId: 0
action: subscribe
type: auto
offerStart: null
offerEnd: null
isCurrent: true
hasActivePaidSubscriptions: false
subscribedOnData: null
canTrialSend: false
isBlocked: false
canUnsubscribe: true
isPendingAutoprolong: false
items:
type: object
properties:
view:
type: string
example: x
avatar:
type: string
example: https://public.onlyfans.com/files/j/jr/jrh/jrhrmrkcgwyldumcgfgsij7h9hncsf3b1640855614/avatar.jpg
avatarThumbs:
type: object
properties:
c50:
type: string
example: https://thumbs.onlyfans.com/public/files/thumbs/c50/j/jr/jrh/jrhrmrkcgwyldumcgfgsij7h9hncsf3b1640855614/avatar.jpg
c144:
type: string
example: https://thumbs.onlyfans.com/public/files/thumbs/c144/j/jr/jrh/jrhrmrkcgwyldumcgfgsij7h9hncsf3b1640855614/avatar.jpg
header:
type: string
example: https://public.onlyfans.com/files/x/xl/xlu/xlusgobxpcebctdptohj7bogxvl9flfu1671047829/254/header.jpg
headerSize:
type: object
properties:
width:
type: integer
example: 4868
height:
type: integer
example: 851
headerThumbs:
type: object
properties:
w480:
type: string
example: https://thumbs.onlyfans.com/public/files/thumbs/w480/x/xl/xlu/xlusgobxpcebctdptohj7bogxvl9flfu1671047829/254/header.jpg
w760:
type: string
example: https://thumbs.onlyfans.com/public/files/thumbs/w760/x/xl/xlu/xlusgobxpcebctdptohj7bogxvl9flfu1671047829/254/header.jpg
id:
type: integer
example: 254
name:
type: string
example: OnlyFans Creators
username:
type: string
example: onlyfanscreators
canLookStory:
type: boolean
example: true
canCommentStory:
type: boolean
example: false
hasNotViewedStory:
type: boolean
example: false
isVerified:
type: boolean
example: true
canPayInternal:
type: boolean
example: true
hasScheduledStream:
type: boolean
example: false
hasStream:
type: boolean
example: false
hasStories:
type: boolean
example: false
tipsEnabled:
type: boolean
example: true
tipsTextEnabled:
type: boolean
example: false
tipsMin:
type: integer
example: 5
tipsMinInternal:
type: integer
example: 1
tipsMax:
type: integer
example: 200
canEarn:
type: boolean
example: true
canAddSubscriber:
type: boolean
example: false
subscribePrice:
type: integer
example: 0
isPaywallRequired:
type: boolean
example: true
isRestricted:
type: boolean
example: false
canRestrict:
type: boolean
example: true
subscribedBy:
type: boolean
example: true
subscribedByExpire:
type: boolean
example: false
subscribedByExpireDate:
type: string
example: 2025-01-01T00:00:00+00:00
subscribedByAutoprolong:
type: boolean
example: true
subscribedIsExpiredNow:
type: boolean
example: false
currentSubscribePrice:
type: integer
example: 0
subscribedOn:
type: boolean
example: false
subscribedOnExpiredNow:
type: string
example: null
nullable: true
subscribedOnDuration:
type: string
example: null
nullable: true
listsStates:
type: array
example:
- id: following
type: following
name: Following
hasUser: true
canAddUser: false
cannotAddUserReason: ALREADY_EXISTS
items:
type: object
properties:
id:
type: string
example: following
type:
type: string
example: following
name:
type: string
example: Following
hasUser:
type: boolean
example: true
canAddUser:
type: boolean
example: false
cannotAddUserReason:
type: string
example: ALREADY_EXISTS
canReport:
type: boolean
example: false
canReceiveChatMessage:
type: boolean
example: false
hideChat:
type: boolean
example: false
lastSeen:
type: string
example: null
nullable: true
isPerformer:
type: boolean
example: true
isRealPerformer:
type: boolean
example: true
subscribedByData:
type: object
properties:
price:
type: integer
example: 0
newPrice:
type: integer
example: 0
regularPrice:
type: integer
example: 0
subscribePrice:
type: integer
example: 0
discountPercent:
type: integer
example: 0
discountPeriod:
type: integer
example: 1
subscribeAt:
type: string
example: 2025-01-01T00:00:00+00:00
expiredAt:
type: string
example: 2025-01-01T00:00:00+00:00
renewedAt:
type: string
example: 2025-01-01T00:00:00+00:00
discountFinishedAt:
type: string
example: null
nullable: true
discountStartedAt:
type: string
example: null
nullable: true
status:
type: string
example: null
nullable: true
isMuted:
type: boolean
example: false
unsubscribeReason:
type: string
example: No reason given
duration:
type: string
example: 4 months
showPostsInFeed:
type: boolean
example: true
subscribes:
type: array
example:
- id: 123
userId: 254
subscriberId: 123
date: 2025-01-01T00:00:00+00:00
duration: 3652
startDate: 2025-01-01T00:00:00+00:00
expireDate: 2025-01-01T00:00:00+00:00
cancelDate: null
price: 0
regularPrice: 0
discount: 0
earningId: 0
action: subscribe
type: auto
offerStart: null
offerEnd: null
isCurrent: true
items:
type: object
properties:
id:
type: integer
example: 123
userId:
type: integer
example: 254
subscriberId:
type: integer
example: 123
date:
type: string
example: 2025-01-01T00:00:00+00:00
duration:
type: integer
example: 3652
startDate:
type: string
example: 2025-01-01T00:00:00+00:00
expireDate:
type: string
example: 2025-01-01T00:00:00+00:00
cancelDate:
type: string
example: null
nullable: true
price:
type: integer
example: 0
regularPrice:
type: integer
example: 0
discount:
type: integer
example: 0
earningId:
type: integer
example: 0
action:
type: string
example: subscribe
type:
type: string
example: auto
offerStart:
type: string
example: null
nullable: true
offerEnd:
type: string
example: null
nullable: true
isCurrent:
type: boolean
example: true
hasActivePaidSubscriptions:
type: boolean
example: false
subscribedOnData:
type: string
example: null
nullable: true
canTrialSend:
type: boolean
example: false
isBlocked:
type: boolean
example: false
canUnsubscribe:
type: boolean
example: true
isPendingAutoprolong:
type: boolean
example: false
hasMore:
type: boolean
example: true
_pagination:
type: object
properties:
next_page:
type: string
example: https://app.onlyfansapi.com/api/acct_abc123/following/all?offset=10&limit=10
_meta:
type: object
properties:
_credits:
type: object
properties:
used:
type: integer
example: 1
balance:
type: integer
example: 999999988
note:
type: string
example: Always
_cache:
type: object
properties:
is_cached:
type: boolean
example: false
note:
type: string
example: Cache disabled for this endpoint
_rate_limits:
type: object
properties:
limit_minute:
type: integer
example: 1000
limit_day:
type: integer
example: 50000
remaining_minute:
type: integer
example: 999
remaining_day:
type: integer
example: 49942
tags:
- Following
components:
securitySchemes:
default:
type: http
scheme: bearer
description: Get your API Key from OnlyFansAPI Console -
https://app.onlyfansapi.com/api-keys
````
# List Expired Followings (/api-reference/following/list-expired-followings)
Get a paginated list of expired followings for an Account. This list has no order guarantee. Unlike the all and active lists, it is sorted by neither `subscribedByData.subscribeAt` nor `subscribedByData.expiredAt`. To poll for new expirations, page through the full list each cycle (`limit=50`, follow `_pagination.next_page` until it is null) and diff it against your own store using `subscribedByData.expiredAt`. Do NOT stop early at the first entry you have already seen, as that can silently skip real expirations. An empty page is not the end of the list either: OnlyFans applies `offset` to the whole following collection and only then filters that window down to expired subscriptions, so early pages can come back empty while hundreds of expired rows still follow. Keep following `_pagination.next_page` until it is `null` instead of stopping at the first empty page. Pass `sort=expire_date` (optionally with `sortDirection`) to get a deterministic order instead — see the parameter description for the caveat that OnlyFans persists the chosen order account-wide. Ordering by expiry descending puts the still-active subscriptions first and moves the expired rows to the tail of the collection, so prefer `sortDirection=asc` or `sort=is_expired` for expired-first results; for that reason `sort=expire_date` defaults to `asc` on this list when no `sortDirection` is given.
## OpenAPI
````yaml https://app.onlyfansapi.com/scribe-docs/openapi.yaml get /api/{account}/following/expired
openapi: 3.0.3
info:
title: OnlyFans API
description: ""
version: 1.0.0
servers:
- url: https://app.onlyfansapi.com
security:
- default: []
tags:
- name: AI Voice Messages
description: ""
- name: API Keys
description: ""
- name: Account
description: Endpoints for your linked accounts
- name: Analytics - Financial
description: APIs for retrieving financial analytics data
- name: Analytics - Summary
description: APIs for retrieving summary analytics data
- name: Banking
description: Operations related to user banking details, payout methods, legal
and tax information, and account country settings.
- name: Banned Words
description: Reference list of OnlyFans banned words used by the
`blockBannedWords` screening parameter
- name: Blocked / Restricted Users
description: APIs for listing the users an account has blocked or restricted
- name: Chargebacks
description: ""
- name: Chat Messages
description: ""
- name: Chats
description: ""
- name: Client Sessions
description: ""
- name: Connect OnlyFans Account
description: ""
- name: Data Exports
description: APIs for managing data exports
- name: Engagement / Messages
description: ""
- name: Fans
description: APIs for managing OnlyFans fans (subscribers)
- name: Fans - AI Summary
description: APIs for generating and retrieving AI-powered fan profile summaries
- name: Following
description: APIs for managing OnlyFans followings (people you're subscribed to)
- name: Free Trial Links
description: APIs for managing Free Trial Links. Revenue totals are net earnings
after refunds and chargebacks. `revenue.chargebacks` (or
`summary.chargebacks_total` in stats) is the positive cached net amount
already excluded from revenue; do not subtract it again. Spender responses
include chargebacks across all attributed periods for each fan with
positive net revenue.
- name: Giphy
description: ""
- name: Link Tags
description: APIs for managing tags on free trial links, tracking links, and Smart Links
- name: Mass Messaging
description: ""
- name: Media
description: ""
- name: Media Vault
description: ""
- name: Media Vault Lists
description: ""
- name: Notifications
description: Endpoints for managingr account notifications
- name: Payouts
description: ""
- name: Post Comments
description: ""
- name: Post Labels
description: APIs for managing your post labels
- name: Posts
description: APIs for managing OnlyFans posts
- name: Profile Content
description: Read another user's profile content using your connected OnlyFans
account. OnlyFans enforces subscription and purchase requirements; these
endpoints do not unlock content. Response samples use captured OnlyFans
payloads with anonymized IDs, text, and media URLs; OFAPI metadata values
are illustrative.
- name: Promotions
description: ""
- name: Public Profiles
description: ""
- name: Queue
description: ""
- name: Release Forms
description: APIs for managing OnlyFans release forms
- name: Saved For Later (Messages)
description: ""
- name: Saved For Later (Posts)
description: ""
- name: Settings
description: ""
- name: Shared Free Trial Links
description: APIs for Free Trial Links that other OF creators have shared with
this account. Revenue, cost, and spender data are not available for shared
links.
- name: Shared Tracking Links
description: APIs for Tracking Links (campaigns) that other OF creators have
shared with this account. Revenue, cost, and spender data are not
available for shared campaigns.
- name: Smart Link Postbacks
description: APIs for managing Smart Link postback destinations
- name: Smart Links
description: APIs for managing Smart Links (Free Trial Links and Tracking Links
with pooled inventory)
- name: Statistics
description: ""
- name: Stored Free Trial Links
description: Instant APIs for retrieving stored free trial links from the
OnlyFansAPI Cache (free, no credits used). `revenue.total` is net earnings
after refunds and chargebacks. `revenue.chargebacks` is the positive
cached net amount already excluded from that total; do not subtract it
again.
- name: Stored Shared Free Trial Links
description: Instant APIs for retrieving stored shared Free Trial Links from the
OnlyFansAPI Cache (free, no credits used)
- name: Stored Shared Tracking Links
description: Instant APIs for retrieving stored shared Tracking Links
(campaigns) from the OnlyFansAPI Cache (free, no credits used)
- name: Stored Tracking Links
description: Instant APIs for retrieving stored tracking links from the
OnlyFansAPI Cache (free, no credits used). `revenue.total` is net earnings
after refunds and chargebacks. `revenue.chargebacks` is the positive
cached net amount already excluded from that total; do not subtract it
again.
- name: Stories
description: APIs for managing OnlyFans stories
- name: Story Highlights
description: APIs for managing OnlyFans story highlights
- name: Subscription Bundles
description: ""
- name: Tracking Links
description: APIs for managing tracking links. Revenue totals are net earnings
after refunds and chargebacks. `revenue.chargebacks` (or
`summary.chargebacks_total` in stats) is the positive cached net amount
already excluded from revenue; do not subtract it again. Spender responses
include chargebacks across all attributed periods for each fan with
positive net revenue.
- name: Transactions
description: APIs for managing OnlyFans transactions
- name: Usage
description: Credit usage reporting for your team
- name: User List Collections
description: ""
- name: Users
description: APIs for fetching OnlyFans users
- name: Webhooks
description: ""
paths:
/api/{account}/following/expired:
parameters:
- in: path
name: account
description: The Account ID
example: acct_XXXXXXXXXXXXXXX
required: true
schema:
type: string
get:
summary: List Expired Followings
operationId: listExpiredFollowings
description: "Get a paginated list of expired followings for an Account. This
list has no order guarantee. Unlike the all and active lists, it is
sorted by neither `subscribedByData.subscribeAt` nor
`subscribedByData.expiredAt`. To poll for new expirations, page through
the full list each cycle (`limit=50`, follow `_pagination.next_page`
until it is null) and diff it against your own store using
`subscribedByData.expiredAt`. Do NOT stop early at the first entry you
have already seen, as that can silently skip real expirations. An empty
page is not the end of the list either: OnlyFans applies `offset` to the
whole following collection and only then filters that window down to
expired subscriptions, so early pages can come back empty while hundreds
of expired rows still follow. Keep following `_pagination.next_page`
until it is `null` instead of stopping at the first empty page. Pass
`sort=expire_date` (optionally with `sortDirection`) to get a
deterministic order instead — see the parameter description for the
caveat that OnlyFans persists the chosen order account-wide. Ordering by
expiry descending puts the still-active subscriptions first and moves
the expired rows to the tail of the collection, so prefer
`sortDirection=asc` or `sort=is_expired` for expired-first results; for
that reason `sort=expire_date` defaults to `asc` on this list when no
`sortDirection` is given."
parameters:
- in: query
name: limit
description: Number of followings to return (1-50). Must be at least 1. Must not
be greater than 50.
example: 10
required: false
schema:
type: integer
description: Number of followings to return (1-50). Must be at least 1. Must not
be greater than 50.
example: 10
- in: query
name: offset
description: Pagination offset. Must be at least 0.
example: 0
required: false
schema:
type: integer
description: Pagination offset. Must be at least 0.
example: 0
- in: query
name: query
description: Search within following name/username.
example: john
required: false
schema:
type: string
description: Search within following name/username.
example: john
nullable: true
- in: query
name: filter
description: ""
example: []
required: false
schema:
type: object
description: ""
example: []
properties: {}
- in: query
name: filter.online
description: Filter by online status (1 for online, 0 for offline, null for all).
example: 1
required: false
schema:
type: integer
description: Filter by online status (1 for online, 0 for offline, null for
all).
example: 1
enum:
- 1
- 0
nullable: true
- in: query
name: filter.paid
description: Filter by paid status (1 for paid, 0 for free, null for all).
example: 1
required: false
schema:
type: integer
description: Filter by paid status (1 for paid, 0 for free, null for all).
example: 1
enum:
- 1
- 0
nullable: true
- in: query
name: sort
description: "Order the list by `last_activity` (the followed creator's last
activity), `expire_date` (subscription expiry), `subscribe_date`
(subscription start) or `is_expired` (expired first — OnlyFans only
offers this one on the expired list). Omit it to keep whichever
order is currently stored for the account. **Note:** OnlyFans
persists this order account-wide, so it also applies to later
requests that omit `sort` and to the creator's own onlyfans.com UI,
until it is changed again. **Expired list:** OnlyFans applies
`offset` to the whole following collection and only then filters it
down to expired subscriptions, so ordering by expiry descending puts
the still-active subscriptions first and moves the expired rows to
the tail of the collection — the first several hundred offsets then
come back empty. Use `sortDirection=asc` or `sort=is_expired` to get
expired-first results. For that reason `sort=expire_date` on the
expired list defaults to `asc` instead of `desc` when you do not
pass `sortDirection`. Whatever order you pick, an empty page is
**not** the end of the list: keep following `_pagination.next_page`
until it is `null` rather than stopping at the first empty page.
This field is required when sortDirection is present."
example: subscribe_date
required: false
schema:
type: string
description: "Order the list by `last_activity` (the followed creator's last
activity), `expire_date` (subscription expiry), `subscribe_date`
(subscription start) or `is_expired` (expired first — OnlyFans
only offers this one on the expired list). Omit it to keep
whichever order is currently stored for the account. **Note:**
OnlyFans persists this order account-wide, so it also applies to
later requests that omit `sort` and to the creator's own
onlyfans.com UI, until it is changed again. **Expired list:**
OnlyFans applies `offset` to the whole following collection and
only then filters it down to expired subscriptions, so ordering by
expiry descending puts the still-active subscriptions first and
moves the expired rows to the tail of the collection — the first
several hundred offsets then come back empty. Use
`sortDirection=asc` or `sort=is_expired` to get expired-first
results. For that reason `sort=expire_date` on the expired list
defaults to `asc` instead of `desc` when you do not pass
`sortDirection`. Whatever order you pick, an empty page is **not**
the end of the list: keep following `_pagination.next_page` until
it is `null` rather than stopping at the first empty page. This
field is required when sortDirection is present."
example: subscribe_date
enum:
- last_activity
- expire_date
- subscribe_date
- is_expired
nullable: true
- in: query
name: sortDirection
description: "Direction for `sort`: `desc` (default) or `asc`. Requires `sort`
to be set. Exception: `sort=expire_date` on the expired list
defaults to `asc`, because `desc` moves the expired rows to the tail
of the underlying collection and leaves the early pages empty.
Passing `sortDirection` explicitly always wins."
example: desc
required: false
schema:
type: string
description: "Direction for `sort`: `desc` (default) or `asc`. Requires `sort`
to be set. Exception: `sort=expire_date` on the expired list
defaults to `asc`, because `desc` moves the expired rows to the
tail of the underlying collection and leaves the early pages
empty. Passing `sortDirection` explicitly always wins."
example: desc
enum:
- asc
- desc
nullable: true
responses:
"200":
description: ""
content:
application/json:
schema:
type: object
example:
data:
list:
- view: x
avatar: https://public.onlyfans.com/files/j/jr/jrh/jrhrmrkcgwyldumcgfgsij7h9hncsf3b1640855614/avatar.jpg
avatarThumbs:
c50: https://thumbs.onlyfans.com/public/files/thumbs/c50/j/jr/jrh/jrhrmrkcgwyldumcgfgsij7h9hncsf3b1640855614/avatar.jpg
c144: https://thumbs.onlyfans.com/public/files/thumbs/c144/j/jr/jrh/jrhrmrkcgwyldumcgfgsij7h9hncsf3b1640855614/avatar.jpg
header: https://public.onlyfans.com/files/x/xl/xlu/xlusgobxpcebctdptohj7bogxvl9flfu1671047829/254/header.jpg
headerSize:
width: 4868
height: 851
headerThumbs:
w480: https://thumbs.onlyfans.com/public/files/thumbs/w480/x/xl/xlu/xlusgobxpcebctdptohj7bogxvl9flfu1671047829/254/header.jpg
w760: https://thumbs.onlyfans.com/public/files/thumbs/w760/x/xl/xlu/xlusgobxpcebctdptohj7bogxvl9flfu1671047829/254/header.jpg
id: 254
name: OnlyFans Creators
username: onlyfanscreators
canLookStory: true
canCommentStory: false
hasNotViewedStory: false
isVerified: true
canPayInternal: true
hasScheduledStream: false
hasStream: false
hasStories: false
tipsEnabled: true
tipsTextEnabled: false
tipsMin: 5
tipsMinInternal: 1
tipsMax: 200
canEarn: true
canAddSubscriber: false
subscribePrice: 0
isPaywallRequired: true
isRestricted: false
canRestrict: true
subscribedBy: true
subscribedByExpire: false
subscribedByExpireDate: 2025-01-01T00:00:00+00:00
subscribedByAutoprolong: true
subscribedIsExpiredNow: false
currentSubscribePrice: 0
subscribedOn: false
subscribedOnExpiredNow: null
subscribedOnDuration: null
listsStates:
- id: following
type: following
name: Following
hasUser: true
canAddUser: false
cannotAddUserReason: ALREADY_EXISTS
canReport: false
canReceiveChatMessage: false
hideChat: false
lastSeen: null
isPerformer: true
isRealPerformer: true
subscribedByData:
price: 0
newPrice: 0
regularPrice: 0
subscribePrice: 0
discountPercent: 0
discountPeriod: 1
subscribeAt: 2025-01-01T00:00:00+00:00
expiredAt: 2025-01-01T00:00:00+00:00
renewedAt: 2025-01-01T00:00:00+00:00
discountFinishedAt: null
discountStartedAt: null
status: null
isMuted: false
unsubscribeReason: No reason given
duration: 4 months
showPostsInFeed: true
subscribes:
- id: 123
userId: 254
subscriberId: 123
date: 2025-01-01T00:00:00+00:00
duration: 3652
startDate: 2025-01-01T00:00:00+00:00
expireDate: 2025-01-01T00:00:00+00:00
cancelDate: null
price: 0
regularPrice: 0
discount: 0
earningId: 0
action: subscribe
type: auto
offerStart: null
offerEnd: null
isCurrent: true
hasActivePaidSubscriptions: false
subscribedOnData: null
canTrialSend: false
isBlocked: false
canUnsubscribe: true
isPendingAutoprolong: false
hasMore: true
_pagination:
next_page: https://app.onlyfansapi.com/api/acct_abc123/following/expired?offset=10&limit=10
_meta:
_credits:
used: 1
balance: 999970
note: Always
_cache:
is_cached: false
note: Cache disabled for this endpoint
_rate_limits:
limit_minute: 1000
limit_day: 50000
remaining_minute: 999
remaining_day: 49993
properties:
data:
type: object
properties:
list:
type: array
example:
- view: x
avatar: https://public.onlyfans.com/files/j/jr/jrh/jrhrmrkcgwyldumcgfgsij7h9hncsf3b1640855614/avatar.jpg
avatarThumbs:
c50: https://thumbs.onlyfans.com/public/files/thumbs/c50/j/jr/jrh/jrhrmrkcgwyldumcgfgsij7h9hncsf3b1640855614/avatar.jpg
c144: https://thumbs.onlyfans.com/public/files/thumbs/c144/j/jr/jrh/jrhrmrkcgwyldumcgfgsij7h9hncsf3b1640855614/avatar.jpg
header: https://public.onlyfans.com/files/x/xl/xlu/xlusgobxpcebctdptohj7bogxvl9flfu1671047829/254/header.jpg
headerSize:
width: 4868
height: 851
headerThumbs:
w480: https://thumbs.onlyfans.com/public/files/thumbs/w480/x/xl/xlu/xlusgobxpcebctdptohj7bogxvl9flfu1671047829/254/header.jpg
w760: https://thumbs.onlyfans.com/public/files/thumbs/w760/x/xl/xlu/xlusgobxpcebctdptohj7bogxvl9flfu1671047829/254/header.jpg
id: 254
name: OnlyFans Creators
username: onlyfanscreators
canLookStory: true
canCommentStory: false
hasNotViewedStory: false
isVerified: true
canPayInternal: true
hasScheduledStream: false
hasStream: false
hasStories: false
tipsEnabled: true
tipsTextEnabled: false
tipsMin: 5
tipsMinInternal: 1
tipsMax: 200
canEarn: true
canAddSubscriber: false
subscribePrice: 0
isPaywallRequired: true
isRestricted: false
canRestrict: true
subscribedBy: true
subscribedByExpire: false
subscribedByExpireDate: 2025-01-01T00:00:00+00:00
subscribedByAutoprolong: true
subscribedIsExpiredNow: false
currentSubscribePrice: 0
subscribedOn: false
subscribedOnExpiredNow: null
subscribedOnDuration: null
listsStates:
- id: following
type: following
name: Following
hasUser: true
canAddUser: false
cannotAddUserReason: ALREADY_EXISTS
canReport: false
canReceiveChatMessage: false
hideChat: false
lastSeen: null
isPerformer: true
isRealPerformer: true
subscribedByData:
price: 0
newPrice: 0
regularPrice: 0
subscribePrice: 0
discountPercent: 0
discountPeriod: 1
subscribeAt: 2025-01-01T00:00:00+00:00
expiredAt: 2025-01-01T00:00:00+00:00
renewedAt: 2025-01-01T00:00:00+00:00
discountFinishedAt: null
discountStartedAt: null
status: null
isMuted: false
unsubscribeReason: No reason given
duration: 4 months
showPostsInFeed: true
subscribes:
- id: 123
userId: 254
subscriberId: 123
date: 2025-01-01T00:00:00+00:00
duration: 3652
startDate: 2025-01-01T00:00:00+00:00
expireDate: 2025-01-01T00:00:00+00:00
cancelDate: null
price: 0
regularPrice: 0
discount: 0
earningId: 0
action: subscribe
type: auto
offerStart: null
offerEnd: null
isCurrent: true
hasActivePaidSubscriptions: false
subscribedOnData: null
canTrialSend: false
isBlocked: false
canUnsubscribe: true
isPendingAutoprolong: false
items:
type: object
properties:
view:
type: string
example: x
avatar:
type: string
example: https://public.onlyfans.com/files/j/jr/jrh/jrhrmrkcgwyldumcgfgsij7h9hncsf3b1640855614/avatar.jpg
avatarThumbs:
type: object
properties:
c50:
type: string
example: https://thumbs.onlyfans.com/public/files/thumbs/c50/j/jr/jrh/jrhrmrkcgwyldumcgfgsij7h9hncsf3b1640855614/avatar.jpg
c144:
type: string
example: https://thumbs.onlyfans.com/public/files/thumbs/c144/j/jr/jrh/jrhrmrkcgwyldumcgfgsij7h9hncsf3b1640855614/avatar.jpg
header:
type: string
example: https://public.onlyfans.com/files/x/xl/xlu/xlusgobxpcebctdptohj7bogxvl9flfu1671047829/254/header.jpg
headerSize:
type: object
properties:
width:
type: integer
example: 4868
height:
type: integer
example: 851
headerThumbs:
type: object
properties:
w480:
type: string
example: https://thumbs.onlyfans.com/public/files/thumbs/w480/x/xl/xlu/xlusgobxpcebctdptohj7bogxvl9flfu1671047829/254/header.jpg
w760:
type: string
example: https://thumbs.onlyfans.com/public/files/thumbs/w760/x/xl/xlu/xlusgobxpcebctdptohj7bogxvl9flfu1671047829/254/header.jpg
id:
type: integer
example: 254
name:
type: string
example: OnlyFans Creators
username:
type: string
example: onlyfanscreators
canLookStory:
type: boolean
example: true
canCommentStory:
type: boolean
example: false
hasNotViewedStory:
type: boolean
example: false
isVerified:
type: boolean
example: true
canPayInternal:
type: boolean
example: true
hasScheduledStream:
type: boolean
example: false
hasStream:
type: boolean
example: false
hasStories:
type: boolean
example: false
tipsEnabled:
type: boolean
example: true
tipsTextEnabled:
type: boolean
example: false
tipsMin:
type: integer
example: 5
tipsMinInternal:
type: integer
example: 1
tipsMax:
type: integer
example: 200
canEarn:
type: boolean
example: true
canAddSubscriber:
type: boolean
example: false
subscribePrice:
type: integer
example: 0
isPaywallRequired:
type: boolean
example: true
isRestricted:
type: boolean
example: false
canRestrict:
type: boolean
example: true
subscribedBy:
type: boolean
example: true
subscribedByExpire:
type: boolean
example: false
subscribedByExpireDate:
type: string
example: 2025-01-01T00:00:00+00:00
subscribedByAutoprolong:
type: boolean
example: true
subscribedIsExpiredNow:
type: boolean
example: false
currentSubscribePrice:
type: integer
example: 0
subscribedOn:
type: boolean
example: false
subscribedOnExpiredNow:
type: string
example: null
nullable: true
subscribedOnDuration:
type: string
example: null
nullable: true
listsStates:
type: array
example:
- id: following
type: following
name: Following
hasUser: true
canAddUser: false
cannotAddUserReason: ALREADY_EXISTS
items:
type: object
properties:
id:
type: string
example: following
type:
type: string
example: following
name:
type: string
example: Following
hasUser:
type: boolean
example: true
canAddUser:
type: boolean
example: false
cannotAddUserReason:
type: string
example: ALREADY_EXISTS
canReport:
type: boolean
example: false
canReceiveChatMessage:
type: boolean
example: false
hideChat:
type: boolean
example: false
lastSeen:
type: string
example: null
nullable: true
isPerformer:
type: boolean
example: true
isRealPerformer:
type: boolean
example: true
subscribedByData:
type: object
properties:
price:
type: integer
example: 0
newPrice:
type: integer
example: 0
regularPrice:
type: integer
example: 0
subscribePrice:
type: integer
example: 0
discountPercent:
type: integer
example: 0
discountPeriod:
type: integer
example: 1
subscribeAt:
type: string
example: 2025-01-01T00:00:00+00:00
expiredAt:
type: string
example: 2025-01-01T00:00:00+00:00
renewedAt:
type: string
example: 2025-01-01T00:00:00+00:00
discountFinishedAt:
type: string
example: null
nullable: true
discountStartedAt:
type: string
example: null
nullable: true
status:
type: string
example: null
nullable: true
isMuted:
type: boolean
example: false
unsubscribeReason:
type: string
example: No reason given
duration:
type: string
example: 4 months
showPostsInFeed:
type: boolean
example: true
subscribes:
type: array
example:
- id: 123
userId: 254
subscriberId: 123
date: 2025-01-01T00:00:00+00:00
duration: 3652
startDate: 2025-01-01T00:00:00+00:00
expireDate: 2025-01-01T00:00:00+00:00
cancelDate: null
price: 0
regularPrice: 0
discount: 0
earningId: 0
action: subscribe
type: auto
offerStart: null
offerEnd: null
isCurrent: true
items:
type: object
properties:
id:
type: integer
example: 123
userId:
type: integer
example: 254
subscriberId:
type: integer
example: 123
date:
type: string
example: 2025-01-01T00:00:00+00:00
duration:
type: integer
example: 3652
startDate:
type: string
example: 2025-01-01T00:00:00+00:00
expireDate:
type: string
example: 2025-01-01T00:00:00+00:00
cancelDate:
type: string
example: null
nullable: true
price:
type: integer
example: 0
regularPrice:
type: integer
example: 0
discount:
type: integer
example: 0
earningId:
type: integer
example: 0
action:
type: string
example: subscribe
type:
type: string
example: auto
offerStart:
type: string
example: null
nullable: true
offerEnd:
type: string
example: null
nullable: true
isCurrent:
type: boolean
example: true
hasActivePaidSubscriptions:
type: boolean
example: false
subscribedOnData:
type: string
example: null
nullable: true
canTrialSend:
type: boolean
example: false
isBlocked:
type: boolean
example: false
canUnsubscribe:
type: boolean
example: true
isPendingAutoprolong:
type: boolean
example: false
hasMore:
type: boolean
example: true
_pagination:
type: object
properties:
next_page:
type: string
example: https://app.onlyfansapi.com/api/acct_abc123/following/expired?offset=10&limit=10
_meta:
type: object
properties:
_credits:
type: object
properties:
used:
type: integer
example: 1
balance:
type: integer
example: 999970
note:
type: string
example: Always
_cache:
type: object
properties:
is_cached:
type: boolean
example: false
note:
type: string
example: Cache disabled for this endpoint
_rate_limits:
type: object
properties:
limit_minute:
type: integer
example: 1000
limit_day:
type: integer
example: 50000
remaining_minute:
type: integer
example: 999
remaining_day:
type: integer
example: 49993
tags:
- Following
components:
securitySchemes:
default:
type: http
scheme: bearer
description: Get your API Key from OnlyFansAPI Console -
https://app.onlyfansapi.com/api-keys
````
# Get Mass Message Overview (/api-reference/mass-messaging/get-mass-message-overview)
Get an overview of mass messages, showing the send count and view count.
## OpenAPI
````yaml https://app.onlyfansapi.com/scribe-docs/openapi.yaml get /api/{account}/mass-messaging/overview
openapi: 3.0.3
info:
title: OnlyFans API
description: ""
version: 1.0.0
servers:
- url: https://app.onlyfansapi.com
security:
- default: []
tags:
- name: AI Voice Messages
description: ""
- name: API Keys
description: ""
- name: Account
description: Endpoints for your linked accounts
- name: Analytics - Financial
description: APIs for retrieving financial analytics data
- name: Analytics - Summary
description: APIs for retrieving summary analytics data
- name: Banking
description: Operations related to user banking details, payout methods, legal
and tax information, and account country settings.
- name: Banned Words
description: Reference list of OnlyFans banned words used by the
`blockBannedWords` screening parameter
- name: Blocked / Restricted Users
description: APIs for listing the users an account has blocked or restricted
- name: Chargebacks
description: ""
- name: Chat Messages
description: ""
- name: Chats
description: ""
- name: Client Sessions
description: ""
- name: Connect OnlyFans Account
description: ""
- name: Data Exports
description: APIs for managing data exports
- name: Engagement / Messages
description: ""
- name: Fans
description: APIs for managing OnlyFans fans (subscribers)
- name: Fans - AI Summary
description: APIs for generating and retrieving AI-powered fan profile summaries
- name: Following
description: APIs for managing OnlyFans followings (people you're subscribed to)
- name: Free Trial Links
description: APIs for managing Free Trial Links. Revenue totals are net earnings
after refunds and chargebacks. `revenue.chargebacks` (or
`summary.chargebacks_total` in stats) is the positive cached net amount
already excluded from revenue; do not subtract it again. Spender responses
include chargebacks across all attributed periods for each fan with
positive net revenue.
- name: Giphy
description: ""
- name: Link Tags
description: APIs for managing tags on free trial links, tracking links, and Smart Links
- name: Mass Messaging
description: ""
- name: Media
description: ""
- name: Media Vault
description: ""
- name: Media Vault Lists
description: ""
- name: Notifications
description: Endpoints for managingr account notifications
- name: Payouts
description: ""
- name: Post Comments
description: ""
- name: Post Labels
description: APIs for managing your post labels
- name: Posts
description: APIs for managing OnlyFans posts
- name: Profile Content
description: Read another user's profile content using your connected OnlyFans
account. OnlyFans enforces subscription and purchase requirements; these
endpoints do not unlock content. Response samples use captured OnlyFans
payloads with anonymized IDs, text, and media URLs; OFAPI metadata values
are illustrative.
- name: Promotions
description: ""
- name: Public Profiles
description: ""
- name: Queue
description: ""
- name: Release Forms
description: APIs for managing OnlyFans release forms
- name: Saved For Later (Messages)
description: ""
- name: Saved For Later (Posts)
description: ""
- name: Settings
description: ""
- name: Shared Free Trial Links
description: APIs for Free Trial Links that other OF creators have shared with
this account. Revenue, cost, and spender data are not available for shared
links.
- name: Shared Tracking Links
description: APIs for Tracking Links (campaigns) that other OF creators have
shared with this account. Revenue, cost, and spender data are not
available for shared campaigns.
- name: Smart Link Postbacks
description: APIs for managing Smart Link postback destinations
- name: Smart Links
description: APIs for managing Smart Links (Free Trial Links and Tracking Links
with pooled inventory)
- name: Statistics
description: ""
- name: Stored Free Trial Links
description: Instant APIs for retrieving stored free trial links from the
OnlyFansAPI Cache (free, no credits used). `revenue.total` is net earnings
after refunds and chargebacks. `revenue.chargebacks` is the positive
cached net amount already excluded from that total; do not subtract it
again.
- name: Stored Shared Free Trial Links
description: Instant APIs for retrieving stored shared Free Trial Links from the
OnlyFansAPI Cache (free, no credits used)
- name: Stored Shared Tracking Links
description: Instant APIs for retrieving stored shared Tracking Links
(campaigns) from the OnlyFansAPI Cache (free, no credits used)
- name: Stored Tracking Links
description: Instant APIs for retrieving stored tracking links from the
OnlyFansAPI Cache (free, no credits used). `revenue.total` is net earnings
after refunds and chargebacks. `revenue.chargebacks` is the positive
cached net amount already excluded from that total; do not subtract it
again.
- name: Stories
description: APIs for managing OnlyFans stories
- name: Story Highlights
description: APIs for managing OnlyFans story highlights
- name: Subscription Bundles
description: ""
- name: Tracking Links
description: APIs for managing tracking links. Revenue totals are net earnings
after refunds and chargebacks. `revenue.chargebacks` (or
`summary.chargebacks_total` in stats) is the positive cached net amount
already excluded from revenue; do not subtract it again. Spender responses
include chargebacks across all attributed periods for each fan with
positive net revenue.
- name: Transactions
description: APIs for managing OnlyFans transactions
- name: Usage
description: Credit usage reporting for your team
- name: User List Collections
description: ""
- name: Users
description: APIs for fetching OnlyFans users
- name: Webhooks
description: ""
paths:
/api/{account}/mass-messaging/overview:
parameters:
- in: path
name: account
description: The Account ID
example: acct_XXXXXXXXXXXXXXX
required: true
schema:
type: string
get:
summary: Get Mass Message Overview
operationId: getMassMessageOverview
description: Get an overview of mass messages, showing the send count and view count.
parameters:
- in: query
name: startDate
description: The earliest mass message to retrieve. Keep empty to get all.
example: 2025-01-01 00:00:00
required: false
schema:
type: string
description: The earliest mass message to retrieve. Keep empty to get all.
example: 2025-01-01 00:00:00
- in: query
name: endDate
description: The latest mass message to retrieve. Keep empty to get all. It must
be after `startDate` and is also used for pagination.
example: 2025-03-31 23:59:59
required: false
schema:
type: string
description: The latest mass message to retrieve. Keep empty to get all. It must
be after `startDate` and is also used for pagination.
example: 2025-03-31 23:59:59
- in: query
name: limit
description: Number of mass messages to return (default = 10)
example: 10
required: false
schema:
type: integer
description: Number of mass messages to return (default = 10)
example: 10
- in: query
name: query
description: Optionally, find a mass message by the message text.
example: My message text
required: false
schema:
type: string
description: Optionally, find a mass message by the message text.
example: My message text
responses:
"200":
description: ""
content:
application/json:
schema:
type: object
example:
data:
hasMore: true
items:
- id: 123
date: 2025-01-01T01:01:01+01:01
responseType: message
text: Text
rawText:Text
giphyId: null isFree: true isMediaReady: true mediaCount: 1 media: - id: 123 type: photo convertedToVideo: false canView: true hasError: false createdAt: 2025-01-01T01:01:01+01:01 isReady: true files: full: url: https://cdn2.onlyfans.com/files/.../image.jpg width: 2335 height: 4175 size: 0 sources: [] thumb: url: https://cdn2.onlyfans.com/files/.../image.jpg width: 300 height: 300 size: 0 preview: url: https://cdn2.onlyfans.com/files/.../image.jpg width: 960 height: 1717 size: 0 squarePreview: url: https://cdn2.onlyfans.com/files/.../image.jpg width: 960 height: 960 size: 0 duration: 0 hasCustomPreview: false videoSources: "240": null "720": null previews: [] isTip: false isReportedByMe: false viewedCount: 123 sentCount: 123 isCanceled: false template: group canUnsend: true unsendSeconds: 1000000 _meta: _credits: used: 1 balance: 999999959 note: Always _cache: is_cached: false note: Cache disabled for this endpoint _rate_limits: limit_minute: 1000 limit_day: 50000 remaining_minute: 998 remaining_day: 49988 properties: data: type: object properties: hasMore: type: boolean example: true items: type: array example: - id: 123 date: 2025-01-01T01:01:01+01:01 responseType: message text:Text
rawText:Text
giphyId: null isFree: true isMediaReady: true mediaCount: 1 media: - id: 123 type: photo convertedToVideo: false canView: true hasError: false createdAt: 2025-01-01T01:01:01+01:01 isReady: true files: full: url: https://cdn2.onlyfans.com/files/.../image.jpg width: 2335 height: 4175 size: 0 sources: [] thumb: url: https://cdn2.onlyfans.com/files/.../image.jpg width: 300 height: 300 size: 0 preview: url: https://cdn2.onlyfans.com/files/.../image.jpg width: 960 height: 1717 size: 0 squarePreview: url: https://cdn2.onlyfans.com/files/.../image.jpg width: 960 height: 960 size: 0 duration: 0 hasCustomPreview: false videoSources: "240": null "720": null previews: [] isTip: false isReportedByMe: false viewedCount: 123 sentCount: 123 isCanceled: false template: group canUnsend: true unsendSeconds: 1000000 items: type: object properties: id: type: integer example: 123 date: type: string example: 2025-01-01T01:01:01+01:01 responseType: type: string example: message text: type: string example:Text
rawText: type: string example:Text
giphyId: type: string example: null nullable: true isFree: type: boolean example: true isMediaReady: type: boolean example: true mediaCount: type: integer example: 1 media: type: array example: - id: 123 type: photo convertedToVideo: false canView: true hasError: false createdAt: 2025-01-01T01:01:01+01:01 isReady: true files: full: url: https://cdn2.onlyfans.com/files/.../image.jpg width: 2335 height: 4175 size: 0 sources: [] thumb: url: https://cdn2.onlyfans.com/files/.../image.jpg width: 300 height: 300 size: 0 preview: url: https://cdn2.onlyfans.com/files/.../image.jpg width: 960 height: 1717 size: 0 squarePreview: url: https://cdn2.onlyfans.com/files/.../image.jpg width: 960 height: 960 size: 0 duration: 0 hasCustomPreview: false videoSources: "240": null "720": null items: type: object properties: id: type: integer example: 123 type: type: string example: photo convertedToVideo: type: boolean example: false canView: type: boolean example: true hasError: type: boolean example: false createdAt: type: string example: 2025-01-01T01:01:01+01:01 isReady: type: boolean example: true files: type: object properties: full: type: object properties: url: type: string example: https://cdn2.onlyfans.com/files/.../image.jpg width: type: integer example: 2335 height: type: integer example: 4175 size: type: integer example: 0 sources: type: array example: [] thumb: type: object properties: url: type: string example: https://cdn2.onlyfans.com/files/.../image.jpg width: type: integer example: 300 height: type: integer example: 300 size: type: integer example: 0 preview: type: object properties: url: type: string example: https://cdn2.onlyfans.com/files/.../image.jpg width: type: integer example: 960 height: type: integer example: 1717 size: type: integer example: 0 squarePreview: type: object properties: url: type: string example: https://cdn2.onlyfans.com/files/.../image.jpg width: type: integer example: 960 height: type: integer example: 960 size: type: integer example: 0 duration: type: integer example: 0 hasCustomPreview: type: boolean example: false videoSources: type: object properties: "240": type: string example: null nullable: true "720": type: string example: null nullable: true previews: type: array example: [] isTip: type: boolean example: false isReportedByMe: type: boolean example: false viewedCount: type: integer example: 123 sentCount: type: integer example: 123 isCanceled: type: boolean example: false template: type: string example: group canUnsend: type: boolean example: true unsendSeconds: type: integer example: 1000000 _meta: type: object properties: _credits: type: object properties: used: type: integer example: 1 balance: type: integer example: 999999959 note: type: string example: Always _cache: type: object properties: is_cached: type: boolean example: false note: type: string example: Cache disabled for this endpoint _rate_limits: type: object properties: limit_minute: type: integer example: 1000 limit_day: type: integer example: 50000 remaining_minute: type: integer example: 998 remaining_day: type: integer example: 49988 tags: - Mass Messaging components: securitySchemes: default: type: http scheme: bearer description: Get your API Key from OnlyFansAPI Console - https://app.onlyfansapi.com/api-keys ```` # Get Mass Message (/api-reference/mass-messaging/get-mass-message) Get the content and settings of a mass message, including a message scheduled for later. ## OpenAPI ````yaml https://app.onlyfansapi.com/scribe-docs/openapi.yaml get /api/{account}/mass-messaging/{id} openapi: 3.0.3 info: title: OnlyFans API description: "" version: 1.0.0 servers: - url: https://app.onlyfansapi.com security: - default: [] tags: - name: AI Voice Messages description: "" - name: API Keys description: "" - name: Account description: Endpoints for your linked accounts - name: Analytics - Financial description: APIs for retrieving financial analytics data - name: Analytics - Summary description: APIs for retrieving summary analytics data - name: Banking description: Operations related to user banking details, payout methods, legal and tax information, and account country settings. - name: Banned Words description: Reference list of OnlyFans banned words used by the `blockBannedWords` screening parameter - name: Blocked / Restricted Users description: APIs for listing the users an account has blocked or restricted - name: Chargebacks description: "" - name: Chat Messages description: "" - name: Chats description: "" - name: Client Sessions description: "" - name: Connect OnlyFans Account description: "" - name: Data Exports description: APIs for managing data exports - name: Engagement / Messages description: "" - name: Fans description: APIs for managing OnlyFans fans (subscribers) - name: Fans - AI Summary description: APIs for generating and retrieving AI-powered fan profile summaries - name: Following description: APIs for managing OnlyFans followings (people you're subscribed to) - name: Free Trial Links description: APIs for managing Free Trial Links. Revenue totals are net earnings after refunds and chargebacks. `revenue.chargebacks` (or `summary.chargebacks_total` in stats) is the positive cached net amount already excluded from revenue; do not subtract it again. Spender responses include chargebacks across all attributed periods for each fan with positive net revenue. - name: Giphy description: "" - name: Link Tags description: APIs for managing tags on free trial links, tracking links, and Smart Links - name: Mass Messaging description: "" - name: Media description: "" - name: Media Vault description: "" - name: Media Vault Lists description: "" - name: Notifications description: Endpoints for managingr account notifications - name: Payouts description: "" - name: Post Comments description: "" - name: Post Labels description: APIs for managing your post labels - name: Posts description: APIs for managing OnlyFans posts - name: Profile Content description: Read another user's profile content using your connected OnlyFans account. OnlyFans enforces subscription and purchase requirements; these endpoints do not unlock content. Response samples use captured OnlyFans payloads with anonymized IDs, text, and media URLs; OFAPI metadata values are illustrative. - name: Promotions description: "" - name: Public Profiles description: "" - name: Queue description: "" - name: Release Forms description: APIs for managing OnlyFans release forms - name: Saved For Later (Messages) description: "" - name: Saved For Later (Posts) description: "" - name: Settings description: "" - name: Shared Free Trial Links description: APIs for Free Trial Links that other OF creators have shared with this account. Revenue, cost, and spender data are not available for shared links. - name: Shared Tracking Links description: APIs for Tracking Links (campaigns) that other OF creators have shared with this account. Revenue, cost, and spender data are not available for shared campaigns. - name: Smart Link Postbacks description: APIs for managing Smart Link postback destinations - name: Smart Links description: APIs for managing Smart Links (Free Trial Links and Tracking Links with pooled inventory) - name: Statistics description: "" - name: Stored Free Trial Links description: Instant APIs for retrieving stored free trial links from the OnlyFansAPI Cache (free, no credits used). `revenue.total` is net earnings after refunds and chargebacks. `revenue.chargebacks` is the positive cached net amount already excluded from that total; do not subtract it again. - name: Stored Shared Free Trial Links description: Instant APIs for retrieving stored shared Free Trial Links from the OnlyFansAPI Cache (free, no credits used) - name: Stored Shared Tracking Links description: Instant APIs for retrieving stored shared Tracking Links (campaigns) from the OnlyFansAPI Cache (free, no credits used) - name: Stored Tracking Links description: Instant APIs for retrieving stored tracking links from the OnlyFansAPI Cache (free, no credits used). `revenue.total` is net earnings after refunds and chargebacks. `revenue.chargebacks` is the positive cached net amount already excluded from that total; do not subtract it again. - name: Stories description: APIs for managing OnlyFans stories - name: Story Highlights description: APIs for managing OnlyFans story highlights - name: Subscription Bundles description: "" - name: Tracking Links description: APIs for managing tracking links. Revenue totals are net earnings after refunds and chargebacks. `revenue.chargebacks` (or `summary.chargebacks_total` in stats) is the positive cached net amount already excluded from revenue; do not subtract it again. Spender responses include chargebacks across all attributed periods for each fan with positive net revenue. - name: Transactions description: APIs for managing OnlyFans transactions - name: Usage description: Credit usage reporting for your team - name: User List Collections description: "" - name: Users description: APIs for fetching OnlyFans users - name: Webhooks description: "" paths: /api/{account}/mass-messaging/{id}: parameters: - in: path name: account description: The Account ID example: acct_XXXXXXXXXXXXXXX required: true schema: type: string - in: path name: id description: The ID of the message queue item. Can be retrieved from the above store and list endpoints. example: 1234567890 required: true schema: type: string get: summary: Get Mass Message operationId: getMassMessage description: Get the content and settings of a mass message, including a message scheduled for later. parameters: [] responses: "200": description: "" content: application/json: schema: type: object example: data: success: true queue: id: 123 date: 2025-01-01T01:01:01+00:00 text: My message giphyId: null textCropped: My message isFree: true sentCount: 2 viewedCount: 0 canUnsend: false unsendSeconds: 0 isCanceled: true mediaTypes: null hasError: false releaseForms: [] _meta: _credits: used: 1 balance: 955 note: Always _cache: is_cached: false note: Cache disabled for this endpoint _rate_limits: limit_minute: 1000 limit_day: 50000 remaining_minute: 994 remaining_day: 49980 properties: data: type: object properties: success: type: boolean example: true queue: type: object properties: id: type: integer example: 123 date: type: string example: 2025-01-01T01:01:01+00:00 text: type: string example: My message giphyId: type: string example: null nullable: true textCropped: type: string example: My message isFree: type: boolean example: true sentCount: type: integer example: 2 viewedCount: type: integer example: 0 canUnsend: type: boolean example: false unsendSeconds: type: integer example: 0 isCanceled: type: boolean example: true mediaTypes: type: string example: null nullable: true hasError: type: boolean example: false releaseForms: type: array example: [] _meta: type: object properties: _credits: type: object properties: used: type: integer example: 1 balance: type: integer example: 955 note: type: string example: Always _cache: type: object properties: is_cached: type: boolean example: false note: type: string example: Cache disabled for this endpoint _rate_limits: type: object properties: limit_minute: type: integer example: 1000 limit_day: type: integer example: 50000 remaining_minute: type: integer example: 994 remaining_day: type: integer example: 49980 tags: - Mass Messaging components: securitySchemes: default: type: http scheme: bearer description: Get your API Key from OnlyFansAPI Console - https://app.onlyfansapi.com/api-keys ```` # List Mass Message Queue (/api-reference/mass-messaging/list-mass-message-queue) List pending, scheduled, and recently sent mass messages. Use an item ID to retrieve, update, reschedule, delete, or unsend the message. ## OpenAPI ````yaml https://app.onlyfansapi.com/scribe-docs/openapi.yaml get /api/{account}/mass-messaging openapi: 3.0.3 info: title: OnlyFans API description: "" version: 1.0.0 servers: - url: https://app.onlyfansapi.com security: - default: [] tags: - name: AI Voice Messages description: "" - name: API Keys description: "" - name: Account description: Endpoints for your linked accounts - name: Analytics - Financial description: APIs for retrieving financial analytics data - name: Analytics - Summary description: APIs for retrieving summary analytics data - name: Banking description: Operations related to user banking details, payout methods, legal and tax information, and account country settings. - name: Banned Words description: Reference list of OnlyFans banned words used by the `blockBannedWords` screening parameter - name: Blocked / Restricted Users description: APIs for listing the users an account has blocked or restricted - name: Chargebacks description: "" - name: Chat Messages description: "" - name: Chats description: "" - name: Client Sessions description: "" - name: Connect OnlyFans Account description: "" - name: Data Exports description: APIs for managing data exports - name: Engagement / Messages description: "" - name: Fans description: APIs for managing OnlyFans fans (subscribers) - name: Fans - AI Summary description: APIs for generating and retrieving AI-powered fan profile summaries - name: Following description: APIs for managing OnlyFans followings (people you're subscribed to) - name: Free Trial Links description: APIs for managing Free Trial Links. Revenue totals are net earnings after refunds and chargebacks. `revenue.chargebacks` (or `summary.chargebacks_total` in stats) is the positive cached net amount already excluded from revenue; do not subtract it again. Spender responses include chargebacks across all attributed periods for each fan with positive net revenue. - name: Giphy description: "" - name: Link Tags description: APIs for managing tags on free trial links, tracking links, and Smart Links - name: Mass Messaging description: "" - name: Media description: "" - name: Media Vault description: "" - name: Media Vault Lists description: "" - name: Notifications description: Endpoints for managingr account notifications - name: Payouts description: "" - name: Post Comments description: "" - name: Post Labels description: APIs for managing your post labels - name: Posts description: APIs for managing OnlyFans posts - name: Profile Content description: Read another user's profile content using your connected OnlyFans account. OnlyFans enforces subscription and purchase requirements; these endpoints do not unlock content. Response samples use captured OnlyFans payloads with anonymized IDs, text, and media URLs; OFAPI metadata values are illustrative. - name: Promotions description: "" - name: Public Profiles description: "" - name: Queue description: "" - name: Release Forms description: APIs for managing OnlyFans release forms - name: Saved For Later (Messages) description: "" - name: Saved For Later (Posts) description: "" - name: Settings description: "" - name: Shared Free Trial Links description: APIs for Free Trial Links that other OF creators have shared with this account. Revenue, cost, and spender data are not available for shared links. - name: Shared Tracking Links description: APIs for Tracking Links (campaigns) that other OF creators have shared with this account. Revenue, cost, and spender data are not available for shared campaigns. - name: Smart Link Postbacks description: APIs for managing Smart Link postback destinations - name: Smart Links description: APIs for managing Smart Links (Free Trial Links and Tracking Links with pooled inventory) - name: Statistics description: "" - name: Stored Free Trial Links description: Instant APIs for retrieving stored free trial links from the OnlyFansAPI Cache (free, no credits used). `revenue.total` is net earnings after refunds and chargebacks. `revenue.chargebacks` is the positive cached net amount already excluded from that total; do not subtract it again. - name: Stored Shared Free Trial Links description: Instant APIs for retrieving stored shared Free Trial Links from the OnlyFansAPI Cache (free, no credits used) - name: Stored Shared Tracking Links description: Instant APIs for retrieving stored shared Tracking Links (campaigns) from the OnlyFansAPI Cache (free, no credits used) - name: Stored Tracking Links description: Instant APIs for retrieving stored tracking links from the OnlyFansAPI Cache (free, no credits used). `revenue.total` is net earnings after refunds and chargebacks. `revenue.chargebacks` is the positive cached net amount already excluded from that total; do not subtract it again. - name: Stories description: APIs for managing OnlyFans stories - name: Story Highlights description: APIs for managing OnlyFans story highlights - name: Subscription Bundles description: "" - name: Tracking Links description: APIs for managing tracking links. Revenue totals are net earnings after refunds and chargebacks. `revenue.chargebacks` (or `summary.chargebacks_total` in stats) is the positive cached net amount already excluded from revenue; do not subtract it again. Spender responses include chargebacks across all attributed periods for each fan with positive net revenue. - name: Transactions description: APIs for managing OnlyFans transactions - name: Usage description: Credit usage reporting for your team - name: User List Collections description: "" - name: Users description: APIs for fetching OnlyFans users - name: Webhooks description: "" paths: /api/{account}/mass-messaging: parameters: - in: path name: account description: The Account ID example: acct_XXXXXXXXXXXXXXX required: true schema: type: string get: summary: List Mass Message Queue operationId: listMassMessageQueue description: List pending, scheduled, and recently sent mass messages. Use an item ID to retrieve, update, reschedule, delete, or unsend the message. parameters: [] responses: "200": description: "" content: application/json: schema: type: object example: data: - id: 123 date: 2025-01-01T01:01:01+00:00 isReady: true isDone: false total: -1 pending: 2 canUnsend: true unsendSeconds: 1000000 hasError: false isCanceled: false isCouplePeopleMedia: false _meta: _credits: used: 1 balance: 964 note: Always _cache: is_cached: false note: Cache disabled for this endpoint _rate_limits: limit_minute: 1000 limit_day: 50000 remaining_minute: 997 remaining_day: 49989 properties: data: type: array example: - id: 123 date: 2025-01-01T01:01:01+00:00 isReady: true isDone: false total: -1 pending: 2 canUnsend: true unsendSeconds: 1000000 hasError: false isCanceled: false isCouplePeopleMedia: false items: type: object properties: id: type: integer example: 123 date: type: string example: 2025-01-01T01:01:01+00:00 isReady: type: boolean example: true isDone: type: boolean example: false total: type: integer example: -1 pending: type: integer example: 2 canUnsend: type: boolean example: true unsendSeconds: type: integer example: 1000000 hasError: type: boolean example: false isCanceled: type: boolean example: false isCouplePeopleMedia: type: boolean example: false _meta: type: object properties: _credits: type: object properties: used: type: integer example: 1 balance: type: integer example: 964 note: type: string example: Always _cache: type: object properties: is_cached: type: boolean example: false note: type: string example: Cache disabled for this endpoint _rate_limits: type: object properties: limit_minute: type: integer example: 1000 limit_day: type: integer example: 50000 remaining_minute: type: integer example: 997 remaining_day: type: integer example: 49989 tags: - Mass Messaging components: securitySchemes: default: type: http scheme: bearer description: Get your API Key from OnlyFansAPI Console - https://app.onlyfansapi.com/api-keys ```` # Send Mass Message (/api-reference/mass-messaging/send-mass-message) Send a mass message to lists and/or users. You may use both the `userLists` and `userIds` parameters to send the same message to both lists and individual users. ## OpenAPI ````yaml https://app.onlyfansapi.com/scribe-docs/openapi.yaml post /api/{account}/mass-messaging openapi: 3.0.3 info: title: OnlyFans API description: "" version: 1.0.0 servers: - url: https://app.onlyfansapi.com security: - default: [] tags: - name: AI Voice Messages description: "" - name: API Keys description: "" - name: Account description: Endpoints for your linked accounts - name: Analytics - Financial description: APIs for retrieving financial analytics data - name: Analytics - Summary description: APIs for retrieving summary analytics data - name: Banking description: Operations related to user banking details, payout methods, legal and tax information, and account country settings. - name: Banned Words description: Reference list of OnlyFans banned words used by the `blockBannedWords` screening parameter - name: Blocked / Restricted Users description: APIs for listing the users an account has blocked or restricted - name: Chargebacks description: "" - name: Chat Messages description: "" - name: Chats description: "" - name: Client Sessions description: "" - name: Connect OnlyFans Account description: "" - name: Data Exports description: APIs for managing data exports - name: Engagement / Messages description: "" - name: Fans description: APIs for managing OnlyFans fans (subscribers) - name: Fans - AI Summary description: APIs for generating and retrieving AI-powered fan profile summaries - name: Following description: APIs for managing OnlyFans followings (people you're subscribed to) - name: Free Trial Links description: APIs for managing Free Trial Links. Revenue totals are net earnings after refunds and chargebacks. `revenue.chargebacks` (or `summary.chargebacks_total` in stats) is the positive cached net amount already excluded from revenue; do not subtract it again. Spender responses include chargebacks across all attributed periods for each fan with positive net revenue. - name: Giphy description: "" - name: Link Tags description: APIs for managing tags on free trial links, tracking links, and Smart Links - name: Mass Messaging description: "" - name: Media description: "" - name: Media Vault description: "" - name: Media Vault Lists description: "" - name: Notifications description: Endpoints for managingr account notifications - name: Payouts description: "" - name: Post Comments description: "" - name: Post Labels description: APIs for managing your post labels - name: Posts description: APIs for managing OnlyFans posts - name: Profile Content description: Read another user's profile content using your connected OnlyFans account. OnlyFans enforces subscription and purchase requirements; these endpoints do not unlock content. Response samples use captured OnlyFans payloads with anonymized IDs, text, and media URLs; OFAPI metadata values are illustrative. - name: Promotions description: "" - name: Public Profiles description: "" - name: Queue description: "" - name: Release Forms description: APIs for managing OnlyFans release forms - name: Saved For Later (Messages) description: "" - name: Saved For Later (Posts) description: "" - name: Settings description: "" - name: Shared Free Trial Links description: APIs for Free Trial Links that other OF creators have shared with this account. Revenue, cost, and spender data are not available for shared links. - name: Shared Tracking Links description: APIs for Tracking Links (campaigns) that other OF creators have shared with this account. Revenue, cost, and spender data are not available for shared campaigns. - name: Smart Link Postbacks description: APIs for managing Smart Link postback destinations - name: Smart Links description: APIs for managing Smart Links (Free Trial Links and Tracking Links with pooled inventory) - name: Statistics description: "" - name: Stored Free Trial Links description: Instant APIs for retrieving stored free trial links from the OnlyFansAPI Cache (free, no credits used). `revenue.total` is net earnings after refunds and chargebacks. `revenue.chargebacks` is the positive cached net amount already excluded from that total; do not subtract it again. - name: Stored Shared Free Trial Links description: Instant APIs for retrieving stored shared Free Trial Links from the OnlyFansAPI Cache (free, no credits used) - name: Stored Shared Tracking Links description: Instant APIs for retrieving stored shared Tracking Links (campaigns) from the OnlyFansAPI Cache (free, no credits used) - name: Stored Tracking Links description: Instant APIs for retrieving stored tracking links from the OnlyFansAPI Cache (free, no credits used). `revenue.total` is net earnings after refunds and chargebacks. `revenue.chargebacks` is the positive cached net amount already excluded from that total; do not subtract it again. - name: Stories description: APIs for managing OnlyFans stories - name: Story Highlights description: APIs for managing OnlyFans story highlights - name: Subscription Bundles description: "" - name: Tracking Links description: APIs for managing tracking links. Revenue totals are net earnings after refunds and chargebacks. `revenue.chargebacks` (or `summary.chargebacks_total` in stats) is the positive cached net amount already excluded from revenue; do not subtract it again. Spender responses include chargebacks across all attributed periods for each fan with positive net revenue. - name: Transactions description: APIs for managing OnlyFans transactions - name: Usage description: Credit usage reporting for your team - name: User List Collections description: "" - name: Users description: APIs for fetching OnlyFans users - name: Webhooks description: "" paths: /api/{account}/mass-messaging: parameters: - in: path name: account description: The Account ID example: acct_XXXXXXXXXXXXXXX required: true schema: type: string post: summary: Send Mass Message operationId: sendMassMessage description: Send a mass message to lists and/or users. You may use both the `userLists` and `userIds` parameters to send the same message to both lists and individual users. parameters: [] responses: "200": description: "" content: application/json: schema: type: object example: data: id: 123 date: 2025-01-01T01:01:01+00:00 isReady: true isDone: false total: -1 pending: 0 canUnsend: true unsendSeconds: 1000000 hasError: false isCanceled: false isCouplePeopleMedia: false _meta: _credits: used: 1 balance: 967 note: Always _cache: is_cached: false note: Cache disabled for this endpoint _rate_limits: limit_minute: 1000 limit_day: 50000 remaining_minute: 998 remaining_day: 49992 properties: data: type: object properties: id: type: integer example: 123 date: type: string example: 2025-01-01T01:01:01+00:00 isReady: type: boolean example: true isDone: type: boolean example: false total: type: integer example: -1 pending: type: integer example: 0 canUnsend: type: boolean example: true unsendSeconds: type: integer example: 1000000 hasError: type: boolean example: false isCanceled: type: boolean example: false isCouplePeopleMedia: type: boolean example: false _meta: type: object properties: _credits: type: object properties: used: type: integer example: 1 balance: type: integer example: 967 note: type: string example: Always _cache: type: object properties: is_cached: type: boolean example: false note: type: string example: Cache disabled for this endpoint _rate_limits: type: object properties: limit_minute: type: integer example: 1000 limit_day: type: integer example: 50000 remaining_minute: type: integer example: 998 remaining_day: type: integer example: 49992 tags: - Mass Messaging requestBody: required: true content: application/json: schema: type: object properties: userLists: type: array description: Array of user list IDs that the mass message will be sent to. example: - fans - recent - following - rebill_off - tagged - 1234567890 items: type: string excludedLists: type: array description: Array of user list IDs that the mass message will NOT be sent to. example: - fans - recent - following - rebill_off - tagged - 1234567890 items: type: string userIds: type: array description: Array of user IDs that the mass message will be sent to. example: - 1234567890 items: type: string subscribedWithinLastDays: type: integer description: Only send to fans who subscribed within the last N calendar days (1-30, including today). Can be combined with `userLists` and `userIds`. Cannot be combined with `scheduledDate` or `saveForLater`. example: null text: type: string description: The message text content example: Hello! lockedText: type: boolean description: Whether the text should be shown or hidden example: true price: type: number description: Price for paid content in USD (0 or between 3-200). In case this is not zero, **mediaFiles** is required example: 6.97 mediaFiles: type: array description: Direct file uploads, OFAPI `ofapi_media_` IDs, or OF vault IDs. Will be hidden if `price` is provided. example: - ofapi_media_abc123 - 1234567890 items: type: file[]|string previews: type: array description: Direct file uploads, OFAPI `ofapi_media_` IDs, OF vault IDs, or integer indices referencing uploaded files in `mediaFiles`. Will be shown if `price` is provided. example: - ofapi_media_abc123 - 1234567890 items: type: file[]|string[]|int giphyId: type: string description: The ID of the Giphy GIF to attach to the message. Get IDs from the Giphy listing endpoints (`/giphy/trending`, `/giphy/search`). example: WAGC3LeqJvXglm5H7a rfTag: type: string description: Array of OnlyFans Creator User IDs to tag in your mass message example: null rfPartner: type: string description: Array of OnlyFans Release Form Partners IDs to tag in your mass message example: null rfGuest: type: string description: Array of OnlyFans Release Form Guest IDs to tag in your mass message example: null scheduledDate: type: string description: Schedule the chat message in the future (UTC timezone). example: 2025-01-01T00:00:00.000Z saveForLater: type: boolean description: Add your message to the "Saved for later" queue. example: true blockBannedWords: type: string description: Screen `text` for OnlyFans banned words and block the send if any are found (returns a 422 listing the offending words). `strict_ban` blocks all tiers, `risky` blocks Risky + Replace/soften, `replace_soften` blocks Replace/soften only. Omit to disable screening. example: strict_ban enum: - strict_ban - risky - replace_soften required: - text components: securitySchemes: default: type: http scheme: bearer description: Get your API Key from OnlyFansAPI Console - https://app.onlyfansapi.com/api-keys ```` # Unsend/Delete Mass Message (/api-reference/mass-messaging/unsend-delete-mass-message) Unsend a recently sent mass message, or delete a scheduled/saved message. When unsending, purchased content will continue to be able to viewable. ## OpenAPI ````yaml https://app.onlyfansapi.com/scribe-docs/openapi.yaml delete /api/{account}/mass-messaging/{id} openapi: 3.0.3 info: title: OnlyFans API description: "" version: 1.0.0 servers: - url: https://app.onlyfansapi.com security: - default: [] tags: - name: AI Voice Messages description: "" - name: API Keys description: "" - name: Account description: Endpoints for your linked accounts - name: Analytics - Financial description: APIs for retrieving financial analytics data - name: Analytics - Summary description: APIs for retrieving summary analytics data - name: Banking description: Operations related to user banking details, payout methods, legal and tax information, and account country settings. - name: Banned Words description: Reference list of OnlyFans banned words used by the `blockBannedWords` screening parameter - name: Blocked / Restricted Users description: APIs for listing the users an account has blocked or restricted - name: Chargebacks description: "" - name: Chat Messages description: "" - name: Chats description: "" - name: Client Sessions description: "" - name: Connect OnlyFans Account description: "" - name: Data Exports description: APIs for managing data exports - name: Engagement / Messages description: "" - name: Fans description: APIs for managing OnlyFans fans (subscribers) - name: Fans - AI Summary description: APIs for generating and retrieving AI-powered fan profile summaries - name: Following description: APIs for managing OnlyFans followings (people you're subscribed to) - name: Free Trial Links description: APIs for managing Free Trial Links. Revenue totals are net earnings after refunds and chargebacks. `revenue.chargebacks` (or `summary.chargebacks_total` in stats) is the positive cached net amount already excluded from revenue; do not subtract it again. Spender responses include chargebacks across all attributed periods for each fan with positive net revenue. - name: Giphy description: "" - name: Link Tags description: APIs for managing tags on free trial links, tracking links, and Smart Links - name: Mass Messaging description: "" - name: Media description: "" - name: Media Vault description: "" - name: Media Vault Lists description: "" - name: Notifications description: Endpoints for managingr account notifications - name: Payouts description: "" - name: Post Comments description: "" - name: Post Labels description: APIs for managing your post labels - name: Posts description: APIs for managing OnlyFans posts - name: Profile Content description: Read another user's profile content using your connected OnlyFans account. OnlyFans enforces subscription and purchase requirements; these endpoints do not unlock content. Response samples use captured OnlyFans payloads with anonymized IDs, text, and media URLs; OFAPI metadata values are illustrative. - name: Promotions description: "" - name: Public Profiles description: "" - name: Queue description: "" - name: Release Forms description: APIs for managing OnlyFans release forms - name: Saved For Later (Messages) description: "" - name: Saved For Later (Posts) description: "" - name: Settings description: "" - name: Shared Free Trial Links description: APIs for Free Trial Links that other OF creators have shared with this account. Revenue, cost, and spender data are not available for shared links. - name: Shared Tracking Links description: APIs for Tracking Links (campaigns) that other OF creators have shared with this account. Revenue, cost, and spender data are not available for shared campaigns. - name: Smart Link Postbacks description: APIs for managing Smart Link postback destinations - name: Smart Links description: APIs for managing Smart Links (Free Trial Links and Tracking Links with pooled inventory) - name: Statistics description: "" - name: Stored Free Trial Links description: Instant APIs for retrieving stored free trial links from the OnlyFansAPI Cache (free, no credits used). `revenue.total` is net earnings after refunds and chargebacks. `revenue.chargebacks` is the positive cached net amount already excluded from that total; do not subtract it again. - name: Stored Shared Free Trial Links description: Instant APIs for retrieving stored shared Free Trial Links from the OnlyFansAPI Cache (free, no credits used) - name: Stored Shared Tracking Links description: Instant APIs for retrieving stored shared Tracking Links (campaigns) from the OnlyFansAPI Cache (free, no credits used) - name: Stored Tracking Links description: Instant APIs for retrieving stored tracking links from the OnlyFansAPI Cache (free, no credits used). `revenue.total` is net earnings after refunds and chargebacks. `revenue.chargebacks` is the positive cached net amount already excluded from that total; do not subtract it again. - name: Stories description: APIs for managing OnlyFans stories - name: Story Highlights description: APIs for managing OnlyFans story highlights - name: Subscription Bundles description: "" - name: Tracking Links description: APIs for managing tracking links. Revenue totals are net earnings after refunds and chargebacks. `revenue.chargebacks` (or `summary.chargebacks_total` in stats) is the positive cached net amount already excluded from revenue; do not subtract it again. Spender responses include chargebacks across all attributed periods for each fan with positive net revenue. - name: Transactions description: APIs for managing OnlyFans transactions - name: Usage description: Credit usage reporting for your team - name: User List Collections description: "" - name: Users description: APIs for fetching OnlyFans users - name: Webhooks description: "" paths: /api/{account}/mass-messaging/{id}: parameters: - in: path name: account description: The Account ID example: acct_XXXXXXXXXXXXXXX required: true schema: type: string - in: path name: id description: The ID of the message queue item. Can be retrieved from the above store and list endpoints. example: 1234567890 required: true schema: type: string delete: summary: Unsend/Delete Mass Message operationId: unsendDeleteMassMessage description: Unsend a recently sent mass message, or delete a scheduled/saved message. When unsending, purchased content will continue to be able to viewable. parameters: [] responses: "200": description: "" content: application/json: schema: type: object example: data: success: true queue: id: 123 date: 2025-01-01T01:01:01+00:00 text: My message giphyId: null textCropped: My message isFree: true sentCount: 2 viewedCount: 0 canUnsend: false unsendSeconds: 0 isCanceled: true mediaTypes: null hasError: false releaseForms: [] _meta: _credits: used: 1 balance: 955 note: Always _cache: is_cached: false note: Cache disabled for this endpoint _rate_limits: limit_minute: 1000 limit_day: 50000 remaining_minute: 994 remaining_day: 49980 properties: data: type: object properties: success: type: boolean example: true queue: type: object properties: id: type: integer example: 123 date: type: string example: 2025-01-01T01:01:01+00:00 text: type: string example: My message giphyId: type: string example: null nullable: true textCropped: type: string example: My message isFree: type: boolean example: true sentCount: type: integer example: 2 viewedCount: type: integer example: 0 canUnsend: type: boolean example: false unsendSeconds: type: integer example: 0 isCanceled: type: boolean example: true mediaTypes: type: string example: null nullable: true hasError: type: boolean example: false releaseForms: type: array example: [] _meta: type: object properties: _credits: type: object properties: used: type: integer example: 1 balance: type: integer example: 955 note: type: string example: Always _cache: type: object properties: is_cached: type: boolean example: false note: type: string example: Cache disabled for this endpoint _rate_limits: type: object properties: limit_minute: type: integer example: 1000 limit_day: type: integer example: 50000 remaining_minute: type: integer example: 994 remaining_day: type: integer example: 49980 tags: - Mass Messaging components: securitySchemes: default: type: http scheme: bearer description: Get your API Key from OnlyFansAPI Console - https://app.onlyfansapi.com/api-keys ```` # Update Mass Message (/api-reference/mass-messaging/update-mass-message) Update the content, recipients, media, price, or scheduled send time of an existing mass message. ## OpenAPI ````yaml https://app.onlyfansapi.com/scribe-docs/openapi.yaml put /api/{account}/mass-messaging/{id} openapi: 3.0.3 info: title: OnlyFans API description: "" version: 1.0.0 servers: - url: https://app.onlyfansapi.com security: - default: [] tags: - name: AI Voice Messages description: "" - name: API Keys description: "" - name: Account description: Endpoints for your linked accounts - name: Analytics - Financial description: APIs for retrieving financial analytics data - name: Analytics - Summary description: APIs for retrieving summary analytics data - name: Banking description: Operations related to user banking details, payout methods, legal and tax information, and account country settings. - name: Banned Words description: Reference list of OnlyFans banned words used by the `blockBannedWords` screening parameter - name: Blocked / Restricted Users description: APIs for listing the users an account has blocked or restricted - name: Chargebacks description: "" - name: Chat Messages description: "" - name: Chats description: "" - name: Client Sessions description: "" - name: Connect OnlyFans Account description: "" - name: Data Exports description: APIs for managing data exports - name: Engagement / Messages description: "" - name: Fans description: APIs for managing OnlyFans fans (subscribers) - name: Fans - AI Summary description: APIs for generating and retrieving AI-powered fan profile summaries - name: Following description: APIs for managing OnlyFans followings (people you're subscribed to) - name: Free Trial Links description: APIs for managing Free Trial Links. Revenue totals are net earnings after refunds and chargebacks. `revenue.chargebacks` (or `summary.chargebacks_total` in stats) is the positive cached net amount already excluded from revenue; do not subtract it again. Spender responses include chargebacks across all attributed periods for each fan with positive net revenue. - name: Giphy description: "" - name: Link Tags description: APIs for managing tags on free trial links, tracking links, and Smart Links - name: Mass Messaging description: "" - name: Media description: "" - name: Media Vault description: "" - name: Media Vault Lists description: "" - name: Notifications description: Endpoints for managingr account notifications - name: Payouts description: "" - name: Post Comments description: "" - name: Post Labels description: APIs for managing your post labels - name: Posts description: APIs for managing OnlyFans posts - name: Profile Content description: Read another user's profile content using your connected OnlyFans account. OnlyFans enforces subscription and purchase requirements; these endpoints do not unlock content. Response samples use captured OnlyFans payloads with anonymized IDs, text, and media URLs; OFAPI metadata values are illustrative. - name: Promotions description: "" - name: Public Profiles description: "" - name: Queue description: "" - name: Release Forms description: APIs for managing OnlyFans release forms - name: Saved For Later (Messages) description: "" - name: Saved For Later (Posts) description: "" - name: Settings description: "" - name: Shared Free Trial Links description: APIs for Free Trial Links that other OF creators have shared with this account. Revenue, cost, and spender data are not available for shared links. - name: Shared Tracking Links description: APIs for Tracking Links (campaigns) that other OF creators have shared with this account. Revenue, cost, and spender data are not available for shared campaigns. - name: Smart Link Postbacks description: APIs for managing Smart Link postback destinations - name: Smart Links description: APIs for managing Smart Links (Free Trial Links and Tracking Links with pooled inventory) - name: Statistics description: "" - name: Stored Free Trial Links description: Instant APIs for retrieving stored free trial links from the OnlyFansAPI Cache (free, no credits used). `revenue.total` is net earnings after refunds and chargebacks. `revenue.chargebacks` is the positive cached net amount already excluded from that total; do not subtract it again. - name: Stored Shared Free Trial Links description: Instant APIs for retrieving stored shared Free Trial Links from the OnlyFansAPI Cache (free, no credits used) - name: Stored Shared Tracking Links description: Instant APIs for retrieving stored shared Tracking Links (campaigns) from the OnlyFansAPI Cache (free, no credits used) - name: Stored Tracking Links description: Instant APIs for retrieving stored tracking links from the OnlyFansAPI Cache (free, no credits used). `revenue.total` is net earnings after refunds and chargebacks. `revenue.chargebacks` is the positive cached net amount already excluded from that total; do not subtract it again. - name: Stories description: APIs for managing OnlyFans stories - name: Story Highlights description: APIs for managing OnlyFans story highlights - name: Subscription Bundles description: "" - name: Tracking Links description: APIs for managing tracking links. Revenue totals are net earnings after refunds and chargebacks. `revenue.chargebacks` (or `summary.chargebacks_total` in stats) is the positive cached net amount already excluded from revenue; do not subtract it again. Spender responses include chargebacks across all attributed periods for each fan with positive net revenue. - name: Transactions description: APIs for managing OnlyFans transactions - name: Usage description: Credit usage reporting for your team - name: User List Collections description: "" - name: Users description: APIs for fetching OnlyFans users - name: Webhooks description: "" paths: /api/{account}/mass-messaging/{id}: parameters: - in: path name: account description: The Account ID example: acct_XXXXXXXXXXXXXXX required: true schema: type: string - in: path name: id description: The ID of the message queue item. Can be retrieved from the above store and list endpoints. example: 1234567890 required: true schema: type: string put: summary: Update Mass Message operationId: updateMassMessage description: Update the content, recipients, media, price, or scheduled send time of an existing mass message. parameters: [] responses: "200": description: "" content: application/json: schema: type: object example: data: id: 123 date: 2025-01-01T01:01:01+01:01 isReady: true isDone: false total: -1 pending: 0 canUnsend: true unsendSeconds: 1000000 hasError: false isCanceled: false isCouplePeopleMedia: false _meta: _credits: used: 1 balance: 999999919 note: Always _cache: is_cached: false note: Cache disabled for this endpoint _rate_limits: limit_minute: 1000 limit_day: 50000 remaining_minute: 998 remaining_day: 49942 properties: data: type: object properties: id: type: integer example: 123 date: type: string example: 2025-01-01T01:01:01+01:01 isReady: type: boolean example: true isDone: type: boolean example: false total: type: integer example: -1 pending: type: integer example: 0 canUnsend: type: boolean example: true unsendSeconds: type: integer example: 1000000 hasError: type: boolean example: false isCanceled: type: boolean example: false isCouplePeopleMedia: type: boolean example: false _meta: type: object properties: _credits: type: object properties: used: type: integer example: 1 balance: type: integer example: 999999919 note: type: string example: Always _cache: type: object properties: is_cached: type: boolean example: false note: type: string example: Cache disabled for this endpoint _rate_limits: type: object properties: limit_minute: type: integer example: 1000 limit_day: type: integer example: 50000 remaining_minute: type: integer example: 998 remaining_day: type: integer example: 49942 tags: - Mass Messaging requestBody: required: true content: application/json: schema: type: object properties: userLists: type: array description: Array of user list IDs that the mass message will be sent to. example: - fans - recent - following - rebill_off - tagged - 1234567890 items: type: string userIds: type: array description: Array of user IDs that the mass message will be sent to. example: - 1234567890 items: type: string text: type: string description: The message text content example: Hello! lockedText: type: boolean description: Whether the text should be shown or hidden example: true price: type: number description: Price for paid content in USD (0 or between 3-200). In case this is not zero, **mediaFiles** is required example: 6.97 mediaFiles: type: array description: Array of media file upload prefixed_ids, or OF media IDs (required if price is not 0). Will be hidden if `price` is provided. example: - ofapi_media_abc123 - 1234567890 items: type: string previews: type: array description: Array of media file upload prefixed_ids, or OF media IDs (required if price is not 0). Will be shown if `price` is provided. All `previews` values must also exist in the `mediaFiles` array. example: - ofapi_media_abc123 - 1234567890 items: type: string giphyId: type: string description: The ID of the Giphy GIF to attach to the message. Get IDs from the Giphy listing endpoints (`/giphy/trending`, `/giphy/search`). example: WAGC3LeqJvXglm5H7a scheduledDate: type: string description: Schedule the chat message in the future (UTC timezone). example: 2025-01-01T00:00:00.000Z blockBannedWords: type: string description: Screen `text` for OnlyFans banned words and block the update if any are found (returns a 422 listing the offending words). `strict_ban` blocks all tiers, `risky` blocks Risky + Replace/soften, `replace_soften` blocks Replace/soften only. Omit to disable screening. example: strict_ban enum: - strict_ban - risky - replace_soften required: - text components: securitySchemes: default: type: http scheme: bearer description: Get your API Key from OnlyFansAPI Console - https://app.onlyfansapi.com/api-keys ```` # Add Free Trial Link Tags (/api-reference/free-trial-links/add-free-trial-link-tags) Add tags to a specific free trial link. Existing tags are preserved. This is a free endpoint. ## OpenAPI ````yaml https://app.onlyfansapi.com/scribe-docs/openapi.yaml post /api/{account}/trial-links/{trial_link_id}/tags openapi: 3.0.3 info: title: OnlyFans API description: "" version: 1.0.0 servers: - url: https://app.onlyfansapi.com security: - default: [] tags: - name: AI Voice Messages description: "" - name: API Keys description: "" - name: Account description: Endpoints for your linked accounts - name: Analytics - Financial description: APIs for retrieving financial analytics data - name: Analytics - Summary description: APIs for retrieving summary analytics data - name: Banking description: Operations related to user banking details, payout methods, legal and tax information, and account country settings. - name: Banned Words description: Reference list of OnlyFans banned words used by the `blockBannedWords` screening parameter - name: Blocked / Restricted Users description: APIs for listing the users an account has blocked or restricted - name: Chargebacks description: "" - name: Chat Messages description: "" - name: Chats description: "" - name: Client Sessions description: "" - name: Connect OnlyFans Account description: "" - name: Data Exports description: APIs for managing data exports - name: Engagement / Messages description: "" - name: Fans description: APIs for managing OnlyFans fans (subscribers) - name: Fans - AI Summary description: APIs for generating and retrieving AI-powered fan profile summaries - name: Following description: APIs for managing OnlyFans followings (people you're subscribed to) - name: Free Trial Links description: APIs for managing Free Trial Links. Revenue totals are net earnings after refunds and chargebacks. `revenue.chargebacks` (or `summary.chargebacks_total` in stats) is the positive cached net amount already excluded from revenue; do not subtract it again. Spender responses include chargebacks across all attributed periods for each fan with positive net revenue. - name: Giphy description: "" - name: Link Tags description: APIs for managing tags on free trial links, tracking links, and Smart Links - name: Mass Messaging description: "" - name: Media description: "" - name: Media Vault description: "" - name: Media Vault Lists description: "" - name: Notifications description: Endpoints for managingr account notifications - name: Payouts description: "" - name: Post Comments description: "" - name: Post Labels description: APIs for managing your post labels - name: Posts description: APIs for managing OnlyFans posts - name: Profile Content description: Read another user's profile content using your connected OnlyFans account. OnlyFans enforces subscription and purchase requirements; these endpoints do not unlock content. Response samples use captured OnlyFans payloads with anonymized IDs, text, and media URLs; OFAPI metadata values are illustrative. - name: Promotions description: "" - name: Public Profiles description: "" - name: Queue description: "" - name: Release Forms description: APIs for managing OnlyFans release forms - name: Saved For Later (Messages) description: "" - name: Saved For Later (Posts) description: "" - name: Settings description: "" - name: Shared Free Trial Links description: APIs for Free Trial Links that other OF creators have shared with this account. Revenue, cost, and spender data are not available for shared links. - name: Shared Tracking Links description: APIs for Tracking Links (campaigns) that other OF creators have shared with this account. Revenue, cost, and spender data are not available for shared campaigns. - name: Smart Link Postbacks description: APIs for managing Smart Link postback destinations - name: Smart Links description: APIs for managing Smart Links (Free Trial Links and Tracking Links with pooled inventory) - name: Statistics description: "" - name: Stored Free Trial Links description: Instant APIs for retrieving stored free trial links from the OnlyFansAPI Cache (free, no credits used). `revenue.total` is net earnings after refunds and chargebacks. `revenue.chargebacks` is the positive cached net amount already excluded from that total; do not subtract it again. - name: Stored Shared Free Trial Links description: Instant APIs for retrieving stored shared Free Trial Links from the OnlyFansAPI Cache (free, no credits used) - name: Stored Shared Tracking Links description: Instant APIs for retrieving stored shared Tracking Links (campaigns) from the OnlyFansAPI Cache (free, no credits used) - name: Stored Tracking Links description: Instant APIs for retrieving stored tracking links from the OnlyFansAPI Cache (free, no credits used). `revenue.total` is net earnings after refunds and chargebacks. `revenue.chargebacks` is the positive cached net amount already excluded from that total; do not subtract it again. - name: Stories description: APIs for managing OnlyFans stories - name: Story Highlights description: APIs for managing OnlyFans story highlights - name: Subscription Bundles description: "" - name: Tracking Links description: APIs for managing tracking links. Revenue totals are net earnings after refunds and chargebacks. `revenue.chargebacks` (or `summary.chargebacks_total` in stats) is the positive cached net amount already excluded from revenue; do not subtract it again. Spender responses include chargebacks across all attributed periods for each fan with positive net revenue. - name: Transactions description: APIs for managing OnlyFans transactions - name: Usage description: Credit usage reporting for your team - name: User List Collections description: "" - name: Users description: APIs for fetching OnlyFans users - name: Webhooks description: "" paths: /api/{account}/trial-links/{trial_link_id}/tags: parameters: - in: path name: account description: The Account ID example: acct_XXXXXXXXXXXXXXX required: true schema: type: string - in: path name: trial_link_id description: The ID of the trial link example: 123456789 required: true schema: type: integer post: summary: Add Free Trial Link Tags operationId: addFreeTrialLinkTags description: Add tags to a specific free trial link. Existing tags are preserved. This is a free endpoint. parameters: [] responses: "200": description: Success content: application/json: schema: type: object example: data: tags: - Instagram - Twitter - TikTok _meta: _credits: used: 0 balance: 9529 note: Free endpoint _cache: is_cached: false note: Cache disabled for this endpoint _rate_limits: limit_minute: 5000 limit_day: null remaining_minute: 4999 remaining_day: null properties: data: type: object properties: tags: type: array example: - Instagram - Twitter - TikTok items: type: string _meta: type: object properties: _credits: type: object properties: used: type: integer example: 0 balance: type: integer example: 9529 note: type: string example: Free endpoint _cache: type: object properties: is_cached: type: boolean example: false note: type: string example: Cache disabled for this endpoint _rate_limits: type: object properties: limit_minute: type: integer example: 5000 limit_day: type: string example: null nullable: true remaining_minute: type: integer example: 4999 remaining_day: type: string example: null nullable: true tags: - Free Trial Links requestBody: required: true content: application/json: schema: type: object properties: tags: type: array description: Array of tag names to add to the trial link. example: '["Instagram", "Twitter"]' items: type: string required: - tags components: securitySchemes: default: type: http scheme: bearer description: Get your API Key from OnlyFansAPI Console - https://app.onlyfansapi.com/api-keys ```` # Create Free Trial Link (/api-reference/free-trial-links/create-free-trial-link) Create a new free trial link for the account ## OpenAPI ````yaml https://app.onlyfansapi.com/scribe-docs/openapi.yaml post /api/{account}/trial-links openapi: 3.0.3 info: title: OnlyFans API description: "" version: 1.0.0 servers: - url: https://app.onlyfansapi.com security: - default: [] tags: - name: AI Voice Messages description: "" - name: API Keys description: "" - name: Account description: Endpoints for your linked accounts - name: Analytics - Financial description: APIs for retrieving financial analytics data - name: Analytics - Summary description: APIs for retrieving summary analytics data - name: Banking description: Operations related to user banking details, payout methods, legal and tax information, and account country settings. - name: Banned Words description: Reference list of OnlyFans banned words used by the `blockBannedWords` screening parameter - name: Blocked / Restricted Users description: APIs for listing the users an account has blocked or restricted - name: Chargebacks description: "" - name: Chat Messages description: "" - name: Chats description: "" - name: Client Sessions description: "" - name: Connect OnlyFans Account description: "" - name: Data Exports description: APIs for managing data exports - name: Engagement / Messages description: "" - name: Fans description: APIs for managing OnlyFans fans (subscribers) - name: Fans - AI Summary description: APIs for generating and retrieving AI-powered fan profile summaries - name: Following description: APIs for managing OnlyFans followings (people you're subscribed to) - name: Free Trial Links description: APIs for managing Free Trial Links. Revenue totals are net earnings after refunds and chargebacks. `revenue.chargebacks` (or `summary.chargebacks_total` in stats) is the positive cached net amount already excluded from revenue; do not subtract it again. Spender responses include chargebacks across all attributed periods for each fan with positive net revenue. - name: Giphy description: "" - name: Link Tags description: APIs for managing tags on free trial links, tracking links, and Smart Links - name: Mass Messaging description: "" - name: Media description: "" - name: Media Vault description: "" - name: Media Vault Lists description: "" - name: Notifications description: Endpoints for managingr account notifications - name: Payouts description: "" - name: Post Comments description: "" - name: Post Labels description: APIs for managing your post labels - name: Posts description: APIs for managing OnlyFans posts - name: Profile Content description: Read another user's profile content using your connected OnlyFans account. OnlyFans enforces subscription and purchase requirements; these endpoints do not unlock content. Response samples use captured OnlyFans payloads with anonymized IDs, text, and media URLs; OFAPI metadata values are illustrative. - name: Promotions description: "" - name: Public Profiles description: "" - name: Queue description: "" - name: Release Forms description: APIs for managing OnlyFans release forms - name: Saved For Later (Messages) description: "" - name: Saved For Later (Posts) description: "" - name: Settings description: "" - name: Shared Free Trial Links description: APIs for Free Trial Links that other OF creators have shared with this account. Revenue, cost, and spender data are not available for shared links. - name: Shared Tracking Links description: APIs for Tracking Links (campaigns) that other OF creators have shared with this account. Revenue, cost, and spender data are not available for shared campaigns. - name: Smart Link Postbacks description: APIs for managing Smart Link postback destinations - name: Smart Links description: APIs for managing Smart Links (Free Trial Links and Tracking Links with pooled inventory) - name: Statistics description: "" - name: Stored Free Trial Links description: Instant APIs for retrieving stored free trial links from the OnlyFansAPI Cache (free, no credits used). `revenue.total` is net earnings after refunds and chargebacks. `revenue.chargebacks` is the positive cached net amount already excluded from that total; do not subtract it again. - name: Stored Shared Free Trial Links description: Instant APIs for retrieving stored shared Free Trial Links from the OnlyFansAPI Cache (free, no credits used) - name: Stored Shared Tracking Links description: Instant APIs for retrieving stored shared Tracking Links (campaigns) from the OnlyFansAPI Cache (free, no credits used) - name: Stored Tracking Links description: Instant APIs for retrieving stored tracking links from the OnlyFansAPI Cache (free, no credits used). `revenue.total` is net earnings after refunds and chargebacks. `revenue.chargebacks` is the positive cached net amount already excluded from that total; do not subtract it again. - name: Stories description: APIs for managing OnlyFans stories - name: Story Highlights description: APIs for managing OnlyFans story highlights - name: Subscription Bundles description: "" - name: Tracking Links description: APIs for managing tracking links. Revenue totals are net earnings after refunds and chargebacks. `revenue.chargebacks` (or `summary.chargebacks_total` in stats) is the positive cached net amount already excluded from revenue; do not subtract it again. Spender responses include chargebacks across all attributed periods for each fan with positive net revenue. - name: Transactions description: APIs for managing OnlyFans transactions - name: Usage description: Credit usage reporting for your team - name: User List Collections description: "" - name: Users description: APIs for fetching OnlyFans users - name: Webhooks description: "" paths: /api/{account}/trial-links: parameters: - in: path name: account description: The Account ID example: acct_XXXXXXXXXXXXXXX required: true schema: type: string post: summary: Create Free Trial Link operationId: createFreeTrialLink description: Create a new free trial link for the account parameters: [] responses: "200": description: Success content: application/json: schema: type: object example: data: id: 123 trialLinkName: My new trial link url: https://onlyfans.com/username/trial/code subscribeDays: 123 subscribeCounts: 123 claimCounts: 123 expiredAt: 2025-01-05T00:00:00+00:00 createdAt: 2025-01-01T00:00:00+00:00 isFinished: false _pagination: next_page: null _meta: _credits: used: 1 balance: 999999840 note: Always _cache: is_cached: false note: Cache disabled for this endpoint _rate_limits: limit_minute: 1000 limit_day: 50000 remaining_minute: 998 remaining_day: 49993 properties: data: type: object properties: id: type: integer example: 123 trialLinkName: type: string example: My new trial link url: type: string example: https://onlyfans.com/username/trial/code subscribeDays: type: integer example: 123 subscribeCounts: type: integer example: 123 claimCounts: type: integer example: 123 expiredAt: type: string example: 2025-01-05T00:00:00+00:00 createdAt: type: string example: 2025-01-01T00:00:00+00:00 isFinished: type: boolean example: false _pagination: type: object properties: next_page: type: string example: null nullable: true _meta: type: object properties: _credits: type: object properties: used: type: integer example: 1 balance: type: integer example: 999999840 note: type: string example: Always _cache: type: object properties: is_cached: type: boolean example: false note: type: string example: Cache disabled for this endpoint _rate_limits: type: object properties: limit_minute: type: integer example: 1000 limit_day: type: integer example: 50000 remaining_minute: type: integer example: 998 remaining_day: type: integer example: 49993 tags: - Free Trial Links requestBody: required: true content: application/json: schema: type: object properties: tags: type: array description: Array of tag names to add to the trial link. example: '["Instagram", "Twitter"]' items: type: string name: type: string description: The name of the trail link (optional). Cannot be longer than 64 characters. example: 7 nullable: true offerExpiration: type: integer description: The trial link expiration **in days (from now)**. Must either be **0** (to never expire), or a number between **1** and **30**. example: 7 offerLimit: type: integer description: How many people can use this offer. Must either be **0** (for no limit), or a number between **1**-**10**, **50**, or **100**. example: 7 enum: - 0 - 1 - 2 - 3 - 4 - 5 - 6 - 7 - 8 - 9 - 10 - 50 - 100 duration: type: integer description: The duration of the free trial **in days**. Must be **1**, **3**, **7**, **14**, **30** (1 month), **90** (3 months), **180** (6 months), or **360** (12 months). example: 7 enum: - 1 - 3 - 7 - 14 - 30 - 90 - 180 - 360 required: - offerExpiration - offerLimit - duration components: securitySchemes: default: type: http scheme: bearer description: Get your API Key from OnlyFansAPI Console - https://app.onlyfansapi.com/api-keys ```` # Delete Free Trial Link (/api-reference/free-trial-links/delete-free-trial-link) Delete a free trial link by its ID ## OpenAPI ````yaml https://app.onlyfansapi.com/scribe-docs/openapi.yaml delete /api/{account}/trial-links/{trial_link_id} openapi: 3.0.3 info: title: OnlyFans API description: "" version: 1.0.0 servers: - url: https://app.onlyfansapi.com security: - default: [] tags: - name: AI Voice Messages description: "" - name: API Keys description: "" - name: Account description: Endpoints for your linked accounts - name: Analytics - Financial description: APIs for retrieving financial analytics data - name: Analytics - Summary description: APIs for retrieving summary analytics data - name: Banking description: Operations related to user banking details, payout methods, legal and tax information, and account country settings. - name: Banned Words description: Reference list of OnlyFans banned words used by the `blockBannedWords` screening parameter - name: Blocked / Restricted Users description: APIs for listing the users an account has blocked or restricted - name: Chargebacks description: "" - name: Chat Messages description: "" - name: Chats description: "" - name: Client Sessions description: "" - name: Connect OnlyFans Account description: "" - name: Data Exports description: APIs for managing data exports - name: Engagement / Messages description: "" - name: Fans description: APIs for managing OnlyFans fans (subscribers) - name: Fans - AI Summary description: APIs for generating and retrieving AI-powered fan profile summaries - name: Following description: APIs for managing OnlyFans followings (people you're subscribed to) - name: Free Trial Links description: APIs for managing Free Trial Links. Revenue totals are net earnings after refunds and chargebacks. `revenue.chargebacks` (or `summary.chargebacks_total` in stats) is the positive cached net amount already excluded from revenue; do not subtract it again. Spender responses include chargebacks across all attributed periods for each fan with positive net revenue. - name: Giphy description: "" - name: Link Tags description: APIs for managing tags on free trial links, tracking links, and Smart Links - name: Mass Messaging description: "" - name: Media description: "" - name: Media Vault description: "" - name: Media Vault Lists description: "" - name: Notifications description: Endpoints for managingr account notifications - name: Payouts description: "" - name: Post Comments description: "" - name: Post Labels description: APIs for managing your post labels - name: Posts description: APIs for managing OnlyFans posts - name: Profile Content description: Read another user's profile content using your connected OnlyFans account. OnlyFans enforces subscription and purchase requirements; these endpoints do not unlock content. Response samples use captured OnlyFans payloads with anonymized IDs, text, and media URLs; OFAPI metadata values are illustrative. - name: Promotions description: "" - name: Public Profiles description: "" - name: Queue description: "" - name: Release Forms description: APIs for managing OnlyFans release forms - name: Saved For Later (Messages) description: "" - name: Saved For Later (Posts) description: "" - name: Settings description: "" - name: Shared Free Trial Links description: APIs for Free Trial Links that other OF creators have shared with this account. Revenue, cost, and spender data are not available for shared links. - name: Shared Tracking Links description: APIs for Tracking Links (campaigns) that other OF creators have shared with this account. Revenue, cost, and spender data are not available for shared campaigns. - name: Smart Link Postbacks description: APIs for managing Smart Link postback destinations - name: Smart Links description: APIs for managing Smart Links (Free Trial Links and Tracking Links with pooled inventory) - name: Statistics description: "" - name: Stored Free Trial Links description: Instant APIs for retrieving stored free trial links from the OnlyFansAPI Cache (free, no credits used). `revenue.total` is net earnings after refunds and chargebacks. `revenue.chargebacks` is the positive cached net amount already excluded from that total; do not subtract it again. - name: Stored Shared Free Trial Links description: Instant APIs for retrieving stored shared Free Trial Links from the OnlyFansAPI Cache (free, no credits used) - name: Stored Shared Tracking Links description: Instant APIs for retrieving stored shared Tracking Links (campaigns) from the OnlyFansAPI Cache (free, no credits used) - name: Stored Tracking Links description: Instant APIs for retrieving stored tracking links from the OnlyFansAPI Cache (free, no credits used). `revenue.total` is net earnings after refunds and chargebacks. `revenue.chargebacks` is the positive cached net amount already excluded from that total; do not subtract it again. - name: Stories description: APIs for managing OnlyFans stories - name: Story Highlights description: APIs for managing OnlyFans story highlights - name: Subscription Bundles description: "" - name: Tracking Links description: APIs for managing tracking links. Revenue totals are net earnings after refunds and chargebacks. `revenue.chargebacks` (or `summary.chargebacks_total` in stats) is the positive cached net amount already excluded from revenue; do not subtract it again. Spender responses include chargebacks across all attributed periods for each fan with positive net revenue. - name: Transactions description: APIs for managing OnlyFans transactions - name: Usage description: Credit usage reporting for your team - name: User List Collections description: "" - name: Users description: APIs for fetching OnlyFans users - name: Webhooks description: "" paths: /api/{account}/trial-links/{trial_link_id}: parameters: - in: path name: account description: The Account ID example: acct_XXXXXXXXXXXXXXX required: true schema: type: string - in: path name: trial_link_id description: The ID of the trial link. example: in required: true schema: type: string delete: summary: Delete Free Trial Link operationId: deleteFreeTrialLink description: Delete a free trial link by its ID parameters: [] responses: "200": description: Success content: application/json: schema: type: object example: data: success: true _meta: _credits: used: 1 balance: 999999837 note: Always _cache: is_cached: false note: Cache disabled for this endpoint _rate_limits: limit_minute: 1000 limit_day: 50000 remaining_minute: 998 remaining_day: 49990 properties: data: type: object properties: success: type: boolean example: true _meta: type: object properties: _credits: type: object properties: used: type: integer example: 1 balance: type: integer example: 999999837 note: type: string example: Always _cache: type: object properties: is_cached: type: boolean example: false note: type: string example: Cache disabled for this endpoint _rate_limits: type: object properties: limit_minute: type: integer example: 1000 limit_day: type: integer example: 50000 remaining_minute: type: integer example: 998 remaining_day: type: integer example: 49990 tags: - Free Trial Links components: securitySchemes: default: type: http scheme: bearer description: Get your API Key from OnlyFansAPI Console - https://app.onlyfansapi.com/api-keys ```` # Get Free Trial Link Cohort ARPS (/api-reference/free-trial-links/get-free-trial-link-cohort-arps) Get per-link time-to-profit cohort ARPS windows for a specific Free Trial Link ## OpenAPI ````yaml https://app.onlyfansapi.com/scribe-docs/openapi.yaml get /api/{account}/trial-links/{trial_link_id}/cohort-arps openapi: 3.0.3 info: title: OnlyFans API description: "" version: 1.0.0 servers: - url: https://app.onlyfansapi.com security: - default: [] tags: - name: AI Voice Messages description: "" - name: API Keys description: "" - name: Account description: Endpoints for your linked accounts - name: Analytics - Financial description: APIs for retrieving financial analytics data - name: Analytics - Summary description: APIs for retrieving summary analytics data - name: Banking description: Operations related to user banking details, payout methods, legal and tax information, and account country settings. - name: Banned Words description: Reference list of OnlyFans banned words used by the `blockBannedWords` screening parameter - name: Blocked / Restricted Users description: APIs for listing the users an account has blocked or restricted - name: Chargebacks description: "" - name: Chat Messages description: "" - name: Chats description: "" - name: Client Sessions description: "" - name: Connect OnlyFans Account description: "" - name: Data Exports description: APIs for managing data exports - name: Engagement / Messages description: "" - name: Fans description: APIs for managing OnlyFans fans (subscribers) - name: Fans - AI Summary description: APIs for generating and retrieving AI-powered fan profile summaries - name: Following description: APIs for managing OnlyFans followings (people you're subscribed to) - name: Free Trial Links description: APIs for managing Free Trial Links. Revenue totals are net earnings after refunds and chargebacks. `revenue.chargebacks` (or `summary.chargebacks_total` in stats) is the positive cached net amount already excluded from revenue; do not subtract it again. Spender responses include chargebacks across all attributed periods for each fan with positive net revenue. - name: Giphy description: "" - name: Link Tags description: APIs for managing tags on free trial links, tracking links, and Smart Links - name: Mass Messaging description: "" - name: Media description: "" - name: Media Vault description: "" - name: Media Vault Lists description: "" - name: Notifications description: Endpoints for managingr account notifications - name: Payouts description: "" - name: Post Comments description: "" - name: Post Labels description: APIs for managing your post labels - name: Posts description: APIs for managing OnlyFans posts - name: Profile Content description: Read another user's profile content using your connected OnlyFans account. OnlyFans enforces subscription and purchase requirements; these endpoints do not unlock content. Response samples use captured OnlyFans payloads with anonymized IDs, text, and media URLs; OFAPI metadata values are illustrative. - name: Promotions description: "" - name: Public Profiles description: "" - name: Queue description: "" - name: Release Forms description: APIs for managing OnlyFans release forms - name: Saved For Later (Messages) description: "" - name: Saved For Later (Posts) description: "" - name: Settings description: "" - name: Shared Free Trial Links description: APIs for Free Trial Links that other OF creators have shared with this account. Revenue, cost, and spender data are not available for shared links. - name: Shared Tracking Links description: APIs for Tracking Links (campaigns) that other OF creators have shared with this account. Revenue, cost, and spender data are not available for shared campaigns. - name: Smart Link Postbacks description: APIs for managing Smart Link postback destinations - name: Smart Links description: APIs for managing Smart Links (Free Trial Links and Tracking Links with pooled inventory) - name: Statistics description: "" - name: Stored Free Trial Links description: Instant APIs for retrieving stored free trial links from the OnlyFansAPI Cache (free, no credits used). `revenue.total` is net earnings after refunds and chargebacks. `revenue.chargebacks` is the positive cached net amount already excluded from that total; do not subtract it again. - name: Stored Shared Free Trial Links description: Instant APIs for retrieving stored shared Free Trial Links from the OnlyFansAPI Cache (free, no credits used) - name: Stored Shared Tracking Links description: Instant APIs for retrieving stored shared Tracking Links (campaigns) from the OnlyFansAPI Cache (free, no credits used) - name: Stored Tracking Links description: Instant APIs for retrieving stored tracking links from the OnlyFansAPI Cache (free, no credits used). `revenue.total` is net earnings after refunds and chargebacks. `revenue.chargebacks` is the positive cached net amount already excluded from that total; do not subtract it again. - name: Stories description: APIs for managing OnlyFans stories - name: Story Highlights description: APIs for managing OnlyFans story highlights - name: Subscription Bundles description: "" - name: Tracking Links description: APIs for managing tracking links. Revenue totals are net earnings after refunds and chargebacks. `revenue.chargebacks` (or `summary.chargebacks_total` in stats) is the positive cached net amount already excluded from revenue; do not subtract it again. Spender responses include chargebacks across all attributed periods for each fan with positive net revenue. - name: Transactions description: APIs for managing OnlyFans transactions - name: Usage description: Credit usage reporting for your team - name: User List Collections description: "" - name: Users description: APIs for fetching OnlyFans users - name: Webhooks description: "" paths: /api/{account}/trial-links/{trial_link_id}/cohort-arps: parameters: - in: path name: account description: The Account ID example: acct_XXXXXXXXXXXXXXX required: true schema: type: string - in: path name: trial_link_id description: The ID of the trial link. example: minima required: true schema: type: string get: summary: Get Free Trial Link Cohort ARPS operationId: getFreeTrialLinkCohortARPS description: Get per-link time-to-profit cohort ARPS windows for a specific Free Trial Link parameters: - in: query name: acquisition_start description: Optional acquisition range start date example: 2026-01-01T00:00:00Z required: false schema: type: string description: Optional acquisition range start date example: 2026-01-01T00:00:00Z - in: query name: acquisition_end description: Optional acquisition range end date example: 2026-01-31T23:59:59Z required: false schema: type: string description: Optional acquisition range end date example: 2026-01-31T23:59:59Z - in: query name: revenue_basis description: Revenue basis. Defaults to `net`. example: net required: false schema: type: string description: Revenue basis. Defaults to `net`. example: net enum: - net - gross responses: "401": description: "" content: application/json: schema: type: object example: error: Unauthorized. Go to https://app.onlyfansapi.com/api-keys to get your API key. properties: error: type: string example: Unauthorized. Go to https://app.onlyfansapi.com/api-keys to get your API key. tags: - Free Trial Links components: securitySchemes: default: type: http scheme: bearer description: Get your API Key from OnlyFansAPI Console - https://app.onlyfansapi.com/api-keys ```` # Get Free Trial Link Stats (/api-reference/free-trial-links/get-free-trial-link-stats) Get dashboard-style summary plus daily and monthly metrics for a specific Free Trial Link ## OpenAPI ````yaml https://app.onlyfansapi.com/scribe-docs/openapi.yaml get /api/{account}/trial-links/{trial_link_id}/stats openapi: 3.0.3 info: title: OnlyFans API description: "" version: 1.0.0 servers: - url: https://app.onlyfansapi.com security: - default: [] tags: - name: AI Voice Messages description: "" - name: API Keys description: "" - name: Account description: Endpoints for your linked accounts - name: Analytics - Financial description: APIs for retrieving financial analytics data - name: Analytics - Summary description: APIs for retrieving summary analytics data - name: Banking description: Operations related to user banking details, payout methods, legal and tax information, and account country settings. - name: Banned Words description: Reference list of OnlyFans banned words used by the `blockBannedWords` screening parameter - name: Blocked / Restricted Users description: APIs for listing the users an account has blocked or restricted - name: Chargebacks description: "" - name: Chat Messages description: "" - name: Chats description: "" - name: Client Sessions description: "" - name: Connect OnlyFans Account description: "" - name: Data Exports description: APIs for managing data exports - name: Engagement / Messages description: "" - name: Fans description: APIs for managing OnlyFans fans (subscribers) - name: Fans - AI Summary description: APIs for generating and retrieving AI-powered fan profile summaries - name: Following description: APIs for managing OnlyFans followings (people you're subscribed to) - name: Free Trial Links description: APIs for managing Free Trial Links. Revenue totals are net earnings after refunds and chargebacks. `revenue.chargebacks` (or `summary.chargebacks_total` in stats) is the positive cached net amount already excluded from revenue; do not subtract it again. Spender responses include chargebacks across all attributed periods for each fan with positive net revenue. - name: Giphy description: "" - name: Link Tags description: APIs for managing tags on free trial links, tracking links, and Smart Links - name: Mass Messaging description: "" - name: Media description: "" - name: Media Vault description: "" - name: Media Vault Lists description: "" - name: Notifications description: Endpoints for managingr account notifications - name: Payouts description: "" - name: Post Comments description: "" - name: Post Labels description: APIs for managing your post labels - name: Posts description: APIs for managing OnlyFans posts - name: Profile Content description: Read another user's profile content using your connected OnlyFans account. OnlyFans enforces subscription and purchase requirements; these endpoints do not unlock content. Response samples use captured OnlyFans payloads with anonymized IDs, text, and media URLs; OFAPI metadata values are illustrative. - name: Promotions description: "" - name: Public Profiles description: "" - name: Queue description: "" - name: Release Forms description: APIs for managing OnlyFans release forms - name: Saved For Later (Messages) description: "" - name: Saved For Later (Posts) description: "" - name: Settings description: "" - name: Shared Free Trial Links description: APIs for Free Trial Links that other OF creators have shared with this account. Revenue, cost, and spender data are not available for shared links. - name: Shared Tracking Links description: APIs for Tracking Links (campaigns) that other OF creators have shared with this account. Revenue, cost, and spender data are not available for shared campaigns. - name: Smart Link Postbacks description: APIs for managing Smart Link postback destinations - name: Smart Links description: APIs for managing Smart Links (Free Trial Links and Tracking Links with pooled inventory) - name: Statistics description: "" - name: Stored Free Trial Links description: Instant APIs for retrieving stored free trial links from the OnlyFansAPI Cache (free, no credits used). `revenue.total` is net earnings after refunds and chargebacks. `revenue.chargebacks` is the positive cached net amount already excluded from that total; do not subtract it again. - name: Stored Shared Free Trial Links description: Instant APIs for retrieving stored shared Free Trial Links from the OnlyFansAPI Cache (free, no credits used) - name: Stored Shared Tracking Links description: Instant APIs for retrieving stored shared Tracking Links (campaigns) from the OnlyFansAPI Cache (free, no credits used) - name: Stored Tracking Links description: Instant APIs for retrieving stored tracking links from the OnlyFansAPI Cache (free, no credits used). `revenue.total` is net earnings after refunds and chargebacks. `revenue.chargebacks` is the positive cached net amount already excluded from that total; do not subtract it again. - name: Stories description: APIs for managing OnlyFans stories - name: Story Highlights description: APIs for managing OnlyFans story highlights - name: Subscription Bundles description: "" - name: Tracking Links description: APIs for managing tracking links. Revenue totals are net earnings after refunds and chargebacks. `revenue.chargebacks` (or `summary.chargebacks_total` in stats) is the positive cached net amount already excluded from revenue; do not subtract it again. Spender responses include chargebacks across all attributed periods for each fan with positive net revenue. - name: Transactions description: APIs for managing OnlyFans transactions - name: Usage description: Credit usage reporting for your team - name: User List Collections description: "" - name: Users description: APIs for fetching OnlyFans users - name: Webhooks description: "" paths: /api/{account}/trial-links/{trial_link_id}/stats: parameters: - in: path name: account description: The Account ID example: acct_XXXXXXXXXXXXXXX required: true schema: type: string - in: path name: trial_link_id description: The ID of the trial link. example: iusto required: true schema: type: string get: summary: Get Free Trial Link Stats operationId: getFreeTrialLinkStats description: Get dashboard-style summary plus daily and monthly metrics for a specific Free Trial Link parameters: - in: query name: date_start description: Optional stats range start date example: 2026-01-01T00:00:00Z required: false schema: type: string description: Optional stats range start date example: 2026-01-01T00:00:00Z - in: query name: date_end description: Optional stats range end date example: 2026-01-31T23:59:59Z required: false schema: type: string description: Optional stats range end date example: 2026-01-31T23:59:59Z responses: "200": description: Success content: application/json: schema: type: object example: data: summary: clicks_total: 182 subs_total: 123 revenue_total: 123 chargebacks_total: 12 spenders_total: 16 revenue_cached_at: 2026-01-31T23:59:59+00:00 daily_metrics: - timestamp: 2026-01-30 clicks: 5 subs: 3 revenue: 12.5 spenders: 1 - timestamp: 2026-01-31 clicks: 8 subs: 4 revenue: 21 spenders: 2 monthly_metrics: - timestamp: 2026-01-01 clicks: 182 subs: 123 revenue: 123 spenders: 16 _meta: _credits: used: 1 balance: 999999 note: Always _cache: is_cached: false note: Cache disabled for this endpoint properties: data: type: object properties: summary: type: object properties: clicks_total: type: integer example: 182 subs_total: type: integer example: 123 revenue_total: type: number example: 123 chargebacks_total: type: number example: 12 spenders_total: type: integer example: 16 revenue_cached_at: type: string example: 2026-01-31T23:59:59+00:00 daily_metrics: type: array example: - timestamp: 2026-01-30 clicks: 5 subs: 3 revenue: 12.5 spenders: 1 - timestamp: 2026-01-31 clicks: 8 subs: 4 revenue: 21 spenders: 2 items: type: object properties: timestamp: type: string example: 2026-01-30 clicks: type: integer example: 5 subs: type: integer example: 3 revenue: type: number example: 12.5 spenders: type: integer example: 1 monthly_metrics: type: array example: - timestamp: 2026-01-01 clicks: 182 subs: 123 revenue: 123 spenders: 16 items: type: object properties: timestamp: type: string example: 2026-01-01 clicks: type: integer example: 182 subs: type: integer example: 123 revenue: type: number example: 123 spenders: type: integer example: 16 _meta: type: object properties: _credits: type: object properties: used: type: integer example: 1 balance: type: integer example: 999999 note: type: string example: Always _cache: type: object properties: is_cached: type: boolean example: false note: type: string example: Cache disabled for this endpoint tags: - Free Trial Links components: securitySchemes: default: type: http scheme: bearer description: Get your API Key from OnlyFansAPI Console - https://app.onlyfansapi.com/api-keys ```` # Get Free Trial Link (/api-reference/free-trial-links/get-free-trial-link) Get individual Free Trial Link details and it's revenue data ## OpenAPI ````yaml https://app.onlyfansapi.com/scribe-docs/openapi.yaml get /api/{account}/trial-links/{trial_link_id} openapi: 3.0.3 info: title: OnlyFans API description: "" version: 1.0.0 servers: - url: https://app.onlyfansapi.com security: - default: [] tags: - name: AI Voice Messages description: "" - name: API Keys description: "" - name: Account description: Endpoints for your linked accounts - name: Analytics - Financial description: APIs for retrieving financial analytics data - name: Analytics - Summary description: APIs for retrieving summary analytics data - name: Banking description: Operations related to user banking details, payout methods, legal and tax information, and account country settings. - name: Banned Words description: Reference list of OnlyFans banned words used by the `blockBannedWords` screening parameter - name: Blocked / Restricted Users description: APIs for listing the users an account has blocked or restricted - name: Chargebacks description: "" - name: Chat Messages description: "" - name: Chats description: "" - name: Client Sessions description: "" - name: Connect OnlyFans Account description: "" - name: Data Exports description: APIs for managing data exports - name: Engagement / Messages description: "" - name: Fans description: APIs for managing OnlyFans fans (subscribers) - name: Fans - AI Summary description: APIs for generating and retrieving AI-powered fan profile summaries - name: Following description: APIs for managing OnlyFans followings (people you're subscribed to) - name: Free Trial Links description: APIs for managing Free Trial Links. Revenue totals are net earnings after refunds and chargebacks. `revenue.chargebacks` (or `summary.chargebacks_total` in stats) is the positive cached net amount already excluded from revenue; do not subtract it again. Spender responses include chargebacks across all attributed periods for each fan with positive net revenue. - name: Giphy description: "" - name: Link Tags description: APIs for managing tags on free trial links, tracking links, and Smart Links - name: Mass Messaging description: "" - name: Media description: "" - name: Media Vault description: "" - name: Media Vault Lists description: "" - name: Notifications description: Endpoints for managingr account notifications - name: Payouts description: "" - name: Post Comments description: "" - name: Post Labels description: APIs for managing your post labels - name: Posts description: APIs for managing OnlyFans posts - name: Profile Content description: Read another user's profile content using your connected OnlyFans account. OnlyFans enforces subscription and purchase requirements; these endpoints do not unlock content. Response samples use captured OnlyFans payloads with anonymized IDs, text, and media URLs; OFAPI metadata values are illustrative. - name: Promotions description: "" - name: Public Profiles description: "" - name: Queue description: "" - name: Release Forms description: APIs for managing OnlyFans release forms - name: Saved For Later (Messages) description: "" - name: Saved For Later (Posts) description: "" - name: Settings description: "" - name: Shared Free Trial Links description: APIs for Free Trial Links that other OF creators have shared with this account. Revenue, cost, and spender data are not available for shared links. - name: Shared Tracking Links description: APIs for Tracking Links (campaigns) that other OF creators have shared with this account. Revenue, cost, and spender data are not available for shared campaigns. - name: Smart Link Postbacks description: APIs for managing Smart Link postback destinations - name: Smart Links description: APIs for managing Smart Links (Free Trial Links and Tracking Links with pooled inventory) - name: Statistics description: "" - name: Stored Free Trial Links description: Instant APIs for retrieving stored free trial links from the OnlyFansAPI Cache (free, no credits used). `revenue.total` is net earnings after refunds and chargebacks. `revenue.chargebacks` is the positive cached net amount already excluded from that total; do not subtract it again. - name: Stored Shared Free Trial Links description: Instant APIs for retrieving stored shared Free Trial Links from the OnlyFansAPI Cache (free, no credits used) - name: Stored Shared Tracking Links description: Instant APIs for retrieving stored shared Tracking Links (campaigns) from the OnlyFansAPI Cache (free, no credits used) - name: Stored Tracking Links description: Instant APIs for retrieving stored tracking links from the OnlyFansAPI Cache (free, no credits used). `revenue.total` is net earnings after refunds and chargebacks. `revenue.chargebacks` is the positive cached net amount already excluded from that total; do not subtract it again. - name: Stories description: APIs for managing OnlyFans stories - name: Story Highlights description: APIs for managing OnlyFans story highlights - name: Subscription Bundles description: "" - name: Tracking Links description: APIs for managing tracking links. Revenue totals are net earnings after refunds and chargebacks. `revenue.chargebacks` (or `summary.chargebacks_total` in stats) is the positive cached net amount already excluded from revenue; do not subtract it again. Spender responses include chargebacks across all attributed periods for each fan with positive net revenue. - name: Transactions description: APIs for managing OnlyFans transactions - name: Usage description: Credit usage reporting for your team - name: User List Collections description: "" - name: Users description: APIs for fetching OnlyFans users - name: Webhooks description: "" paths: /api/{account}/trial-links/{trial_link_id}: parameters: - in: path name: account description: The Account ID example: acct_XXXXXXXXXXXXXXX required: true schema: type: string - in: path name: trial_link_id description: The ID of the trial link. example: in required: true schema: type: string get: summary: Get Free Trial Link operationId: getFreeTrialLink description: Get individual Free Trial Link details and it's revenue data parameters: [] responses: "200": description: "" content: application/json: schema: type: object example: data: id: 123 trialLinkName: Trial link name url: https://onlyfans.com/username/trial/abc123 subscribeDays: 30 subscribeCounts: 0 claimCounts: 123 clicksCounts: 182 expiredAt: null createdAt: 2025-01-01T01:01:01+00:00 isFinished: false tags: - Instagram - Twitter revenue: total: 123 chargebacks: 12 revenuePerSubscriber: 12 spendersCount: 16 calculatedAt: 2025-01-01T01:01:01+00:00 isLoading: false cost: inputMode: null inputValue: null perSub: null perClick: null perPromo: null subscriberSourceCount: 123 clickSourceCount: 182 links: related: subscribers: https://app.onlyfansapi.com/api/acct_abc123/trial-links/123/subscribers _meta: _credits: used: 1 balance: 7095551 note: Always _cache: is_cached: false note: Cache disabled for this endpoint _rate_limits: limit_minute: 5000 limit_day: null remaining_minute: 4998 remaining_day: null notice: We have decided to remove our daily rate limits. Please remove any references to these in your integrations. properties: data: type: object properties: id: type: integer example: 123 trialLinkName: type: string example: Trial link name url: type: string example: https://onlyfans.com/username/trial/abc123 subscribeDays: type: integer example: 30 subscribeCounts: type: integer example: 0 claimCounts: type: integer example: 123 clicksCounts: type: integer example: 182 expiredAt: type: string example: null nullable: true createdAt: type: string example: 2025-01-01T01:01:01+00:00 isFinished: type: boolean example: false tags: type: array example: - Instagram - Twitter items: type: string revenue: type: object properties: total: type: number example: 123 chargebacks: type: number example: 12 revenuePerSubscriber: type: number example: 12 spendersCount: type: integer example: 16 calculatedAt: type: string example: 2025-01-01T01:01:01+00:00 isLoading: type: boolean example: false cost: type: object properties: inputMode: type: string example: null nullable: true inputValue: type: string example: null nullable: true perSub: type: string example: null nullable: true perClick: type: string example: null nullable: true perPromo: type: string example: null nullable: true subscriberSourceCount: type: integer example: 123 clickSourceCount: type: integer example: 182 links: type: object properties: related: type: object properties: subscribers: type: string example: https://app.onlyfansapi.com/api/acct_abc123/trial-links/123/subscribers _meta: type: object properties: _credits: type: object properties: used: type: integer example: 1 balance: type: integer example: 7095551 note: type: string example: Always _cache: type: object properties: is_cached: type: boolean example: false note: type: string example: Cache disabled for this endpoint _rate_limits: type: object properties: limit_minute: type: integer example: 5000 limit_day: type: string example: null nullable: true remaining_minute: type: integer example: 4998 remaining_day: type: string example: null nullable: true notice: type: string example: We have decided to remove our daily rate limits. Please remove any references to these in your integrations. tags: - Free Trial Links components: securitySchemes: default: type: http scheme: bearer description: Get your API Key from OnlyFansAPI Console - https://app.onlyfansapi.com/api-keys ```` # Introduction (/api-reference/free-trial-links) import { ChartPieIcon, LayersIcon } from 'lucide-react'; Through our API, you are able to create and manage free trial links, as well as retrieve advanced analytics on their performance, spenders and subscribers. ### A note on our calculation logic \[!toc]Post text
isMarkdownDisabled: true canDelete: true canComment: true canEdit: true isMediaReady: true isOpened: true canToggleFavorite: true canEditText: true tipsAmount: $0 rawText: Post text canViewMedia: true _meta: _credits: used: 1 balance: 999999836 note: Always _cache: is_cached: false note: Cache disabled for this endpoint _rate_limits: limit_minute: 10000000 limit_day: 50000 remaining_minute: 9999998 remaining_day: 49994 properties: data: type: object properties: author: type: object properties: view: type: string example: a avatar: type: string example: https://public.onlyfans.com/files/w/w6/w6g/.../123/avatar.jpg avatarThumbs: type: object properties: c50: type: string example: https://thumbs.onlyfans.com/public/files/thumbs/c50/w/w6/w6g/.../123/avatar.jpg c144: type: string example: https://thumbs.onlyfans.com/public/files/thumbs/c144/w/w6/w6g/.../123/avatar.jpg header: type: string example: https://public.onlyfans.com/files/k/kk/kk6/.../123/header_image.jpg headerSize: type: object properties: width: type: integer example: 760 height: type: integer example: 570 headerThumbs: type: object properties: w480: type: string example: https://thumbs.onlyfans.com/public/files/thumbs/w480/k/kk/kk6/.../123/header_image.jpg w760: type: string example: https://thumbs.onlyfans.com/public/files/thumbs/w760/k/kk/kk6/.../123/header_image.jpg id: type: integer example: 123 name: type: string example: name username: type: string example: username canLookStory: type: boolean example: true canCommentStory: type: boolean example: true hasNotViewedStory: type: boolean example: false isVerified: type: boolean example: true canPayInternal: type: boolean example: true hasScheduledStream: type: boolean example: false hasStream: type: boolean example: false hasStories: type: boolean example: false tipsEnabled: type: boolean example: true tipsTextEnabled: type: boolean example: true tipsMin: type: integer example: 5 tipsMinInternal: type: integer example: 1 tipsMax: type: integer example: 200 canEarn: type: boolean example: true canAddSubscriber: type: boolean example: false subscribePrice: type: integer example: 0 hasStripe: type: boolean example: false isStripeExist: type: boolean example: false subscriptionBundles: type: array example: [] canSendChatToAll: type: boolean example: true creditsMin: type: integer example: 10 creditsMax: type: integer example: 200 isPaywallPassed: type: boolean example: true canCreateLists: type: boolean example: true showMediaCount: type: boolean example: true showPostsInFeed: type: boolean example: true subscribedBy: type: boolean example: true canTrialSend: type: boolean example: false responseType: type: string example: post id: type: integer example: 123 postedAt: type: string example: 2025-01-01T01:01:01+00:00 postedAtPrecise: type: string example: "123.000000" text: type: string example:Post text
isMarkdownDisabled: type: boolean example: true canDelete: type: boolean example: true canComment: type: boolean example: true canEdit: type: boolean example: true isMediaReady: type: boolean example: true isOpened: type: boolean example: true canToggleFavorite: type: boolean example: true canEditText: type: boolean example: true tipsAmount: type: string example: $0 rawText: type: string example: Post text canViewMedia: type: boolean example: true _meta: type: object properties: _credits: type: object properties: used: type: integer example: 1 balance: type: integer example: 999999836 note: type: string example: Always _cache: type: object properties: is_cached: type: boolean example: false note: type: string example: Cache disabled for this endpoint _rate_limits: type: object properties: limit_minute: type: integer example: 10000000 limit_day: type: integer example: 50000 remaining_minute: type: integer example: 9999998 remaining_day: type: integer example: 49994 tags: - Posts components: securitySchemes: default: type: http scheme: bearer description: Get your API Key from OnlyFansAPI Console - https://app.onlyfansapi.com/api-keys ```` # List Posts (/api-reference/posts/list-posts) Get posts from your OnlyFans account. ## OpenAPI ````yaml https://app.onlyfansapi.com/scribe-docs/openapi.yaml get /api/{account}/posts openapi: 3.0.3 info: title: OnlyFans API description: "" version: 1.0.0 servers: - url: https://app.onlyfansapi.com security: - default: [] tags: - name: AI Voice Messages description: "" - name: API Keys description: "" - name: Account description: Endpoints for your linked accounts - name: Analytics - Financial description: APIs for retrieving financial analytics data - name: Analytics - Summary description: APIs for retrieving summary analytics data - name: Banking description: Operations related to user banking details, payout methods, legal and tax information, and account country settings. - name: Banned Words description: Reference list of OnlyFans banned words used by the `blockBannedWords` screening parameter - name: Blocked / Restricted Users description: APIs for listing the users an account has blocked or restricted - name: Chargebacks description: "" - name: Chat Messages description: "" - name: Chats description: "" - name: Client Sessions description: "" - name: Connect OnlyFans Account description: "" - name: Data Exports description: APIs for managing data exports - name: Engagement / Messages description: "" - name: Fans description: APIs for managing OnlyFans fans (subscribers) - name: Fans - AI Summary description: APIs for generating and retrieving AI-powered fan profile summaries - name: Following description: APIs for managing OnlyFans followings (people you're subscribed to) - name: Free Trial Links description: APIs for managing Free Trial Links. Revenue totals are net earnings after refunds and chargebacks. `revenue.chargebacks` (or `summary.chargebacks_total` in stats) is the positive cached net amount already excluded from revenue; do not subtract it again. Spender responses include chargebacks across all attributed periods for each fan with positive net revenue. - name: Giphy description: "" - name: Link Tags description: APIs for managing tags on free trial links, tracking links, and Smart Links - name: Mass Messaging description: "" - name: Media description: "" - name: Media Vault description: "" - name: Media Vault Lists description: "" - name: Notifications description: Endpoints for managingr account notifications - name: Payouts description: "" - name: Post Comments description: "" - name: Post Labels description: APIs for managing your post labels - name: Posts description: APIs for managing OnlyFans posts - name: Profile Content description: Read another user's profile content using your connected OnlyFans account. OnlyFans enforces subscription and purchase requirements; these endpoints do not unlock content. Response samples use captured OnlyFans payloads with anonymized IDs, text, and media URLs; OFAPI metadata values are illustrative. - name: Promotions description: "" - name: Public Profiles description: "" - name: Queue description: "" - name: Release Forms description: APIs for managing OnlyFans release forms - name: Saved For Later (Messages) description: "" - name: Saved For Later (Posts) description: "" - name: Settings description: "" - name: Shared Free Trial Links description: APIs for Free Trial Links that other OF creators have shared with this account. Revenue, cost, and spender data are not available for shared links. - name: Shared Tracking Links description: APIs for Tracking Links (campaigns) that other OF creators have shared with this account. Revenue, cost, and spender data are not available for shared campaigns. - name: Smart Link Postbacks description: APIs for managing Smart Link postback destinations - name: Smart Links description: APIs for managing Smart Links (Free Trial Links and Tracking Links with pooled inventory) - name: Statistics description: "" - name: Stored Free Trial Links description: Instant APIs for retrieving stored free trial links from the OnlyFansAPI Cache (free, no credits used). `revenue.total` is net earnings after refunds and chargebacks. `revenue.chargebacks` is the positive cached net amount already excluded from that total; do not subtract it again. - name: Stored Shared Free Trial Links description: Instant APIs for retrieving stored shared Free Trial Links from the OnlyFansAPI Cache (free, no credits used) - name: Stored Shared Tracking Links description: Instant APIs for retrieving stored shared Tracking Links (campaigns) from the OnlyFansAPI Cache (free, no credits used) - name: Stored Tracking Links description: Instant APIs for retrieving stored tracking links from the OnlyFansAPI Cache (free, no credits used). `revenue.total` is net earnings after refunds and chargebacks. `revenue.chargebacks` is the positive cached net amount already excluded from that total; do not subtract it again. - name: Stories description: APIs for managing OnlyFans stories - name: Story Highlights description: APIs for managing OnlyFans story highlights - name: Subscription Bundles description: "" - name: Tracking Links description: APIs for managing tracking links. Revenue totals are net earnings after refunds and chargebacks. `revenue.chargebacks` (or `summary.chargebacks_total` in stats) is the positive cached net amount already excluded from revenue; do not subtract it again. Spender responses include chargebacks across all attributed periods for each fan with positive net revenue. - name: Transactions description: APIs for managing OnlyFans transactions - name: Usage description: Credit usage reporting for your team - name: User List Collections description: "" - name: Users description: APIs for fetching OnlyFans users - name: Webhooks description: "" paths: /api/{account}/posts: parameters: - in: path name: account description: The Account ID example: acct_XXXXXXXXXXXXXXX required: true schema: type: string get: summary: List Posts operationId: listPosts description: Get posts from your OnlyFans account. parameters: - in: query name: query description: Search query to filter posts example: Hello required: false schema: type: string description: Search query to filter posts example: Hello - in: query name: limit description: Number of posts to return (default = 10) example: 10 required: false schema: type: integer description: Number of posts to return (default = 10) example: 10 - in: query name: offset description: Number of posts to skip for pagination example: 0 required: false schema: type: integer description: Number of posts to skip for pagination example: 0 - in: query name: order description: Order the returned posts (default = publish_date) example: publish_date required: false schema: type: string description: Order the returned posts (default = publish_date) example: publish_date enum: - publish_date - favorites_count - tips_summ - in: query name: sort description: Sort the returned posts (default = desc) example: desc required: false schema: type: string description: Sort the returned posts (default = desc) example: desc enum: - desc - asc - in: query name: pinned description: Set to true to only show pinned posts example: true required: false schema: type: boolean description: Set to true to only show pinned posts example: true - in: query name: counters description: Set to true to include an array of counters (see example responses) example: true required: false schema: type: boolean description: Set to true to include an array of counters (see example responses) example: true - in: query name: minimumPublishDate description: Filter posts by minimum publish date example: 2025-06-26 required: false schema: type: string description: Filter posts by minimum publish date example: 2025-06-26 responses: "200": description: Success content: application/json: schema: type: object example: data: list: - author: id: 123 _view: a responseType: post id: 123 postedAt: 2025-01-01T01:01:01+00:00 postedAtPrecise: "1234567890.000000" text:Text
isMarkdownDisabled: true canDelete: true canComment: true canEdit: true isMediaReady: true isOpened: true canToggleFavorite: true tipsAmount: $0 rawText: Text canViewMedia: true hasMore: false headMarker: "1234567890.000000" tailMarker: "1234567890.000000" counters: audiosCount: 123 photosCount: 123 videosCount: 123 mediasCount: 123 postsCount: 123 streamsCount: 123 archivedPostsCount: 123 privateArchivedPostsCount: 123 _meta: _credits: used: 1 balance: 999999886 note: Always _cache: is_cached: false note: Cache disabled for this endpoint _rate_limits: limit_minute: 1000 limit_day: 50000 remaining_minute: 998 remaining_day: 49896 properties: data: type: object properties: list: type: array example: - author: id: 123 _view: a responseType: post id: 123 postedAt: 2025-01-01T01:01:01+00:00 postedAtPrecise: "1234567890.000000" text:Text
isMarkdownDisabled: true canDelete: true canComment: true canEdit: true isMediaReady: true isOpened: true canToggleFavorite: true tipsAmount: $0 rawText: Text canViewMedia: true items: type: object properties: author: type: object properties: id: type: integer example: 123 _view: type: string example: a responseType: type: string example: post id: type: integer example: 123 postedAt: type: string example: 2025-01-01T01:01:01+00:00 postedAtPrecise: type: string example: "1234567890.000000" text: type: string example:Text
isMarkdownDisabled: type: boolean example: true canDelete: type: boolean example: true canComment: type: boolean example: true canEdit: type: boolean example: true isMediaReady: type: boolean example: true isOpened: type: boolean example: true canToggleFavorite: type: boolean example: true tipsAmount: type: string example: $0 rawText: type: string example: Text canViewMedia: type: boolean example: true hasMore: type: boolean example: false headMarker: type: string example: "1234567890.000000" tailMarker: type: string example: "1234567890.000000" counters: type: object properties: audiosCount: type: integer example: 123 photosCount: type: integer example: 123 videosCount: type: integer example: 123 mediasCount: type: integer example: 123 postsCount: type: integer example: 123 streamsCount: type: integer example: 123 archivedPostsCount: type: integer example: 123 privateArchivedPostsCount: type: integer example: 123 _meta: type: object properties: _credits: type: object properties: used: type: integer example: 1 balance: type: integer example: 999999886 note: type: string example: Always _cache: type: object properties: is_cached: type: boolean example: false note: type: string example: Cache disabled for this endpoint _rate_limits: type: object properties: limit_minute: type: integer example: 1000 limit_day: type: integer example: 50000 remaining_minute: type: integer example: 998 remaining_day: type: integer example: 49896 tags: - Posts components: securitySchemes: default: type: http scheme: bearer description: Get your API Key from OnlyFansAPI Console - https://app.onlyfansapi.com/api-keys ```` # Pin/Unpin Post (/api-reference/posts/pin-unpin-post) Pin or unpin a post to your account. ## OpenAPI ````yaml https://app.onlyfansapi.com/scribe-docs/openapi.yaml post /api/{account}/posts/{post_id}/pin openapi: 3.0.3 info: title: OnlyFans API description: "" version: 1.0.0 servers: - url: https://app.onlyfansapi.com security: - default: [] tags: - name: AI Voice Messages description: "" - name: API Keys description: "" - name: Account description: Endpoints for your linked accounts - name: Analytics - Financial description: APIs for retrieving financial analytics data - name: Analytics - Summary description: APIs for retrieving summary analytics data - name: Banking description: Operations related to user banking details, payout methods, legal and tax information, and account country settings. - name: Banned Words description: Reference list of OnlyFans banned words used by the `blockBannedWords` screening parameter - name: Blocked / Restricted Users description: APIs for listing the users an account has blocked or restricted - name: Chargebacks description: "" - name: Chat Messages description: "" - name: Chats description: "" - name: Client Sessions description: "" - name: Connect OnlyFans Account description: "" - name: Data Exports description: APIs for managing data exports - name: Engagement / Messages description: "" - name: Fans description: APIs for managing OnlyFans fans (subscribers) - name: Fans - AI Summary description: APIs for generating and retrieving AI-powered fan profile summaries - name: Following description: APIs for managing OnlyFans followings (people you're subscribed to) - name: Free Trial Links description: APIs for managing Free Trial Links. Revenue totals are net earnings after refunds and chargebacks. `revenue.chargebacks` (or `summary.chargebacks_total` in stats) is the positive cached net amount already excluded from revenue; do not subtract it again. Spender responses include chargebacks across all attributed periods for each fan with positive net revenue. - name: Giphy description: "" - name: Link Tags description: APIs for managing tags on free trial links, tracking links, and Smart Links - name: Mass Messaging description: "" - name: Media description: "" - name: Media Vault description: "" - name: Media Vault Lists description: "" - name: Notifications description: Endpoints for managingr account notifications - name: Payouts description: "" - name: Post Comments description: "" - name: Post Labels description: APIs for managing your post labels - name: Posts description: APIs for managing OnlyFans posts - name: Profile Content description: Read another user's profile content using your connected OnlyFans account. OnlyFans enforces subscription and purchase requirements; these endpoints do not unlock content. Response samples use captured OnlyFans payloads with anonymized IDs, text, and media URLs; OFAPI metadata values are illustrative. - name: Promotions description: "" - name: Public Profiles description: "" - name: Queue description: "" - name: Release Forms description: APIs for managing OnlyFans release forms - name: Saved For Later (Messages) description: "" - name: Saved For Later (Posts) description: "" - name: Settings description: "" - name: Shared Free Trial Links description: APIs for Free Trial Links that other OF creators have shared with this account. Revenue, cost, and spender data are not available for shared links. - name: Shared Tracking Links description: APIs for Tracking Links (campaigns) that other OF creators have shared with this account. Revenue, cost, and spender data are not available for shared campaigns. - name: Smart Link Postbacks description: APIs for managing Smart Link postback destinations - name: Smart Links description: APIs for managing Smart Links (Free Trial Links and Tracking Links with pooled inventory) - name: Statistics description: "" - name: Stored Free Trial Links description: Instant APIs for retrieving stored free trial links from the OnlyFansAPI Cache (free, no credits used). `revenue.total` is net earnings after refunds and chargebacks. `revenue.chargebacks` is the positive cached net amount already excluded from that total; do not subtract it again. - name: Stored Shared Free Trial Links description: Instant APIs for retrieving stored shared Free Trial Links from the OnlyFansAPI Cache (free, no credits used) - name: Stored Shared Tracking Links description: Instant APIs for retrieving stored shared Tracking Links (campaigns) from the OnlyFansAPI Cache (free, no credits used) - name: Stored Tracking Links description: Instant APIs for retrieving stored tracking links from the OnlyFansAPI Cache (free, no credits used). `revenue.total` is net earnings after refunds and chargebacks. `revenue.chargebacks` is the positive cached net amount already excluded from that total; do not subtract it again. - name: Stories description: APIs for managing OnlyFans stories - name: Story Highlights description: APIs for managing OnlyFans story highlights - name: Subscription Bundles description: "" - name: Tracking Links description: APIs for managing tracking links. Revenue totals are net earnings after refunds and chargebacks. `revenue.chargebacks` (or `summary.chargebacks_total` in stats) is the positive cached net amount already excluded from revenue; do not subtract it again. Spender responses include chargebacks across all attributed periods for each fan with positive net revenue. - name: Transactions description: APIs for managing OnlyFans transactions - name: Usage description: Credit usage reporting for your team - name: User List Collections description: "" - name: Users description: APIs for fetching OnlyFans users - name: Webhooks description: "" paths: /api/{account}/posts/{post_id}/pin: parameters: - in: path name: account description: The Account ID example: acct_XXXXXXXXXXXXXXX required: true schema: type: string - in: path name: post_id description: The ID of the post example: 1234567890 required: true schema: type: integer post: summary: Pin/Unpin Post operationId: pinUnpinPost description: Pin or unpin a post to your account. parameters: [] responses: "200": description: Success content: application/json: schema: type: object example: data: success: true _meta: _credits: used: 1 balance: 999999883 note: Always _cache: is_cached: false note: Cache disabled for this endpoint _rate_limits: limit_minute: 1000 limit_day: 50000 remaining_minute: 998 remaining_day: 49892 properties: data: type: object properties: success: type: boolean example: true _meta: type: object properties: _credits: type: object properties: used: type: integer example: 1 balance: type: integer example: 999999883 note: type: string example: Always _cache: type: object properties: is_cached: type: boolean example: false note: type: string example: Cache disabled for this endpoint _rate_limits: type: object properties: limit_minute: type: integer example: 1000 limit_day: type: integer example: 50000 remaining_minute: type: integer example: 998 remaining_day: type: integer example: 49892 tags: - Posts components: securitySchemes: default: type: http scheme: bearer description: Get your API Key from OnlyFansAPI Console - https://app.onlyfansapi.com/api-keys ```` # Send Post (/api-reference/posts/send-post) Compose and send a new post to your OnlyFans account. ## OpenAPI ````yaml https://app.onlyfansapi.com/scribe-docs/openapi.yaml post /api/{account}/posts openapi: 3.0.3 info: title: OnlyFans API description: "" version: 1.0.0 servers: - url: https://app.onlyfansapi.com security: - default: [] tags: - name: AI Voice Messages description: "" - name: API Keys description: "" - name: Account description: Endpoints for your linked accounts - name: Analytics - Financial description: APIs for retrieving financial analytics data - name: Analytics - Summary description: APIs for retrieving summary analytics data - name: Banking description: Operations related to user banking details, payout methods, legal and tax information, and account country settings. - name: Banned Words description: Reference list of OnlyFans banned words used by the `blockBannedWords` screening parameter - name: Blocked / Restricted Users description: APIs for listing the users an account has blocked or restricted - name: Chargebacks description: "" - name: Chat Messages description: "" - name: Chats description: "" - name: Client Sessions description: "" - name: Connect OnlyFans Account description: "" - name: Data Exports description: APIs for managing data exports - name: Engagement / Messages description: "" - name: Fans description: APIs for managing OnlyFans fans (subscribers) - name: Fans - AI Summary description: APIs for generating and retrieving AI-powered fan profile summaries - name: Following description: APIs for managing OnlyFans followings (people you're subscribed to) - name: Free Trial Links description: APIs for managing Free Trial Links. Revenue totals are net earnings after refunds and chargebacks. `revenue.chargebacks` (or `summary.chargebacks_total` in stats) is the positive cached net amount already excluded from revenue; do not subtract it again. Spender responses include chargebacks across all attributed periods for each fan with positive net revenue. - name: Giphy description: "" - name: Link Tags description: APIs for managing tags on free trial links, tracking links, and Smart Links - name: Mass Messaging description: "" - name: Media description: "" - name: Media Vault description: "" - name: Media Vault Lists description: "" - name: Notifications description: Endpoints for managingr account notifications - name: Payouts description: "" - name: Post Comments description: "" - name: Post Labels description: APIs for managing your post labels - name: Posts description: APIs for managing OnlyFans posts - name: Profile Content description: Read another user's profile content using your connected OnlyFans account. OnlyFans enforces subscription and purchase requirements; these endpoints do not unlock content. Response samples use captured OnlyFans payloads with anonymized IDs, text, and media URLs; OFAPI metadata values are illustrative. - name: Promotions description: "" - name: Public Profiles description: "" - name: Queue description: "" - name: Release Forms description: APIs for managing OnlyFans release forms - name: Saved For Later (Messages) description: "" - name: Saved For Later (Posts) description: "" - name: Settings description: "" - name: Shared Free Trial Links description: APIs for Free Trial Links that other OF creators have shared with this account. Revenue, cost, and spender data are not available for shared links. - name: Shared Tracking Links description: APIs for Tracking Links (campaigns) that other OF creators have shared with this account. Revenue, cost, and spender data are not available for shared campaigns. - name: Smart Link Postbacks description: APIs for managing Smart Link postback destinations - name: Smart Links description: APIs for managing Smart Links (Free Trial Links and Tracking Links with pooled inventory) - name: Statistics description: "" - name: Stored Free Trial Links description: Instant APIs for retrieving stored free trial links from the OnlyFansAPI Cache (free, no credits used). `revenue.total` is net earnings after refunds and chargebacks. `revenue.chargebacks` is the positive cached net amount already excluded from that total; do not subtract it again. - name: Stored Shared Free Trial Links description: Instant APIs for retrieving stored shared Free Trial Links from the OnlyFansAPI Cache (free, no credits used) - name: Stored Shared Tracking Links description: Instant APIs for retrieving stored shared Tracking Links (campaigns) from the OnlyFansAPI Cache (free, no credits used) - name: Stored Tracking Links description: Instant APIs for retrieving stored tracking links from the OnlyFansAPI Cache (free, no credits used). `revenue.total` is net earnings after refunds and chargebacks. `revenue.chargebacks` is the positive cached net amount already excluded from that total; do not subtract it again. - name: Stories description: APIs for managing OnlyFans stories - name: Story Highlights description: APIs for managing OnlyFans story highlights - name: Subscription Bundles description: "" - name: Tracking Links description: APIs for managing tracking links. Revenue totals are net earnings after refunds and chargebacks. `revenue.chargebacks` (or `summary.chargebacks_total` in stats) is the positive cached net amount already excluded from revenue; do not subtract it again. Spender responses include chargebacks across all attributed periods for each fan with positive net revenue. - name: Transactions description: APIs for managing OnlyFans transactions - name: Usage description: Credit usage reporting for your team - name: User List Collections description: "" - name: Users description: APIs for fetching OnlyFans users - name: Webhooks description: "" paths: /api/{account}/posts: parameters: - in: path name: account description: The Account ID example: acct_XXXXXXXXXXXXXXX required: true schema: type: string post: summary: Send Post operationId: sendPost description: Compose and send a new post to your OnlyFans account. parameters: [] responses: "200": description: Success content: application/json: schema: type: object example: data: author: view: a avatar: https://public.onlyfans.com/files/.../avatar.jpg avatarThumbs: c50: https://thumbs.onlyfans.com/public/files/thumbs/.../avatar.jpg c144: https://thumbs.onlyfans.com/public/files/thumbs/.../avatar.jpg header: https://public.onlyfans.com/files/.../header_image.jpg headerSize: width: 4032 height: 3024 headerThumbs: w480: https://thumbs.onlyfans.com/public/files/thumbs/w480/.../header_image.jpg w760: https://thumbs.onlyfans.com/public/files/thumbs/w760/.../header_image.jpg id: 123 name: Name username: username canLookStory: true canCommentStory: true hasNotViewedStory: false isVerified: true canPayInternal: true hasScheduledStream: false hasStream: false hasStories: false tipsEnabled: false tipsTextEnabled: true tipsMin: 5 tipsMinInternal: 1 tipsMax: 200 canEarn: true canAddSubscriber: false subscribePrice: 4.99 hasStripe: false isStripeExist: false subscriptionBundles: [] canSendChatToAll: true creditsMin: 10 creditsMax: 200 isPaywallPassed: true canCreateLists: true showMediaCount: true showPostsInFeed: true subscribedBy: true canTrialSend: false responseType: post id: 123 postedAt: 2025-01-01T01:01:01+00:00 postedAtPrecise: "123.000000" text: Text isMarkdownDisabled: true canDelete: true canComment: true canEdit: true mediaCount: 1 isOpened: true canToggleFavorite: true tipsAmount: $0 rawText: Text media: - id: 123 type: photo convertedToVideo: false canView: true hasError: false createdAt: 2025-01-01T00:00:00+00:00 isReady: false files: full: url: null width: 0 height: 0 size: 0 sources: [] thumb: null preview: null squarePreview: null duration: 0 releaseForms: [] hasCustomPreview: false canViewMedia: true _meta: _credits: used: 1 balance: 999999991 note: Always _cache: is_cached: false note: Cache disabled for this endpoint _rate_limits: limit_minute: 1000 limit_day: 50000 remaining_minute: 999 remaining_day: 49990 properties: data: type: object properties: author: type: object properties: view: type: string example: a avatar: type: string example: https://public.onlyfans.com/files/.../avatar.jpg avatarThumbs: type: object properties: c50: type: string example: https://thumbs.onlyfans.com/public/files/thumbs/.../avatar.jpg c144: type: string example: https://thumbs.onlyfans.com/public/files/thumbs/.../avatar.jpg header: type: string example: https://public.onlyfans.com/files/.../header_image.jpg headerSize: type: object properties: width: type: integer example: 4032 height: type: integer example: 3024 headerThumbs: type: object properties: w480: type: string example: https://thumbs.onlyfans.com/public/files/thumbs/w480/.../header_image.jpg w760: type: string example: https://thumbs.onlyfans.com/public/files/thumbs/w760/.../header_image.jpg id: type: integer example: 123 name: type: string example: Name username: type: string example: username canLookStory: type: boolean example: true canCommentStory: type: boolean example: true hasNotViewedStory: type: boolean example: false isVerified: type: boolean example: true canPayInternal: type: boolean example: true hasScheduledStream: type: boolean example: false hasStream: type: boolean example: false hasStories: type: boolean example: false tipsEnabled: type: boolean example: false tipsTextEnabled: type: boolean example: true tipsMin: type: integer example: 5 tipsMinInternal: type: integer example: 1 tipsMax: type: integer example: 200 canEarn: type: boolean example: true canAddSubscriber: type: boolean example: false subscribePrice: type: number example: 4.99 hasStripe: type: boolean example: false isStripeExist: type: boolean example: false subscriptionBundles: type: array example: [] canSendChatToAll: type: boolean example: true creditsMin: type: integer example: 10 creditsMax: type: integer example: 200 isPaywallPassed: type: boolean example: true canCreateLists: type: boolean example: true showMediaCount: type: boolean example: true showPostsInFeed: type: boolean example: true subscribedBy: type: boolean example: true canTrialSend: type: boolean example: false responseType: type: string example: post id: type: integer example: 123 postedAt: type: string example: 2025-01-01T01:01:01+00:00 postedAtPrecise: type: string example: "123.000000" text: type: string example: Text isMarkdownDisabled: type: boolean example: true canDelete: type: boolean example: true canComment: type: boolean example: true canEdit: type: boolean example: true mediaCount: type: integer example: 1 isOpened: type: boolean example: true canToggleFavorite: type: boolean example: true tipsAmount: type: string example: $0 rawText: type: string example: Text media: type: array example: - id: 123 type: photo convertedToVideo: false canView: true hasError: false createdAt: 2025-01-01T00:00:00+00:00 isReady: false files: full: url: null width: 0 height: 0 size: 0 sources: [] thumb: null preview: null squarePreview: null duration: 0 releaseForms: [] hasCustomPreview: false items: type: object properties: id: type: integer example: 123 type: type: string example: photo convertedToVideo: type: boolean example: false canView: type: boolean example: true hasError: type: boolean example: false createdAt: type: string example: 2025-01-01T00:00:00+00:00 isReady: type: boolean example: false files: type: object properties: full: type: object properties: url: type: string example: null nullable: true width: type: integer example: 0 height: type: integer example: 0 size: type: integer example: 0 sources: type: array example: [] thumb: type: string example: null nullable: true preview: type: string example: null nullable: true squarePreview: type: string example: null nullable: true duration: type: integer example: 0 releaseForms: type: array example: [] hasCustomPreview: type: boolean example: false canViewMedia: type: boolean example: true _meta: type: object properties: _credits: type: object properties: used: type: integer example: 1 balance: type: integer example: 999999991 note: type: string example: Always _cache: type: object properties: is_cached: type: boolean example: false note: type: string example: Cache disabled for this endpoint _rate_limits: type: object properties: limit_minute: type: integer example: 1000 limit_day: type: integer example: 50000 remaining_minute: type: integer example: 999 remaining_day: type: integer example: 49990 tags: - Posts requestBody: required: true content: application/json: schema: type: object properties: text: type: string description: The post text content example: Hello! labelIds: type: string description: Array of OF label IDs. Refer to our `/posts/labels` endpoint. example: - 123 mediaFiles: type: array description: Direct file uploads, OFAPI `ofapi_media_` IDs, or OF vault IDs. example: - ofapi_media_abc123 - "1234567890" items: type: file[]|string previews: type: array description: Direct file uploads, OFAPI `ofapi_media_` IDs, OF vault IDs, or integer indices referencing uploaded files in `mediaFiles`. Will be shown if `price` is provided. example: - ofapi_media_abc123 - 1234567890 items: type: file[]|string[]|int rfTag: type: string description: Array OnlyFans creator user IDs to tag in your post example: - 123 expireDays: type: integer description: Number of days after which the post will expire. Between 1 and 30 days. Keep empty for no expiration. example: 3 scheduledDate: type: string description: Schedule your post in the future (UTC timezone). example: 2025-01-01T00:00:00.000Z saveForLater: type: boolean description: Add your post to the "Saved for later" queue. example: true fundRaisingTargetAmount: type: integer description: Add a fundraising target to your post. If present, value must be at least 10. example: 30 fundRaisingTipsPresets: type: array description: Specify which tip amounts will be listed under the fundraising card. Required with `fundRaisingTargetAmount`, and you must provide at least 1 option. Array items cannot be higher than the `fundRaisingTargetAmount`. example: - 5 - 10 - 15 items: type: string votingType: type: string description: Include a poll or quiz within your post. example: poll enum: - poll - quiz votingDue: type: integer description: The due date (in days) of your poll/quiz. Can be 1, 3, 7 or 30 days. Can only be filled with `votingType`. example: 3 votingOptions: type: array description: The options of your poll/quiz. Required with `votingType`. example: - First option - Second option items: type: string votingCorrectIndex: type: integer description: The array key of your quiz' correct answer. Required when `votingType` is "quiz". Keep in mind that arrays start at `0` example: 0 blockBannedWords: type: string description: Screen `text` for OnlyFans banned words and block the post if any are found (returns a 422 listing the offending words). `strict_ban` blocks all tiers, `risky` blocks Risky + Replace/soften, `replace_soften` blocks Replace/soften only. Omit to disable screening. example: strict_ban enum: - strict_ban - risky - replace_soften required: - text components: securitySchemes: default: type: http scheme: bearer description: Get your API Key from OnlyFansAPI Console - https://app.onlyfansapi.com/api-keys ```` # Show Post Statistics (/api-reference/posts/show-post-statistics) Show the statistics of a post like purchases, views, likes, tips and more. ## OpenAPI ````yaml https://app.onlyfansapi.com/scribe-docs/openapi.yaml get /api/{account}/posts/{post_id}/stats openapi: 3.0.3 info: title: OnlyFans API description: "" version: 1.0.0 servers: - url: https://app.onlyfansapi.com security: - default: [] tags: - name: AI Voice Messages description: "" - name: API Keys description: "" - name: Account description: Endpoints for your linked accounts - name: Analytics - Financial description: APIs for retrieving financial analytics data - name: Analytics - Summary description: APIs for retrieving summary analytics data - name: Banking description: Operations related to user banking details, payout methods, legal and tax information, and account country settings. - name: Banned Words description: Reference list of OnlyFans banned words used by the `blockBannedWords` screening parameter - name: Blocked / Restricted Users description: APIs for listing the users an account has blocked or restricted - name: Chargebacks description: "" - name: Chat Messages description: "" - name: Chats description: "" - name: Client Sessions description: "" - name: Connect OnlyFans Account description: "" - name: Data Exports description: APIs for managing data exports - name: Engagement / Messages description: "" - name: Fans description: APIs for managing OnlyFans fans (subscribers) - name: Fans - AI Summary description: APIs for generating and retrieving AI-powered fan profile summaries - name: Following description: APIs for managing OnlyFans followings (people you're subscribed to) - name: Free Trial Links description: APIs for managing Free Trial Links. Revenue totals are net earnings after refunds and chargebacks. `revenue.chargebacks` (or `summary.chargebacks_total` in stats) is the positive cached net amount already excluded from revenue; do not subtract it again. Spender responses include chargebacks across all attributed periods for each fan with positive net revenue. - name: Giphy description: "" - name: Link Tags description: APIs for managing tags on free trial links, tracking links, and Smart Links - name: Mass Messaging description: "" - name: Media description: "" - name: Media Vault description: "" - name: Media Vault Lists description: "" - name: Notifications description: Endpoints for managingr account notifications - name: Payouts description: "" - name: Post Comments description: "" - name: Post Labels description: APIs for managing your post labels - name: Posts description: APIs for managing OnlyFans posts - name: Profile Content description: Read another user's profile content using your connected OnlyFans account. OnlyFans enforces subscription and purchase requirements; these endpoints do not unlock content. Response samples use captured OnlyFans payloads with anonymized IDs, text, and media URLs; OFAPI metadata values are illustrative. - name: Promotions description: "" - name: Public Profiles description: "" - name: Queue description: "" - name: Release Forms description: APIs for managing OnlyFans release forms - name: Saved For Later (Messages) description: "" - name: Saved For Later (Posts) description: "" - name: Settings description: "" - name: Shared Free Trial Links description: APIs for Free Trial Links that other OF creators have shared with this account. Revenue, cost, and spender data are not available for shared links. - name: Shared Tracking Links description: APIs for Tracking Links (campaigns) that other OF creators have shared with this account. Revenue, cost, and spender data are not available for shared campaigns. - name: Smart Link Postbacks description: APIs for managing Smart Link postback destinations - name: Smart Links description: APIs for managing Smart Links (Free Trial Links and Tracking Links with pooled inventory) - name: Statistics description: "" - name: Stored Free Trial Links description: Instant APIs for retrieving stored free trial links from the OnlyFansAPI Cache (free, no credits used). `revenue.total` is net earnings after refunds and chargebacks. `revenue.chargebacks` is the positive cached net amount already excluded from that total; do not subtract it again. - name: Stored Shared Free Trial Links description: Instant APIs for retrieving stored shared Free Trial Links from the OnlyFansAPI Cache (free, no credits used) - name: Stored Shared Tracking Links description: Instant APIs for retrieving stored shared Tracking Links (campaigns) from the OnlyFansAPI Cache (free, no credits used) - name: Stored Tracking Links description: Instant APIs for retrieving stored tracking links from the OnlyFansAPI Cache (free, no credits used). `revenue.total` is net earnings after refunds and chargebacks. `revenue.chargebacks` is the positive cached net amount already excluded from that total; do not subtract it again. - name: Stories description: APIs for managing OnlyFans stories - name: Story Highlights description: APIs for managing OnlyFans story highlights - name: Subscription Bundles description: "" - name: Tracking Links description: APIs for managing tracking links. Revenue totals are net earnings after refunds and chargebacks. `revenue.chargebacks` (or `summary.chargebacks_total` in stats) is the positive cached net amount already excluded from revenue; do not subtract it again. Spender responses include chargebacks across all attributed periods for each fan with positive net revenue. - name: Transactions description: APIs for managing OnlyFans transactions - name: Usage description: Credit usage reporting for your team - name: User List Collections description: "" - name: Users description: APIs for fetching OnlyFans users - name: Webhooks description: "" paths: /api/{account}/posts/{post_id}/stats: parameters: - in: path name: account description: The Account ID example: acct_XXXXXXXXXXXXXXX required: true schema: type: string - in: path name: post_id description: The ID of the post example: 1234567890 required: true schema: type: integer get: summary: Show Post Statistics operationId: showPostStatistics description: Show the statistics of a post like purchases, views, likes, tips and more. parameters: - in: query name: with_historical_data description: Set to `true` to include historical data for a post. example: true required: false schema: type: boolean description: Set to `true` to include historical data for a post. example: true responses: "200": description: Success content: application/json: schema: type: object example: data: isAvailable: true hasStats: false hasVideo: false lookCount: 0 uniqueLookCount: 0 uniqueLookChart: - date: 2025-06-20T19:00:00+00:00 count: 0 - date: 2025-06-20T20:00:00+00:00 count: 0 - date: 2025-06-20T21:00:00+00:00 count: 0 - date: 2025-06-20T22:00:00+00:00 count: 0 - date: 2025-06-20T23:00:00+00:00 count: 0 - date: 2025-06-21T00:00:00+00:00 count: 0 lookChart: - date: 2025-06-20T19:00:00+00:00 count: 0 - date: 2025-06-20T20:00:00+00:00 count: 0 - date: 2025-06-20T21:00:00+00:00 count: 0 - date: 2025-06-20T22:00:00+00:00 count: 0 - date: 2025-06-20T23:00:00+00:00 count: 0 - date: 2025-06-21T00:00:00+00:00 count: 0 lookDuration: 0 lookDurationAverage: 0 likeCount: 0 likeChart: - date: 2025-06-20T19:00:00+00:00 count: 0 - date: 2025-06-20T20:00:00+00:00 count: 0 - date: 2025-06-20T21:00:00+00:00 count: 0 - date: 2025-06-20T22:00:00+00:00 count: 0 - date: 2025-06-20T23:00:00+00:00 count: 0 - date: 2025-06-21T00:00:00+00:00 count: 0 commentCount: 0 commentChart: - date: 2025-06-20T19:00:00+00:00 count: 0 - date: 2025-06-20T20:00:00+00:00 count: 0 - date: 2025-06-20T21:00:00+00:00 count: 0 - date: 2025-06-20T22:00:00+00:00 count: 0 - date: 2025-06-20T23:00:00+00:00 count: 0 - date: 2025-06-21T00:00:00+00:00 count: 0 tipCount: 0 tipChart: - date: 2025-06-20T19:00:00+00:00 count: 0 - date: 2025-06-20T20:00:00+00:00 count: 0 - date: 2025-06-20T21:00:00+00:00 count: 0 - date: 2025-06-20T22:00:00+00:00 count: 0 - date: 2025-06-20T23:00:00+00:00 count: 0 - date: 2025-06-21T00:00:00+00:00 count: 0 tipSum: 0 purchasedCount: 0 purchasedSumm: 0 tipSumChart: - date: 2025-06-20T19:00:00+00:00 count: 0 - date: 2025-06-20T20:00:00+00:00 count: 0 - date: 2025-06-20T21:00:00+00:00 count: 0 - date: 2025-06-20T22:00:00+00:00 count: 0 - date: 2025-06-20T23:00:00+00:00 count: 0 - date: 2025-06-21T00:00:00+00:00 count: 0 purchasesChart: - date: 2025-06-20T19:00:00+00:00 count: 0 - date: 2025-06-20T20:00:00+00:00 count: 0 - date: 2025-06-20T21:00:00+00:00 count: 0 - date: 2025-06-20T22:00:00+00:00 count: 0 - date: 2025-06-20T23:00:00+00:00 count: 0 - date: 2025-06-21T00:00:00+00:00 count: 0 _meta: _credits: used: 1 balance: 999999878 note: Always _cache: is_cached: false note: Cache disabled for this endpoint _rate_limits: limit_minute: 1000 limit_day: 50000 remaining_minute: 996 remaining_day: 49885 properties: data: type: object properties: isAvailable: type: boolean example: true hasStats: type: boolean example: false hasVideo: type: boolean example: false lookCount: type: integer example: 0 uniqueLookCount: type: integer example: 0 uniqueLookChart: type: array example: - date: 2025-06-20T19:00:00+00:00 count: 0 - date: 2025-06-20T20:00:00+00:00 count: 0 - date: 2025-06-20T21:00:00+00:00 count: 0 - date: 2025-06-20T22:00:00+00:00 count: 0 - date: 2025-06-20T23:00:00+00:00 count: 0 - date: 2025-06-21T00:00:00+00:00 count: 0 items: type: object properties: date: type: string example: 2025-06-20T19:00:00+00:00 count: type: integer example: 0 lookChart: type: array example: - date: 2025-06-20T19:00:00+00:00 count: 0 - date: 2025-06-20T20:00:00+00:00 count: 0 - date: 2025-06-20T21:00:00+00:00 count: 0 - date: 2025-06-20T22:00:00+00:00 count: 0 - date: 2025-06-20T23:00:00+00:00 count: 0 - date: 2025-06-21T00:00:00+00:00 count: 0 items: type: object properties: date: type: string example: 2025-06-20T19:00:00+00:00 count: type: integer example: 0 lookDuration: type: integer example: 0 lookDurationAverage: type: integer example: 0 likeCount: type: integer example: 0 likeChart: type: array example: - date: 2025-06-20T19:00:00+00:00 count: 0 - date: 2025-06-20T20:00:00+00:00 count: 0 - date: 2025-06-20T21:00:00+00:00 count: 0 - date: 2025-06-20T22:00:00+00:00 count: 0 - date: 2025-06-20T23:00:00+00:00 count: 0 - date: 2025-06-21T00:00:00+00:00 count: 0 items: type: object properties: date: type: string example: 2025-06-20T19:00:00+00:00 count: type: integer example: 0 commentCount: type: integer example: 0 commentChart: type: array example: - date: 2025-06-20T19:00:00+00:00 count: 0 - date: 2025-06-20T20:00:00+00:00 count: 0 - date: 2025-06-20T21:00:00+00:00 count: 0 - date: 2025-06-20T22:00:00+00:00 count: 0 - date: 2025-06-20T23:00:00+00:00 count: 0 - date: 2025-06-21T00:00:00+00:00 count: 0 items: type: object properties: date: type: string example: 2025-06-20T19:00:00+00:00 count: type: integer example: 0 tipCount: type: integer example: 0 tipChart: type: array example: - date: 2025-06-20T19:00:00+00:00 count: 0 - date: 2025-06-20T20:00:00+00:00 count: 0 - date: 2025-06-20T21:00:00+00:00 count: 0 - date: 2025-06-20T22:00:00+00:00 count: 0 - date: 2025-06-20T23:00:00+00:00 count: 0 - date: 2025-06-21T00:00:00+00:00 count: 0 items: type: object properties: date: type: string example: 2025-06-20T19:00:00+00:00 count: type: integer example: 0 tipSum: type: integer example: 0 purchasedCount: type: integer example: 0 purchasedSumm: type: integer example: 0 tipSumChart: type: array example: - date: 2025-06-20T19:00:00+00:00 count: 0 - date: 2025-06-20T20:00:00+00:00 count: 0 - date: 2025-06-20T21:00:00+00:00 count: 0 - date: 2025-06-20T22:00:00+00:00 count: 0 - date: 2025-06-20T23:00:00+00:00 count: 0 - date: 2025-06-21T00:00:00+00:00 count: 0 items: type: object properties: date: type: string example: 2025-06-20T19:00:00+00:00 count: type: integer example: 0 purchasesChart: type: array example: - date: 2025-06-20T19:00:00+00:00 count: 0 - date: 2025-06-20T20:00:00+00:00 count: 0 - date: 2025-06-20T21:00:00+00:00 count: 0 - date: 2025-06-20T22:00:00+00:00 count: 0 - date: 2025-06-20T23:00:00+00:00 count: 0 - date: 2025-06-21T00:00:00+00:00 count: 0 items: type: object properties: date: type: string example: 2025-06-20T19:00:00+00:00 count: type: integer example: 0 _meta: type: object properties: _credits: type: object properties: used: type: integer example: 1 balance: type: integer example: 999999878 note: type: string example: Always _cache: type: object properties: is_cached: type: boolean example: false note: type: string example: Cache disabled for this endpoint _rate_limits: type: object properties: limit_minute: type: integer example: 1000 limit_day: type: integer example: 50000 remaining_minute: type: integer example: 996 remaining_day: type: integer example: 49885 tags: - Posts components: securitySchemes: default: type: http scheme: bearer description: Get your API Key from OnlyFansAPI Console - https://app.onlyfansapi.com/api-keys ```` # Unarchive Post (/api-reference/posts/unarchive-post) Unarchive a post from your account. ## OpenAPI ````yaml https://app.onlyfansapi.com/scribe-docs/openapi.yaml post /api/{account}/posts/{post_id}/unarchive openapi: 3.0.3 info: title: OnlyFans API description: "" version: 1.0.0 servers: - url: https://app.onlyfansapi.com security: - default: [] tags: - name: AI Voice Messages description: "" - name: API Keys description: "" - name: Account description: Endpoints for your linked accounts - name: Analytics - Financial description: APIs for retrieving financial analytics data - name: Analytics - Summary description: APIs for retrieving summary analytics data - name: Banking description: Operations related to user banking details, payout methods, legal and tax information, and account country settings. - name: Banned Words description: Reference list of OnlyFans banned words used by the `blockBannedWords` screening parameter - name: Blocked / Restricted Users description: APIs for listing the users an account has blocked or restricted - name: Chargebacks description: "" - name: Chat Messages description: "" - name: Chats description: "" - name: Client Sessions description: "" - name: Connect OnlyFans Account description: "" - name: Data Exports description: APIs for managing data exports - name: Engagement / Messages description: "" - name: Fans description: APIs for managing OnlyFans fans (subscribers) - name: Fans - AI Summary description: APIs for generating and retrieving AI-powered fan profile summaries - name: Following description: APIs for managing OnlyFans followings (people you're subscribed to) - name: Free Trial Links description: APIs for managing Free Trial Links. Revenue totals are net earnings after refunds and chargebacks. `revenue.chargebacks` (or `summary.chargebacks_total` in stats) is the positive cached net amount already excluded from revenue; do not subtract it again. Spender responses include chargebacks across all attributed periods for each fan with positive net revenue. - name: Giphy description: "" - name: Link Tags description: APIs for managing tags on free trial links, tracking links, and Smart Links - name: Mass Messaging description: "" - name: Media description: "" - name: Media Vault description: "" - name: Media Vault Lists description: "" - name: Notifications description: Endpoints for managingr account notifications - name: Payouts description: "" - name: Post Comments description: "" - name: Post Labels description: APIs for managing your post labels - name: Posts description: APIs for managing OnlyFans posts - name: Profile Content description: Read another user's profile content using your connected OnlyFans account. OnlyFans enforces subscription and purchase requirements; these endpoints do not unlock content. Response samples use captured OnlyFans payloads with anonymized IDs, text, and media URLs; OFAPI metadata values are illustrative. - name: Promotions description: "" - name: Public Profiles description: "" - name: Queue description: "" - name: Release Forms description: APIs for managing OnlyFans release forms - name: Saved For Later (Messages) description: "" - name: Saved For Later (Posts) description: "" - name: Settings description: "" - name: Shared Free Trial Links description: APIs for Free Trial Links that other OF creators have shared with this account. Revenue, cost, and spender data are not available for shared links. - name: Shared Tracking Links description: APIs for Tracking Links (campaigns) that other OF creators have shared with this account. Revenue, cost, and spender data are not available for shared campaigns. - name: Smart Link Postbacks description: APIs for managing Smart Link postback destinations - name: Smart Links description: APIs for managing Smart Links (Free Trial Links and Tracking Links with pooled inventory) - name: Statistics description: "" - name: Stored Free Trial Links description: Instant APIs for retrieving stored free trial links from the OnlyFansAPI Cache (free, no credits used). `revenue.total` is net earnings after refunds and chargebacks. `revenue.chargebacks` is the positive cached net amount already excluded from that total; do not subtract it again. - name: Stored Shared Free Trial Links description: Instant APIs for retrieving stored shared Free Trial Links from the OnlyFansAPI Cache (free, no credits used) - name: Stored Shared Tracking Links description: Instant APIs for retrieving stored shared Tracking Links (campaigns) from the OnlyFansAPI Cache (free, no credits used) - name: Stored Tracking Links description: Instant APIs for retrieving stored tracking links from the OnlyFansAPI Cache (free, no credits used). `revenue.total` is net earnings after refunds and chargebacks. `revenue.chargebacks` is the positive cached net amount already excluded from that total; do not subtract it again. - name: Stories description: APIs for managing OnlyFans stories - name: Story Highlights description: APIs for managing OnlyFans story highlights - name: Subscription Bundles description: "" - name: Tracking Links description: APIs for managing tracking links. Revenue totals are net earnings after refunds and chargebacks. `revenue.chargebacks` (or `summary.chargebacks_total` in stats) is the positive cached net amount already excluded from revenue; do not subtract it again. Spender responses include chargebacks across all attributed periods for each fan with positive net revenue. - name: Transactions description: APIs for managing OnlyFans transactions - name: Usage description: Credit usage reporting for your team - name: User List Collections description: "" - name: Users description: APIs for fetching OnlyFans users - name: Webhooks description: "" paths: /api/{account}/posts/{post_id}/unarchive: parameters: - in: path name: account description: The Account ID example: acct_XXXXXXXXXXXXXXX required: true schema: type: string - in: path name: post_id description: The ID of the post example: 1234567890 required: true schema: type: integer post: summary: Unarchive Post operationId: unarchivePost description: Unarchive a post from your account. parameters: - in: query name: private_archive description: Set to `true` if this post is currently in the Private Archive. example: true required: false schema: type: boolean description: Set to `true` if this post is currently in the Private Archive. example: true responses: "200": description: Success content: application/json: schema: type: object example: data: labelStates: - id: archived name: Archive type: archived isClearInProgress: false postsCount: 0 posts: [] counters: audiosCount: 0 photosCount: 0 videosCount: 0 mediasCount: 0 postsCount: 2 streamsCount: 0 archivedPostsCount: 0 privateArchivedPostsCount: 0 _meta: _credits: used: 1 balance: 999999903 note: Always _cache: is_cached: false note: Cache disabled for this endpoint _rate_limits: limit_minute: 1000 limit_day: 50000 remaining_minute: 998 remaining_day: 49919 properties: data: type: object properties: labelStates: type: array example: - id: archived name: Archive type: archived isClearInProgress: false postsCount: 0 posts: [] items: type: object properties: id: type: string example: archived name: type: string example: Archive type: type: string example: archived isClearInProgress: type: boolean example: false postsCount: type: integer example: 0 posts: type: array example: [] counters: type: object properties: audiosCount: type: integer example: 0 photosCount: type: integer example: 0 videosCount: type: integer example: 0 mediasCount: type: integer example: 0 postsCount: type: integer example: 2 streamsCount: type: integer example: 0 archivedPostsCount: type: integer example: 0 privateArchivedPostsCount: type: integer example: 0 _meta: type: object properties: _credits: type: object properties: used: type: integer example: 1 balance: type: integer example: 999999903 note: type: string example: Always _cache: type: object properties: is_cached: type: boolean example: false note: type: string example: Cache disabled for this endpoint _rate_limits: type: object properties: limit_minute: type: integer example: 1000 limit_day: type: integer example: 50000 remaining_minute: type: integer example: 998 remaining_day: type: integer example: 49919 tags: - Posts components: securitySchemes: default: type: http scheme: bearer description: Get your API Key from OnlyFansAPI Console - https://app.onlyfansapi.com/api-keys ```` # Update Post (/api-reference/posts/update-post) Update a posted, queued, or "saved for later" post. ## OpenAPI ````yaml https://app.onlyfansapi.com/scribe-docs/openapi.yaml put /api/{account}/posts/{post_id} openapi: 3.0.3 info: title: OnlyFans API description: "" version: 1.0.0 servers: - url: https://app.onlyfansapi.com security: - default: [] tags: - name: AI Voice Messages description: "" - name: API Keys description: "" - name: Account description: Endpoints for your linked accounts - name: Analytics - Financial description: APIs for retrieving financial analytics data - name: Analytics - Summary description: APIs for retrieving summary analytics data - name: Banking description: Operations related to user banking details, payout methods, legal and tax information, and account country settings. - name: Banned Words description: Reference list of OnlyFans banned words used by the `blockBannedWords` screening parameter - name: Blocked / Restricted Users description: APIs for listing the users an account has blocked or restricted - name: Chargebacks description: "" - name: Chat Messages description: "" - name: Chats description: "" - name: Client Sessions description: "" - name: Connect OnlyFans Account description: "" - name: Data Exports description: APIs for managing data exports - name: Engagement / Messages description: "" - name: Fans description: APIs for managing OnlyFans fans (subscribers) - name: Fans - AI Summary description: APIs for generating and retrieving AI-powered fan profile summaries - name: Following description: APIs for managing OnlyFans followings (people you're subscribed to) - name: Free Trial Links description: APIs for managing Free Trial Links. Revenue totals are net earnings after refunds and chargebacks. `revenue.chargebacks` (or `summary.chargebacks_total` in stats) is the positive cached net amount already excluded from revenue; do not subtract it again. Spender responses include chargebacks across all attributed periods for each fan with positive net revenue. - name: Giphy description: "" - name: Link Tags description: APIs for managing tags on free trial links, tracking links, and Smart Links - name: Mass Messaging description: "" - name: Media description: "" - name: Media Vault description: "" - name: Media Vault Lists description: "" - name: Notifications description: Endpoints for managingr account notifications - name: Payouts description: "" - name: Post Comments description: "" - name: Post Labels description: APIs for managing your post labels - name: Posts description: APIs for managing OnlyFans posts - name: Profile Content description: Read another user's profile content using your connected OnlyFans account. OnlyFans enforces subscription and purchase requirements; these endpoints do not unlock content. Response samples use captured OnlyFans payloads with anonymized IDs, text, and media URLs; OFAPI metadata values are illustrative. - name: Promotions description: "" - name: Public Profiles description: "" - name: Queue description: "" - name: Release Forms description: APIs for managing OnlyFans release forms - name: Saved For Later (Messages) description: "" - name: Saved For Later (Posts) description: "" - name: Settings description: "" - name: Shared Free Trial Links description: APIs for Free Trial Links that other OF creators have shared with this account. Revenue, cost, and spender data are not available for shared links. - name: Shared Tracking Links description: APIs for Tracking Links (campaigns) that other OF creators have shared with this account. Revenue, cost, and spender data are not available for shared campaigns. - name: Smart Link Postbacks description: APIs for managing Smart Link postback destinations - name: Smart Links description: APIs for managing Smart Links (Free Trial Links and Tracking Links with pooled inventory) - name: Statistics description: "" - name: Stored Free Trial Links description: Instant APIs for retrieving stored free trial links from the OnlyFansAPI Cache (free, no credits used). `revenue.total` is net earnings after refunds and chargebacks. `revenue.chargebacks` is the positive cached net amount already excluded from that total; do not subtract it again. - name: Stored Shared Free Trial Links description: Instant APIs for retrieving stored shared Free Trial Links from the OnlyFansAPI Cache (free, no credits used) - name: Stored Shared Tracking Links description: Instant APIs for retrieving stored shared Tracking Links (campaigns) from the OnlyFansAPI Cache (free, no credits used) - name: Stored Tracking Links description: Instant APIs for retrieving stored tracking links from the OnlyFansAPI Cache (free, no credits used). `revenue.total` is net earnings after refunds and chargebacks. `revenue.chargebacks` is the positive cached net amount already excluded from that total; do not subtract it again. - name: Stories description: APIs for managing OnlyFans stories - name: Story Highlights description: APIs for managing OnlyFans story highlights - name: Subscription Bundles description: "" - name: Tracking Links description: APIs for managing tracking links. Revenue totals are net earnings after refunds and chargebacks. `revenue.chargebacks` (or `summary.chargebacks_total` in stats) is the positive cached net amount already excluded from revenue; do not subtract it again. Spender responses include chargebacks across all attributed periods for each fan with positive net revenue. - name: Transactions description: APIs for managing OnlyFans transactions - name: Usage description: Credit usage reporting for your team - name: User List Collections description: "" - name: Users description: APIs for fetching OnlyFans users - name: Webhooks description: "" paths: /api/{account}/posts/{post_id}: parameters: - in: path name: account description: The Account ID example: acct_XXXXXXXXXXXXXXX required: true schema: type: string - in: path name: post_id description: The ID of the post example: 1234567890 required: true schema: type: integer put: summary: Update Post operationId: updatePost description: Update a posted, queued, or "saved for later" post. parameters: [] responses: "200": description: Success content: text/plain: schema: type: string example: "" tags: - Posts requestBody: required: true content: application/json: schema: type: object properties: text: type: string description: The post text content example: Hello! labelIds: type: string description: Array of OF label IDs. Refer to our `/posts/labels` endpoint. example: - 123 price: type: integer description: Price for paid content (0 or between 3-100). In case this is not zero, **mediaFiles** is required example: 10 mediaFiles: type: string description: Array of OFAPI `ofapi_media_` IDs, or OF media IDs example: - ofapi_media_abc123 - "1234567890" rfTag: type: string description: Array OnlyFans creator user IDs to tag in your post example: - 123 expireDays: type: integer description: Number of days after which the post will expire. Between 1 and 30 days. Keep empty for no expiration. example: 3 scheduledDate: type: string description: Schedule your post in the future (UTC timezone). example: 2025-01-01T00:00:00.000Z saveForLater: type: boolean description: Add your post to the "Saved for later" queue. example: true fundRaisingTargetAmount: type: integer description: Add a fundraising target to your post. If present, value must be at least 10. example: 30 fundRaisingTipsPresets: type: array description: Specify which tip amounts will be listed under the fundraising card. Required with `fundRaisingTargetAmount`, and you must provide at least 1 option. Array items cannot be higher than the `fundRaisingTargetAmount`. example: - 5 - 10 - 15 items: type: string votingType: type: string description: Include a poll or quiz within your post. example: poll enum: - poll - quiz votingDue: type: integer description: The due date (in days) of your poll/quiz. Can be 1, 3, 7 or 30 days. Can only be filled with `votingType`. example: 3 votingOptions: type: array description: The options of your poll/quiz. Required with `votingType`. example: - First option - Second option items: type: string votingCorrectIndex: type: integer description: The array key of your quiz' correct answer. Required when `votingType` is "quiz". Keep in mind that arrays start at `0` example: 0 blockBannedWords: type: string description: Screen `text` for OnlyFans banned words and block the update if any are found (returns a 422 listing the offending words). `strict_ban` blocks all tiers, `risky` blocks Risky + Replace/soften, `replace_soften` blocks Replace/soften only. Omit to disable screening. example: strict_ban enum: - strict_ban - risky - replace_soften required: - text components: securitySchemes: default: type: http scheme: bearer description: Get your API Key from OnlyFansAPI Console - https://app.onlyfansapi.com/api-keys ```` # List Profile Highlights (/api-reference/profile-content/list-profile-highlights) Retrieve the story highlights displayed on another user's profile using your connected account's access. Highlights are ordered by most recent first. Subscription and purchase requirements still apply. ## OpenAPI ````yaml https://app.onlyfansapi.com/scribe-docs/openapi.yaml get /api/{account}/users/{user_id}/stories/highlights openapi: 3.0.3 info: title: OnlyFans API description: "" version: 1.0.0 servers: - url: https://app.onlyfansapi.com security: - default: [] tags: - name: AI Voice Messages description: "" - name: API Keys description: "" - name: Account description: Endpoints for your linked accounts - name: Analytics - Financial description: APIs for retrieving financial analytics data - name: Analytics - Summary description: APIs for retrieving summary analytics data - name: Banking description: Operations related to user banking details, payout methods, legal and tax information, and account country settings. - name: Banned Words description: Reference list of OnlyFans banned words used by the `blockBannedWords` screening parameter - name: Blocked / Restricted Users description: APIs for listing the users an account has blocked or restricted - name: Chargebacks description: "" - name: Chat Messages description: "" - name: Chats description: "" - name: Client Sessions description: "" - name: Connect OnlyFans Account description: "" - name: Data Exports description: APIs for managing data exports - name: Engagement / Messages description: "" - name: Fans description: APIs for managing OnlyFans fans (subscribers) - name: Fans - AI Summary description: APIs for generating and retrieving AI-powered fan profile summaries - name: Following description: APIs for managing OnlyFans followings (people you're subscribed to) - name: Free Trial Links description: APIs for managing Free Trial Links. Revenue totals are net earnings after refunds and chargebacks. `revenue.chargebacks` (or `summary.chargebacks_total` in stats) is the positive cached net amount already excluded from revenue; do not subtract it again. Spender responses include chargebacks across all attributed periods for each fan with positive net revenue. - name: Giphy description: "" - name: Link Tags description: APIs for managing tags on free trial links, tracking links, and Smart Links - name: Mass Messaging description: "" - name: Media description: "" - name: Media Vault description: "" - name: Media Vault Lists description: "" - name: Notifications description: Endpoints for managingr account notifications - name: Payouts description: "" - name: Post Comments description: "" - name: Post Labels description: APIs for managing your post labels - name: Posts description: APIs for managing OnlyFans posts - name: Profile Content description: Read another user's profile content using your connected OnlyFans account. OnlyFans enforces subscription and purchase requirements; these endpoints do not unlock content. Response samples use captured OnlyFans payloads with anonymized IDs, text, and media URLs; OFAPI metadata values are illustrative. - name: Promotions description: "" - name: Public Profiles description: "" - name: Queue description: "" - name: Release Forms description: APIs for managing OnlyFans release forms - name: Saved For Later (Messages) description: "" - name: Saved For Later (Posts) description: "" - name: Settings description: "" - name: Shared Free Trial Links description: APIs for Free Trial Links that other OF creators have shared with this account. Revenue, cost, and spender data are not available for shared links. - name: Shared Tracking Links description: APIs for Tracking Links (campaigns) that other OF creators have shared with this account. Revenue, cost, and spender data are not available for shared campaigns. - name: Smart Link Postbacks description: APIs for managing Smart Link postback destinations - name: Smart Links description: APIs for managing Smart Links (Free Trial Links and Tracking Links with pooled inventory) - name: Statistics description: "" - name: Stored Free Trial Links description: Instant APIs for retrieving stored free trial links from the OnlyFansAPI Cache (free, no credits used). `revenue.total` is net earnings after refunds and chargebacks. `revenue.chargebacks` is the positive cached net amount already excluded from that total; do not subtract it again. - name: Stored Shared Free Trial Links description: Instant APIs for retrieving stored shared Free Trial Links from the OnlyFansAPI Cache (free, no credits used) - name: Stored Shared Tracking Links description: Instant APIs for retrieving stored shared Tracking Links (campaigns) from the OnlyFansAPI Cache (free, no credits used) - name: Stored Tracking Links description: Instant APIs for retrieving stored tracking links from the OnlyFansAPI Cache (free, no credits used). `revenue.total` is net earnings after refunds and chargebacks. `revenue.chargebacks` is the positive cached net amount already excluded from that total; do not subtract it again. - name: Stories description: APIs for managing OnlyFans stories - name: Story Highlights description: APIs for managing OnlyFans story highlights - name: Subscription Bundles description: "" - name: Tracking Links description: APIs for managing tracking links. Revenue totals are net earnings after refunds and chargebacks. `revenue.chargebacks` (or `summary.chargebacks_total` in stats) is the positive cached net amount already excluded from revenue; do not subtract it again. Spender responses include chargebacks across all attributed periods for each fan with positive net revenue. - name: Transactions description: APIs for managing OnlyFans transactions - name: Usage description: Credit usage reporting for your team - name: User List Collections description: "" - name: Users description: APIs for fetching OnlyFans users - name: Webhooks description: "" paths: /api/{account}/users/{user_id}/stories/highlights: parameters: - in: path name: account description: The Account ID example: acct_XXXXXXXXXXXXXXX required: true schema: type: string - in: path name: user_id description: The other user's numeric OnlyFans ID. Resolve a username with GET /{account}/users/{username} first. example: 308625502 required: true schema: type: integer get: summary: List Profile Highlights operationId: listProfileHighlights description: Retrieve the story highlights displayed on another user's profile using your connected account's access. Highlights are ordered by most recent first. Subscription and purchase requirements still apply. parameters: - in: query name: limit description: "Number of highlights, from 1 to 100. Default: 5." example: 5 required: false schema: type: integer description: "Number of highlights, from 1 to 100. Default: 5." example: 5 - in: query name: offset description: "Number of highlights to skip. Default: 0." example: 0 required: false schema: type: integer description: "Number of highlights to skip. Default: 0." example: 0 responses: "200": description: Anonymized captured final-page response content: application/json: schema: type: object example: data: list: - id: 987650000 userId: 308625502 title: Behind the scenes coverStoryId: 987650001 cover: https://cdn2.onlyfans.com/files/example/media-1.jpg storiesCount: 7 createdAt: 2026-04-09T14:53:32+00:00 hasMore: false _pagination: next_page: null notice: null _meta: _credits: used: 1 balance: 9999 note: Always _cache: is_cached: false note: Cache disabled for this endpoint _rate_limits: limit_minute: 1000 limit_day: null remaining_minute: 999 remaining_day: null notice: We have decided to remove our daily rate limits. Please remove any references to these in your integrations. properties: data: type: object properties: list: type: array example: - id: 987650000 userId: 308625502 title: Behind the scenes coverStoryId: 987650001 cover: https://cdn2.onlyfans.com/files/example/media-1.jpg storiesCount: 7 createdAt: 2026-04-09T14:53:32+00:00 items: type: object properties: id: type: integer example: 987650000 userId: type: integer example: 308625502 title: type: string example: Behind the scenes coverStoryId: type: integer example: 987650001 cover: type: string example: https://cdn2.onlyfans.com/files/example/media-1.jpg storiesCount: type: integer example: 7 createdAt: type: string example: 2026-04-09T14:53:32+00:00 hasMore: type: boolean example: false _pagination: type: object properties: next_page: type: string example: null nullable: true notice: type: string example: null nullable: true _meta: type: object properties: _credits: type: object properties: used: type: integer example: 1 balance: type: integer example: 9999 note: type: string example: Always _cache: type: object properties: is_cached: type: boolean example: false note: type: string example: Cache disabled for this endpoint _rate_limits: type: object properties: limit_minute: type: integer example: 1000 limit_day: type: string example: null nullable: true remaining_minute: type: integer example: 999 remaining_day: type: string example: null nullable: true notice: type: string example: We have decided to remove our daily rate limits. Please remove any references to these in your integrations. tags: - Profile Content components: securitySchemes: default: type: http scheme: bearer description: Get your API Key from OnlyFansAPI Console - https://app.onlyfansapi.com/api-keys ```` # List Profile Post Labels (/api-reference/profile-content/list-profile-post-labels) Retrieve the post labels displayed on another user's profile using your connected account's access. By default, only labels containing posts are returned. ## OpenAPI ````yaml https://app.onlyfansapi.com/scribe-docs/openapi.yaml get /api/{account}/users/{user_id}/labels openapi: 3.0.3 info: title: OnlyFans API description: "" version: 1.0.0 servers: - url: https://app.onlyfansapi.com security: - default: [] tags: - name: AI Voice Messages description: "" - name: API Keys description: "" - name: Account description: Endpoints for your linked accounts - name: Analytics - Financial description: APIs for retrieving financial analytics data - name: Analytics - Summary description: APIs for retrieving summary analytics data - name: Banking description: Operations related to user banking details, payout methods, legal and tax information, and account country settings. - name: Banned Words description: Reference list of OnlyFans banned words used by the `blockBannedWords` screening parameter - name: Blocked / Restricted Users description: APIs for listing the users an account has blocked or restricted - name: Chargebacks description: "" - name: Chat Messages description: "" - name: Chats description: "" - name: Client Sessions description: "" - name: Connect OnlyFans Account description: "" - name: Data Exports description: APIs for managing data exports - name: Engagement / Messages description: "" - name: Fans description: APIs for managing OnlyFans fans (subscribers) - name: Fans - AI Summary description: APIs for generating and retrieving AI-powered fan profile summaries - name: Following description: APIs for managing OnlyFans followings (people you're subscribed to) - name: Free Trial Links description: APIs for managing Free Trial Links. Revenue totals are net earnings after refunds and chargebacks. `revenue.chargebacks` (or `summary.chargebacks_total` in stats) is the positive cached net amount already excluded from revenue; do not subtract it again. Spender responses include chargebacks across all attributed periods for each fan with positive net revenue. - name: Giphy description: "" - name: Link Tags description: APIs for managing tags on free trial links, tracking links, and Smart Links - name: Mass Messaging description: "" - name: Media description: "" - name: Media Vault description: "" - name: Media Vault Lists description: "" - name: Notifications description: Endpoints for managingr account notifications - name: Payouts description: "" - name: Post Comments description: "" - name: Post Labels description: APIs for managing your post labels - name: Posts description: APIs for managing OnlyFans posts - name: Profile Content description: Read another user's profile content using your connected OnlyFans account. OnlyFans enforces subscription and purchase requirements; these endpoints do not unlock content. Response samples use captured OnlyFans payloads with anonymized IDs, text, and media URLs; OFAPI metadata values are illustrative. - name: Promotions description: "" - name: Public Profiles description: "" - name: Queue description: "" - name: Release Forms description: APIs for managing OnlyFans release forms - name: Saved For Later (Messages) description: "" - name: Saved For Later (Posts) description: "" - name: Settings description: "" - name: Shared Free Trial Links description: APIs for Free Trial Links that other OF creators have shared with this account. Revenue, cost, and spender data are not available for shared links. - name: Shared Tracking Links description: APIs for Tracking Links (campaigns) that other OF creators have shared with this account. Revenue, cost, and spender data are not available for shared campaigns. - name: Smart Link Postbacks description: APIs for managing Smart Link postback destinations - name: Smart Links description: APIs for managing Smart Links (Free Trial Links and Tracking Links with pooled inventory) - name: Statistics description: "" - name: Stored Free Trial Links description: Instant APIs for retrieving stored free trial links from the OnlyFansAPI Cache (free, no credits used). `revenue.total` is net earnings after refunds and chargebacks. `revenue.chargebacks` is the positive cached net amount already excluded from that total; do not subtract it again. - name: Stored Shared Free Trial Links description: Instant APIs for retrieving stored shared Free Trial Links from the OnlyFansAPI Cache (free, no credits used) - name: Stored Shared Tracking Links description: Instant APIs for retrieving stored shared Tracking Links (campaigns) from the OnlyFansAPI Cache (free, no credits used) - name: Stored Tracking Links description: Instant APIs for retrieving stored tracking links from the OnlyFansAPI Cache (free, no credits used). `revenue.total` is net earnings after refunds and chargebacks. `revenue.chargebacks` is the positive cached net amount already excluded from that total; do not subtract it again. - name: Stories description: APIs for managing OnlyFans stories - name: Story Highlights description: APIs for managing OnlyFans story highlights - name: Subscription Bundles description: "" - name: Tracking Links description: APIs for managing tracking links. Revenue totals are net earnings after refunds and chargebacks. `revenue.chargebacks` (or `summary.chargebacks_total` in stats) is the positive cached net amount already excluded from revenue; do not subtract it again. Spender responses include chargebacks across all attributed periods for each fan with positive net revenue. - name: Transactions description: APIs for managing OnlyFans transactions - name: Usage description: Credit usage reporting for your team - name: User List Collections description: "" - name: Users description: APIs for fetching OnlyFans users - name: Webhooks description: "" paths: /api/{account}/users/{user_id}/labels: parameters: - in: path name: account description: The Account ID example: acct_XXXXXXXXXXXXXXX required: true schema: type: string - in: path name: user_id description: The other user's numeric OnlyFans ID. Resolve a username with GET /{account}/users/{username} first. example: 308625502 required: true schema: type: integer get: summary: List Profile Post Labels operationId: listProfilePostLabels description: Retrieve the post labels displayed on another user's profile using your connected account's access. By default, only labels containing posts are returned. parameters: - in: query name: limit description: "Number of labels, from 1 to 100. Default: 10." example: 10 required: false schema: type: integer description: "Number of labels, from 1 to 100. Default: 10." example: 10 - in: query name: offset description: "Number of labels to skip. Default: 0." example: 0 required: false schema: type: integer description: "Number of labels to skip. Default: 0." example: 0 - in: query name: non-empty description: "Only return labels containing posts. Default: true." example: true required: false schema: type: boolean description: "Only return labels containing posts. Default: true." example: true responses: "200": description: Anonymized captured final-page response content: application/json: schema: type: object example: data: list: [] order: asc sort: default hasMore: false nextOffset: 10 hashSort: 0123456789abcdef0123456789abcdef _pagination: next_page: null notice: null _meta: _credits: used: 1 balance: 9999 note: Always _cache: is_cached: false note: Cache disabled for this endpoint _rate_limits: limit_minute: 1000 limit_day: null remaining_minute: 999 remaining_day: null notice: We have decided to remove our daily rate limits. Please remove any references to these in your integrations. properties: data: type: object properties: list: type: array example: [] order: type: string example: asc sort: type: string example: default hasMore: type: boolean example: false nextOffset: type: integer example: 10 hashSort: type: string example: 0123456789abcdef0123456789abcdef _pagination: type: object properties: next_page: type: string example: null nullable: true notice: type: string example: null nullable: true _meta: type: object properties: _credits: type: object properties: used: type: integer example: 1 balance: type: integer example: 9999 note: type: string example: Always _cache: type: object properties: is_cached: type: boolean example: false note: type: string example: Cache disabled for this endpoint _rate_limits: type: object properties: limit_minute: type: integer example: 1000 limit_day: type: string example: null nullable: true remaining_minute: type: integer example: 999 remaining_day: type: string example: null nullable: true notice: type: string example: We have decided to remove our daily rate limits. Please remove any references to these in your integrations. tags: - Profile Content components: securitySchemes: default: type: http scheme: bearer description: Get your API Key from OnlyFansAPI Console - https://app.onlyfansapi.com/api-keys ```` # List Profile Posts (/api-reference/profile-content/list-profile-posts) Retrieve posts from another user's profile using your connected account's access. Follow \_pagination.next\_page for more results. Publication-date descending order uses a precise timestamp cursor; other ordering or an explicit offset uses offset pagination. Subscription and purchase requirements still apply. ## OpenAPI ````yaml https://app.onlyfansapi.com/scribe-docs/openapi.yaml get /api/{account}/users/{user_id}/posts openapi: 3.0.3 info: title: OnlyFans API description: "" version: 1.0.0 servers: - url: https://app.onlyfansapi.com security: - default: [] tags: - name: AI Voice Messages description: "" - name: API Keys description: "" - name: Account description: Endpoints for your linked accounts - name: Analytics - Financial description: APIs for retrieving financial analytics data - name: Analytics - Summary description: APIs for retrieving summary analytics data - name: Banking description: Operations related to user banking details, payout methods, legal and tax information, and account country settings. - name: Banned Words description: Reference list of OnlyFans banned words used by the `blockBannedWords` screening parameter - name: Blocked / Restricted Users description: APIs for listing the users an account has blocked or restricted - name: Chargebacks description: "" - name: Chat Messages description: "" - name: Chats description: "" - name: Client Sessions description: "" - name: Connect OnlyFans Account description: "" - name: Data Exports description: APIs for managing data exports - name: Engagement / Messages description: "" - name: Fans description: APIs for managing OnlyFans fans (subscribers) - name: Fans - AI Summary description: APIs for generating and retrieving AI-powered fan profile summaries - name: Following description: APIs for managing OnlyFans followings (people you're subscribed to) - name: Free Trial Links description: APIs for managing Free Trial Links. Revenue totals are net earnings after refunds and chargebacks. `revenue.chargebacks` (or `summary.chargebacks_total` in stats) is the positive cached net amount already excluded from revenue; do not subtract it again. Spender responses include chargebacks across all attributed periods for each fan with positive net revenue. - name: Giphy description: "" - name: Link Tags description: APIs for managing tags on free trial links, tracking links, and Smart Links - name: Mass Messaging description: "" - name: Media description: "" - name: Media Vault description: "" - name: Media Vault Lists description: "" - name: Notifications description: Endpoints for managingr account notifications - name: Payouts description: "" - name: Post Comments description: "" - name: Post Labels description: APIs for managing your post labels - name: Posts description: APIs for managing OnlyFans posts - name: Profile Content description: Read another user's profile content using your connected OnlyFans account. OnlyFans enforces subscription and purchase requirements; these endpoints do not unlock content. Response samples use captured OnlyFans payloads with anonymized IDs, text, and media URLs; OFAPI metadata values are illustrative. - name: Promotions description: "" - name: Public Profiles description: "" - name: Queue description: "" - name: Release Forms description: APIs for managing OnlyFans release forms - name: Saved For Later (Messages) description: "" - name: Saved For Later (Posts) description: "" - name: Settings description: "" - name: Shared Free Trial Links description: APIs for Free Trial Links that other OF creators have shared with this account. Revenue, cost, and spender data are not available for shared links. - name: Shared Tracking Links description: APIs for Tracking Links (campaigns) that other OF creators have shared with this account. Revenue, cost, and spender data are not available for shared campaigns. - name: Smart Link Postbacks description: APIs for managing Smart Link postback destinations - name: Smart Links description: APIs for managing Smart Links (Free Trial Links and Tracking Links with pooled inventory) - name: Statistics description: "" - name: Stored Free Trial Links description: Instant APIs for retrieving stored free trial links from the OnlyFansAPI Cache (free, no credits used). `revenue.total` is net earnings after refunds and chargebacks. `revenue.chargebacks` is the positive cached net amount already excluded from that total; do not subtract it again. - name: Stored Shared Free Trial Links description: Instant APIs for retrieving stored shared Free Trial Links from the OnlyFansAPI Cache (free, no credits used) - name: Stored Shared Tracking Links description: Instant APIs for retrieving stored shared Tracking Links (campaigns) from the OnlyFansAPI Cache (free, no credits used) - name: Stored Tracking Links description: Instant APIs for retrieving stored tracking links from the OnlyFansAPI Cache (free, no credits used). `revenue.total` is net earnings after refunds and chargebacks. `revenue.chargebacks` is the positive cached net amount already excluded from that total; do not subtract it again. - name: Stories description: APIs for managing OnlyFans stories - name: Story Highlights description: APIs for managing OnlyFans story highlights - name: Subscription Bundles description: "" - name: Tracking Links description: APIs for managing tracking links. Revenue totals are net earnings after refunds and chargebacks. `revenue.chargebacks` (or `summary.chargebacks_total` in stats) is the positive cached net amount already excluded from revenue; do not subtract it again. Spender responses include chargebacks across all attributed periods for each fan with positive net revenue. - name: Transactions description: APIs for managing OnlyFans transactions - name: Usage description: Credit usage reporting for your team - name: User List Collections description: "" - name: Users description: APIs for fetching OnlyFans users - name: Webhooks description: "" paths: /api/{account}/users/{user_id}/posts: parameters: - in: path name: account description: The Account ID example: acct_XXXXXXXXXXXXXXX required: true schema: type: string - in: path name: user_id description: The other user's numeric OnlyFans ID. Resolve a username with GET /{account}/users/{username} first. example: 308625502 required: true schema: type: integer get: summary: List Profile Posts operationId: listProfilePosts description: Retrieve posts from another user's profile using your connected account's access. Follow _pagination.next_page for more results. Publication-date descending order uses a precise timestamp cursor; other ordering or an explicit offset uses offset pagination. Subscription and purchase requirements still apply. parameters: - in: query name: limit description: "Number of posts, from 1 to 100. Default: 10." example: 10 required: false schema: type: integer description: "Number of posts, from 1 to 100. Default: 10." example: 10 - in: query name: offset description: Number of posts to skip. Use beforePublishTime for publication-time cursor pagination. example: null required: false schema: type: integer description: Number of posts to skip. Use beforePublishTime for publication-time cursor pagination. example: null - in: query name: order description: "Order posts by this field. Default: publish_date." example: publish_date required: false schema: type: string description: "Order posts by this field. Default: publish_date." example: publish_date enum: - publish_date - favorites_count - tips_summ - in: query name: sort description: "Sort direction. Default: desc." example: desc required: false schema: type: string description: "Sort direction. Default: desc." example: desc enum: - desc - asc - in: query name: beforePublishTime description: Publication timestamp cursor for older posts. Preserve decimal precision. example: null required: false schema: type: string description: Publication timestamp cursor for older posts. Preserve decimal precision. example: null - in: query name: query description: Search posts by text. example: null required: false schema: type: string description: Search posts by text. example: null - in: query name: pinned description: Set to true to request pinned posts. example: false required: false schema: type: boolean description: Set to true to request pinned posts. example: false - in: query name: counters description: "Include post counters. Default: false." example: true required: false schema: type: boolean description: "Include post counters. Default: false." example: true - in: query name: minimumPublishDate description: Only include posts after this date. example: null required: false schema: type: string description: Only include posts after this date. example: null responses: "200": description: Anonymized captured response with another page available content: application/json: schema: type: object example: data: list: - author: id: 308625502 _view: a responseType: post id: 987650002 postedAt: 2026-02-08T15:32:46+00:00 postedAtPrecise: "1770564766.000000" text:A new update from my profile.
isMarkdownDisabled: true canReport: true canComment: true favoritesCount: 660 mediaCount: 1 isMediaReady: true isOpened: true canToggleFavorite: true commentsCount: 8 tipsAmount: $25 media: - id: 987650003 type: photo convertedToVideo: false canView: true hasError: false createdAt: null isReady: true files: full: url: https://cdn2.onlyfans.com/files/example/media-2.jpg width: 1290 height: 1687 size: 0 sources: [] thumb: url: https://cdn2.onlyfans.com/files/example/media-3.jpg width: 300 height: 300 size: 0 preview: url: https://cdn2.onlyfans.com/files/example/media-4.jpg width: 960 height: 1256 size: 0 squarePreview: url: https://cdn2.onlyfans.com/files/example/media-5.jpg width: 960 height: 960 size: 0 duration: 0 hasCustomPreview: false videoSources: "240": null "720": null canViewMedia: true - author: id: 308625502 _view: a responseType: post id: 987650004 postedAt: 2026-02-04T03:31:18+00:00 postedAtPrecise: "1770175878.000000" text:A new update from my profile.
isMarkdownDisabled: true canReport: true canComment: true favoritesCount: 596 mediaCount: 1 isMediaReady: true isOpened: true canToggleFavorite: true commentsCount: 11 tipsAmount: $0 media: - id: 987650005 type: photo convertedToVideo: false canView: true hasError: false createdAt: null isReady: true files: full: url: https://cdn2.onlyfans.com/files/example/media-6.jpg width: 1290 height: 936 size: 0 sources: [] thumb: url: https://cdn2.onlyfans.com/files/example/media-7.jpg width: 300 height: 300 size: 0 preview: url: https://cdn2.onlyfans.com/files/example/media-8.jpg width: 960 height: 697 size: 0 squarePreview: url: https://cdn2.onlyfans.com/files/example/media-9.jpg width: 960 height: 960 size: 0 duration: 0 hasCustomPreview: false videoSources: "240": null "720": null canViewMedia: true - author: id: 308625502 _view: a responseType: post id: 987650006 postedAt: 2026-01-23T09:35:49+00:00 postedAtPrecise: "1769160949.000000" text:A new update from my profile.
isMarkdownDisabled: true canReport: true canComment: true favoritesCount: 647 mediaCount: 1 isMediaReady: true isOpened: true canToggleFavorite: true commentsCount: 7 tipsAmount: $10 media: - id: 987650007 type: photo convertedToVideo: false canView: true hasError: false createdAt: null isReady: true files: full: url: https://cdn2.onlyfans.com/files/example/media-10.jpg width: 1290 height: 1707 size: 0 sources: [] thumb: url: https://cdn2.onlyfans.com/files/example/media-11.jpg width: 300 height: 300 size: 0 preview: url: https://cdn2.onlyfans.com/files/example/media-12.jpg width: 960 height: 1271 size: 0 squarePreview: url: https://cdn2.onlyfans.com/files/example/media-13.jpg width: 960 height: 960 size: 0 duration: 0 hasCustomPreview: false videoSources: "240": null "720": null canViewMedia: true - author: id: 308625502 _view: a responseType: post id: 987650008 postedAt: 2026-01-15T14:58:43+00:00 postedAtPrecise: "1768489123.000000" text:A new update from my profile.
isMarkdownDisabled: true canReport: true canComment: true favoritesCount: 551 mediaCount: 1 isMediaReady: true isOpened: true canToggleFavorite: true commentsCount: 9 tipsAmount: $0 media: - id: 987650009 type: photo convertedToVideo: false canView: true hasError: false createdAt: null isReady: true files: full: url: https://cdn2.onlyfans.com/files/example/media-14.jpg width: 1290 height: 1692 size: 0 sources: [] thumb: url: https://cdn2.onlyfans.com/files/example/media-15.jpg width: 300 height: 300 size: 0 preview: url: https://cdn2.onlyfans.com/files/example/media-16.jpg width: 960 height: 1260 size: 0 squarePreview: url: https://cdn2.onlyfans.com/files/example/media-17.jpg width: 960 height: 960 size: 0 duration: 0 hasCustomPreview: false videoSources: "240": null "720": null canViewMedia: true - author: id: 308625502 _view: a responseType: post id: 987650010 postedAt: 2026-01-08T20:44:59+00:00 postedAtPrecise: "1767905099.000000" text:A new update from my profile.
isMarkdownDisabled: true canReport: true canComment: true favoritesCount: 489 mediaCount: 1 isMediaReady: true isOpened: true canToggleFavorite: true commentsCount: 8 tipsAmount: $5 media: - id: 987650011 type: photo convertedToVideo: false canView: true hasError: false createdAt: null isReady: true files: full: url: https://cdn2.onlyfans.com/files/example/media-18.jpg width: 1290 height: 1686 size: 0 sources: [] thumb: url: https://cdn2.onlyfans.com/files/example/media-19.jpg width: 300 height: 300 size: 0 preview: url: https://cdn2.onlyfans.com/files/example/media-20.jpg width: 960 height: 1255 size: 0 squarePreview: url: https://cdn2.onlyfans.com/files/example/media-21.jpg width: 960 height: 960 size: 0 duration: 0 hasCustomPreview: false videoSources: "240": null "720": null canViewMedia: true - author: id: 308625502 _view: a responseType: post id: 987650012 postedAt: 2025-12-14T17:17:17+00:00 postedAtPrecise: "1765732637.000000" text:A new update from my profile.
isMarkdownDisabled: true canReport: true canComment: true favoritesCount: 951 mediaCount: 1 isMediaReady: true isOpened: true canToggleFavorite: true commentsCount: 14 tipsAmount: $15 media: - id: 987650013 type: photo convertedToVideo: false canView: true hasError: false createdAt: null isReady: true files: full: url: https://cdn2.onlyfans.com/files/example/media-22.jpg width: 1290 height: 1910 size: 0 sources: [] thumb: url: https://cdn2.onlyfans.com/files/example/media-23.jpg width: 300 height: 300 size: 0 preview: url: https://cdn2.onlyfans.com/files/example/media-24.jpg width: 960 height: 1422 size: 0 squarePreview: url: https://cdn2.onlyfans.com/files/example/media-25.jpg width: 960 height: 960 size: 0 duration: 0 hasCustomPreview: false videoSources: "240": null "720": null canViewMedia: true - author: id: 308625502 _view: a responseType: post id: 987650014 postedAt: 2025-11-11T01:00:29+00:00 postedAtPrecise: "1762822829.000000" text:A new update from my profile.
isMarkdownDisabled: true canReport: true canComment: true favoritesCount: 926 mediaCount: 1 isMediaReady: true isOpened: true canToggleFavorite: true commentsCount: 14 tipsAmount: $0 media: - id: 987650015 type: photo convertedToVideo: false canView: true hasError: false createdAt: null isReady: true files: full: url: https://cdn2.onlyfans.com/files/example/media-26.jpg width: 1290 height: 1695 size: 0 sources: [] thumb: url: https://cdn2.onlyfans.com/files/example/media-27.jpg width: 300 height: 300 size: 0 preview: url: https://cdn2.onlyfans.com/files/example/media-28.jpg width: 960 height: 1262 size: 0 squarePreview: url: https://cdn2.onlyfans.com/files/example/media-29.jpg width: 960 height: 960 size: 0 duration: 0 hasCustomPreview: false videoSources: "240": null "720": null canViewMedia: true - author: id: 308625502 _view: a responseType: post id: 987650016 postedAt: 2025-11-07T04:31:36+00:00 postedAtPrecise: "1762489896.000000" text:A new update from my profile.
isMarkdownDisabled: true canReport: true canComment: true favoritesCount: 725 mediaCount: 1 isMediaReady: true isOpened: true canToggleFavorite: true commentsCount: 12 tipsAmount: $20 media: - id: 987650017 type: photo convertedToVideo: false canView: true hasError: false createdAt: null isReady: true files: full: url: https://cdn2.onlyfans.com/files/example/media-30.jpg width: 1290 height: 1693 size: 0 sources: [] thumb: url: https://cdn2.onlyfans.com/files/example/media-31.jpg width: 300 height: 300 size: 0 preview: url: https://cdn2.onlyfans.com/files/example/media-32.jpg width: 960 height: 1260 size: 0 squarePreview: url: https://cdn2.onlyfans.com/files/example/media-33.jpg width: 960 height: 960 size: 0 duration: 0 hasCustomPreview: false videoSources: "240": null "720": null canViewMedia: true - author: id: 308625502 _view: a responseType: post id: 987650018 postedAt: 2025-10-24T15:53:26+00:00 postedAtPrecise: "1761321206.000000" text:A new update from my profile.
isMarkdownDisabled: true canReport: true canComment: true favoritesCount: 1219 mediaCount: 1 isMediaReady: true isOpened: true canToggleFavorite: true commentsCount: 16 tipsAmount: $39.20 media: - id: 987650019 type: photo convertedToVideo: false canView: true hasError: false createdAt: null isReady: true files: full: url: https://cdn2.onlyfans.com/files/example/media-34.jpg width: 1290 height: 1676 size: 0 sources: [] thumb: url: https://cdn2.onlyfans.com/files/example/media-35.jpg width: 300 height: 300 size: 0 preview: url: https://cdn2.onlyfans.com/files/example/media-36.jpg width: 960 height: 1248 size: 0 squarePreview: url: https://cdn2.onlyfans.com/files/example/media-37.jpg width: 960 height: 960 size: 0 duration: 0 hasCustomPreview: false videoSources: "240": null "720": null canViewMedia: true - author: id: 308625502 _view: a responseType: post id: 987650020 postedAt: 2025-09-13T14:58:01+00:00 postedAtPrecise: "1757775481.000000" text:A new update from my profile.
isMarkdownDisabled: true canReport: true canComment: true favoritesCount: 1236 mediaCount: 1 isMediaReady: true isOpened: true canToggleFavorite: true commentsCount: 18 tipsAmount: $10 media: - id: 987650021 type: photo convertedToVideo: false canView: true hasError: false createdAt: null isReady: true files: full: url: https://cdn2.onlyfans.com/files/example/media-38.jpg width: 2048 height: 1536 size: 0 sources: [] thumb: url: https://cdn2.onlyfans.com/files/example/media-39.jpg width: 300 height: 300 size: 0 preview: url: https://cdn2.onlyfans.com/files/example/media-40.jpg width: 960 height: 720 size: 0 squarePreview: url: https://cdn2.onlyfans.com/files/example/media-41.jpg width: 960 height: 960 size: 0 duration: 0 hasCustomPreview: false videoSources: "240": null "720": null canViewMedia: true hasMore: true headMarker: "1770564766.000000" tailMarker: "1757775481.000000" counters: audiosCount: 0 photosCount: 73 videosCount: 0 mediasCount: 73 postsCount: 63 streamsCount: 0 archivedPostsCount: 0 _pagination: next_page: https://app.onlyfansapi.com/api/acct_XXXXXXXXXXXXXXX/users/308625502/posts?limit=10&order=publish_date&sort=desc&pinned=0&counters=1&beforePublishTime=1757775481.000000 _meta: _credits: used: 1 balance: 9999 note: Always _cache: is_cached: false note: Cache disabled for this endpoint _rate_limits: limit_minute: 1000 limit_day: null remaining_minute: 999 remaining_day: null notice: We have decided to remove our daily rate limits. Please remove any references to these in your integrations. properties: data: type: object properties: list: type: array example: - author: id: 308625502 _view: a responseType: post id: 987650002 postedAt: 2026-02-08T15:32:46+00:00 postedAtPrecise: "1770564766.000000" text:A new update from my profile.
isMarkdownDisabled: true canReport: true canComment: true favoritesCount: 660 mediaCount: 1 isMediaReady: true isOpened: true canToggleFavorite: true commentsCount: 8 tipsAmount: $25 media: - id: 987650003 type: photo convertedToVideo: false canView: true hasError: false createdAt: null isReady: true files: full: url: https://cdn2.onlyfans.com/files/example/media-2.jpg width: 1290 height: 1687 size: 0 sources: [] thumb: url: https://cdn2.onlyfans.com/files/example/media-3.jpg width: 300 height: 300 size: 0 preview: url: https://cdn2.onlyfans.com/files/example/media-4.jpg width: 960 height: 1256 size: 0 squarePreview: url: https://cdn2.onlyfans.com/files/example/media-5.jpg width: 960 height: 960 size: 0 duration: 0 hasCustomPreview: false videoSources: "240": null "720": null canViewMedia: true - author: id: 308625502 _view: a responseType: post id: 987650004 postedAt: 2026-02-04T03:31:18+00:00 postedAtPrecise: "1770175878.000000" text:A new update from my profile.
isMarkdownDisabled: true canReport: true canComment: true favoritesCount: 596 mediaCount: 1 isMediaReady: true isOpened: true canToggleFavorite: true commentsCount: 11 tipsAmount: $0 media: - id: 987650005 type: photo convertedToVideo: false canView: true hasError: false createdAt: null isReady: true files: full: url: https://cdn2.onlyfans.com/files/example/media-6.jpg width: 1290 height: 936 size: 0 sources: [] thumb: url: https://cdn2.onlyfans.com/files/example/media-7.jpg width: 300 height: 300 size: 0 preview: url: https://cdn2.onlyfans.com/files/example/media-8.jpg width: 960 height: 697 size: 0 squarePreview: url: https://cdn2.onlyfans.com/files/example/media-9.jpg width: 960 height: 960 size: 0 duration: 0 hasCustomPreview: false videoSources: "240": null "720": null canViewMedia: true - author: id: 308625502 _view: a responseType: post id: 987650006 postedAt: 2026-01-23T09:35:49+00:00 postedAtPrecise: "1769160949.000000" text:A new update from my profile.
isMarkdownDisabled: true canReport: true canComment: true favoritesCount: 647 mediaCount: 1 isMediaReady: true isOpened: true canToggleFavorite: true commentsCount: 7 tipsAmount: $10 media: - id: 987650007 type: photo convertedToVideo: false canView: true hasError: false createdAt: null isReady: true files: full: url: https://cdn2.onlyfans.com/files/example/media-10.jpg width: 1290 height: 1707 size: 0 sources: [] thumb: url: https://cdn2.onlyfans.com/files/example/media-11.jpg width: 300 height: 300 size: 0 preview: url: https://cdn2.onlyfans.com/files/example/media-12.jpg width: 960 height: 1271 size: 0 squarePreview: url: https://cdn2.onlyfans.com/files/example/media-13.jpg width: 960 height: 960 size: 0 duration: 0 hasCustomPreview: false videoSources: "240": null "720": null canViewMedia: true - author: id: 308625502 _view: a responseType: post id: 987650008 postedAt: 2026-01-15T14:58:43+00:00 postedAtPrecise: "1768489123.000000" text:A new update from my profile.
isMarkdownDisabled: true canReport: true canComment: true favoritesCount: 551 mediaCount: 1 isMediaReady: true isOpened: true canToggleFavorite: true commentsCount: 9 tipsAmount: $0 media: - id: 987650009 type: photo convertedToVideo: false canView: true hasError: false createdAt: null isReady: true files: full: url: https://cdn2.onlyfans.com/files/example/media-14.jpg width: 1290 height: 1692 size: 0 sources: [] thumb: url: https://cdn2.onlyfans.com/files/example/media-15.jpg width: 300 height: 300 size: 0 preview: url: https://cdn2.onlyfans.com/files/example/media-16.jpg width: 960 height: 1260 size: 0 squarePreview: url: https://cdn2.onlyfans.com/files/example/media-17.jpg width: 960 height: 960 size: 0 duration: 0 hasCustomPreview: false videoSources: "240": null "720": null canViewMedia: true - author: id: 308625502 _view: a responseType: post id: 987650010 postedAt: 2026-01-08T20:44:59+00:00 postedAtPrecise: "1767905099.000000" text:A new update from my profile.
isMarkdownDisabled: true canReport: true canComment: true favoritesCount: 489 mediaCount: 1 isMediaReady: true isOpened: true canToggleFavorite: true commentsCount: 8 tipsAmount: $5 media: - id: 987650011 type: photo convertedToVideo: false canView: true hasError: false createdAt: null isReady: true files: full: url: https://cdn2.onlyfans.com/files/example/media-18.jpg width: 1290 height: 1686 size: 0 sources: [] thumb: url: https://cdn2.onlyfans.com/files/example/media-19.jpg width: 300 height: 300 size: 0 preview: url: https://cdn2.onlyfans.com/files/example/media-20.jpg width: 960 height: 1255 size: 0 squarePreview: url: https://cdn2.onlyfans.com/files/example/media-21.jpg width: 960 height: 960 size: 0 duration: 0 hasCustomPreview: false videoSources: "240": null "720": null canViewMedia: true - author: id: 308625502 _view: a responseType: post id: 987650012 postedAt: 2025-12-14T17:17:17+00:00 postedAtPrecise: "1765732637.000000" text:A new update from my profile.
isMarkdownDisabled: true canReport: true canComment: true favoritesCount: 951 mediaCount: 1 isMediaReady: true isOpened: true canToggleFavorite: true commentsCount: 14 tipsAmount: $15 media: - id: 987650013 type: photo convertedToVideo: false canView: true hasError: false createdAt: null isReady: true files: full: url: https://cdn2.onlyfans.com/files/example/media-22.jpg width: 1290 height: 1910 size: 0 sources: [] thumb: url: https://cdn2.onlyfans.com/files/example/media-23.jpg width: 300 height: 300 size: 0 preview: url: https://cdn2.onlyfans.com/files/example/media-24.jpg width: 960 height: 1422 size: 0 squarePreview: url: https://cdn2.onlyfans.com/files/example/media-25.jpg width: 960 height: 960 size: 0 duration: 0 hasCustomPreview: false videoSources: "240": null "720": null canViewMedia: true - author: id: 308625502 _view: a responseType: post id: 987650014 postedAt: 2025-11-11T01:00:29+00:00 postedAtPrecise: "1762822829.000000" text:A new update from my profile.
isMarkdownDisabled: true canReport: true canComment: true favoritesCount: 926 mediaCount: 1 isMediaReady: true isOpened: true canToggleFavorite: true commentsCount: 14 tipsAmount: $0 media: - id: 987650015 type: photo convertedToVideo: false canView: true hasError: false createdAt: null isReady: true files: full: url: https://cdn2.onlyfans.com/files/example/media-26.jpg width: 1290 height: 1695 size: 0 sources: [] thumb: url: https://cdn2.onlyfans.com/files/example/media-27.jpg width: 300 height: 300 size: 0 preview: url: https://cdn2.onlyfans.com/files/example/media-28.jpg width: 960 height: 1262 size: 0 squarePreview: url: https://cdn2.onlyfans.com/files/example/media-29.jpg width: 960 height: 960 size: 0 duration: 0 hasCustomPreview: false videoSources: "240": null "720": null canViewMedia: true - author: id: 308625502 _view: a responseType: post id: 987650016 postedAt: 2025-11-07T04:31:36+00:00 postedAtPrecise: "1762489896.000000" text:A new update from my profile.
isMarkdownDisabled: true canReport: true canComment: true favoritesCount: 725 mediaCount: 1 isMediaReady: true isOpened: true canToggleFavorite: true commentsCount: 12 tipsAmount: $20 media: - id: 987650017 type: photo convertedToVideo: false canView: true hasError: false createdAt: null isReady: true files: full: url: https://cdn2.onlyfans.com/files/example/media-30.jpg width: 1290 height: 1693 size: 0 sources: [] thumb: url: https://cdn2.onlyfans.com/files/example/media-31.jpg width: 300 height: 300 size: 0 preview: url: https://cdn2.onlyfans.com/files/example/media-32.jpg width: 960 height: 1260 size: 0 squarePreview: url: https://cdn2.onlyfans.com/files/example/media-33.jpg width: 960 height: 960 size: 0 duration: 0 hasCustomPreview: false videoSources: "240": null "720": null canViewMedia: true - author: id: 308625502 _view: a responseType: post id: 987650018 postedAt: 2025-10-24T15:53:26+00:00 postedAtPrecise: "1761321206.000000" text:A new update from my profile.
isMarkdownDisabled: true canReport: true canComment: true favoritesCount: 1219 mediaCount: 1 isMediaReady: true isOpened: true canToggleFavorite: true commentsCount: 16 tipsAmount: $39.20 media: - id: 987650019 type: photo convertedToVideo: false canView: true hasError: false createdAt: null isReady: true files: full: url: https://cdn2.onlyfans.com/files/example/media-34.jpg width: 1290 height: 1676 size: 0 sources: [] thumb: url: https://cdn2.onlyfans.com/files/example/media-35.jpg width: 300 height: 300 size: 0 preview: url: https://cdn2.onlyfans.com/files/example/media-36.jpg width: 960 height: 1248 size: 0 squarePreview: url: https://cdn2.onlyfans.com/files/example/media-37.jpg width: 960 height: 960 size: 0 duration: 0 hasCustomPreview: false videoSources: "240": null "720": null canViewMedia: true - author: id: 308625502 _view: a responseType: post id: 987650020 postedAt: 2025-09-13T14:58:01+00:00 postedAtPrecise: "1757775481.000000" text:A new update from my profile.
isMarkdownDisabled: true canReport: true canComment: true favoritesCount: 1236 mediaCount: 1 isMediaReady: true isOpened: true canToggleFavorite: true commentsCount: 18 tipsAmount: $10 media: - id: 987650021 type: photo convertedToVideo: false canView: true hasError: false createdAt: null isReady: true files: full: url: https://cdn2.onlyfans.com/files/example/media-38.jpg width: 2048 height: 1536 size: 0 sources: [] thumb: url: https://cdn2.onlyfans.com/files/example/media-39.jpg width: 300 height: 300 size: 0 preview: url: https://cdn2.onlyfans.com/files/example/media-40.jpg width: 960 height: 720 size: 0 squarePreview: url: https://cdn2.onlyfans.com/files/example/media-41.jpg width: 960 height: 960 size: 0 duration: 0 hasCustomPreview: false videoSources: "240": null "720": null canViewMedia: true items: type: object properties: author: type: object properties: id: type: integer example: 308625502 _view: type: string example: a responseType: type: string example: post id: type: integer example: 987650002 postedAt: type: string example: 2026-02-08T15:32:46+00:00 postedAtPrecise: type: string example: "1770564766.000000" text: type: string example:A new update from my profile.
isMarkdownDisabled: type: boolean example: true canReport: type: boolean example: true canComment: type: boolean example: true favoritesCount: type: integer example: 660 mediaCount: type: integer example: 1 isMediaReady: type: boolean example: true isOpened: type: boolean example: true canToggleFavorite: type: boolean example: true commentsCount: type: integer example: 8 tipsAmount: type: string example: $25 media: type: array example: - id: 987650003 type: photo convertedToVideo: false canView: true hasError: false createdAt: null isReady: true files: full: url: https://cdn2.onlyfans.com/files/example/media-2.jpg width: 1290 height: 1687 size: 0 sources: [] thumb: url: https://cdn2.onlyfans.com/files/example/media-3.jpg width: 300 height: 300 size: 0 preview: url: https://cdn2.onlyfans.com/files/example/media-4.jpg width: 960 height: 1256 size: 0 squarePreview: url: https://cdn2.onlyfans.com/files/example/media-5.jpg width: 960 height: 960 size: 0 duration: 0 hasCustomPreview: false videoSources: "240": null "720": null items: type: object properties: id: type: integer example: 987650003 type: type: string example: photo convertedToVideo: type: boolean example: false canView: type: boolean example: true hasError: type: boolean example: false createdAt: type: string example: null nullable: true isReady: type: boolean example: true files: type: object properties: full: type: object properties: url: type: string example: https://cdn2.onlyfans.com/files/example/media-2.jpg width: type: integer example: 1290 height: type: integer example: 1687 size: type: integer example: 0 sources: type: array example: [] thumb: type: object properties: url: type: string example: https://cdn2.onlyfans.com/files/example/media-3.jpg width: type: integer example: 300 height: type: integer example: 300 size: type: integer example: 0 preview: type: object properties: url: type: string example: https://cdn2.onlyfans.com/files/example/media-4.jpg width: type: integer example: 960 height: type: integer example: 1256 size: type: integer example: 0 squarePreview: type: object properties: url: type: string example: https://cdn2.onlyfans.com/files/example/media-5.jpg width: type: integer example: 960 height: type: integer example: 960 size: type: integer example: 0 duration: type: integer example: 0 hasCustomPreview: type: boolean example: false videoSources: type: object properties: "240": type: string example: null nullable: true "720": type: string example: null nullable: true canViewMedia: type: boolean example: true hasMore: type: boolean example: true headMarker: type: string example: "1770564766.000000" tailMarker: type: string example: "1757775481.000000" counters: type: object properties: audiosCount: type: integer example: 0 photosCount: type: integer example: 73 videosCount: type: integer example: 0 mediasCount: type: integer example: 73 postsCount: type: integer example: 63 streamsCount: type: integer example: 0 archivedPostsCount: type: integer example: 0 _pagination: type: object properties: next_page: type: string example: https://app.onlyfansapi.com/api/acct_XXXXXXXXXXXXXXX/users/308625502/posts?limit=10&order=publish_date&sort=desc&pinned=0&counters=1&beforePublishTime=1757775481.000000 _meta: type: object properties: _credits: type: object properties: used: type: integer example: 1 balance: type: integer example: 9999 note: type: string example: Always _cache: type: object properties: is_cached: type: boolean example: false note: type: string example: Cache disabled for this endpoint _rate_limits: type: object properties: limit_minute: type: integer example: 1000 limit_day: type: string example: null nullable: true remaining_minute: type: integer example: 999 remaining_day: type: string example: null nullable: true notice: type: string example: We have decided to remove our daily rate limits. Please remove any references to these in your integrations. tags: - Profile Content components: securitySchemes: default: type: http scheme: bearer description: Get your API Key from OnlyFansAPI Console - https://app.onlyfansapi.com/api-keys ```` # Create Custom Summary Category (/api-reference/fans-ai-summary/create-custom-summary-category) Create a custom fan summary category for your Team (max 10). The category label becomes an additional field in every subsequently generated fan summary, and the keywords are used to retrieve matching fan messages. ## OpenAPI ````yaml https://app.onlyfansapi.com/scribe-docs/openapi.yaml post /api/fan-summary-categories openapi: 3.0.3 info: title: OnlyFans API description: "" version: 1.0.0 servers: - url: https://app.onlyfansapi.com security: - default: [] tags: - name: AI Voice Messages description: "" - name: API Keys description: "" - name: Account description: Endpoints for your linked accounts - name: Analytics - Financial description: APIs for retrieving financial analytics data - name: Analytics - Summary description: APIs for retrieving summary analytics data - name: Banking description: Operations related to user banking details, payout methods, legal and tax information, and account country settings. - name: Banned Words description: Reference list of OnlyFans banned words used by the `blockBannedWords` screening parameter - name: Blocked / Restricted Users description: APIs for listing the users an account has blocked or restricted - name: Chargebacks description: "" - name: Chat Messages description: "" - name: Chats description: "" - name: Client Sessions description: "" - name: Connect OnlyFans Account description: "" - name: Data Exports description: APIs for managing data exports - name: Engagement / Messages description: "" - name: Fans description: APIs for managing OnlyFans fans (subscribers) - name: Fans - AI Summary description: APIs for generating and retrieving AI-powered fan profile summaries - name: Following description: APIs for managing OnlyFans followings (people you're subscribed to) - name: Free Trial Links description: APIs for managing Free Trial Links. Revenue totals are net earnings after refunds and chargebacks. `revenue.chargebacks` (or `summary.chargebacks_total` in stats) is the positive cached net amount already excluded from revenue; do not subtract it again. Spender responses include chargebacks across all attributed periods for each fan with positive net revenue. - name: Giphy description: "" - name: Link Tags description: APIs for managing tags on free trial links, tracking links, and Smart Links - name: Mass Messaging description: "" - name: Media description: "" - name: Media Vault description: "" - name: Media Vault Lists description: "" - name: Notifications description: Endpoints for managingr account notifications - name: Payouts description: "" - name: Post Comments description: "" - name: Post Labels description: APIs for managing your post labels - name: Posts description: APIs for managing OnlyFans posts - name: Profile Content description: Read another user's profile content using your connected OnlyFans account. OnlyFans enforces subscription and purchase requirements; these endpoints do not unlock content. Response samples use captured OnlyFans payloads with anonymized IDs, text, and media URLs; OFAPI metadata values are illustrative. - name: Promotions description: "" - name: Public Profiles description: "" - name: Queue description: "" - name: Release Forms description: APIs for managing OnlyFans release forms - name: Saved For Later (Messages) description: "" - name: Saved For Later (Posts) description: "" - name: Settings description: "" - name: Shared Free Trial Links description: APIs for Free Trial Links that other OF creators have shared with this account. Revenue, cost, and spender data are not available for shared links. - name: Shared Tracking Links description: APIs for Tracking Links (campaigns) that other OF creators have shared with this account. Revenue, cost, and spender data are not available for shared campaigns. - name: Smart Link Postbacks description: APIs for managing Smart Link postback destinations - name: Smart Links description: APIs for managing Smart Links (Free Trial Links and Tracking Links with pooled inventory) - name: Statistics description: "" - name: Stored Free Trial Links description: Instant APIs for retrieving stored free trial links from the OnlyFansAPI Cache (free, no credits used). `revenue.total` is net earnings after refunds and chargebacks. `revenue.chargebacks` is the positive cached net amount already excluded from that total; do not subtract it again. - name: Stored Shared Free Trial Links description: Instant APIs for retrieving stored shared Free Trial Links from the OnlyFansAPI Cache (free, no credits used) - name: Stored Shared Tracking Links description: Instant APIs for retrieving stored shared Tracking Links (campaigns) from the OnlyFansAPI Cache (free, no credits used) - name: Stored Tracking Links description: Instant APIs for retrieving stored tracking links from the OnlyFansAPI Cache (free, no credits used). `revenue.total` is net earnings after refunds and chargebacks. `revenue.chargebacks` is the positive cached net amount already excluded from that total; do not subtract it again. - name: Stories description: APIs for managing OnlyFans stories - name: Story Highlights description: APIs for managing OnlyFans story highlights - name: Subscription Bundles description: "" - name: Tracking Links description: APIs for managing tracking links. Revenue totals are net earnings after refunds and chargebacks. `revenue.chargebacks` (or `summary.chargebacks_total` in stats) is the positive cached net amount already excluded from revenue; do not subtract it again. Spender responses include chargebacks across all attributed periods for each fan with positive net revenue. - name: Transactions description: APIs for managing OnlyFans transactions - name: Usage description: Credit usage reporting for your team - name: User List Collections description: "" - name: Users description: APIs for fetching OnlyFans users - name: Webhooks description: "" paths: /api/fan-summary-categories: post: summary: Create Custom Summary Category operationId: createCustomSummaryCategory description: Create a custom fan summary category for your Team (max 10). The category label becomes an additional field in every subsequently generated fan summary, and the keywords are used to retrieve matching fan messages. parameters: [] responses: "200": description: Success content: application/json: schema: type: object example: data: id: fan_cat_abc123 key: custom_gift_preferences label: Gift Preferences keywords: gift, wishlist, amazon, spoil, surprise, present created_at: 2026-07-17T12:00:00.000000Z properties: data: type: object properties: id: type: string example: fan_cat_abc123 key: type: string example: custom_gift_preferences label: type: string example: Gift Preferences keywords: type: string example: gift, wishlist, amazon, spoil, surprise, present created_at: type: string example: 2026-07-17T12:00:00.000000Z tags: - Fans - AI Summary requestBody: required: true content: application/json: schema: type: object properties: label: type: string description: Display label for the category. Also determines the immutable field key in summary_data (e.g. "Gift Preferences" becomes custom_gift_preferences). example: Gift Preferences keywords: type: string description: Comma-separated keywords used to find relevant fan messages for this category. example: gift, wishlist, amazon, spoil, surprise, present required: - label - keywords components: securitySchemes: default: type: http scheme: bearer description: Get your API Key from OnlyFansAPI Console - https://app.onlyfansapi.com/api-keys ```` # Delete Custom Summary Category (/api-reference/fans-ai-summary/delete-custom-summary-category) Delete a custom fan summary category. Existing summaries keep any previously extracted data for this category; new summaries will no longer include it. ## OpenAPI ````yaml https://app.onlyfansapi.com/scribe-docs/openapi.yaml delete /api/fan-summary-categories/{category_id} openapi: 3.0.3 info: title: OnlyFans API description: "" version: 1.0.0 servers: - url: https://app.onlyfansapi.com security: - default: [] tags: - name: AI Voice Messages description: "" - name: API Keys description: "" - name: Account description: Endpoints for your linked accounts - name: Analytics - Financial description: APIs for retrieving financial analytics data - name: Analytics - Summary description: APIs for retrieving summary analytics data - name: Banking description: Operations related to user banking details, payout methods, legal and tax information, and account country settings. - name: Banned Words description: Reference list of OnlyFans banned words used by the `blockBannedWords` screening parameter - name: Blocked / Restricted Users description: APIs for listing the users an account has blocked or restricted - name: Chargebacks description: "" - name: Chat Messages description: "" - name: Chats description: "" - name: Client Sessions description: "" - name: Connect OnlyFans Account description: "" - name: Data Exports description: APIs for managing data exports - name: Engagement / Messages description: "" - name: Fans description: APIs for managing OnlyFans fans (subscribers) - name: Fans - AI Summary description: APIs for generating and retrieving AI-powered fan profile summaries - name: Following description: APIs for managing OnlyFans followings (people you're subscribed to) - name: Free Trial Links description: APIs for managing Free Trial Links. Revenue totals are net earnings after refunds and chargebacks. `revenue.chargebacks` (or `summary.chargebacks_total` in stats) is the positive cached net amount already excluded from revenue; do not subtract it again. Spender responses include chargebacks across all attributed periods for each fan with positive net revenue. - name: Giphy description: "" - name: Link Tags description: APIs for managing tags on free trial links, tracking links, and Smart Links - name: Mass Messaging description: "" - name: Media description: "" - name: Media Vault description: "" - name: Media Vault Lists description: "" - name: Notifications description: Endpoints for managingr account notifications - name: Payouts description: "" - name: Post Comments description: "" - name: Post Labels description: APIs for managing your post labels - name: Posts description: APIs for managing OnlyFans posts - name: Profile Content description: Read another user's profile content using your connected OnlyFans account. OnlyFans enforces subscription and purchase requirements; these endpoints do not unlock content. Response samples use captured OnlyFans payloads with anonymized IDs, text, and media URLs; OFAPI metadata values are illustrative. - name: Promotions description: "" - name: Public Profiles description: "" - name: Queue description: "" - name: Release Forms description: APIs for managing OnlyFans release forms - name: Saved For Later (Messages) description: "" - name: Saved For Later (Posts) description: "" - name: Settings description: "" - name: Shared Free Trial Links description: APIs for Free Trial Links that other OF creators have shared with this account. Revenue, cost, and spender data are not available for shared links. - name: Shared Tracking Links description: APIs for Tracking Links (campaigns) that other OF creators have shared with this account. Revenue, cost, and spender data are not available for shared campaigns. - name: Smart Link Postbacks description: APIs for managing Smart Link postback destinations - name: Smart Links description: APIs for managing Smart Links (Free Trial Links and Tracking Links with pooled inventory) - name: Statistics description: "" - name: Stored Free Trial Links description: Instant APIs for retrieving stored free trial links from the OnlyFansAPI Cache (free, no credits used). `revenue.total` is net earnings after refunds and chargebacks. `revenue.chargebacks` is the positive cached net amount already excluded from that total; do not subtract it again. - name: Stored Shared Free Trial Links description: Instant APIs for retrieving stored shared Free Trial Links from the OnlyFansAPI Cache (free, no credits used) - name: Stored Shared Tracking Links description: Instant APIs for retrieving stored shared Tracking Links (campaigns) from the OnlyFansAPI Cache (free, no credits used) - name: Stored Tracking Links description: Instant APIs for retrieving stored tracking links from the OnlyFansAPI Cache (free, no credits used). `revenue.total` is net earnings after refunds and chargebacks. `revenue.chargebacks` is the positive cached net amount already excluded from that total; do not subtract it again. - name: Stories description: APIs for managing OnlyFans stories - name: Story Highlights description: APIs for managing OnlyFans story highlights - name: Subscription Bundles description: "" - name: Tracking Links description: APIs for managing tracking links. Revenue totals are net earnings after refunds and chargebacks. `revenue.chargebacks` (or `summary.chargebacks_total` in stats) is the positive cached net amount already excluded from revenue; do not subtract it again. Spender responses include chargebacks across all attributed periods for each fan with positive net revenue. - name: Transactions description: APIs for managing OnlyFans transactions - name: Usage description: Credit usage reporting for your team - name: User List Collections description: "" - name: Users description: APIs for fetching OnlyFans users - name: Webhooks description: "" paths: /api/fan-summary-categories/{category_id}: parameters: - in: path name: category_id description: The ID of the category example: fan_cat_abc123 required: true schema: type: string delete: summary: Delete Custom Summary Category operationId: deleteCustomSummaryCategory description: Delete a custom fan summary category. Existing summaries keep any previously extracted data for this category; new summaries will no longer include it. parameters: [] responses: "204": description: Successfully deleted content: application/json: schema: type: object nullable: true tags: - Fans - AI Summary components: securitySchemes: default: type: http scheme: bearer description: Get your API Key from OnlyFansAPI Console - https://app.onlyfansapi.com/api-keys ```` # Generate Fan Summary (/api-reference/fans-ai-summary/generate-fan-summary) Queue generation or regeneration of an AI profile summary for a fan. Costs 200 credits (charged on completion). Use the GET endpoint to poll for results. To regenerate an existing summary, pass `regenerate: true`. ## OpenAPI ````yaml https://app.onlyfansapi.com/scribe-docs/openapi.yaml post /api/{account}/fans/{fan_id}/summary openapi: 3.0.3 info: title: OnlyFans API description: "" version: 1.0.0 servers: - url: https://app.onlyfansapi.com security: - default: [] tags: - name: AI Voice Messages description: "" - name: API Keys description: "" - name: Account description: Endpoints for your linked accounts - name: Analytics - Financial description: APIs for retrieving financial analytics data - name: Analytics - Summary description: APIs for retrieving summary analytics data - name: Banking description: Operations related to user banking details, payout methods, legal and tax information, and account country settings. - name: Banned Words description: Reference list of OnlyFans banned words used by the `blockBannedWords` screening parameter - name: Blocked / Restricted Users description: APIs for listing the users an account has blocked or restricted - name: Chargebacks description: "" - name: Chat Messages description: "" - name: Chats description: "" - name: Client Sessions description: "" - name: Connect OnlyFans Account description: "" - name: Data Exports description: APIs for managing data exports - name: Engagement / Messages description: "" - name: Fans description: APIs for managing OnlyFans fans (subscribers) - name: Fans - AI Summary description: APIs for generating and retrieving AI-powered fan profile summaries - name: Following description: APIs for managing OnlyFans followings (people you're subscribed to) - name: Free Trial Links description: APIs for managing Free Trial Links. Revenue totals are net earnings after refunds and chargebacks. `revenue.chargebacks` (or `summary.chargebacks_total` in stats) is the positive cached net amount already excluded from revenue; do not subtract it again. Spender responses include chargebacks across all attributed periods for each fan with positive net revenue. - name: Giphy description: "" - name: Link Tags description: APIs for managing tags on free trial links, tracking links, and Smart Links - name: Mass Messaging description: "" - name: Media description: "" - name: Media Vault description: "" - name: Media Vault Lists description: "" - name: Notifications description: Endpoints for managingr account notifications - name: Payouts description: "" - name: Post Comments description: "" - name: Post Labels description: APIs for managing your post labels - name: Posts description: APIs for managing OnlyFans posts - name: Profile Content description: Read another user's profile content using your connected OnlyFans account. OnlyFans enforces subscription and purchase requirements; these endpoints do not unlock content. Response samples use captured OnlyFans payloads with anonymized IDs, text, and media URLs; OFAPI metadata values are illustrative. - name: Promotions description: "" - name: Public Profiles description: "" - name: Queue description: "" - name: Release Forms description: APIs for managing OnlyFans release forms - name: Saved For Later (Messages) description: "" - name: Saved For Later (Posts) description: "" - name: Settings description: "" - name: Shared Free Trial Links description: APIs for Free Trial Links that other OF creators have shared with this account. Revenue, cost, and spender data are not available for shared links. - name: Shared Tracking Links description: APIs for Tracking Links (campaigns) that other OF creators have shared with this account. Revenue, cost, and spender data are not available for shared campaigns. - name: Smart Link Postbacks description: APIs for managing Smart Link postback destinations - name: Smart Links description: APIs for managing Smart Links (Free Trial Links and Tracking Links with pooled inventory) - name: Statistics description: "" - name: Stored Free Trial Links description: Instant APIs for retrieving stored free trial links from the OnlyFansAPI Cache (free, no credits used). `revenue.total` is net earnings after refunds and chargebacks. `revenue.chargebacks` is the positive cached net amount already excluded from that total; do not subtract it again. - name: Stored Shared Free Trial Links description: Instant APIs for retrieving stored shared Free Trial Links from the OnlyFansAPI Cache (free, no credits used) - name: Stored Shared Tracking Links description: Instant APIs for retrieving stored shared Tracking Links (campaigns) from the OnlyFansAPI Cache (free, no credits used) - name: Stored Tracking Links description: Instant APIs for retrieving stored tracking links from the OnlyFansAPI Cache (free, no credits used). `revenue.total` is net earnings after refunds and chargebacks. `revenue.chargebacks` is the positive cached net amount already excluded from that total; do not subtract it again. - name: Stories description: APIs for managing OnlyFans stories - name: Story Highlights description: APIs for managing OnlyFans story highlights - name: Subscription Bundles description: "" - name: Tracking Links description: APIs for managing tracking links. Revenue totals are net earnings after refunds and chargebacks. `revenue.chargebacks` (or `summary.chargebacks_total` in stats) is the positive cached net amount already excluded from revenue; do not subtract it again. Spender responses include chargebacks across all attributed periods for each fan with positive net revenue. - name: Transactions description: APIs for managing OnlyFans transactions - name: Usage description: Credit usage reporting for your team - name: User List Collections description: "" - name: Users description: APIs for fetching OnlyFans users - name: Webhooks description: "" paths: /api/{account}/fans/{fan_id}/summary: parameters: - in: path name: account description: The Account ID example: acct_XXXXXXXXXXXXXXX required: true schema: type: string - in: path name: fan_id description: Fan's OnlyFans ID example: 123456789 required: true schema: type: string post: summary: Generate Fan Summary operationId: generateFanSummary description: "Queue generation or regeneration of an AI profile summary for a fan. Costs 200 credits (charged on completion). Use the GET endpoint to poll for results. To regenerate an existing summary, pass `regenerate: true`." parameters: [] responses: "200": description: Generation queued content: application/json: schema: type: object example: status: processing message: Fan summary generation has been queued. Use GET to poll for results. properties: status: type: string example: processing message: type: string example: Fan summary generation has been queued. Use GET to poll for results. tags: - Fans - AI Summary requestBody: required: false content: application/json: schema: type: object properties: regenerate: type: boolean description: Set to true to regenerate an existing completed summary. example: true components: securitySchemes: default: type: http scheme: bearer description: Get your API Key from OnlyFansAPI Console - https://app.onlyfansapi.com/api-keys ```` # Get Fan Summary (/api-reference/fans-ai-summary/get-fan-summary) Retrieve the AI profile summary for a fan. Poll this endpoint after triggering a generation to check for completion. ## OpenAPI ````yaml https://app.onlyfansapi.com/scribe-docs/openapi.yaml get /api/{account}/fans/{fan_id}/summary openapi: 3.0.3 info: title: OnlyFans API description: "" version: 1.0.0 servers: - url: https://app.onlyfansapi.com security: - default: [] tags: - name: AI Voice Messages description: "" - name: API Keys description: "" - name: Account description: Endpoints for your linked accounts - name: Analytics - Financial description: APIs for retrieving financial analytics data - name: Analytics - Summary description: APIs for retrieving summary analytics data - name: Banking description: Operations related to user banking details, payout methods, legal and tax information, and account country settings. - name: Banned Words description: Reference list of OnlyFans banned words used by the `blockBannedWords` screening parameter - name: Blocked / Restricted Users description: APIs for listing the users an account has blocked or restricted - name: Chargebacks description: "" - name: Chat Messages description: "" - name: Chats description: "" - name: Client Sessions description: "" - name: Connect OnlyFans Account description: "" - name: Data Exports description: APIs for managing data exports - name: Engagement / Messages description: "" - name: Fans description: APIs for managing OnlyFans fans (subscribers) - name: Fans - AI Summary description: APIs for generating and retrieving AI-powered fan profile summaries - name: Following description: APIs for managing OnlyFans followings (people you're subscribed to) - name: Free Trial Links description: APIs for managing Free Trial Links. Revenue totals are net earnings after refunds and chargebacks. `revenue.chargebacks` (or `summary.chargebacks_total` in stats) is the positive cached net amount already excluded from revenue; do not subtract it again. Spender responses include chargebacks across all attributed periods for each fan with positive net revenue. - name: Giphy description: "" - name: Link Tags description: APIs for managing tags on free trial links, tracking links, and Smart Links - name: Mass Messaging description: "" - name: Media description: "" - name: Media Vault description: "" - name: Media Vault Lists description: "" - name: Notifications description: Endpoints for managingr account notifications - name: Payouts description: "" - name: Post Comments description: "" - name: Post Labels description: APIs for managing your post labels - name: Posts description: APIs for managing OnlyFans posts - name: Profile Content description: Read another user's profile content using your connected OnlyFans account. OnlyFans enforces subscription and purchase requirements; these endpoints do not unlock content. Response samples use captured OnlyFans payloads with anonymized IDs, text, and media URLs; OFAPI metadata values are illustrative. - name: Promotions description: "" - name: Public Profiles description: "" - name: Queue description: "" - name: Release Forms description: APIs for managing OnlyFans release forms - name: Saved For Later (Messages) description: "" - name: Saved For Later (Posts) description: "" - name: Settings description: "" - name: Shared Free Trial Links description: APIs for Free Trial Links that other OF creators have shared with this account. Revenue, cost, and spender data are not available for shared links. - name: Shared Tracking Links description: APIs for Tracking Links (campaigns) that other OF creators have shared with this account. Revenue, cost, and spender data are not available for shared campaigns. - name: Smart Link Postbacks description: APIs for managing Smart Link postback destinations - name: Smart Links description: APIs for managing Smart Links (Free Trial Links and Tracking Links with pooled inventory) - name: Statistics description: "" - name: Stored Free Trial Links description: Instant APIs for retrieving stored free trial links from the OnlyFansAPI Cache (free, no credits used). `revenue.total` is net earnings after refunds and chargebacks. `revenue.chargebacks` is the positive cached net amount already excluded from that total; do not subtract it again. - name: Stored Shared Free Trial Links description: Instant APIs for retrieving stored shared Free Trial Links from the OnlyFansAPI Cache (free, no credits used) - name: Stored Shared Tracking Links description: Instant APIs for retrieving stored shared Tracking Links (campaigns) from the OnlyFansAPI Cache (free, no credits used) - name: Stored Tracking Links description: Instant APIs for retrieving stored tracking links from the OnlyFansAPI Cache (free, no credits used). `revenue.total` is net earnings after refunds and chargebacks. `revenue.chargebacks` is the positive cached net amount already excluded from that total; do not subtract it again. - name: Stories description: APIs for managing OnlyFans stories - name: Story Highlights description: APIs for managing OnlyFans story highlights - name: Subscription Bundles description: "" - name: Tracking Links description: APIs for managing tracking links. Revenue totals are net earnings after refunds and chargebacks. `revenue.chargebacks` (or `summary.chargebacks_total` in stats) is the positive cached net amount already excluded from revenue; do not subtract it again. Spender responses include chargebacks across all attributed periods for each fan with positive net revenue. - name: Transactions description: APIs for managing OnlyFans transactions - name: Usage description: Credit usage reporting for your team - name: User List Collections description: "" - name: Users description: APIs for fetching OnlyFans users - name: Webhooks description: "" paths: /api/{account}/fans/{fan_id}/summary: parameters: - in: path name: account description: The Account ID example: acct_XXXXXXXXXXXXXXX required: true schema: type: string - in: path name: fan_id description: Fan's OnlyFans ID example: 123456789 required: true schema: type: string get: summary: Get Fan Summary operationId: getFanSummary description: Retrieve the AI profile summary for a fan. Poll this endpoint after triggering a generation to check for completion. parameters: [] responses: "200": description: Success content: application/json: schema: type: object example: status: completed summary_data: name: Jane Doe preferred_name: Jane family_pets: Has a golden retriever named Max travel_plans: Planning a trip to Bali kinks: "" hobbies: Yoga, photography content_preferences: Behind the scenes content content_dislikes: Not into feet content themes: "" requests: "" interests: Fitness, travel other_notes: "" spend_cadence: Mostly tips on Fridays; said he can't buy anything this month anymore — June dos_and_donts: Never mention his wife analyzed_message_count: 42 last_analyzed_at: 2026-03-19T12:00:00+00:00 last_buy_date: 2026-03-15T18:30:00+00:00 error_message: null custom_fields: - key: custom_gift_preferences label: Gift Preferences properties: status: type: string example: completed summary_data: type: object properties: name: type: string example: Jane Doe preferred_name: type: string example: Jane family_pets: type: string example: Has a golden retriever named Max travel_plans: type: string example: Planning a trip to Bali kinks: type: string example: "" hobbies: type: string example: Yoga, photography content_preferences: type: string example: Behind the scenes content content_dislikes: type: string example: Not into feet content themes: type: string example: "" requests: type: string example: "" interests: type: string example: Fitness, travel other_notes: type: string example: "" spend_cadence: type: string example: Mostly tips on Fridays; said he can't buy anything this month anymore — June dos_and_donts: type: string example: Never mention his wife analyzed_message_count: type: integer example: 42 last_analyzed_at: type: string example: 2026-03-19T12:00:00+00:00 last_buy_date: type: string example: 2026-03-15T18:30:00+00:00 error_message: type: string example: null nullable: true custom_fields: type: array example: - key: custom_gift_preferences label: Gift Preferences items: type: object properties: key: type: string example: custom_gift_preferences label: type: string example: Gift Preferences tags: - Fans - AI Summary components: securitySchemes: default: type: http scheme: bearer description: Get your API Key from OnlyFansAPI Console - https://app.onlyfansapi.com/api-keys ```` # List Custom Summary Categories (/api-reference/fans-ai-summary/list-custom-summary-categories) Retrieve the custom fan summary categories defined for your Team. Custom categories are extracted as additional fields in every generated fan summary. ## OpenAPI ````yaml https://app.onlyfansapi.com/scribe-docs/openapi.yaml get /api/fan-summary-categories openapi: 3.0.3 info: title: OnlyFans API description: "" version: 1.0.0 servers: - url: https://app.onlyfansapi.com security: - default: [] tags: - name: AI Voice Messages description: "" - name: API Keys description: "" - name: Account description: Endpoints for your linked accounts - name: Analytics - Financial description: APIs for retrieving financial analytics data - name: Analytics - Summary description: APIs for retrieving summary analytics data - name: Banking description: Operations related to user banking details, payout methods, legal and tax information, and account country settings. - name: Banned Words description: Reference list of OnlyFans banned words used by the `blockBannedWords` screening parameter - name: Blocked / Restricted Users description: APIs for listing the users an account has blocked or restricted - name: Chargebacks description: "" - name: Chat Messages description: "" - name: Chats description: "" - name: Client Sessions description: "" - name: Connect OnlyFans Account description: "" - name: Data Exports description: APIs for managing data exports - name: Engagement / Messages description: "" - name: Fans description: APIs for managing OnlyFans fans (subscribers) - name: Fans - AI Summary description: APIs for generating and retrieving AI-powered fan profile summaries - name: Following description: APIs for managing OnlyFans followings (people you're subscribed to) - name: Free Trial Links description: APIs for managing Free Trial Links. Revenue totals are net earnings after refunds and chargebacks. `revenue.chargebacks` (or `summary.chargebacks_total` in stats) is the positive cached net amount already excluded from revenue; do not subtract it again. Spender responses include chargebacks across all attributed periods for each fan with positive net revenue. - name: Giphy description: "" - name: Link Tags description: APIs for managing tags on free trial links, tracking links, and Smart Links - name: Mass Messaging description: "" - name: Media description: "" - name: Media Vault description: "" - name: Media Vault Lists description: "" - name: Notifications description: Endpoints for managingr account notifications - name: Payouts description: "" - name: Post Comments description: "" - name: Post Labels description: APIs for managing your post labels - name: Posts description: APIs for managing OnlyFans posts - name: Profile Content description: Read another user's profile content using your connected OnlyFans account. OnlyFans enforces subscription and purchase requirements; these endpoints do not unlock content. Response samples use captured OnlyFans payloads with anonymized IDs, text, and media URLs; OFAPI metadata values are illustrative. - name: Promotions description: "" - name: Public Profiles description: "" - name: Queue description: "" - name: Release Forms description: APIs for managing OnlyFans release forms - name: Saved For Later (Messages) description: "" - name: Saved For Later (Posts) description: "" - name: Settings description: "" - name: Shared Free Trial Links description: APIs for Free Trial Links that other OF creators have shared with this account. Revenue, cost, and spender data are not available for shared links. - name: Shared Tracking Links description: APIs for Tracking Links (campaigns) that other OF creators have shared with this account. Revenue, cost, and spender data are not available for shared campaigns. - name: Smart Link Postbacks description: APIs for managing Smart Link postback destinations - name: Smart Links description: APIs for managing Smart Links (Free Trial Links and Tracking Links with pooled inventory) - name: Statistics description: "" - name: Stored Free Trial Links description: Instant APIs for retrieving stored free trial links from the OnlyFansAPI Cache (free, no credits used). `revenue.total` is net earnings after refunds and chargebacks. `revenue.chargebacks` is the positive cached net amount already excluded from that total; do not subtract it again. - name: Stored Shared Free Trial Links description: Instant APIs for retrieving stored shared Free Trial Links from the OnlyFansAPI Cache (free, no credits used) - name: Stored Shared Tracking Links description: Instant APIs for retrieving stored shared Tracking Links (campaigns) from the OnlyFansAPI Cache (free, no credits used) - name: Stored Tracking Links description: Instant APIs for retrieving stored tracking links from the OnlyFansAPI Cache (free, no credits used). `revenue.total` is net earnings after refunds and chargebacks. `revenue.chargebacks` is the positive cached net amount already excluded from that total; do not subtract it again. - name: Stories description: APIs for managing OnlyFans stories - name: Story Highlights description: APIs for managing OnlyFans story highlights - name: Subscription Bundles description: "" - name: Tracking Links description: APIs for managing tracking links. Revenue totals are net earnings after refunds and chargebacks. `revenue.chargebacks` (or `summary.chargebacks_total` in stats) is the positive cached net amount already excluded from revenue; do not subtract it again. Spender responses include chargebacks across all attributed periods for each fan with positive net revenue. - name: Transactions description: APIs for managing OnlyFans transactions - name: Usage description: Credit usage reporting for your team - name: User List Collections description: "" - name: Users description: APIs for fetching OnlyFans users - name: Webhooks description: "" paths: /api/fan-summary-categories: get: summary: List Custom Summary Categories operationId: listCustomSummaryCategories description: Retrieve the custom fan summary categories defined for your Team. Custom categories are extracted as additional fields in every generated fan summary. parameters: [] responses: "200": description: Success content: application/json: schema: type: object example: data: - id: fan_cat_abc123 key: custom_gift_preferences label: Gift Preferences keywords: gift, wishlist, amazon, spoil, surprise, present created_at: 2026-07-17T12:00:00.000000Z properties: data: type: array example: - id: fan_cat_abc123 key: custom_gift_preferences label: Gift Preferences keywords: gift, wishlist, amazon, spoil, surprise, present created_at: 2026-07-17T12:00:00.000000Z items: type: object properties: id: type: string example: fan_cat_abc123 key: type: string example: custom_gift_preferences label: type: string example: Gift Preferences keywords: type: string example: gift, wishlist, amazon, spoil, surprise, present created_at: type: string example: 2026-07-17T12:00:00.000000Z tags: - Fans - AI Summary components: securitySchemes: default: type: http scheme: bearer description: Get your API Key from OnlyFansAPI Console - https://app.onlyfansapi.com/api-keys ```` # Update Custom Summary Category (/api-reference/fans-ai-summary/update-custom-summary-category) Update the label or keywords of a custom fan summary category. The field key is immutable so existing summaries keep their data. ## OpenAPI ````yaml https://app.onlyfansapi.com/scribe-docs/openapi.yaml put /api/fan-summary-categories/{category_id} openapi: 3.0.3 info: title: OnlyFans API description: "" version: 1.0.0 servers: - url: https://app.onlyfansapi.com security: - default: [] tags: - name: AI Voice Messages description: "" - name: API Keys description: "" - name: Account description: Endpoints for your linked accounts - name: Analytics - Financial description: APIs for retrieving financial analytics data - name: Analytics - Summary description: APIs for retrieving summary analytics data - name: Banking description: Operations related to user banking details, payout methods, legal and tax information, and account country settings. - name: Banned Words description: Reference list of OnlyFans banned words used by the `blockBannedWords` screening parameter - name: Blocked / Restricted Users description: APIs for listing the users an account has blocked or restricted - name: Chargebacks description: "" - name: Chat Messages description: "" - name: Chats description: "" - name: Client Sessions description: "" - name: Connect OnlyFans Account description: "" - name: Data Exports description: APIs for managing data exports - name: Engagement / Messages description: "" - name: Fans description: APIs for managing OnlyFans fans (subscribers) - name: Fans - AI Summary description: APIs for generating and retrieving AI-powered fan profile summaries - name: Following description: APIs for managing OnlyFans followings (people you're subscribed to) - name: Free Trial Links description: APIs for managing Free Trial Links. Revenue totals are net earnings after refunds and chargebacks. `revenue.chargebacks` (or `summary.chargebacks_total` in stats) is the positive cached net amount already excluded from revenue; do not subtract it again. Spender responses include chargebacks across all attributed periods for each fan with positive net revenue. - name: Giphy description: "" - name: Link Tags description: APIs for managing tags on free trial links, tracking links, and Smart Links - name: Mass Messaging description: "" - name: Media description: "" - name: Media Vault description: "" - name: Media Vault Lists description: "" - name: Notifications description: Endpoints for managingr account notifications - name: Payouts description: "" - name: Post Comments description: "" - name: Post Labels description: APIs for managing your post labels - name: Posts description: APIs for managing OnlyFans posts - name: Profile Content description: Read another user's profile content using your connected OnlyFans account. OnlyFans enforces subscription and purchase requirements; these endpoints do not unlock content. Response samples use captured OnlyFans payloads with anonymized IDs, text, and media URLs; OFAPI metadata values are illustrative. - name: Promotions description: "" - name: Public Profiles description: "" - name: Queue description: "" - name: Release Forms description: APIs for managing OnlyFans release forms - name: Saved For Later (Messages) description: "" - name: Saved For Later (Posts) description: "" - name: Settings description: "" - name: Shared Free Trial Links description: APIs for Free Trial Links that other OF creators have shared with this account. Revenue, cost, and spender data are not available for shared links. - name: Shared Tracking Links description: APIs for Tracking Links (campaigns) that other OF creators have shared with this account. Revenue, cost, and spender data are not available for shared campaigns. - name: Smart Link Postbacks description: APIs for managing Smart Link postback destinations - name: Smart Links description: APIs for managing Smart Links (Free Trial Links and Tracking Links with pooled inventory) - name: Statistics description: "" - name: Stored Free Trial Links description: Instant APIs for retrieving stored free trial links from the OnlyFansAPI Cache (free, no credits used). `revenue.total` is net earnings after refunds and chargebacks. `revenue.chargebacks` is the positive cached net amount already excluded from that total; do not subtract it again. - name: Stored Shared Free Trial Links description: Instant APIs for retrieving stored shared Free Trial Links from the OnlyFansAPI Cache (free, no credits used) - name: Stored Shared Tracking Links description: Instant APIs for retrieving stored shared Tracking Links (campaigns) from the OnlyFansAPI Cache (free, no credits used) - name: Stored Tracking Links description: Instant APIs for retrieving stored tracking links from the OnlyFansAPI Cache (free, no credits used). `revenue.total` is net earnings after refunds and chargebacks. `revenue.chargebacks` is the positive cached net amount already excluded from that total; do not subtract it again. - name: Stories description: APIs for managing OnlyFans stories - name: Story Highlights description: APIs for managing OnlyFans story highlights - name: Subscription Bundles description: "" - name: Tracking Links description: APIs for managing tracking links. Revenue totals are net earnings after refunds and chargebacks. `revenue.chargebacks` (or `summary.chargebacks_total` in stats) is the positive cached net amount already excluded from revenue; do not subtract it again. Spender responses include chargebacks across all attributed periods for each fan with positive net revenue. - name: Transactions description: APIs for managing OnlyFans transactions - name: Usage description: Credit usage reporting for your team - name: User List Collections description: "" - name: Users description: APIs for fetching OnlyFans users - name: Webhooks description: "" paths: /api/fan-summary-categories/{category_id}: parameters: - in: path name: category_id description: The ID of the category example: fan_cat_abc123 required: true schema: type: string put: summary: Update Custom Summary Category operationId: updateCustomSummaryCategory description: Update the label or keywords of a custom fan summary category. The field key is immutable so existing summaries keep their data. parameters: [] responses: "200": description: Success content: application/json: schema: type: object example: data: id: fan_cat_abc123 key: custom_gift_preferences label: Gift Preferences keywords: gift, wishlist, amazon, spoil, surprise, present created_at: 2026-07-17T12:00:00.000000Z properties: data: type: object properties: id: type: string example: fan_cat_abc123 key: type: string example: custom_gift_preferences label: type: string example: Gift Preferences keywords: type: string example: gift, wishlist, amazon, spoil, surprise, present created_at: type: string example: 2026-07-17T12:00:00.000000Z tags: - Fans - AI Summary requestBody: required: true content: application/json: schema: type: object properties: label: type: string description: Display label for the category. example: Gift Preferences keywords: type: string description: Comma-separated keywords used to find relevant fan messages for this category. example: gift, wishlist, amazon, spoil, surprise, present required: - label - keywords components: securitySchemes: default: type: http scheme: bearer description: Get your API Key from OnlyFansAPI Console - https://app.onlyfansapi.com/api-keys ```` # Direct Messages Chart (/api-reference/engagement-messages/direct-messages-chart) Get engagement chart metrics for direct messages: sent count and purchase amount over time. ## OpenAPI ````yaml https://app.onlyfansapi.com/scribe-docs/openapi.yaml get /api/{account}/engagement/messages/direct-messages/chart openapi: 3.0.3 info: title: OnlyFans API description: "" version: 1.0.0 servers: - url: https://app.onlyfansapi.com security: - default: [] tags: - name: AI Voice Messages description: "" - name: API Keys description: "" - name: Account description: Endpoints for your linked accounts - name: Analytics - Financial description: APIs for retrieving financial analytics data - name: Analytics - Summary description: APIs for retrieving summary analytics data - name: Banking description: Operations related to user banking details, payout methods, legal and tax information, and account country settings. - name: Banned Words description: Reference list of OnlyFans banned words used by the `blockBannedWords` screening parameter - name: Blocked / Restricted Users description: APIs for listing the users an account has blocked or restricted - name: Chargebacks description: "" - name: Chat Messages description: "" - name: Chats description: "" - name: Client Sessions description: "" - name: Connect OnlyFans Account description: "" - name: Data Exports description: APIs for managing data exports - name: Engagement / Messages description: "" - name: Fans description: APIs for managing OnlyFans fans (subscribers) - name: Fans - AI Summary description: APIs for generating and retrieving AI-powered fan profile summaries - name: Following description: APIs for managing OnlyFans followings (people you're subscribed to) - name: Free Trial Links description: APIs for managing Free Trial Links. Revenue totals are net earnings after refunds and chargebacks. `revenue.chargebacks` (or `summary.chargebacks_total` in stats) is the positive cached net amount already excluded from revenue; do not subtract it again. Spender responses include chargebacks across all attributed periods for each fan with positive net revenue. - name: Giphy description: "" - name: Link Tags description: APIs for managing tags on free trial links, tracking links, and Smart Links - name: Mass Messaging description: "" - name: Media description: "" - name: Media Vault description: "" - name: Media Vault Lists description: "" - name: Notifications description: Endpoints for managingr account notifications - name: Payouts description: "" - name: Post Comments description: "" - name: Post Labels description: APIs for managing your post labels - name: Posts description: APIs for managing OnlyFans posts - name: Profile Content description: Read another user's profile content using your connected OnlyFans account. OnlyFans enforces subscription and purchase requirements; these endpoints do not unlock content. Response samples use captured OnlyFans payloads with anonymized IDs, text, and media URLs; OFAPI metadata values are illustrative. - name: Promotions description: "" - name: Public Profiles description: "" - name: Queue description: "" - name: Release Forms description: APIs for managing OnlyFans release forms - name: Saved For Later (Messages) description: "" - name: Saved For Later (Posts) description: "" - name: Settings description: "" - name: Shared Free Trial Links description: APIs for Free Trial Links that other OF creators have shared with this account. Revenue, cost, and spender data are not available for shared links. - name: Shared Tracking Links description: APIs for Tracking Links (campaigns) that other OF creators have shared with this account. Revenue, cost, and spender data are not available for shared campaigns. - name: Smart Link Postbacks description: APIs for managing Smart Link postback destinations - name: Smart Links description: APIs for managing Smart Links (Free Trial Links and Tracking Links with pooled inventory) - name: Statistics description: "" - name: Stored Free Trial Links description: Instant APIs for retrieving stored free trial links from the OnlyFansAPI Cache (free, no credits used). `revenue.total` is net earnings after refunds and chargebacks. `revenue.chargebacks` is the positive cached net amount already excluded from that total; do not subtract it again. - name: Stored Shared Free Trial Links description: Instant APIs for retrieving stored shared Free Trial Links from the OnlyFansAPI Cache (free, no credits used) - name: Stored Shared Tracking Links description: Instant APIs for retrieving stored shared Tracking Links (campaigns) from the OnlyFansAPI Cache (free, no credits used) - name: Stored Tracking Links description: Instant APIs for retrieving stored tracking links from the OnlyFansAPI Cache (free, no credits used). `revenue.total` is net earnings after refunds and chargebacks. `revenue.chargebacks` is the positive cached net amount already excluded from that total; do not subtract it again. - name: Stories description: APIs for managing OnlyFans stories - name: Story Highlights description: APIs for managing OnlyFans story highlights - name: Subscription Bundles description: "" - name: Tracking Links description: APIs for managing tracking links. Revenue totals are net earnings after refunds and chargebacks. `revenue.chargebacks` (or `summary.chargebacks_total` in stats) is the positive cached net amount already excluded from revenue; do not subtract it again. Spender responses include chargebacks across all attributed periods for each fan with positive net revenue. - name: Transactions description: APIs for managing OnlyFans transactions - name: Usage description: Credit usage reporting for your team - name: User List Collections description: "" - name: Users description: APIs for fetching OnlyFans users - name: Webhooks description: "" paths: /api/{account}/engagement/messages/direct-messages/chart: parameters: - in: path name: account description: The Account ID example: acct_XXXXXXXXXXXXXXX required: true schema: type: string get: summary: Direct Messages Chart operationId: directMessagesChart description: "Get engagement chart metrics for direct messages: sent count and purchase amount over time." parameters: - in: query name: startDate description: Start of the chart window in `Y-m-d H:i:s` format. example: 2026-01-07 00:00:00 required: false schema: type: string description: Start of the chart window in `Y-m-d H:i:s` format. example: 2026-01-07 00:00:00 - in: query name: endDate description: End of the chart window in `Y-m-d H:i:s` format. It must be after `startDate`. example: 2026-02-06 22:19:59 required: false schema: type: string description: End of the chart window in `Y-m-d H:i:s` format. It must be after `startDate`. example: 2026-02-06 22:19:59 - in: query name: withTotal description: Include `total` and `delta` aggregates in the response. Defaults to `true`. example: true required: false schema: type: boolean description: Include `total` and `delta` aggregates in the response. Defaults to `true`. example: true responses: "200": description: "" content: application/json: schema: type: object example: data: direct_messages: chart: - date: 2026-01-07T00:00:00+00:00 count: 436 - date: 2026-01-08T00:00:00+00:00 count: 403 - date: 2026-01-09T00:00:00+00:00 count: 587 - date: 2026-01-10T00:00:00+00:00 count: 543 - date: 2026-01-11T00:00:00+00:00 count: 622 - date: 2026-01-12T00:00:00+00:00 count: 538 - date: 2026-01-13T00:00:00+00:00 count: 326 - date: 2026-01-14T00:00:00+00:00 count: 569 - date: 2026-01-15T00:00:00+00:00 count: 478 - date: 2026-01-16T00:00:00+00:00 count: 506 - date: 2026-01-17T00:00:00+00:00 count: 611 - date: 2026-01-18T00:00:00+00:00 count: 593 - date: 2026-01-19T00:00:00+00:00 count: 875 - date: 2026-01-20T00:00:00+00:00 count: 1178 - date: 2026-01-21T00:00:00+00:00 count: 1331 - date: 2026-01-22T00:00:00+00:00 count: 1277 - date: 2026-01-23T00:00:00+00:00 count: 1153 - date: 2026-01-24T00:00:00+00:00 count: 1255 - date: 2026-01-25T00:00:00+00:00 count: 1179 - date: 2026-01-26T00:00:00+00:00 count: 1147 - date: 2026-01-27T00:00:00+00:00 count: 905 - date: 2026-01-28T00:00:00+00:00 count: 1467 - date: 2026-01-29T00:00:00+00:00 count: 1681 - date: 2026-01-30T00:00:00+00:00 count: 1827 - date: 2026-01-31T00:00:00+00:00 count: 1501 - date: 2026-02-01T00:00:00+00:00 count: 935 - date: 2026-02-02T00:00:00+00:00 count: 922 - date: 2026-02-03T00:00:00+00:00 count: 1059 - date: 2026-02-04T00:00:00+00:00 count: 1124 - date: 2026-02-05T00:00:00+00:00 count: 1111 - date: 2026-02-06T00:00:00+00:00 count: 1155 total: 29294 delta: 71 direct_messages_purchases: chart: - date: 2026-01-07T00:00:00+00:00 count: 4229.47 - date: 2026-01-08T00:00:00+00:00 count: 3501.2 - date: 2026-01-09T00:00:00+00:00 count: 7119.34 - date: 2026-01-10T00:00:00+00:00 count: 5141.29 - date: 2026-01-11T00:00:00+00:00 count: 8131.15 - date: 2026-01-12T00:00:00+00:00 count: 5387.46 - date: 2026-01-13T00:00:00+00:00 count: 2680.16 - date: 2026-01-14T00:00:00+00:00 count: 3728.25 - date: 2026-01-15T00:00:00+00:00 count: 4577.14 - date: 2026-01-16T00:00:00+00:00 count: 4369.77 - date: 2026-01-17T00:00:00+00:00 count: 7509.09 - date: 2026-01-18T00:00:00+00:00 count: 3741.5 - date: 2026-01-19T00:00:00+00:00 count: 3089.89 - date: 2026-01-20T00:00:00+00:00 count: 5318.68 - date: 2026-01-21T00:00:00+00:00 count: 6722.56 - date: 2026-01-22T00:00:00+00:00 count: 4585.53 - date: 2026-01-23T00:00:00+00:00 count: 8163.06 - date: 2026-01-24T00:00:00+00:00 count: 4872.21 - date: 2026-01-25T00:00:00+00:00 count: 5804.55 - date: 2026-01-26T00:00:00+00:00 count: 5393.57 - date: 2026-01-27T00:00:00+00:00 count: 3874.12 - date: 2026-01-28T00:00:00+00:00 count: 6735.14 - date: 2026-01-29T00:00:00+00:00 count: 7908.03 - date: 2026-01-30T00:00:00+00:00 count: 11120.55 - date: 2026-01-31T00:00:00+00:00 count: 12434.52 - date: 2026-02-01T00:00:00+00:00 count: 6016.15 - date: 2026-02-02T00:00:00+00:00 count: 3772.66 - date: 2026-02-03T00:00:00+00:00 count: 5710.38 - date: 2026-02-04T00:00:00+00:00 count: 5652.75 - date: 2026-02-05T00:00:00+00:00 count: 6934.73 - date: 2026-02-06T00:00:00+00:00 count: 5046.19 total: 179903.2 delta: 26.6 _meta: _credits: used: 1 balance: 11270560 note: Always _cache: is_cached: false note: Cache disabled for this endpoint _rate_limits: limit_minute: 5000 limit_day: null remaining_minute: 4998 remaining_day: null notice: We have decided to remove our daily rate limits. Please remove any references to these in your integrations. properties: data: type: object properties: direct_messages: type: object properties: chart: type: array example: - date: 2026-01-07T00:00:00+00:00 count: 436 - date: 2026-01-08T00:00:00+00:00 count: 403 - date: 2026-01-09T00:00:00+00:00 count: 587 - date: 2026-01-10T00:00:00+00:00 count: 543 - date: 2026-01-11T00:00:00+00:00 count: 622 - date: 2026-01-12T00:00:00+00:00 count: 538 - date: 2026-01-13T00:00:00+00:00 count: 326 - date: 2026-01-14T00:00:00+00:00 count: 569 - date: 2026-01-15T00:00:00+00:00 count: 478 - date: 2026-01-16T00:00:00+00:00 count: 506 - date: 2026-01-17T00:00:00+00:00 count: 611 - date: 2026-01-18T00:00:00+00:00 count: 593 - date: 2026-01-19T00:00:00+00:00 count: 875 - date: 2026-01-20T00:00:00+00:00 count: 1178 - date: 2026-01-21T00:00:00+00:00 count: 1331 - date: 2026-01-22T00:00:00+00:00 count: 1277 - date: 2026-01-23T00:00:00+00:00 count: 1153 - date: 2026-01-24T00:00:00+00:00 count: 1255 - date: 2026-01-25T00:00:00+00:00 count: 1179 - date: 2026-01-26T00:00:00+00:00 count: 1147 - date: 2026-01-27T00:00:00+00:00 count: 905 - date: 2026-01-28T00:00:00+00:00 count: 1467 - date: 2026-01-29T00:00:00+00:00 count: 1681 - date: 2026-01-30T00:00:00+00:00 count: 1827 - date: 2026-01-31T00:00:00+00:00 count: 1501 - date: 2026-02-01T00:00:00+00:00 count: 935 - date: 2026-02-02T00:00:00+00:00 count: 922 - date: 2026-02-03T00:00:00+00:00 count: 1059 - date: 2026-02-04T00:00:00+00:00 count: 1124 - date: 2026-02-05T00:00:00+00:00 count: 1111 - date: 2026-02-06T00:00:00+00:00 count: 1155 items: type: object properties: date: type: string example: 2026-01-07T00:00:00+00:00 count: type: integer example: 436 total: type: integer example: 29294 delta: type: integer example: 71 direct_messages_purchases: type: object properties: chart: type: array example: - date: 2026-01-07T00:00:00+00:00 count: 4229.47 - date: 2026-01-08T00:00:00+00:00 count: 3501.2 - date: 2026-01-09T00:00:00+00:00 count: 7119.34 - date: 2026-01-10T00:00:00+00:00 count: 5141.29 - date: 2026-01-11T00:00:00+00:00 count: 8131.15 - date: 2026-01-12T00:00:00+00:00 count: 5387.46 - date: 2026-01-13T00:00:00+00:00 count: 2680.16 - date: 2026-01-14T00:00:00+00:00 count: 3728.25 - date: 2026-01-15T00:00:00+00:00 count: 4577.14 - date: 2026-01-16T00:00:00+00:00 count: 4369.77 - date: 2026-01-17T00:00:00+00:00 count: 7509.09 - date: 2026-01-18T00:00:00+00:00 count: 3741.5 - date: 2026-01-19T00:00:00+00:00 count: 3089.89 - date: 2026-01-20T00:00:00+00:00 count: 5318.68 - date: 2026-01-21T00:00:00+00:00 count: 6722.56 - date: 2026-01-22T00:00:00+00:00 count: 4585.53 - date: 2026-01-23T00:00:00+00:00 count: 8163.06 - date: 2026-01-24T00:00:00+00:00 count: 4872.21 - date: 2026-01-25T00:00:00+00:00 count: 5804.55 - date: 2026-01-26T00:00:00+00:00 count: 5393.57 - date: 2026-01-27T00:00:00+00:00 count: 3874.12 - date: 2026-01-28T00:00:00+00:00 count: 6735.14 - date: 2026-01-29T00:00:00+00:00 count: 7908.03 - date: 2026-01-30T00:00:00+00:00 count: 11120.55 - date: 2026-01-31T00:00:00+00:00 count: 12434.52 - date: 2026-02-01T00:00:00+00:00 count: 6016.15 - date: 2026-02-02T00:00:00+00:00 count: 3772.66 - date: 2026-02-03T00:00:00+00:00 count: 5710.38 - date: 2026-02-04T00:00:00+00:00 count: 5652.75 - date: 2026-02-05T00:00:00+00:00 count: 6934.73 - date: 2026-02-06T00:00:00+00:00 count: 5046.19 items: type: object properties: date: type: string example: 2026-01-07T00:00:00+00:00 count: type: number example: 4229.47 total: type: number example: 179903.2 delta: type: number example: 26.6 _meta: type: object properties: _credits: type: object properties: used: type: integer example: 1 balance: type: integer example: 11270560 note: type: string example: Always _cache: type: object properties: is_cached: type: boolean example: false note: type: string example: Cache disabled for this endpoint _rate_limits: type: object properties: limit_minute: type: integer example: 5000 limit_day: type: string example: null nullable: true remaining_minute: type: integer example: 4998 remaining_day: type: string example: null nullable: true notice: type: string example: We have decided to remove our daily rate limits. Please remove any references to these in your integrations. tags: - Engagement / Messages components: securitySchemes: default: type: http scheme: bearer description: Get your API Key from OnlyFansAPI Console - https://app.onlyfansapi.com/api-keys ```` # Direct Messages (/api-reference/engagement-messages/direct-messages) List sent direct messages with engagement stats (sent, viewed, purchased, etc.). ## OpenAPI ````yaml https://app.onlyfansapi.com/scribe-docs/openapi.yaml get /api/{account}/engagement/messages/direct-messages openapi: 3.0.3 info: title: OnlyFans API description: "" version: 1.0.0 servers: - url: https://app.onlyfansapi.com security: - default: [] tags: - name: AI Voice Messages description: "" - name: API Keys description: "" - name: Account description: Endpoints for your linked accounts - name: Analytics - Financial description: APIs for retrieving financial analytics data - name: Analytics - Summary description: APIs for retrieving summary analytics data - name: Banking description: Operations related to user banking details, payout methods, legal and tax information, and account country settings. - name: Banned Words description: Reference list of OnlyFans banned words used by the `blockBannedWords` screening parameter - name: Blocked / Restricted Users description: APIs for listing the users an account has blocked or restricted - name: Chargebacks description: "" - name: Chat Messages description: "" - name: Chats description: "" - name: Client Sessions description: "" - name: Connect OnlyFans Account description: "" - name: Data Exports description: APIs for managing data exports - name: Engagement / Messages description: "" - name: Fans description: APIs for managing OnlyFans fans (subscribers) - name: Fans - AI Summary description: APIs for generating and retrieving AI-powered fan profile summaries - name: Following description: APIs for managing OnlyFans followings (people you're subscribed to) - name: Free Trial Links description: APIs for managing Free Trial Links. Revenue totals are net earnings after refunds and chargebacks. `revenue.chargebacks` (or `summary.chargebacks_total` in stats) is the positive cached net amount already excluded from revenue; do not subtract it again. Spender responses include chargebacks across all attributed periods for each fan with positive net revenue. - name: Giphy description: "" - name: Link Tags description: APIs for managing tags on free trial links, tracking links, and Smart Links - name: Mass Messaging description: "" - name: Media description: "" - name: Media Vault description: "" - name: Media Vault Lists description: "" - name: Notifications description: Endpoints for managingr account notifications - name: Payouts description: "" - name: Post Comments description: "" - name: Post Labels description: APIs for managing your post labels - name: Posts description: APIs for managing OnlyFans posts - name: Profile Content description: Read another user's profile content using your connected OnlyFans account. OnlyFans enforces subscription and purchase requirements; these endpoints do not unlock content. Response samples use captured OnlyFans payloads with anonymized IDs, text, and media URLs; OFAPI metadata values are illustrative. - name: Promotions description: "" - name: Public Profiles description: "" - name: Queue description: "" - name: Release Forms description: APIs for managing OnlyFans release forms - name: Saved For Later (Messages) description: "" - name: Saved For Later (Posts) description: "" - name: Settings description: "" - name: Shared Free Trial Links description: APIs for Free Trial Links that other OF creators have shared with this account. Revenue, cost, and spender data are not available for shared links. - name: Shared Tracking Links description: APIs for Tracking Links (campaigns) that other OF creators have shared with this account. Revenue, cost, and spender data are not available for shared campaigns. - name: Smart Link Postbacks description: APIs for managing Smart Link postback destinations - name: Smart Links description: APIs for managing Smart Links (Free Trial Links and Tracking Links with pooled inventory) - name: Statistics description: "" - name: Stored Free Trial Links description: Instant APIs for retrieving stored free trial links from the OnlyFansAPI Cache (free, no credits used). `revenue.total` is net earnings after refunds and chargebacks. `revenue.chargebacks` is the positive cached net amount already excluded from that total; do not subtract it again. - name: Stored Shared Free Trial Links description: Instant APIs for retrieving stored shared Free Trial Links from the OnlyFansAPI Cache (free, no credits used) - name: Stored Shared Tracking Links description: Instant APIs for retrieving stored shared Tracking Links (campaigns) from the OnlyFansAPI Cache (free, no credits used) - name: Stored Tracking Links description: Instant APIs for retrieving stored tracking links from the OnlyFansAPI Cache (free, no credits used). `revenue.total` is net earnings after refunds and chargebacks. `revenue.chargebacks` is the positive cached net amount already excluded from that total; do not subtract it again. - name: Stories description: APIs for managing OnlyFans stories - name: Story Highlights description: APIs for managing OnlyFans story highlights - name: Subscription Bundles description: "" - name: Tracking Links description: APIs for managing tracking links. Revenue totals are net earnings after refunds and chargebacks. `revenue.chargebacks` (or `summary.chargebacks_total` in stats) is the positive cached net amount already excluded from revenue; do not subtract it again. Spender responses include chargebacks across all attributed periods for each fan with positive net revenue. - name: Transactions description: APIs for managing OnlyFans transactions - name: Usage description: Credit usage reporting for your team - name: User List Collections description: "" - name: Users description: APIs for fetching OnlyFans users - name: Webhooks description: "" paths: /api/{account}/engagement/messages/direct-messages: parameters: - in: path name: account description: The Account ID example: acct_XXXXXXXXXXXXXXX required: true schema: type: string get: summary: Direct Messages operationId: directMessages description: List sent direct messages with engagement stats (sent, viewed, purchased, etc.). parameters: - in: query name: startDate description: The earliest message to retrieve. Keep empty to get all. example: 2026-01-07 00:00:00 required: false schema: type: string description: The earliest message to retrieve. Keep empty to get all. example: 2026-01-07 00:00:00 - in: query name: endDate description: The latest message to retrieve. Keep empty to get all. It must be after `startDate` and is also used for pagination. example: 2026-02-06 01:26:15 required: false schema: type: string description: The latest message to retrieve. Keep empty to get all. It must be after `startDate` and is also used for pagination. example: 2026-02-06 01:26:15 - in: query name: limit description: Number of messages to return (default = 10) example: 10 required: false schema: type: integer description: Number of messages to return (default = 10) example: 10 - in: query name: query description: Optionally, filter by message text. example: sciss required: false schema: type: string description: Optionally, filter by message text. example: sciss - in: query name: offset description: Optional offset for manual pagination. example: 0 required: false schema: type: integer description: Optional offset for manual pagination. example: 0 responses: "200": description: "" content: application/json: schema: type: object example: data: hasMore: true items: - id: 2233445566 date: 2026-02-06T01:20:15+00:00 responseType: message text:SCISSORS
rawText: SCISSORS giphyId: null isFree: false isMediaReady: true mediaCount: 1 media: - id: 3344556677 type: photo convertedToVideo: false canView: true hasError: false createdAt: 2025-03-30T23:06:00+00:00 isReady: true files: full: url: https://cdn.example.com/files/placeholder/image.jpg width: 2801 height: 3735 size: 0 sources: [] thumb: url: https://cdn.example.com/files/placeholder/thumb.jpg width: 300 height: 300 size: 0 preview: url: https://cdn.example.com/files/placeholder/preview.jpg width: 960 height: 1281 size: 0 squarePreview: url: https://cdn.example.com/files/placeholder/square.jpg width: 960 height: 960 size: 0 duration: 0 hasCustomPreview: false videoSources: "240": null "720": null previews: [] isTip: false isReportedByMe: false viewedCount: 0 sentCount: 1 isCanceled: false template: direct messageId: 4455667788990 toUserId: 55667788 canUnsend: true unsendSeconds: 1000000 price: "29.99" purchasedCount: 0 canSendMessageToBuyers: false _pagination: next_page: https://app.onlyfansapi.com/api/acct_XXXXXXXXXX/engagement/messages/direct-messages?endDate=2026-02-06%2002%3A53%3A05&limit=10 _meta: _credits: used: 1 balance: 999999959 note: Always _cache: is_cached: false note: Cache disabled for this endpoint _rate_limits: limit_minute: 1000 limit_day: 50000 remaining_minute: 998 remaining_day: 49988 properties: data: type: object properties: hasMore: type: boolean example: true items: type: array example: - id: 2233445566 date: 2026-02-06T01:20:15+00:00 responseType: message text:SCISSORS
rawText: SCISSORS giphyId: null isFree: false isMediaReady: true mediaCount: 1 media: - id: 3344556677 type: photo convertedToVideo: false canView: true hasError: false createdAt: 2025-03-30T23:06:00+00:00 isReady: true files: full: url: https://cdn.example.com/files/placeholder/image.jpg width: 2801 height: 3735 size: 0 sources: [] thumb: url: https://cdn.example.com/files/placeholder/thumb.jpg width: 300 height: 300 size: 0 preview: url: https://cdn.example.com/files/placeholder/preview.jpg width: 960 height: 1281 size: 0 squarePreview: url: https://cdn.example.com/files/placeholder/square.jpg width: 960 height: 960 size: 0 duration: 0 hasCustomPreview: false videoSources: "240": null "720": null previews: [] isTip: false isReportedByMe: false viewedCount: 0 sentCount: 1 isCanceled: false template: direct messageId: 4455667788990 toUserId: 55667788 canUnsend: true unsendSeconds: 1000000 price: "29.99" purchasedCount: 0 canSendMessageToBuyers: false items: type: object properties: id: type: integer example: 2233445566 date: type: string example: 2026-02-06T01:20:15+00:00 responseType: type: string example: message text: type: string example:SCISSORS
rawText: type: string example: SCISSORS giphyId: type: string example: null nullable: true isFree: type: boolean example: false isMediaReady: type: boolean example: true mediaCount: type: integer example: 1 media: type: array example: - id: 3344556677 type: photo convertedToVideo: false canView: true hasError: false createdAt: 2025-03-30T23:06:00+00:00 isReady: true files: full: url: https://cdn.example.com/files/placeholder/image.jpg width: 2801 height: 3735 size: 0 sources: [] thumb: url: https://cdn.example.com/files/placeholder/thumb.jpg width: 300 height: 300 size: 0 preview: url: https://cdn.example.com/files/placeholder/preview.jpg width: 960 height: 1281 size: 0 squarePreview: url: https://cdn.example.com/files/placeholder/square.jpg width: 960 height: 960 size: 0 duration: 0 hasCustomPreview: false videoSources: "240": null "720": null items: type: object properties: id: type: integer example: 3344556677 type: type: string example: photo convertedToVideo: type: boolean example: false canView: type: boolean example: true hasError: type: boolean example: false createdAt: type: string example: 2025-03-30T23:06:00+00:00 isReady: type: boolean example: true files: type: object properties: full: type: object properties: url: type: string example: https://cdn.example.com/files/placeholder/image.jpg width: type: integer example: 2801 height: type: integer example: 3735 size: type: integer example: 0 sources: type: array example: [] thumb: type: object properties: url: type: string example: https://cdn.example.com/files/placeholder/thumb.jpg width: type: integer example: 300 height: type: integer example: 300 size: type: integer example: 0 preview: type: object properties: url: type: string example: https://cdn.example.com/files/placeholder/preview.jpg width: type: integer example: 960 height: type: integer example: 1281 size: type: integer example: 0 squarePreview: type: object properties: url: type: string example: https://cdn.example.com/files/placeholder/square.jpg width: type: integer example: 960 height: type: integer example: 960 size: type: integer example: 0 duration: type: integer example: 0 hasCustomPreview: type: boolean example: false videoSources: type: object properties: "240": type: string example: null nullable: true "720": type: string example: null nullable: true previews: type: array example: [] isTip: type: boolean example: false isReportedByMe: type: boolean example: false viewedCount: type: integer example: 0 sentCount: type: integer example: 1 isCanceled: type: boolean example: false template: type: string example: direct messageId: type: integer example: 4455667788990 toUserId: type: integer example: 55667788 canUnsend: type: boolean example: true unsendSeconds: type: integer example: 1000000 price: type: string example: "29.99" purchasedCount: type: integer example: 0 canSendMessageToBuyers: type: boolean example: false _pagination: type: object properties: next_page: type: string example: https://app.onlyfansapi.com/api/acct_XXXXXXXXXX/engagement/messages/direct-messages?endDate=2026-02-06%2002%3A53%3A05&limit=10 _meta: type: object properties: _credits: type: object properties: used: type: integer example: 1 balance: type: integer example: 999999959 note: type: string example: Always _cache: type: object properties: is_cached: type: boolean example: false note: type: string example: Cache disabled for this endpoint _rate_limits: type: object properties: limit_minute: type: integer example: 1000 limit_day: type: integer example: 50000 remaining_minute: type: integer example: 998 remaining_day: type: integer example: 49988 tags: - Engagement / Messages components: securitySchemes: default: type: http scheme: bearer description: Get your API Key from OnlyFansAPI Console - https://app.onlyfansapi.com/api-keys ```` # Mass Messages Chart (/api-reference/engagement-messages/mass-messages-chart) Get engagement chart metrics for mass messages: sent count and purchase amount over time. ## OpenAPI ````yaml https://app.onlyfansapi.com/scribe-docs/openapi.yaml get /api/{account}/engagement/messages/mass-messages/chart openapi: 3.0.3 info: title: OnlyFans API description: "" version: 1.0.0 servers: - url: https://app.onlyfansapi.com security: - default: [] tags: - name: AI Voice Messages description: "" - name: API Keys description: "" - name: Account description: Endpoints for your linked accounts - name: Analytics - Financial description: APIs for retrieving financial analytics data - name: Analytics - Summary description: APIs for retrieving summary analytics data - name: Banking description: Operations related to user banking details, payout methods, legal and tax information, and account country settings. - name: Banned Words description: Reference list of OnlyFans banned words used by the `blockBannedWords` screening parameter - name: Blocked / Restricted Users description: APIs for listing the users an account has blocked or restricted - name: Chargebacks description: "" - name: Chat Messages description: "" - name: Chats description: "" - name: Client Sessions description: "" - name: Connect OnlyFans Account description: "" - name: Data Exports description: APIs for managing data exports - name: Engagement / Messages description: "" - name: Fans description: APIs for managing OnlyFans fans (subscribers) - name: Fans - AI Summary description: APIs for generating and retrieving AI-powered fan profile summaries - name: Following description: APIs for managing OnlyFans followings (people you're subscribed to) - name: Free Trial Links description: APIs for managing Free Trial Links. Revenue totals are net earnings after refunds and chargebacks. `revenue.chargebacks` (or `summary.chargebacks_total` in stats) is the positive cached net amount already excluded from revenue; do not subtract it again. Spender responses include chargebacks across all attributed periods for each fan with positive net revenue. - name: Giphy description: "" - name: Link Tags description: APIs for managing tags on free trial links, tracking links, and Smart Links - name: Mass Messaging description: "" - name: Media description: "" - name: Media Vault description: "" - name: Media Vault Lists description: "" - name: Notifications description: Endpoints for managingr account notifications - name: Payouts description: "" - name: Post Comments description: "" - name: Post Labels description: APIs for managing your post labels - name: Posts description: APIs for managing OnlyFans posts - name: Profile Content description: Read another user's profile content using your connected OnlyFans account. OnlyFans enforces subscription and purchase requirements; these endpoints do not unlock content. Response samples use captured OnlyFans payloads with anonymized IDs, text, and media URLs; OFAPI metadata values are illustrative. - name: Promotions description: "" - name: Public Profiles description: "" - name: Queue description: "" - name: Release Forms description: APIs for managing OnlyFans release forms - name: Saved For Later (Messages) description: "" - name: Saved For Later (Posts) description: "" - name: Settings description: "" - name: Shared Free Trial Links description: APIs for Free Trial Links that other OF creators have shared with this account. Revenue, cost, and spender data are not available for shared links. - name: Shared Tracking Links description: APIs for Tracking Links (campaigns) that other OF creators have shared with this account. Revenue, cost, and spender data are not available for shared campaigns. - name: Smart Link Postbacks description: APIs for managing Smart Link postback destinations - name: Smart Links description: APIs for managing Smart Links (Free Trial Links and Tracking Links with pooled inventory) - name: Statistics description: "" - name: Stored Free Trial Links description: Instant APIs for retrieving stored free trial links from the OnlyFansAPI Cache (free, no credits used). `revenue.total` is net earnings after refunds and chargebacks. `revenue.chargebacks` is the positive cached net amount already excluded from that total; do not subtract it again. - name: Stored Shared Free Trial Links description: Instant APIs for retrieving stored shared Free Trial Links from the OnlyFansAPI Cache (free, no credits used) - name: Stored Shared Tracking Links description: Instant APIs for retrieving stored shared Tracking Links (campaigns) from the OnlyFansAPI Cache (free, no credits used) - name: Stored Tracking Links description: Instant APIs for retrieving stored tracking links from the OnlyFansAPI Cache (free, no credits used). `revenue.total` is net earnings after refunds and chargebacks. `revenue.chargebacks` is the positive cached net amount already excluded from that total; do not subtract it again. - name: Stories description: APIs for managing OnlyFans stories - name: Story Highlights description: APIs for managing OnlyFans story highlights - name: Subscription Bundles description: "" - name: Tracking Links description: APIs for managing tracking links. Revenue totals are net earnings after refunds and chargebacks. `revenue.chargebacks` (or `summary.chargebacks_total` in stats) is the positive cached net amount already excluded from revenue; do not subtract it again. Spender responses include chargebacks across all attributed periods for each fan with positive net revenue. - name: Transactions description: APIs for managing OnlyFans transactions - name: Usage description: Credit usage reporting for your team - name: User List Collections description: "" - name: Users description: APIs for fetching OnlyFans users - name: Webhooks description: "" paths: /api/{account}/engagement/messages/mass-messages/chart: parameters: - in: path name: account description: The Account ID example: acct_XXXXXXXXXXXXXXX required: true schema: type: string get: summary: Mass Messages Chart operationId: massMessagesChart description: "Get engagement chart metrics for mass messages: sent count and purchase amount over time." parameters: - in: query name: startDate description: Start of the chart window in `Y-m-d H:i:s` format. example: 2026-01-07 00:00:00 required: false schema: type: string description: Start of the chart window in `Y-m-d H:i:s` format. example: 2026-01-07 00:00:00 - in: query name: endDate description: End of the chart window in `Y-m-d H:i:s` format. It must be after `startDate`. example: 2026-02-06 22:19:59 required: false schema: type: string description: End of the chart window in `Y-m-d H:i:s` format. It must be after `startDate`. example: 2026-02-06 22:19:59 - in: query name: withTotal description: Include `total` and `delta` aggregates in the response. Defaults to `true`. example: true required: false schema: type: boolean description: Include `total` and `delta` aggregates in the response. Defaults to `true`. example: true responses: "200": description: "" content: application/json: schema: type: object example: data: group_messages: chart: - date: 2026-01-07T00:00:00+00:00 count: 8 - date: 2026-01-08T00:00:00+00:00 count: 5 - date: 2026-01-09T00:00:00+00:00 count: 10 - date: 2026-01-10T00:00:00+00:00 count: 7 - date: 2026-01-11T00:00:00+00:00 count: 9 - date: 2026-01-12T00:00:00+00:00 count: 11 - date: 2026-01-13T00:00:00+00:00 count: 6 - date: 2026-01-14T00:00:00+00:00 count: 9 - date: 2026-01-15T00:00:00+00:00 count: 9 - date: 2026-01-16T00:00:00+00:00 count: 12 - date: 2026-01-17T00:00:00+00:00 count: 8 - date: 2026-01-18T00:00:00+00:00 count: 9 - date: 2026-01-19T00:00:00+00:00 count: 8 - date: 2026-01-20T00:00:00+00:00 count: 5 - date: 2026-01-21T00:00:00+00:00 count: 8 - date: 2026-01-22T00:00:00+00:00 count: 11 - date: 2026-01-23T00:00:00+00:00 count: 9 - date: 2026-01-24T00:00:00+00:00 count: 8 - date: 2026-01-25T00:00:00+00:00 count: 8 - date: 2026-01-26T00:00:00+00:00 count: 10 - date: 2026-01-27T00:00:00+00:00 count: 5 - date: 2026-01-28T00:00:00+00:00 count: 7 - date: 2026-01-29T00:00:00+00:00 count: 6 - date: 2026-01-30T00:00:00+00:00 count: 9 - date: 2026-01-31T00:00:00+00:00 count: 4 - date: 2026-02-01T00:00:00+00:00 count: 6 - date: 2026-02-02T00:00:00+00:00 count: 12 - date: 2026-02-03T00:00:00+00:00 count: 6 - date: 2026-02-04T00:00:00+00:00 count: 10 - date: 2026-02-05T00:00:00+00:00 count: 13 - date: 2026-02-06T00:00:00+00:00 count: 8 total: 256 delta: 32.6 group_messages_purchases: chart: - date: 2026-01-07T00:00:00+00:00 count: 846.54 - date: 2026-01-08T00:00:00+00:00 count: 549.11 - date: 2026-01-09T00:00:00+00:00 count: 1665.94 - date: 2026-01-10T00:00:00+00:00 count: 1063.36 - date: 2026-01-11T00:00:00+00:00 count: 1368.39 - date: 2026-01-12T00:00:00+00:00 count: 1207.98 - date: 2026-01-13T00:00:00+00:00 count: 1067.6 - date: 2026-01-14T00:00:00+00:00 count: 1009.73 - date: 2026-01-15T00:00:00+00:00 count: 548.28 - date: 2026-01-16T00:00:00+00:00 count: 1225.95 - date: 2026-01-17T00:00:00+00:00 count: 729.63 - date: 2026-01-18T00:00:00+00:00 count: 1031.37 - date: 2026-01-19T00:00:00+00:00 count: 1030.77 - date: 2026-01-20T00:00:00+00:00 count: 664.54 - date: 2026-01-21T00:00:00+00:00 count: 989.29 - date: 2026-01-22T00:00:00+00:00 count: 1208.15 - date: 2026-01-23T00:00:00+00:00 count: 981.15 - date: 2026-01-24T00:00:00+00:00 count: 807.61 - date: 2026-01-25T00:00:00+00:00 count: 1343.55 - date: 2026-01-26T00:00:00+00:00 count: 1040.85 - date: 2026-01-27T00:00:00+00:00 count: 468.98 - date: 2026-01-28T00:00:00+00:00 count: 1515.54 - date: 2026-01-29T00:00:00+00:00 count: 1497.24 - date: 2026-01-30T00:00:00+00:00 count: 1331.33 - date: 2026-01-31T00:00:00+00:00 count: 938.93 - date: 2026-02-01T00:00:00+00:00 count: 372.78 - date: 2026-02-02T00:00:00+00:00 count: 780.88 - date: 2026-02-03T00:00:00+00:00 count: 521.2 - date: 2026-02-04T00:00:00+00:00 count: 1409.73 - date: 2026-02-05T00:00:00+00:00 count: 1330.83 - date: 2026-02-06T00:00:00+00:00 count: 1504.63 total: 32131 delta: -1.7 _meta: _credits: used: 1 balance: 11270561 note: Always _cache: is_cached: false note: Cache disabled for this endpoint _rate_limits: limit_minute: 5000 limit_day: null remaining_minute: 4999 remaining_day: null notice: We have decided to remove our daily rate limits. Please remove any references to these in your integrations. properties: data: type: object properties: group_messages: type: object properties: chart: type: array example: - date: 2026-01-07T00:00:00+00:00 count: 8 - date: 2026-01-08T00:00:00+00:00 count: 5 - date: 2026-01-09T00:00:00+00:00 count: 10 - date: 2026-01-10T00:00:00+00:00 count: 7 - date: 2026-01-11T00:00:00+00:00 count: 9 - date: 2026-01-12T00:00:00+00:00 count: 11 - date: 2026-01-13T00:00:00+00:00 count: 6 - date: 2026-01-14T00:00:00+00:00 count: 9 - date: 2026-01-15T00:00:00+00:00 count: 9 - date: 2026-01-16T00:00:00+00:00 count: 12 - date: 2026-01-17T00:00:00+00:00 count: 8 - date: 2026-01-18T00:00:00+00:00 count: 9 - date: 2026-01-19T00:00:00+00:00 count: 8 - date: 2026-01-20T00:00:00+00:00 count: 5 - date: 2026-01-21T00:00:00+00:00 count: 8 - date: 2026-01-22T00:00:00+00:00 count: 11 - date: 2026-01-23T00:00:00+00:00 count: 9 - date: 2026-01-24T00:00:00+00:00 count: 8 - date: 2026-01-25T00:00:00+00:00 count: 8 - date: 2026-01-26T00:00:00+00:00 count: 10 - date: 2026-01-27T00:00:00+00:00 count: 5 - date: 2026-01-28T00:00:00+00:00 count: 7 - date: 2026-01-29T00:00:00+00:00 count: 6 - date: 2026-01-30T00:00:00+00:00 count: 9 - date: 2026-01-31T00:00:00+00:00 count: 4 - date: 2026-02-01T00:00:00+00:00 count: 6 - date: 2026-02-02T00:00:00+00:00 count: 12 - date: 2026-02-03T00:00:00+00:00 count: 6 - date: 2026-02-04T00:00:00+00:00 count: 10 - date: 2026-02-05T00:00:00+00:00 count: 13 - date: 2026-02-06T00:00:00+00:00 count: 8 items: type: object properties: date: type: string example: 2026-01-07T00:00:00+00:00 count: type: integer example: 8 total: type: integer example: 256 delta: type: number example: 32.6 group_messages_purchases: type: object properties: chart: type: array example: - date: 2026-01-07T00:00:00+00:00 count: 846.54 - date: 2026-01-08T00:00:00+00:00 count: 549.11 - date: 2026-01-09T00:00:00+00:00 count: 1665.94 - date: 2026-01-10T00:00:00+00:00 count: 1063.36 - date: 2026-01-11T00:00:00+00:00 count: 1368.39 - date: 2026-01-12T00:00:00+00:00 count: 1207.98 - date: 2026-01-13T00:00:00+00:00 count: 1067.6 - date: 2026-01-14T00:00:00+00:00 count: 1009.73 - date: 2026-01-15T00:00:00+00:00 count: 548.28 - date: 2026-01-16T00:00:00+00:00 count: 1225.95 - date: 2026-01-17T00:00:00+00:00 count: 729.63 - date: 2026-01-18T00:00:00+00:00 count: 1031.37 - date: 2026-01-19T00:00:00+00:00 count: 1030.77 - date: 2026-01-20T00:00:00+00:00 count: 664.54 - date: 2026-01-21T00:00:00+00:00 count: 989.29 - date: 2026-01-22T00:00:00+00:00 count: 1208.15 - date: 2026-01-23T00:00:00+00:00 count: 981.15 - date: 2026-01-24T00:00:00+00:00 count: 807.61 - date: 2026-01-25T00:00:00+00:00 count: 1343.55 - date: 2026-01-26T00:00:00+00:00 count: 1040.85 - date: 2026-01-27T00:00:00+00:00 count: 468.98 - date: 2026-01-28T00:00:00+00:00 count: 1515.54 - date: 2026-01-29T00:00:00+00:00 count: 1497.24 - date: 2026-01-30T00:00:00+00:00 count: 1331.33 - date: 2026-01-31T00:00:00+00:00 count: 938.93 - date: 2026-02-01T00:00:00+00:00 count: 372.78 - date: 2026-02-02T00:00:00+00:00 count: 780.88 - date: 2026-02-03T00:00:00+00:00 count: 521.2 - date: 2026-02-04T00:00:00+00:00 count: 1409.73 - date: 2026-02-05T00:00:00+00:00 count: 1330.83 - date: 2026-02-06T00:00:00+00:00 count: 1504.63 items: type: object properties: date: type: string example: 2026-01-07T00:00:00+00:00 count: type: number example: 846.54 total: type: integer example: 32131 delta: type: number example: -1.7 _meta: type: object properties: _credits: type: object properties: used: type: integer example: 1 balance: type: integer example: 11270561 note: type: string example: Always _cache: type: object properties: is_cached: type: boolean example: false note: type: string example: Cache disabled for this endpoint _rate_limits: type: object properties: limit_minute: type: integer example: 5000 limit_day: type: string example: null nullable: true remaining_minute: type: integer example: 4999 remaining_day: type: string example: null nullable: true notice: type: string example: We have decided to remove our daily rate limits. Please remove any references to these in your integrations. tags: - Engagement / Messages components: securitySchemes: default: type: http scheme: bearer description: Get your API Key from OnlyFansAPI Console - https://app.onlyfansapi.com/api-keys ```` # Mass Messages (/api-reference/engagement-messages/mass-messages) List sent mass messages with engagement stats (sent, viewed, purchased, etc.). ## OpenAPI ````yaml https://app.onlyfansapi.com/scribe-docs/openapi.yaml get /api/{account}/engagement/messages/mass-messages openapi: 3.0.3 info: title: OnlyFans API description: "" version: 1.0.0 servers: - url: https://app.onlyfansapi.com security: - default: [] tags: - name: AI Voice Messages description: "" - name: API Keys description: "" - name: Account description: Endpoints for your linked accounts - name: Analytics - Financial description: APIs for retrieving financial analytics data - name: Analytics - Summary description: APIs for retrieving summary analytics data - name: Banking description: Operations related to user banking details, payout methods, legal and tax information, and account country settings. - name: Banned Words description: Reference list of OnlyFans banned words used by the `blockBannedWords` screening parameter - name: Blocked / Restricted Users description: APIs for listing the users an account has blocked or restricted - name: Chargebacks description: "" - name: Chat Messages description: "" - name: Chats description: "" - name: Client Sessions description: "" - name: Connect OnlyFans Account description: "" - name: Data Exports description: APIs for managing data exports - name: Engagement / Messages description: "" - name: Fans description: APIs for managing OnlyFans fans (subscribers) - name: Fans - AI Summary description: APIs for generating and retrieving AI-powered fan profile summaries - name: Following description: APIs for managing OnlyFans followings (people you're subscribed to) - name: Free Trial Links description: APIs for managing Free Trial Links. Revenue totals are net earnings after refunds and chargebacks. `revenue.chargebacks` (or `summary.chargebacks_total` in stats) is the positive cached net amount already excluded from revenue; do not subtract it again. Spender responses include chargebacks across all attributed periods for each fan with positive net revenue. - name: Giphy description: "" - name: Link Tags description: APIs for managing tags on free trial links, tracking links, and Smart Links - name: Mass Messaging description: "" - name: Media description: "" - name: Media Vault description: "" - name: Media Vault Lists description: "" - name: Notifications description: Endpoints for managingr account notifications - name: Payouts description: "" - name: Post Comments description: "" - name: Post Labels description: APIs for managing your post labels - name: Posts description: APIs for managing OnlyFans posts - name: Profile Content description: Read another user's profile content using your connected OnlyFans account. OnlyFans enforces subscription and purchase requirements; these endpoints do not unlock content. Response samples use captured OnlyFans payloads with anonymized IDs, text, and media URLs; OFAPI metadata values are illustrative. - name: Promotions description: "" - name: Public Profiles description: "" - name: Queue description: "" - name: Release Forms description: APIs for managing OnlyFans release forms - name: Saved For Later (Messages) description: "" - name: Saved For Later (Posts) description: "" - name: Settings description: "" - name: Shared Free Trial Links description: APIs for Free Trial Links that other OF creators have shared with this account. Revenue, cost, and spender data are not available for shared links. - name: Shared Tracking Links description: APIs for Tracking Links (campaigns) that other OF creators have shared with this account. Revenue, cost, and spender data are not available for shared campaigns. - name: Smart Link Postbacks description: APIs for managing Smart Link postback destinations - name: Smart Links description: APIs for managing Smart Links (Free Trial Links and Tracking Links with pooled inventory) - name: Statistics description: "" - name: Stored Free Trial Links description: Instant APIs for retrieving stored free trial links from the OnlyFansAPI Cache (free, no credits used). `revenue.total` is net earnings after refunds and chargebacks. `revenue.chargebacks` is the positive cached net amount already excluded from that total; do not subtract it again. - name: Stored Shared Free Trial Links description: Instant APIs for retrieving stored shared Free Trial Links from the OnlyFansAPI Cache (free, no credits used) - name: Stored Shared Tracking Links description: Instant APIs for retrieving stored shared Tracking Links (campaigns) from the OnlyFansAPI Cache (free, no credits used) - name: Stored Tracking Links description: Instant APIs for retrieving stored tracking links from the OnlyFansAPI Cache (free, no credits used). `revenue.total` is net earnings after refunds and chargebacks. `revenue.chargebacks` is the positive cached net amount already excluded from that total; do not subtract it again. - name: Stories description: APIs for managing OnlyFans stories - name: Story Highlights description: APIs for managing OnlyFans story highlights - name: Subscription Bundles description: "" - name: Tracking Links description: APIs for managing tracking links. Revenue totals are net earnings after refunds and chargebacks. `revenue.chargebacks` (or `summary.chargebacks_total` in stats) is the positive cached net amount already excluded from revenue; do not subtract it again. Spender responses include chargebacks across all attributed periods for each fan with positive net revenue. - name: Transactions description: APIs for managing OnlyFans transactions - name: Usage description: Credit usage reporting for your team - name: User List Collections description: "" - name: Users description: APIs for fetching OnlyFans users - name: Webhooks description: "" paths: /api/{account}/engagement/messages/mass-messages: parameters: - in: path name: account description: The Account ID example: acct_XXXXXXXXXXXXXXX required: true schema: type: string get: summary: Mass Messages operationId: massMessages description: List sent mass messages with engagement stats (sent, viewed, purchased, etc.). parameters: - in: query name: startDate description: The earliest message to retrieve. Keep empty to get all. example: 2026-01-07 00:00:00 required: false schema: type: string description: The earliest message to retrieve. Keep empty to get all. example: 2026-01-07 00:00:00 - in: query name: endDate description: The latest message to retrieve. Keep empty to get all. It must be after `startDate` and is also used for pagination. example: 2026-02-06 01:26:15 required: false schema: type: string description: The latest message to retrieve. Keep empty to get all. It must be after `startDate` and is also used for pagination. example: 2026-02-06 01:26:15 - in: query name: limit description: Number of messages to return (default = 10) example: 10 required: false schema: type: integer description: Number of messages to return (default = 10) example: 10 - in: query name: query description: Optionally, filter by message text. example: sciss required: false schema: type: string description: Optionally, filter by message text. example: sciss responses: "200": description: "" content: application/json: schema: type: object example: data: hasMore: true items: - id: 1234567890 date: 2026-02-06T00:51:23+00:00 responseType: message text:Lets play ADULT ROCK-PAPER-SCISSORS babe, shall we?
rawText: Lets play ADULT ROCK-PAPER-SCISSORS babe, shall we? giphyId: null isFree: true isMediaReady: true mediaCount: 0 media: [] previews: [] isTip: false isReportedByMe: false viewedCount: 203 sentCount: 68400 isCanceled: false template: group canUnsend: true unsendSeconds: 1000000 _pagination: next_page: https://app.onlyfansapi.com/api/acct_XXXXXXXXXX/engagement/messages/mass-messages?endDate=2026-02-05%2011%3A06%3A57&limit=10 _meta: _credits: used: 1 balance: 999999959 note: Always _cache: is_cached: false note: Cache disabled for this endpoint _rate_limits: limit_minute: 1000 limit_day: 50000 remaining_minute: 998 remaining_day: 49988 properties: data: type: object properties: hasMore: type: boolean example: true items: type: array example: - id: 1234567890 date: 2026-02-06T00:51:23+00:00 responseType: message text:Lets play ADULT ROCK-PAPER-SCISSORS babe, shall we?
rawText: Lets play ADULT ROCK-PAPER-SCISSORS babe, shall we? giphyId: null isFree: true isMediaReady: true mediaCount: 0 media: [] previews: [] isTip: false isReportedByMe: false viewedCount: 203 sentCount: 68400 isCanceled: false template: group canUnsend: true unsendSeconds: 1000000 items: type: object properties: id: type: integer example: 1234567890 date: type: string example: 2026-02-06T00:51:23+00:00 responseType: type: string example: message text: type: string example:Lets play ADULT ROCK-PAPER-SCISSORS babe, shall we?
rawText: type: string example: Lets play ADULT ROCK-PAPER-SCISSORS babe, shall we? giphyId: type: string example: null nullable: true isFree: type: boolean example: true isMediaReady: type: boolean example: true mediaCount: type: integer example: 0 media: type: array example: [] previews: type: array example: [] isTip: type: boolean example: false isReportedByMe: type: boolean example: false viewedCount: type: integer example: 203 sentCount: type: integer example: 68400 isCanceled: type: boolean example: false template: type: string example: group canUnsend: type: boolean example: true unsendSeconds: type: integer example: 1000000 _pagination: type: object properties: next_page: type: string example: https://app.onlyfansapi.com/api/acct_XXXXXXXXXX/engagement/messages/mass-messages?endDate=2026-02-05%2011%3A06%3A57&limit=10 _meta: type: object properties: _credits: type: object properties: used: type: integer example: 1 balance: type: integer example: 999999959 note: type: string example: Always _cache: type: object properties: is_cached: type: boolean example: false note: type: string example: Cache disabled for this endpoint _rate_limits: type: object properties: limit_minute: type: integer example: 1000 limit_day: type: integer example: 50000 remaining_minute: type: integer example: 998 remaining_day: type: integer example: 49988 tags: - Engagement / Messages components: securitySchemes: default: type: http scheme: bearer description: Get your API Key from OnlyFansAPI Console - https://app.onlyfansapi.com/api-keys ```` # Message Buyers (/api-reference/engagement-messages/message-buyers) List buyers for a specific message. ## OpenAPI ````yaml https://app.onlyfansapi.com/scribe-docs/openapi.yaml get /api/{account}/engagement/messages/{message_id}/buyers openapi: 3.0.3 info: title: OnlyFans API description: "" version: 1.0.0 servers: - url: https://app.onlyfansapi.com security: - default: [] tags: - name: AI Voice Messages description: "" - name: API Keys description: "" - name: Account description: Endpoints for your linked accounts - name: Analytics - Financial description: APIs for retrieving financial analytics data - name: Analytics - Summary description: APIs for retrieving summary analytics data - name: Banking description: Operations related to user banking details, payout methods, legal and tax information, and account country settings. - name: Banned Words description: Reference list of OnlyFans banned words used by the `blockBannedWords` screening parameter - name: Blocked / Restricted Users description: APIs for listing the users an account has blocked or restricted - name: Chargebacks description: "" - name: Chat Messages description: "" - name: Chats description: "" - name: Client Sessions description: "" - name: Connect OnlyFans Account description: "" - name: Data Exports description: APIs for managing data exports - name: Engagement / Messages description: "" - name: Fans description: APIs for managing OnlyFans fans (subscribers) - name: Fans - AI Summary description: APIs for generating and retrieving AI-powered fan profile summaries - name: Following description: APIs for managing OnlyFans followings (people you're subscribed to) - name: Free Trial Links description: APIs for managing Free Trial Links. Revenue totals are net earnings after refunds and chargebacks. `revenue.chargebacks` (or `summary.chargebacks_total` in stats) is the positive cached net amount already excluded from revenue; do not subtract it again. Spender responses include chargebacks across all attributed periods for each fan with positive net revenue. - name: Giphy description: "" - name: Link Tags description: APIs for managing tags on free trial links, tracking links, and Smart Links - name: Mass Messaging description: "" - name: Media description: "" - name: Media Vault description: "" - name: Media Vault Lists description: "" - name: Notifications description: Endpoints for managingr account notifications - name: Payouts description: "" - name: Post Comments description: "" - name: Post Labels description: APIs for managing your post labels - name: Posts description: APIs for managing OnlyFans posts - name: Profile Content description: Read another user's profile content using your connected OnlyFans account. OnlyFans enforces subscription and purchase requirements; these endpoints do not unlock content. Response samples use captured OnlyFans payloads with anonymized IDs, text, and media URLs; OFAPI metadata values are illustrative. - name: Promotions description: "" - name: Public Profiles description: "" - name: Queue description: "" - name: Release Forms description: APIs for managing OnlyFans release forms - name: Saved For Later (Messages) description: "" - name: Saved For Later (Posts) description: "" - name: Settings description: "" - name: Shared Free Trial Links description: APIs for Free Trial Links that other OF creators have shared with this account. Revenue, cost, and spender data are not available for shared links. - name: Shared Tracking Links description: APIs for Tracking Links (campaigns) that other OF creators have shared with this account. Revenue, cost, and spender data are not available for shared campaigns. - name: Smart Link Postbacks description: APIs for managing Smart Link postback destinations - name: Smart Links description: APIs for managing Smart Links (Free Trial Links and Tracking Links with pooled inventory) - name: Statistics description: "" - name: Stored Free Trial Links description: Instant APIs for retrieving stored free trial links from the OnlyFansAPI Cache (free, no credits used). `revenue.total` is net earnings after refunds and chargebacks. `revenue.chargebacks` is the positive cached net amount already excluded from that total; do not subtract it again. - name: Stored Shared Free Trial Links description: Instant APIs for retrieving stored shared Free Trial Links from the OnlyFansAPI Cache (free, no credits used) - name: Stored Shared Tracking Links description: Instant APIs for retrieving stored shared Tracking Links (campaigns) from the OnlyFansAPI Cache (free, no credits used) - name: Stored Tracking Links description: Instant APIs for retrieving stored tracking links from the OnlyFansAPI Cache (free, no credits used). `revenue.total` is net earnings after refunds and chargebacks. `revenue.chargebacks` is the positive cached net amount already excluded from that total; do not subtract it again. - name: Stories description: APIs for managing OnlyFans stories - name: Story Highlights description: APIs for managing OnlyFans story highlights - name: Subscription Bundles description: "" - name: Tracking Links description: APIs for managing tracking links. Revenue totals are net earnings after refunds and chargebacks. `revenue.chargebacks` (or `summary.chargebacks_total` in stats) is the positive cached net amount already excluded from revenue; do not subtract it again. Spender responses include chargebacks across all attributed periods for each fan with positive net revenue. - name: Transactions description: APIs for managing OnlyFans transactions - name: Usage description: Credit usage reporting for your team - name: User List Collections description: "" - name: Users description: APIs for fetching OnlyFans users - name: Webhooks description: "" paths: /api/{account}/engagement/messages/{message_id}/buyers: parameters: - in: path name: account description: The Account ID example: acct_XXXXXXXXXXXXXXX required: true schema: type: string - in: path name: message_id description: The ID of the message. example: maxime required: true schema: type: string get: summary: Message Buyers operationId: messageBuyers description: List buyers for a specific message. parameters: - in: query name: limit description: Number of buyers to return (default = 10) example: 10 required: false schema: type: integer description: Number of buyers to return (default = 10) example: 10 - in: query name: offset description: Offset for pagination (default = 0) example: 0 required: false schema: type: integer description: Offset for pagination (default = 0) example: 0 - in: query name: skip_users_dups description: Skip duplicate users in results (0/1). Default = 1 example: 1 required: false schema: type: integer description: Skip duplicate users in results (0/1). Default = 1 example: 1 - in: query name: skip_users description: "Optional flag for subsequent pages (example: all)." example: all required: false schema: type: string description: "Optional flag for subsequent pages (example: all)." example: all - in: query name: marker description: Marker for pagination example: 0 required: false schema: type: integer description: Marker for pagination example: 0 responses: "200": description: "" content: application/json: schema: type: object example: data: list: - view: s avatar: null avatarThumbs: null header: null headerSize: null headerThumbs: null id: 35777544 name: Newbles username: u35777544 canLookStory: false canCommentStory: false hasNotViewedStory: false isVerified: false canPayInternal: false hasScheduledStream: false hasStream: false hasStories: false tipsEnabled: false tipsTextEnabled: true tipsMin: 5 tipsMinInternal: 1 tipsMax: 200 canEarn: false canAddSubscriber: false subscribePrice: 0 displayName: Doesnt rly like BJ notice: Solo isActive: true isRestricted: false canRestrict: true subscribedBy: true subscribedByExpire: false subscribedByExpireDate: 2033-05-03T05:32:54+00:00 subscribedByAutoprolong: true subscribedIsExpiredNow: false currentSubscribePrice: 0 subscribedOn: null subscribedOnExpiredNow: true subscribedOnDuration: 10 months showMediaCount: true lastSeen: 2026-02-05T16:10:14+00:00 canReport: true marker: 957523925 hasMore: true _pagination: next_page: http://localhost/api/{account}/engagement/messages/34700613157/buyers?offset=10&limit=10&marker=957523925 _meta: _credits: used: 1 balance: 999999959 note: Always _cache: is_cached: false note: Cache disabled for this endpoint _rate_limits: limit_minute: 1000 limit_day: 50000 remaining_minute: 998 remaining_day: 49988 properties: data: type: object properties: list: type: array example: - view: s avatar: null avatarThumbs: null header: null headerSize: null headerThumbs: null id: 35777544 name: Newbles username: u35777544 canLookStory: false canCommentStory: false hasNotViewedStory: false isVerified: false canPayInternal: false hasScheduledStream: false hasStream: false hasStories: false tipsEnabled: false tipsTextEnabled: true tipsMin: 5 tipsMinInternal: 1 tipsMax: 200 canEarn: false canAddSubscriber: false subscribePrice: 0 displayName: Doesnt rly like BJ notice: Solo isActive: true isRestricted: false canRestrict: true subscribedBy: true subscribedByExpire: false subscribedByExpireDate: 2033-05-03T05:32:54+00:00 subscribedByAutoprolong: true subscribedIsExpiredNow: false currentSubscribePrice: 0 subscribedOn: null subscribedOnExpiredNow: true subscribedOnDuration: 10 months showMediaCount: true lastSeen: 2026-02-05T16:10:14+00:00 canReport: true items: type: object properties: view: type: string example: s avatar: type: string example: null nullable: true avatarThumbs: type: string example: null nullable: true header: type: string example: null nullable: true headerSize: type: string example: null nullable: true headerThumbs: type: string example: null nullable: true id: type: integer example: 35777544 name: type: string example: Newbles username: type: string example: u35777544 canLookStory: type: boolean example: false canCommentStory: type: boolean example: false hasNotViewedStory: type: boolean example: false isVerified: type: boolean example: false canPayInternal: type: boolean example: false hasScheduledStream: type: boolean example: false hasStream: type: boolean example: false hasStories: type: boolean example: false tipsEnabled: type: boolean example: false tipsTextEnabled: type: boolean example: true tipsMin: type: integer example: 5 tipsMinInternal: type: integer example: 1 tipsMax: type: integer example: 200 canEarn: type: boolean example: false canAddSubscriber: type: boolean example: false subscribePrice: type: integer example: 0 displayName: type: string example: Doesnt rly like BJ notice: type: string example: Solo isActive: type: boolean example: true isRestricted: type: boolean example: false canRestrict: type: boolean example: true subscribedBy: type: boolean example: true subscribedByExpire: type: boolean example: false subscribedByExpireDate: type: string example: 2033-05-03T05:32:54+00:00 subscribedByAutoprolong: type: boolean example: true subscribedIsExpiredNow: type: boolean example: false currentSubscribePrice: type: integer example: 0 subscribedOn: type: string example: null nullable: true subscribedOnExpiredNow: type: boolean example: true subscribedOnDuration: type: string example: 10 months showMediaCount: type: boolean example: true lastSeen: type: string example: 2026-02-05T16:10:14+00:00 canReport: type: boolean example: true marker: type: integer example: 957523925 hasMore: type: boolean example: true _pagination: type: object properties: next_page: type: string example: http://localhost/api/{account}/engagement/messages/34700613157/buyers?offset=10&limit=10&marker=957523925 _meta: type: object properties: _credits: type: object properties: used: type: integer example: 1 balance: type: integer example: 999999959 note: type: string example: Always _cache: type: object properties: is_cached: type: boolean example: false note: type: string example: Cache disabled for this endpoint _rate_limits: type: object properties: limit_minute: type: integer example: 1000 limit_day: type: integer example: 50000 remaining_minute: type: integer example: 998 remaining_day: type: integer example: 49988 tags: - Engagement / Messages components: securitySchemes: default: type: http scheme: bearer description: Get your API Key from OnlyFansAPI Console - https://app.onlyfansapi.com/api-keys ```` # Top Message (/api-reference/engagement-messages/top-message) Get the top performing message by purchases in the selected timeframe. ## OpenAPI ````yaml https://app.onlyfansapi.com/scribe-docs/openapi.yaml get /api/{account}/engagement/messages/top-message openapi: 3.0.3 info: title: OnlyFans API description: "" version: 1.0.0 servers: - url: https://app.onlyfansapi.com security: - default: [] tags: - name: AI Voice Messages description: "" - name: API Keys description: "" - name: Account description: Endpoints for your linked accounts - name: Analytics - Financial description: APIs for retrieving financial analytics data - name: Analytics - Summary description: APIs for retrieving summary analytics data - name: Banking description: Operations related to user banking details, payout methods, legal and tax information, and account country settings. - name: Banned Words description: Reference list of OnlyFans banned words used by the `blockBannedWords` screening parameter - name: Blocked / Restricted Users description: APIs for listing the users an account has blocked or restricted - name: Chargebacks description: "" - name: Chat Messages description: "" - name: Chats description: "" - name: Client Sessions description: "" - name: Connect OnlyFans Account description: "" - name: Data Exports description: APIs for managing data exports - name: Engagement / Messages description: "" - name: Fans description: APIs for managing OnlyFans fans (subscribers) - name: Fans - AI Summary description: APIs for generating and retrieving AI-powered fan profile summaries - name: Following description: APIs for managing OnlyFans followings (people you're subscribed to) - name: Free Trial Links description: APIs for managing Free Trial Links. Revenue totals are net earnings after refunds and chargebacks. `revenue.chargebacks` (or `summary.chargebacks_total` in stats) is the positive cached net amount already excluded from revenue; do not subtract it again. Spender responses include chargebacks across all attributed periods for each fan with positive net revenue. - name: Giphy description: "" - name: Link Tags description: APIs for managing tags on free trial links, tracking links, and Smart Links - name: Mass Messaging description: "" - name: Media description: "" - name: Media Vault description: "" - name: Media Vault Lists description: "" - name: Notifications description: Endpoints for managingr account notifications - name: Payouts description: "" - name: Post Comments description: "" - name: Post Labels description: APIs for managing your post labels - name: Posts description: APIs for managing OnlyFans posts - name: Profile Content description: Read another user's profile content using your connected OnlyFans account. OnlyFans enforces subscription and purchase requirements; these endpoints do not unlock content. Response samples use captured OnlyFans payloads with anonymized IDs, text, and media URLs; OFAPI metadata values are illustrative. - name: Promotions description: "" - name: Public Profiles description: "" - name: Queue description: "" - name: Release Forms description: APIs for managing OnlyFans release forms - name: Saved For Later (Messages) description: "" - name: Saved For Later (Posts) description: "" - name: Settings description: "" - name: Shared Free Trial Links description: APIs for Free Trial Links that other OF creators have shared with this account. Revenue, cost, and spender data are not available for shared links. - name: Shared Tracking Links description: APIs for Tracking Links (campaigns) that other OF creators have shared with this account. Revenue, cost, and spender data are not available for shared campaigns. - name: Smart Link Postbacks description: APIs for managing Smart Link postback destinations - name: Smart Links description: APIs for managing Smart Links (Free Trial Links and Tracking Links with pooled inventory) - name: Statistics description: "" - name: Stored Free Trial Links description: Instant APIs for retrieving stored free trial links from the OnlyFansAPI Cache (free, no credits used). `revenue.total` is net earnings after refunds and chargebacks. `revenue.chargebacks` is the positive cached net amount already excluded from that total; do not subtract it again. - name: Stored Shared Free Trial Links description: Instant APIs for retrieving stored shared Free Trial Links from the OnlyFansAPI Cache (free, no credits used) - name: Stored Shared Tracking Links description: Instant APIs for retrieving stored shared Tracking Links (campaigns) from the OnlyFansAPI Cache (free, no credits used) - name: Stored Tracking Links description: Instant APIs for retrieving stored tracking links from the OnlyFansAPI Cache (free, no credits used). `revenue.total` is net earnings after refunds and chargebacks. `revenue.chargebacks` is the positive cached net amount already excluded from that total; do not subtract it again. - name: Stories description: APIs for managing OnlyFans stories - name: Story Highlights description: APIs for managing OnlyFans story highlights - name: Subscription Bundles description: "" - name: Tracking Links description: APIs for managing tracking links. Revenue totals are net earnings after refunds and chargebacks. `revenue.chargebacks` (or `summary.chargebacks_total` in stats) is the positive cached net amount already excluded from revenue; do not subtract it again. Spender responses include chargebacks across all attributed periods for each fan with positive net revenue. - name: Transactions description: APIs for managing OnlyFans transactions - name: Usage description: Credit usage reporting for your team - name: User List Collections description: "" - name: Users description: APIs for fetching OnlyFans users - name: Webhooks description: "" paths: /api/{account}/engagement/messages/top-message: parameters: - in: path name: account description: The Account ID example: acct_XXXXXXXXXXXXXXX required: true schema: type: string get: summary: Top Message operationId: topMessage description: Get the top performing message by purchases in the selected timeframe. parameters: - in: query name: startDate description: The start date for the period. Keep empty to retrieve from the model start date. example: 2026-01-07 00:00:00 required: false schema: type: string description: The start date for the period. Keep empty to retrieve from the model start date. example: 2026-01-07 00:00:00 - in: query name: endDate description: The end date for the period. Keep empty to retrieve until now. It must be after `startDate`. example: 2026-02-06 01:26:15 required: false schema: type: string description: The end date for the period. Keep empty to retrieve until now. It must be after `startDate`. example: 2026-02-06 01:26:15 responses: "200": description: "" content: application/json: schema: type: object example: data: purchases: id: 6677889900 date: 2024-06-30T12:53:42+00:00 responseType: message text: This is the hardest i've ever been fucked... would you make me cum more than this?? 🥵💦 rawText: This is the hardest i've ever been fucked... would you make me cum more than this?? 🥵💦 giphyId: null isFree: false isMediaReady: true mediaCount: 1 media: - id: 7788990011 type: video convertedToVideo: false canView: true hasError: false createdAt: 2023-01-31T13:14:15+00:00 isReady: true files: full: url: https://cdn.example.com/files/placeholder/video_source.mp4 width: 1080 height: 1920 size: 0 sources: [] thumb: url: https://cdn.example.com/files/placeholder/thumb.jpg width: 300 height: 300 size: 0 preview: url: https://cdn.example.com/files/placeholder/preview.jpg width: 960 height: 1707 size: 0 squarePreview: url: https://cdn.example.com/files/placeholder/square.jpg width: 960 height: 960 size: 0 duration: 528 hasCustomPreview: false videoSources: "240": https://cdn.example.com/files/placeholder/video_240p.mp4 "720": https://cdn.example.com/files/placeholder/video_720p.mp4 previews: [] isTip: false isReportedByMe: false viewedCount: 9360 sentCount: 15802 isCanceled: true template: group canUnsend: false unsendSeconds: 0 price: "98.00" purchasedCount: 146 canSendMessageToBuyers: true totalRevenueGenerated: "14308.00" relationships: buyers: href: https://app.onlyfansapi.com/api/acct_XXXXXXXXXX/engagement/messages/6677889900/buyers?limit=10&offset=0&skip_users_dups=1&marker=0 method: GET _meta: _credits: used: 1 balance: 11335469 note: Always _cache: is_cached: false note: Cache disabled for this endpoint _rate_limits: limit_minute: 5000 limit_day: null remaining_minute: 4999 remaining_day: null notice: We have decided to remove our daily rate limits. Please remove any references to these in your integrations. properties: data: type: object properties: purchases: type: object properties: id: type: integer example: 6677889900 date: type: string example: 2024-06-30T12:53:42+00:00 responseType: type: string example: message text: type: string example: This is the hardest i've ever been fucked... would you make me cum more than this?? 🥵💦 rawText: type: string example: This is the hardest i've ever been fucked... would you make me cum more than this?? 🥵💦 giphyId: type: string example: null nullable: true isFree: type: boolean example: false isMediaReady: type: boolean example: true mediaCount: type: integer example: 1 media: type: array example: - id: 7788990011 type: video convertedToVideo: false canView: true hasError: false createdAt: 2023-01-31T13:14:15+00:00 isReady: true files: full: url: https://cdn.example.com/files/placeholder/video_source.mp4 width: 1080 height: 1920 size: 0 sources: [] thumb: url: https://cdn.example.com/files/placeholder/thumb.jpg width: 300 height: 300 size: 0 preview: url: https://cdn.example.com/files/placeholder/preview.jpg width: 960 height: 1707 size: 0 squarePreview: url: https://cdn.example.com/files/placeholder/square.jpg width: 960 height: 960 size: 0 duration: 528 hasCustomPreview: false videoSources: "240": https://cdn.example.com/files/placeholder/video_240p.mp4 "720": https://cdn.example.com/files/placeholder/video_720p.mp4 items: type: object properties: id: type: integer example: 7788990011 type: type: string example: video convertedToVideo: type: boolean example: false canView: type: boolean example: true hasError: type: boolean example: false createdAt: type: string example: 2023-01-31T13:14:15+00:00 isReady: type: boolean example: true files: type: object properties: full: type: object properties: url: type: string example: https://cdn.example.com/files/placeholder/video_source.mp4 width: type: integer example: 1080 height: type: integer example: 1920 size: type: integer example: 0 sources: type: array example: [] thumb: type: object properties: url: type: string example: https://cdn.example.com/files/placeholder/thumb.jpg width: type: integer example: 300 height: type: integer example: 300 size: type: integer example: 0 preview: type: object properties: url: type: string example: https://cdn.example.com/files/placeholder/preview.jpg width: type: integer example: 960 height: type: integer example: 1707 size: type: integer example: 0 squarePreview: type: object properties: url: type: string example: https://cdn.example.com/files/placeholder/square.jpg width: type: integer example: 960 height: type: integer example: 960 size: type: integer example: 0 duration: type: integer example: 528 hasCustomPreview: type: boolean example: false videoSources: type: object properties: "240": type: string example: https://cdn.example.com/files/placeholder/video_240p.mp4 "720": type: string example: https://cdn.example.com/files/placeholder/video_720p.mp4 previews: type: array example: [] isTip: type: boolean example: false isReportedByMe: type: boolean example: false viewedCount: type: integer example: 9360 sentCount: type: integer example: 15802 isCanceled: type: boolean example: true template: type: string example: group canUnsend: type: boolean example: false unsendSeconds: type: integer example: 0 price: type: string example: "98.00" purchasedCount: type: integer example: 146 canSendMessageToBuyers: type: boolean example: true totalRevenueGenerated: type: string example: "14308.00" relationships: type: object properties: buyers: type: object properties: href: type: string example: https://app.onlyfansapi.com/api/acct_XXXXXXXXXX/engagement/messages/6677889900/buyers?limit=10&offset=0&skip_users_dups=1&marker=0 method: type: string example: GET _meta: type: object properties: _credits: type: object properties: used: type: integer example: 1 balance: type: integer example: 11335469 note: type: string example: Always _cache: type: object properties: is_cached: type: boolean example: false note: type: string example: Cache disabled for this endpoint _rate_limits: type: object properties: limit_minute: type: integer example: 5000 limit_day: type: string example: null nullable: true remaining_minute: type: integer example: 4999 remaining_day: type: string example: null nullable: true notice: type: string example: We have decided to remove our daily rate limits. Please remove any references to these in your integrations. tags: - Engagement / Messages components: securitySchemes: default: type: http scheme: bearer description: Get your API Key from OnlyFansAPI Console - https://app.onlyfansapi.com/api-keys ```` # Count Queue Items (/api-reference/queue/count-queue-items) Count posts and messages in the queue. ## OpenAPI ````yaml https://app.onlyfansapi.com/scribe-docs/openapi.yaml get /api/{account}/queue/counts openapi: 3.0.3 info: title: OnlyFans API description: "" version: 1.0.0 servers: - url: https://app.onlyfansapi.com security: - default: [] tags: - name: AI Voice Messages description: "" - name: API Keys description: "" - name: Account description: Endpoints for your linked accounts - name: Analytics - Financial description: APIs for retrieving financial analytics data - name: Analytics - Summary description: APIs for retrieving summary analytics data - name: Banking description: Operations related to user banking details, payout methods, legal and tax information, and account country settings. - name: Banned Words description: Reference list of OnlyFans banned words used by the `blockBannedWords` screening parameter - name: Blocked / Restricted Users description: APIs for listing the users an account has blocked or restricted - name: Chargebacks description: "" - name: Chat Messages description: "" - name: Chats description: "" - name: Client Sessions description: "" - name: Connect OnlyFans Account description: "" - name: Data Exports description: APIs for managing data exports - name: Engagement / Messages description: "" - name: Fans description: APIs for managing OnlyFans fans (subscribers) - name: Fans - AI Summary description: APIs for generating and retrieving AI-powered fan profile summaries - name: Following description: APIs for managing OnlyFans followings (people you're subscribed to) - name: Free Trial Links description: APIs for managing Free Trial Links. Revenue totals are net earnings after refunds and chargebacks. `revenue.chargebacks` (or `summary.chargebacks_total` in stats) is the positive cached net amount already excluded from revenue; do not subtract it again. Spender responses include chargebacks across all attributed periods for each fan with positive net revenue. - name: Giphy description: "" - name: Link Tags description: APIs for managing tags on free trial links, tracking links, and Smart Links - name: Mass Messaging description: "" - name: Media description: "" - name: Media Vault description: "" - name: Media Vault Lists description: "" - name: Notifications description: Endpoints for managingr account notifications - name: Payouts description: "" - name: Post Comments description: "" - name: Post Labels description: APIs for managing your post labels - name: Posts description: APIs for managing OnlyFans posts - name: Profile Content description: Read another user's profile content using your connected OnlyFans account. OnlyFans enforces subscription and purchase requirements; these endpoints do not unlock content. Response samples use captured OnlyFans payloads with anonymized IDs, text, and media URLs; OFAPI metadata values are illustrative. - name: Promotions description: "" - name: Public Profiles description: "" - name: Queue description: "" - name: Release Forms description: APIs for managing OnlyFans release forms - name: Saved For Later (Messages) description: "" - name: Saved For Later (Posts) description: "" - name: Settings description: "" - name: Shared Free Trial Links description: APIs for Free Trial Links that other OF creators have shared with this account. Revenue, cost, and spender data are not available for shared links. - name: Shared Tracking Links description: APIs for Tracking Links (campaigns) that other OF creators have shared with this account. Revenue, cost, and spender data are not available for shared campaigns. - name: Smart Link Postbacks description: APIs for managing Smart Link postback destinations - name: Smart Links description: APIs for managing Smart Links (Free Trial Links and Tracking Links with pooled inventory) - name: Statistics description: "" - name: Stored Free Trial Links description: Instant APIs for retrieving stored free trial links from the OnlyFansAPI Cache (free, no credits used). `revenue.total` is net earnings after refunds and chargebacks. `revenue.chargebacks` is the positive cached net amount already excluded from that total; do not subtract it again. - name: Stored Shared Free Trial Links description: Instant APIs for retrieving stored shared Free Trial Links from the OnlyFansAPI Cache (free, no credits used) - name: Stored Shared Tracking Links description: Instant APIs for retrieving stored shared Tracking Links (campaigns) from the OnlyFansAPI Cache (free, no credits used) - name: Stored Tracking Links description: Instant APIs for retrieving stored tracking links from the OnlyFansAPI Cache (free, no credits used). `revenue.total` is net earnings after refunds and chargebacks. `revenue.chargebacks` is the positive cached net amount already excluded from that total; do not subtract it again. - name: Stories description: APIs for managing OnlyFans stories - name: Story Highlights description: APIs for managing OnlyFans story highlights - name: Subscription Bundles description: "" - name: Tracking Links description: APIs for managing tracking links. Revenue totals are net earnings after refunds and chargebacks. `revenue.chargebacks` (or `summary.chargebacks_total` in stats) is the positive cached net amount already excluded from revenue; do not subtract it again. Spender responses include chargebacks across all attributed periods for each fan with positive net revenue. - name: Transactions description: APIs for managing OnlyFans transactions - name: Usage description: Credit usage reporting for your team - name: User List Collections description: "" - name: Users description: APIs for fetching OnlyFans users - name: Webhooks description: "" paths: /api/{account}/queue/counts: parameters: - in: path name: account description: The Account ID example: acct_XXXXXXXXXXXXXXX required: true schema: type: string get: summary: Count Queue Items operationId: countQueueItems description: Count posts and messages in the queue. parameters: - in: query name: publishDateStart description: Earliest publish date to count from (must be at least today) example: 2025-01-01 required: true schema: type: string description: Earliest publish date to count from (must be at least today) example: 2025-01-01 - in: query name: publishDateEnd description: Latest publish date to count to example: 2025-01-01 required: true schema: type: string description: Latest publish date to count to example: 2025-01-01 - in: query name: timezone description: Time timezone of the provided dates. [View available timezone values](https://www.php.net/manual/en/timezones.php) example: Europe/Prague required: true schema: type: string description: Time timezone of the provided dates. [View available timezone values](https://www.php.net/manual/en/timezones.php) example: Europe/Prague responses: "200": description: Success content: application/json: schema: type: object example: data: list: 2025-01-01: post: 2 2025-01-02: post: 3 chat: 4 syncInProcess: false _meta: _credits: used: 1 balance: 999999950 note: Always _cache: is_cached: false note: Cache disabled for this endpoint _rate_limits: limit_minute: 1000 limit_day: 50000 remaining_minute: 998 remaining_day: 49985 properties: data: type: object properties: list: type: object properties: 2025-01-01: type: object properties: post: type: integer example: 2 2025-01-02: type: object properties: post: type: integer example: 3 chat: type: integer example: 4 syncInProcess: type: boolean example: false _meta: type: object properties: _credits: type: object properties: used: type: integer example: 1 balance: type: integer example: 999999950 note: type: string example: Always _cache: type: object properties: is_cached: type: boolean example: false note: type: string example: Cache disabled for this endpoint _rate_limits: type: object properties: limit_minute: type: integer example: 1000 limit_day: type: integer example: 50000 remaining_minute: type: integer example: 998 remaining_day: type: integer example: 49985 tags: - Queue components: securitySchemes: default: type: http scheme: bearer description: Get your API Key from OnlyFansAPI Console - https://app.onlyfansapi.com/api-keys ```` # List Queue Items (/api-reference/queue/list-queue-items) List scheduled posts and mass messages for a date range. Use the type filter to return only posts, messages, or both. ## OpenAPI ````yaml https://app.onlyfansapi.com/scribe-docs/openapi.yaml get /api/{account}/queue openapi: 3.0.3 info: title: OnlyFans API description: "" version: 1.0.0 servers: - url: https://app.onlyfansapi.com security: - default: [] tags: - name: AI Voice Messages description: "" - name: API Keys description: "" - name: Account description: Endpoints for your linked accounts - name: Analytics - Financial description: APIs for retrieving financial analytics data - name: Analytics - Summary description: APIs for retrieving summary analytics data - name: Banking description: Operations related to user banking details, payout methods, legal and tax information, and account country settings. - name: Banned Words description: Reference list of OnlyFans banned words used by the `blockBannedWords` screening parameter - name: Blocked / Restricted Users description: APIs for listing the users an account has blocked or restricted - name: Chargebacks description: "" - name: Chat Messages description: "" - name: Chats description: "" - name: Client Sessions description: "" - name: Connect OnlyFans Account description: "" - name: Data Exports description: APIs for managing data exports - name: Engagement / Messages description: "" - name: Fans description: APIs for managing OnlyFans fans (subscribers) - name: Fans - AI Summary description: APIs for generating and retrieving AI-powered fan profile summaries - name: Following description: APIs for managing OnlyFans followings (people you're subscribed to) - name: Free Trial Links description: APIs for managing Free Trial Links. Revenue totals are net earnings after refunds and chargebacks. `revenue.chargebacks` (or `summary.chargebacks_total` in stats) is the positive cached net amount already excluded from revenue; do not subtract it again. Spender responses include chargebacks across all attributed periods for each fan with positive net revenue. - name: Giphy description: "" - name: Link Tags description: APIs for managing tags on free trial links, tracking links, and Smart Links - name: Mass Messaging description: "" - name: Media description: "" - name: Media Vault description: "" - name: Media Vault Lists description: "" - name: Notifications description: Endpoints for managingr account notifications - name: Payouts description: "" - name: Post Comments description: "" - name: Post Labels description: APIs for managing your post labels - name: Posts description: APIs for managing OnlyFans posts - name: Profile Content description: Read another user's profile content using your connected OnlyFans account. OnlyFans enforces subscription and purchase requirements; these endpoints do not unlock content. Response samples use captured OnlyFans payloads with anonymized IDs, text, and media URLs; OFAPI metadata values are illustrative. - name: Promotions description: "" - name: Public Profiles description: "" - name: Queue description: "" - name: Release Forms description: APIs for managing OnlyFans release forms - name: Saved For Later (Messages) description: "" - name: Saved For Later (Posts) description: "" - name: Settings description: "" - name: Shared Free Trial Links description: APIs for Free Trial Links that other OF creators have shared with this account. Revenue, cost, and spender data are not available for shared links. - name: Shared Tracking Links description: APIs for Tracking Links (campaigns) that other OF creators have shared with this account. Revenue, cost, and spender data are not available for shared campaigns. - name: Smart Link Postbacks description: APIs for managing Smart Link postback destinations - name: Smart Links description: APIs for managing Smart Links (Free Trial Links and Tracking Links with pooled inventory) - name: Statistics description: "" - name: Stored Free Trial Links description: Instant APIs for retrieving stored free trial links from the OnlyFansAPI Cache (free, no credits used). `revenue.total` is net earnings after refunds and chargebacks. `revenue.chargebacks` is the positive cached net amount already excluded from that total; do not subtract it again. - name: Stored Shared Free Trial Links description: Instant APIs for retrieving stored shared Free Trial Links from the OnlyFansAPI Cache (free, no credits used) - name: Stored Shared Tracking Links description: Instant APIs for retrieving stored shared Tracking Links (campaigns) from the OnlyFansAPI Cache (free, no credits used) - name: Stored Tracking Links description: Instant APIs for retrieving stored tracking links from the OnlyFansAPI Cache (free, no credits used). `revenue.total` is net earnings after refunds and chargebacks. `revenue.chargebacks` is the positive cached net amount already excluded from that total; do not subtract it again. - name: Stories description: APIs for managing OnlyFans stories - name: Story Highlights description: APIs for managing OnlyFans story highlights - name: Subscription Bundles description: "" - name: Tracking Links description: APIs for managing tracking links. Revenue totals are net earnings after refunds and chargebacks. `revenue.chargebacks` (or `summary.chargebacks_total` in stats) is the positive cached net amount already excluded from revenue; do not subtract it again. Spender responses include chargebacks across all attributed periods for each fan with positive net revenue. - name: Transactions description: APIs for managing OnlyFans transactions - name: Usage description: Credit usage reporting for your team - name: User List Collections description: "" - name: Users description: APIs for fetching OnlyFans users - name: Webhooks description: "" paths: /api/{account}/queue: parameters: - in: path name: account description: The Account ID example: acct_XXXXXXXXXXXXXXX required: true schema: type: string get: summary: List Queue Items operationId: listQueueItems description: List scheduled posts and mass messages for a date range. Use the type filter to return only posts, messages, or both. parameters: - in: query name: publishDateStart description: Earliest publish date to return (must be at least today). Must be a valid date. Must be a valid date. Must be a date after or equal totoday.
example: 2025-01-01
required: true
schema:
type: string
description: Earliest publish date to return (must be at least today). Must be a
valid date. Must be a valid date. Must be a date after or equal to
today.
example: 2025-01-01
- in: query
name: publishDateEnd
description: Latest publish date to return. Must be a valid date. Must be a
valid date. Must be a date after or equal to
publishDateStart.
example: 2025-01-01
required: true
schema:
type: string
description: Latest publish date to return. Must be a valid date. Must be a
valid date. Must be a date after or equal to
publishDateStart.
example: 2025-01-01
- in: query
name: timezone
description: Timezone of the provided dates. [View available timezone
values](https://www.php.net/manual/en/timezones.php). Must be a
valid time zone, such as Africa/Accra.
example: Europe/Prague
required: true
schema:
type: string
description: Timezone of the provided dates. [View available timezone
values](https://www.php.net/manual/en/timezones.php). Must be a
valid time zone, such as Africa/Accra.
example: Europe/Prague
- in: query
name: limit
description: Maximum number of queue items to return (default 20). Must be at
least 1. Must not be greater than 100.
example: 20
required: false
schema:
type: integer
description: Maximum number of queue items to return (default 20). Must be at
least 1. Must not be greater than 100.
example: 20
- in: query
name: type
description: ""
example:
- post
required: false
schema:
type: array
description: ""
example:
- post
items:
type: string
enum:
- chat
- post
responses:
"200":
description: Success
content:
application/json:
schema:
type: object
example:
data:
list:
- id: 123
type: chat
publishDateTime: 2025-01-01T01:01:01+01:01
createdDateTime: 2025-01-01T01:01:01+01:01
entity:
responseType: message
id: 123
text: Text
rawText: Text giphyId: null lockedText: false isNew: true isFree: true isOpened: false price: 0 isMediaReady: true mediaCount: 0 media: [] previews: [] createdAt: 2025-01-01T01:01:01+01:01 changedAt: 2025-01-01T01:01:01+01:01 scheduledAt: 2025-01-01T01:01:01+01:01 isTip: false cancelSeconds: 1000000 isLiked: false canPurchase: false isMarkdownDisabled: true releaseForms: [] userLists: - fans sentRulesType: list sentRulesExtra: Fans isFromQueue: true queueId: 123 canUnsendQueue: true unsendSecondsQueue: 1000000 - id: 123 type: post publishDateTime: 2025-01-01T01:01:01+01:01 createdDateTime: 2025-01-01T01:01:01+01:01 entity: responseType: post id: 123 postedAt: 2025-01-01T01:01:01+01:01 postedAtPrecise: "1234567890.000000" text: Text isMarkdownDisabled: true canDelete: true canEdit: true isMediaReady: true isOpened: true canToggleFavorite: true tipsAmount: $0 rawText: Text canViewMedia: true syncInProcess: false _meta: _credits: used: 1 balance: 999999953 note: Always _cache: is_cached: false note: Cache disabled for this endpoint _rate_limits: limit_minute: 1000 limit_day: 50000 remaining_minute: 994 remaining_day: 49988 properties: data: type: object properties: list: type: array example: - id: 123 type: chat publishDateTime: 2025-01-01T01:01:01+01:01 createdDateTime: 2025-01-01T01:01:01+01:01 entity: responseType: message id: 123 text:Text
rawText: Text giphyId: null lockedText: false isNew: true isFree: true isOpened: false price: 0 isMediaReady: true mediaCount: 0 media: [] previews: [] createdAt: 2025-01-01T01:01:01+01:01 changedAt: 2025-01-01T01:01:01+01:01 scheduledAt: 2025-01-01T01:01:01+01:01 isTip: false cancelSeconds: 1000000 isLiked: false canPurchase: false isMarkdownDisabled: true releaseForms: [] userLists: - fans sentRulesType: list sentRulesExtra: Fans isFromQueue: true queueId: 123 canUnsendQueue: true unsendSecondsQueue: 1000000 - id: 123 type: post publishDateTime: 2025-01-01T01:01:01+01:01 createdDateTime: 2025-01-01T01:01:01+01:01 entity: responseType: post id: 123 postedAt: 2025-01-01T01:01:01+01:01 postedAtPrecise: "1234567890.000000" text: Text isMarkdownDisabled: true canDelete: true canEdit: true isMediaReady: true isOpened: true canToggleFavorite: true tipsAmount: $0 rawText: Text canViewMedia: true items: type: object properties: id: type: integer example: 123 type: type: string example: chat publishDateTime: type: string example: 2025-01-01T01:01:01+01:01 createdDateTime: type: string example: 2025-01-01T01:01:01+01:01 entity: type: object properties: responseType: type: string example: message id: type: integer example: 123 text: type: string example:Text
rawText: type: string example: Text giphyId: type: string example: null nullable: true lockedText: type: boolean example: false isNew: type: boolean example: true isFree: type: boolean example: true isOpened: type: boolean example: false price: type: integer example: 0 isMediaReady: type: boolean example: true mediaCount: type: integer example: 0 media: type: array example: [] previews: type: array example: [] createdAt: type: string example: 2025-01-01T01:01:01+01:01 changedAt: type: string example: 2025-01-01T01:01:01+01:01 scheduledAt: type: string example: 2025-01-01T01:01:01+01:01 isTip: type: boolean example: false cancelSeconds: type: integer example: 1000000 isLiked: type: boolean example: false canPurchase: type: boolean example: false isMarkdownDisabled: type: boolean example: true releaseForms: type: array example: [] userLists: type: array example: - fans items: type: string sentRulesType: type: string example: list sentRulesExtra: type: string example: Fans isFromQueue: type: boolean example: true queueId: type: integer example: 123 canUnsendQueue: type: boolean example: true unsendSecondsQueue: type: integer example: 1000000 syncInProcess: type: boolean example: false _meta: type: object properties: _credits: type: object properties: used: type: integer example: 1 balance: type: integer example: 999999953 note: type: string example: Always _cache: type: object properties: is_cached: type: boolean example: false note: type: string example: Cache disabled for this endpoint _rate_limits: type: object properties: limit_minute: type: integer example: 1000 limit_day: type: integer example: 50000 remaining_minute: type: integer example: 994 remaining_day: type: integer example: 49988 tags: - Queue components: securitySchemes: default: type: http scheme: bearer description: Get your API Key from OnlyFansAPI Console - https://app.onlyfansapi.com/api-keys ```` # Publish Queue Item (/api-reference/queue/publish-queue-item) Publish a queue item or "saved for later" item (post or mass message). This means that the item will be sent immediately, regardless of its scheduled date. ## OpenAPI ````yaml https://app.onlyfansapi.com/scribe-docs/openapi.yaml put /api/{account}/queue/{queue_id}/publish openapi: 3.0.3 info: title: OnlyFans API description: "" version: 1.0.0 servers: - url: https://app.onlyfansapi.com security: - default: [] tags: - name: AI Voice Messages description: "" - name: API Keys description: "" - name: Account description: Endpoints for your linked accounts - name: Analytics - Financial description: APIs for retrieving financial analytics data - name: Analytics - Summary description: APIs for retrieving summary analytics data - name: Banking description: Operations related to user banking details, payout methods, legal and tax information, and account country settings. - name: Banned Words description: Reference list of OnlyFans banned words used by the `blockBannedWords` screening parameter - name: Blocked / Restricted Users description: APIs for listing the users an account has blocked or restricted - name: Chargebacks description: "" - name: Chat Messages description: "" - name: Chats description: "" - name: Client Sessions description: "" - name: Connect OnlyFans Account description: "" - name: Data Exports description: APIs for managing data exports - name: Engagement / Messages description: "" - name: Fans description: APIs for managing OnlyFans fans (subscribers) - name: Fans - AI Summary description: APIs for generating and retrieving AI-powered fan profile summaries - name: Following description: APIs for managing OnlyFans followings (people you're subscribed to) - name: Free Trial Links description: APIs for managing Free Trial Links. Revenue totals are net earnings after refunds and chargebacks. `revenue.chargebacks` (or `summary.chargebacks_total` in stats) is the positive cached net amount already excluded from revenue; do not subtract it again. Spender responses include chargebacks across all attributed periods for each fan with positive net revenue. - name: Giphy description: "" - name: Link Tags description: APIs for managing tags on free trial links, tracking links, and Smart Links - name: Mass Messaging description: "" - name: Media description: "" - name: Media Vault description: "" - name: Media Vault Lists description: "" - name: Notifications description: Endpoints for managingr account notifications - name: Payouts description: "" - name: Post Comments description: "" - name: Post Labels description: APIs for managing your post labels - name: Posts description: APIs for managing OnlyFans posts - name: Profile Content description: Read another user's profile content using your connected OnlyFans account. OnlyFans enforces subscription and purchase requirements; these endpoints do not unlock content. Response samples use captured OnlyFans payloads with anonymized IDs, text, and media URLs; OFAPI metadata values are illustrative. - name: Promotions description: "" - name: Public Profiles description: "" - name: Queue description: "" - name: Release Forms description: APIs for managing OnlyFans release forms - name: Saved For Later (Messages) description: "" - name: Saved For Later (Posts) description: "" - name: Settings description: "" - name: Shared Free Trial Links description: APIs for Free Trial Links that other OF creators have shared with this account. Revenue, cost, and spender data are not available for shared links. - name: Shared Tracking Links description: APIs for Tracking Links (campaigns) that other OF creators have shared with this account. Revenue, cost, and spender data are not available for shared campaigns. - name: Smart Link Postbacks description: APIs for managing Smart Link postback destinations - name: Smart Links description: APIs for managing Smart Links (Free Trial Links and Tracking Links with pooled inventory) - name: Statistics description: "" - name: Stored Free Trial Links description: Instant APIs for retrieving stored free trial links from the OnlyFansAPI Cache (free, no credits used). `revenue.total` is net earnings after refunds and chargebacks. `revenue.chargebacks` is the positive cached net amount already excluded from that total; do not subtract it again. - name: Stored Shared Free Trial Links description: Instant APIs for retrieving stored shared Free Trial Links from the OnlyFansAPI Cache (free, no credits used) - name: Stored Shared Tracking Links description: Instant APIs for retrieving stored shared Tracking Links (campaigns) from the OnlyFansAPI Cache (free, no credits used) - name: Stored Tracking Links description: Instant APIs for retrieving stored tracking links from the OnlyFansAPI Cache (free, no credits used). `revenue.total` is net earnings after refunds and chargebacks. `revenue.chargebacks` is the positive cached net amount already excluded from that total; do not subtract it again. - name: Stories description: APIs for managing OnlyFans stories - name: Story Highlights description: APIs for managing OnlyFans story highlights - name: Subscription Bundles description: "" - name: Tracking Links description: APIs for managing tracking links. Revenue totals are net earnings after refunds and chargebacks. `revenue.chargebacks` (or `summary.chargebacks_total` in stats) is the positive cached net amount already excluded from revenue; do not subtract it again. Spender responses include chargebacks across all attributed periods for each fan with positive net revenue. - name: Transactions description: APIs for managing OnlyFans transactions - name: Usage description: Credit usage reporting for your team - name: User List Collections description: "" - name: Users description: APIs for fetching OnlyFans users - name: Webhooks description: "" paths: /api/{account}/queue/{queue_id}/publish: parameters: - in: path name: account description: The Account ID example: acct_XXXXXXXXXXXXXXX required: true schema: type: string - in: path name: queue_id description: The ID of the message queue item. Can be retrieved from Queue or Mass Messaging endpoints example: 1234567890 required: true schema: type: string put: summary: Publish Queue Item operationId: publishQueueItem description: Publish a queue item or "saved for later" item (post or mass message). This means that the item will be sent immediately, regardless of its scheduled date. parameters: [] responses: "200": description: "" content: application/json: schema: type: object example: data: success: true _meta: _credits: used: 1 balance: 999999916 note: Always _cache: is_cached: false note: Cache disabled for this endpoint _rate_limits: limit_minute: 1000 limit_day: 50000 remaining_minute: 999 remaining_day: 49937 properties: data: type: object properties: success: type: boolean example: true _meta: type: object properties: _credits: type: object properties: used: type: integer example: 1 balance: type: integer example: 999999916 note: type: string example: Always _cache: type: object properties: is_cached: type: boolean example: false note: type: string example: Cache disabled for this endpoint _rate_limits: type: object properties: limit_minute: type: integer example: 1000 limit_day: type: integer example: 50000 remaining_minute: type: integer example: 999 remaining_day: type: integer example: 49937 tags: - Queue components: securitySchemes: default: type: http scheme: bearer description: Get your API Key from OnlyFansAPI Console - https://app.onlyfansapi.com/api-keys ```` # Get Account Balances (/api-reference/payouts/get-account-balances) Get the current available and pending balances for the account. ## OpenAPI ````yaml https://app.onlyfansapi.com/scribe-docs/openapi.yaml get /api/{account}/payouts/balances openapi: 3.0.3 info: title: OnlyFans API description: "" version: 1.0.0 servers: - url: https://app.onlyfansapi.com security: - default: [] tags: - name: AI Voice Messages description: "" - name: API Keys description: "" - name: Account description: Endpoints for your linked accounts - name: Analytics - Financial description: APIs for retrieving financial analytics data - name: Analytics - Summary description: APIs for retrieving summary analytics data - name: Banking description: Operations related to user banking details, payout methods, legal and tax information, and account country settings. - name: Banned Words description: Reference list of OnlyFans banned words used by the `blockBannedWords` screening parameter - name: Blocked / Restricted Users description: APIs for listing the users an account has blocked or restricted - name: Chargebacks description: "" - name: Chat Messages description: "" - name: Chats description: "" - name: Client Sessions description: "" - name: Connect OnlyFans Account description: "" - name: Data Exports description: APIs for managing data exports - name: Engagement / Messages description: "" - name: Fans description: APIs for managing OnlyFans fans (subscribers) - name: Fans - AI Summary description: APIs for generating and retrieving AI-powered fan profile summaries - name: Following description: APIs for managing OnlyFans followings (people you're subscribed to) - name: Free Trial Links description: APIs for managing Free Trial Links. Revenue totals are net earnings after refunds and chargebacks. `revenue.chargebacks` (or `summary.chargebacks_total` in stats) is the positive cached net amount already excluded from revenue; do not subtract it again. Spender responses include chargebacks across all attributed periods for each fan with positive net revenue. - name: Giphy description: "" - name: Link Tags description: APIs for managing tags on free trial links, tracking links, and Smart Links - name: Mass Messaging description: "" - name: Media description: "" - name: Media Vault description: "" - name: Media Vault Lists description: "" - name: Notifications description: Endpoints for managingr account notifications - name: Payouts description: "" - name: Post Comments description: "" - name: Post Labels description: APIs for managing your post labels - name: Posts description: APIs for managing OnlyFans posts - name: Profile Content description: Read another user's profile content using your connected OnlyFans account. OnlyFans enforces subscription and purchase requirements; these endpoints do not unlock content. Response samples use captured OnlyFans payloads with anonymized IDs, text, and media URLs; OFAPI metadata values are illustrative. - name: Promotions description: "" - name: Public Profiles description: "" - name: Queue description: "" - name: Release Forms description: APIs for managing OnlyFans release forms - name: Saved For Later (Messages) description: "" - name: Saved For Later (Posts) description: "" - name: Settings description: "" - name: Shared Free Trial Links description: APIs for Free Trial Links that other OF creators have shared with this account. Revenue, cost, and spender data are not available for shared links. - name: Shared Tracking Links description: APIs for Tracking Links (campaigns) that other OF creators have shared with this account. Revenue, cost, and spender data are not available for shared campaigns. - name: Smart Link Postbacks description: APIs for managing Smart Link postback destinations - name: Smart Links description: APIs for managing Smart Links (Free Trial Links and Tracking Links with pooled inventory) - name: Statistics description: "" - name: Stored Free Trial Links description: Instant APIs for retrieving stored free trial links from the OnlyFansAPI Cache (free, no credits used). `revenue.total` is net earnings after refunds and chargebacks. `revenue.chargebacks` is the positive cached net amount already excluded from that total; do not subtract it again. - name: Stored Shared Free Trial Links description: Instant APIs for retrieving stored shared Free Trial Links from the OnlyFansAPI Cache (free, no credits used) - name: Stored Shared Tracking Links description: Instant APIs for retrieving stored shared Tracking Links (campaigns) from the OnlyFansAPI Cache (free, no credits used) - name: Stored Tracking Links description: Instant APIs for retrieving stored tracking links from the OnlyFansAPI Cache (free, no credits used). `revenue.total` is net earnings after refunds and chargebacks. `revenue.chargebacks` is the positive cached net amount already excluded from that total; do not subtract it again. - name: Stories description: APIs for managing OnlyFans stories - name: Story Highlights description: APIs for managing OnlyFans story highlights - name: Subscription Bundles description: "" - name: Tracking Links description: APIs for managing tracking links. Revenue totals are net earnings after refunds and chargebacks. `revenue.chargebacks` (or `summary.chargebacks_total` in stats) is the positive cached net amount already excluded from revenue; do not subtract it again. Spender responses include chargebacks across all attributed periods for each fan with positive net revenue. - name: Transactions description: APIs for managing OnlyFans transactions - name: Usage description: Credit usage reporting for your team - name: User List Collections description: "" - name: Users description: APIs for fetching OnlyFans users - name: Webhooks description: "" paths: /api/{account}/payouts/balances: parameters: - in: path name: account description: The Account ID example: acct_XXXXXXXXXXXXXXX required: true schema: type: string get: summary: Get Account Balances operationId: getAccountBalances description: Get the current available and pending balances for the account. parameters: [] responses: "200": description: "" content: application/json: schema: type: object example: data: payoutAvailable: 123.45 payoutPending: 123.45 currency: USD minPayoutSumm: 20 maxPayoutSumm: 213.45 withdrawalPeriodOptions: - code: manual name: Manual payouts - code: weekly name: Weekly payouts - code: monthly name: Monthly payouts manualPayoutPendingDays: 7 withdrawalPeriod: manual _meta: _credits: used: 1 balance: 25661 note: Always _cache: is_cached: false note: Cache disabled for this endpoint _rate_limits: limit_minute: 1000 limit_day: 5000 remaining_minute: 999 remaining_day: 4994 properties: data: type: object properties: payoutAvailable: type: number example: 123.45 payoutPending: type: number example: 123.45 currency: type: string example: USD minPayoutSumm: type: integer example: 20 maxPayoutSumm: type: number example: 213.45 withdrawalPeriodOptions: type: array example: - code: manual name: Manual payouts - code: weekly name: Weekly payouts - code: monthly name: Monthly payouts items: type: object properties: code: type: string example: manual name: type: string example: Manual payouts manualPayoutPendingDays: type: integer example: 7 withdrawalPeriod: type: string example: manual _meta: type: object properties: _credits: type: object properties: used: type: integer example: 1 balance: type: integer example: 25661 note: type: string example: Always _cache: type: object properties: is_cached: type: boolean example: false note: type: string example: Cache disabled for this endpoint _rate_limits: type: object properties: limit_minute: type: integer example: 1000 limit_day: type: integer example: 5000 remaining_minute: type: integer example: 999 remaining_day: type: integer example: 4994 tags: - Payouts components: securitySchemes: default: type: http scheme: bearer description: Get your API Key from OnlyFansAPI Console - https://app.onlyfansapi.com/api-keys ```` # Get Earning Statistics (/api-reference/payouts/get-earning-statistics) Get total and monthly time-series earning statistics for the account. ## OpenAPI ````yaml https://app.onlyfansapi.com/scribe-docs/openapi.yaml get /api/{account}/payouts/earning-statistics openapi: 3.0.3 info: title: OnlyFans API description: "" version: 1.0.0 servers: - url: https://app.onlyfansapi.com security: - default: [] tags: - name: AI Voice Messages description: "" - name: API Keys description: "" - name: Account description: Endpoints for your linked accounts - name: Analytics - Financial description: APIs for retrieving financial analytics data - name: Analytics - Summary description: APIs for retrieving summary analytics data - name: Banking description: Operations related to user banking details, payout methods, legal and tax information, and account country settings. - name: Banned Words description: Reference list of OnlyFans banned words used by the `blockBannedWords` screening parameter - name: Blocked / Restricted Users description: APIs for listing the users an account has blocked or restricted - name: Chargebacks description: "" - name: Chat Messages description: "" - name: Chats description: "" - name: Client Sessions description: "" - name: Connect OnlyFans Account description: "" - name: Data Exports description: APIs for managing data exports - name: Engagement / Messages description: "" - name: Fans description: APIs for managing OnlyFans fans (subscribers) - name: Fans - AI Summary description: APIs for generating and retrieving AI-powered fan profile summaries - name: Following description: APIs for managing OnlyFans followings (people you're subscribed to) - name: Free Trial Links description: APIs for managing Free Trial Links. Revenue totals are net earnings after refunds and chargebacks. `revenue.chargebacks` (or `summary.chargebacks_total` in stats) is the positive cached net amount already excluded from revenue; do not subtract it again. Spender responses include chargebacks across all attributed periods for each fan with positive net revenue. - name: Giphy description: "" - name: Link Tags description: APIs for managing tags on free trial links, tracking links, and Smart Links - name: Mass Messaging description: "" - name: Media description: "" - name: Media Vault description: "" - name: Media Vault Lists description: "" - name: Notifications description: Endpoints for managingr account notifications - name: Payouts description: "" - name: Post Comments description: "" - name: Post Labels description: APIs for managing your post labels - name: Posts description: APIs for managing OnlyFans posts - name: Profile Content description: Read another user's profile content using your connected OnlyFans account. OnlyFans enforces subscription and purchase requirements; these endpoints do not unlock content. Response samples use captured OnlyFans payloads with anonymized IDs, text, and media URLs; OFAPI metadata values are illustrative. - name: Promotions description: "" - name: Public Profiles description: "" - name: Queue description: "" - name: Release Forms description: APIs for managing OnlyFans release forms - name: Saved For Later (Messages) description: "" - name: Saved For Later (Posts) description: "" - name: Settings description: "" - name: Shared Free Trial Links description: APIs for Free Trial Links that other OF creators have shared with this account. Revenue, cost, and spender data are not available for shared links. - name: Shared Tracking Links description: APIs for Tracking Links (campaigns) that other OF creators have shared with this account. Revenue, cost, and spender data are not available for shared campaigns. - name: Smart Link Postbacks description: APIs for managing Smart Link postback destinations - name: Smart Links description: APIs for managing Smart Links (Free Trial Links and Tracking Links with pooled inventory) - name: Statistics description: "" - name: Stored Free Trial Links description: Instant APIs for retrieving stored free trial links from the OnlyFansAPI Cache (free, no credits used). `revenue.total` is net earnings after refunds and chargebacks. `revenue.chargebacks` is the positive cached net amount already excluded from that total; do not subtract it again. - name: Stored Shared Free Trial Links description: Instant APIs for retrieving stored shared Free Trial Links from the OnlyFansAPI Cache (free, no credits used) - name: Stored Shared Tracking Links description: Instant APIs for retrieving stored shared Tracking Links (campaigns) from the OnlyFansAPI Cache (free, no credits used) - name: Stored Tracking Links description: Instant APIs for retrieving stored tracking links from the OnlyFansAPI Cache (free, no credits used). `revenue.total` is net earnings after refunds and chargebacks. `revenue.chargebacks` is the positive cached net amount already excluded from that total; do not subtract it again. - name: Stories description: APIs for managing OnlyFans stories - name: Story Highlights description: APIs for managing OnlyFans story highlights - name: Subscription Bundles description: "" - name: Tracking Links description: APIs for managing tracking links. Revenue totals are net earnings after refunds and chargebacks. `revenue.chargebacks` (or `summary.chargebacks_total` in stats) is the positive cached net amount already excluded from revenue; do not subtract it again. Spender responses include chargebacks across all attributed periods for each fan with positive net revenue. - name: Transactions description: APIs for managing OnlyFans transactions - name: Usage description: Credit usage reporting for your team - name: User List Collections description: "" - name: Users description: APIs for fetching OnlyFans users - name: Webhooks description: "" paths: /api/{account}/payouts/earning-statistics: parameters: - in: path name: account description: The Account ID example: acct_XXXXXXXXXXXXXXX required: true schema: type: string get: summary: Get Earning Statistics operationId: getEarningStatistics description: Get total and monthly time-series earning statistics for the account. parameters: - in: query name: startDate description: The start date for earning statistics. Keep empty to get all earnings. example: 2025-01-01 00:00:00 required: false schema: type: string description: The start date for earning statistics. Keep empty to get all earnings. example: 2025-01-01 00:00:00 nullable: true - in: query name: endDate description: The end date for earning statistics. Keep empty to get all earnings. example: 2025-01-31 23:59:59 required: false schema: type: string description: The end date for earning statistics. Keep empty to get all earnings. example: 2025-01-31 23:59:59 nullable: true responses: "200": description: "" content: application/json: schema: type: object example: data: list: months: "1735689661": tips: - time: 1735689661 net: 4 gross: 5 total_net: 100 total_gross: 125 subscribes: - time: 1735689661 net: 16 gross: 20 total: tips: total_net: 123.45 total_gross: 123.45 all: total_net: 123.45 total_gross: 123.45 subscribes: total_net: 123.45 total_gross: 123.45 chat_messages: total_net: 123.45 total_gross: 123.45 post: total_net: 123.45 total_gross: 123.45 _meta: _credits: used: 1 balance: 999999842 note: Always _cache: is_cached: false note: Cache disabled for this endpoint _rate_limits: limit_minute: 1000 limit_day: 50000 remaining_minute: 999 remaining_day: 49846 properties: data: type: object properties: list: type: object properties: months: type: object properties: "1735689661": type: object properties: tips: type: array example: - time: 1735689661 net: 4 gross: 5 items: type: object properties: time: type: integer example: 1735689661 net: type: integer example: 4 gross: type: integer example: 5 total_net: type: integer example: 100 total_gross: type: integer example: 125 subscribes: type: array example: - time: 1735689661 net: 16 gross: 20 items: type: object properties: time: type: integer example: 1735689661 net: type: integer example: 16 gross: type: integer example: 20 total: type: object properties: tips: type: object properties: total_net: type: number example: 123.45 total_gross: type: number example: 123.45 all: type: object properties: total_net: type: number example: 123.45 total_gross: type: number example: 123.45 subscribes: type: object properties: total_net: type: number example: 123.45 total_gross: type: number example: 123.45 chat_messages: type: object properties: total_net: type: number example: 123.45 total_gross: type: number example: 123.45 post: type: object properties: total_net: type: number example: 123.45 total_gross: type: number example: 123.45 _meta: type: object properties: _credits: type: object properties: used: type: integer example: 1 balance: type: integer example: 999999842 note: type: string example: Always _cache: type: object properties: is_cached: type: boolean example: false note: type: string example: Cache disabled for this endpoint _rate_limits: type: object properties: limit_minute: type: integer example: 1000 limit_day: type: integer example: 50000 remaining_minute: type: integer example: 999 remaining_day: type: integer example: 49846 tags: - Payouts components: securitySchemes: default: type: http scheme: bearer description: Get your API Key from OnlyFansAPI Console - https://app.onlyfansapi.com/api-keys ```` # Get Eligibility (/api-reference/payouts/get-eligibility) Get the eligibility details for receiving payouts. ## OpenAPI ````yaml https://app.onlyfansapi.com/scribe-docs/openapi.yaml get /api/{account}/payouts/eligibility openapi: 3.0.3 info: title: OnlyFans API description: "" version: 1.0.0 servers: - url: https://app.onlyfansapi.com security: - default: [] tags: - name: AI Voice Messages description: "" - name: API Keys description: "" - name: Account description: Endpoints for your linked accounts - name: Analytics - Financial description: APIs for retrieving financial analytics data - name: Analytics - Summary description: APIs for retrieving summary analytics data - name: Banking description: Operations related to user banking details, payout methods, legal and tax information, and account country settings. - name: Banned Words description: Reference list of OnlyFans banned words used by the `blockBannedWords` screening parameter - name: Blocked / Restricted Users description: APIs for listing the users an account has blocked or restricted - name: Chargebacks description: "" - name: Chat Messages description: "" - name: Chats description: "" - name: Client Sessions description: "" - name: Connect OnlyFans Account description: "" - name: Data Exports description: APIs for managing data exports - name: Engagement / Messages description: "" - name: Fans description: APIs for managing OnlyFans fans (subscribers) - name: Fans - AI Summary description: APIs for generating and retrieving AI-powered fan profile summaries - name: Following description: APIs for managing OnlyFans followings (people you're subscribed to) - name: Free Trial Links description: APIs for managing Free Trial Links. Revenue totals are net earnings after refunds and chargebacks. `revenue.chargebacks` (or `summary.chargebacks_total` in stats) is the positive cached net amount already excluded from revenue; do not subtract it again. Spender responses include chargebacks across all attributed periods for each fan with positive net revenue. - name: Giphy description: "" - name: Link Tags description: APIs for managing tags on free trial links, tracking links, and Smart Links - name: Mass Messaging description: "" - name: Media description: "" - name: Media Vault description: "" - name: Media Vault Lists description: "" - name: Notifications description: Endpoints for managingr account notifications - name: Payouts description: "" - name: Post Comments description: "" - name: Post Labels description: APIs for managing your post labels - name: Posts description: APIs for managing OnlyFans posts - name: Profile Content description: Read another user's profile content using your connected OnlyFans account. OnlyFans enforces subscription and purchase requirements; these endpoints do not unlock content. Response samples use captured OnlyFans payloads with anonymized IDs, text, and media URLs; OFAPI metadata values are illustrative. - name: Promotions description: "" - name: Public Profiles description: "" - name: Queue description: "" - name: Release Forms description: APIs for managing OnlyFans release forms - name: Saved For Later (Messages) description: "" - name: Saved For Later (Posts) description: "" - name: Settings description: "" - name: Shared Free Trial Links description: APIs for Free Trial Links that other OF creators have shared with this account. Revenue, cost, and spender data are not available for shared links. - name: Shared Tracking Links description: APIs for Tracking Links (campaigns) that other OF creators have shared with this account. Revenue, cost, and spender data are not available for shared campaigns. - name: Smart Link Postbacks description: APIs for managing Smart Link postback destinations - name: Smart Links description: APIs for managing Smart Links (Free Trial Links and Tracking Links with pooled inventory) - name: Statistics description: "" - name: Stored Free Trial Links description: Instant APIs for retrieving stored free trial links from the OnlyFansAPI Cache (free, no credits used). `revenue.total` is net earnings after refunds and chargebacks. `revenue.chargebacks` is the positive cached net amount already excluded from that total; do not subtract it again. - name: Stored Shared Free Trial Links description: Instant APIs for retrieving stored shared Free Trial Links from the OnlyFansAPI Cache (free, no credits used) - name: Stored Shared Tracking Links description: Instant APIs for retrieving stored shared Tracking Links (campaigns) from the OnlyFansAPI Cache (free, no credits used) - name: Stored Tracking Links description: Instant APIs for retrieving stored tracking links from the OnlyFansAPI Cache (free, no credits used). `revenue.total` is net earnings after refunds and chargebacks. `revenue.chargebacks` is the positive cached net amount already excluded from that total; do not subtract it again. - name: Stories description: APIs for managing OnlyFans stories - name: Story Highlights description: APIs for managing OnlyFans story highlights - name: Subscription Bundles description: "" - name: Tracking Links description: APIs for managing tracking links. Revenue totals are net earnings after refunds and chargebacks. `revenue.chargebacks` (or `summary.chargebacks_total` in stats) is the positive cached net amount already excluded from revenue; do not subtract it again. Spender responses include chargebacks across all attributed periods for each fan with positive net revenue. - name: Transactions description: APIs for managing OnlyFans transactions - name: Usage description: Credit usage reporting for your team - name: User List Collections description: "" - name: Users description: APIs for fetching OnlyFans users - name: Webhooks description: "" paths: /api/{account}/payouts/eligibility: parameters: - in: path name: account description: The Account ID example: acct_XXXXXXXXXXXXXXX required: true schema: type: string get: summary: Get Eligibility operationId: getEligibility description: Get the eligibility details for receiving payouts. parameters: [] responses: "200": description: "" content: application/json: schema: type: object example: data: isVerifiedReason: false canReceiveManualPayout: true needUpdateBanking: false _meta: _credits: used: 1 balance: 999999846 note: Always _cache: is_cached: false note: Cache disabled for this endpoint _rate_limits: limit_minute: 1000 limit_day: 50000 remaining_minute: 998 remaining_day: 49850 properties: data: type: object properties: isVerifiedReason: type: boolean example: false canReceiveManualPayout: type: boolean example: true needUpdateBanking: type: boolean example: false _meta: type: object properties: _credits: type: object properties: used: type: integer example: 1 balance: type: integer example: 999999846 note: type: string example: Always _cache: type: object properties: is_cached: type: boolean example: false note: type: string example: Cache disabled for this endpoint _rate_limits: type: object properties: limit_minute: type: integer example: 1000 limit_day: type: integer example: 50000 remaining_minute: type: integer example: 998 remaining_day: type: integer example: 49850 tags: - Payouts components: securitySchemes: default: type: http scheme: bearer description: Get your API Key from OnlyFansAPI Console - https://app.onlyfansapi.com/api-keys ```` # List Payout Requests (/api-reference/payouts/list-payout-requests) List all payout requests for the account. ## OpenAPI ````yaml https://app.onlyfansapi.com/scribe-docs/openapi.yaml get /api/{account}/payouts/payout-requests openapi: 3.0.3 info: title: OnlyFans API description: "" version: 1.0.0 servers: - url: https://app.onlyfansapi.com security: - default: [] tags: - name: AI Voice Messages description: "" - name: API Keys description: "" - name: Account description: Endpoints for your linked accounts - name: Analytics - Financial description: APIs for retrieving financial analytics data - name: Analytics - Summary description: APIs for retrieving summary analytics data - name: Banking description: Operations related to user banking details, payout methods, legal and tax information, and account country settings. - name: Banned Words description: Reference list of OnlyFans banned words used by the `blockBannedWords` screening parameter - name: Blocked / Restricted Users description: APIs for listing the users an account has blocked or restricted - name: Chargebacks description: "" - name: Chat Messages description: "" - name: Chats description: "" - name: Client Sessions description: "" - name: Connect OnlyFans Account description: "" - name: Data Exports description: APIs for managing data exports - name: Engagement / Messages description: "" - name: Fans description: APIs for managing OnlyFans fans (subscribers) - name: Fans - AI Summary description: APIs for generating and retrieving AI-powered fan profile summaries - name: Following description: APIs for managing OnlyFans followings (people you're subscribed to) - name: Free Trial Links description: APIs for managing Free Trial Links. Revenue totals are net earnings after refunds and chargebacks. `revenue.chargebacks` (or `summary.chargebacks_total` in stats) is the positive cached net amount already excluded from revenue; do not subtract it again. Spender responses include chargebacks across all attributed periods for each fan with positive net revenue. - name: Giphy description: "" - name: Link Tags description: APIs for managing tags on free trial links, tracking links, and Smart Links - name: Mass Messaging description: "" - name: Media description: "" - name: Media Vault description: "" - name: Media Vault Lists description: "" - name: Notifications description: Endpoints for managingr account notifications - name: Payouts description: "" - name: Post Comments description: "" - name: Post Labels description: APIs for managing your post labels - name: Posts description: APIs for managing OnlyFans posts - name: Profile Content description: Read another user's profile content using your connected OnlyFans account. OnlyFans enforces subscription and purchase requirements; these endpoints do not unlock content. Response samples use captured OnlyFans payloads with anonymized IDs, text, and media URLs; OFAPI metadata values are illustrative. - name: Promotions description: "" - name: Public Profiles description: "" - name: Queue description: "" - name: Release Forms description: APIs for managing OnlyFans release forms - name: Saved For Later (Messages) description: "" - name: Saved For Later (Posts) description: "" - name: Settings description: "" - name: Shared Free Trial Links description: APIs for Free Trial Links that other OF creators have shared with this account. Revenue, cost, and spender data are not available for shared links. - name: Shared Tracking Links description: APIs for Tracking Links (campaigns) that other OF creators have shared with this account. Revenue, cost, and spender data are not available for shared campaigns. - name: Smart Link Postbacks description: APIs for managing Smart Link postback destinations - name: Smart Links description: APIs for managing Smart Links (Free Trial Links and Tracking Links with pooled inventory) - name: Statistics description: "" - name: Stored Free Trial Links description: Instant APIs for retrieving stored free trial links from the OnlyFansAPI Cache (free, no credits used). `revenue.total` is net earnings after refunds and chargebacks. `revenue.chargebacks` is the positive cached net amount already excluded from that total; do not subtract it again. - name: Stored Shared Free Trial Links description: Instant APIs for retrieving stored shared Free Trial Links from the OnlyFansAPI Cache (free, no credits used) - name: Stored Shared Tracking Links description: Instant APIs for retrieving stored shared Tracking Links (campaigns) from the OnlyFansAPI Cache (free, no credits used) - name: Stored Tracking Links description: Instant APIs for retrieving stored tracking links from the OnlyFansAPI Cache (free, no credits used). `revenue.total` is net earnings after refunds and chargebacks. `revenue.chargebacks` is the positive cached net amount already excluded from that total; do not subtract it again. - name: Stories description: APIs for managing OnlyFans stories - name: Story Highlights description: APIs for managing OnlyFans story highlights - name: Subscription Bundles description: "" - name: Tracking Links description: APIs for managing tracking links. Revenue totals are net earnings after refunds and chargebacks. `revenue.chargebacks` (or `summary.chargebacks_total` in stats) is the positive cached net amount already excluded from revenue; do not subtract it again. Spender responses include chargebacks across all attributed periods for each fan with positive net revenue. - name: Transactions description: APIs for managing OnlyFans transactions - name: Usage description: Credit usage reporting for your team - name: User List Collections description: "" - name: Users description: APIs for fetching OnlyFans users - name: Webhooks description: "" paths: /api/{account}/payouts/payout-requests: parameters: - in: path name: account description: The Account ID example: acct_XXXXXXXXXXXXXXX required: true schema: type: string get: summary: List Payout Requests operationId: listPayoutRequests description: List all payout requests for the account. parameters: - in: query name: limit description: Number of payout requests to return example: 10 required: false schema: type: string description: Number of payout requests to return example: 10 - in: query name: offset description: Number of payout requests to skip for pagination example: 0 required: false schema: type: string description: Number of payout requests to skip for pagination example: 0 responses: "200": description: "" content: application/json: schema: type: object example: data: list: - invoiceId: "123" createdAt: 2025-01-01T01:01:01+00:00 amount: 123 currency: USD state: new rejectReason: null marker: 123 _meta: _credits: used: 1 balance: 999999844 note: Always _cache: is_cached: false note: Cache disabled for this endpoint _rate_limits: limit_minute: 1000 limit_day: 50000 remaining_minute: 999 remaining_day: 49848 properties: data: type: object properties: list: type: array example: - invoiceId: "123" createdAt: 2025-01-01T01:01:01+00:00 amount: 123 currency: USD state: new rejectReason: null items: type: object properties: invoiceId: type: string example: "123" createdAt: type: string example: 2025-01-01T01:01:01+00:00 amount: type: integer example: 123 currency: type: string example: USD state: type: string example: new rejectReason: type: string example: null nullable: true marker: type: integer example: 123 _meta: type: object properties: _credits: type: object properties: used: type: integer example: 1 balance: type: integer example: 999999844 note: type: string example: Always _cache: type: object properties: is_cached: type: boolean example: false note: type: string example: Cache disabled for this endpoint _rate_limits: type: object properties: limit_minute: type: integer example: 1000 limit_day: type: integer example: 50000 remaining_minute: type: integer example: 999 remaining_day: type: integer example: 49848 tags: - Payouts components: securitySchemes: default: type: http scheme: bearer description: Get your API Key from OnlyFansAPI Console - https://app.onlyfansapi.com/api-keys ```` # Request Manual Withdrawal (/api-reference/payouts/request-manual-withdrawal) Request a payout withdrawal, if the frequency is set to manual. Refer to our `/payouts/balances` endpoint to retrieve the minimum and maximum withdrawal amounts. ## OpenAPI ````yaml https://app.onlyfansapi.com/scribe-docs/openapi.yaml post /api/{account}/payouts/request-manual-withdrawal openapi: 3.0.3 info: title: OnlyFans API description: "" version: 1.0.0 servers: - url: https://app.onlyfansapi.com security: - default: [] tags: - name: AI Voice Messages description: "" - name: API Keys description: "" - name: Account description: Endpoints for your linked accounts - name: Analytics - Financial description: APIs for retrieving financial analytics data - name: Analytics - Summary description: APIs for retrieving summary analytics data - name: Banking description: Operations related to user banking details, payout methods, legal and tax information, and account country settings. - name: Banned Words description: Reference list of OnlyFans banned words used by the `blockBannedWords` screening parameter - name: Blocked / Restricted Users description: APIs for listing the users an account has blocked or restricted - name: Chargebacks description: "" - name: Chat Messages description: "" - name: Chats description: "" - name: Client Sessions description: "" - name: Connect OnlyFans Account description: "" - name: Data Exports description: APIs for managing data exports - name: Engagement / Messages description: "" - name: Fans description: APIs for managing OnlyFans fans (subscribers) - name: Fans - AI Summary description: APIs for generating and retrieving AI-powered fan profile summaries - name: Following description: APIs for managing OnlyFans followings (people you're subscribed to) - name: Free Trial Links description: APIs for managing Free Trial Links. Revenue totals are net earnings after refunds and chargebacks. `revenue.chargebacks` (or `summary.chargebacks_total` in stats) is the positive cached net amount already excluded from revenue; do not subtract it again. Spender responses include chargebacks across all attributed periods for each fan with positive net revenue. - name: Giphy description: "" - name: Link Tags description: APIs for managing tags on free trial links, tracking links, and Smart Links - name: Mass Messaging description: "" - name: Media description: "" - name: Media Vault description: "" - name: Media Vault Lists description: "" - name: Notifications description: Endpoints for managingr account notifications - name: Payouts description: "" - name: Post Comments description: "" - name: Post Labels description: APIs for managing your post labels - name: Posts description: APIs for managing OnlyFans posts - name: Profile Content description: Read another user's profile content using your connected OnlyFans account. OnlyFans enforces subscription and purchase requirements; these endpoints do not unlock content. Response samples use captured OnlyFans payloads with anonymized IDs, text, and media URLs; OFAPI metadata values are illustrative. - name: Promotions description: "" - name: Public Profiles description: "" - name: Queue description: "" - name: Release Forms description: APIs for managing OnlyFans release forms - name: Saved For Later (Messages) description: "" - name: Saved For Later (Posts) description: "" - name: Settings description: "" - name: Shared Free Trial Links description: APIs for Free Trial Links that other OF creators have shared with this account. Revenue, cost, and spender data are not available for shared links. - name: Shared Tracking Links description: APIs for Tracking Links (campaigns) that other OF creators have shared with this account. Revenue, cost, and spender data are not available for shared campaigns. - name: Smart Link Postbacks description: APIs for managing Smart Link postback destinations - name: Smart Links description: APIs for managing Smart Links (Free Trial Links and Tracking Links with pooled inventory) - name: Statistics description: "" - name: Stored Free Trial Links description: Instant APIs for retrieving stored free trial links from the OnlyFansAPI Cache (free, no credits used). `revenue.total` is net earnings after refunds and chargebacks. `revenue.chargebacks` is the positive cached net amount already excluded from that total; do not subtract it again. - name: Stored Shared Free Trial Links description: Instant APIs for retrieving stored shared Free Trial Links from the OnlyFansAPI Cache (free, no credits used) - name: Stored Shared Tracking Links description: Instant APIs for retrieving stored shared Tracking Links (campaigns) from the OnlyFansAPI Cache (free, no credits used) - name: Stored Tracking Links description: Instant APIs for retrieving stored tracking links from the OnlyFansAPI Cache (free, no credits used). `revenue.total` is net earnings after refunds and chargebacks. `revenue.chargebacks` is the positive cached net amount already excluded from that total; do not subtract it again. - name: Stories description: APIs for managing OnlyFans stories - name: Story Highlights description: APIs for managing OnlyFans story highlights - name: Subscription Bundles description: "" - name: Tracking Links description: APIs for managing tracking links. Revenue totals are net earnings after refunds and chargebacks. `revenue.chargebacks` (or `summary.chargebacks_total` in stats) is the positive cached net amount already excluded from revenue; do not subtract it again. Spender responses include chargebacks across all attributed periods for each fan with positive net revenue. - name: Transactions description: APIs for managing OnlyFans transactions - name: Usage description: Credit usage reporting for your team - name: User List Collections description: "" - name: Users description: APIs for fetching OnlyFans users - name: Webhooks description: "" paths: /api/{account}/payouts/request-manual-withdrawal: parameters: - in: path name: account description: The Account ID example: acct_XXXXXXXXXXXXXXX required: true schema: type: string post: summary: Request Manual Withdrawal operationId: requestManualWithdrawal description: Request a payout withdrawal, if the frequency is set to manual. Refer to our `/payouts/balances` endpoint to retrieve the minimum and maximum withdrawal amounts. parameters: [] responses: "200": description: "" content: application/json: schema: oneOf: - description: "" type: object example: data: list: - state: new rejectReason: null _meta: _credits: used: 1 balance: 1000000028 note: Always _cache: is_cached: false note: Cache disabled for this endpoint _rate_limits: limit_minute: 10000000 limit_day: 50000 remaining_minute: 9999999 remaining_day: 49998 properties: data: type: object properties: list: type: array example: - state: new rejectReason: null items: type: object properties: state: type: string example: new rejectReason: type: string example: null nullable: true _meta: type: object properties: _credits: type: object properties: used: type: integer example: 1 balance: type: integer example: 1000000028 note: type: string example: Always _cache: type: object properties: is_cached: type: boolean example: false note: type: string example: Cache disabled for this endpoint _rate_limits: type: object properties: limit_minute: type: integer example: 10000000 limit_day: type: integer example: 50000 remaining_minute: type: integer example: 9999999 remaining_day: type: integer example: 49998 - description: "" type: object example: data: list: - state: new rejectReason: null _meta: _credits: used: 1 balance: 1000000028 note: Always _cache: is_cached: false note: Cache disabled for this endpoint _rate_limits: limit_minute: 10000000 limit_day: 50000 remaining_minute: 9999999 remaining_day: 49998 properties: data: type: object properties: list: type: array example: - state: new rejectReason: null items: type: object properties: state: type: string example: new rejectReason: type: string example: null nullable: true _meta: type: object properties: _credits: type: object properties: used: type: integer example: 1 balance: type: integer example: 1000000028 note: type: string example: Always _cache: type: object properties: is_cached: type: boolean example: false note: type: string example: Cache disabled for this endpoint _rate_limits: type: object properties: limit_minute: type: integer example: 10000000 limit_day: type: integer example: 50000 remaining_minute: type: integer example: 9999999 remaining_day: type: integer example: 49998 "400": description: "" content: application/json: schema: oneOf: - description: Not enough funds type: object example: error: ONLYFANS_COM_ERROR message: Bad Request - The request could not be understood by the server. description: This error happened most probably because of a bug in the OnlyFans.com API or you sent wrong parameters (like a non-existing user id). onlyfans_response: status: 400 body: error: code: 0 message: Not enough funds to request a payout _meta: _credits: used: 1 balance: 999999866 note: OnlyFans returned an error, but we still had to make an API request to OnlyFans.com _cache: is_cached: false note: Cache disabled for this endpoint _rate_limits: limit_minute: 10000000 limit_day: 50000 remaining_minute: 9999997 remaining_day: 49984 properties: error: type: string example: ONLYFANS_COM_ERROR message: type: string example: Bad Request - The request could not be understood by the server. description: type: string example: This error happened most probably because of a bug in the OnlyFans.com API or you sent wrong parameters (like a non-existing user id). onlyfans_response: type: object properties: status: type: integer example: 400 body: type: object properties: error: type: object properties: code: type: integer example: 0 message: type: string example: Not enough funds to request a payout _meta: type: object properties: _credits: type: object properties: used: type: integer example: 1 balance: type: integer example: 999999866 note: type: string example: OnlyFans returned an error, but we still had to make an API request to OnlyFans.com _cache: type: object properties: is_cached: type: boolean example: false note: type: string example: Cache disabled for this endpoint _rate_limits: type: object properties: limit_minute: type: integer example: 10000000 limit_day: type: integer example: 50000 remaining_minute: type: integer example: 9999997 remaining_day: type: integer example: 49984 - description: Payout frequency is not set to manual type: object example: error: ONLYFANS_COM_ERROR message: Bad Request - The request could not be understood by the server due to malformed syntax. description: This error happened most probably because of a bug in the OnlyFans.com API or you sent wrong parameters (like a non-existing user id). onlyfans_response: status: 400 body: error: code: 0 message: Please contact support to resume payouts _meta: _credits: used: 1 balance: 999999865 note: OnlyFans returned an error, but we still had to make an API request to OnlyFans.com _cache: is_cached: false note: Cache disabled for this endpoint _rate_limits: limit_minute: 10000000 limit_day: 50000 remaining_minute: 9999996 remaining_day: 49983 properties: error: type: string example: ONLYFANS_COM_ERROR message: type: string example: Bad Request - The request could not be understood by the server due to malformed syntax. description: type: string example: This error happened most probably because of a bug in the OnlyFans.com API or you sent wrong parameters (like a non-existing user id). onlyfans_response: type: object properties: status: type: integer example: 400 body: type: object properties: error: type: object properties: code: type: integer example: 0 message: type: string example: Please contact support to resume payouts _meta: type: object properties: _credits: type: object properties: used: type: integer example: 1 balance: type: integer example: 999999865 note: type: string example: OnlyFans returned an error, but we still had to make an API request to OnlyFans.com _cache: type: object properties: is_cached: type: boolean example: false note: type: string example: Cache disabled for this endpoint _rate_limits: type: object properties: limit_minute: type: integer example: 10000000 limit_day: type: integer example: 50000 remaining_minute: type: integer example: 9999996 remaining_day: type: integer example: 49983 tags: - Payouts requestBody: required: true content: application/json: schema: type: object properties: amount: type: integer description: The amount to withdraw. Amount may not be higher than the current balance. example: 50 required: - amount components: securitySchemes: default: type: http scheme: bearer description: Get your API Key from OnlyFansAPI Console - https://app.onlyfansapi.com/api-keys ```` # Update Payout Frequency (/api-reference/payouts/update-payout-frequency) Update the payout frequency for the account (Manual, Weekly or Monthly). ## OpenAPI ````yaml https://app.onlyfansapi.com/scribe-docs/openapi.yaml patch /api/{account}/payouts/payout-frequency openapi: 3.0.3 info: title: OnlyFans API description: "" version: 1.0.0 servers: - url: https://app.onlyfansapi.com security: - default: [] tags: - name: AI Voice Messages description: "" - name: API Keys description: "" - name: Account description: Endpoints for your linked accounts - name: Analytics - Financial description: APIs for retrieving financial analytics data - name: Analytics - Summary description: APIs for retrieving summary analytics data - name: Banking description: Operations related to user banking details, payout methods, legal and tax information, and account country settings. - name: Banned Words description: Reference list of OnlyFans banned words used by the `blockBannedWords` screening parameter - name: Blocked / Restricted Users description: APIs for listing the users an account has blocked or restricted - name: Chargebacks description: "" - name: Chat Messages description: "" - name: Chats description: "" - name: Client Sessions description: "" - name: Connect OnlyFans Account description: "" - name: Data Exports description: APIs for managing data exports - name: Engagement / Messages description: "" - name: Fans description: APIs for managing OnlyFans fans (subscribers) - name: Fans - AI Summary description: APIs for generating and retrieving AI-powered fan profile summaries - name: Following description: APIs for managing OnlyFans followings (people you're subscribed to) - name: Free Trial Links description: APIs for managing Free Trial Links. Revenue totals are net earnings after refunds and chargebacks. `revenue.chargebacks` (or `summary.chargebacks_total` in stats) is the positive cached net amount already excluded from revenue; do not subtract it again. Spender responses include chargebacks across all attributed periods for each fan with positive net revenue. - name: Giphy description: "" - name: Link Tags description: APIs for managing tags on free trial links, tracking links, and Smart Links - name: Mass Messaging description: "" - name: Media description: "" - name: Media Vault description: "" - name: Media Vault Lists description: "" - name: Notifications description: Endpoints for managingr account notifications - name: Payouts description: "" - name: Post Comments description: "" - name: Post Labels description: APIs for managing your post labels - name: Posts description: APIs for managing OnlyFans posts - name: Profile Content description: Read another user's profile content using your connected OnlyFans account. OnlyFans enforces subscription and purchase requirements; these endpoints do not unlock content. Response samples use captured OnlyFans payloads with anonymized IDs, text, and media URLs; OFAPI metadata values are illustrative. - name: Promotions description: "" - name: Public Profiles description: "" - name: Queue description: "" - name: Release Forms description: APIs for managing OnlyFans release forms - name: Saved For Later (Messages) description: "" - name: Saved For Later (Posts) description: "" - name: Settings description: "" - name: Shared Free Trial Links description: APIs for Free Trial Links that other OF creators have shared with this account. Revenue, cost, and spender data are not available for shared links. - name: Shared Tracking Links description: APIs for Tracking Links (campaigns) that other OF creators have shared with this account. Revenue, cost, and spender data are not available for shared campaigns. - name: Smart Link Postbacks description: APIs for managing Smart Link postback destinations - name: Smart Links description: APIs for managing Smart Links (Free Trial Links and Tracking Links with pooled inventory) - name: Statistics description: "" - name: Stored Free Trial Links description: Instant APIs for retrieving stored free trial links from the OnlyFansAPI Cache (free, no credits used). `revenue.total` is net earnings after refunds and chargebacks. `revenue.chargebacks` is the positive cached net amount already excluded from that total; do not subtract it again. - name: Stored Shared Free Trial Links description: Instant APIs for retrieving stored shared Free Trial Links from the OnlyFansAPI Cache (free, no credits used) - name: Stored Shared Tracking Links description: Instant APIs for retrieving stored shared Tracking Links (campaigns) from the OnlyFansAPI Cache (free, no credits used) - name: Stored Tracking Links description: Instant APIs for retrieving stored tracking links from the OnlyFansAPI Cache (free, no credits used). `revenue.total` is net earnings after refunds and chargebacks. `revenue.chargebacks` is the positive cached net amount already excluded from that total; do not subtract it again. - name: Stories description: APIs for managing OnlyFans stories - name: Story Highlights description: APIs for managing OnlyFans story highlights - name: Subscription Bundles description: "" - name: Tracking Links description: APIs for managing tracking links. Revenue totals are net earnings after refunds and chargebacks. `revenue.chargebacks` (or `summary.chargebacks_total` in stats) is the positive cached net amount already excluded from revenue; do not subtract it again. Spender responses include chargebacks across all attributed periods for each fan with positive net revenue. - name: Transactions description: APIs for managing OnlyFans transactions - name: Usage description: Credit usage reporting for your team - name: User List Collections description: "" - name: Users description: APIs for fetching OnlyFans users - name: Webhooks description: "" paths: /api/{account}/payouts/payout-frequency: parameters: - in: path name: account description: The Account ID example: acct_XXXXXXXXXXXXXXX required: true schema: type: string patch: summary: Update Payout Frequency operationId: updatePayoutFrequency description: Update the payout frequency for the account (Manual, Weekly or Monthly). parameters: [] responses: "200": description: "" content: application/json: schema: type: object example: data: success: true _meta: _credits: used: 1 balance: 999999871 note: Always _cache: is_cached: false note: Cache disabled for this endpoint _rate_limits: limit_minute: 10000000 limit_day: 50000 remaining_minute: 9999994 remaining_day: 49994 properties: data: type: object properties: success: type: boolean example: true _meta: type: object properties: _credits: type: object properties: used: type: integer example: 1 balance: type: integer example: 999999871 note: type: string example: Always _cache: type: object properties: is_cached: type: boolean example: false note: type: string example: Cache disabled for this endpoint _rate_limits: type: object properties: limit_minute: type: integer example: 10000000 limit_day: type: integer example: 50000 remaining_minute: type: integer example: 9999994 remaining_day: type: integer example: 49994 tags: - Payouts requestBody: required: true content: application/json: schema: type: object properties: frequency: type: string description: The new payout frequency example: manual enum: - manual - weekly - monthly required: - frequency components: securitySchemes: default: type: http scheme: bearer description: Get your API Key from OnlyFansAPI Console - https://app.onlyfansapi.com/api-keys ```` # Create Invitation Link (/api-reference/release-forms/create-invitation-link) Create a new invitation link for release forms. ## OpenAPI ````yaml https://app.onlyfansapi.com/scribe-docs/openapi.yaml post /api/{account}/release-forms/create-invitation-link openapi: 3.0.3 info: title: OnlyFans API description: "" version: 1.0.0 servers: - url: https://app.onlyfansapi.com security: - default: [] tags: - name: AI Voice Messages description: "" - name: API Keys description: "" - name: Account description: Endpoints for your linked accounts - name: Analytics - Financial description: APIs for retrieving financial analytics data - name: Analytics - Summary description: APIs for retrieving summary analytics data - name: Banking description: Operations related to user banking details, payout methods, legal and tax information, and account country settings. - name: Banned Words description: Reference list of OnlyFans banned words used by the `blockBannedWords` screening parameter - name: Blocked / Restricted Users description: APIs for listing the users an account has blocked or restricted - name: Chargebacks description: "" - name: Chat Messages description: "" - name: Chats description: "" - name: Client Sessions description: "" - name: Connect OnlyFans Account description: "" - name: Data Exports description: APIs for managing data exports - name: Engagement / Messages description: "" - name: Fans description: APIs for managing OnlyFans fans (subscribers) - name: Fans - AI Summary description: APIs for generating and retrieving AI-powered fan profile summaries - name: Following description: APIs for managing OnlyFans followings (people you're subscribed to) - name: Free Trial Links description: APIs for managing Free Trial Links. Revenue totals are net earnings after refunds and chargebacks. `revenue.chargebacks` (or `summary.chargebacks_total` in stats) is the positive cached net amount already excluded from revenue; do not subtract it again. Spender responses include chargebacks across all attributed periods for each fan with positive net revenue. - name: Giphy description: "" - name: Link Tags description: APIs for managing tags on free trial links, tracking links, and Smart Links - name: Mass Messaging description: "" - name: Media description: "" - name: Media Vault description: "" - name: Media Vault Lists description: "" - name: Notifications description: Endpoints for managingr account notifications - name: Payouts description: "" - name: Post Comments description: "" - name: Post Labels description: APIs for managing your post labels - name: Posts description: APIs for managing OnlyFans posts - name: Profile Content description: Read another user's profile content using your connected OnlyFans account. OnlyFans enforces subscription and purchase requirements; these endpoints do not unlock content. Response samples use captured OnlyFans payloads with anonymized IDs, text, and media URLs; OFAPI metadata values are illustrative. - name: Promotions description: "" - name: Public Profiles description: "" - name: Queue description: "" - name: Release Forms description: APIs for managing OnlyFans release forms - name: Saved For Later (Messages) description: "" - name: Saved For Later (Posts) description: "" - name: Settings description: "" - name: Shared Free Trial Links description: APIs for Free Trial Links that other OF creators have shared with this account. Revenue, cost, and spender data are not available for shared links. - name: Shared Tracking Links description: APIs for Tracking Links (campaigns) that other OF creators have shared with this account. Revenue, cost, and spender data are not available for shared campaigns. - name: Smart Link Postbacks description: APIs for managing Smart Link postback destinations - name: Smart Links description: APIs for managing Smart Links (Free Trial Links and Tracking Links with pooled inventory) - name: Statistics description: "" - name: Stored Free Trial Links description: Instant APIs for retrieving stored free trial links from the OnlyFansAPI Cache (free, no credits used). `revenue.total` is net earnings after refunds and chargebacks. `revenue.chargebacks` is the positive cached net amount already excluded from that total; do not subtract it again. - name: Stored Shared Free Trial Links description: Instant APIs for retrieving stored shared Free Trial Links from the OnlyFansAPI Cache (free, no credits used) - name: Stored Shared Tracking Links description: Instant APIs for retrieving stored shared Tracking Links (campaigns) from the OnlyFansAPI Cache (free, no credits used) - name: Stored Tracking Links description: Instant APIs for retrieving stored tracking links from the OnlyFansAPI Cache (free, no credits used). `revenue.total` is net earnings after refunds and chargebacks. `revenue.chargebacks` is the positive cached net amount already excluded from that total; do not subtract it again. - name: Stories description: APIs for managing OnlyFans stories - name: Story Highlights description: APIs for managing OnlyFans story highlights - name: Subscription Bundles description: "" - name: Tracking Links description: APIs for managing tracking links. Revenue totals are net earnings after refunds and chargebacks. `revenue.chargebacks` (or `summary.chargebacks_total` in stats) is the positive cached net amount already excluded from revenue; do not subtract it again. Spender responses include chargebacks across all attributed periods for each fan with positive net revenue. - name: Transactions description: APIs for managing OnlyFans transactions - name: Usage description: Credit usage reporting for your team - name: User List Collections description: "" - name: Users description: APIs for fetching OnlyFans users - name: Webhooks description: "" paths: /api/{account}/release-forms/create-invitation-link: parameters: - in: path name: account description: The Account ID example: acct_XXXXXXXXXXXXXXX required: true schema: type: string post: summary: Create Invitation Link operationId: createInvitationLink description: Create a new invitation link for release forms. parameters: [] responses: "200": description: Success content: application/json: schema: type: object example: data: id: 5000003 type: guest name: Collab Example - 24/7 token: exampleInvitationToken1234567890 date: 2026-03-10T12:15:03+00:00 invitationUrl: https://onlyfans.com?rfguesttoken=exampleInvitationToken1234567890 user: view: t id: 100000001 name: Example Creator username: examplecreator isVerified: true isDeleted: false isActive: true avatar: https://public.onlyfans.com/files/example/avatar.jpg avatarThumbs: c50: https://thumbs.onlyfans.com/public/files/thumbs/c50/example/avatar.jpg c144: https://thumbs.onlyfans.com/public/files/thumbs/c144/example/avatar.jpg _meta: _credits: used: 1 balance: 999999839 note: Always _cache: is_cached: false note: Cache disabled for this endpoint _rate_limits: limit_minute: 10000000 limit_day: 50000 remaining_minute: 9999999 remaining_day: 49997 properties: data: type: object properties: id: type: integer example: 5000003 type: type: string example: guest name: type: string example: Collab Example - 24/7 token: type: string example: exampleInvitationToken1234567890 date: type: string example: 2026-03-10T12:15:03+00:00 invitationUrl: type: string example: https://onlyfans.com?rfguesttoken=exampleInvitationToken1234567890 user: type: object properties: view: type: string example: t id: type: integer example: 100000001 name: type: string example: Example Creator username: type: string example: examplecreator isVerified: type: boolean example: true isDeleted: type: boolean example: false isActive: type: boolean example: true avatar: type: string example: https://public.onlyfans.com/files/example/avatar.jpg avatarThumbs: type: object properties: c50: type: string example: https://thumbs.onlyfans.com/public/files/thumbs/c50/example/avatar.jpg c144: type: string example: https://thumbs.onlyfans.com/public/files/thumbs/c144/example/avatar.jpg _meta: type: object properties: _credits: type: object properties: used: type: integer example: 1 balance: type: integer example: 999999839 note: type: string example: Always _cache: type: object properties: is_cached: type: boolean example: false note: type: string example: Cache disabled for this endpoint _rate_limits: type: object properties: limit_minute: type: integer example: 10000000 limit_day: type: integer example: 50000 remaining_minute: type: integer example: 9999999 remaining_day: type: integer example: 49997 "400": description: Validation error from OnlyFans, e.g. duplicate name content: application/json: schema: type: object example: error: ONLYFANS_COM_ERROR message: Bad Request - The request could not be understood by the server. description: This error happened most probably because of a bug in the OnlyFans.com API or you sent wrong parameters (like a non-existing user id). onlyfans_response: status: 400 body: error: code: 0 message: Name already in use errors: name: - Name already in use properties: error: type: string example: ONLYFANS_COM_ERROR message: type: string example: Bad Request - The request could not be understood by the server. description: type: string example: This error happened most probably because of a bug in the OnlyFans.com API or you sent wrong parameters (like a non-existing user id). onlyfans_response: type: object properties: status: type: integer example: 400 body: type: object properties: error: type: object properties: code: type: integer example: 0 message: type: string example: Name already in use errors: type: object properties: name: type: array example: - Name already in use items: type: string tags: - Release Forms requestBody: required: true content: application/json: schema: type: object properties: name: type: string description: The name of the invitation link. example: Collab Sebastian - 24/7 required: - name components: securitySchemes: default: type: http scheme: bearer description: Get your API Key from OnlyFansAPI Console - https://app.onlyfansapi.com/api-keys ```` # Create Release Form (/api-reference/release-forms/create-release-form) Create a new release form link. ## OpenAPI ````yaml https://app.onlyfansapi.com/scribe-docs/openapi.yaml post /api/{account}/release-forms/create-release-form openapi: 3.0.3 info: title: OnlyFans API description: "" version: 1.0.0 servers: - url: https://app.onlyfansapi.com security: - default: [] tags: - name: AI Voice Messages description: "" - name: API Keys description: "" - name: Account description: Endpoints for your linked accounts - name: Analytics - Financial description: APIs for retrieving financial analytics data - name: Analytics - Summary description: APIs for retrieving summary analytics data - name: Banking description: Operations related to user banking details, payout methods, legal and tax information, and account country settings. - name: Banned Words description: Reference list of OnlyFans banned words used by the `blockBannedWords` screening parameter - name: Blocked / Restricted Users description: APIs for listing the users an account has blocked or restricted - name: Chargebacks description: "" - name: Chat Messages description: "" - name: Chats description: "" - name: Client Sessions description: "" - name: Connect OnlyFans Account description: "" - name: Data Exports description: APIs for managing data exports - name: Engagement / Messages description: "" - name: Fans description: APIs for managing OnlyFans fans (subscribers) - name: Fans - AI Summary description: APIs for generating and retrieving AI-powered fan profile summaries - name: Following description: APIs for managing OnlyFans followings (people you're subscribed to) - name: Free Trial Links description: APIs for managing Free Trial Links. Revenue totals are net earnings after refunds and chargebacks. `revenue.chargebacks` (or `summary.chargebacks_total` in stats) is the positive cached net amount already excluded from revenue; do not subtract it again. Spender responses include chargebacks across all attributed periods for each fan with positive net revenue. - name: Giphy description: "" - name: Link Tags description: APIs for managing tags on free trial links, tracking links, and Smart Links - name: Mass Messaging description: "" - name: Media description: "" - name: Media Vault description: "" - name: Media Vault Lists description: "" - name: Notifications description: Endpoints for managingr account notifications - name: Payouts description: "" - name: Post Comments description: "" - name: Post Labels description: APIs for managing your post labels - name: Posts description: APIs for managing OnlyFans posts - name: Profile Content description: Read another user's profile content using your connected OnlyFans account. OnlyFans enforces subscription and purchase requirements; these endpoints do not unlock content. Response samples use captured OnlyFans payloads with anonymized IDs, text, and media URLs; OFAPI metadata values are illustrative. - name: Promotions description: "" - name: Public Profiles description: "" - name: Queue description: "" - name: Release Forms description: APIs for managing OnlyFans release forms - name: Saved For Later (Messages) description: "" - name: Saved For Later (Posts) description: "" - name: Settings description: "" - name: Shared Free Trial Links description: APIs for Free Trial Links that other OF creators have shared with this account. Revenue, cost, and spender data are not available for shared links. - name: Shared Tracking Links description: APIs for Tracking Links (campaigns) that other OF creators have shared with this account. Revenue, cost, and spender data are not available for shared campaigns. - name: Smart Link Postbacks description: APIs for managing Smart Link postback destinations - name: Smart Links description: APIs for managing Smart Links (Free Trial Links and Tracking Links with pooled inventory) - name: Statistics description: "" - name: Stored Free Trial Links description: Instant APIs for retrieving stored free trial links from the OnlyFansAPI Cache (free, no credits used). `revenue.total` is net earnings after refunds and chargebacks. `revenue.chargebacks` is the positive cached net amount already excluded from that total; do not subtract it again. - name: Stored Shared Free Trial Links description: Instant APIs for retrieving stored shared Free Trial Links from the OnlyFansAPI Cache (free, no credits used) - name: Stored Shared Tracking Links description: Instant APIs for retrieving stored shared Tracking Links (campaigns) from the OnlyFansAPI Cache (free, no credits used) - name: Stored Tracking Links description: Instant APIs for retrieving stored tracking links from the OnlyFansAPI Cache (free, no credits used). `revenue.total` is net earnings after refunds and chargebacks. `revenue.chargebacks` is the positive cached net amount already excluded from that total; do not subtract it again. - name: Stories description: APIs for managing OnlyFans stories - name: Story Highlights description: APIs for managing OnlyFans story highlights - name: Subscription Bundles description: "" - name: Tracking Links description: APIs for managing tracking links. Revenue totals are net earnings after refunds and chargebacks. `revenue.chargebacks` (or `summary.chargebacks_total` in stats) is the positive cached net amount already excluded from revenue; do not subtract it again. Spender responses include chargebacks across all attributed periods for each fan with positive net revenue. - name: Transactions description: APIs for managing OnlyFans transactions - name: Usage description: Credit usage reporting for your team - name: User List Collections description: "" - name: Users description: APIs for fetching OnlyFans users - name: Webhooks description: "" paths: /api/{account}/release-forms/create-release-form: parameters: - in: path name: account description: The Account ID example: acct_XXXXXXXXXXXXXXX required: true schema: type: string post: summary: Create Release Form operationId: createReleaseForm description: Create a new release form link. parameters: [] responses: "200": description: "" content: application/json: schema: type: object example: data: id: 5000004 type: link name: Example Release Form createdAt: 2026-03-10T12:19:56+00:00 approvedAt: null code: exampleReleaseFormCodeABCDEF1234 signature: abcdef0123456789abcdef0123456789abcdef0123456789abcdef0123456789 submissionUrl: https://onlyfans.com/my/release-forms/exampleReleaseFormCodeABCDEF1234?signature=abcdef0123456789abcdef0123456789abcdef0123456789abcdef0123456789 signed: [] signersCount: 1 user: view: x avatar: https://public.onlyfans.com/files/example/avatar.jpg avatarThumbs: c50: https://thumbs.onlyfans.com/public/files/thumbs/c50/example/avatar.jpg c144: https://thumbs.onlyfans.com/public/files/thumbs/c144/example/avatar.jpg header: https://public.onlyfans.com/files/example/header_image.jpg headerSize: width: 945 height: 1260 headerThumbs: w480: https://thumbs.onlyfans.com/public/files/thumbs/w480/example/header_image.jpg w760: https://thumbs.onlyfans.com/public/files/thumbs/w760/example/header_image.jpg id: 100000001 name: Example Creator username: examplecreator isVerified: true canPayInternal: true tipsEnabled: true tipsMin: 5 tipsMinInternal: 1 tipsMax: 200 subscribePrice: 17.99 canTrialSend: false _meta: _credits: used: 1 balance: 999999839 note: Always _cache: is_cached: false note: Cache disabled for this endpoint _rate_limits: limit_minute: 10000000 limit_day: 50000 remaining_minute: 9999999 remaining_day: 49997 properties: data: type: object properties: id: type: integer example: 5000004 type: type: string example: link name: type: string example: Example Release Form createdAt: type: string example: 2026-03-10T12:19:56+00:00 approvedAt: type: string example: null nullable: true code: type: string example: exampleReleaseFormCodeABCDEF1234 signature: type: string example: abcdef0123456789abcdef0123456789abcdef0123456789abcdef0123456789 submissionUrl: type: string example: https://onlyfans.com/my/release-forms/exampleReleaseFormCodeABCDEF1234?signature=abcdef0123456789abcdef0123456789abcdef0123456789abcdef0123456789 signed: type: array example: [] signersCount: type: integer example: 1 user: type: object properties: view: type: string example: x avatar: type: string example: https://public.onlyfans.com/files/example/avatar.jpg avatarThumbs: type: object properties: c50: type: string example: https://thumbs.onlyfans.com/public/files/thumbs/c50/example/avatar.jpg c144: type: string example: https://thumbs.onlyfans.com/public/files/thumbs/c144/example/avatar.jpg header: type: string example: https://public.onlyfans.com/files/example/header_image.jpg headerSize: type: object properties: width: type: integer example: 945 height: type: integer example: 1260 headerThumbs: type: object properties: w480: type: string example: https://thumbs.onlyfans.com/public/files/thumbs/w480/example/header_image.jpg w760: type: string example: https://thumbs.onlyfans.com/public/files/thumbs/w760/example/header_image.jpg id: type: integer example: 100000001 name: type: string example: Example Creator username: type: string example: examplecreator isVerified: type: boolean example: true canPayInternal: type: boolean example: true tipsEnabled: type: boolean example: true tipsMin: type: integer example: 5 tipsMinInternal: type: integer example: 1 tipsMax: type: integer example: 200 subscribePrice: type: number example: 17.99 canTrialSend: type: boolean example: false _meta: type: object properties: _credits: type: object properties: used: type: integer example: 1 balance: type: integer example: 999999839 note: type: string example: Always _cache: type: object properties: is_cached: type: boolean example: false note: type: string example: Cache disabled for this endpoint _rate_limits: type: object properties: limit_minute: type: integer example: 10000000 limit_day: type: integer example: 50000 remaining_minute: type: integer example: 9999999 remaining_day: type: integer example: 49997 tags: - Release Forms requestBody: required: true content: application/json: schema: type: object properties: name: type: string description: The name of the release form. example: Example Release Form required: - name components: securitySchemes: default: type: http scheme: bearer description: Get your API Key from OnlyFansAPI Console - https://app.onlyfansapi.com/api-keys ```` # Hide / Unhide Release Form (/api-reference/release-forms/hide-unhide-release-form) Toggle the visibility of a release form. Returns the new `isHidden` state. ## OpenAPI ````yaml https://app.onlyfansapi.com/scribe-docs/openapi.yaml patch /api/{account}/release-forms/toggle-show openapi: 3.0.3 info: title: OnlyFans API description: "" version: 1.0.0 servers: - url: https://app.onlyfansapi.com security: - default: [] tags: - name: AI Voice Messages description: "" - name: API Keys description: "" - name: Account description: Endpoints for your linked accounts - name: Analytics - Financial description: APIs for retrieving financial analytics data - name: Analytics - Summary description: APIs for retrieving summary analytics data - name: Banking description: Operations related to user banking details, payout methods, legal and tax information, and account country settings. - name: Banned Words description: Reference list of OnlyFans banned words used by the `blockBannedWords` screening parameter - name: Blocked / Restricted Users description: APIs for listing the users an account has blocked or restricted - name: Chargebacks description: "" - name: Chat Messages description: "" - name: Chats description: "" - name: Client Sessions description: "" - name: Connect OnlyFans Account description: "" - name: Data Exports description: APIs for managing data exports - name: Engagement / Messages description: "" - name: Fans description: APIs for managing OnlyFans fans (subscribers) - name: Fans - AI Summary description: APIs for generating and retrieving AI-powered fan profile summaries - name: Following description: APIs for managing OnlyFans followings (people you're subscribed to) - name: Free Trial Links description: APIs for managing Free Trial Links. Revenue totals are net earnings after refunds and chargebacks. `revenue.chargebacks` (or `summary.chargebacks_total` in stats) is the positive cached net amount already excluded from revenue; do not subtract it again. Spender responses include chargebacks across all attributed periods for each fan with positive net revenue. - name: Giphy description: "" - name: Link Tags description: APIs for managing tags on free trial links, tracking links, and Smart Links - name: Mass Messaging description: "" - name: Media description: "" - name: Media Vault description: "" - name: Media Vault Lists description: "" - name: Notifications description: Endpoints for managingr account notifications - name: Payouts description: "" - name: Post Comments description: "" - name: Post Labels description: APIs for managing your post labels - name: Posts description: APIs for managing OnlyFans posts - name: Profile Content description: Read another user's profile content using your connected OnlyFans account. OnlyFans enforces subscription and purchase requirements; these endpoints do not unlock content. Response samples use captured OnlyFans payloads with anonymized IDs, text, and media URLs; OFAPI metadata values are illustrative. - name: Promotions description: "" - name: Public Profiles description: "" - name: Queue description: "" - name: Release Forms description: APIs for managing OnlyFans release forms - name: Saved For Later (Messages) description: "" - name: Saved For Later (Posts) description: "" - name: Settings description: "" - name: Shared Free Trial Links description: APIs for Free Trial Links that other OF creators have shared with this account. Revenue, cost, and spender data are not available for shared links. - name: Shared Tracking Links description: APIs for Tracking Links (campaigns) that other OF creators have shared with this account. Revenue, cost, and spender data are not available for shared campaigns. - name: Smart Link Postbacks description: APIs for managing Smart Link postback destinations - name: Smart Links description: APIs for managing Smart Links (Free Trial Links and Tracking Links with pooled inventory) - name: Statistics description: "" - name: Stored Free Trial Links description: Instant APIs for retrieving stored free trial links from the OnlyFansAPI Cache (free, no credits used). `revenue.total` is net earnings after refunds and chargebacks. `revenue.chargebacks` is the positive cached net amount already excluded from that total; do not subtract it again. - name: Stored Shared Free Trial Links description: Instant APIs for retrieving stored shared Free Trial Links from the OnlyFansAPI Cache (free, no credits used) - name: Stored Shared Tracking Links description: Instant APIs for retrieving stored shared Tracking Links (campaigns) from the OnlyFansAPI Cache (free, no credits used) - name: Stored Tracking Links description: Instant APIs for retrieving stored tracking links from the OnlyFansAPI Cache (free, no credits used). `revenue.total` is net earnings after refunds and chargebacks. `revenue.chargebacks` is the positive cached net amount already excluded from that total; do not subtract it again. - name: Stories description: APIs for managing OnlyFans stories - name: Story Highlights description: APIs for managing OnlyFans story highlights - name: Subscription Bundles description: "" - name: Tracking Links description: APIs for managing tracking links. Revenue totals are net earnings after refunds and chargebacks. `revenue.chargebacks` (or `summary.chargebacks_total` in stats) is the positive cached net amount already excluded from revenue; do not subtract it again. Spender responses include chargebacks across all attributed periods for each fan with positive net revenue. - name: Transactions description: APIs for managing OnlyFans transactions - name: Usage description: Credit usage reporting for your team - name: User List Collections description: "" - name: Users description: APIs for fetching OnlyFans users - name: Webhooks description: "" paths: /api/{account}/release-forms/toggle-show: parameters: - in: path name: account description: The Account ID example: acct_XXXXXXXXXXXXXXX required: true schema: type: string patch: summary: Hide / Unhide Release Form operationId: hideUnhideReleaseForm description: Toggle the visibility of a release form. Returns the new `isHidden` state. parameters: [] responses: "200": description: "" content: application/json: schema: type: object example: data: entityId: 5000002 entityType: link isHidden: true success: true _meta: _credits: used: 1 balance: 999999839 note: Always _cache: is_cached: false note: Cache disabled for this endpoint _rate_limits: limit_minute: 10000000 limit_day: 50000 remaining_minute: 9999999 remaining_day: 49997 properties: data: type: object properties: entityId: type: integer example: 5000002 entityType: type: string example: link isHidden: type: boolean example: true success: type: boolean example: true _meta: type: object properties: _credits: type: object properties: used: type: integer example: 1 balance: type: integer example: 999999839 note: type: string example: Always _cache: type: object properties: is_cached: type: boolean example: false note: type: string example: Cache disabled for this endpoint _rate_limits: type: object properties: limit_minute: type: integer example: 10000000 limit_day: type: integer example: 50000 remaining_minute: type: integer example: 9999999 remaining_day: type: integer example: 49997 tags: - Release Forms requestBody: required: true content: application/json: schema: type: object properties: entityId: type: integer description: The ID of the release form to hide or unhide. example: 1029961 entityType: type: string description: "The type of the release form: `link` or `document`." example: link enum: - link - document required: - entityId - entityType components: securitySchemes: default: type: http scheme: bearer description: Get your API Key from OnlyFansAPI Console - https://app.onlyfansapi.com/api-keys ```` # List Mentions (/api-reference/release-forms/list-mentions) Get a paginated list of mentions: posts where other creators have tagged or mentioned the account in a release form. Pagination is infinite-scroll: follow `_pagination.next_page` (which advances both `offset` and the `fromId` cursor) until it is `null`. ## OpenAPI ````yaml https://app.onlyfansapi.com/scribe-docs/openapi.yaml get /api/{account}/release-forms/mentions openapi: 3.0.3 info: title: OnlyFans API description: "" version: 1.0.0 servers: - url: https://app.onlyfansapi.com security: - default: [] tags: - name: AI Voice Messages description: "" - name: API Keys description: "" - name: Account description: Endpoints for your linked accounts - name: Analytics - Financial description: APIs for retrieving financial analytics data - name: Analytics - Summary description: APIs for retrieving summary analytics data - name: Banking description: Operations related to user banking details, payout methods, legal and tax information, and account country settings. - name: Banned Words description: Reference list of OnlyFans banned words used by the `blockBannedWords` screening parameter - name: Blocked / Restricted Users description: APIs for listing the users an account has blocked or restricted - name: Chargebacks description: "" - name: Chat Messages description: "" - name: Chats description: "" - name: Client Sessions description: "" - name: Connect OnlyFans Account description: "" - name: Data Exports description: APIs for managing data exports - name: Engagement / Messages description: "" - name: Fans description: APIs for managing OnlyFans fans (subscribers) - name: Fans - AI Summary description: APIs for generating and retrieving AI-powered fan profile summaries - name: Following description: APIs for managing OnlyFans followings (people you're subscribed to) - name: Free Trial Links description: APIs for managing Free Trial Links. Revenue totals are net earnings after refunds and chargebacks. `revenue.chargebacks` (or `summary.chargebacks_total` in stats) is the positive cached net amount already excluded from revenue; do not subtract it again. Spender responses include chargebacks across all attributed periods for each fan with positive net revenue. - name: Giphy description: "" - name: Link Tags description: APIs for managing tags on free trial links, tracking links, and Smart Links - name: Mass Messaging description: "" - name: Media description: "" - name: Media Vault description: "" - name: Media Vault Lists description: "" - name: Notifications description: Endpoints for managingr account notifications - name: Payouts description: "" - name: Post Comments description: "" - name: Post Labels description: APIs for managing your post labels - name: Posts description: APIs for managing OnlyFans posts - name: Profile Content description: Read another user's profile content using your connected OnlyFans account. OnlyFans enforces subscription and purchase requirements; these endpoints do not unlock content. Response samples use captured OnlyFans payloads with anonymized IDs, text, and media URLs; OFAPI metadata values are illustrative. - name: Promotions description: "" - name: Public Profiles description: "" - name: Queue description: "" - name: Release Forms description: APIs for managing OnlyFans release forms - name: Saved For Later (Messages) description: "" - name: Saved For Later (Posts) description: "" - name: Settings description: "" - name: Shared Free Trial Links description: APIs for Free Trial Links that other OF creators have shared with this account. Revenue, cost, and spender data are not available for shared links. - name: Shared Tracking Links description: APIs for Tracking Links (campaigns) that other OF creators have shared with this account. Revenue, cost, and spender data are not available for shared campaigns. - name: Smart Link Postbacks description: APIs for managing Smart Link postback destinations - name: Smart Links description: APIs for managing Smart Links (Free Trial Links and Tracking Links with pooled inventory) - name: Statistics description: "" - name: Stored Free Trial Links description: Instant APIs for retrieving stored free trial links from the OnlyFansAPI Cache (free, no credits used). `revenue.total` is net earnings after refunds and chargebacks. `revenue.chargebacks` is the positive cached net amount already excluded from that total; do not subtract it again. - name: Stored Shared Free Trial Links description: Instant APIs for retrieving stored shared Free Trial Links from the OnlyFansAPI Cache (free, no credits used) - name: Stored Shared Tracking Links description: Instant APIs for retrieving stored shared Tracking Links (campaigns) from the OnlyFansAPI Cache (free, no credits used) - name: Stored Tracking Links description: Instant APIs for retrieving stored tracking links from the OnlyFansAPI Cache (free, no credits used). `revenue.total` is net earnings after refunds and chargebacks. `revenue.chargebacks` is the positive cached net amount already excluded from that total; do not subtract it again. - name: Stories description: APIs for managing OnlyFans stories - name: Story Highlights description: APIs for managing OnlyFans story highlights - name: Subscription Bundles description: "" - name: Tracking Links description: APIs for managing tracking links. Revenue totals are net earnings after refunds and chargebacks. `revenue.chargebacks` (or `summary.chargebacks_total` in stats) is the positive cached net amount already excluded from revenue; do not subtract it again. Spender responses include chargebacks across all attributed periods for each fan with positive net revenue. - name: Transactions description: APIs for managing OnlyFans transactions - name: Usage description: Credit usage reporting for your team - name: User List Collections description: "" - name: Users description: APIs for fetching OnlyFans users - name: Webhooks description: "" paths: /api/{account}/release-forms/mentions: parameters: - in: path name: account description: The Account ID example: acct_XXXXXXXXXXXXXXX required: true schema: type: string get: summary: List Mentions operationId: listMentions description: "Get a paginated list of mentions: posts where other creators have tagged or mentioned the account in a release form. Pagination is infinite-scroll: follow `_pagination.next_page` (which advances both `offset` and the `fromId` cursor) until it is `null`." parameters: - in: query name: limit description: Number of mentions to return per page (1-50). Must be at least 1. Must not be greater than 50. example: 10 required: false schema: type: integer description: Number of mentions to return per page (1-50). Must be at least 1. Must not be greater than 50. example: 10 - in: query name: offset description: Number of mentions to skip for pagination. Must be at least 0. example: 0 required: false schema: type: integer description: Number of mentions to skip for pagination. Must be at least 0. example: 0 - in: query name: fromId description: Cursor for infinite-scroll pagination. Use the `lastId` returned by the previous page. Prefer following `_pagination.next_page`, which sets this automatically. example: null required: false schema: type: integer description: Cursor for infinite-scroll pagination. Use the `lastId` returned by the previous page. Prefer following `_pagination.next_page`, which sets this automatically. example: null nullable: true responses: "200": description: "" content: application/json: schema: type: object example: data: list: - id: 9000000002 replacePairs: "{BASE_URL}": https://onlyfans.com "{RECIPIENT_EMAIL}": creator@example.com "{RECIPIENT_ID}": 100000001 "{RECIPIENT_LOGIN}": examplecreator "{RECIPIENT_NAME}": Example Creator "{RECIPIENT_URL}": https://onlyfans.com/examplecreator "{RELATED_USER_ID}": 200000001 "{RELATED_USER_NAME}": Another Creator "{RELATED_USER_LOGIN}": anothercreator "{RELATED_USER_URL}": https://onlyfans.com/anothercreator "{RELATED_USER_AVATAR}": https://thumbs.onlyfans.com/public/files/thumbs/c144/example/avatar.jpg "{RELATED_USER_HAS_AVATAR}": true "{RELATED_USER_SHORT_NAME}": AC createdAt: 2026-06-26T02:09:55+00:00 type: user source: text text: mentioned you in a post canGoToProfile: true isRead: true user: id: 200000001 - id: 9000000001 replacePairs: "{BASE_URL}": https://onlyfans.com "{RECIPIENT_EMAIL}": creator@example.com "{RECIPIENT_ID}": 100000001 "{RECIPIENT_LOGIN}": examplecreator "{RECIPIENT_NAME}": Example Creator "{RECIPIENT_URL}": https://onlyfans.com/examplecreator "{RELATED_USER_ID}": 200000002 "{RELATED_USER_NAME}": Third Creator "{RELATED_USER_LOGIN}": thirdcreator "{RELATED_USER_URL}": https://onlyfans.com/thirdcreator "{RELATED_USER_AVATAR}": https://thumbs.onlyfans.com/public/files/thumbs/c144/example/avatar.jpg "{RELATED_USER_HAS_AVATAR}": true "{RELATED_USER_SHORT_NAME}": TC createdAt: 2026-06-23T04:28:11+00:00 type: user source: tag text: mentioned you in a post canGoToProfile: true isRead: true user: id: 200000002 hasMore: true lastId: 9000000000 _pagination: next_page: https://app.onlyfansapi.com/api/acct_abc123/release-forms/mentions?limit=10&offset=10&fromId=9000000000 _meta: _credits: used: 1 balance: 999999839 note: Always _cache: is_cached: false note: Cache disabled for this endpoint _rate_limits: limit_minute: 10000000 limit_day: 50000 remaining_minute: 9999999 remaining_day: 49997 properties: data: type: object properties: list: type: array example: - id: 9000000002 replacePairs: "{BASE_URL}": https://onlyfans.com "{RECIPIENT_EMAIL}": creator@example.com "{RECIPIENT_ID}": 100000001 "{RECIPIENT_LOGIN}": examplecreator "{RECIPIENT_NAME}": Example Creator "{RECIPIENT_URL}": https://onlyfans.com/examplecreator "{RELATED_USER_ID}": 200000001 "{RELATED_USER_NAME}": Another Creator "{RELATED_USER_LOGIN}": anothercreator "{RELATED_USER_URL}": https://onlyfans.com/anothercreator "{RELATED_USER_AVATAR}": https://thumbs.onlyfans.com/public/files/thumbs/c144/example/avatar.jpg "{RELATED_USER_HAS_AVATAR}": true "{RELATED_USER_SHORT_NAME}": AC createdAt: 2026-06-26T02:09:55+00:00 type: user source: text text: mentioned you in a post canGoToProfile: true isRead: true user: id: 200000001 - id: 9000000001 replacePairs: "{BASE_URL}": https://onlyfans.com "{RECIPIENT_EMAIL}": creator@example.com "{RECIPIENT_ID}": 100000001 "{RECIPIENT_LOGIN}": examplecreator "{RECIPIENT_NAME}": Example Creator "{RECIPIENT_URL}": https://onlyfans.com/examplecreator "{RELATED_USER_ID}": 200000002 "{RELATED_USER_NAME}": Third Creator "{RELATED_USER_LOGIN}": thirdcreator "{RELATED_USER_URL}": https://onlyfans.com/thirdcreator "{RELATED_USER_AVATAR}": https://thumbs.onlyfans.com/public/files/thumbs/c144/example/avatar.jpg "{RELATED_USER_HAS_AVATAR}": true "{RELATED_USER_SHORT_NAME}": TC createdAt: 2026-06-23T04:28:11+00:00 type: user source: tag text: mentioned you in a post canGoToProfile: true isRead: true user: id: 200000002 items: type: object properties: id: type: integer example: 9000000002 replacePairs: type: object properties: "{BASE_URL}": type: string example: https://onlyfans.com "{RECIPIENT_EMAIL}": type: string example: creator@example.com "{RECIPIENT_ID}": type: integer example: 100000001 "{RECIPIENT_LOGIN}": type: string example: examplecreator "{RECIPIENT_NAME}": type: string example: Example Creator "{RECIPIENT_URL}": type: string example: https://onlyfans.com/examplecreator "{RELATED_USER_ID}": type: integer example: 200000001 "{RELATED_USER_NAME}": type: string example: Another Creator "{RELATED_USER_LOGIN}": type: string example: anothercreator "{RELATED_USER_URL}": type: string example: https://onlyfans.com/anothercreator "{RELATED_USER_AVATAR}": type: string example: https://thumbs.onlyfans.com/public/files/thumbs/c144/example/avatar.jpg "{RELATED_USER_HAS_AVATAR}": type: boolean example: true "{RELATED_USER_SHORT_NAME}": type: string example: AC createdAt: type: string example: 2026-06-26T02:09:55+00:00 type: type: string example: user source: type: string example: text text: type: string example: mentioned you in a post canGoToProfile: type: boolean example: true isRead: type: boolean example: true user: type: object properties: id: type: integer example: 200000001 hasMore: type: boolean example: true lastId: type: integer example: 9000000000 _pagination: type: object properties: next_page: type: string example: https://app.onlyfansapi.com/api/acct_abc123/release-forms/mentions?limit=10&offset=10&fromId=9000000000 _meta: type: object properties: _credits: type: object properties: used: type: integer example: 1 balance: type: integer example: 999999839 note: type: string example: Always _cache: type: object properties: is_cached: type: boolean example: false note: type: string example: Cache disabled for this endpoint _rate_limits: type: object properties: limit_minute: type: integer example: 10000000 limit_day: type: integer example: 50000 remaining_minute: type: integer example: 9999999 remaining_day: type: integer example: 49997 tags: - Release Forms components: securitySchemes: default: type: http scheme: bearer description: Get your API Key from OnlyFansAPI Console - https://app.onlyfansapi.com/api-keys ```` # List Release Forms (/api-reference/release-forms/list-release-forms) Get a paginated list of release forms for the account. Use `offset` and `limit` for pagination, following `_pagination.next_page` until it is `null`. Optionally filter with `filter`, sort with `sort`/`sortDirection`, or search by `name`. ## OpenAPI ````yaml https://app.onlyfansapi.com/scribe-docs/openapi.yaml get /api/{account}/release-forms openapi: 3.0.3 info: title: OnlyFans API description: "" version: 1.0.0 servers: - url: https://app.onlyfansapi.com security: - default: [] tags: - name: AI Voice Messages description: "" - name: API Keys description: "" - name: Account description: Endpoints for your linked accounts - name: Analytics - Financial description: APIs for retrieving financial analytics data - name: Analytics - Summary description: APIs for retrieving summary analytics data - name: Banking description: Operations related to user banking details, payout methods, legal and tax information, and account country settings. - name: Banned Words description: Reference list of OnlyFans banned words used by the `blockBannedWords` screening parameter - name: Blocked / Restricted Users description: APIs for listing the users an account has blocked or restricted - name: Chargebacks description: "" - name: Chat Messages description: "" - name: Chats description: "" - name: Client Sessions description: "" - name: Connect OnlyFans Account description: "" - name: Data Exports description: APIs for managing data exports - name: Engagement / Messages description: "" - name: Fans description: APIs for managing OnlyFans fans (subscribers) - name: Fans - AI Summary description: APIs for generating and retrieving AI-powered fan profile summaries - name: Following description: APIs for managing OnlyFans followings (people you're subscribed to) - name: Free Trial Links description: APIs for managing Free Trial Links. Revenue totals are net earnings after refunds and chargebacks. `revenue.chargebacks` (or `summary.chargebacks_total` in stats) is the positive cached net amount already excluded from revenue; do not subtract it again. Spender responses include chargebacks across all attributed periods for each fan with positive net revenue. - name: Giphy description: "" - name: Link Tags description: APIs for managing tags on free trial links, tracking links, and Smart Links - name: Mass Messaging description: "" - name: Media description: "" - name: Media Vault description: "" - name: Media Vault Lists description: "" - name: Notifications description: Endpoints for managingr account notifications - name: Payouts description: "" - name: Post Comments description: "" - name: Post Labels description: APIs for managing your post labels - name: Posts description: APIs for managing OnlyFans posts - name: Profile Content description: Read another user's profile content using your connected OnlyFans account. OnlyFans enforces subscription and purchase requirements; these endpoints do not unlock content. Response samples use captured OnlyFans payloads with anonymized IDs, text, and media URLs; OFAPI metadata values are illustrative. - name: Promotions description: "" - name: Public Profiles description: "" - name: Queue description: "" - name: Release Forms description: APIs for managing OnlyFans release forms - name: Saved For Later (Messages) description: "" - name: Saved For Later (Posts) description: "" - name: Settings description: "" - name: Shared Free Trial Links description: APIs for Free Trial Links that other OF creators have shared with this account. Revenue, cost, and spender data are not available for shared links. - name: Shared Tracking Links description: APIs for Tracking Links (campaigns) that other OF creators have shared with this account. Revenue, cost, and spender data are not available for shared campaigns. - name: Smart Link Postbacks description: APIs for managing Smart Link postback destinations - name: Smart Links description: APIs for managing Smart Links (Free Trial Links and Tracking Links with pooled inventory) - name: Statistics description: "" - name: Stored Free Trial Links description: Instant APIs for retrieving stored free trial links from the OnlyFansAPI Cache (free, no credits used). `revenue.total` is net earnings after refunds and chargebacks. `revenue.chargebacks` is the positive cached net amount already excluded from that total; do not subtract it again. - name: Stored Shared Free Trial Links description: Instant APIs for retrieving stored shared Free Trial Links from the OnlyFansAPI Cache (free, no credits used) - name: Stored Shared Tracking Links description: Instant APIs for retrieving stored shared Tracking Links (campaigns) from the OnlyFansAPI Cache (free, no credits used) - name: Stored Tracking Links description: Instant APIs for retrieving stored tracking links from the OnlyFansAPI Cache (free, no credits used). `revenue.total` is net earnings after refunds and chargebacks. `revenue.chargebacks` is the positive cached net amount already excluded from that total; do not subtract it again. - name: Stories description: APIs for managing OnlyFans stories - name: Story Highlights description: APIs for managing OnlyFans story highlights - name: Subscription Bundles description: "" - name: Tracking Links description: APIs for managing tracking links. Revenue totals are net earnings after refunds and chargebacks. `revenue.chargebacks` (or `summary.chargebacks_total` in stats) is the positive cached net amount already excluded from revenue; do not subtract it again. Spender responses include chargebacks across all attributed periods for each fan with positive net revenue. - name: Transactions description: APIs for managing OnlyFans transactions - name: Usage description: Credit usage reporting for your team - name: User List Collections description: "" - name: Users description: APIs for fetching OnlyFans users - name: Webhooks description: "" paths: /api/{account}/release-forms: parameters: - in: path name: account description: The Account ID example: acct_XXXXXXXXXXXXXXX required: true schema: type: string get: summary: List Release Forms operationId: listReleaseForms description: Get a paginated list of release forms for the account. Use `offset` and `limit` for pagination, following `_pagination.next_page` until it is `null`. Optionally filter with `filter`, sort with `sort`/`sortDirection`, or search by `name`. parameters: - in: query name: limit description: Number of release forms to return per page (1-50). Must be at least 1. Must not be greater than 50. example: 10 required: false schema: type: integer description: Number of release forms to return per page (1-50). Must be at least 1. Must not be greater than 50. example: 10 - in: query name: offset description: Number of release forms to skip for pagination. Must be at least 0. example: 0 required: false schema: type: integer description: Number of release forms to skip for pagination. Must be at least 0. example: 0 - in: query name: filter description: "Filter release forms by state: `all` or `pending`." example: all required: false schema: type: string description: "Filter release forms by state: `all` or `pending`." example: all enum: - all - pending nullable: true - in: query name: sort description: "Sort field: `date` or `name`." example: date required: false schema: type: string description: "Sort field: `date` or `name`." example: date enum: - date - name nullable: true - in: query name: sortDirection description: "Sort direction: `desc` or `asc`." example: desc required: false schema: type: string description: "Sort direction: `desc` or `asc`." example: desc enum: - desc - asc nullable: true - in: query name: name description: Search release forms by name. example: null required: false schema: type: string description: Search release forms by name. example: null nullable: true responses: "200": description: "" content: application/json: schema: type: object example: data: items: - id: 5000001 type: document name: Example Creator user_partner_id: 300000001 code: null date: 2023-01-09 03:53:56 approve_date: 2023-01-09 03:55:23 last_changed: 2026-06-26 06:33:35 status: approved hiddenForRf: false user_name: null hasUser: true - id: 5000002 type: link name: Collab Example - 24/7 user_partner_id: null code: exampleReleaseFormCode1234567890 date: 2026-03-10 12:19:56 approve_date: null last_changed: 2026-03-10 12:19:56 status: pending hiddenForRf: false user_name: null hasUser: false hasMore: true _pagination: next_page: https://app.onlyfansapi.com/api/acct_abc123/release-forms?limit=10&offset=10 _meta: _credits: used: 1 balance: 999999839 note: Always _cache: is_cached: false note: Cache disabled for this endpoint _rate_limits: limit_minute: 10000000 limit_day: 50000 remaining_minute: 9999999 remaining_day: 49997 properties: data: type: object properties: items: type: array example: - id: 5000001 type: document name: Example Creator user_partner_id: 300000001 code: null date: 2023-01-09 03:53:56 approve_date: 2023-01-09 03:55:23 last_changed: 2026-06-26 06:33:35 status: approved hiddenForRf: false user_name: null hasUser: true - id: 5000002 type: link name: Collab Example - 24/7 user_partner_id: null code: exampleReleaseFormCode1234567890 date: 2026-03-10 12:19:56 approve_date: null last_changed: 2026-03-10 12:19:56 status: pending hiddenForRf: false user_name: null hasUser: false items: type: object properties: id: type: integer example: 5000001 type: type: string example: document name: type: string example: Example Creator user_partner_id: type: integer example: 300000001 code: type: string example: null nullable: true date: type: string example: 2023-01-09 03:53:56 approve_date: type: string example: 2023-01-09 03:55:23 last_changed: type: string example: 2026-06-26 06:33:35 status: type: string example: approved hiddenForRf: type: boolean example: false user_name: type: string example: null nullable: true hasUser: type: boolean example: true hasMore: type: boolean example: true _pagination: type: object properties: next_page: type: string example: https://app.onlyfansapi.com/api/acct_abc123/release-forms?limit=10&offset=10 _meta: type: object properties: _credits: type: object properties: used: type: integer example: 1 balance: type: integer example: 999999839 note: type: string example: Always _cache: type: object properties: is_cached: type: boolean example: false note: type: string example: Cache disabled for this endpoint _rate_limits: type: object properties: limit_minute: type: integer example: 10000000 limit_day: type: integer example: 50000 remaining_minute: type: integer example: 9999999 remaining_day: type: integer example: 49997 tags: - Release Forms components: securitySchemes: default: type: http scheme: bearer description: Get your API Key from OnlyFansAPI Console - https://app.onlyfansapi.com/api-keys ```` # List Taggable Users (/api-reference/release-forms/list-taggable-users) Get a paginated list of users that can be tagged in release forms. These are verified creators who have signed release forms to appear in your content. Use `offset` and `limit` for pagination, following `_pagination.next_page` until it is `null`. ## OpenAPI ````yaml https://app.onlyfansapi.com/scribe-docs/openapi.yaml get /api/{account}/release-forms/taggable-users openapi: 3.0.3 info: title: OnlyFans API description: "" version: 1.0.0 servers: - url: https://app.onlyfansapi.com security: - default: [] tags: - name: AI Voice Messages description: "" - name: API Keys description: "" - name: Account description: Endpoints for your linked accounts - name: Analytics - Financial description: APIs for retrieving financial analytics data - name: Analytics - Summary description: APIs for retrieving summary analytics data - name: Banking description: Operations related to user banking details, payout methods, legal and tax information, and account country settings. - name: Banned Words description: Reference list of OnlyFans banned words used by the `blockBannedWords` screening parameter - name: Blocked / Restricted Users description: APIs for listing the users an account has blocked or restricted - name: Chargebacks description: "" - name: Chat Messages description: "" - name: Chats description: "" - name: Client Sessions description: "" - name: Connect OnlyFans Account description: "" - name: Data Exports description: APIs for managing data exports - name: Engagement / Messages description: "" - name: Fans description: APIs for managing OnlyFans fans (subscribers) - name: Fans - AI Summary description: APIs for generating and retrieving AI-powered fan profile summaries - name: Following description: APIs for managing OnlyFans followings (people you're subscribed to) - name: Free Trial Links description: APIs for managing Free Trial Links. Revenue totals are net earnings after refunds and chargebacks. `revenue.chargebacks` (or `summary.chargebacks_total` in stats) is the positive cached net amount already excluded from revenue; do not subtract it again. Spender responses include chargebacks across all attributed periods for each fan with positive net revenue. - name: Giphy description: "" - name: Link Tags description: APIs for managing tags on free trial links, tracking links, and Smart Links - name: Mass Messaging description: "" - name: Media description: "" - name: Media Vault description: "" - name: Media Vault Lists description: "" - name: Notifications description: Endpoints for managingr account notifications - name: Payouts description: "" - name: Post Comments description: "" - name: Post Labels description: APIs for managing your post labels - name: Posts description: APIs for managing OnlyFans posts - name: Profile Content description: Read another user's profile content using your connected OnlyFans account. OnlyFans enforces subscription and purchase requirements; these endpoints do not unlock content. Response samples use captured OnlyFans payloads with anonymized IDs, text, and media URLs; OFAPI metadata values are illustrative. - name: Promotions description: "" - name: Public Profiles description: "" - name: Queue description: "" - name: Release Forms description: APIs for managing OnlyFans release forms - name: Saved For Later (Messages) description: "" - name: Saved For Later (Posts) description: "" - name: Settings description: "" - name: Shared Free Trial Links description: APIs for Free Trial Links that other OF creators have shared with this account. Revenue, cost, and spender data are not available for shared links. - name: Shared Tracking Links description: APIs for Tracking Links (campaigns) that other OF creators have shared with this account. Revenue, cost, and spender data are not available for shared campaigns. - name: Smart Link Postbacks description: APIs for managing Smart Link postback destinations - name: Smart Links description: APIs for managing Smart Links (Free Trial Links and Tracking Links with pooled inventory) - name: Statistics description: "" - name: Stored Free Trial Links description: Instant APIs for retrieving stored free trial links from the OnlyFansAPI Cache (free, no credits used). `revenue.total` is net earnings after refunds and chargebacks. `revenue.chargebacks` is the positive cached net amount already excluded from that total; do not subtract it again. - name: Stored Shared Free Trial Links description: Instant APIs for retrieving stored shared Free Trial Links from the OnlyFansAPI Cache (free, no credits used) - name: Stored Shared Tracking Links description: Instant APIs for retrieving stored shared Tracking Links (campaigns) from the OnlyFansAPI Cache (free, no credits used) - name: Stored Tracking Links description: Instant APIs for retrieving stored tracking links from the OnlyFansAPI Cache (free, no credits used). `revenue.total` is net earnings after refunds and chargebacks. `revenue.chargebacks` is the positive cached net amount already excluded from that total; do not subtract it again. - name: Stories description: APIs for managing OnlyFans stories - name: Story Highlights description: APIs for managing OnlyFans story highlights - name: Subscription Bundles description: "" - name: Tracking Links description: APIs for managing tracking links. Revenue totals are net earnings after refunds and chargebacks. `revenue.chargebacks` (or `summary.chargebacks_total` in stats) is the positive cached net amount already excluded from revenue; do not subtract it again. Spender responses include chargebacks across all attributed periods for each fan with positive net revenue. - name: Transactions description: APIs for managing OnlyFans transactions - name: Usage description: Credit usage reporting for your team - name: User List Collections description: "" - name: Users description: APIs for fetching OnlyFans users - name: Webhooks description: "" paths: /api/{account}/release-forms/taggable-users: parameters: - in: path name: account description: The Account ID example: acct_XXXXXXXXXXXXXXX required: true schema: type: string get: summary: List Taggable Users operationId: listTaggableUsers description: Get a paginated list of users that can be tagged in release forms. These are verified creators who have signed release forms to appear in your content. Use `offset` and `limit` for pagination, following `_pagination.next_page` until it is `null`. parameters: - in: query name: limit description: Number of users to return per page (1-50). Must be at least 1. Must not be greater than 50. example: 50 required: false schema: type: integer description: Number of users to return per page (1-50). Must be at least 1. Must not be greater than 50. example: 50 - in: query name: offset description: Number of users to skip for pagination. Must be at least 0. example: 0 required: false schema: type: integer description: Number of users to skip for pagination. Must be at least 0. example: 0 - in: query name: filter description: "Filter users by type: `all` or `pending`." example: all required: false schema: type: string description: "Filter users by type: `all` or `pending`." example: all enum: - all - pending nullable: true - in: query name: sort description: "Sort field: `date` or `name`." example: date required: false schema: type: string description: "Sort field: `date` or `name`." example: date enum: - date - name nullable: true - in: query name: sortDirection description: "Sort direction: `desc` or `asc`." example: desc required: false schema: type: string description: "Sort direction: `desc` or `asc`." example: desc enum: - desc - asc nullable: true - in: query name: name description: Filter users by name or username. example: null required: false schema: type: string description: Filter users by name or username. example: null nullable: true responses: "200": description: "" content: application/json: schema: type: object example: data: items: - id: 26898170 name: Example User type: user user: view: tu id: 26898170 name: Example User username: exampleuser isVerified: true avatar: https://public.onlyfans.com/files/.../26898170/avatar.jpg avatarThumbs: c50: https://thumbs.onlyfans.com/public/files/thumbs/c50/.../26898170/avatar.jpg c144: https://thumbs.onlyfans.com/public/files/thumbs/c144/.../26898170/avatar.jpg ivStatus: approved isFromGuest: false hiddenForRf: false - id: 43888127 name: Another Creator type: user user: view: tu id: 43888127 name: Another Creator username: anothercreator isVerified: true avatar: https://public.onlyfans.com/files/.../43888127/avatar.jpg avatarThumbs: c50: https://thumbs.onlyfans.com/public/files/thumbs/c50/.../43888127/avatar.jpg c144: https://thumbs.onlyfans.com/public/files/thumbs/c144/.../43888127/avatar.jpg ivStatus: approved isFromGuest: true hiddenForRf: false _pagination: next_page: https://app.onlyfansapi.com/api/acct_abc123/release-forms/taggable-users?limit=50&offset=50 notice: OnlyFans does not return a reliable `hasMore` flag for this endpoint, so pagination is inferred from page fullness. Keep requesting `next_page` until it is `null`. _meta: _credits: used: 1 balance: 999999839 note: Always _cache: is_cached: false note: Cache disabled for this endpoint _rate_limits: limit_minute: 10000000 limit_day: 50000 remaining_minute: 9999999 remaining_day: 49997 properties: data: type: object properties: items: type: array example: - id: 26898170 name: Example User type: user user: view: tu id: 26898170 name: Example User username: exampleuser isVerified: true avatar: https://public.onlyfans.com/files/.../26898170/avatar.jpg avatarThumbs: c50: https://thumbs.onlyfans.com/public/files/thumbs/c50/.../26898170/avatar.jpg c144: https://thumbs.onlyfans.com/public/files/thumbs/c144/.../26898170/avatar.jpg ivStatus: approved isFromGuest: false hiddenForRf: false - id: 43888127 name: Another Creator type: user user: view: tu id: 43888127 name: Another Creator username: anothercreator isVerified: true avatar: https://public.onlyfans.com/files/.../43888127/avatar.jpg avatarThumbs: c50: https://thumbs.onlyfans.com/public/files/thumbs/c50/.../43888127/avatar.jpg c144: https://thumbs.onlyfans.com/public/files/thumbs/c144/.../43888127/avatar.jpg ivStatus: approved isFromGuest: true hiddenForRf: false items: type: object properties: id: type: integer example: 26898170 name: type: string example: Example User type: type: string example: user user: type: object properties: view: type: string example: tu id: type: integer example: 26898170 name: type: string example: Example User username: type: string example: exampleuser isVerified: type: boolean example: true avatar: type: string example: https://public.onlyfans.com/files/.../26898170/avatar.jpg avatarThumbs: type: object properties: c50: type: string example: https://thumbs.onlyfans.com/public/files/thumbs/c50/.../26898170/avatar.jpg c144: type: string example: https://thumbs.onlyfans.com/public/files/thumbs/c144/.../26898170/avatar.jpg ivStatus: type: string example: approved isFromGuest: type: boolean example: false hiddenForRf: type: boolean example: false _pagination: type: object properties: next_page: type: string example: https://app.onlyfansapi.com/api/acct_abc123/release-forms/taggable-users?limit=50&offset=50 notice: type: string example: OnlyFans does not return a reliable `hasMore` flag for this endpoint, so pagination is inferred from page fullness. Keep requesting `next_page` until it is `null`. _meta: type: object properties: _credits: type: object properties: used: type: integer example: 1 balance: type: integer example: 999999839 note: type: string example: Always _cache: type: object properties: is_cached: type: boolean example: false note: type: string example: Cache disabled for this endpoint _rate_limits: type: object properties: limit_minute: type: integer example: 10000000 limit_day: type: integer example: 50000 remaining_minute: type: integer example: 9999999 remaining_day: type: integer example: 49997 tags: - Release Forms components: securitySchemes: default: type: http scheme: bearer description: Get your API Key from OnlyFansAPI Console - https://app.onlyfansapi.com/api-keys ```` # Rename Release Form (/api-reference/release-forms/rename-release-form) Rename a release form. ## OpenAPI ````yaml https://app.onlyfansapi.com/scribe-docs/openapi.yaml patch /api/{account}/release-forms/rename openapi: 3.0.3 info: title: OnlyFans API description: "" version: 1.0.0 servers: - url: https://app.onlyfansapi.com security: - default: [] tags: - name: AI Voice Messages description: "" - name: API Keys description: "" - name: Account description: Endpoints for your linked accounts - name: Analytics - Financial description: APIs for retrieving financial analytics data - name: Analytics - Summary description: APIs for retrieving summary analytics data - name: Banking description: Operations related to user banking details, payout methods, legal and tax information, and account country settings. - name: Banned Words description: Reference list of OnlyFans banned words used by the `blockBannedWords` screening parameter - name: Blocked / Restricted Users description: APIs for listing the users an account has blocked or restricted - name: Chargebacks description: "" - name: Chat Messages description: "" - name: Chats description: "" - name: Client Sessions description: "" - name: Connect OnlyFans Account description: "" - name: Data Exports description: APIs for managing data exports - name: Engagement / Messages description: "" - name: Fans description: APIs for managing OnlyFans fans (subscribers) - name: Fans - AI Summary description: APIs for generating and retrieving AI-powered fan profile summaries - name: Following description: APIs for managing OnlyFans followings (people you're subscribed to) - name: Free Trial Links description: APIs for managing Free Trial Links. Revenue totals are net earnings after refunds and chargebacks. `revenue.chargebacks` (or `summary.chargebacks_total` in stats) is the positive cached net amount already excluded from revenue; do not subtract it again. Spender responses include chargebacks across all attributed periods for each fan with positive net revenue. - name: Giphy description: "" - name: Link Tags description: APIs for managing tags on free trial links, tracking links, and Smart Links - name: Mass Messaging description: "" - name: Media description: "" - name: Media Vault description: "" - name: Media Vault Lists description: "" - name: Notifications description: Endpoints for managingr account notifications - name: Payouts description: "" - name: Post Comments description: "" - name: Post Labels description: APIs for managing your post labels - name: Posts description: APIs for managing OnlyFans posts - name: Profile Content description: Read another user's profile content using your connected OnlyFans account. OnlyFans enforces subscription and purchase requirements; these endpoints do not unlock content. Response samples use captured OnlyFans payloads with anonymized IDs, text, and media URLs; OFAPI metadata values are illustrative. - name: Promotions description: "" - name: Public Profiles description: "" - name: Queue description: "" - name: Release Forms description: APIs for managing OnlyFans release forms - name: Saved For Later (Messages) description: "" - name: Saved For Later (Posts) description: "" - name: Settings description: "" - name: Shared Free Trial Links description: APIs for Free Trial Links that other OF creators have shared with this account. Revenue, cost, and spender data are not available for shared links. - name: Shared Tracking Links description: APIs for Tracking Links (campaigns) that other OF creators have shared with this account. Revenue, cost, and spender data are not available for shared campaigns. - name: Smart Link Postbacks description: APIs for managing Smart Link postback destinations - name: Smart Links description: APIs for managing Smart Links (Free Trial Links and Tracking Links with pooled inventory) - name: Statistics description: "" - name: Stored Free Trial Links description: Instant APIs for retrieving stored free trial links from the OnlyFansAPI Cache (free, no credits used). `revenue.total` is net earnings after refunds and chargebacks. `revenue.chargebacks` is the positive cached net amount already excluded from that total; do not subtract it again. - name: Stored Shared Free Trial Links description: Instant APIs for retrieving stored shared Free Trial Links from the OnlyFansAPI Cache (free, no credits used) - name: Stored Shared Tracking Links description: Instant APIs for retrieving stored shared Tracking Links (campaigns) from the OnlyFansAPI Cache (free, no credits used) - name: Stored Tracking Links description: Instant APIs for retrieving stored tracking links from the OnlyFansAPI Cache (free, no credits used). `revenue.total` is net earnings after refunds and chargebacks. `revenue.chargebacks` is the positive cached net amount already excluded from that total; do not subtract it again. - name: Stories description: APIs for managing OnlyFans stories - name: Story Highlights description: APIs for managing OnlyFans story highlights - name: Subscription Bundles description: "" - name: Tracking Links description: APIs for managing tracking links. Revenue totals are net earnings after refunds and chargebacks. `revenue.chargebacks` (or `summary.chargebacks_total` in stats) is the positive cached net amount already excluded from revenue; do not subtract it again. Spender responses include chargebacks across all attributed periods for each fan with positive net revenue. - name: Transactions description: APIs for managing OnlyFans transactions - name: Usage description: Credit usage reporting for your team - name: User List Collections description: "" - name: Users description: APIs for fetching OnlyFans users - name: Webhooks description: "" paths: /api/{account}/release-forms/rename: parameters: - in: path name: account description: The Account ID example: acct_XXXXXXXXXXXXXXX required: true schema: type: string patch: summary: Rename Release Form operationId: renameReleaseForm description: Rename a release form. parameters: [] responses: "200": description: "" content: application/json: schema: type: object example: data: id: 5000002 name: Collab Example - Renamed success: true _meta: _credits: used: 1 balance: 999999839 note: Always _cache: is_cached: false note: Cache disabled for this endpoint _rate_limits: limit_minute: 10000000 limit_day: 50000 remaining_minute: 9999999 remaining_day: 49997 properties: data: type: object properties: id: type: integer example: 5000002 name: type: string example: Collab Example - Renamed success: type: boolean example: true _meta: type: object properties: _credits: type: object properties: used: type: integer example: 1 balance: type: integer example: 999999839 note: type: string example: Always _cache: type: object properties: is_cached: type: boolean example: false note: type: string example: Cache disabled for this endpoint _rate_limits: type: object properties: limit_minute: type: integer example: 10000000 limit_day: type: integer example: 50000 remaining_minute: type: integer example: 9999999 remaining_day: type: integer example: 49997 tags: - Release Forms requestBody: required: true content: application/json: schema: type: object properties: entityId: type: integer description: The ID of the release form to rename. example: 1029961 name: type: string description: The new name for the release form. example: Collab Sebastian - Renamed required: - entityId - name components: securitySchemes: default: type: http scheme: bearer description: Get your API Key from OnlyFansAPI Console - https://app.onlyfansapi.com/api-keys ```` # Disable Automatic Messaging (/api-reference/saved-for-later-messages/disable-automatic-messaging) Disable automatic messaging of Saved For Later messages. ## OpenAPI ````yaml https://app.onlyfansapi.com/scribe-docs/openapi.yaml patch /api/{account}/saved-for-later/messages/settings/disable-automatic-messaging openapi: 3.0.3 info: title: OnlyFans API description: "" version: 1.0.0 servers: - url: https://app.onlyfansapi.com security: - default: [] tags: - name: AI Voice Messages description: "" - name: API Keys description: "" - name: Account description: Endpoints for your linked accounts - name: Analytics - Financial description: APIs for retrieving financial analytics data - name: Analytics - Summary description: APIs for retrieving summary analytics data - name: Banking description: Operations related to user banking details, payout methods, legal and tax information, and account country settings. - name: Banned Words description: Reference list of OnlyFans banned words used by the `blockBannedWords` screening parameter - name: Blocked / Restricted Users description: APIs for listing the users an account has blocked or restricted - name: Chargebacks description: "" - name: Chat Messages description: "" - name: Chats description: "" - name: Client Sessions description: "" - name: Connect OnlyFans Account description: "" - name: Data Exports description: APIs for managing data exports - name: Engagement / Messages description: "" - name: Fans description: APIs for managing OnlyFans fans (subscribers) - name: Fans - AI Summary description: APIs for generating and retrieving AI-powered fan profile summaries - name: Following description: APIs for managing OnlyFans followings (people you're subscribed to) - name: Free Trial Links description: APIs for managing Free Trial Links. Revenue totals are net earnings after refunds and chargebacks. `revenue.chargebacks` (or `summary.chargebacks_total` in stats) is the positive cached net amount already excluded from revenue; do not subtract it again. Spender responses include chargebacks across all attributed periods for each fan with positive net revenue. - name: Giphy description: "" - name: Link Tags description: APIs for managing tags on free trial links, tracking links, and Smart Links - name: Mass Messaging description: "" - name: Media description: "" - name: Media Vault description: "" - name: Media Vault Lists description: "" - name: Notifications description: Endpoints for managingr account notifications - name: Payouts description: "" - name: Post Comments description: "" - name: Post Labels description: APIs for managing your post labels - name: Posts description: APIs for managing OnlyFans posts - name: Profile Content description: Read another user's profile content using your connected OnlyFans account. OnlyFans enforces subscription and purchase requirements; these endpoints do not unlock content. Response samples use captured OnlyFans payloads with anonymized IDs, text, and media URLs; OFAPI metadata values are illustrative. - name: Promotions description: "" - name: Public Profiles description: "" - name: Queue description: "" - name: Release Forms description: APIs for managing OnlyFans release forms - name: Saved For Later (Messages) description: "" - name: Saved For Later (Posts) description: "" - name: Settings description: "" - name: Shared Free Trial Links description: APIs for Free Trial Links that other OF creators have shared with this account. Revenue, cost, and spender data are not available for shared links. - name: Shared Tracking Links description: APIs for Tracking Links (campaigns) that other OF creators have shared with this account. Revenue, cost, and spender data are not available for shared campaigns. - name: Smart Link Postbacks description: APIs for managing Smart Link postback destinations - name: Smart Links description: APIs for managing Smart Links (Free Trial Links and Tracking Links with pooled inventory) - name: Statistics description: "" - name: Stored Free Trial Links description: Instant APIs for retrieving stored free trial links from the OnlyFansAPI Cache (free, no credits used). `revenue.total` is net earnings after refunds and chargebacks. `revenue.chargebacks` is the positive cached net amount already excluded from that total; do not subtract it again. - name: Stored Shared Free Trial Links description: Instant APIs for retrieving stored shared Free Trial Links from the OnlyFansAPI Cache (free, no credits used) - name: Stored Shared Tracking Links description: Instant APIs for retrieving stored shared Tracking Links (campaigns) from the OnlyFansAPI Cache (free, no credits used) - name: Stored Tracking Links description: Instant APIs for retrieving stored tracking links from the OnlyFansAPI Cache (free, no credits used). `revenue.total` is net earnings after refunds and chargebacks. `revenue.chargebacks` is the positive cached net amount already excluded from that total; do not subtract it again. - name: Stories description: APIs for managing OnlyFans stories - name: Story Highlights description: APIs for managing OnlyFans story highlights - name: Subscription Bundles description: "" - name: Tracking Links description: APIs for managing tracking links. Revenue totals are net earnings after refunds and chargebacks. `revenue.chargebacks` (or `summary.chargebacks_total` in stats) is the positive cached net amount already excluded from revenue; do not subtract it again. Spender responses include chargebacks across all attributed periods for each fan with positive net revenue. - name: Transactions description: APIs for managing OnlyFans transactions - name: Usage description: Credit usage reporting for your team - name: User List Collections description: "" - name: Users description: APIs for fetching OnlyFans users - name: Webhooks description: "" paths: /api/{account}/saved-for-later/messages/settings/disable-automatic-messaging: parameters: - in: path name: account description: The Account ID example: acct_XXXXXXXXXXXXXXX required: true schema: type: string patch: summary: Disable Automatic Messaging operationId: disableAutomaticMessaging description: Disable automatic messaging of Saved For Later messages. parameters: [] responses: "200": description: Success content: application/json: schema: type: object example: data: [] _meta: _credits: used: 1 balance: 999999932 note: Always _cache: is_cached: false note: Cache disabled for this endpoint _rate_limits: limit_minute: 1000 limit_day: 50000 remaining_minute: 997 remaining_day: 49961 properties: data: type: array example: [] _meta: type: object properties: _credits: type: object properties: used: type: integer example: 1 balance: type: integer example: 999999932 note: type: string example: Always _cache: type: object properties: is_cached: type: boolean example: false note: type: string example: Cache disabled for this endpoint _rate_limits: type: object properties: limit_minute: type: integer example: 1000 limit_day: type: integer example: 50000 remaining_minute: type: integer example: 997 remaining_day: type: integer example: 49961 tags: - Saved For Later (Messages) components: securitySchemes: default: type: http scheme: bearer description: Get your API Key from OnlyFansAPI Console - https://app.onlyfansapi.com/api-keys ```` # Enable/Update Automatic Messaging (/api-reference/saved-for-later-messages/enable-update-automatic-messaging) Enable or update automatic messaging of Saved For Later messages. ## OpenAPI ````yaml https://app.onlyfansapi.com/scribe-docs/openapi.yaml patch /api/{account}/saved-for-later/messages/settings/enable-or-update-automatic-messaging openapi: 3.0.3 info: title: OnlyFans API description: "" version: 1.0.0 servers: - url: https://app.onlyfansapi.com security: - default: [] tags: - name: AI Voice Messages description: "" - name: API Keys description: "" - name: Account description: Endpoints for your linked accounts - name: Analytics - Financial description: APIs for retrieving financial analytics data - name: Analytics - Summary description: APIs for retrieving summary analytics data - name: Banking description: Operations related to user banking details, payout methods, legal and tax information, and account country settings. - name: Banned Words description: Reference list of OnlyFans banned words used by the `blockBannedWords` screening parameter - name: Blocked / Restricted Users description: APIs for listing the users an account has blocked or restricted - name: Chargebacks description: "" - name: Chat Messages description: "" - name: Chats description: "" - name: Client Sessions description: "" - name: Connect OnlyFans Account description: "" - name: Data Exports description: APIs for managing data exports - name: Engagement / Messages description: "" - name: Fans description: APIs for managing OnlyFans fans (subscribers) - name: Fans - AI Summary description: APIs for generating and retrieving AI-powered fan profile summaries - name: Following description: APIs for managing OnlyFans followings (people you're subscribed to) - name: Free Trial Links description: APIs for managing Free Trial Links. Revenue totals are net earnings after refunds and chargebacks. `revenue.chargebacks` (or `summary.chargebacks_total` in stats) is the positive cached net amount already excluded from revenue; do not subtract it again. Spender responses include chargebacks across all attributed periods for each fan with positive net revenue. - name: Giphy description: "" - name: Link Tags description: APIs for managing tags on free trial links, tracking links, and Smart Links - name: Mass Messaging description: "" - name: Media description: "" - name: Media Vault description: "" - name: Media Vault Lists description: "" - name: Notifications description: Endpoints for managingr account notifications - name: Payouts description: "" - name: Post Comments description: "" - name: Post Labels description: APIs for managing your post labels - name: Posts description: APIs for managing OnlyFans posts - name: Profile Content description: Read another user's profile content using your connected OnlyFans account. OnlyFans enforces subscription and purchase requirements; these endpoints do not unlock content. Response samples use captured OnlyFans payloads with anonymized IDs, text, and media URLs; OFAPI metadata values are illustrative. - name: Promotions description: "" - name: Public Profiles description: "" - name: Queue description: "" - name: Release Forms description: APIs for managing OnlyFans release forms - name: Saved For Later (Messages) description: "" - name: Saved For Later (Posts) description: "" - name: Settings description: "" - name: Shared Free Trial Links description: APIs for Free Trial Links that other OF creators have shared with this account. Revenue, cost, and spender data are not available for shared links. - name: Shared Tracking Links description: APIs for Tracking Links (campaigns) that other OF creators have shared with this account. Revenue, cost, and spender data are not available for shared campaigns. - name: Smart Link Postbacks description: APIs for managing Smart Link postback destinations - name: Smart Links description: APIs for managing Smart Links (Free Trial Links and Tracking Links with pooled inventory) - name: Statistics description: "" - name: Stored Free Trial Links description: Instant APIs for retrieving stored free trial links from the OnlyFansAPI Cache (free, no credits used). `revenue.total` is net earnings after refunds and chargebacks. `revenue.chargebacks` is the positive cached net amount already excluded from that total; do not subtract it again. - name: Stored Shared Free Trial Links description: Instant APIs for retrieving stored shared Free Trial Links from the OnlyFansAPI Cache (free, no credits used) - name: Stored Shared Tracking Links description: Instant APIs for retrieving stored shared Tracking Links (campaigns) from the OnlyFansAPI Cache (free, no credits used) - name: Stored Tracking Links description: Instant APIs for retrieving stored tracking links from the OnlyFansAPI Cache (free, no credits used). `revenue.total` is net earnings after refunds and chargebacks. `revenue.chargebacks` is the positive cached net amount already excluded from that total; do not subtract it again. - name: Stories description: APIs for managing OnlyFans stories - name: Story Highlights description: APIs for managing OnlyFans story highlights - name: Subscription Bundles description: "" - name: Tracking Links description: APIs for managing tracking links. Revenue totals are net earnings after refunds and chargebacks. `revenue.chargebacks` (or `summary.chargebacks_total` in stats) is the positive cached net amount already excluded from revenue; do not subtract it again. Spender responses include chargebacks across all attributed periods for each fan with positive net revenue. - name: Transactions description: APIs for managing OnlyFans transactions - name: Usage description: Credit usage reporting for your team - name: User List Collections description: "" - name: Users description: APIs for fetching OnlyFans users - name: Webhooks description: "" paths: /api/{account}/saved-for-later/messages/settings/enable-or-update-automatic-messaging: parameters: - in: path name: account description: The Account ID example: acct_XXXXXXXXXXXXXXX required: true schema: type: string patch: summary: Enable/Update Automatic Messaging operationId: enableUpdateAutomaticMessaging description: Enable or update automatic messaging of Saved For Later messages. parameters: [] responses: "200": description: Success content: application/json: schema: type: object example: data: period: 12 _meta: _credits: used: 1 balance: 999999933 note: Always _cache: is_cached: false note: Cache disabled for this endpoint _rate_limits: limit_minute: 1000 limit_day: 50000 remaining_minute: 998 remaining_day: 49962 properties: data: type: object properties: period: type: integer example: 12 _meta: type: object properties: _credits: type: object properties: used: type: integer example: 1 balance: type: integer example: 999999933 note: type: string example: Always _cache: type: object properties: is_cached: type: boolean example: false note: type: string example: Cache disabled for this endpoint _rate_limits: type: object properties: limit_minute: type: integer example: 1000 limit_day: type: integer example: 50000 remaining_minute: type: integer example: 998 remaining_day: type: integer example: 49962 tags: - Saved For Later (Messages) requestBody: required: true content: application/json: schema: type: object properties: period: type: integer description: The automatic messaging interval (in hours) example: 12 enum: - 6 - 12 - 24 - 48 required: - period components: securitySchemes: default: type: http scheme: bearer description: Get your API Key from OnlyFansAPI Console - https://app.onlyfansapi.com/api-keys ```` # Get Message Settings (/api-reference/saved-for-later-messages/get-message-settings) Get the Saved For Later message settings. ## OpenAPI ````yaml https://app.onlyfansapi.com/scribe-docs/openapi.yaml get /api/{account}/saved-for-later/messages/settings openapi: 3.0.3 info: title: OnlyFans API description: "" version: 1.0.0 servers: - url: https://app.onlyfansapi.com security: - default: [] tags: - name: AI Voice Messages description: "" - name: API Keys description: "" - name: Account description: Endpoints for your linked accounts - name: Analytics - Financial description: APIs for retrieving financial analytics data - name: Analytics - Summary description: APIs for retrieving summary analytics data - name: Banking description: Operations related to user banking details, payout methods, legal and tax information, and account country settings. - name: Banned Words description: Reference list of OnlyFans banned words used by the `blockBannedWords` screening parameter - name: Blocked / Restricted Users description: APIs for listing the users an account has blocked or restricted - name: Chargebacks description: "" - name: Chat Messages description: "" - name: Chats description: "" - name: Client Sessions description: "" - name: Connect OnlyFans Account description: "" - name: Data Exports description: APIs for managing data exports - name: Engagement / Messages description: "" - name: Fans description: APIs for managing OnlyFans fans (subscribers) - name: Fans - AI Summary description: APIs for generating and retrieving AI-powered fan profile summaries - name: Following description: APIs for managing OnlyFans followings (people you're subscribed to) - name: Free Trial Links description: APIs for managing Free Trial Links. Revenue totals are net earnings after refunds and chargebacks. `revenue.chargebacks` (or `summary.chargebacks_total` in stats) is the positive cached net amount already excluded from revenue; do not subtract it again. Spender responses include chargebacks across all attributed periods for each fan with positive net revenue. - name: Giphy description: "" - name: Link Tags description: APIs for managing tags on free trial links, tracking links, and Smart Links - name: Mass Messaging description: "" - name: Media description: "" - name: Media Vault description: "" - name: Media Vault Lists description: "" - name: Notifications description: Endpoints for managingr account notifications - name: Payouts description: "" - name: Post Comments description: "" - name: Post Labels description: APIs for managing your post labels - name: Posts description: APIs for managing OnlyFans posts - name: Profile Content description: Read another user's profile content using your connected OnlyFans account. OnlyFans enforces subscription and purchase requirements; these endpoints do not unlock content. Response samples use captured OnlyFans payloads with anonymized IDs, text, and media URLs; OFAPI metadata values are illustrative. - name: Promotions description: "" - name: Public Profiles description: "" - name: Queue description: "" - name: Release Forms description: APIs for managing OnlyFans release forms - name: Saved For Later (Messages) description: "" - name: Saved For Later (Posts) description: "" - name: Settings description: "" - name: Shared Free Trial Links description: APIs for Free Trial Links that other OF creators have shared with this account. Revenue, cost, and spender data are not available for shared links. - name: Shared Tracking Links description: APIs for Tracking Links (campaigns) that other OF creators have shared with this account. Revenue, cost, and spender data are not available for shared campaigns. - name: Smart Link Postbacks description: APIs for managing Smart Link postback destinations - name: Smart Links description: APIs for managing Smart Links (Free Trial Links and Tracking Links with pooled inventory) - name: Statistics description: "" - name: Stored Free Trial Links description: Instant APIs for retrieving stored free trial links from the OnlyFansAPI Cache (free, no credits used). `revenue.total` is net earnings after refunds and chargebacks. `revenue.chargebacks` is the positive cached net amount already excluded from that total; do not subtract it again. - name: Stored Shared Free Trial Links description: Instant APIs for retrieving stored shared Free Trial Links from the OnlyFansAPI Cache (free, no credits used) - name: Stored Shared Tracking Links description: Instant APIs for retrieving stored shared Tracking Links (campaigns) from the OnlyFansAPI Cache (free, no credits used) - name: Stored Tracking Links description: Instant APIs for retrieving stored tracking links from the OnlyFansAPI Cache (free, no credits used). `revenue.total` is net earnings after refunds and chargebacks. `revenue.chargebacks` is the positive cached net amount already excluded from that total; do not subtract it again. - name: Stories description: APIs for managing OnlyFans stories - name: Story Highlights description: APIs for managing OnlyFans story highlights - name: Subscription Bundles description: "" - name: Tracking Links description: APIs for managing tracking links. Revenue totals are net earnings after refunds and chargebacks. `revenue.chargebacks` (or `summary.chargebacks_total` in stats) is the positive cached net amount already excluded from revenue; do not subtract it again. Spender responses include chargebacks across all attributed periods for each fan with positive net revenue. - name: Transactions description: APIs for managing OnlyFans transactions - name: Usage description: Credit usage reporting for your team - name: User List Collections description: "" - name: Users description: APIs for fetching OnlyFans users - name: Webhooks description: "" paths: /api/{account}/saved-for-later/messages/settings: parameters: - in: path name: account description: The Account ID example: acct_XXXXXXXXXXXXXXX required: true schema: type: string get: summary: Get Message Settings operationId: getMessageSettings description: Get the Saved For Later message settings. parameters: [] responses: "200": description: Success content: application/json: schema: type: object example: data: currentCode: 12 isEnabled: false options: - 6 - 12 - 24 - 48 _meta: _credits: used: 1 balance: 999999934 note: Always _cache: is_cached: false note: Cache disabled for this endpoint _rate_limits: limit_minute: 1000 limit_day: 50000 remaining_minute: 999 remaining_day: 49963 properties: data: type: object properties: currentCode: type: integer example: 12 isEnabled: type: boolean example: false options: type: array example: - 6 - 12 - 24 - 48 items: type: integer _meta: type: object properties: _credits: type: object properties: used: type: integer example: 1 balance: type: integer example: 999999934 note: type: string example: Always _cache: type: object properties: is_cached: type: boolean example: false note: type: string example: Cache disabled for this endpoint _rate_limits: type: object properties: limit_minute: type: integer example: 1000 limit_day: type: integer example: 50000 remaining_minute: type: integer example: 999 remaining_day: type: integer example: 49963 tags: - Saved For Later (Messages) components: securitySchemes: default: type: http scheme: bearer description: Get your API Key from OnlyFansAPI Console - https://app.onlyfansapi.com/api-keys ```` # List Saved For Later Messages (/api-reference/saved-for-later-messages/list-saved-for-later-messages) List all messages that are marked as "Save For Later". ## OpenAPI ````yaml https://app.onlyfansapi.com/scribe-docs/openapi.yaml get /api/{account}/saved-for-later/messages openapi: 3.0.3 info: title: OnlyFans API description: "" version: 1.0.0 servers: - url: https://app.onlyfansapi.com security: - default: [] tags: - name: AI Voice Messages description: "" - name: API Keys description: "" - name: Account description: Endpoints for your linked accounts - name: Analytics - Financial description: APIs for retrieving financial analytics data - name: Analytics - Summary description: APIs for retrieving summary analytics data - name: Banking description: Operations related to user banking details, payout methods, legal and tax information, and account country settings. - name: Banned Words description: Reference list of OnlyFans banned words used by the `blockBannedWords` screening parameter - name: Blocked / Restricted Users description: APIs for listing the users an account has blocked or restricted - name: Chargebacks description: "" - name: Chat Messages description: "" - name: Chats description: "" - name: Client Sessions description: "" - name: Connect OnlyFans Account description: "" - name: Data Exports description: APIs for managing data exports - name: Engagement / Messages description: "" - name: Fans description: APIs for managing OnlyFans fans (subscribers) - name: Fans - AI Summary description: APIs for generating and retrieving AI-powered fan profile summaries - name: Following description: APIs for managing OnlyFans followings (people you're subscribed to) - name: Free Trial Links description: APIs for managing Free Trial Links. Revenue totals are net earnings after refunds and chargebacks. `revenue.chargebacks` (or `summary.chargebacks_total` in stats) is the positive cached net amount already excluded from revenue; do not subtract it again. Spender responses include chargebacks across all attributed periods for each fan with positive net revenue. - name: Giphy description: "" - name: Link Tags description: APIs for managing tags on free trial links, tracking links, and Smart Links - name: Mass Messaging description: "" - name: Media description: "" - name: Media Vault description: "" - name: Media Vault Lists description: "" - name: Notifications description: Endpoints for managingr account notifications - name: Payouts description: "" - name: Post Comments description: "" - name: Post Labels description: APIs for managing your post labels - name: Posts description: APIs for managing OnlyFans posts - name: Profile Content description: Read another user's profile content using your connected OnlyFans account. OnlyFans enforces subscription and purchase requirements; these endpoints do not unlock content. Response samples use captured OnlyFans payloads with anonymized IDs, text, and media URLs; OFAPI metadata values are illustrative. - name: Promotions description: "" - name: Public Profiles description: "" - name: Queue description: "" - name: Release Forms description: APIs for managing OnlyFans release forms - name: Saved For Later (Messages) description: "" - name: Saved For Later (Posts) description: "" - name: Settings description: "" - name: Shared Free Trial Links description: APIs for Free Trial Links that other OF creators have shared with this account. Revenue, cost, and spender data are not available for shared links. - name: Shared Tracking Links description: APIs for Tracking Links (campaigns) that other OF creators have shared with this account. Revenue, cost, and spender data are not available for shared campaigns. - name: Smart Link Postbacks description: APIs for managing Smart Link postback destinations - name: Smart Links description: APIs for managing Smart Links (Free Trial Links and Tracking Links with pooled inventory) - name: Statistics description: "" - name: Stored Free Trial Links description: Instant APIs for retrieving stored free trial links from the OnlyFansAPI Cache (free, no credits used). `revenue.total` is net earnings after refunds and chargebacks. `revenue.chargebacks` is the positive cached net amount already excluded from that total; do not subtract it again. - name: Stored Shared Free Trial Links description: Instant APIs for retrieving stored shared Free Trial Links from the OnlyFansAPI Cache (free, no credits used) - name: Stored Shared Tracking Links description: Instant APIs for retrieving stored shared Tracking Links (campaigns) from the OnlyFansAPI Cache (free, no credits used) - name: Stored Tracking Links description: Instant APIs for retrieving stored tracking links from the OnlyFansAPI Cache (free, no credits used). `revenue.total` is net earnings after refunds and chargebacks. `revenue.chargebacks` is the positive cached net amount already excluded from that total; do not subtract it again. - name: Stories description: APIs for managing OnlyFans stories - name: Story Highlights description: APIs for managing OnlyFans story highlights - name: Subscription Bundles description: "" - name: Tracking Links description: APIs for managing tracking links. Revenue totals are net earnings after refunds and chargebacks. `revenue.chargebacks` (or `summary.chargebacks_total` in stats) is the positive cached net amount already excluded from revenue; do not subtract it again. Spender responses include chargebacks across all attributed periods for each fan with positive net revenue. - name: Transactions description: APIs for managing OnlyFans transactions - name: Usage description: Credit usage reporting for your team - name: User List Collections description: "" - name: Users description: APIs for fetching OnlyFans users - name: Webhooks description: "" paths: /api/{account}/saved-for-later/messages: parameters: - in: path name: account description: The Account ID example: acct_XXXXXXXXXXXXXXX required: true schema: type: string get: summary: List Saved For Later Messages operationId: listSavedForLaterMessages description: List all messages that are marked as "Save For Later". parameters: - in: query name: limit description: Maximum number of messages to return (default = 10) example: 10 required: true schema: type: integer description: Maximum number of messages to return (default = 10) example: 10 - in: query name: offset description: Offset for pagination (default = 0) example: 0 required: true schema: type: integer description: Offset for pagination (default = 0) example: 0 responses: "200": description: Success content: application/json: schema: type: object example: data: list: - id: 123 type: chat publishDateTime: null createdDateTime: 2025-01-01T01:01:01+01:01 entity: responseType: message id: 123 text:Text
rawText: Text giphyId: null lockedText: false isNew: true isFree: true isOpened: false price: 0 isMediaReady: true mediaCount: 0 media: [] previews: [] createdAt: 2025-01-01T01:01:01+01:01 changedAt: 2025-01-01T01:01:01+01:01 scheduledAt: null isTip: false cancelSeconds: 1000000 isLiked: false canPurchase: false isMarkdownDisabled: true releaseForms: [] userIds: - "123" sentRulesType: user sentRulesExtra: username isFromQueue: true queueId: 123 canUnsendQueue: true unsendSecondsQueue: 1000000 hasMore: false syncInProcess: false _meta: _credits: used: 1 balance: 999999943 note: Always _cache: is_cached: false note: Cache disabled for this endpoint _rate_limits: limit_minute: 1000 limit_day: 50000 remaining_minute: 999 remaining_day: 49974 properties: data: type: object properties: list: type: array example: - id: 123 type: chat publishDateTime: null createdDateTime: 2025-01-01T01:01:01+01:01 entity: responseType: message id: 123 text:Text
rawText: Text giphyId: null lockedText: false isNew: true isFree: true isOpened: false price: 0 isMediaReady: true mediaCount: 0 media: [] previews: [] createdAt: 2025-01-01T01:01:01+01:01 changedAt: 2025-01-01T01:01:01+01:01 scheduledAt: null isTip: false cancelSeconds: 1000000 isLiked: false canPurchase: false isMarkdownDisabled: true releaseForms: [] userIds: - "123" sentRulesType: user sentRulesExtra: username isFromQueue: true queueId: 123 canUnsendQueue: true unsendSecondsQueue: 1000000 items: type: object properties: id: type: integer example: 123 type: type: string example: chat publishDateTime: type: string example: null nullable: true createdDateTime: type: string example: 2025-01-01T01:01:01+01:01 entity: type: object properties: responseType: type: string example: message id: type: integer example: 123 text: type: string example:Text
rawText: type: string example: Text giphyId: type: string example: null nullable: true lockedText: type: boolean example: false isNew: type: boolean example: true isFree: type: boolean example: true isOpened: type: boolean example: false price: type: integer example: 0 isMediaReady: type: boolean example: true mediaCount: type: integer example: 0 media: type: array example: [] previews: type: array example: [] createdAt: type: string example: 2025-01-01T01:01:01+01:01 changedAt: type: string example: 2025-01-01T01:01:01+01:01 scheduledAt: type: string example: null nullable: true isTip: type: boolean example: false cancelSeconds: type: integer example: 1000000 isLiked: type: boolean example: false canPurchase: type: boolean example: false isMarkdownDisabled: type: boolean example: true releaseForms: type: array example: [] userIds: type: array example: - "123" items: type: string sentRulesType: type: string example: user sentRulesExtra: type: string example: username isFromQueue: type: boolean example: true queueId: type: integer example: 123 canUnsendQueue: type: boolean example: true unsendSecondsQueue: type: integer example: 1000000 hasMore: type: boolean example: false syncInProcess: type: boolean example: false _meta: type: object properties: _credits: type: object properties: used: type: integer example: 1 balance: type: integer example: 999999943 note: type: string example: Always _cache: type: object properties: is_cached: type: boolean example: false note: type: string example: Cache disabled for this endpoint _rate_limits: type: object properties: limit_minute: type: integer example: 1000 limit_day: type: integer example: 50000 remaining_minute: type: integer example: 999 remaining_day: type: integer example: 49974 tags: - Saved For Later (Messages) components: securitySchemes: default: type: http scheme: bearer description: Get your API Key from OnlyFansAPI Console - https://app.onlyfansapi.com/api-keys ```` # Get Profile Details (/api-reference/public-profiles/get-profile-details) Get profile details by username. ## OpenAPI ````yaml https://app.onlyfansapi.com/scribe-docs/openapi.yaml get /api/profiles/{username} openapi: 3.0.3 info: title: OnlyFans API description: "" version: 1.0.0 servers: - url: https://app.onlyfansapi.com security: - default: [] tags: - name: AI Voice Messages description: "" - name: API Keys description: "" - name: Account description: Endpoints for your linked accounts - name: Analytics - Financial description: APIs for retrieving financial analytics data - name: Analytics - Summary description: APIs for retrieving summary analytics data - name: Banking description: Operations related to user banking details, payout methods, legal and tax information, and account country settings. - name: Banned Words description: Reference list of OnlyFans banned words used by the `blockBannedWords` screening parameter - name: Blocked / Restricted Users description: APIs for listing the users an account has blocked or restricted - name: Chargebacks description: "" - name: Chat Messages description: "" - name: Chats description: "" - name: Client Sessions description: "" - name: Connect OnlyFans Account description: "" - name: Data Exports description: APIs for managing data exports - name: Engagement / Messages description: "" - name: Fans description: APIs for managing OnlyFans fans (subscribers) - name: Fans - AI Summary description: APIs for generating and retrieving AI-powered fan profile summaries - name: Following description: APIs for managing OnlyFans followings (people you're subscribed to) - name: Free Trial Links description: APIs for managing Free Trial Links. Revenue totals are net earnings after refunds and chargebacks. `revenue.chargebacks` (or `summary.chargebacks_total` in stats) is the positive cached net amount already excluded from revenue; do not subtract it again. Spender responses include chargebacks across all attributed periods for each fan with positive net revenue. - name: Giphy description: "" - name: Link Tags description: APIs for managing tags on free trial links, tracking links, and Smart Links - name: Mass Messaging description: "" - name: Media description: "" - name: Media Vault description: "" - name: Media Vault Lists description: "" - name: Notifications description: Endpoints for managingr account notifications - name: Payouts description: "" - name: Post Comments description: "" - name: Post Labels description: APIs for managing your post labels - name: Posts description: APIs for managing OnlyFans posts - name: Profile Content description: Read another user's profile content using your connected OnlyFans account. OnlyFans enforces subscription and purchase requirements; these endpoints do not unlock content. Response samples use captured OnlyFans payloads with anonymized IDs, text, and media URLs; OFAPI metadata values are illustrative. - name: Promotions description: "" - name: Public Profiles description: "" - name: Queue description: "" - name: Release Forms description: APIs for managing OnlyFans release forms - name: Saved For Later (Messages) description: "" - name: Saved For Later (Posts) description: "" - name: Settings description: "" - name: Shared Free Trial Links description: APIs for Free Trial Links that other OF creators have shared with this account. Revenue, cost, and spender data are not available for shared links. - name: Shared Tracking Links description: APIs for Tracking Links (campaigns) that other OF creators have shared with this account. Revenue, cost, and spender data are not available for shared campaigns. - name: Smart Link Postbacks description: APIs for managing Smart Link postback destinations - name: Smart Links description: APIs for managing Smart Links (Free Trial Links and Tracking Links with pooled inventory) - name: Statistics description: "" - name: Stored Free Trial Links description: Instant APIs for retrieving stored free trial links from the OnlyFansAPI Cache (free, no credits used). `revenue.total` is net earnings after refunds and chargebacks. `revenue.chargebacks` is the positive cached net amount already excluded from that total; do not subtract it again. - name: Stored Shared Free Trial Links description: Instant APIs for retrieving stored shared Free Trial Links from the OnlyFansAPI Cache (free, no credits used) - name: Stored Shared Tracking Links description: Instant APIs for retrieving stored shared Tracking Links (campaigns) from the OnlyFansAPI Cache (free, no credits used) - name: Stored Tracking Links description: Instant APIs for retrieving stored tracking links from the OnlyFansAPI Cache (free, no credits used). `revenue.total` is net earnings after refunds and chargebacks. `revenue.chargebacks` is the positive cached net amount already excluded from that total; do not subtract it again. - name: Stories description: APIs for managing OnlyFans stories - name: Story Highlights description: APIs for managing OnlyFans story highlights - name: Subscription Bundles description: "" - name: Tracking Links description: APIs for managing tracking links. Revenue totals are net earnings after refunds and chargebacks. `revenue.chargebacks` (or `summary.chargebacks_total` in stats) is the positive cached net amount already excluded from revenue; do not subtract it again. Spender responses include chargebacks across all attributed periods for each fan with positive net revenue. - name: Transactions description: APIs for managing OnlyFans transactions - name: Usage description: Credit usage reporting for your team - name: User List Collections description: "" - name: Users description: APIs for fetching OnlyFans users - name: Webhooks description: "" paths: /api/profiles/{username}: parameters: - in: path name: username description: The username of the profile to get example: madison420ivy required: true schema: type: string get: summary: Get Profile Details operationId: getProfileDetails description: Get profile details by username. parameters: - in: query name: fresh description: If `true` then OnlyFansAPI will always return the real time information about profile (eg. when was the profile last online). example: true required: false schema: type: boolean description: If `true` then OnlyFansAPI will always return the real time information about profile (eg. when was the profile last online). example: true nullable: true responses: "200": description: "" content: application/json: schema: type: object example: data: ofapi_gender: female ofapi_gender_confidence: 0.99 view: f avatar: https://public.onlyfans.com/files/w/w6/w6g/.../123/avatar.jpg avatarThumbs: c50: https://thumbs.onlyfans.com/public/files/thumbs/c50/w/w6/w6g/.../123/avatar.jpg c144: https://thumbs.onlyfans.com/public/files/thumbs/c144/w/w6/w6g/.../123/avatar.jpg header: https://public.onlyfans.com/files/k/kk/kk6/.../123/header_image.jpg headerSize: width: 760 height: 570 headerThumbs: w480: https://thumbs.onlyfans.com/public/files/thumbs/w480/k/kk/kk6/.../123/header_image.jpg w760: https://thumbs.onlyfans.com/public/files/thumbs/w760/k/kk/kk6/.../123/header_image.jpg id: 123 name: name username: username canLookStory: false canCommentStory: false hasNotViewedStory: false isVerified: true canPayInternal: false hasScheduledStream: false hasStream: false hasStories: false tipsEnabled: false tipsTextEnabled: true tipsMin: 5 tipsMinInternal: 1 tipsMax: 200 canEarn: true canAddSubscriber: true subscribePrice: 0 isRestricted: false canRestrict: true subscribedBy: false subscribedByExpire: null subscribedByExpireDate: null subscribedByAutoprolong: null subscribedIsExpiredNow: null currentSubscribePrice: null subscribedOn: false subscribedOnExpiredNow: null subscribedOnDuration: null joinDate: 2025-01-01T01:01:01+00:00 isReferrerAllowed: true about: "" isMarkdownDisabledForAbout: true website: https://onlyfans.com wishlist: null location: null postsCount: 2 archivedPostsCount: 0 privateArchivedPostsCount: 0 photosCount: 0 videosCount: 0 audiosCount: 0 mediasCount: 0 lastSeen: 2025-01-01T01:01:01+00:00 favoritesCount: 0 favoritedCount: 0 showPostsInFeed: false canReceiveChatMessage: false isPerformer: true isRealPerformer: false isSpotifyConnected: false subscribersCount: null hasPinnedPosts: true hasLabels: true canChat: true avatarHeaderConverterUpload: true isPrivateRestriction: false showSubscribersCount: false showMediaCount: true subscribedByData: null subscribedOnData: null canCreatePromotion: false canCreateTrial: false isAdultContent: false canTrialSend: false hasLinks: false referalBonusSummForReferer: 0 firstPublishedPostDate: 2025-01-01T01:01:01+00:00 isSpringConnected: false isFriend: false isBlocked: false canReport: false _meta: _credits: used: 1 balance: 999999835 note: Cache MISS. We had to make a new request to OnlyFans.com because the cache expired _cache: is_cached: false note: Cache MISS. We had to make a new request to OnlyFans.com _rate_limits: limit_minute: 10000000 limit_day: 50000 remaining_minute: 9999999 remaining_day: 49993 properties: data: type: object properties: ofapi_gender: type: string example: female ofapi_gender_confidence: type: number example: 0.99 view: type: string example: f avatar: type: string example: https://public.onlyfans.com/files/w/w6/w6g/.../123/avatar.jpg avatarThumbs: type: object properties: c50: type: string example: https://thumbs.onlyfans.com/public/files/thumbs/c50/w/w6/w6g/.../123/avatar.jpg c144: type: string example: https://thumbs.onlyfans.com/public/files/thumbs/c144/w/w6/w6g/.../123/avatar.jpg header: type: string example: https://public.onlyfans.com/files/k/kk/kk6/.../123/header_image.jpg headerSize: type: object properties: width: type: integer example: 760 height: type: integer example: 570 headerThumbs: type: object properties: w480: type: string example: https://thumbs.onlyfans.com/public/files/thumbs/w480/k/kk/kk6/.../123/header_image.jpg w760: type: string example: https://thumbs.onlyfans.com/public/files/thumbs/w760/k/kk/kk6/.../123/header_image.jpg id: type: integer example: 123 name: type: string example: name username: type: string example: username canLookStory: type: boolean example: false canCommentStory: type: boolean example: false hasNotViewedStory: type: boolean example: false isVerified: type: boolean example: true canPayInternal: type: boolean example: false hasScheduledStream: type: boolean example: false hasStream: type: boolean example: false hasStories: type: boolean example: false tipsEnabled: type: boolean example: false tipsTextEnabled: type: boolean example: true tipsMin: type: integer example: 5 tipsMinInternal: type: integer example: 1 tipsMax: type: integer example: 200 canEarn: type: boolean example: true canAddSubscriber: type: boolean example: true subscribePrice: type: integer example: 0 isRestricted: type: boolean example: false canRestrict: type: boolean example: true subscribedBy: type: boolean example: false subscribedByExpire: type: string example: null nullable: true subscribedByExpireDate: type: string example: null nullable: true subscribedByAutoprolong: type: string example: null nullable: true subscribedIsExpiredNow: type: string example: null nullable: true currentSubscribePrice: type: string example: null nullable: true subscribedOn: type: boolean example: false subscribedOnExpiredNow: type: string example: null nullable: true subscribedOnDuration: type: string example: null nullable: true joinDate: type: string example: 2025-01-01T01:01:01+00:00 isReferrerAllowed: type: boolean example: true about: type: string example: "" isMarkdownDisabledForAbout: type: boolean example: true website: type: string example: https://onlyfans.com wishlist: type: string example: null nullable: true location: type: string example: null nullable: true postsCount: type: integer example: 2 archivedPostsCount: type: integer example: 0 privateArchivedPostsCount: type: integer example: 0 photosCount: type: integer example: 0 videosCount: type: integer example: 0 audiosCount: type: integer example: 0 mediasCount: type: integer example: 0 lastSeen: type: string example: 2025-01-01T01:01:01+00:00 favoritesCount: type: integer example: 0 favoritedCount: type: integer example: 0 showPostsInFeed: type: boolean example: false canReceiveChatMessage: type: boolean example: false isPerformer: type: boolean example: true isRealPerformer: type: boolean example: false isSpotifyConnected: type: boolean example: false subscribersCount: type: string example: null nullable: true hasPinnedPosts: type: boolean example: true hasLabels: type: boolean example: true canChat: type: boolean example: true avatarHeaderConverterUpload: type: boolean example: true isPrivateRestriction: type: boolean example: false showSubscribersCount: type: boolean example: false showMediaCount: type: boolean example: true subscribedByData: type: string example: null nullable: true subscribedOnData: type: string example: null nullable: true canCreatePromotion: type: boolean example: false canCreateTrial: type: boolean example: false isAdultContent: type: boolean example: false canTrialSend: type: boolean example: false hasLinks: type: boolean example: false referalBonusSummForReferer: type: integer example: 0 firstPublishedPostDate: type: string example: 2025-01-01T01:01:01+00:00 isSpringConnected: type: boolean example: false isFriend: type: boolean example: false isBlocked: type: boolean example: false canReport: type: boolean example: false _meta: type: object properties: _credits: type: object properties: used: type: integer example: 1 balance: type: integer example: 999999835 note: type: string example: Cache MISS. We had to make a new request to OnlyFans.com because the cache expired _cache: type: object properties: is_cached: type: boolean example: false note: type: string example: Cache MISS. We had to make a new request to OnlyFans.com _rate_limits: type: object properties: limit_minute: type: integer example: 10000000 limit_day: type: integer example: 50000 remaining_minute: type: integer example: 9999999 remaining_day: type: integer example: 49993 tags: - Public Profiles components: securitySchemes: default: type: http scheme: bearer description: Get your API Key from OnlyFansAPI Console - https://app.onlyfansapi.com/api-keys ```` # Search Profiles (/api-reference/public-profiles/search-profiles) Full-text search for profiles with filters for pricing, free trials, location, media count and more. ## OpenAPI ````yaml https://app.onlyfansapi.com/scribe-docs/openapi.yaml get /api/search openapi: 3.0.3 info: title: OnlyFans API description: "" version: 1.0.0 servers: - url: https://app.onlyfansapi.com security: - default: [] tags: - name: AI Voice Messages description: "" - name: API Keys description: "" - name: Account description: Endpoints for your linked accounts - name: Analytics - Financial description: APIs for retrieving financial analytics data - name: Analytics - Summary description: APIs for retrieving summary analytics data - name: Banking description: Operations related to user banking details, payout methods, legal and tax information, and account country settings. - name: Banned Words description: Reference list of OnlyFans banned words used by the `blockBannedWords` screening parameter - name: Blocked / Restricted Users description: APIs for listing the users an account has blocked or restricted - name: Chargebacks description: "" - name: Chat Messages description: "" - name: Chats description: "" - name: Client Sessions description: "" - name: Connect OnlyFans Account description: "" - name: Data Exports description: APIs for managing data exports - name: Engagement / Messages description: "" - name: Fans description: APIs for managing OnlyFans fans (subscribers) - name: Fans - AI Summary description: APIs for generating and retrieving AI-powered fan profile summaries - name: Following description: APIs for managing OnlyFans followings (people you're subscribed to) - name: Free Trial Links description: APIs for managing Free Trial Links. Revenue totals are net earnings after refunds and chargebacks. `revenue.chargebacks` (or `summary.chargebacks_total` in stats) is the positive cached net amount already excluded from revenue; do not subtract it again. Spender responses include chargebacks across all attributed periods for each fan with positive net revenue. - name: Giphy description: "" - name: Link Tags description: APIs for managing tags on free trial links, tracking links, and Smart Links - name: Mass Messaging description: "" - name: Media description: "" - name: Media Vault description: "" - name: Media Vault Lists description: "" - name: Notifications description: Endpoints for managingr account notifications - name: Payouts description: "" - name: Post Comments description: "" - name: Post Labels description: APIs for managing your post labels - name: Posts description: APIs for managing OnlyFans posts - name: Profile Content description: Read another user's profile content using your connected OnlyFans account. OnlyFans enforces subscription and purchase requirements; these endpoints do not unlock content. Response samples use captured OnlyFans payloads with anonymized IDs, text, and media URLs; OFAPI metadata values are illustrative. - name: Promotions description: "" - name: Public Profiles description: "" - name: Queue description: "" - name: Release Forms description: APIs for managing OnlyFans release forms - name: Saved For Later (Messages) description: "" - name: Saved For Later (Posts) description: "" - name: Settings description: "" - name: Shared Free Trial Links description: APIs for Free Trial Links that other OF creators have shared with this account. Revenue, cost, and spender data are not available for shared links. - name: Shared Tracking Links description: APIs for Tracking Links (campaigns) that other OF creators have shared with this account. Revenue, cost, and spender data are not available for shared campaigns. - name: Smart Link Postbacks description: APIs for managing Smart Link postback destinations - name: Smart Links description: APIs for managing Smart Links (Free Trial Links and Tracking Links with pooled inventory) - name: Statistics description: "" - name: Stored Free Trial Links description: Instant APIs for retrieving stored free trial links from the OnlyFansAPI Cache (free, no credits used). `revenue.total` is net earnings after refunds and chargebacks. `revenue.chargebacks` is the positive cached net amount already excluded from that total; do not subtract it again. - name: Stored Shared Free Trial Links description: Instant APIs for retrieving stored shared Free Trial Links from the OnlyFansAPI Cache (free, no credits used) - name: Stored Shared Tracking Links description: Instant APIs for retrieving stored shared Tracking Links (campaigns) from the OnlyFansAPI Cache (free, no credits used) - name: Stored Tracking Links description: Instant APIs for retrieving stored tracking links from the OnlyFansAPI Cache (free, no credits used). `revenue.total` is net earnings after refunds and chargebacks. `revenue.chargebacks` is the positive cached net amount already excluded from that total; do not subtract it again. - name: Stories description: APIs for managing OnlyFans stories - name: Story Highlights description: APIs for managing OnlyFans story highlights - name: Subscription Bundles description: "" - name: Tracking Links description: APIs for managing tracking links. Revenue totals are net earnings after refunds and chargebacks. `revenue.chargebacks` (or `summary.chargebacks_total` in stats) is the positive cached net amount already excluded from revenue; do not subtract it again. Spender responses include chargebacks across all attributed periods for each fan with positive net revenue. - name: Transactions description: APIs for managing OnlyFans transactions - name: Usage description: Credit usage reporting for your team - name: User List Collections description: "" - name: Users description: APIs for fetching OnlyFans users - name: Webhooks description: "" paths: /api/search: get: summary: Search Profiles operationId: searchProfiles description: Full-text search for profiles with filters for pricing, free trials, location, media count and more. parameters: - in: query name: query description: Query for full text search in username, display name, bio. Must be at least 3 characters. example: null required: false schema: type: string description: Query for full text search in username, display name, bio. Must be at least 3 characters. example: null - in: query name: min_subscribe_price description: Filter by minimum subscribe price. Must be at least 0.00. example: 0 required: false schema: type: number description: Filter by minimum subscribe price. Must be at least 0.00. example: 0 - in: query name: max_subscribe_price description: Filter by maximum subscribe price. Must be at least 0.00. example: 200 required: false schema: type: number description: Filter by maximum subscribe price. Must be at least 0.00. example: 200 - in: query name: location description: Filter by location. example: null required: false schema: type: string description: Filter by location. example: null - in: query name: website description: Filter by website. example: null required: false schema: type: string description: Filter by website. example: null - in: query name: instagram description: Filter by Instagram username. example: null required: false schema: type: string description: Filter by Instagram username. example: null - in: query name: tiktok description: Filter by TikTok username. example: null required: false schema: type: string description: Filter by TikTok username. example: null - in: query name: limit description: "The number of profiles to return. For each returned profile we charge your account 1 credit. Default: `10`. Must be at least 1. Must not be greater than 100." example: 10 required: false schema: type: integer description: "The number of profiles to return. For each returned profile we charge your account 1 credit. Default: `10`. Must be at least 1. Must not be greater than 100." example: 10 - in: query name: cursor description: Cursor for pagination. Use the `next_cursor` from the previous response to get the next page of results. example: null required: false schema: type: string description: Cursor for pagination. Use the `next_cursor` from the previous response to get the next page of results. example: null nullable: true - in: query name: sort description: Field to sort by. ⭐️ Only available on the Pro and Enterprise plan. example: null required: false schema: type: string description: Field to sort by. ⭐️ Only available on the Pro and Enterprise plan. example: null enum: - likes - photos - videos - subscribers - subscribe_price - min_subscribe_price - join_date - last_seen - in: query name: sortDirection description: Direction for sorting. `desc` - highest value first. `asc` - lowest value first. example: null required: false schema: type: string description: Direction for sorting. `desc` - highest value first. `asc` - lowest value first. example: null enum: - desc - asc - in: query name: filter description: "" example: [] required: false schema: type: object description: "" example: [] properties: {} - in: query name: filter.gender description: "Filter by gender (available: `female`, `male`, `trans`, `trans_ftm` (Female-to-Male), `trans_mft` (Male-to-Female), `couple`). ⭐️ Only available on the Pro and Enterprise plan." example: null required: false schema: type: string description: "Filter by gender (available: `female`, `male`, `trans`, `trans_ftm` (Female-to-Male), `trans_mft` (Male-to-Female), `couple`). ⭐️ Only available on the Pro and Enterprise plan." example: null enum: - female - male - trans - trans_ftm - trans_mtf - couple responses: "200": description: "" content: application/json: schema: type: object example: data: - ofapi_gender: female ofapi_gender_confidence: 0.98 onlyfans_id: 5140520 stats_updated_at: 2025-12-15T21:00:42.000000Z username: madison420ivy name: Madison Ivy avatar_url: https://public.onlyfans.com/files/v/v3/v30/v302xscgzgb1qijezrvsotwo4dxn00pe1760573833/5140520/avatar.jpg header_url: https://public.onlyfans.com/files/i/iz/izt/iztyiyvqu9mg54vccnxjjivnkz2cyivm1617484103/header.jpg subscribe_price: 0 min_subscribe_price: 0 posts_count: 157 photos_count: 530 videos_count: 207 audios_count: 0 favorites_count: 16 favorited_count: 570621 subscribers_count: null is_verified: true website: Www.fleshlight.com/Madisonivy location: CannaBliss wishlist: null about:My wish in life is to be your personal lil fuck toy. WELCOME to my
naughty corner of the world.
I hope you’ll love
my extremely up-close and personal POVs. I want to give
you a true feeling of being with me.
Let me tease
you and please you.
Command me, Master. For I am
your little pet.
And I am waiting… 😈💦
I absolutely love suggestions, so please feel free to
send me a DM with ideas! I always try to include as much
as possibles 💋
🚨Also about my page
👇👇👇👇👇👇👇👇
...............................................................................................
💖 Custom Video Contest is returning soon!!!
(Watch page for details)
💙Tipping is NEVER
required.
(But because my page is free, I’m
starting to only respond to messages with tips. I’m very
sorry about this, but for the past 5 years I’ve answered
every single message. And they’re just isn’t enough time
in the day.)
Xoxo
Ur little fuck
toy,
THE ONLY OFFICIAL JOHNNY SINS ONLYFANS
🔥 NEW SUBSCRIBERS
GET A FREE VIDEO FOR JOINING!!!
🔥 NEW scenes 2x
per week!!
My wish in life is to be your personal lil fuck toy. WELCOME to my
naughty corner of the world.
I hope you’ll love
my extremely up-close and personal POVs. I want to
give you a true feeling of being with me.
Let
me tease you and please you.
Command me, Master.
For I am your little pet.
And I am waiting…
😈💦
I absolutely love suggestions, so
please feel free to send me a DM with ideas! I always
try to include as much as possibles 💋
🚨Also
about my page 👇👇👇👇👇👇👇👇
...............................................................................................
💖 Custom Video Contest is returning soon!!!
(Watch page for details)
💙Tipping is NEVER
required.
(But because my page is free, I’m
starting to only respond to messages with tips. I’m
very sorry about this, but for the past 5 years I’ve
answered every single message. And they’re just isn’t
enough time in the day.)
Xoxo
Ur
little fuck toy,
THE ONLY OFFICIAL JOHNNY SINS ONLYFANS
🔥 NEW SUBSCRIBERS
GET A FREE VIDEO FOR JOINING!!!
🔥 NEW scenes 2x
per week!!
My wish in life is to be your personal lil fuck toy. WELCOME to my
naughty corner of the world.
I hope you’ll
love my extremely up-close and personal POVs. I want
to give you a true feeling of being with me.
Let me tease you and please you.
Command me,
Master. For I am your little pet.
And I am
waiting… 😈💦
I absolutely love
suggestions, so please feel free to send me a DM
with ideas! I always try to include as much as
possibles 💋
🚨Also about my page
👇👇👇👇👇👇👇👇
...............................................................................................
💖 Custom Video Contest is returning soon!!!
(Watch page for details)
💙Tipping is NEVER
required.
(But because my page is free, I’m
starting to only respond to messages with tips. I’m
very sorry about this, but for the past 5 years I’ve
answered every single message. And they’re just
isn’t enough time in the day.)
Xoxo
Ur little fuck toy,
Text
isMarkdownDisabled: true canDelete: true canEdit: true isMediaReady: true isOpened: true canToggleFavorite: true tipsAmount: $0 isPublishedWithPeriod: true rawText: Text canViewMedia: true hasMore: false syncInProcess: false _meta: _credits: used: 1 balance: 999999942 note: Always _cache: is_cached: false note: Cache disabled for this endpoint _rate_limits: limit_minute: 1000 limit_day: 50000 remaining_minute: 999 remaining_day: 49973 properties: data: type: object properties: list: type: array example: - id: 123 type: post publishDateTime: null createdDateTime: 2025-01-01T01:01:01+01:01 entity: responseType: post id: 123 postedAt: 2025-01-01T01:01:01+01:01 postedAtPrecise: 2025-01-01T01:01:01+01:01 text:Text
isMarkdownDisabled: true canDelete: true canEdit: true isMediaReady: true isOpened: true canToggleFavorite: true tipsAmount: $0 isPublishedWithPeriod: true rawText: Text canViewMedia: true items: type: object properties: id: type: integer example: 123 type: type: string example: post publishDateTime: type: string example: null nullable: true createdDateTime: type: string example: 2025-01-01T01:01:01+01:01 entity: type: object properties: responseType: type: string example: post id: type: integer example: 123 postedAt: type: string example: 2025-01-01T01:01:01+01:01 postedAtPrecise: type: string example: 2025-01-01T01:01:01+01:01 text: type: string example:Text
isMarkdownDisabled: type: boolean example: true canDelete: type: boolean example: true canEdit: type: boolean example: true isMediaReady: type: boolean example: true isOpened: type: boolean example: true canToggleFavorite: type: boolean example: true tipsAmount: type: string example: $0 isPublishedWithPeriod: type: boolean example: true rawText: type: string example: Text canViewMedia: type: boolean example: true hasMore: type: boolean example: false syncInProcess: type: boolean example: false _meta: type: object properties: _credits: type: object properties: used: type: integer example: 1 balance: type: integer example: 999999942 note: type: string example: Always _cache: type: object properties: is_cached: type: boolean example: false note: type: string example: Cache disabled for this endpoint _rate_limits: type: object properties: limit_minute: type: integer example: 1000 limit_day: type: integer example: 50000 remaining_minute: type: integer example: 999 remaining_day: type: integer example: 49973 tags: - Saved For Later (Posts) components: securitySchemes: default: type: http scheme: bearer description: Get your API Key from OnlyFansAPI Console - https://app.onlyfansapi.com/api-keys ```` # Add Social Media Button (/api-reference/settings/add-social-media-button) Adds a new social media button to the account ## OpenAPI ````yaml https://app.onlyfansapi.com/scribe-docs/openapi.yaml post /api/{account}/settings/social-media-buttons openapi: 3.0.3 info: title: OnlyFans API description: "" version: 1.0.0 servers: - url: https://app.onlyfansapi.com security: - default: [] tags: - name: AI Voice Messages description: "" - name: API Keys description: "" - name: Account description: Endpoints for your linked accounts - name: Analytics - Financial description: APIs for retrieving financial analytics data - name: Analytics - Summary description: APIs for retrieving summary analytics data - name: Banking description: Operations related to user banking details, payout methods, legal and tax information, and account country settings. - name: Banned Words description: Reference list of OnlyFans banned words used by the `blockBannedWords` screening parameter - name: Blocked / Restricted Users description: APIs for listing the users an account has blocked or restricted - name: Chargebacks description: "" - name: Chat Messages description: "" - name: Chats description: "" - name: Client Sessions description: "" - name: Connect OnlyFans Account description: "" - name: Data Exports description: APIs for managing data exports - name: Engagement / Messages description: "" - name: Fans description: APIs for managing OnlyFans fans (subscribers) - name: Fans - AI Summary description: APIs for generating and retrieving AI-powered fan profile summaries - name: Following description: APIs for managing OnlyFans followings (people you're subscribed to) - name: Free Trial Links description: APIs for managing Free Trial Links. Revenue totals are net earnings after refunds and chargebacks. `revenue.chargebacks` (or `summary.chargebacks_total` in stats) is the positive cached net amount already excluded from revenue; do not subtract it again. Spender responses include chargebacks across all attributed periods for each fan with positive net revenue. - name: Giphy description: "" - name: Link Tags description: APIs for managing tags on free trial links, tracking links, and Smart Links - name: Mass Messaging description: "" - name: Media description: "" - name: Media Vault description: "" - name: Media Vault Lists description: "" - name: Notifications description: Endpoints for managingr account notifications - name: Payouts description: "" - name: Post Comments description: "" - name: Post Labels description: APIs for managing your post labels - name: Posts description: APIs for managing OnlyFans posts - name: Profile Content description: Read another user's profile content using your connected OnlyFans account. OnlyFans enforces subscription and purchase requirements; these endpoints do not unlock content. Response samples use captured OnlyFans payloads with anonymized IDs, text, and media URLs; OFAPI metadata values are illustrative. - name: Promotions description: "" - name: Public Profiles description: "" - name: Queue description: "" - name: Release Forms description: APIs for managing OnlyFans release forms - name: Saved For Later (Messages) description: "" - name: Saved For Later (Posts) description: "" - name: Settings description: "" - name: Shared Free Trial Links description: APIs for Free Trial Links that other OF creators have shared with this account. Revenue, cost, and spender data are not available for shared links. - name: Shared Tracking Links description: APIs for Tracking Links (campaigns) that other OF creators have shared with this account. Revenue, cost, and spender data are not available for shared campaigns. - name: Smart Link Postbacks description: APIs for managing Smart Link postback destinations - name: Smart Links description: APIs for managing Smart Links (Free Trial Links and Tracking Links with pooled inventory) - name: Statistics description: "" - name: Stored Free Trial Links description: Instant APIs for retrieving stored free trial links from the OnlyFansAPI Cache (free, no credits used). `revenue.total` is net earnings after refunds and chargebacks. `revenue.chargebacks` is the positive cached net amount already excluded from that total; do not subtract it again. - name: Stored Shared Free Trial Links description: Instant APIs for retrieving stored shared Free Trial Links from the OnlyFansAPI Cache (free, no credits used) - name: Stored Shared Tracking Links description: Instant APIs for retrieving stored shared Tracking Links (campaigns) from the OnlyFansAPI Cache (free, no credits used) - name: Stored Tracking Links description: Instant APIs for retrieving stored tracking links from the OnlyFansAPI Cache (free, no credits used). `revenue.total` is net earnings after refunds and chargebacks. `revenue.chargebacks` is the positive cached net amount already excluded from that total; do not subtract it again. - name: Stories description: APIs for managing OnlyFans stories - name: Story Highlights description: APIs for managing OnlyFans story highlights - name: Subscription Bundles description: "" - name: Tracking Links description: APIs for managing tracking links. Revenue totals are net earnings after refunds and chargebacks. `revenue.chargebacks` (or `summary.chargebacks_total` in stats) is the positive cached net amount already excluded from revenue; do not subtract it again. Spender responses include chargebacks across all attributed periods for each fan with positive net revenue. - name: Transactions description: APIs for managing OnlyFans transactions - name: Usage description: Credit usage reporting for your team - name: User List Collections description: "" - name: Users description: APIs for fetching OnlyFans users - name: Webhooks description: "" paths: /api/{account}/settings/social-media-buttons: parameters: - in: path name: account description: The Account ID example: acct_XXXXXXXXXXXXXXX required: true schema: type: string post: summary: Add Social Media Button operationId: addSocialMediaButton description: Adds a new social media button to the account parameters: [] responses: "200": description: "" content: application/json: schema: type: object example: data: - id: 123 sort: 0 label: Amazon username: "" socialMedia: amazon link: https://amazon.com/example url: https://amazon.com/example isValid: true clicks: 0 _meta: _credits: used: 1 balance: 999999959 note: Always _cache: is_cached: false note: Cache disabled for this endpoint _rate_limits: limit_minute: 1000 limit_day: 50000 remaining_minute: 999 remaining_day: 49986 properties: data: type: array example: - id: 123 sort: 0 label: Amazon username: "" socialMedia: amazon link: https://amazon.com/example url: https://amazon.com/example isValid: true clicks: 0 items: type: object properties: id: type: integer example: 123 sort: type: integer example: 0 label: type: string example: Amazon username: type: string example: "" socialMedia: type: string example: amazon link: type: string example: https://amazon.com/example url: type: string example: https://amazon.com/example isValid: type: boolean example: true clicks: type: integer example: 0 _meta: type: object properties: _credits: type: object properties: used: type: integer example: 1 balance: type: integer example: 999999959 note: type: string example: Always _cache: type: object properties: is_cached: type: boolean example: false note: type: string example: Cache disabled for this endpoint _rate_limits: type: object properties: limit_minute: type: integer example: 1000 limit_day: type: integer example: 50000 remaining_minute: type: integer example: 999 remaining_day: type: integer example: 49986 tags: - Settings requestBody: required: true content: application/json: schema: type: object properties: label: type: string description: The button label example: Instagram type: type: string description: The button type example: Instagram enum: - instagram - x - facebook - youtube - tiktok - snapchat - amazon - twitch - discord - patreon - pinterest - etsy - bereal - kick - depop - poshmark - vsco - threads - throne - shopltk - oftv - bluesky value: type: string description: The button value, either a username or link. example: example_user required: - label - type - value components: securitySchemes: default: type: http scheme: bearer description: Get your API Key from OnlyFansAPI Console - https://app.onlyfansapi.com/api-keys ```` # Check Username Availability (/api-reference/settings/check-username-availability) Check if a username is taken. Returns `false` if the username is available, `true` if it is already taken. ## OpenAPI ````yaml https://app.onlyfansapi.com/scribe-docs/openapi.yaml post /api/{account}/settings/username-exists openapi: 3.0.3 info: title: OnlyFans API description: "" version: 1.0.0 servers: - url: https://app.onlyfansapi.com security: - default: [] tags: - name: AI Voice Messages description: "" - name: API Keys description: "" - name: Account description: Endpoints for your linked accounts - name: Analytics - Financial description: APIs for retrieving financial analytics data - name: Analytics - Summary description: APIs for retrieving summary analytics data - name: Banking description: Operations related to user banking details, payout methods, legal and tax information, and account country settings. - name: Banned Words description: Reference list of OnlyFans banned words used by the `blockBannedWords` screening parameter - name: Blocked / Restricted Users description: APIs for listing the users an account has blocked or restricted - name: Chargebacks description: "" - name: Chat Messages description: "" - name: Chats description: "" - name: Client Sessions description: "" - name: Connect OnlyFans Account description: "" - name: Data Exports description: APIs for managing data exports - name: Engagement / Messages description: "" - name: Fans description: APIs for managing OnlyFans fans (subscribers) - name: Fans - AI Summary description: APIs for generating and retrieving AI-powered fan profile summaries - name: Following description: APIs for managing OnlyFans followings (people you're subscribed to) - name: Free Trial Links description: APIs for managing Free Trial Links. Revenue totals are net earnings after refunds and chargebacks. `revenue.chargebacks` (or `summary.chargebacks_total` in stats) is the positive cached net amount already excluded from revenue; do not subtract it again. Spender responses include chargebacks across all attributed periods for each fan with positive net revenue. - name: Giphy description: "" - name: Link Tags description: APIs for managing tags on free trial links, tracking links, and Smart Links - name: Mass Messaging description: "" - name: Media description: "" - name: Media Vault description: "" - name: Media Vault Lists description: "" - name: Notifications description: Endpoints for managingr account notifications - name: Payouts description: "" - name: Post Comments description: "" - name: Post Labels description: APIs for managing your post labels - name: Posts description: APIs for managing OnlyFans posts - name: Profile Content description: Read another user's profile content using your connected OnlyFans account. OnlyFans enforces subscription and purchase requirements; these endpoints do not unlock content. Response samples use captured OnlyFans payloads with anonymized IDs, text, and media URLs; OFAPI metadata values are illustrative. - name: Promotions description: "" - name: Public Profiles description: "" - name: Queue description: "" - name: Release Forms description: APIs for managing OnlyFans release forms - name: Saved For Later (Messages) description: "" - name: Saved For Later (Posts) description: "" - name: Settings description: "" - name: Shared Free Trial Links description: APIs for Free Trial Links that other OF creators have shared with this account. Revenue, cost, and spender data are not available for shared links. - name: Shared Tracking Links description: APIs for Tracking Links (campaigns) that other OF creators have shared with this account. Revenue, cost, and spender data are not available for shared campaigns. - name: Smart Link Postbacks description: APIs for managing Smart Link postback destinations - name: Smart Links description: APIs for managing Smart Links (Free Trial Links and Tracking Links with pooled inventory) - name: Statistics description: "" - name: Stored Free Trial Links description: Instant APIs for retrieving stored free trial links from the OnlyFansAPI Cache (free, no credits used). `revenue.total` is net earnings after refunds and chargebacks. `revenue.chargebacks` is the positive cached net amount already excluded from that total; do not subtract it again. - name: Stored Shared Free Trial Links description: Instant APIs for retrieving stored shared Free Trial Links from the OnlyFansAPI Cache (free, no credits used) - name: Stored Shared Tracking Links description: Instant APIs for retrieving stored shared Tracking Links (campaigns) from the OnlyFansAPI Cache (free, no credits used) - name: Stored Tracking Links description: Instant APIs for retrieving stored tracking links from the OnlyFansAPI Cache (free, no credits used). `revenue.total` is net earnings after refunds and chargebacks. `revenue.chargebacks` is the positive cached net amount already excluded from that total; do not subtract it again. - name: Stories description: APIs for managing OnlyFans stories - name: Story Highlights description: APIs for managing OnlyFans story highlights - name: Subscription Bundles description: "" - name: Tracking Links description: APIs for managing tracking links. Revenue totals are net earnings after refunds and chargebacks. `revenue.chargebacks` (or `summary.chargebacks_total` in stats) is the positive cached net amount already excluded from revenue; do not subtract it again. Spender responses include chargebacks across all attributed periods for each fan with positive net revenue. - name: Transactions description: APIs for managing OnlyFans transactions - name: Usage description: Credit usage reporting for your team - name: User List Collections description: "" - name: Users description: APIs for fetching OnlyFans users - name: Webhooks description: "" paths: /api/{account}/settings/username-exists: parameters: - in: path name: account description: The Account ID example: acct_XXXXXXXXXXXXXXX required: true schema: type: string post: summary: Check Username Availability operationId: checkUsernameAvailability description: Check if a username is taken. Returns `false` if the username is available, `true` if it is already taken. parameters: [] responses: "200": description: Success content: application/json: schema: type: object example: data: success: false _meta: _credits: used: 1 balance: 999999972 note: Always _cache: is_cached: false note: Cache disabled for this endpoint _rate_limits: limit_minute: 10000000 limit_day: 50000 remaining_minute: 9999994 remaining_day: 49973 properties: data: type: object properties: success: type: boolean example: false _meta: type: object properties: _credits: type: object properties: used: type: integer example: 1 balance: type: integer example: 999999972 note: type: string example: Always _cache: type: object properties: is_cached: type: boolean example: false note: type: string example: Cache disabled for this endpoint _rate_limits: type: object properties: limit_minute: type: integer example: 10000000 limit_day: type: integer example: 50000 remaining_minute: type: integer example: 9999994 remaining_day: type: integer example: 49973 tags: - Settings requestBody: required: true content: application/json: schema: type: object properties: username: type: string description: The username to check. example: MyNewUsername required: - username components: securitySchemes: default: type: http scheme: bearer description: Get your API Key from OnlyFansAPI Console - https://app.onlyfansapi.com/api-keys ```` # Delete Social Media Button (/api-reference/settings/delete-social-media-button) Deletes a social media button from the account ## OpenAPI ````yaml https://app.onlyfansapi.com/scribe-docs/openapi.yaml delete /api/{account}/settings/social-media-buttons/{button_id} openapi: 3.0.3 info: title: OnlyFans API description: "" version: 1.0.0 servers: - url: https://app.onlyfansapi.com security: - default: [] tags: - name: AI Voice Messages description: "" - name: API Keys description: "" - name: Account description: Endpoints for your linked accounts - name: Analytics - Financial description: APIs for retrieving financial analytics data - name: Analytics - Summary description: APIs for retrieving summary analytics data - name: Banking description: Operations related to user banking details, payout methods, legal and tax information, and account country settings. - name: Banned Words description: Reference list of OnlyFans banned words used by the `blockBannedWords` screening parameter - name: Blocked / Restricted Users description: APIs for listing the users an account has blocked or restricted - name: Chargebacks description: "" - name: Chat Messages description: "" - name: Chats description: "" - name: Client Sessions description: "" - name: Connect OnlyFans Account description: "" - name: Data Exports description: APIs for managing data exports - name: Engagement / Messages description: "" - name: Fans description: APIs for managing OnlyFans fans (subscribers) - name: Fans - AI Summary description: APIs for generating and retrieving AI-powered fan profile summaries - name: Following description: APIs for managing OnlyFans followings (people you're subscribed to) - name: Free Trial Links description: APIs for managing Free Trial Links. Revenue totals are net earnings after refunds and chargebacks. `revenue.chargebacks` (or `summary.chargebacks_total` in stats) is the positive cached net amount already excluded from revenue; do not subtract it again. Spender responses include chargebacks across all attributed periods for each fan with positive net revenue. - name: Giphy description: "" - name: Link Tags description: APIs for managing tags on free trial links, tracking links, and Smart Links - name: Mass Messaging description: "" - name: Media description: "" - name: Media Vault description: "" - name: Media Vault Lists description: "" - name: Notifications description: Endpoints for managingr account notifications - name: Payouts description: "" - name: Post Comments description: "" - name: Post Labels description: APIs for managing your post labels - name: Posts description: APIs for managing OnlyFans posts - name: Profile Content description: Read another user's profile content using your connected OnlyFans account. OnlyFans enforces subscription and purchase requirements; these endpoints do not unlock content. Response samples use captured OnlyFans payloads with anonymized IDs, text, and media URLs; OFAPI metadata values are illustrative. - name: Promotions description: "" - name: Public Profiles description: "" - name: Queue description: "" - name: Release Forms description: APIs for managing OnlyFans release forms - name: Saved For Later (Messages) description: "" - name: Saved For Later (Posts) description: "" - name: Settings description: "" - name: Shared Free Trial Links description: APIs for Free Trial Links that other OF creators have shared with this account. Revenue, cost, and spender data are not available for shared links. - name: Shared Tracking Links description: APIs for Tracking Links (campaigns) that other OF creators have shared with this account. Revenue, cost, and spender data are not available for shared campaigns. - name: Smart Link Postbacks description: APIs for managing Smart Link postback destinations - name: Smart Links description: APIs for managing Smart Links (Free Trial Links and Tracking Links with pooled inventory) - name: Statistics description: "" - name: Stored Free Trial Links description: Instant APIs for retrieving stored free trial links from the OnlyFansAPI Cache (free, no credits used). `revenue.total` is net earnings after refunds and chargebacks. `revenue.chargebacks` is the positive cached net amount already excluded from that total; do not subtract it again. - name: Stored Shared Free Trial Links description: Instant APIs for retrieving stored shared Free Trial Links from the OnlyFansAPI Cache (free, no credits used) - name: Stored Shared Tracking Links description: Instant APIs for retrieving stored shared Tracking Links (campaigns) from the OnlyFansAPI Cache (free, no credits used) - name: Stored Tracking Links description: Instant APIs for retrieving stored tracking links from the OnlyFansAPI Cache (free, no credits used). `revenue.total` is net earnings after refunds and chargebacks. `revenue.chargebacks` is the positive cached net amount already excluded from that total; do not subtract it again. - name: Stories description: APIs for managing OnlyFans stories - name: Story Highlights description: APIs for managing OnlyFans story highlights - name: Subscription Bundles description: "" - name: Tracking Links description: APIs for managing tracking links. Revenue totals are net earnings after refunds and chargebacks. `revenue.chargebacks` (or `summary.chargebacks_total` in stats) is the positive cached net amount already excluded from revenue; do not subtract it again. Spender responses include chargebacks across all attributed periods for each fan with positive net revenue. - name: Transactions description: APIs for managing OnlyFans transactions - name: Usage description: Credit usage reporting for your team - name: User List Collections description: "" - name: Users description: APIs for fetching OnlyFans users - name: Webhooks description: "" paths: /api/{account}/settings/social-media-buttons/{button_id}: parameters: - in: path name: account description: The Account ID example: acct_XXXXXXXXXXXXXXX required: true schema: type: string - in: path name: button_id description: The ID of the social media button to update example: 123 required: true schema: type: string delete: summary: Delete Social Media Button operationId: deleteSocialMediaButton description: Deletes a social media button from the account parameters: [] responses: "200": description: "" content: application/json: schema: type: object example: data: success: true _meta: _credits: used: 1 balance: 999999960 note: Always _cache: is_cached: false note: Cache disabled for this endpoint _rate_limits: limit_minute: 1000 limit_day: 50000 remaining_minute: 996 remaining_day: 49987 properties: data: type: object properties: success: type: boolean example: true _meta: type: object properties: _credits: type: object properties: used: type: integer example: 1 balance: type: integer example: 999999960 note: type: string example: Always _cache: type: object properties: is_cached: type: boolean example: false note: type: string example: Cache disabled for this endpoint _rate_limits: type: object properties: limit_minute: type: integer example: 1000 limit_day: type: integer example: 50000 remaining_minute: type: integer example: 996 remaining_day: type: integer example: 49987 tags: - Settings components: securitySchemes: default: type: http scheme: bearer description: Get your API Key from OnlyFansAPI Console - https://app.onlyfansapi.com/api-keys ```` # Enable/Disable DRM (/api-reference/settings/enable-disable-drm) Enable or disable DRM protection for media. DRM Protection helps to protect video content from being copied or downloaded. After you enable it, DRM Protection will be applied to uploads after that date. DRM Protection may limit the ability of fans using older devices to view this video content. ## OpenAPI ````yaml https://app.onlyfansapi.com/scribe-docs/openapi.yaml patch /api/{account}/settings/drm openapi: 3.0.3 info: title: OnlyFans API description: "" version: 1.0.0 servers: - url: https://app.onlyfansapi.com security: - default: [] tags: - name: AI Voice Messages description: "" - name: API Keys description: "" - name: Account description: Endpoints for your linked accounts - name: Analytics - Financial description: APIs for retrieving financial analytics data - name: Analytics - Summary description: APIs for retrieving summary analytics data - name: Banking description: Operations related to user banking details, payout methods, legal and tax information, and account country settings. - name: Banned Words description: Reference list of OnlyFans banned words used by the `blockBannedWords` screening parameter - name: Blocked / Restricted Users description: APIs for listing the users an account has blocked or restricted - name: Chargebacks description: "" - name: Chat Messages description: "" - name: Chats description: "" - name: Client Sessions description: "" - name: Connect OnlyFans Account description: "" - name: Data Exports description: APIs for managing data exports - name: Engagement / Messages description: "" - name: Fans description: APIs for managing OnlyFans fans (subscribers) - name: Fans - AI Summary description: APIs for generating and retrieving AI-powered fan profile summaries - name: Following description: APIs for managing OnlyFans followings (people you're subscribed to) - name: Free Trial Links description: APIs for managing Free Trial Links. Revenue totals are net earnings after refunds and chargebacks. `revenue.chargebacks` (or `summary.chargebacks_total` in stats) is the positive cached net amount already excluded from revenue; do not subtract it again. Spender responses include chargebacks across all attributed periods for each fan with positive net revenue. - name: Giphy description: "" - name: Link Tags description: APIs for managing tags on free trial links, tracking links, and Smart Links - name: Mass Messaging description: "" - name: Media description: "" - name: Media Vault description: "" - name: Media Vault Lists description: "" - name: Notifications description: Endpoints for managingr account notifications - name: Payouts description: "" - name: Post Comments description: "" - name: Post Labels description: APIs for managing your post labels - name: Posts description: APIs for managing OnlyFans posts - name: Profile Content description: Read another user's profile content using your connected OnlyFans account. OnlyFans enforces subscription and purchase requirements; these endpoints do not unlock content. Response samples use captured OnlyFans payloads with anonymized IDs, text, and media URLs; OFAPI metadata values are illustrative. - name: Promotions description: "" - name: Public Profiles description: "" - name: Queue description: "" - name: Release Forms description: APIs for managing OnlyFans release forms - name: Saved For Later (Messages) description: "" - name: Saved For Later (Posts) description: "" - name: Settings description: "" - name: Shared Free Trial Links description: APIs for Free Trial Links that other OF creators have shared with this account. Revenue, cost, and spender data are not available for shared links. - name: Shared Tracking Links description: APIs for Tracking Links (campaigns) that other OF creators have shared with this account. Revenue, cost, and spender data are not available for shared campaigns. - name: Smart Link Postbacks description: APIs for managing Smart Link postback destinations - name: Smart Links description: APIs for managing Smart Links (Free Trial Links and Tracking Links with pooled inventory) - name: Statistics description: "" - name: Stored Free Trial Links description: Instant APIs for retrieving stored free trial links from the OnlyFansAPI Cache (free, no credits used). `revenue.total` is net earnings after refunds and chargebacks. `revenue.chargebacks` is the positive cached net amount already excluded from that total; do not subtract it again. - name: Stored Shared Free Trial Links description: Instant APIs for retrieving stored shared Free Trial Links from the OnlyFansAPI Cache (free, no credits used) - name: Stored Shared Tracking Links description: Instant APIs for retrieving stored shared Tracking Links (campaigns) from the OnlyFansAPI Cache (free, no credits used) - name: Stored Tracking Links description: Instant APIs for retrieving stored tracking links from the OnlyFansAPI Cache (free, no credits used). `revenue.total` is net earnings after refunds and chargebacks. `revenue.chargebacks` is the positive cached net amount already excluded from that total; do not subtract it again. - name: Stories description: APIs for managing OnlyFans stories - name: Story Highlights description: APIs for managing OnlyFans story highlights - name: Subscription Bundles description: "" - name: Tracking Links description: APIs for managing tracking links. Revenue totals are net earnings after refunds and chargebacks. `revenue.chargebacks` (or `summary.chargebacks_total` in stats) is the positive cached net amount already excluded from revenue; do not subtract it again. Spender responses include chargebacks across all attributed periods for each fan with positive net revenue. - name: Transactions description: APIs for managing OnlyFans transactions - name: Usage description: Credit usage reporting for your team - name: User List Collections description: "" - name: Users description: APIs for fetching OnlyFans users - name: Webhooks description: "" paths: /api/{account}/settings/drm: parameters: - in: path name: account description: The Account ID example: acct_XXXXXXXXXXXXXXX required: true schema: type: string patch: summary: Enable/Disable DRM operationId: enableDisableDRM description: Enable or disable DRM protection for media. DRM Protection helps to protect video content from being copied or downloaded. After you enable it, DRM Protection will be applied to uploads after that date. DRM Protection may limit the ability of fans using older devices to view this video content. parameters: [] responses: "200": description: Success content: application/json: schema: type: object example: data: init: upload: geoUploadArgs: preset: of_drm protected_preset: of_drm preset_public: of_public preset_png: of_png isDelay: true needThumbs: true success: true _meta: _credits: used: 1 balance: 999999969 note: Always _cache: is_cached: false note: Cache disabled for this endpoint _rate_limits: limit_minute: 10000000 limit_day: 50000 remaining_minute: 9999998 remaining_day: 49970 properties: data: type: object properties: init: type: object properties: upload: type: object properties: geoUploadArgs: type: object properties: preset: type: string example: of_drm protected_preset: type: string example: of_drm preset_public: type: string example: of_public preset_png: type: string example: of_png isDelay: type: boolean example: true needThumbs: type: boolean example: true success: type: boolean example: true _meta: type: object properties: _credits: type: object properties: used: type: integer example: 1 balance: type: integer example: 999999969 note: type: string example: Always _cache: type: object properties: is_cached: type: boolean example: false note: type: string example: Cache disabled for this endpoint _rate_limits: type: object properties: limit_minute: type: integer example: 10000000 limit_day: type: integer example: 50000 remaining_minute: type: integer example: 9999998 remaining_day: type: integer example: 49970 tags: - Settings requestBody: required: true content: application/json: schema: type: object properties: enabled: type: boolean description: Whether DRM protection should be enabled. example: true required: - enabled components: securitySchemes: default: type: http scheme: bearer description: Get your API Key from OnlyFansAPI Console - https://app.onlyfansapi.com/api-keys ```` # Enable/Disable Welcome Message (/api-reference/settings/enable-disable-welcome-message) Enable or disable the automatic welcome message that is sent when someone subscribes. ## OpenAPI ````yaml https://app.onlyfansapi.com/scribe-docs/openapi.yaml patch /api/{account}/settings/welcome-message openapi: 3.0.3 info: title: OnlyFans API description: "" version: 1.0.0 servers: - url: https://app.onlyfansapi.com security: - default: [] tags: - name: AI Voice Messages description: "" - name: API Keys description: "" - name: Account description: Endpoints for your linked accounts - name: Analytics - Financial description: APIs for retrieving financial analytics data - name: Analytics - Summary description: APIs for retrieving summary analytics data - name: Banking description: Operations related to user banking details, payout methods, legal and tax information, and account country settings. - name: Banned Words description: Reference list of OnlyFans banned words used by the `blockBannedWords` screening parameter - name: Blocked / Restricted Users description: APIs for listing the users an account has blocked or restricted - name: Chargebacks description: "" - name: Chat Messages description: "" - name: Chats description: "" - name: Client Sessions description: "" - name: Connect OnlyFans Account description: "" - name: Data Exports description: APIs for managing data exports - name: Engagement / Messages description: "" - name: Fans description: APIs for managing OnlyFans fans (subscribers) - name: Fans - AI Summary description: APIs for generating and retrieving AI-powered fan profile summaries - name: Following description: APIs for managing OnlyFans followings (people you're subscribed to) - name: Free Trial Links description: APIs for managing Free Trial Links. Revenue totals are net earnings after refunds and chargebacks. `revenue.chargebacks` (or `summary.chargebacks_total` in stats) is the positive cached net amount already excluded from revenue; do not subtract it again. Spender responses include chargebacks across all attributed periods for each fan with positive net revenue. - name: Giphy description: "" - name: Link Tags description: APIs for managing tags on free trial links, tracking links, and Smart Links - name: Mass Messaging description: "" - name: Media description: "" - name: Media Vault description: "" - name: Media Vault Lists description: "" - name: Notifications description: Endpoints for managingr account notifications - name: Payouts description: "" - name: Post Comments description: "" - name: Post Labels description: APIs for managing your post labels - name: Posts description: APIs for managing OnlyFans posts - name: Profile Content description: Read another user's profile content using your connected OnlyFans account. OnlyFans enforces subscription and purchase requirements; these endpoints do not unlock content. Response samples use captured OnlyFans payloads with anonymized IDs, text, and media URLs; OFAPI metadata values are illustrative. - name: Promotions description: "" - name: Public Profiles description: "" - name: Queue description: "" - name: Release Forms description: APIs for managing OnlyFans release forms - name: Saved For Later (Messages) description: "" - name: Saved For Later (Posts) description: "" - name: Settings description: "" - name: Shared Free Trial Links description: APIs for Free Trial Links that other OF creators have shared with this account. Revenue, cost, and spender data are not available for shared links. - name: Shared Tracking Links description: APIs for Tracking Links (campaigns) that other OF creators have shared with this account. Revenue, cost, and spender data are not available for shared campaigns. - name: Smart Link Postbacks description: APIs for managing Smart Link postback destinations - name: Smart Links description: APIs for managing Smart Links (Free Trial Links and Tracking Links with pooled inventory) - name: Statistics description: "" - name: Stored Free Trial Links description: Instant APIs for retrieving stored free trial links from the OnlyFansAPI Cache (free, no credits used). `revenue.total` is net earnings after refunds and chargebacks. `revenue.chargebacks` is the positive cached net amount already excluded from that total; do not subtract it again. - name: Stored Shared Free Trial Links description: Instant APIs for retrieving stored shared Free Trial Links from the OnlyFansAPI Cache (free, no credits used) - name: Stored Shared Tracking Links description: Instant APIs for retrieving stored shared Tracking Links (campaigns) from the OnlyFansAPI Cache (free, no credits used) - name: Stored Tracking Links description: Instant APIs for retrieving stored tracking links from the OnlyFansAPI Cache (free, no credits used). `revenue.total` is net earnings after refunds and chargebacks. `revenue.chargebacks` is the positive cached net amount already excluded from that total; do not subtract it again. - name: Stories description: APIs for managing OnlyFans stories - name: Story Highlights description: APIs for managing OnlyFans story highlights - name: Subscription Bundles description: "" - name: Tracking Links description: APIs for managing tracking links. Revenue totals are net earnings after refunds and chargebacks. `revenue.chargebacks` (or `summary.chargebacks_total` in stats) is the positive cached net amount already excluded from revenue; do not subtract it again. Spender responses include chargebacks across all attributed periods for each fan with positive net revenue. - name: Transactions description: APIs for managing OnlyFans transactions - name: Usage description: Credit usage reporting for your team - name: User List Collections description: "" - name: Users description: APIs for fetching OnlyFans users - name: Webhooks description: "" paths: /api/{account}/settings/welcome-message: parameters: - in: path name: account description: The Account ID example: acct_XXXXXXXXXXXXXXX required: true schema: type: string patch: summary: Enable/Disable Welcome Message operationId: enableDisableWelcomeMessage description: Enable or disable the automatic welcome message that is sent when someone subscribes. parameters: [] responses: "200": description: Success content: application/json: schema: type: object example: data: success: true _meta: _credits: used: 1 balance: 999999969 note: Always _cache: is_cached: false note: Cache disabled for this endpoint _rate_limits: limit_minute: 10000000 limit_day: 50000 remaining_minute: 9999998 remaining_day: 49970 properties: data: type: object properties: success: type: boolean example: true _meta: type: object properties: _credits: type: object properties: used: type: integer example: 1 balance: type: integer example: 999999969 note: type: string example: Always _cache: type: object properties: is_cached: type: boolean example: false note: type: string example: Cache disabled for this endpoint _rate_limits: type: object properties: limit_minute: type: integer example: 10000000 limit_day: type: integer example: 50000 remaining_minute: type: integer example: 9999998 remaining_day: type: integer example: 49970 tags: - Settings requestBody: required: true content: application/json: schema: type: object properties: enabled: type: boolean description: Whether the welcome message should be enabled. example: true required: - enabled components: securitySchemes: default: type: http scheme: bearer description: Get your API Key from OnlyFansAPI Console - https://app.onlyfansapi.com/api-keys ```` # Get Blocked Countries (/api-reference/settings/get-blocked-countries) Returns the countries blocked from viewing the account. ## OpenAPI ````yaml https://app.onlyfansapi.com/scribe-docs/openapi.yaml get /api/{account}/settings/blocked-countries openapi: 3.0.3 info: title: OnlyFans API description: "" version: 1.0.0 servers: - url: https://app.onlyfansapi.com security: - default: [] tags: - name: AI Voice Messages description: "" - name: API Keys description: "" - name: Account description: Endpoints for your linked accounts - name: Analytics - Financial description: APIs for retrieving financial analytics data - name: Analytics - Summary description: APIs for retrieving summary analytics data - name: Banking description: Operations related to user banking details, payout methods, legal and tax information, and account country settings. - name: Banned Words description: Reference list of OnlyFans banned words used by the `blockBannedWords` screening parameter - name: Blocked / Restricted Users description: APIs for listing the users an account has blocked or restricted - name: Chargebacks description: "" - name: Chat Messages description: "" - name: Chats description: "" - name: Client Sessions description: "" - name: Connect OnlyFans Account description: "" - name: Data Exports description: APIs for managing data exports - name: Engagement / Messages description: "" - name: Fans description: APIs for managing OnlyFans fans (subscribers) - name: Fans - AI Summary description: APIs for generating and retrieving AI-powered fan profile summaries - name: Following description: APIs for managing OnlyFans followings (people you're subscribed to) - name: Free Trial Links description: APIs for managing Free Trial Links. Revenue totals are net earnings after refunds and chargebacks. `revenue.chargebacks` (or `summary.chargebacks_total` in stats) is the positive cached net amount already excluded from revenue; do not subtract it again. Spender responses include chargebacks across all attributed periods for each fan with positive net revenue. - name: Giphy description: "" - name: Link Tags description: APIs for managing tags on free trial links, tracking links, and Smart Links - name: Mass Messaging description: "" - name: Media description: "" - name: Media Vault description: "" - name: Media Vault Lists description: "" - name: Notifications description: Endpoints for managingr account notifications - name: Payouts description: "" - name: Post Comments description: "" - name: Post Labels description: APIs for managing your post labels - name: Posts description: APIs for managing OnlyFans posts - name: Profile Content description: Read another user's profile content using your connected OnlyFans account. OnlyFans enforces subscription and purchase requirements; these endpoints do not unlock content. Response samples use captured OnlyFans payloads with anonymized IDs, text, and media URLs; OFAPI metadata values are illustrative. - name: Promotions description: "" - name: Public Profiles description: "" - name: Queue description: "" - name: Release Forms description: APIs for managing OnlyFans release forms - name: Saved For Later (Messages) description: "" - name: Saved For Later (Posts) description: "" - name: Settings description: "" - name: Shared Free Trial Links description: APIs for Free Trial Links that other OF creators have shared with this account. Revenue, cost, and spender data are not available for shared links. - name: Shared Tracking Links description: APIs for Tracking Links (campaigns) that other OF creators have shared with this account. Revenue, cost, and spender data are not available for shared campaigns. - name: Smart Link Postbacks description: APIs for managing Smart Link postback destinations - name: Smart Links description: APIs for managing Smart Links (Free Trial Links and Tracking Links with pooled inventory) - name: Statistics description: "" - name: Stored Free Trial Links description: Instant APIs for retrieving stored free trial links from the OnlyFansAPI Cache (free, no credits used). `revenue.total` is net earnings after refunds and chargebacks. `revenue.chargebacks` is the positive cached net amount already excluded from that total; do not subtract it again. - name: Stored Shared Free Trial Links description: Instant APIs for retrieving stored shared Free Trial Links from the OnlyFansAPI Cache (free, no credits used) - name: Stored Shared Tracking Links description: Instant APIs for retrieving stored shared Tracking Links (campaigns) from the OnlyFansAPI Cache (free, no credits used) - name: Stored Tracking Links description: Instant APIs for retrieving stored tracking links from the OnlyFansAPI Cache (free, no credits used). `revenue.total` is net earnings after refunds and chargebacks. `revenue.chargebacks` is the positive cached net amount already excluded from that total; do not subtract it again. - name: Stories description: APIs for managing OnlyFans stories - name: Story Highlights description: APIs for managing OnlyFans story highlights - name: Subscription Bundles description: "" - name: Tracking Links description: APIs for managing tracking links. Revenue totals are net earnings after refunds and chargebacks. `revenue.chargebacks` (or `summary.chargebacks_total` in stats) is the positive cached net amount already excluded from revenue; do not subtract it again. Spender responses include chargebacks across all attributed periods for each fan with positive net revenue. - name: Transactions description: APIs for managing OnlyFans transactions - name: Usage description: Credit usage reporting for your team - name: User List Collections description: "" - name: Users description: APIs for fetching OnlyFans users - name: Webhooks description: "" paths: /api/{account}/settings/blocked-countries: parameters: - in: path name: account description: The Account ID example: acct_XXXXXXXXXXXXXXX required: true schema: type: string get: summary: Get Blocked Countries operationId: getBlockedCountries description: Returns the countries blocked from viewing the account. parameters: [] responses: "200": description: Success content: application/json: schema: type: object example: data: blockedCountries: - US - RU _meta: _credits: used: 1 balance: 999999969 note: Always _cache: is_cached: false note: Cache disabled for this endpoint _rate_limits: limit_minute: 10000000 limit_day: 50000 remaining_minute: 9999998 remaining_day: 49970 properties: data: type: object properties: blockedCountries: type: array example: - US - RU items: type: string _meta: type: object properties: _credits: type: object properties: used: type: integer example: 1 balance: type: integer example: 999999969 note: type: string example: Always _cache: type: object properties: is_cached: type: boolean example: false note: type: string example: Cache disabled for this endpoint _rate_limits: type: object properties: limit_minute: type: integer example: 10000000 limit_day: type: integer example: 50000 remaining_minute: type: integer example: 9999998 remaining_day: type: integer example: 49970 tags: - Settings components: securitySchemes: default: type: http scheme: bearer description: Get your API Key from OnlyFansAPI Console - https://app.onlyfansapi.com/api-keys ```` # Get DRM Status (/api-reference/settings/get-drm-status) Returns whether DRM protection is enabled for media. DRM Protection helps to protect video content from being copied or downloaded. DRM Protection may limit the ability of fans using older devices to view this video content. ## OpenAPI ````yaml https://app.onlyfansapi.com/scribe-docs/openapi.yaml get /api/{account}/settings/drm openapi: 3.0.3 info: title: OnlyFans API description: "" version: 1.0.0 servers: - url: https://app.onlyfansapi.com security: - default: [] tags: - name: AI Voice Messages description: "" - name: API Keys description: "" - name: Account description: Endpoints for your linked accounts - name: Analytics - Financial description: APIs for retrieving financial analytics data - name: Analytics - Summary description: APIs for retrieving summary analytics data - name: Banking description: Operations related to user banking details, payout methods, legal and tax information, and account country settings. - name: Banned Words description: Reference list of OnlyFans banned words used by the `blockBannedWords` screening parameter - name: Blocked / Restricted Users description: APIs for listing the users an account has blocked or restricted - name: Chargebacks description: "" - name: Chat Messages description: "" - name: Chats description: "" - name: Client Sessions description: "" - name: Connect OnlyFans Account description: "" - name: Data Exports description: APIs for managing data exports - name: Engagement / Messages description: "" - name: Fans description: APIs for managing OnlyFans fans (subscribers) - name: Fans - AI Summary description: APIs for generating and retrieving AI-powered fan profile summaries - name: Following description: APIs for managing OnlyFans followings (people you're subscribed to) - name: Free Trial Links description: APIs for managing Free Trial Links. Revenue totals are net earnings after refunds and chargebacks. `revenue.chargebacks` (or `summary.chargebacks_total` in stats) is the positive cached net amount already excluded from revenue; do not subtract it again. Spender responses include chargebacks across all attributed periods for each fan with positive net revenue. - name: Giphy description: "" - name: Link Tags description: APIs for managing tags on free trial links, tracking links, and Smart Links - name: Mass Messaging description: "" - name: Media description: "" - name: Media Vault description: "" - name: Media Vault Lists description: "" - name: Notifications description: Endpoints for managingr account notifications - name: Payouts description: "" - name: Post Comments description: "" - name: Post Labels description: APIs for managing your post labels - name: Posts description: APIs for managing OnlyFans posts - name: Profile Content description: Read another user's profile content using your connected OnlyFans account. OnlyFans enforces subscription and purchase requirements; these endpoints do not unlock content. Response samples use captured OnlyFans payloads with anonymized IDs, text, and media URLs; OFAPI metadata values are illustrative. - name: Promotions description: "" - name: Public Profiles description: "" - name: Queue description: "" - name: Release Forms description: APIs for managing OnlyFans release forms - name: Saved For Later (Messages) description: "" - name: Saved For Later (Posts) description: "" - name: Settings description: "" - name: Shared Free Trial Links description: APIs for Free Trial Links that other OF creators have shared with this account. Revenue, cost, and spender data are not available for shared links. - name: Shared Tracking Links description: APIs for Tracking Links (campaigns) that other OF creators have shared with this account. Revenue, cost, and spender data are not available for shared campaigns. - name: Smart Link Postbacks description: APIs for managing Smart Link postback destinations - name: Smart Links description: APIs for managing Smart Links (Free Trial Links and Tracking Links with pooled inventory) - name: Statistics description: "" - name: Stored Free Trial Links description: Instant APIs for retrieving stored free trial links from the OnlyFansAPI Cache (free, no credits used). `revenue.total` is net earnings after refunds and chargebacks. `revenue.chargebacks` is the positive cached net amount already excluded from that total; do not subtract it again. - name: Stored Shared Free Trial Links description: Instant APIs for retrieving stored shared Free Trial Links from the OnlyFansAPI Cache (free, no credits used) - name: Stored Shared Tracking Links description: Instant APIs for retrieving stored shared Tracking Links (campaigns) from the OnlyFansAPI Cache (free, no credits used) - name: Stored Tracking Links description: Instant APIs for retrieving stored tracking links from the OnlyFansAPI Cache (free, no credits used). `revenue.total` is net earnings after refunds and chargebacks. `revenue.chargebacks` is the positive cached net amount already excluded from that total; do not subtract it again. - name: Stories description: APIs for managing OnlyFans stories - name: Story Highlights description: APIs for managing OnlyFans story highlights - name: Subscription Bundles description: "" - name: Tracking Links description: APIs for managing tracking links. Revenue totals are net earnings after refunds and chargebacks. `revenue.chargebacks` (or `summary.chargebacks_total` in stats) is the positive cached net amount already excluded from revenue; do not subtract it again. Spender responses include chargebacks across all attributed periods for each fan with positive net revenue. - name: Transactions description: APIs for managing OnlyFans transactions - name: Usage description: Credit usage reporting for your team - name: User List Collections description: "" - name: Users description: APIs for fetching OnlyFans users - name: Webhooks description: "" paths: /api/{account}/settings/drm: parameters: - in: path name: account description: The Account ID example: acct_XXXXXXXXXXXXXXX required: true schema: type: string get: summary: Get DRM Status operationId: getDRMStatus description: Returns whether DRM protection is enabled for media. DRM Protection helps to protect video content from being copied or downloaded. DRM Protection may limit the ability of fans using older devices to view this video content. parameters: [] responses: "200": description: Success content: application/json: schema: type: object example: data: enabled: false _meta: _credits: used: 1 balance: 999999969 note: Always _cache: is_cached: false note: Cache disabled for this endpoint _rate_limits: limit_minute: 10000000 limit_day: 50000 remaining_minute: 9999998 remaining_day: 49970 properties: data: type: object properties: enabled: type: boolean example: false _meta: type: object properties: _credits: type: object properties: used: type: integer example: 1 balance: type: integer example: 999999969 note: type: string example: Always _cache: type: object properties: is_cached: type: boolean example: false note: type: string example: Cache disabled for this endpoint _rate_limits: type: object properties: limit_minute: type: integer example: 10000000 limit_day: type: integer example: 50000 remaining_minute: type: integer example: 9999998 remaining_day: type: integer example: 49970 tags: - Settings components: securitySchemes: default: type: http scheme: bearer description: Get your API Key from OnlyFansAPI Console - https://app.onlyfansapi.com/api-keys ```` # Get Settings (/api-reference/settings/get-settings) Returns the account settings ## OpenAPI ````yaml https://app.onlyfansapi.com/scribe-docs/openapi.yaml get /api/{account}/settings openapi: 3.0.3 info: title: OnlyFans API description: "" version: 1.0.0 servers: - url: https://app.onlyfansapi.com security: - default: [] tags: - name: AI Voice Messages description: "" - name: API Keys description: "" - name: Account description: Endpoints for your linked accounts - name: Analytics - Financial description: APIs for retrieving financial analytics data - name: Analytics - Summary description: APIs for retrieving summary analytics data - name: Banking description: Operations related to user banking details, payout methods, legal and tax information, and account country settings. - name: Banned Words description: Reference list of OnlyFans banned words used by the `blockBannedWords` screening parameter - name: Blocked / Restricted Users description: APIs for listing the users an account has blocked or restricted - name: Chargebacks description: "" - name: Chat Messages description: "" - name: Chats description: "" - name: Client Sessions description: "" - name: Connect OnlyFans Account description: "" - name: Data Exports description: APIs for managing data exports - name: Engagement / Messages description: "" - name: Fans description: APIs for managing OnlyFans fans (subscribers) - name: Fans - AI Summary description: APIs for generating and retrieving AI-powered fan profile summaries - name: Following description: APIs for managing OnlyFans followings (people you're subscribed to) - name: Free Trial Links description: APIs for managing Free Trial Links. Revenue totals are net earnings after refunds and chargebacks. `revenue.chargebacks` (or `summary.chargebacks_total` in stats) is the positive cached net amount already excluded from revenue; do not subtract it again. Spender responses include chargebacks across all attributed periods for each fan with positive net revenue. - name: Giphy description: "" - name: Link Tags description: APIs for managing tags on free trial links, tracking links, and Smart Links - name: Mass Messaging description: "" - name: Media description: "" - name: Media Vault description: "" - name: Media Vault Lists description: "" - name: Notifications description: Endpoints for managingr account notifications - name: Payouts description: "" - name: Post Comments description: "" - name: Post Labels description: APIs for managing your post labels - name: Posts description: APIs for managing OnlyFans posts - name: Profile Content description: Read another user's profile content using your connected OnlyFans account. OnlyFans enforces subscription and purchase requirements; these endpoints do not unlock content. Response samples use captured OnlyFans payloads with anonymized IDs, text, and media URLs; OFAPI metadata values are illustrative. - name: Promotions description: "" - name: Public Profiles description: "" - name: Queue description: "" - name: Release Forms description: APIs for managing OnlyFans release forms - name: Saved For Later (Messages) description: "" - name: Saved For Later (Posts) description: "" - name: Settings description: "" - name: Shared Free Trial Links description: APIs for Free Trial Links that other OF creators have shared with this account. Revenue, cost, and spender data are not available for shared links. - name: Shared Tracking Links description: APIs for Tracking Links (campaigns) that other OF creators have shared with this account. Revenue, cost, and spender data are not available for shared campaigns. - name: Smart Link Postbacks description: APIs for managing Smart Link postback destinations - name: Smart Links description: APIs for managing Smart Links (Free Trial Links and Tracking Links with pooled inventory) - name: Statistics description: "" - name: Stored Free Trial Links description: Instant APIs for retrieving stored free trial links from the OnlyFansAPI Cache (free, no credits used). `revenue.total` is net earnings after refunds and chargebacks. `revenue.chargebacks` is the positive cached net amount already excluded from that total; do not subtract it again. - name: Stored Shared Free Trial Links description: Instant APIs for retrieving stored shared Free Trial Links from the OnlyFansAPI Cache (free, no credits used) - name: Stored Shared Tracking Links description: Instant APIs for retrieving stored shared Tracking Links (campaigns) from the OnlyFansAPI Cache (free, no credits used) - name: Stored Tracking Links description: Instant APIs for retrieving stored tracking links from the OnlyFansAPI Cache (free, no credits used). `revenue.total` is net earnings after refunds and chargebacks. `revenue.chargebacks` is the positive cached net amount already excluded from that total; do not subtract it again. - name: Stories description: APIs for managing OnlyFans stories - name: Story Highlights description: APIs for managing OnlyFans story highlights - name: Subscription Bundles description: "" - name: Tracking Links description: APIs for managing tracking links. Revenue totals are net earnings after refunds and chargebacks. `revenue.chargebacks` (or `summary.chargebacks_total` in stats) is the positive cached net amount already excluded from revenue; do not subtract it again. Spender responses include chargebacks across all attributed periods for each fan with positive net revenue. - name: Transactions description: APIs for managing OnlyFans transactions - name: Usage description: Credit usage reporting for your team - name: User List Collections description: "" - name: Users description: APIs for fetching OnlyFans users - name: Webhooks description: "" paths: /api/{account}/settings: parameters: - in: path name: account description: The Account ID example: acct_XXXXXXXXXXXXXXX required: true schema: type: string get: summary: Get Settings operationId: getSettings description: Returns the account settings parameters: [] responses: "200": description: Success content: application/json: schema: type: object example: data: isDeleteInitiated: false lastSubscriptionExpiredAt: null streamingObsKey: abc123 streamingObsServer: rtmp://route0-dc2.onlyfans.com/live streamingMuxKey: null streamingMuxServer: rtmps://global-live.mux.com:443/app streamingMuxKeyExpiredAt: null activityHubAllowed: false activityHubTokens: [] confirmEmailSentAt: 2025-01-01T00:00:00+00:00 hideAfterMassMessages: true changelogUpdates: 3 showFullTextInEmailNotify: false isPrivate: true blockedCountries: [] blockedStates: [] blockedIps: [] showPostsTips: true recommenderReward: null showFriendsToSubscribers: true showSubscribesOffers: true disableSubscribesOffers: true isEmailNotificationsEnabled: false canAcceptMessageOnlyFromFriends: false isAutoFollowBack: true unfollowAutoFollowBack: false changeEmailStep: null newEmail: null lifeTimeEmailCode: null coStreamingRequestFrom: subscribers hasPaidPosts: false isCoStreamingAllowed: true isMonthlyNewsletters: false strongOtp: false phoneOtp: false appOtp: false isOtpAppConnected: false isOldLoginRedirect: true faceOtp: false canSocialsConnect: true socialsConnects: [] importantSubscriptionNotifications: true isOpenseaConnected: false forceFaceOtp: false hasPassword: true canAddSubscriberByBundle: discounts: "0": 0% discount "5": 5% discount "10": 10% discount "15": 15% discount "20": 20% discount "25": 25% discount "30": 30% discount "35": 35% discount "40": 40% discount "45": 45% discount "50": 50% discount durations: "3": 3 months "6": 6 months "12": 12 months bundleMaxPrice: 250 canMakeProfileLinks: true isSuggestionsOptOut: false isTelegramConnected: false replyOnSubscribe: false shouldReceiveLessNotifications: false avatarHeaderConverterUpload: true streamingRtmpKey: abc123 streamingRtmpServer: rtmp://cloudbeta.streaming.onlyfans.com/live canAddPhone: true phoneLast4: null sendAwardsTop1: true sendAwardsTop5: true notifyOnAllMentions: false commentsOnlyForPayers: false isDrmEnabled: false creatorsCommentsOnlyForFriends: false muteTagsInChats: true muteTagsInPosts: false muteTagsInStories: true muteTagsInStreams: false _meta: _credits: used: 1 balance: 999999983 note: Always _cache: is_cached: false note: Cache disabled for this endpoint _rate_limits: limit_minute: 10000000 limit_day: 50000 remaining_minute: 9999999 remaining_day: 49986 properties: data: type: object properties: isDeleteInitiated: type: boolean example: false lastSubscriptionExpiredAt: type: string example: null nullable: true streamingObsKey: type: string example: abc123 streamingObsServer: type: string example: rtmp://route0-dc2.onlyfans.com/live streamingMuxKey: type: string example: null nullable: true streamingMuxServer: type: string example: rtmps://global-live.mux.com:443/app streamingMuxKeyExpiredAt: type: string example: null nullable: true activityHubAllowed: type: boolean example: false activityHubTokens: type: array example: [] confirmEmailSentAt: type: string example: 2025-01-01T00:00:00+00:00 hideAfterMassMessages: type: boolean example: true changelogUpdates: type: integer example: 3 showFullTextInEmailNotify: type: boolean example: false isPrivate: type: boolean example: true blockedCountries: type: array example: [] blockedStates: type: array example: [] blockedIps: type: array example: [] showPostsTips: type: boolean example: true recommenderReward: type: string example: null nullable: true showFriendsToSubscribers: type: boolean example: true showSubscribesOffers: type: boolean example: true disableSubscribesOffers: type: boolean example: true isEmailNotificationsEnabled: type: boolean example: false canAcceptMessageOnlyFromFriends: type: boolean example: false isAutoFollowBack: type: boolean example: true unfollowAutoFollowBack: type: boolean example: false changeEmailStep: type: string example: null nullable: true newEmail: type: string example: null nullable: true lifeTimeEmailCode: type: string example: null nullable: true coStreamingRequestFrom: type: string example: subscribers hasPaidPosts: type: boolean example: false isCoStreamingAllowed: type: boolean example: true isMonthlyNewsletters: type: boolean example: false strongOtp: type: boolean example: false phoneOtp: type: boolean example: false appOtp: type: boolean example: false isOtpAppConnected: type: boolean example: false isOldLoginRedirect: type: boolean example: true faceOtp: type: boolean example: false canSocialsConnect: type: boolean example: true socialsConnects: type: array example: [] importantSubscriptionNotifications: type: boolean example: true isOpenseaConnected: type: boolean example: false forceFaceOtp: type: boolean example: false hasPassword: type: boolean example: true canAddSubscriberByBundle: type: object properties: discounts: type: object properties: "0": type: string example: 0% discount "5": type: string example: 5% discount "10": type: string example: 10% discount "15": type: string example: 15% discount "20": type: string example: 20% discount "25": type: string example: 25% discount "30": type: string example: 30% discount "35": type: string example: 35% discount "40": type: string example: 40% discount "45": type: string example: 45% discount "50": type: string example: 50% discount durations: type: object properties: "3": type: string example: 3 months "6": type: string example: 6 months "12": type: string example: 12 months bundleMaxPrice: type: integer example: 250 canMakeProfileLinks: type: boolean example: true isSuggestionsOptOut: type: boolean example: false isTelegramConnected: type: boolean example: false replyOnSubscribe: type: boolean example: false shouldReceiveLessNotifications: type: boolean example: false avatarHeaderConverterUpload: type: boolean example: true streamingRtmpKey: type: string example: abc123 streamingRtmpServer: type: string example: rtmp://cloudbeta.streaming.onlyfans.com/live canAddPhone: type: boolean example: true phoneLast4: type: string example: null nullable: true sendAwardsTop1: type: boolean example: true sendAwardsTop5: type: boolean example: true notifyOnAllMentions: type: boolean example: false commentsOnlyForPayers: type: boolean example: false isDrmEnabled: type: boolean example: false creatorsCommentsOnlyForFriends: type: boolean example: false muteTagsInChats: type: boolean example: true muteTagsInPosts: type: boolean example: false muteTagsInStories: type: boolean example: true muteTagsInStreams: type: boolean example: false _meta: type: object properties: _credits: type: object properties: used: type: integer example: 1 balance: type: integer example: 999999983 note: type: string example: Always _cache: type: object properties: is_cached: type: boolean example: false note: type: string example: Cache disabled for this endpoint _rate_limits: type: object properties: limit_minute: type: integer example: 10000000 limit_day: type: integer example: 50000 remaining_minute: type: integer example: 9999999 remaining_day: type: integer example: 49986 tags: - Settings components: securitySchemes: default: type: http scheme: bearer description: Get your API Key from OnlyFansAPI Console - https://app.onlyfansapi.com/api-keys ```` # Get Welcome Message (/api-reference/settings/get-welcome-message) Get the current automatic welcome message template that is sent when someone subscribes. ## OpenAPI ````yaml https://app.onlyfansapi.com/scribe-docs/openapi.yaml get /api/{account}/settings/welcome-message openapi: 3.0.3 info: title: OnlyFans API description: "" version: 1.0.0 servers: - url: https://app.onlyfansapi.com security: - default: [] tags: - name: AI Voice Messages description: "" - name: API Keys description: "" - name: Account description: Endpoints for your linked accounts - name: Analytics - Financial description: APIs for retrieving financial analytics data - name: Analytics - Summary description: APIs for retrieving summary analytics data - name: Banking description: Operations related to user banking details, payout methods, legal and tax information, and account country settings. - name: Banned Words description: Reference list of OnlyFans banned words used by the `blockBannedWords` screening parameter - name: Blocked / Restricted Users description: APIs for listing the users an account has blocked or restricted - name: Chargebacks description: "" - name: Chat Messages description: "" - name: Chats description: "" - name: Client Sessions description: "" - name: Connect OnlyFans Account description: "" - name: Data Exports description: APIs for managing data exports - name: Engagement / Messages description: "" - name: Fans description: APIs for managing OnlyFans fans (subscribers) - name: Fans - AI Summary description: APIs for generating and retrieving AI-powered fan profile summaries - name: Following description: APIs for managing OnlyFans followings (people you're subscribed to) - name: Free Trial Links description: APIs for managing Free Trial Links. Revenue totals are net earnings after refunds and chargebacks. `revenue.chargebacks` (or `summary.chargebacks_total` in stats) is the positive cached net amount already excluded from revenue; do not subtract it again. Spender responses include chargebacks across all attributed periods for each fan with positive net revenue. - name: Giphy description: "" - name: Link Tags description: APIs for managing tags on free trial links, tracking links, and Smart Links - name: Mass Messaging description: "" - name: Media description: "" - name: Media Vault description: "" - name: Media Vault Lists description: "" - name: Notifications description: Endpoints for managingr account notifications - name: Payouts description: "" - name: Post Comments description: "" - name: Post Labels description: APIs for managing your post labels - name: Posts description: APIs for managing OnlyFans posts - name: Profile Content description: Read another user's profile content using your connected OnlyFans account. OnlyFans enforces subscription and purchase requirements; these endpoints do not unlock content. Response samples use captured OnlyFans payloads with anonymized IDs, text, and media URLs; OFAPI metadata values are illustrative. - name: Promotions description: "" - name: Public Profiles description: "" - name: Queue description: "" - name: Release Forms description: APIs for managing OnlyFans release forms - name: Saved For Later (Messages) description: "" - name: Saved For Later (Posts) description: "" - name: Settings description: "" - name: Shared Free Trial Links description: APIs for Free Trial Links that other OF creators have shared with this account. Revenue, cost, and spender data are not available for shared links. - name: Shared Tracking Links description: APIs for Tracking Links (campaigns) that other OF creators have shared with this account. Revenue, cost, and spender data are not available for shared campaigns. - name: Smart Link Postbacks description: APIs for managing Smart Link postback destinations - name: Smart Links description: APIs for managing Smart Links (Free Trial Links and Tracking Links with pooled inventory) - name: Statistics description: "" - name: Stored Free Trial Links description: Instant APIs for retrieving stored free trial links from the OnlyFansAPI Cache (free, no credits used). `revenue.total` is net earnings after refunds and chargebacks. `revenue.chargebacks` is the positive cached net amount already excluded from that total; do not subtract it again. - name: Stored Shared Free Trial Links description: Instant APIs for retrieving stored shared Free Trial Links from the OnlyFansAPI Cache (free, no credits used) - name: Stored Shared Tracking Links description: Instant APIs for retrieving stored shared Tracking Links (campaigns) from the OnlyFansAPI Cache (free, no credits used) - name: Stored Tracking Links description: Instant APIs for retrieving stored tracking links from the OnlyFansAPI Cache (free, no credits used). `revenue.total` is net earnings after refunds and chargebacks. `revenue.chargebacks` is the positive cached net amount already excluded from that total; do not subtract it again. - name: Stories description: APIs for managing OnlyFans stories - name: Story Highlights description: APIs for managing OnlyFans story highlights - name: Subscription Bundles description: "" - name: Tracking Links description: APIs for managing tracking links. Revenue totals are net earnings after refunds and chargebacks. `revenue.chargebacks` (or `summary.chargebacks_total` in stats) is the positive cached net amount already excluded from revenue; do not subtract it again. Spender responses include chargebacks across all attributed periods for each fan with positive net revenue. - name: Transactions description: APIs for managing OnlyFans transactions - name: Usage description: Credit usage reporting for your team - name: User List Collections description: "" - name: Users description: APIs for fetching OnlyFans users - name: Webhooks description: "" paths: /api/{account}/settings/welcome-message: parameters: - in: path name: account description: The Account ID example: acct_XXXXXXXXXXXXXXX required: true schema: type: string get: summary: Get Welcome Message operationId: getWelcomeMessage description: Get the current automatic welcome message template that is sent when someone subscribes. parameters: [] responses: "200": description: Success content: application/json: schema: type: object example: data: id: "12345678901" template: reply_on_subscribe text:Hey, welcome to my profile
displayText:Hey, welcome to my profile
price: 0 lockedText: false previews: [] isMediaReady: true mediaCount: 1 media: - id: 1234567890 type: photo convertedToVideo: false canView: true hasError: false createdAt: 2026-04-28T20:44:55+00:00 isReady: true files: full: url: https://cdn2.onlyfans.com/files/example/full.jpg width: 549 height: 309 size: 0 sources: [] thumb: url: https://cdn2.onlyfans.com/files/example/thumb.jpg width: 300 height: 300 size: 0 preview: url: https://cdn2.onlyfans.com/files/example/preview.jpg width: 549 height: 309 size: 0 squarePreview: url: https://cdn2.onlyfans.com/files/example/square.jpg width: 960 height: 960 size: 0 duration: 0 releaseForms: [] hasCustomPreview: false videoSources: "240": null "720": null createdAt: 2026-04-28T20:44:55+00:00 isActive: false giphyId: null isCouplePeopleMedia: false isMarkdownDisabled: true releaseForms: [] _meta: _credits: used: 1 balance: 999999968 note: Always _cache: is_cached: false note: Cache disabled for this endpoint _rate_limits: limit_minute: 10000000 limit_day: 50000 remaining_minute: 9999997 remaining_day: 49969 properties: data: type: object properties: id: type: string example: "12345678901" template: type: string example: reply_on_subscribe text: type: string example:Hey, welcome to my profile
displayText: type: string example:Hey, welcome to my profile
price: type: integer example: 0 lockedText: type: boolean example: false previews: type: array example: [] isMediaReady: type: boolean example: true mediaCount: type: integer example: 1 media: type: array example: - id: 1234567890 type: photo convertedToVideo: false canView: true hasError: false createdAt: 2026-04-28T20:44:55+00:00 isReady: true files: full: url: https://cdn2.onlyfans.com/files/example/full.jpg width: 549 height: 309 size: 0 sources: [] thumb: url: https://cdn2.onlyfans.com/files/example/thumb.jpg width: 300 height: 300 size: 0 preview: url: https://cdn2.onlyfans.com/files/example/preview.jpg width: 549 height: 309 size: 0 squarePreview: url: https://cdn2.onlyfans.com/files/example/square.jpg width: 960 height: 960 size: 0 duration: 0 releaseForms: [] hasCustomPreview: false videoSources: "240": null "720": null items: type: object properties: id: type: integer example: 1234567890 type: type: string example: photo convertedToVideo: type: boolean example: false canView: type: boolean example: true hasError: type: boolean example: false createdAt: type: string example: 2026-04-28T20:44:55+00:00 isReady: type: boolean example: true files: type: object properties: full: type: object properties: url: type: string example: https://cdn2.onlyfans.com/files/example/full.jpg width: type: integer example: 549 height: type: integer example: 309 size: type: integer example: 0 sources: type: array example: [] thumb: type: object properties: url: type: string example: https://cdn2.onlyfans.com/files/example/thumb.jpg width: type: integer example: 300 height: type: integer example: 300 size: type: integer example: 0 preview: type: object properties: url: type: string example: https://cdn2.onlyfans.com/files/example/preview.jpg width: type: integer example: 549 height: type: integer example: 309 size: type: integer example: 0 squarePreview: type: object properties: url: type: string example: https://cdn2.onlyfans.com/files/example/square.jpg width: type: integer example: 960 height: type: integer example: 960 size: type: integer example: 0 duration: type: integer example: 0 releaseForms: type: array example: [] hasCustomPreview: type: boolean example: false videoSources: type: object properties: "240": type: string example: null nullable: true "720": type: string example: null nullable: true createdAt: type: string example: 2026-04-28T20:44:55+00:00 isActive: type: boolean example: false giphyId: type: string example: null nullable: true isCouplePeopleMedia: type: boolean example: false isMarkdownDisabled: type: boolean example: true releaseForms: type: array example: [] _meta: type: object properties: _credits: type: object properties: used: type: integer example: 1 balance: type: integer example: 999999968 note: type: string example: Always _cache: type: object properties: is_cached: type: boolean example: false note: type: string example: Cache disabled for this endpoint _rate_limits: type: object properties: limit_minute: type: integer example: 10000000 limit_day: type: integer example: 50000 remaining_minute: type: integer example: 9999997 remaining_day: type: integer example: 49969 tags: - Settings components: securitySchemes: default: type: http scheme: bearer description: Get your API Key from OnlyFansAPI Console - https://app.onlyfansapi.com/api-keys ```` # List Social Media Buttons (/api-reference/settings/list-social-media-buttons) Returns the list of social media buttons for the account ## OpenAPI ````yaml https://app.onlyfansapi.com/scribe-docs/openapi.yaml get /api/{account}/settings/social-media-buttons openapi: 3.0.3 info: title: OnlyFans API description: "" version: 1.0.0 servers: - url: https://app.onlyfansapi.com security: - default: [] tags: - name: AI Voice Messages description: "" - name: API Keys description: "" - name: Account description: Endpoints for your linked accounts - name: Analytics - Financial description: APIs for retrieving financial analytics data - name: Analytics - Summary description: APIs for retrieving summary analytics data - name: Banking description: Operations related to user banking details, payout methods, legal and tax information, and account country settings. - name: Banned Words description: Reference list of OnlyFans banned words used by the `blockBannedWords` screening parameter - name: Blocked / Restricted Users description: APIs for listing the users an account has blocked or restricted - name: Chargebacks description: "" - name: Chat Messages description: "" - name: Chats description: "" - name: Client Sessions description: "" - name: Connect OnlyFans Account description: "" - name: Data Exports description: APIs for managing data exports - name: Engagement / Messages description: "" - name: Fans description: APIs for managing OnlyFans fans (subscribers) - name: Fans - AI Summary description: APIs for generating and retrieving AI-powered fan profile summaries - name: Following description: APIs for managing OnlyFans followings (people you're subscribed to) - name: Free Trial Links description: APIs for managing Free Trial Links. Revenue totals are net earnings after refunds and chargebacks. `revenue.chargebacks` (or `summary.chargebacks_total` in stats) is the positive cached net amount already excluded from revenue; do not subtract it again. Spender responses include chargebacks across all attributed periods for each fan with positive net revenue. - name: Giphy description: "" - name: Link Tags description: APIs for managing tags on free trial links, tracking links, and Smart Links - name: Mass Messaging description: "" - name: Media description: "" - name: Media Vault description: "" - name: Media Vault Lists description: "" - name: Notifications description: Endpoints for managingr account notifications - name: Payouts description: "" - name: Post Comments description: "" - name: Post Labels description: APIs for managing your post labels - name: Posts description: APIs for managing OnlyFans posts - name: Profile Content description: Read another user's profile content using your connected OnlyFans account. OnlyFans enforces subscription and purchase requirements; these endpoints do not unlock content. Response samples use captured OnlyFans payloads with anonymized IDs, text, and media URLs; OFAPI metadata values are illustrative. - name: Promotions description: "" - name: Public Profiles description: "" - name: Queue description: "" - name: Release Forms description: APIs for managing OnlyFans release forms - name: Saved For Later (Messages) description: "" - name: Saved For Later (Posts) description: "" - name: Settings description: "" - name: Shared Free Trial Links description: APIs for Free Trial Links that other OF creators have shared with this account. Revenue, cost, and spender data are not available for shared links. - name: Shared Tracking Links description: APIs for Tracking Links (campaigns) that other OF creators have shared with this account. Revenue, cost, and spender data are not available for shared campaigns. - name: Smart Link Postbacks description: APIs for managing Smart Link postback destinations - name: Smart Links description: APIs for managing Smart Links (Free Trial Links and Tracking Links with pooled inventory) - name: Statistics description: "" - name: Stored Free Trial Links description: Instant APIs for retrieving stored free trial links from the OnlyFansAPI Cache (free, no credits used). `revenue.total` is net earnings after refunds and chargebacks. `revenue.chargebacks` is the positive cached net amount already excluded from that total; do not subtract it again. - name: Stored Shared Free Trial Links description: Instant APIs for retrieving stored shared Free Trial Links from the OnlyFansAPI Cache (free, no credits used) - name: Stored Shared Tracking Links description: Instant APIs for retrieving stored shared Tracking Links (campaigns) from the OnlyFansAPI Cache (free, no credits used) - name: Stored Tracking Links description: Instant APIs for retrieving stored tracking links from the OnlyFansAPI Cache (free, no credits used). `revenue.total` is net earnings after refunds and chargebacks. `revenue.chargebacks` is the positive cached net amount already excluded from that total; do not subtract it again. - name: Stories description: APIs for managing OnlyFans stories - name: Story Highlights description: APIs for managing OnlyFans story highlights - name: Subscription Bundles description: "" - name: Tracking Links description: APIs for managing tracking links. Revenue totals are net earnings after refunds and chargebacks. `revenue.chargebacks` (or `summary.chargebacks_total` in stats) is the positive cached net amount already excluded from revenue; do not subtract it again. Spender responses include chargebacks across all attributed periods for each fan with positive net revenue. - name: Transactions description: APIs for managing OnlyFans transactions - name: Usage description: Credit usage reporting for your team - name: User List Collections description: "" - name: Users description: APIs for fetching OnlyFans users - name: Webhooks description: "" paths: /api/{account}/settings/social-media-buttons: parameters: - in: path name: account description: The Account ID example: acct_XXXXXXXXXXXXXXX required: true schema: type: string get: summary: List Social Media Buttons operationId: listSocialMediaButtons description: Returns the list of social media buttons for the account parameters: [] responses: "200": description: "" content: application/json: schema: type: object example: data: - id: 123 sort: 0 label: Amazon username: "" socialMedia: amazon link: https://amazon.com/example url: https://amazon.com/example isValid: true clicks: 0 - id: 1234 sort: 0 label: Instagram username: example_user socialMedia: instagram link: "" url: https://instagram.com/example_user isValid: true clicks: 0 _meta: _credits: used: 1 balance: 999999969 note: Always _cache: is_cached: false note: Cache disabled for this endpoint _rate_limits: limit_minute: 1000 limit_day: 50000 remaining_minute: 999 remaining_day: 49996 properties: data: type: array example: - id: 123 sort: 0 label: Amazon username: "" socialMedia: amazon link: https://amazon.com/example url: https://amazon.com/example isValid: true clicks: 0 - id: 1234 sort: 0 label: Instagram username: example_user socialMedia: instagram link: "" url: https://instagram.com/example_user isValid: true clicks: 0 items: type: object properties: id: type: integer example: 123 sort: type: integer example: 0 label: type: string example: Amazon username: type: string example: "" socialMedia: type: string example: amazon link: type: string example: https://amazon.com/example url: type: string example: https://amazon.com/example isValid: type: boolean example: true clicks: type: integer example: 0 _meta: type: object properties: _credits: type: object properties: used: type: integer example: 1 balance: type: integer example: 999999969 note: type: string example: Always _cache: type: object properties: is_cached: type: boolean example: false note: type: string example: Cache disabled for this endpoint _rate_limits: type: object properties: limit_minute: type: integer example: 1000 limit_day: type: integer example: 50000 remaining_minute: type: integer example: 999 remaining_day: type: integer example: 49996 tags: - Settings components: securitySchemes: default: type: http scheme: bearer description: Get your API Key from OnlyFansAPI Console - https://app.onlyfansapi.com/api-keys ```` # Reorder Social Media Buttons (/api-reference/settings/reorder-social-media-buttons) Changes the order of social media buttons for the account ## OpenAPI ````yaml https://app.onlyfansapi.com/scribe-docs/openapi.yaml post /api/{account}/settings/social-media-buttons/reorder openapi: 3.0.3 info: title: OnlyFans API description: "" version: 1.0.0 servers: - url: https://app.onlyfansapi.com security: - default: [] tags: - name: AI Voice Messages description: "" - name: API Keys description: "" - name: Account description: Endpoints for your linked accounts - name: Analytics - Financial description: APIs for retrieving financial analytics data - name: Analytics - Summary description: APIs for retrieving summary analytics data - name: Banking description: Operations related to user banking details, payout methods, legal and tax information, and account country settings. - name: Banned Words description: Reference list of OnlyFans banned words used by the `blockBannedWords` screening parameter - name: Blocked / Restricted Users description: APIs for listing the users an account has blocked or restricted - name: Chargebacks description: "" - name: Chat Messages description: "" - name: Chats description: "" - name: Client Sessions description: "" - name: Connect OnlyFans Account description: "" - name: Data Exports description: APIs for managing data exports - name: Engagement / Messages description: "" - name: Fans description: APIs for managing OnlyFans fans (subscribers) - name: Fans - AI Summary description: APIs for generating and retrieving AI-powered fan profile summaries - name: Following description: APIs for managing OnlyFans followings (people you're subscribed to) - name: Free Trial Links description: APIs for managing Free Trial Links. Revenue totals are net earnings after refunds and chargebacks. `revenue.chargebacks` (or `summary.chargebacks_total` in stats) is the positive cached net amount already excluded from revenue; do not subtract it again. Spender responses include chargebacks across all attributed periods for each fan with positive net revenue. - name: Giphy description: "" - name: Link Tags description: APIs for managing tags on free trial links, tracking links, and Smart Links - name: Mass Messaging description: "" - name: Media description: "" - name: Media Vault description: "" - name: Media Vault Lists description: "" - name: Notifications description: Endpoints for managingr account notifications - name: Payouts description: "" - name: Post Comments description: "" - name: Post Labels description: APIs for managing your post labels - name: Posts description: APIs for managing OnlyFans posts - name: Profile Content description: Read another user's profile content using your connected OnlyFans account. OnlyFans enforces subscription and purchase requirements; these endpoints do not unlock content. Response samples use captured OnlyFans payloads with anonymized IDs, text, and media URLs; OFAPI metadata values are illustrative. - name: Promotions description: "" - name: Public Profiles description: "" - name: Queue description: "" - name: Release Forms description: APIs for managing OnlyFans release forms - name: Saved For Later (Messages) description: "" - name: Saved For Later (Posts) description: "" - name: Settings description: "" - name: Shared Free Trial Links description: APIs for Free Trial Links that other OF creators have shared with this account. Revenue, cost, and spender data are not available for shared links. - name: Shared Tracking Links description: APIs for Tracking Links (campaigns) that other OF creators have shared with this account. Revenue, cost, and spender data are not available for shared campaigns. - name: Smart Link Postbacks description: APIs for managing Smart Link postback destinations - name: Smart Links description: APIs for managing Smart Links (Free Trial Links and Tracking Links with pooled inventory) - name: Statistics description: "" - name: Stored Free Trial Links description: Instant APIs for retrieving stored free trial links from the OnlyFansAPI Cache (free, no credits used). `revenue.total` is net earnings after refunds and chargebacks. `revenue.chargebacks` is the positive cached net amount already excluded from that total; do not subtract it again. - name: Stored Shared Free Trial Links description: Instant APIs for retrieving stored shared Free Trial Links from the OnlyFansAPI Cache (free, no credits used) - name: Stored Shared Tracking Links description: Instant APIs for retrieving stored shared Tracking Links (campaigns) from the OnlyFansAPI Cache (free, no credits used) - name: Stored Tracking Links description: Instant APIs for retrieving stored tracking links from the OnlyFansAPI Cache (free, no credits used). `revenue.total` is net earnings after refunds and chargebacks. `revenue.chargebacks` is the positive cached net amount already excluded from that total; do not subtract it again. - name: Stories description: APIs for managing OnlyFans stories - name: Story Highlights description: APIs for managing OnlyFans story highlights - name: Subscription Bundles description: "" - name: Tracking Links description: APIs for managing tracking links. Revenue totals are net earnings after refunds and chargebacks. `revenue.chargebacks` (or `summary.chargebacks_total` in stats) is the positive cached net amount already excluded from revenue; do not subtract it again. Spender responses include chargebacks across all attributed periods for each fan with positive net revenue. - name: Transactions description: APIs for managing OnlyFans transactions - name: Usage description: Credit usage reporting for your team - name: User List Collections description: "" - name: Users description: APIs for fetching OnlyFans users - name: Webhooks description: "" paths: /api/{account}/settings/social-media-buttons/reorder: parameters: - in: path name: account description: The Account ID example: acct_XXXXXXXXXXXXXXX required: true schema: type: string post: summary: Reorder Social Media Buttons operationId: reorderSocialMediaButtons description: Changes the order of social media buttons for the account parameters: [] responses: "200": description: "" content: application/json: schema: type: object example: data: - id: 123 sort: 0 label: Amazon username: "" socialMedia: amazon link: https://amazon.com/example url: https://amazon.com/example isValid: true clicks: 0 - id: 1234 sort: 0 label: Instagram username: example_user socialMedia: instagram link: "" url: https://instagram.com/example_user isValid: true clicks: 0 _meta: _credits: used: 1 balance: 999999969 note: Always _cache: is_cached: false note: Cache disabled for this endpoint _rate_limits: limit_minute: 1000 limit_day: 50000 remaining_minute: 999 remaining_day: 49996 properties: data: type: array example: - id: 123 sort: 0 label: Amazon username: "" socialMedia: amazon link: https://amazon.com/example url: https://amazon.com/example isValid: true clicks: 0 - id: 1234 sort: 0 label: Instagram username: example_user socialMedia: instagram link: "" url: https://instagram.com/example_user isValid: true clicks: 0 items: type: object properties: id: type: integer example: 123 sort: type: integer example: 0 label: type: string example: Amazon username: type: string example: "" socialMedia: type: string example: amazon link: type: string example: https://amazon.com/example url: type: string example: https://amazon.com/example isValid: type: boolean example: true clicks: type: integer example: 0 _meta: type: object properties: _credits: type: object properties: used: type: integer example: 1 balance: type: integer example: 999999969 note: type: string example: Always _cache: type: object properties: is_cached: type: boolean example: false note: type: string example: Cache disabled for this endpoint _rate_limits: type: object properties: limit_minute: type: integer example: 1000 limit_day: type: integer example: 50000 remaining_minute: type: integer example: 999 remaining_day: type: integer example: 49996 tags: - Settings requestBody: required: true content: application/json: schema: type: object properties: button_ids: type: array description: The new order of the buttons example: - 123 - 456 items: type: string required: - button_ids components: securitySchemes: default: type: http scheme: bearer description: Get your API Key from OnlyFansAPI Console - https://app.onlyfansapi.com/api-keys ```` # Update Blocked Countries (/api-reference/settings/update-blocked-countries) Updates the countries blocked from viewing the account. ## OpenAPI ````yaml https://app.onlyfansapi.com/scribe-docs/openapi.yaml put /api/{account}/settings/blocked-countries openapi: 3.0.3 info: title: OnlyFans API description: "" version: 1.0.0 servers: - url: https://app.onlyfansapi.com security: - default: [] tags: - name: AI Voice Messages description: "" - name: API Keys description: "" - name: Account description: Endpoints for your linked accounts - name: Analytics - Financial description: APIs for retrieving financial analytics data - name: Analytics - Summary description: APIs for retrieving summary analytics data - name: Banking description: Operations related to user banking details, payout methods, legal and tax information, and account country settings. - name: Banned Words description: Reference list of OnlyFans banned words used by the `blockBannedWords` screening parameter - name: Blocked / Restricted Users description: APIs for listing the users an account has blocked or restricted - name: Chargebacks description: "" - name: Chat Messages description: "" - name: Chats description: "" - name: Client Sessions description: "" - name: Connect OnlyFans Account description: "" - name: Data Exports description: APIs for managing data exports - name: Engagement / Messages description: "" - name: Fans description: APIs for managing OnlyFans fans (subscribers) - name: Fans - AI Summary description: APIs for generating and retrieving AI-powered fan profile summaries - name: Following description: APIs for managing OnlyFans followings (people you're subscribed to) - name: Free Trial Links description: APIs for managing Free Trial Links. Revenue totals are net earnings after refunds and chargebacks. `revenue.chargebacks` (or `summary.chargebacks_total` in stats) is the positive cached net amount already excluded from revenue; do not subtract it again. Spender responses include chargebacks across all attributed periods for each fan with positive net revenue. - name: Giphy description: "" - name: Link Tags description: APIs for managing tags on free trial links, tracking links, and Smart Links - name: Mass Messaging description: "" - name: Media description: "" - name: Media Vault description: "" - name: Media Vault Lists description: "" - name: Notifications description: Endpoints for managingr account notifications - name: Payouts description: "" - name: Post Comments description: "" - name: Post Labels description: APIs for managing your post labels - name: Posts description: APIs for managing OnlyFans posts - name: Profile Content description: Read another user's profile content using your connected OnlyFans account. OnlyFans enforces subscription and purchase requirements; these endpoints do not unlock content. Response samples use captured OnlyFans payloads with anonymized IDs, text, and media URLs; OFAPI metadata values are illustrative. - name: Promotions description: "" - name: Public Profiles description: "" - name: Queue description: "" - name: Release Forms description: APIs for managing OnlyFans release forms - name: Saved For Later (Messages) description: "" - name: Saved For Later (Posts) description: "" - name: Settings description: "" - name: Shared Free Trial Links description: APIs for Free Trial Links that other OF creators have shared with this account. Revenue, cost, and spender data are not available for shared links. - name: Shared Tracking Links description: APIs for Tracking Links (campaigns) that other OF creators have shared with this account. Revenue, cost, and spender data are not available for shared campaigns. - name: Smart Link Postbacks description: APIs for managing Smart Link postback destinations - name: Smart Links description: APIs for managing Smart Links (Free Trial Links and Tracking Links with pooled inventory) - name: Statistics description: "" - name: Stored Free Trial Links description: Instant APIs for retrieving stored free trial links from the OnlyFansAPI Cache (free, no credits used). `revenue.total` is net earnings after refunds and chargebacks. `revenue.chargebacks` is the positive cached net amount already excluded from that total; do not subtract it again. - name: Stored Shared Free Trial Links description: Instant APIs for retrieving stored shared Free Trial Links from the OnlyFansAPI Cache (free, no credits used) - name: Stored Shared Tracking Links description: Instant APIs for retrieving stored shared Tracking Links (campaigns) from the OnlyFansAPI Cache (free, no credits used) - name: Stored Tracking Links description: Instant APIs for retrieving stored tracking links from the OnlyFansAPI Cache (free, no credits used). `revenue.total` is net earnings after refunds and chargebacks. `revenue.chargebacks` is the positive cached net amount already excluded from that total; do not subtract it again. - name: Stories description: APIs for managing OnlyFans stories - name: Story Highlights description: APIs for managing OnlyFans story highlights - name: Subscription Bundles description: "" - name: Tracking Links description: APIs for managing tracking links. Revenue totals are net earnings after refunds and chargebacks. `revenue.chargebacks` (or `summary.chargebacks_total` in stats) is the positive cached net amount already excluded from revenue; do not subtract it again. Spender responses include chargebacks across all attributed periods for each fan with positive net revenue. - name: Transactions description: APIs for managing OnlyFans transactions - name: Usage description: Credit usage reporting for your team - name: User List Collections description: "" - name: Users description: APIs for fetching OnlyFans users - name: Webhooks description: "" paths: /api/{account}/settings/blocked-countries: parameters: - in: path name: account description: The Account ID example: acct_XXXXXXXXXXXXXXX required: true schema: type: string put: summary: Update Blocked Countries operationId: updateBlockedCountries description: Updates the countries blocked from viewing the account. parameters: [] responses: "200": description: Success content: application/json: schema: type: object example: data: success: true _meta: _credits: used: 1 balance: 999999969 note: Always _cache: is_cached: false note: Cache disabled for this endpoint _rate_limits: limit_minute: 10000000 limit_day: 50000 remaining_minute: 9999998 remaining_day: 49970 properties: data: type: object properties: success: type: boolean example: true _meta: type: object properties: _credits: type: object properties: used: type: integer example: 1 balance: type: integer example: 999999969 note: type: string example: Always _cache: type: object properties: is_cached: type: boolean example: false note: type: string example: Cache disabled for this endpoint _rate_limits: type: object properties: limit_minute: type: integer example: 10000000 limit_day: type: integer example: 50000 remaining_minute: type: integer example: 9999998 remaining_day: type: integer example: 49970 tags: - Settings requestBody: required: true content: application/json: schema: type: object properties: blockedCountries: type: array description: List of all ISO 3166-1 alpha-2 country codes to block including existing ones. If you want to unblock all countries, set this to an empty array or `null`. example: - RU items: type: string blockedStates: type: array description: Blocked states payload forwarded to OnlyFans. Defaults to an empty array. example: [] items: type: string required: - blockedCountries components: securitySchemes: default: type: http scheme: bearer description: Get your API Key from OnlyFansAPI Console - https://app.onlyfansapi.com/api-keys ```` # Update Profile (/api-reference/settings/update-profile) Updates the account profile. **Only include the fields you want to update.** To make a field empty, set it to `null`. ## OpenAPI ````yaml https://app.onlyfansapi.com/scribe-docs/openapi.yaml post /api/{account}/settings/profile openapi: 3.0.3 info: title: OnlyFans API description: "" version: 1.0.0 servers: - url: https://app.onlyfansapi.com security: - default: [] tags: - name: AI Voice Messages description: "" - name: API Keys description: "" - name: Account description: Endpoints for your linked accounts - name: Analytics - Financial description: APIs for retrieving financial analytics data - name: Analytics - Summary description: APIs for retrieving summary analytics data - name: Banking description: Operations related to user banking details, payout methods, legal and tax information, and account country settings. - name: Banned Words description: Reference list of OnlyFans banned words used by the `blockBannedWords` screening parameter - name: Blocked / Restricted Users description: APIs for listing the users an account has blocked or restricted - name: Chargebacks description: "" - name: Chat Messages description: "" - name: Chats description: "" - name: Client Sessions description: "" - name: Connect OnlyFans Account description: "" - name: Data Exports description: APIs for managing data exports - name: Engagement / Messages description: "" - name: Fans description: APIs for managing OnlyFans fans (subscribers) - name: Fans - AI Summary description: APIs for generating and retrieving AI-powered fan profile summaries - name: Following description: APIs for managing OnlyFans followings (people you're subscribed to) - name: Free Trial Links description: APIs for managing Free Trial Links. Revenue totals are net earnings after refunds and chargebacks. `revenue.chargebacks` (or `summary.chargebacks_total` in stats) is the positive cached net amount already excluded from revenue; do not subtract it again. Spender responses include chargebacks across all attributed periods for each fan with positive net revenue. - name: Giphy description: "" - name: Link Tags description: APIs for managing tags on free trial links, tracking links, and Smart Links - name: Mass Messaging description: "" - name: Media description: "" - name: Media Vault description: "" - name: Media Vault Lists description: "" - name: Notifications description: Endpoints for managingr account notifications - name: Payouts description: "" - name: Post Comments description: "" - name: Post Labels description: APIs for managing your post labels - name: Posts description: APIs for managing OnlyFans posts - name: Profile Content description: Read another user's profile content using your connected OnlyFans account. OnlyFans enforces subscription and purchase requirements; these endpoints do not unlock content. Response samples use captured OnlyFans payloads with anonymized IDs, text, and media URLs; OFAPI metadata values are illustrative. - name: Promotions description: "" - name: Public Profiles description: "" - name: Queue description: "" - name: Release Forms description: APIs for managing OnlyFans release forms - name: Saved For Later (Messages) description: "" - name: Saved For Later (Posts) description: "" - name: Settings description: "" - name: Shared Free Trial Links description: APIs for Free Trial Links that other OF creators have shared with this account. Revenue, cost, and spender data are not available for shared links. - name: Shared Tracking Links description: APIs for Tracking Links (campaigns) that other OF creators have shared with this account. Revenue, cost, and spender data are not available for shared campaigns. - name: Smart Link Postbacks description: APIs for managing Smart Link postback destinations - name: Smart Links description: APIs for managing Smart Links (Free Trial Links and Tracking Links with pooled inventory) - name: Statistics description: "" - name: Stored Free Trial Links description: Instant APIs for retrieving stored free trial links from the OnlyFansAPI Cache (free, no credits used). `revenue.total` is net earnings after refunds and chargebacks. `revenue.chargebacks` is the positive cached net amount already excluded from that total; do not subtract it again. - name: Stored Shared Free Trial Links description: Instant APIs for retrieving stored shared Free Trial Links from the OnlyFansAPI Cache (free, no credits used) - name: Stored Shared Tracking Links description: Instant APIs for retrieving stored shared Tracking Links (campaigns) from the OnlyFansAPI Cache (free, no credits used) - name: Stored Tracking Links description: Instant APIs for retrieving stored tracking links from the OnlyFansAPI Cache (free, no credits used). `revenue.total` is net earnings after refunds and chargebacks. `revenue.chargebacks` is the positive cached net amount already excluded from that total; do not subtract it again. - name: Stories description: APIs for managing OnlyFans stories - name: Story Highlights description: APIs for managing OnlyFans story highlights - name: Subscription Bundles description: "" - name: Tracking Links description: APIs for managing tracking links. Revenue totals are net earnings after refunds and chargebacks. `revenue.chargebacks` (or `summary.chargebacks_total` in stats) is the positive cached net amount already excluded from revenue; do not subtract it again. Spender responses include chargebacks across all attributed periods for each fan with positive net revenue. - name: Transactions description: APIs for managing OnlyFans transactions - name: Usage description: Credit usage reporting for your team - name: User List Collections description: "" - name: Users description: APIs for fetching OnlyFans users - name: Webhooks description: "" paths: /api/{account}/settings/profile: parameters: - in: path name: account description: The Account ID example: acct_XXXXXXXXXXXXXXX required: true schema: type: string post: summary: Update Profile operationId: updateProfile description: Updates the account profile. **Only include the fields you want to update.** To make a field empty, set it to `null`. parameters: [] responses: "200": description: Success content: application/json: schema: type: object example: data: success: true _meta: _credits: used: 1 balance: 999999969 note: Always _cache: is_cached: false note: Cache disabled for this endpoint _rate_limits: limit_minute: 10000000 limit_day: 50000 remaining_minute: 9999998 remaining_day: 49970 properties: data: type: object properties: success: type: boolean example: true _meta: type: object properties: _credits: type: object properties: used: type: integer example: 1 balance: type: integer example: 999999969 note: type: string example: Always _cache: type: object properties: is_cached: type: boolean example: false note: type: string example: Cache disabled for this endpoint _rate_limits: type: object properties: limit_minute: type: integer example: 10000000 limit_day: type: integer example: 50000 remaining_minute: type: integer example: 9999998 remaining_day: type: integer example: 49970 tags: - Settings requestBody: required: false content: application/json: schema: type: object properties: username: type: string description: The new username to use. Make sure to first check if it exists using our `/settings/username-exists` endpoint. example: MyNewUsername name: type: string description: The new display name to use. Set to `null` to use the default display name. example: u1234 nullable: true avatar: type: string description: The new avatar to use. Must be a `ofapi_media_` ID. Refer to our `/media/upload` endpoint on how to get this. example: ofapi_media_abc123 header: type: string description: The new header (banner) to use. Must be a `ofapi_media_` ID. Refer to our `/media/upload` endpoint on how to get this. example: ofapi_media_abc123 about: type: string description: The new bio to use. Set to `null` to empty it. example: Hey there! nullable: true location: type: string description: The new location to use. Set to `null` to empty it. example: Europe nullable: true website: type: string description: The new website URL to use. Must be a valid URL. Set to `null` to empty it. example: https://example.com nullable: true wishlist: type: string description: The new Amazon Wishlist URL to use. Must be a valid URL. Set to `null` to empty it. example: https://example.com nullable: true components: securitySchemes: default: type: http scheme: bearer description: Get your API Key from OnlyFansAPI Console - https://app.onlyfansapi.com/api-keys ```` # Update Social Media Button (/api-reference/settings/update-social-media-button) Updates a social media button from the account ## OpenAPI ````yaml https://app.onlyfansapi.com/scribe-docs/openapi.yaml put /api/{account}/settings/social-media-buttons/{button_id} openapi: 3.0.3 info: title: OnlyFans API description: "" version: 1.0.0 servers: - url: https://app.onlyfansapi.com security: - default: [] tags: - name: AI Voice Messages description: "" - name: API Keys description: "" - name: Account description: Endpoints for your linked accounts - name: Analytics - Financial description: APIs for retrieving financial analytics data - name: Analytics - Summary description: APIs for retrieving summary analytics data - name: Banking description: Operations related to user banking details, payout methods, legal and tax information, and account country settings. - name: Banned Words description: Reference list of OnlyFans banned words used by the `blockBannedWords` screening parameter - name: Blocked / Restricted Users description: APIs for listing the users an account has blocked or restricted - name: Chargebacks description: "" - name: Chat Messages description: "" - name: Chats description: "" - name: Client Sessions description: "" - name: Connect OnlyFans Account description: "" - name: Data Exports description: APIs for managing data exports - name: Engagement / Messages description: "" - name: Fans description: APIs for managing OnlyFans fans (subscribers) - name: Fans - AI Summary description: APIs for generating and retrieving AI-powered fan profile summaries - name: Following description: APIs for managing OnlyFans followings (people you're subscribed to) - name: Free Trial Links description: APIs for managing Free Trial Links. Revenue totals are net earnings after refunds and chargebacks. `revenue.chargebacks` (or `summary.chargebacks_total` in stats) is the positive cached net amount already excluded from revenue; do not subtract it again. Spender responses include chargebacks across all attributed periods for each fan with positive net revenue. - name: Giphy description: "" - name: Link Tags description: APIs for managing tags on free trial links, tracking links, and Smart Links - name: Mass Messaging description: "" - name: Media description: "" - name: Media Vault description: "" - name: Media Vault Lists description: "" - name: Notifications description: Endpoints for managingr account notifications - name: Payouts description: "" - name: Post Comments description: "" - name: Post Labels description: APIs for managing your post labels - name: Posts description: APIs for managing OnlyFans posts - name: Profile Content description: Read another user's profile content using your connected OnlyFans account. OnlyFans enforces subscription and purchase requirements; these endpoints do not unlock content. Response samples use captured OnlyFans payloads with anonymized IDs, text, and media URLs; OFAPI metadata values are illustrative. - name: Promotions description: "" - name: Public Profiles description: "" - name: Queue description: "" - name: Release Forms description: APIs for managing OnlyFans release forms - name: Saved For Later (Messages) description: "" - name: Saved For Later (Posts) description: "" - name: Settings description: "" - name: Shared Free Trial Links description: APIs for Free Trial Links that other OF creators have shared with this account. Revenue, cost, and spender data are not available for shared links. - name: Shared Tracking Links description: APIs for Tracking Links (campaigns) that other OF creators have shared with this account. Revenue, cost, and spender data are not available for shared campaigns. - name: Smart Link Postbacks description: APIs for managing Smart Link postback destinations - name: Smart Links description: APIs for managing Smart Links (Free Trial Links and Tracking Links with pooled inventory) - name: Statistics description: "" - name: Stored Free Trial Links description: Instant APIs for retrieving stored free trial links from the OnlyFansAPI Cache (free, no credits used). `revenue.total` is net earnings after refunds and chargebacks. `revenue.chargebacks` is the positive cached net amount already excluded from that total; do not subtract it again. - name: Stored Shared Free Trial Links description: Instant APIs for retrieving stored shared Free Trial Links from the OnlyFansAPI Cache (free, no credits used) - name: Stored Shared Tracking Links description: Instant APIs for retrieving stored shared Tracking Links (campaigns) from the OnlyFansAPI Cache (free, no credits used) - name: Stored Tracking Links description: Instant APIs for retrieving stored tracking links from the OnlyFansAPI Cache (free, no credits used). `revenue.total` is net earnings after refunds and chargebacks. `revenue.chargebacks` is the positive cached net amount already excluded from that total; do not subtract it again. - name: Stories description: APIs for managing OnlyFans stories - name: Story Highlights description: APIs for managing OnlyFans story highlights - name: Subscription Bundles description: "" - name: Tracking Links description: APIs for managing tracking links. Revenue totals are net earnings after refunds and chargebacks. `revenue.chargebacks` (or `summary.chargebacks_total` in stats) is the positive cached net amount already excluded from revenue; do not subtract it again. Spender responses include chargebacks across all attributed periods for each fan with positive net revenue. - name: Transactions description: APIs for managing OnlyFans transactions - name: Usage description: Credit usage reporting for your team - name: User List Collections description: "" - name: Users description: APIs for fetching OnlyFans users - name: Webhooks description: "" paths: /api/{account}/settings/social-media-buttons/{button_id}: parameters: - in: path name: account description: The Account ID example: acct_XXXXXXXXXXXXXXX required: true schema: type: string - in: path name: button_id description: The ID of the social media button to update example: 123 required: true schema: type: string put: summary: Update Social Media Button operationId: updateSocialMediaButton description: Updates a social media button from the account parameters: [] responses: "200": description: "" content: application/json: schema: type: object example: data: - id: 3384764 sort: 0 label: new username: test socialMedia: instagram link: "" url: https://instagram.com/test isValid: true clicks: 0 - id: 3385711 sort: 1 label: X username: test socialMedia: x link: "" url: https://twitter.com/test isValid: true clicks: 0 _meta: _credits: used: 1 balance: 999999905 note: Always _cache: is_cached: false note: Cache disabled for this endpoint _rate_limits: limit_minute: 1000 limit_day: 50000 remaining_minute: 995 remaining_day: 49993 properties: data: type: array example: - id: 3384764 sort: 0 label: new username: test socialMedia: instagram link: "" url: https://instagram.com/test isValid: true clicks: 0 - id: 3385711 sort: 1 label: X username: test socialMedia: x link: "" url: https://twitter.com/test isValid: true clicks: 0 items: type: object properties: id: type: integer example: 3384764 sort: type: integer example: 0 label: type: string example: new username: type: string example: test socialMedia: type: string example: instagram link: type: string example: "" url: type: string example: https://instagram.com/test isValid: type: boolean example: true clicks: type: integer example: 0 _meta: type: object properties: _credits: type: object properties: used: type: integer example: 1 balance: type: integer example: 999999905 note: type: string example: Always _cache: type: object properties: is_cached: type: boolean example: false note: type: string example: Cache disabled for this endpoint _rate_limits: type: object properties: limit_minute: type: integer example: 1000 limit_day: type: integer example: 50000 remaining_minute: type: integer example: 995 remaining_day: type: integer example: 49993 tags: - Settings requestBody: required: true content: application/json: schema: type: object properties: label: type: string description: The new label for the button example: Instagram required: - label components: securitySchemes: default: type: http scheme: bearer description: Get your API Key from OnlyFansAPI Console - https://app.onlyfansapi.com/api-keys ```` # Update Subscription Price (/api-reference/settings/update-subscription-price) Update the account subscription price. Send `0` or `"free"` to make the account free. ⚠️ WARNING! OnlyFans limits updating the subscription price to max. 3 times per day. ## OpenAPI ````yaml https://app.onlyfansapi.com/scribe-docs/openapi.yaml patch /api/{account}/settings/subscription-price openapi: 3.0.3 info: title: OnlyFans API description: "" version: 1.0.0 servers: - url: https://app.onlyfansapi.com security: - default: [] tags: - name: AI Voice Messages description: "" - name: API Keys description: "" - name: Account description: Endpoints for your linked accounts - name: Analytics - Financial description: APIs for retrieving financial analytics data - name: Analytics - Summary description: APIs for retrieving summary analytics data - name: Banking description: Operations related to user banking details, payout methods, legal and tax information, and account country settings. - name: Banned Words description: Reference list of OnlyFans banned words used by the `blockBannedWords` screening parameter - name: Blocked / Restricted Users description: APIs for listing the users an account has blocked or restricted - name: Chargebacks description: "" - name: Chat Messages description: "" - name: Chats description: "" - name: Client Sessions description: "" - name: Connect OnlyFans Account description: "" - name: Data Exports description: APIs for managing data exports - name: Engagement / Messages description: "" - name: Fans description: APIs for managing OnlyFans fans (subscribers) - name: Fans - AI Summary description: APIs for generating and retrieving AI-powered fan profile summaries - name: Following description: APIs for managing OnlyFans followings (people you're subscribed to) - name: Free Trial Links description: APIs for managing Free Trial Links. Revenue totals are net earnings after refunds and chargebacks. `revenue.chargebacks` (or `summary.chargebacks_total` in stats) is the positive cached net amount already excluded from revenue; do not subtract it again. Spender responses include chargebacks across all attributed periods for each fan with positive net revenue. - name: Giphy description: "" - name: Link Tags description: APIs for managing tags on free trial links, tracking links, and Smart Links - name: Mass Messaging description: "" - name: Media description: "" - name: Media Vault description: "" - name: Media Vault Lists description: "" - name: Notifications description: Endpoints for managingr account notifications - name: Payouts description: "" - name: Post Comments description: "" - name: Post Labels description: APIs for managing your post labels - name: Posts description: APIs for managing OnlyFans posts - name: Profile Content description: Read another user's profile content using your connected OnlyFans account. OnlyFans enforces subscription and purchase requirements; these endpoints do not unlock content. Response samples use captured OnlyFans payloads with anonymized IDs, text, and media URLs; OFAPI metadata values are illustrative. - name: Promotions description: "" - name: Public Profiles description: "" - name: Queue description: "" - name: Release Forms description: APIs for managing OnlyFans release forms - name: Saved For Later (Messages) description: "" - name: Saved For Later (Posts) description: "" - name: Settings description: "" - name: Shared Free Trial Links description: APIs for Free Trial Links that other OF creators have shared with this account. Revenue, cost, and spender data are not available for shared links. - name: Shared Tracking Links description: APIs for Tracking Links (campaigns) that other OF creators have shared with this account. Revenue, cost, and spender data are not available for shared campaigns. - name: Smart Link Postbacks description: APIs for managing Smart Link postback destinations - name: Smart Links description: APIs for managing Smart Links (Free Trial Links and Tracking Links with pooled inventory) - name: Statistics description: "" - name: Stored Free Trial Links description: Instant APIs for retrieving stored free trial links from the OnlyFansAPI Cache (free, no credits used). `revenue.total` is net earnings after refunds and chargebacks. `revenue.chargebacks` is the positive cached net amount already excluded from that total; do not subtract it again. - name: Stored Shared Free Trial Links description: Instant APIs for retrieving stored shared Free Trial Links from the OnlyFansAPI Cache (free, no credits used) - name: Stored Shared Tracking Links description: Instant APIs for retrieving stored shared Tracking Links (campaigns) from the OnlyFansAPI Cache (free, no credits used) - name: Stored Tracking Links description: Instant APIs for retrieving stored tracking links from the OnlyFansAPI Cache (free, no credits used). `revenue.total` is net earnings after refunds and chargebacks. `revenue.chargebacks` is the positive cached net amount already excluded from that total; do not subtract it again. - name: Stories description: APIs for managing OnlyFans stories - name: Story Highlights description: APIs for managing OnlyFans story highlights - name: Subscription Bundles description: "" - name: Tracking Links description: APIs for managing tracking links. Revenue totals are net earnings after refunds and chargebacks. `revenue.chargebacks` (or `summary.chargebacks_total` in stats) is the positive cached net amount already excluded from revenue; do not subtract it again. Spender responses include chargebacks across all attributed periods for each fan with positive net revenue. - name: Transactions description: APIs for managing OnlyFans transactions - name: Usage description: Credit usage reporting for your team - name: User List Collections description: "" - name: Users description: APIs for fetching OnlyFans users - name: Webhooks description: "" paths: /api/{account}/settings/subscription-price: parameters: - in: path name: account description: The Account ID example: acct_XXXXXXXXXXXXXXX required: true schema: type: string patch: summary: Update Subscription Price operationId: updateSubscriptionPrice description: 'Update the account subscription price. Send `0` or `"free"` to make the account free. ⚠️ WARNING! OnlyFans limits updating the subscription price to max. 3 times per day. ' parameters: [] responses: "200": description: Success content: application/json: schema: type: object example: data: success: true _meta: _credits: used: 1 balance: 999999969 note: Always _cache: is_cached: false note: Cache disabled for this endpoint _rate_limits: limit_minute: 10000000 limit_day: 50000 remaining_minute: 9999998 remaining_day: 49970 properties: data: type: object properties: success: type: boolean example: true _meta: type: object properties: _credits: type: object properties: used: type: integer example: 1 balance: type: integer example: 999999969 note: type: string example: Always _cache: type: object properties: is_cached: type: boolean example: false note: type: string example: Cache disabled for this endpoint _rate_limits: type: object properties: limit_minute: type: integer example: 10000000 limit_day: type: integer example: 50000 remaining_minute: type: integer example: 9999998 remaining_day: type: integer example: 49970 tags: - Settings requestBody: required: true content: application/json: schema: type: object properties: price: type: string description: The new subscription price. Accepts `0`, `"free"`, or a number between 4.99 and 200. example: "4.99" required: - price components: securitySchemes: default: type: http scheme: bearer description: Get your API Key from OnlyFansAPI Console - https://app.onlyfansapi.com/api-keys ```` # Update Welcome Message (/api-reference/settings/update-welcome-message) Update the automatic welcome message template that is sent when someone subscribes. ## OpenAPI ````yaml https://app.onlyfansapi.com/scribe-docs/openapi.yaml post /api/{account}/settings/welcome-message openapi: 3.0.3 info: title: OnlyFans API description: "" version: 1.0.0 servers: - url: https://app.onlyfansapi.com security: - default: [] tags: - name: AI Voice Messages description: "" - name: API Keys description: "" - name: Account description: Endpoints for your linked accounts - name: Analytics - Financial description: APIs for retrieving financial analytics data - name: Analytics - Summary description: APIs for retrieving summary analytics data - name: Banking description: Operations related to user banking details, payout methods, legal and tax information, and account country settings. - name: Banned Words description: Reference list of OnlyFans banned words used by the `blockBannedWords` screening parameter - name: Blocked / Restricted Users description: APIs for listing the users an account has blocked or restricted - name: Chargebacks description: "" - name: Chat Messages description: "" - name: Chats description: "" - name: Client Sessions description: "" - name: Connect OnlyFans Account description: "" - name: Data Exports description: APIs for managing data exports - name: Engagement / Messages description: "" - name: Fans description: APIs for managing OnlyFans fans (subscribers) - name: Fans - AI Summary description: APIs for generating and retrieving AI-powered fan profile summaries - name: Following description: APIs for managing OnlyFans followings (people you're subscribed to) - name: Free Trial Links description: APIs for managing Free Trial Links. Revenue totals are net earnings after refunds and chargebacks. `revenue.chargebacks` (or `summary.chargebacks_total` in stats) is the positive cached net amount already excluded from revenue; do not subtract it again. Spender responses include chargebacks across all attributed periods for each fan with positive net revenue. - name: Giphy description: "" - name: Link Tags description: APIs for managing tags on free trial links, tracking links, and Smart Links - name: Mass Messaging description: "" - name: Media description: "" - name: Media Vault description: "" - name: Media Vault Lists description: "" - name: Notifications description: Endpoints for managingr account notifications - name: Payouts description: "" - name: Post Comments description: "" - name: Post Labels description: APIs for managing your post labels - name: Posts description: APIs for managing OnlyFans posts - name: Profile Content description: Read another user's profile content using your connected OnlyFans account. OnlyFans enforces subscription and purchase requirements; these endpoints do not unlock content. Response samples use captured OnlyFans payloads with anonymized IDs, text, and media URLs; OFAPI metadata values are illustrative. - name: Promotions description: "" - name: Public Profiles description: "" - name: Queue description: "" - name: Release Forms description: APIs for managing OnlyFans release forms - name: Saved For Later (Messages) description: "" - name: Saved For Later (Posts) description: "" - name: Settings description: "" - name: Shared Free Trial Links description: APIs for Free Trial Links that other OF creators have shared with this account. Revenue, cost, and spender data are not available for shared links. - name: Shared Tracking Links description: APIs for Tracking Links (campaigns) that other OF creators have shared with this account. Revenue, cost, and spender data are not available for shared campaigns. - name: Smart Link Postbacks description: APIs for managing Smart Link postback destinations - name: Smart Links description: APIs for managing Smart Links (Free Trial Links and Tracking Links with pooled inventory) - name: Statistics description: "" - name: Stored Free Trial Links description: Instant APIs for retrieving stored free trial links from the OnlyFansAPI Cache (free, no credits used). `revenue.total` is net earnings after refunds and chargebacks. `revenue.chargebacks` is the positive cached net amount already excluded from that total; do not subtract it again. - name: Stored Shared Free Trial Links description: Instant APIs for retrieving stored shared Free Trial Links from the OnlyFansAPI Cache (free, no credits used) - name: Stored Shared Tracking Links description: Instant APIs for retrieving stored shared Tracking Links (campaigns) from the OnlyFansAPI Cache (free, no credits used) - name: Stored Tracking Links description: Instant APIs for retrieving stored tracking links from the OnlyFansAPI Cache (free, no credits used). `revenue.total` is net earnings after refunds and chargebacks. `revenue.chargebacks` is the positive cached net amount already excluded from that total; do not subtract it again. - name: Stories description: APIs for managing OnlyFans stories - name: Story Highlights description: APIs for managing OnlyFans story highlights - name: Subscription Bundles description: "" - name: Tracking Links description: APIs for managing tracking links. Revenue totals are net earnings after refunds and chargebacks. `revenue.chargebacks` (or `summary.chargebacks_total` in stats) is the positive cached net amount already excluded from revenue; do not subtract it again. Spender responses include chargebacks across all attributed periods for each fan with positive net revenue. - name: Transactions description: APIs for managing OnlyFans transactions - name: Usage description: Credit usage reporting for your team - name: User List Collections description: "" - name: Users description: APIs for fetching OnlyFans users - name: Webhooks description: "" paths: /api/{account}/settings/welcome-message: parameters: - in: path name: account description: The Account ID example: acct_XXXXXXXXXXXXXXX required: true schema: type: string post: summary: Update Welcome Message operationId: updateWelcomeMessage description: Update the automatic welcome message template that is sent when someone subscribes. parameters: [] responses: "200": description: Success content: application/json: schema: type: object example: data: id: "12345678901" template: reply_on_subscribe text:Hey, welcome to my profile
displayText:Hey, welcome to my profile
price: 0 lockedText: false previews: [] isMediaReady: true mediaCount: 1 media: - id: 1234567890 type: photo convertedToVideo: false canView: true hasError: false createdAt: 2026-04-28T20:44:55+00:00 isReady: true files: full: url: https://cdn2.onlyfans.com/files/example/full.jpg width: 549 height: 309 size: 0 sources: [] thumb: url: https://cdn2.onlyfans.com/files/example/thumb.jpg width: 300 height: 300 size: 0 preview: url: https://cdn2.onlyfans.com/files/example/preview.jpg width: 549 height: 309 size: 0 squarePreview: url: https://cdn2.onlyfans.com/files/example/square.jpg width: 960 height: 960 size: 0 duration: 0 releaseForms: [] hasCustomPreview: false videoSources: "240": null "720": null createdAt: 2026-04-28T20:44:55+00:00 isActive: false giphyId: null isCouplePeopleMedia: false isMarkdownDisabled: true releaseForms: [] _meta: _credits: used: 1 balance: 999999968 note: Always _cache: is_cached: false note: Cache disabled for this endpoint _rate_limits: limit_minute: 10000000 limit_day: 50000 remaining_minute: 9999997 remaining_day: 49969 properties: data: type: object properties: id: type: string example: "12345678901" template: type: string example: reply_on_subscribe text: type: string example:Hey, welcome to my profile
displayText: type: string example:Hey, welcome to my profile
price: type: integer example: 0 lockedText: type: boolean example: false previews: type: array example: [] isMediaReady: type: boolean example: true mediaCount: type: integer example: 1 media: type: array example: - id: 1234567890 type: photo convertedToVideo: false canView: true hasError: false createdAt: 2026-04-28T20:44:55+00:00 isReady: true files: full: url: https://cdn2.onlyfans.com/files/example/full.jpg width: 549 height: 309 size: 0 sources: [] thumb: url: https://cdn2.onlyfans.com/files/example/thumb.jpg width: 300 height: 300 size: 0 preview: url: https://cdn2.onlyfans.com/files/example/preview.jpg width: 549 height: 309 size: 0 squarePreview: url: https://cdn2.onlyfans.com/files/example/square.jpg width: 960 height: 960 size: 0 duration: 0 releaseForms: [] hasCustomPreview: false videoSources: "240": null "720": null items: type: object properties: id: type: integer example: 1234567890 type: type: string example: photo convertedToVideo: type: boolean example: false canView: type: boolean example: true hasError: type: boolean example: false createdAt: type: string example: 2026-04-28T20:44:55+00:00 isReady: type: boolean example: true files: type: object properties: full: type: object properties: url: type: string example: https://cdn2.onlyfans.com/files/example/full.jpg width: type: integer example: 549 height: type: integer example: 309 size: type: integer example: 0 sources: type: array example: [] thumb: type: object properties: url: type: string example: https://cdn2.onlyfans.com/files/example/thumb.jpg width: type: integer example: 300 height: type: integer example: 300 size: type: integer example: 0 preview: type: object properties: url: type: string example: https://cdn2.onlyfans.com/files/example/preview.jpg width: type: integer example: 549 height: type: integer example: 309 size: type: integer example: 0 squarePreview: type: object properties: url: type: string example: https://cdn2.onlyfans.com/files/example/square.jpg width: type: integer example: 960 height: type: integer example: 960 size: type: integer example: 0 duration: type: integer example: 0 releaseForms: type: array example: [] hasCustomPreview: type: boolean example: false videoSources: type: object properties: "240": type: string example: null nullable: true "720": type: string example: null nullable: true createdAt: type: string example: 2026-04-28T20:44:55+00:00 isActive: type: boolean example: false giphyId: type: string example: null nullable: true isCouplePeopleMedia: type: boolean example: false isMarkdownDisabled: type: boolean example: true releaseForms: type: array example: [] _meta: type: object properties: _credits: type: object properties: used: type: integer example: 1 balance: type: integer example: 999999968 note: type: string example: Always _cache: type: object properties: is_cached: type: boolean example: false note: type: string example: Cache disabled for this endpoint _rate_limits: type: object properties: limit_minute: type: integer example: 10000000 limit_day: type: integer example: 50000 remaining_minute: type: integer example: 9999997 remaining_day: type: integer example: 49969 tags: - Settings requestBody: required: false content: application/json: schema: type: object properties: text: type: string description: The welcome message text content. Required unless a media file is present. example:Hey, welcome to my profile
lockedText: type: boolean description: Whether the text should be shown or hidden. example: false price: type: integer description: Price for paid content (0 or between 3-200). In case this is not zero, **mediaFiles** is required. example: 0 mediaFiles: type: array description: Direct file uploads, OFAPI `ofapi_media_` IDs, or OF vault IDs. Will be hidden if `price` is provided. example: - ofapi_media_abc123 - 1234567890 items: type: file[]|string previews: type: array description: Direct file uploads, OFAPI `ofapi_media_` IDs, OF vault IDs, or integer indices referencing uploaded files in `mediaFiles`. Will be shown if `price` is provided. example: - ofapi_media_abc123 - 1234567890 items: type: file[]|string[]|int rfTag: type: string description: Array of OnlyFans Creator User IDs to tag in your message. example: null rfGuest: type: string description: Array of OnlyFans Release Form Guest IDs to tag in your message. example: null rfPartner: type: string description: Array of OnlyFans Release Form Partners IDs to tag in your message. example: null isForward: type: boolean description: "" example: true components: securitySchemes: default: type: http scheme: bearer description: Get your API Key from OnlyFansAPI Console - https://app.onlyfansapi.com/api-keys ```` # Add Shared Tracking Link Tags (/api-reference/shared-tracking-links/add-shared-tracking-link-tags) Add tags to a shared Tracking Link. Existing tags are preserved. Tag namespace is shared with owned Tracking Links. This is a free endpoint. ## OpenAPI ````yaml https://app.onlyfansapi.com/scribe-docs/openapi.yaml post /api/{account}/shared-tracking-links/{shared_tracking_link_id}/tags openapi: 3.0.3 info: title: OnlyFans API description: "" version: 1.0.0 servers: - url: https://app.onlyfansapi.com security: - default: [] tags: - name: AI Voice Messages description: "" - name: API Keys description: "" - name: Account description: Endpoints for your linked accounts - name: Analytics - Financial description: APIs for retrieving financial analytics data - name: Analytics - Summary description: APIs for retrieving summary analytics data - name: Banking description: Operations related to user banking details, payout methods, legal and tax information, and account country settings. - name: Banned Words description: Reference list of OnlyFans banned words used by the `blockBannedWords` screening parameter - name: Blocked / Restricted Users description: APIs for listing the users an account has blocked or restricted - name: Chargebacks description: "" - name: Chat Messages description: "" - name: Chats description: "" - name: Client Sessions description: "" - name: Connect OnlyFans Account description: "" - name: Data Exports description: APIs for managing data exports - name: Engagement / Messages description: "" - name: Fans description: APIs for managing OnlyFans fans (subscribers) - name: Fans - AI Summary description: APIs for generating and retrieving AI-powered fan profile summaries - name: Following description: APIs for managing OnlyFans followings (people you're subscribed to) - name: Free Trial Links description: APIs for managing Free Trial Links. Revenue totals are net earnings after refunds and chargebacks. `revenue.chargebacks` (or `summary.chargebacks_total` in stats) is the positive cached net amount already excluded from revenue; do not subtract it again. Spender responses include chargebacks across all attributed periods for each fan with positive net revenue. - name: Giphy description: "" - name: Link Tags description: APIs for managing tags on free trial links, tracking links, and Smart Links - name: Mass Messaging description: "" - name: Media description: "" - name: Media Vault description: "" - name: Media Vault Lists description: "" - name: Notifications description: Endpoints for managingr account notifications - name: Payouts description: "" - name: Post Comments description: "" - name: Post Labels description: APIs for managing your post labels - name: Posts description: APIs for managing OnlyFans posts - name: Profile Content description: Read another user's profile content using your connected OnlyFans account. OnlyFans enforces subscription and purchase requirements; these endpoints do not unlock content. Response samples use captured OnlyFans payloads with anonymized IDs, text, and media URLs; OFAPI metadata values are illustrative. - name: Promotions description: "" - name: Public Profiles description: "" - name: Queue description: "" - name: Release Forms description: APIs for managing OnlyFans release forms - name: Saved For Later (Messages) description: "" - name: Saved For Later (Posts) description: "" - name: Settings description: "" - name: Shared Free Trial Links description: APIs for Free Trial Links that other OF creators have shared with this account. Revenue, cost, and spender data are not available for shared links. - name: Shared Tracking Links description: APIs for Tracking Links (campaigns) that other OF creators have shared with this account. Revenue, cost, and spender data are not available for shared campaigns. - name: Smart Link Postbacks description: APIs for managing Smart Link postback destinations - name: Smart Links description: APIs for managing Smart Links (Free Trial Links and Tracking Links with pooled inventory) - name: Statistics description: "" - name: Stored Free Trial Links description: Instant APIs for retrieving stored free trial links from the OnlyFansAPI Cache (free, no credits used). `revenue.total` is net earnings after refunds and chargebacks. `revenue.chargebacks` is the positive cached net amount already excluded from that total; do not subtract it again. - name: Stored Shared Free Trial Links description: Instant APIs for retrieving stored shared Free Trial Links from the OnlyFansAPI Cache (free, no credits used) - name: Stored Shared Tracking Links description: Instant APIs for retrieving stored shared Tracking Links (campaigns) from the OnlyFansAPI Cache (free, no credits used) - name: Stored Tracking Links description: Instant APIs for retrieving stored tracking links from the OnlyFansAPI Cache (free, no credits used). `revenue.total` is net earnings after refunds and chargebacks. `revenue.chargebacks` is the positive cached net amount already excluded from that total; do not subtract it again. - name: Stories description: APIs for managing OnlyFans stories - name: Story Highlights description: APIs for managing OnlyFans story highlights - name: Subscription Bundles description: "" - name: Tracking Links description: APIs for managing tracking links. Revenue totals are net earnings after refunds and chargebacks. `revenue.chargebacks` (or `summary.chargebacks_total` in stats) is the positive cached net amount already excluded from revenue; do not subtract it again. Spender responses include chargebacks across all attributed periods for each fan with positive net revenue. - name: Transactions description: APIs for managing OnlyFans transactions - name: Usage description: Credit usage reporting for your team - name: User List Collections description: "" - name: Users description: APIs for fetching OnlyFans users - name: Webhooks description: "" paths: /api/{account}/shared-tracking-links/{shared_tracking_link_id}/tags: parameters: - in: path name: account description: The Account ID example: acct_XXXXXXXXXXXXXXX required: true schema: type: string - in: path name: shared_tracking_link_id description: The OnlyFans-side ID of the shared tracking link example: 123 required: true schema: type: integer post: summary: Add Shared Tracking Link Tags operationId: addSharedTrackingLinkTags description: Add tags to a shared Tracking Link. Existing tags are preserved. Tag namespace is shared with owned Tracking Links. This is a free endpoint. parameters: [] responses: "200": description: Success content: application/json: schema: type: object example: data: tags: - collab - sfs _meta: _credits: used: 0 balance: 10055833 note: Free endpoint _cache: is_cached: false note: Cache disabled for this endpoint _rate_limits: limit_minute: 5000 limit_day: null remaining_minute: 4999 remaining_day: null notice: We have decided to remove our daily rate limits. Please remove any references to these in your integrations. properties: data: type: object properties: tags: type: array example: - collab - sfs items: type: string _meta: type: object properties: _credits: type: object properties: used: type: integer example: 0 balance: type: integer example: 10055833 note: type: string example: Free endpoint _cache: type: object properties: is_cached: type: boolean example: false note: type: string example: Cache disabled for this endpoint _rate_limits: type: object properties: limit_minute: type: integer example: 5000 limit_day: type: string example: null nullable: true remaining_minute: type: integer example: 4999 remaining_day: type: string example: null nullable: true notice: type: string example: We have decided to remove our daily rate limits. Please remove any references to these in your integrations. tags: - Shared Tracking Links requestBody: required: true content: application/json: schema: type: object properties: tags: type: array description: Array of tag names to add to the shared tracking link. example: '["collab", "sfs"]' items: type: string required: - tags components: securitySchemes: default: type: http scheme: bearer description: Get your API Key from OnlyFansAPI Console - https://app.onlyfansapi.com/api-keys ```` # List Shared Tracking Link Tags (/api-reference/shared-tracking-links/list-shared-tracking-link-tags) Get tags for a specific shared Tracking Link. Tag namespace is shared with owned Tracking Links. This is a free endpoint. ## OpenAPI ````yaml https://app.onlyfansapi.com/scribe-docs/openapi.yaml get /api/{account}/shared-tracking-links/{shared_tracking_link_id}/tags openapi: 3.0.3 info: title: OnlyFans API description: "" version: 1.0.0 servers: - url: https://app.onlyfansapi.com security: - default: [] tags: - name: AI Voice Messages description: "" - name: API Keys description: "" - name: Account description: Endpoints for your linked accounts - name: Analytics - Financial description: APIs for retrieving financial analytics data - name: Analytics - Summary description: APIs for retrieving summary analytics data - name: Banking description: Operations related to user banking details, payout methods, legal and tax information, and account country settings. - name: Banned Words description: Reference list of OnlyFans banned words used by the `blockBannedWords` screening parameter - name: Blocked / Restricted Users description: APIs for listing the users an account has blocked or restricted - name: Chargebacks description: "" - name: Chat Messages description: "" - name: Chats description: "" - name: Client Sessions description: "" - name: Connect OnlyFans Account description: "" - name: Data Exports description: APIs for managing data exports - name: Engagement / Messages description: "" - name: Fans description: APIs for managing OnlyFans fans (subscribers) - name: Fans - AI Summary description: APIs for generating and retrieving AI-powered fan profile summaries - name: Following description: APIs for managing OnlyFans followings (people you're subscribed to) - name: Free Trial Links description: APIs for managing Free Trial Links. Revenue totals are net earnings after refunds and chargebacks. `revenue.chargebacks` (or `summary.chargebacks_total` in stats) is the positive cached net amount already excluded from revenue; do not subtract it again. Spender responses include chargebacks across all attributed periods for each fan with positive net revenue. - name: Giphy description: "" - name: Link Tags description: APIs for managing tags on free trial links, tracking links, and Smart Links - name: Mass Messaging description: "" - name: Media description: "" - name: Media Vault description: "" - name: Media Vault Lists description: "" - name: Notifications description: Endpoints for managingr account notifications - name: Payouts description: "" - name: Post Comments description: "" - name: Post Labels description: APIs for managing your post labels - name: Posts description: APIs for managing OnlyFans posts - name: Profile Content description: Read another user's profile content using your connected OnlyFans account. OnlyFans enforces subscription and purchase requirements; these endpoints do not unlock content. Response samples use captured OnlyFans payloads with anonymized IDs, text, and media URLs; OFAPI metadata values are illustrative. - name: Promotions description: "" - name: Public Profiles description: "" - name: Queue description: "" - name: Release Forms description: APIs for managing OnlyFans release forms - name: Saved For Later (Messages) description: "" - name: Saved For Later (Posts) description: "" - name: Settings description: "" - name: Shared Free Trial Links description: APIs for Free Trial Links that other OF creators have shared with this account. Revenue, cost, and spender data are not available for shared links. - name: Shared Tracking Links description: APIs for Tracking Links (campaigns) that other OF creators have shared with this account. Revenue, cost, and spender data are not available for shared campaigns. - name: Smart Link Postbacks description: APIs for managing Smart Link postback destinations - name: Smart Links description: APIs for managing Smart Links (Free Trial Links and Tracking Links with pooled inventory) - name: Statistics description: "" - name: Stored Free Trial Links description: Instant APIs for retrieving stored free trial links from the OnlyFansAPI Cache (free, no credits used). `revenue.total` is net earnings after refunds and chargebacks. `revenue.chargebacks` is the positive cached net amount already excluded from that total; do not subtract it again. - name: Stored Shared Free Trial Links description: Instant APIs for retrieving stored shared Free Trial Links from the OnlyFansAPI Cache (free, no credits used) - name: Stored Shared Tracking Links description: Instant APIs for retrieving stored shared Tracking Links (campaigns) from the OnlyFansAPI Cache (free, no credits used) - name: Stored Tracking Links description: Instant APIs for retrieving stored tracking links from the OnlyFansAPI Cache (free, no credits used). `revenue.total` is net earnings after refunds and chargebacks. `revenue.chargebacks` is the positive cached net amount already excluded from that total; do not subtract it again. - name: Stories description: APIs for managing OnlyFans stories - name: Story Highlights description: APIs for managing OnlyFans story highlights - name: Subscription Bundles description: "" - name: Tracking Links description: APIs for managing tracking links. Revenue totals are net earnings after refunds and chargebacks. `revenue.chargebacks` (or `summary.chargebacks_total` in stats) is the positive cached net amount already excluded from revenue; do not subtract it again. Spender responses include chargebacks across all attributed periods for each fan with positive net revenue. - name: Transactions description: APIs for managing OnlyFans transactions - name: Usage description: Credit usage reporting for your team - name: User List Collections description: "" - name: Users description: APIs for fetching OnlyFans users - name: Webhooks description: "" paths: /api/{account}/shared-tracking-links/{shared_tracking_link_id}/tags: parameters: - in: path name: account description: The Account ID example: acct_XXXXXXXXXXXXXXX required: true schema: type: string - in: path name: shared_tracking_link_id description: The OnlyFans-side ID of the shared tracking link example: 123 required: true schema: type: integer get: summary: List Shared Tracking Link Tags operationId: listSharedTrackingLinkTags description: Get tags for a specific shared Tracking Link. Tag namespace is shared with owned Tracking Links. This is a free endpoint. parameters: [] responses: "200": description: Success content: application/json: schema: type: object example: data: tags: - collab - sfs _meta: _credits: used: 0 balance: 10055833 note: Free endpoint _cache: is_cached: false note: Cache disabled for this endpoint _rate_limits: limit_minute: 5000 limit_day: null remaining_minute: 4999 remaining_day: null notice: We have decided to remove our daily rate limits. Please remove any references to these in your integrations. properties: data: type: object properties: tags: type: array example: - collab - sfs items: type: string _meta: type: object properties: _credits: type: object properties: used: type: integer example: 0 balance: type: integer example: 10055833 note: type: string example: Free endpoint _cache: type: object properties: is_cached: type: boolean example: false note: type: string example: Cache disabled for this endpoint _rate_limits: type: object properties: limit_minute: type: integer example: 5000 limit_day: type: string example: null nullable: true remaining_minute: type: integer example: 4999 remaining_day: type: string example: null nullable: true notice: type: string example: We have decided to remove our daily rate limits. Please remove any references to these in your integrations. tags: - Shared Tracking Links components: securitySchemes: default: type: http scheme: bearer description: Get your API Key from OnlyFansAPI Console - https://app.onlyfansapi.com/api-keys ```` # List Shared Tracking Links (/api-reference/shared-tracking-links/list-shared-tracking-links) List all Tracking Links (campaigns) shared with the account by other OF creators. Calls OnlyFans live and syncs to our cache. ## OpenAPI ````yaml https://app.onlyfansapi.com/scribe-docs/openapi.yaml get /api/{account}/shared-tracking-links openapi: 3.0.3 info: title: OnlyFans API description: "" version: 1.0.0 servers: - url: https://app.onlyfansapi.com security: - default: [] tags: - name: AI Voice Messages description: "" - name: API Keys description: "" - name: Account description: Endpoints for your linked accounts - name: Analytics - Financial description: APIs for retrieving financial analytics data - name: Analytics - Summary description: APIs for retrieving summary analytics data - name: Banking description: Operations related to user banking details, payout methods, legal and tax information, and account country settings. - name: Banned Words description: Reference list of OnlyFans banned words used by the `blockBannedWords` screening parameter - name: Blocked / Restricted Users description: APIs for listing the users an account has blocked or restricted - name: Chargebacks description: "" - name: Chat Messages description: "" - name: Chats description: "" - name: Client Sessions description: "" - name: Connect OnlyFans Account description: "" - name: Data Exports description: APIs for managing data exports - name: Engagement / Messages description: "" - name: Fans description: APIs for managing OnlyFans fans (subscribers) - name: Fans - AI Summary description: APIs for generating and retrieving AI-powered fan profile summaries - name: Following description: APIs for managing OnlyFans followings (people you're subscribed to) - name: Free Trial Links description: APIs for managing Free Trial Links. Revenue totals are net earnings after refunds and chargebacks. `revenue.chargebacks` (or `summary.chargebacks_total` in stats) is the positive cached net amount already excluded from revenue; do not subtract it again. Spender responses include chargebacks across all attributed periods for each fan with positive net revenue. - name: Giphy description: "" - name: Link Tags description: APIs for managing tags on free trial links, tracking links, and Smart Links - name: Mass Messaging description: "" - name: Media description: "" - name: Media Vault description: "" - name: Media Vault Lists description: "" - name: Notifications description: Endpoints for managingr account notifications - name: Payouts description: "" - name: Post Comments description: "" - name: Post Labels description: APIs for managing your post labels - name: Posts description: APIs for managing OnlyFans posts - name: Profile Content description: Read another user's profile content using your connected OnlyFans account. OnlyFans enforces subscription and purchase requirements; these endpoints do not unlock content. Response samples use captured OnlyFans payloads with anonymized IDs, text, and media URLs; OFAPI metadata values are illustrative. - name: Promotions description: "" - name: Public Profiles description: "" - name: Queue description: "" - name: Release Forms description: APIs for managing OnlyFans release forms - name: Saved For Later (Messages) description: "" - name: Saved For Later (Posts) description: "" - name: Settings description: "" - name: Shared Free Trial Links description: APIs for Free Trial Links that other OF creators have shared with this account. Revenue, cost, and spender data are not available for shared links. - name: Shared Tracking Links description: APIs for Tracking Links (campaigns) that other OF creators have shared with this account. Revenue, cost, and spender data are not available for shared campaigns. - name: Smart Link Postbacks description: APIs for managing Smart Link postback destinations - name: Smart Links description: APIs for managing Smart Links (Free Trial Links and Tracking Links with pooled inventory) - name: Statistics description: "" - name: Stored Free Trial Links description: Instant APIs for retrieving stored free trial links from the OnlyFansAPI Cache (free, no credits used). `revenue.total` is net earnings after refunds and chargebacks. `revenue.chargebacks` is the positive cached net amount already excluded from that total; do not subtract it again. - name: Stored Shared Free Trial Links description: Instant APIs for retrieving stored shared Free Trial Links from the OnlyFansAPI Cache (free, no credits used) - name: Stored Shared Tracking Links description: Instant APIs for retrieving stored shared Tracking Links (campaigns) from the OnlyFansAPI Cache (free, no credits used) - name: Stored Tracking Links description: Instant APIs for retrieving stored tracking links from the OnlyFansAPI Cache (free, no credits used). `revenue.total` is net earnings after refunds and chargebacks. `revenue.chargebacks` is the positive cached net amount already excluded from that total; do not subtract it again. - name: Stories description: APIs for managing OnlyFans stories - name: Story Highlights description: APIs for managing OnlyFans story highlights - name: Subscription Bundles description: "" - name: Tracking Links description: APIs for managing tracking links. Revenue totals are net earnings after refunds and chargebacks. `revenue.chargebacks` (or `summary.chargebacks_total` in stats) is the positive cached net amount already excluded from revenue; do not subtract it again. Spender responses include chargebacks across all attributed periods for each fan with positive net revenue. - name: Transactions description: APIs for managing OnlyFans transactions - name: Usage description: Credit usage reporting for your team - name: User List Collections description: "" - name: Users description: APIs for fetching OnlyFans users - name: Webhooks description: "" paths: /api/{account}/shared-tracking-links: parameters: - in: path name: account description: The Account ID example: acct_XXXXXXXXXXXXXXX required: true schema: type: string get: summary: List Shared Tracking Links operationId: listSharedTrackingLinks description: List all Tracking Links (campaigns) shared with the account by other OF creators. Calls OnlyFans live and syncs to our cache. parameters: - in: query name: limit description: The number of shared tracking links to return. Default `10`. Must be at least 1. Must not be greater than 100. example: 10 required: false schema: type: integer description: The number of shared tracking links to return. Default `10`. Must be at least 1. Must not be greater than 100. example: 10 - in: query name: offset description: The offset used for pagination. Default `0`. Must be at least 0. example: 0 required: false schema: type: integer description: The offset used for pagination. Default `0`. Must be at least 0. example: 0 - in: query name: pagination description: Whether pagination metadata is enabled. Default `1`. example: 1 required: false schema: type: integer description: Whether pagination metadata is enabled. Default `1`. example: 1 enum: - 0 - 1 - in: query name: with_deleted description: Whether to include deleted shared tracking links. Default `1`. example: 1 required: false schema: type: integer description: Whether to include deleted shared tracking links. Default `1`. example: 1 enum: - 0 - 1 - in: query name: sorting_deleted description: Whether deleted links participate in sorting. Default `1`. example: 1 required: false schema: type: integer description: Whether deleted links participate in sorting. Default `1`. example: 1 enum: - 0 - 1 - in: query name: stats description: Whether statistics are included. Default `true`. Must not be greater than 10 characters. example: "true" required: false schema: type: string description: Whether statistics are included. Default `true`. Must not be greater than 10 characters. example: "true" - in: query name: synchronous description: Wait for the database sync instead of processing it in the background. example: false required: false schema: type: boolean description: Wait for the database sync instead of processing it in the background. example: false responses: "200": description: Success content: application/json: schema: type: object example: data: list: - id: 123 campaignCode: 123 campaignName: Example shared tracking link campaignUrl: https://onlyfans.com/username/c123 subscribersCount: 0 clicksCount: 12 createdAt: 2025-01-01T01:01:01+00:00 endDate: null isDeleted: false tags: [] owner: id: 123 username: username name: Model name avatarThumbUrl: https://thumbs.onlyfans.com/public/files/thumbs/a123/a/aa/aaa/abc123/123/avatar.jpg hasMore: true _pagination: next_page: https://app.onlyfansapi.com/api/acct_abc123/shared-tracking-links?limit=10&offset=10 _meta: _credits: used: 1 balance: 10055833 note: Always _cache: is_cached: false note: Cache disabled for this endpoint _rate_limits: limit_minute: 5000 limit_day: null remaining_minute: 4999 remaining_day: null notice: We have decided to remove our daily rate limits. Please remove any references to these in your integrations. properties: data: type: object properties: list: type: array example: - id: 123 campaignCode: 123 campaignName: Example shared tracking link campaignUrl: https://onlyfans.com/username/c123 subscribersCount: 0 clicksCount: 12 createdAt: 2025-01-01T01:01:01+00:00 endDate: null isDeleted: false tags: [] owner: id: 123 username: username name: Model name avatarThumbUrl: https://thumbs.onlyfans.com/public/files/thumbs/a123/a/aa/aaa/abc123/123/avatar.jpg items: type: object properties: id: type: integer example: 123 campaignCode: type: integer example: 123 campaignName: type: string example: Example shared tracking link campaignUrl: type: string example: https://onlyfans.com/username/c123 subscribersCount: type: integer example: 0 clicksCount: type: integer example: 12 createdAt: type: string example: 2025-01-01T01:01:01+00:00 endDate: type: string example: null nullable: true isDeleted: type: boolean example: false tags: type: array example: [] owner: type: object properties: id: type: integer example: 123 username: type: string example: username name: type: string example: Model name avatarThumbUrl: type: string example: https://thumbs.onlyfans.com/public/files/thumbs/a123/a/aa/aaa/abc123/123/avatar.jpg hasMore: type: boolean example: true _pagination: type: object properties: next_page: type: string example: https://app.onlyfansapi.com/api/acct_abc123/shared-tracking-links?limit=10&offset=10 _meta: type: object properties: _credits: type: object properties: used: type: integer example: 1 balance: type: integer example: 10055833 note: type: string example: Always _cache: type: object properties: is_cached: type: boolean example: false note: type: string example: Cache disabled for this endpoint _rate_limits: type: object properties: limit_minute: type: integer example: 5000 limit_day: type: string example: null nullable: true remaining_minute: type: integer example: 4999 remaining_day: type: string example: null nullable: true notice: type: string example: We have decided to remove our daily rate limits. Please remove any references to these in your integrations. tags: - Shared Tracking Links components: securitySchemes: default: type: http scheme: bearer description: Get your API Key from OnlyFansAPI Console - https://app.onlyfansapi.com/api-keys ```` # Remove Shared Tracking Link Tags (/api-reference/shared-tracking-links/remove-shared-tracking-link-tags) Remove tags from a shared Tracking Link. Tag namespace is shared with owned Tracking Links. This is a free endpoint. ## OpenAPI ````yaml https://app.onlyfansapi.com/scribe-docs/openapi.yaml delete /api/{account}/shared-tracking-links/{shared_tracking_link_id}/tags openapi: 3.0.3 info: title: OnlyFans API description: "" version: 1.0.0 servers: - url: https://app.onlyfansapi.com security: - default: [] tags: - name: AI Voice Messages description: "" - name: API Keys description: "" - name: Account description: Endpoints for your linked accounts - name: Analytics - Financial description: APIs for retrieving financial analytics data - name: Analytics - Summary description: APIs for retrieving summary analytics data - name: Banking description: Operations related to user banking details, payout methods, legal and tax information, and account country settings. - name: Banned Words description: Reference list of OnlyFans banned words used by the `blockBannedWords` screening parameter - name: Blocked / Restricted Users description: APIs for listing the users an account has blocked or restricted - name: Chargebacks description: "" - name: Chat Messages description: "" - name: Chats description: "" - name: Client Sessions description: "" - name: Connect OnlyFans Account description: "" - name: Data Exports description: APIs for managing data exports - name: Engagement / Messages description: "" - name: Fans description: APIs for managing OnlyFans fans (subscribers) - name: Fans - AI Summary description: APIs for generating and retrieving AI-powered fan profile summaries - name: Following description: APIs for managing OnlyFans followings (people you're subscribed to) - name: Free Trial Links description: APIs for managing Free Trial Links. Revenue totals are net earnings after refunds and chargebacks. `revenue.chargebacks` (or `summary.chargebacks_total` in stats) is the positive cached net amount already excluded from revenue; do not subtract it again. Spender responses include chargebacks across all attributed periods for each fan with positive net revenue. - name: Giphy description: "" - name: Link Tags description: APIs for managing tags on free trial links, tracking links, and Smart Links - name: Mass Messaging description: "" - name: Media description: "" - name: Media Vault description: "" - name: Media Vault Lists description: "" - name: Notifications description: Endpoints for managingr account notifications - name: Payouts description: "" - name: Post Comments description: "" - name: Post Labels description: APIs for managing your post labels - name: Posts description: APIs for managing OnlyFans posts - name: Profile Content description: Read another user's profile content using your connected OnlyFans account. OnlyFans enforces subscription and purchase requirements; these endpoints do not unlock content. Response samples use captured OnlyFans payloads with anonymized IDs, text, and media URLs; OFAPI metadata values are illustrative. - name: Promotions description: "" - name: Public Profiles description: "" - name: Queue description: "" - name: Release Forms description: APIs for managing OnlyFans release forms - name: Saved For Later (Messages) description: "" - name: Saved For Later (Posts) description: "" - name: Settings description: "" - name: Shared Free Trial Links description: APIs for Free Trial Links that other OF creators have shared with this account. Revenue, cost, and spender data are not available for shared links. - name: Shared Tracking Links description: APIs for Tracking Links (campaigns) that other OF creators have shared with this account. Revenue, cost, and spender data are not available for shared campaigns. - name: Smart Link Postbacks description: APIs for managing Smart Link postback destinations - name: Smart Links description: APIs for managing Smart Links (Free Trial Links and Tracking Links with pooled inventory) - name: Statistics description: "" - name: Stored Free Trial Links description: Instant APIs for retrieving stored free trial links from the OnlyFansAPI Cache (free, no credits used). `revenue.total` is net earnings after refunds and chargebacks. `revenue.chargebacks` is the positive cached net amount already excluded from that total; do not subtract it again. - name: Stored Shared Free Trial Links description: Instant APIs for retrieving stored shared Free Trial Links from the OnlyFansAPI Cache (free, no credits used) - name: Stored Shared Tracking Links description: Instant APIs for retrieving stored shared Tracking Links (campaigns) from the OnlyFansAPI Cache (free, no credits used) - name: Stored Tracking Links description: Instant APIs for retrieving stored tracking links from the OnlyFansAPI Cache (free, no credits used). `revenue.total` is net earnings after refunds and chargebacks. `revenue.chargebacks` is the positive cached net amount already excluded from that total; do not subtract it again. - name: Stories description: APIs for managing OnlyFans stories - name: Story Highlights description: APIs for managing OnlyFans story highlights - name: Subscription Bundles description: "" - name: Tracking Links description: APIs for managing tracking links. Revenue totals are net earnings after refunds and chargebacks. `revenue.chargebacks` (or `summary.chargebacks_total` in stats) is the positive cached net amount already excluded from revenue; do not subtract it again. Spender responses include chargebacks across all attributed periods for each fan with positive net revenue. - name: Transactions description: APIs for managing OnlyFans transactions - name: Usage description: Credit usage reporting for your team - name: User List Collections description: "" - name: Users description: APIs for fetching OnlyFans users - name: Webhooks description: "" paths: /api/{account}/shared-tracking-links/{shared_tracking_link_id}/tags: parameters: - in: path name: account description: The Account ID example: acct_XXXXXXXXXXXXXXX required: true schema: type: string - in: path name: shared_tracking_link_id description: The OnlyFans-side ID of the shared tracking link example: 123 required: true schema: type: integer delete: summary: Remove Shared Tracking Link Tags operationId: removeSharedTrackingLinkTags description: Remove tags from a shared Tracking Link. Tag namespace is shared with owned Tracking Links. This is a free endpoint. parameters: [] responses: "200": description: Success content: application/json: schema: type: object example: data: tags: - sfs _meta: _credits: used: 0 balance: 10055833 note: Free endpoint _cache: is_cached: false note: Cache disabled for this endpoint _rate_limits: limit_minute: 5000 limit_day: null remaining_minute: 4999 remaining_day: null notice: We have decided to remove our daily rate limits. Please remove any references to these in your integrations. properties: data: type: object properties: tags: type: array example: - sfs items: type: string _meta: type: object properties: _credits: type: object properties: used: type: integer example: 0 balance: type: integer example: 10055833 note: type: string example: Free endpoint _cache: type: object properties: is_cached: type: boolean example: false note: type: string example: Cache disabled for this endpoint _rate_limits: type: object properties: limit_minute: type: integer example: 5000 limit_day: type: string example: null nullable: true remaining_minute: type: integer example: 4999 remaining_day: type: string example: null nullable: true notice: type: string example: We have decided to remove our daily rate limits. Please remove any references to these in your integrations. tags: - Shared Tracking Links requestBody: required: true content: application/json: schema: type: object properties: tags: type: array description: Array of tag names to remove from the shared tracking link. example: '["collab"]' items: type: string required: - tags components: securitySchemes: default: type: http scheme: bearer description: Get your API Key from OnlyFansAPI Console - https://app.onlyfansapi.com/api-keys ```` # Revoke Shared Tracking Link Access (/api-reference/shared-tracking-links/revoke-shared-tracking-link-access) Revoke the account's access to a shared Tracking Link (campaign). Calls OnlyFans `DELETE /campaigns/share-access`, then removes the local cache row. The owner keeps the link. ## OpenAPI ````yaml https://app.onlyfansapi.com/scribe-docs/openapi.yaml delete /api/{account}/shared-tracking-links/{shared_tracking_link_id} openapi: 3.0.3 info: title: OnlyFans API description: "" version: 1.0.0 servers: - url: https://app.onlyfansapi.com security: - default: [] tags: - name: AI Voice Messages description: "" - name: API Keys description: "" - name: Account description: Endpoints for your linked accounts - name: Analytics - Financial description: APIs for retrieving financial analytics data - name: Analytics - Summary description: APIs for retrieving summary analytics data - name: Banking description: Operations related to user banking details, payout methods, legal and tax information, and account country settings. - name: Banned Words description: Reference list of OnlyFans banned words used by the `blockBannedWords` screening parameter - name: Blocked / Restricted Users description: APIs for listing the users an account has blocked or restricted - name: Chargebacks description: "" - name: Chat Messages description: "" - name: Chats description: "" - name: Client Sessions description: "" - name: Connect OnlyFans Account description: "" - name: Data Exports description: APIs for managing data exports - name: Engagement / Messages description: "" - name: Fans description: APIs for managing OnlyFans fans (subscribers) - name: Fans - AI Summary description: APIs for generating and retrieving AI-powered fan profile summaries - name: Following description: APIs for managing OnlyFans followings (people you're subscribed to) - name: Free Trial Links description: APIs for managing Free Trial Links. Revenue totals are net earnings after refunds and chargebacks. `revenue.chargebacks` (or `summary.chargebacks_total` in stats) is the positive cached net amount already excluded from revenue; do not subtract it again. Spender responses include chargebacks across all attributed periods for each fan with positive net revenue. - name: Giphy description: "" - name: Link Tags description: APIs for managing tags on free trial links, tracking links, and Smart Links - name: Mass Messaging description: "" - name: Media description: "" - name: Media Vault description: "" - name: Media Vault Lists description: "" - name: Notifications description: Endpoints for managingr account notifications - name: Payouts description: "" - name: Post Comments description: "" - name: Post Labels description: APIs for managing your post labels - name: Posts description: APIs for managing OnlyFans posts - name: Profile Content description: Read another user's profile content using your connected OnlyFans account. OnlyFans enforces subscription and purchase requirements; these endpoints do not unlock content. Response samples use captured OnlyFans payloads with anonymized IDs, text, and media URLs; OFAPI metadata values are illustrative. - name: Promotions description: "" - name: Public Profiles description: "" - name: Queue description: "" - name: Release Forms description: APIs for managing OnlyFans release forms - name: Saved For Later (Messages) description: "" - name: Saved For Later (Posts) description: "" - name: Settings description: "" - name: Shared Free Trial Links description: APIs for Free Trial Links that other OF creators have shared with this account. Revenue, cost, and spender data are not available for shared links. - name: Shared Tracking Links description: APIs for Tracking Links (campaigns) that other OF creators have shared with this account. Revenue, cost, and spender data are not available for shared campaigns. - name: Smart Link Postbacks description: APIs for managing Smart Link postback destinations - name: Smart Links description: APIs for managing Smart Links (Free Trial Links and Tracking Links with pooled inventory) - name: Statistics description: "" - name: Stored Free Trial Links description: Instant APIs for retrieving stored free trial links from the OnlyFansAPI Cache (free, no credits used). `revenue.total` is net earnings after refunds and chargebacks. `revenue.chargebacks` is the positive cached net amount already excluded from that total; do not subtract it again. - name: Stored Shared Free Trial Links description: Instant APIs for retrieving stored shared Free Trial Links from the OnlyFansAPI Cache (free, no credits used) - name: Stored Shared Tracking Links description: Instant APIs for retrieving stored shared Tracking Links (campaigns) from the OnlyFansAPI Cache (free, no credits used) - name: Stored Tracking Links description: Instant APIs for retrieving stored tracking links from the OnlyFansAPI Cache (free, no credits used). `revenue.total` is net earnings after refunds and chargebacks. `revenue.chargebacks` is the positive cached net amount already excluded from that total; do not subtract it again. - name: Stories description: APIs for managing OnlyFans stories - name: Story Highlights description: APIs for managing OnlyFans story highlights - name: Subscription Bundles description: "" - name: Tracking Links description: APIs for managing tracking links. Revenue totals are net earnings after refunds and chargebacks. `revenue.chargebacks` (or `summary.chargebacks_total` in stats) is the positive cached net amount already excluded from revenue; do not subtract it again. Spender responses include chargebacks across all attributed periods for each fan with positive net revenue. - name: Transactions description: APIs for managing OnlyFans transactions - name: Usage description: Credit usage reporting for your team - name: User List Collections description: "" - name: Users description: APIs for fetching OnlyFans users - name: Webhooks description: "" paths: /api/{account}/shared-tracking-links/{shared_tracking_link_id}: parameters: - in: path name: account description: The Account ID example: acct_XXXXXXXXXXXXXXX required: true schema: type: string - in: path name: shared_tracking_link_id description: The OnlyFans-side ID of the shared tracking link example: 123 required: true schema: type: integer delete: summary: Revoke Shared Tracking Link Access operationId: revokeSharedTrackingLinkAccess description: Revoke the account's access to a shared Tracking Link (campaign). Calls OnlyFans `DELETE /campaigns/share-access`, then removes the local cache row. The owner keeps the link. parameters: [] responses: "200": description: Success content: application/json: schema: type: object example: data: success: true _meta: _credits: used: 1 balance: 10055832 note: Always _cache: is_cached: false note: Cache disabled for this endpoint _rate_limits: limit_minute: 5000 limit_day: null remaining_minute: 4999 remaining_day: null notice: We have decided to remove our daily rate limits. Please remove any references to these in your integrations. properties: data: type: object properties: success: type: boolean example: true _meta: type: object properties: _credits: type: object properties: used: type: integer example: 1 balance: type: integer example: 10055832 note: type: string example: Always _cache: type: object properties: is_cached: type: boolean example: false note: type: string example: Cache disabled for this endpoint _rate_limits: type: object properties: limit_minute: type: integer example: 5000 limit_day: type: string example: null nullable: true remaining_minute: type: integer example: 4999 remaining_day: type: string example: null nullable: true notice: type: string example: We have decided to remove our daily rate limits. Please remove any references to these in your integrations. tags: - Shared Tracking Links components: securitySchemes: default: type: http scheme: bearer description: Get your API Key from OnlyFansAPI Console - https://app.onlyfansapi.com/api-keys ```` # Create Smart Link Postback (/api-reference/smart-link-postbacks/create-smart-link-postback) Create a postback that fires for selected Smart Link conversion types ## OpenAPI ````yaml https://app.onlyfansapi.com/scribe-docs/openapi.yaml post /api/smart-link-postbacks openapi: 3.0.3 info: title: OnlyFans API description: "" version: 1.0.0 servers: - url: https://app.onlyfansapi.com security: - default: [] tags: - name: AI Voice Messages description: "" - name: API Keys description: "" - name: Account description: Endpoints for your linked accounts - name: Analytics - Financial description: APIs for retrieving financial analytics data - name: Analytics - Summary description: APIs for retrieving summary analytics data - name: Banking description: Operations related to user banking details, payout methods, legal and tax information, and account country settings. - name: Banned Words description: Reference list of OnlyFans banned words used by the `blockBannedWords` screening parameter - name: Blocked / Restricted Users description: APIs for listing the users an account has blocked or restricted - name: Chargebacks description: "" - name: Chat Messages description: "" - name: Chats description: "" - name: Client Sessions description: "" - name: Connect OnlyFans Account description: "" - name: Data Exports description: APIs for managing data exports - name: Engagement / Messages description: "" - name: Fans description: APIs for managing OnlyFans fans (subscribers) - name: Fans - AI Summary description: APIs for generating and retrieving AI-powered fan profile summaries - name: Following description: APIs for managing OnlyFans followings (people you're subscribed to) - name: Free Trial Links description: APIs for managing Free Trial Links. Revenue totals are net earnings after refunds and chargebacks. `revenue.chargebacks` (or `summary.chargebacks_total` in stats) is the positive cached net amount already excluded from revenue; do not subtract it again. Spender responses include chargebacks across all attributed periods for each fan with positive net revenue. - name: Giphy description: "" - name: Link Tags description: APIs for managing tags on free trial links, tracking links, and Smart Links - name: Mass Messaging description: "" - name: Media description: "" - name: Media Vault description: "" - name: Media Vault Lists description: "" - name: Notifications description: Endpoints for managingr account notifications - name: Payouts description: "" - name: Post Comments description: "" - name: Post Labels description: APIs for managing your post labels - name: Posts description: APIs for managing OnlyFans posts - name: Profile Content description: Read another user's profile content using your connected OnlyFans account. OnlyFans enforces subscription and purchase requirements; these endpoints do not unlock content. Response samples use captured OnlyFans payloads with anonymized IDs, text, and media URLs; OFAPI metadata values are illustrative. - name: Promotions description: "" - name: Public Profiles description: "" - name: Queue description: "" - name: Release Forms description: APIs for managing OnlyFans release forms - name: Saved For Later (Messages) description: "" - name: Saved For Later (Posts) description: "" - name: Settings description: "" - name: Shared Free Trial Links description: APIs for Free Trial Links that other OF creators have shared with this account. Revenue, cost, and spender data are not available for shared links. - name: Shared Tracking Links description: APIs for Tracking Links (campaigns) that other OF creators have shared with this account. Revenue, cost, and spender data are not available for shared campaigns. - name: Smart Link Postbacks description: APIs for managing Smart Link postback destinations - name: Smart Links description: APIs for managing Smart Links (Free Trial Links and Tracking Links with pooled inventory) - name: Statistics description: "" - name: Stored Free Trial Links description: Instant APIs for retrieving stored free trial links from the OnlyFansAPI Cache (free, no credits used). `revenue.total` is net earnings after refunds and chargebacks. `revenue.chargebacks` is the positive cached net amount already excluded from that total; do not subtract it again. - name: Stored Shared Free Trial Links description: Instant APIs for retrieving stored shared Free Trial Links from the OnlyFansAPI Cache (free, no credits used) - name: Stored Shared Tracking Links description: Instant APIs for retrieving stored shared Tracking Links (campaigns) from the OnlyFansAPI Cache (free, no credits used) - name: Stored Tracking Links description: Instant APIs for retrieving stored tracking links from the OnlyFansAPI Cache (free, no credits used). `revenue.total` is net earnings after refunds and chargebacks. `revenue.chargebacks` is the positive cached net amount already excluded from that total; do not subtract it again. - name: Stories description: APIs for managing OnlyFans stories - name: Story Highlights description: APIs for managing OnlyFans story highlights - name: Subscription Bundles description: "" - name: Tracking Links description: APIs for managing tracking links. Revenue totals are net earnings after refunds and chargebacks. `revenue.chargebacks` (or `summary.chargebacks_total` in stats) is the positive cached net amount already excluded from revenue; do not subtract it again. Spender responses include chargebacks across all attributed periods for each fan with positive net revenue. - name: Transactions description: APIs for managing OnlyFans transactions - name: Usage description: Credit usage reporting for your team - name: User List Collections description: "" - name: Users description: APIs for fetching OnlyFans users - name: Webhooks description: "" paths: /api/smart-link-postbacks: post: summary: Create Smart Link Postback operationId: createSmartLinkPostback description: Create a postback that fires for selected Smart Link conversion types parameters: [] responses: "200": description: Success content: application/json: schema: type: object example: data: id: 123 url: https://example.com/postback?click={click_id}&type={conversion_type}&gclid={gclid} http_method: POST body: '{"click_id":"{click_id}","value":"{amount_gross}"}' headers: - name: Authorization value: Bearer token smart_link_scope: global conversion_types: - new_subscriber - new_transaction smart_link_ids: [] smart_links: [] traffic_source_ids: [] traffic_sources: [] latest_response: null created_at: 2026-01-31T21:45:00+00:00 updated_at: 2026-01-31T21:45:00+00:00 _meta: _credits: used: 0 balance: 999999 note: Free endpoint _cache: is_cached: false note: Cache disabled for this endpoint properties: data: type: object properties: id: type: integer example: 123 url: type: string example: https://example.com/postback?click={click_id}&type={conversion_type}&gclid={gclid} http_method: type: string example: POST body: type: string example: '{"click_id":"{click_id}","value":"{amount_gross}"}' headers: type: array example: - name: Authorization value: Bearer token items: type: object properties: name: type: string example: Authorization value: type: string example: Bearer token smart_link_scope: type: string example: global conversion_types: type: array example: - new_subscriber - new_transaction items: type: string smart_link_ids: type: array example: [] smart_links: type: array example: [] traffic_source_ids: type: array example: [] traffic_sources: type: array example: [] latest_response: type: string example: null nullable: true created_at: type: string example: 2026-01-31T21:45:00+00:00 updated_at: type: string example: 2026-01-31T21:45:00+00:00 _meta: type: object properties: _credits: type: object properties: used: type: integer example: 0 balance: type: integer example: 999999 note: type: string example: Free endpoint _cache: type: object properties: is_cached: type: boolean example: false note: type: string example: Cache disabled for this endpoint tags: - Smart Link Postbacks requestBody: required: true content: application/json: schema: type: object properties: url: type: string description: The destination URL. Variables such as `{external_click_id}`, `{fbclid}`, `{gclid}`, `{gbraid}`, `{wbraid}`, `{ttclid}`, and `{sccid}` are replaced when the postback is dispatched. example: https://example.com/postback?click={external_click_id}&type={conversion_type}&gclid={gclid} http_method: type: string description: HTTP method used for the postback request. Defaults to `GET` when omitted. example: POST enum: - GET - POST body: type: string description: Optional request body template for POST postbacks. Variables are replaced when the postback is dispatched. example: '{"click_id":"{click_id}","value":"{amount_gross}"}' headers: type: array description: Optional request headers. Header values may include postback variables. example: - name: Authorization value: Bearer token items: type: object properties: name: type: string description: This field is required whenheaders.*.value is
present. Must match the regex
/\A[A-Za-z0-9!#$%&'*+.^_`|~-]+\z/. Must not be greater
than 100 characters.
example: zlvchttxvreulpyrja
nullable: true
value:
type: string
description: Must not be greater than 2000 characters.
example: oulngwzv
nullable: true
smart_link_scope:
type: string
description: "`global` fires for all Smart Links. `campaign_specific` fires only
for selected Smart Links."
example: campaign_specific
enum:
- global
- campaign_specific
conversion_types:
type: array
description: One or more Smart Link conversion types that should trigger this
postback.
example:
- new_subscriber
- new_transaction
items:
type: string
smart_link_ids:
type: array
description: Smart Link ULIDs. Required when `smart_link_scope` is
`campaign_specific`.
example:
- 01JTESTLINK000000000000001
items:
type: string
required:
- url
- smart_link_scope
- conversion_types
components:
securitySchemes:
default:
type: http
scheme: bearer
description: Get your API Key from OnlyFansAPI Console -
https://app.onlyfansapi.com/api-keys
````
# Delete Smart Link Postback (/api-reference/smart-link-postbacks/delete-smart-link-postback)
Delete a Smart Link postback
## OpenAPI
````yaml https://app.onlyfansapi.com/scribe-docs/openapi.yaml delete /api/smart-link-postbacks/{postback_id}
openapi: 3.0.3
info:
title: OnlyFans API
description: ""
version: 1.0.0
servers:
- url: https://app.onlyfansapi.com
security:
- default: []
tags:
- name: AI Voice Messages
description: ""
- name: API Keys
description: ""
- name: Account
description: Endpoints for your linked accounts
- name: Analytics - Financial
description: APIs for retrieving financial analytics data
- name: Analytics - Summary
description: APIs for retrieving summary analytics data
- name: Banking
description: Operations related to user banking details, payout methods, legal
and tax information, and account country settings.
- name: Banned Words
description: Reference list of OnlyFans banned words used by the
`blockBannedWords` screening parameter
- name: Blocked / Restricted Users
description: APIs for listing the users an account has blocked or restricted
- name: Chargebacks
description: ""
- name: Chat Messages
description: ""
- name: Chats
description: ""
- name: Client Sessions
description: ""
- name: Connect OnlyFans Account
description: ""
- name: Data Exports
description: APIs for managing data exports
- name: Engagement / Messages
description: ""
- name: Fans
description: APIs for managing OnlyFans fans (subscribers)
- name: Fans - AI Summary
description: APIs for generating and retrieving AI-powered fan profile summaries
- name: Following
description: APIs for managing OnlyFans followings (people you're subscribed to)
- name: Free Trial Links
description: APIs for managing Free Trial Links. Revenue totals are net earnings
after refunds and chargebacks. `revenue.chargebacks` (or
`summary.chargebacks_total` in stats) is the positive cached net amount
already excluded from revenue; do not subtract it again. Spender responses
include chargebacks across all attributed periods for each fan with
positive net revenue.
- name: Giphy
description: ""
- name: Link Tags
description: APIs for managing tags on free trial links, tracking links, and Smart Links
- name: Mass Messaging
description: ""
- name: Media
description: ""
- name: Media Vault
description: ""
- name: Media Vault Lists
description: ""
- name: Notifications
description: Endpoints for managingr account notifications
- name: Payouts
description: ""
- name: Post Comments
description: ""
- name: Post Labels
description: APIs for managing your post labels
- name: Posts
description: APIs for managing OnlyFans posts
- name: Profile Content
description: Read another user's profile content using your connected OnlyFans
account. OnlyFans enforces subscription and purchase requirements; these
endpoints do not unlock content. Response samples use captured OnlyFans
payloads with anonymized IDs, text, and media URLs; OFAPI metadata values
are illustrative.
- name: Promotions
description: ""
- name: Public Profiles
description: ""
- name: Queue
description: ""
- name: Release Forms
description: APIs for managing OnlyFans release forms
- name: Saved For Later (Messages)
description: ""
- name: Saved For Later (Posts)
description: ""
- name: Settings
description: ""
- name: Shared Free Trial Links
description: APIs for Free Trial Links that other OF creators have shared with
this account. Revenue, cost, and spender data are not available for shared
links.
- name: Shared Tracking Links
description: APIs for Tracking Links (campaigns) that other OF creators have
shared with this account. Revenue, cost, and spender data are not
available for shared campaigns.
- name: Smart Link Postbacks
description: APIs for managing Smart Link postback destinations
- name: Smart Links
description: APIs for managing Smart Links (Free Trial Links and Tracking Links
with pooled inventory)
- name: Statistics
description: ""
- name: Stored Free Trial Links
description: Instant APIs for retrieving stored free trial links from the
OnlyFansAPI Cache (free, no credits used). `revenue.total` is net earnings
after refunds and chargebacks. `revenue.chargebacks` is the positive
cached net amount already excluded from that total; do not subtract it
again.
- name: Stored Shared Free Trial Links
description: Instant APIs for retrieving stored shared Free Trial Links from the
OnlyFansAPI Cache (free, no credits used)
- name: Stored Shared Tracking Links
description: Instant APIs for retrieving stored shared Tracking Links
(campaigns) from the OnlyFansAPI Cache (free, no credits used)
- name: Stored Tracking Links
description: Instant APIs for retrieving stored tracking links from the
OnlyFansAPI Cache (free, no credits used). `revenue.total` is net earnings
after refunds and chargebacks. `revenue.chargebacks` is the positive
cached net amount already excluded from that total; do not subtract it
again.
- name: Stories
description: APIs for managing OnlyFans stories
- name: Story Highlights
description: APIs for managing OnlyFans story highlights
- name: Subscription Bundles
description: ""
- name: Tracking Links
description: APIs for managing tracking links. Revenue totals are net earnings
after refunds and chargebacks. `revenue.chargebacks` (or
`summary.chargebacks_total` in stats) is the positive cached net amount
already excluded from revenue; do not subtract it again. Spender responses
include chargebacks across all attributed periods for each fan with
positive net revenue.
- name: Transactions
description: APIs for managing OnlyFans transactions
- name: Usage
description: Credit usage reporting for your team
- name: User List Collections
description: ""
- name: Users
description: APIs for fetching OnlyFans users
- name: Webhooks
description: ""
paths:
/api/smart-link-postbacks/{postback_id}:
parameters:
- in: path
name: postback_id
description: The postback ID
example: 123
required: true
schema:
type: integer
delete:
summary: Delete Smart Link Postback
operationId: deleteSmartLinkPostback
description: Delete a Smart Link postback
parameters: []
responses:
"204":
description: Successfully deleted
content:
application/json:
schema:
type: object
nullable: true
tags:
- Smart Link Postbacks
components:
securitySchemes:
default:
type: http
scheme: bearer
description: Get your API Key from OnlyFansAPI Console -
https://app.onlyfansapi.com/api-keys
````
# List Smart Link Postbacks (/api-reference/smart-link-postbacks/list-smart-link-postbacks)
List all Smart Link postbacks configured for your Team
## OpenAPI
````yaml https://app.onlyfansapi.com/scribe-docs/openapi.yaml get /api/smart-link-postbacks
openapi: 3.0.3
info:
title: OnlyFans API
description: ""
version: 1.0.0
servers:
- url: https://app.onlyfansapi.com
security:
- default: []
tags:
- name: AI Voice Messages
description: ""
- name: API Keys
description: ""
- name: Account
description: Endpoints for your linked accounts
- name: Analytics - Financial
description: APIs for retrieving financial analytics data
- name: Analytics - Summary
description: APIs for retrieving summary analytics data
- name: Banking
description: Operations related to user banking details, payout methods, legal
and tax information, and account country settings.
- name: Banned Words
description: Reference list of OnlyFans banned words used by the
`blockBannedWords` screening parameter
- name: Blocked / Restricted Users
description: APIs for listing the users an account has blocked or restricted
- name: Chargebacks
description: ""
- name: Chat Messages
description: ""
- name: Chats
description: ""
- name: Client Sessions
description: ""
- name: Connect OnlyFans Account
description: ""
- name: Data Exports
description: APIs for managing data exports
- name: Engagement / Messages
description: ""
- name: Fans
description: APIs for managing OnlyFans fans (subscribers)
- name: Fans - AI Summary
description: APIs for generating and retrieving AI-powered fan profile summaries
- name: Following
description: APIs for managing OnlyFans followings (people you're subscribed to)
- name: Free Trial Links
description: APIs for managing Free Trial Links. Revenue totals are net earnings
after refunds and chargebacks. `revenue.chargebacks` (or
`summary.chargebacks_total` in stats) is the positive cached net amount
already excluded from revenue; do not subtract it again. Spender responses
include chargebacks across all attributed periods for each fan with
positive net revenue.
- name: Giphy
description: ""
- name: Link Tags
description: APIs for managing tags on free trial links, tracking links, and Smart Links
- name: Mass Messaging
description: ""
- name: Media
description: ""
- name: Media Vault
description: ""
- name: Media Vault Lists
description: ""
- name: Notifications
description: Endpoints for managingr account notifications
- name: Payouts
description: ""
- name: Post Comments
description: ""
- name: Post Labels
description: APIs for managing your post labels
- name: Posts
description: APIs for managing OnlyFans posts
- name: Profile Content
description: Read another user's profile content using your connected OnlyFans
account. OnlyFans enforces subscription and purchase requirements; these
endpoints do not unlock content. Response samples use captured OnlyFans
payloads with anonymized IDs, text, and media URLs; OFAPI metadata values
are illustrative.
- name: Promotions
description: ""
- name: Public Profiles
description: ""
- name: Queue
description: ""
- name: Release Forms
description: APIs for managing OnlyFans release forms
- name: Saved For Later (Messages)
description: ""
- name: Saved For Later (Posts)
description: ""
- name: Settings
description: ""
- name: Shared Free Trial Links
description: APIs for Free Trial Links that other OF creators have shared with
this account. Revenue, cost, and spender data are not available for shared
links.
- name: Shared Tracking Links
description: APIs for Tracking Links (campaigns) that other OF creators have
shared with this account. Revenue, cost, and spender data are not
available for shared campaigns.
- name: Smart Link Postbacks
description: APIs for managing Smart Link postback destinations
- name: Smart Links
description: APIs for managing Smart Links (Free Trial Links and Tracking Links
with pooled inventory)
- name: Statistics
description: ""
- name: Stored Free Trial Links
description: Instant APIs for retrieving stored free trial links from the
OnlyFansAPI Cache (free, no credits used). `revenue.total` is net earnings
after refunds and chargebacks. `revenue.chargebacks` is the positive
cached net amount already excluded from that total; do not subtract it
again.
- name: Stored Shared Free Trial Links
description: Instant APIs for retrieving stored shared Free Trial Links from the
OnlyFansAPI Cache (free, no credits used)
- name: Stored Shared Tracking Links
description: Instant APIs for retrieving stored shared Tracking Links
(campaigns) from the OnlyFansAPI Cache (free, no credits used)
- name: Stored Tracking Links
description: Instant APIs for retrieving stored tracking links from the
OnlyFansAPI Cache (free, no credits used). `revenue.total` is net earnings
after refunds and chargebacks. `revenue.chargebacks` is the positive
cached net amount already excluded from that total; do not subtract it
again.
- name: Stories
description: APIs for managing OnlyFans stories
- name: Story Highlights
description: APIs for managing OnlyFans story highlights
- name: Subscription Bundles
description: ""
- name: Tracking Links
description: APIs for managing tracking links. Revenue totals are net earnings
after refunds and chargebacks. `revenue.chargebacks` (or
`summary.chargebacks_total` in stats) is the positive cached net amount
already excluded from revenue; do not subtract it again. Spender responses
include chargebacks across all attributed periods for each fan with
positive net revenue.
- name: Transactions
description: APIs for managing OnlyFans transactions
- name: Usage
description: Credit usage reporting for your team
- name: User List Collections
description: ""
- name: Users
description: APIs for fetching OnlyFans users
- name: Webhooks
description: ""
paths:
/api/smart-link-postbacks:
get:
summary: List Smart Link Postbacks
operationId: listSmartLinkPostbacks
description: List all Smart Link postbacks configured for your Team
parameters: []
responses:
"200":
description: Success
content:
application/json:
schema:
type: object
example:
data:
- id: 123
url: https://example.com/postback?click={click_id}&type={conversion_type}&gclid={gclid}
http_method: POST
body: '{"click_id":"{click_id}","value":"{amount_gross}"}'
headers:
- name: Authorization
value: Bearer token
smart_link_scope: campaign_specific
conversion_types:
- new_subscriber
- new_transaction
smart_link_ids:
- 01JTESTLINK000000000000001
smart_links:
- link_ulid: 01JTESTLINK000000000000001
name: Instagram Bio Link
account_display_name: Creator Main
account_prefixed_id: acct_XXXXXXXX
traffic_source_ids: []
traffic_sources: []
latest_response:
id: 456
conversion_type: new_subscriber
postback_url: https://example.com/postback?click=01JTESTCLICK000000000000001&type=new_subscriber&gclid=google-click-id
succeeded: true
status_code: 200
error_type: null
error_message: null
created_at: 2026-01-31T22:16:00+00:00
created_at: 2026-01-31T21:45:00+00:00
updated_at: 2026-01-31T21:45:00+00:00
_meta:
_credits:
used: 0
balance: 999999
note: Free endpoint
_cache:
is_cached: false
note: Cache disabled for this endpoint
properties:
data:
type: array
example:
- id: 123
url: https://example.com/postback?click={click_id}&type={conversion_type}&gclid={gclid}
http_method: POST
body: '{"click_id":"{click_id}","value":"{amount_gross}"}'
headers:
- name: Authorization
value: Bearer token
smart_link_scope: campaign_specific
conversion_types:
- new_subscriber
- new_transaction
smart_link_ids:
- 01JTESTLINK000000000000001
smart_links:
- link_ulid: 01JTESTLINK000000000000001
name: Instagram Bio Link
account_display_name: Creator Main
account_prefixed_id: acct_XXXXXXXX
traffic_source_ids: []
traffic_sources: []
latest_response:
id: 456
conversion_type: new_subscriber
postback_url: https://example.com/postback?click=01JTESTCLICK000000000000001&type=new_subscriber&gclid=google-click-id
succeeded: true
status_code: 200
error_type: null
error_message: null
created_at: 2026-01-31T22:16:00+00:00
created_at: 2026-01-31T21:45:00+00:00
updated_at: 2026-01-31T21:45:00+00:00
items:
type: object
properties:
id:
type: integer
example: 123
url:
type: string
example: https://example.com/postback?click={click_id}&type={conversion_type}&gclid={gclid}
http_method:
type: string
example: POST
body:
type: string
example: '{"click_id":"{click_id}","value":"{amount_gross}"}'
headers:
type: array
example:
- name: Authorization
value: Bearer token
items:
type: object
properties:
name:
type: string
example: Authorization
value:
type: string
example: Bearer token
smart_link_scope:
type: string
example: campaign_specific
conversion_types:
type: array
example:
- new_subscriber
- new_transaction
items:
type: string
smart_link_ids:
type: array
example:
- 01JTESTLINK000000000000001
items:
type: string
smart_links:
type: array
example:
- link_ulid: 01JTESTLINK000000000000001
name: Instagram Bio Link
account_display_name: Creator Main
account_prefixed_id: acct_XXXXXXXX
items:
type: object
properties:
link_ulid:
type: string
example: 01JTESTLINK000000000000001
name:
type: string
example: Instagram Bio Link
account_display_name:
type: string
example: Creator Main
account_prefixed_id:
type: string
example: acct_XXXXXXXX
traffic_source_ids:
type: array
example: []
traffic_sources:
type: array
example: []
latest_response:
type: object
properties:
id:
type: integer
example: 456
conversion_type:
type: string
example: new_subscriber
postback_url:
type: string
example: https://example.com/postback?click=01JTESTCLICK000000000000001&type=new_subscriber&gclid=google-click-id
succeeded:
type: boolean
example: true
status_code:
type: integer
example: 200
error_type:
type: string
example: null
nullable: true
error_message:
type: string
example: null
nullable: true
created_at:
type: string
example: 2026-01-31T22:16:00+00:00
created_at:
type: string
example: 2026-01-31T21:45:00+00:00
updated_at:
type: string
example: 2026-01-31T21:45:00+00:00
_meta:
type: object
properties:
_credits:
type: object
properties:
used:
type: integer
example: 0
balance:
type: integer
example: 999999
note:
type: string
example: Free endpoint
_cache:
type: object
properties:
is_cached:
type: boolean
example: false
note:
type: string
example: Cache disabled for this endpoint
tags:
- Smart Link Postbacks
components:
securitySchemes:
default:
type: http
scheme: bearer
description: Get your API Key from OnlyFansAPI Console -
https://app.onlyfansapi.com/api-keys
````
# Show Smart Link Postback (/api-reference/smart-link-postbacks/show-smart-link-postback)
Retrieve a Smart Link postback by ID
## OpenAPI
````yaml https://app.onlyfansapi.com/scribe-docs/openapi.yaml get /api/smart-link-postbacks/{postback_id}
openapi: 3.0.3
info:
title: OnlyFans API
description: ""
version: 1.0.0
servers:
- url: https://app.onlyfansapi.com
security:
- default: []
tags:
- name: AI Voice Messages
description: ""
- name: API Keys
description: ""
- name: Account
description: Endpoints for your linked accounts
- name: Analytics - Financial
description: APIs for retrieving financial analytics data
- name: Analytics - Summary
description: APIs for retrieving summary analytics data
- name: Banking
description: Operations related to user banking details, payout methods, legal
and tax information, and account country settings.
- name: Banned Words
description: Reference list of OnlyFans banned words used by the
`blockBannedWords` screening parameter
- name: Blocked / Restricted Users
description: APIs for listing the users an account has blocked or restricted
- name: Chargebacks
description: ""
- name: Chat Messages
description: ""
- name: Chats
description: ""
- name: Client Sessions
description: ""
- name: Connect OnlyFans Account
description: ""
- name: Data Exports
description: APIs for managing data exports
- name: Engagement / Messages
description: ""
- name: Fans
description: APIs for managing OnlyFans fans (subscribers)
- name: Fans - AI Summary
description: APIs for generating and retrieving AI-powered fan profile summaries
- name: Following
description: APIs for managing OnlyFans followings (people you're subscribed to)
- name: Free Trial Links
description: APIs for managing Free Trial Links. Revenue totals are net earnings
after refunds and chargebacks. `revenue.chargebacks` (or
`summary.chargebacks_total` in stats) is the positive cached net amount
already excluded from revenue; do not subtract it again. Spender responses
include chargebacks across all attributed periods for each fan with
positive net revenue.
- name: Giphy
description: ""
- name: Link Tags
description: APIs for managing tags on free trial links, tracking links, and Smart Links
- name: Mass Messaging
description: ""
- name: Media
description: ""
- name: Media Vault
description: ""
- name: Media Vault Lists
description: ""
- name: Notifications
description: Endpoints for managingr account notifications
- name: Payouts
description: ""
- name: Post Comments
description: ""
- name: Post Labels
description: APIs for managing your post labels
- name: Posts
description: APIs for managing OnlyFans posts
- name: Profile Content
description: Read another user's profile content using your connected OnlyFans
account. OnlyFans enforces subscription and purchase requirements; these
endpoints do not unlock content. Response samples use captured OnlyFans
payloads with anonymized IDs, text, and media URLs; OFAPI metadata values
are illustrative.
- name: Promotions
description: ""
- name: Public Profiles
description: ""
- name: Queue
description: ""
- name: Release Forms
description: APIs for managing OnlyFans release forms
- name: Saved For Later (Messages)
description: ""
- name: Saved For Later (Posts)
description: ""
- name: Settings
description: ""
- name: Shared Free Trial Links
description: APIs for Free Trial Links that other OF creators have shared with
this account. Revenue, cost, and spender data are not available for shared
links.
- name: Shared Tracking Links
description: APIs for Tracking Links (campaigns) that other OF creators have
shared with this account. Revenue, cost, and spender data are not
available for shared campaigns.
- name: Smart Link Postbacks
description: APIs for managing Smart Link postback destinations
- name: Smart Links
description: APIs for managing Smart Links (Free Trial Links and Tracking Links
with pooled inventory)
- name: Statistics
description: ""
- name: Stored Free Trial Links
description: Instant APIs for retrieving stored free trial links from the
OnlyFansAPI Cache (free, no credits used). `revenue.total` is net earnings
after refunds and chargebacks. `revenue.chargebacks` is the positive
cached net amount already excluded from that total; do not subtract it
again.
- name: Stored Shared Free Trial Links
description: Instant APIs for retrieving stored shared Free Trial Links from the
OnlyFansAPI Cache (free, no credits used)
- name: Stored Shared Tracking Links
description: Instant APIs for retrieving stored shared Tracking Links
(campaigns) from the OnlyFansAPI Cache (free, no credits used)
- name: Stored Tracking Links
description: Instant APIs for retrieving stored tracking links from the
OnlyFansAPI Cache (free, no credits used). `revenue.total` is net earnings
after refunds and chargebacks. `revenue.chargebacks` is the positive
cached net amount already excluded from that total; do not subtract it
again.
- name: Stories
description: APIs for managing OnlyFans stories
- name: Story Highlights
description: APIs for managing OnlyFans story highlights
- name: Subscription Bundles
description: ""
- name: Tracking Links
description: APIs for managing tracking links. Revenue totals are net earnings
after refunds and chargebacks. `revenue.chargebacks` (or
`summary.chargebacks_total` in stats) is the positive cached net amount
already excluded from revenue; do not subtract it again. Spender responses
include chargebacks across all attributed periods for each fan with
positive net revenue.
- name: Transactions
description: APIs for managing OnlyFans transactions
- name: Usage
description: Credit usage reporting for your team
- name: User List Collections
description: ""
- name: Users
description: APIs for fetching OnlyFans users
- name: Webhooks
description: ""
paths:
/api/smart-link-postbacks/{postback_id}:
parameters:
- in: path
name: postback_id
description: The postback ID
example: 123
required: true
schema:
type: integer
get:
summary: Show Smart Link Postback
operationId: showSmartLinkPostback
description: Retrieve a Smart Link postback by ID
parameters: []
responses:
"200":
description: Success
content:
application/json:
schema:
type: object
example:
data:
id: 123
url: https://example.com/postback?click={click_id}&type={conversion_type}&gclid={gclid}
http_method: POST
body: '{"click_id":"{click_id}","value":"{amount_gross}"}'
headers:
- name: Authorization
value: Bearer token
smart_link_scope: campaign_specific
conversion_types:
- new_subscriber
- new_transaction
smart_link_ids:
- 01JTESTLINK000000000000001
smart_links:
- link_ulid: 01JTESTLINK000000000000001
name: Instagram Bio Link
account_display_name: Creator Main
account_prefixed_id: acct_XXXXXXXX
traffic_source_ids: []
traffic_sources: []
latest_response: null
created_at: 2026-01-31T21:45:00+00:00
updated_at: 2026-01-31T21:45:00+00:00
_meta:
_credits:
used: 0
balance: 999999
note: Free endpoint
_cache:
is_cached: false
note: Cache disabled for this endpoint
properties:
data:
type: object
properties:
id:
type: integer
example: 123
url:
type: string
example: https://example.com/postback?click={click_id}&type={conversion_type}&gclid={gclid}
http_method:
type: string
example: POST
body:
type: string
example: '{"click_id":"{click_id}","value":"{amount_gross}"}'
headers:
type: array
example:
- name: Authorization
value: Bearer token
items:
type: object
properties:
name:
type: string
example: Authorization
value:
type: string
example: Bearer token
smart_link_scope:
type: string
example: campaign_specific
conversion_types:
type: array
example:
- new_subscriber
- new_transaction
items:
type: string
smart_link_ids:
type: array
example:
- 01JTESTLINK000000000000001
items:
type: string
smart_links:
type: array
example:
- link_ulid: 01JTESTLINK000000000000001
name: Instagram Bio Link
account_display_name: Creator Main
account_prefixed_id: acct_XXXXXXXX
items:
type: object
properties:
link_ulid:
type: string
example: 01JTESTLINK000000000000001
name:
type: string
example: Instagram Bio Link
account_display_name:
type: string
example: Creator Main
account_prefixed_id:
type: string
example: acct_XXXXXXXX
traffic_source_ids:
type: array
example: []
traffic_sources:
type: array
example: []
latest_response:
type: string
example: null
nullable: true
created_at:
type: string
example: 2026-01-31T21:45:00+00:00
updated_at:
type: string
example: 2026-01-31T21:45:00+00:00
_meta:
type: object
properties:
_credits:
type: object
properties:
used:
type: integer
example: 0
balance:
type: integer
example: 999999
note:
type: string
example: Free endpoint
_cache:
type: object
properties:
is_cached:
type: boolean
example: false
note:
type: string
example: Cache disabled for this endpoint
tags:
- Smart Link Postbacks
components:
securitySchemes:
default:
type: http
scheme: bearer
description: Get your API Key from OnlyFansAPI Console -
https://app.onlyfansapi.com/api-keys
````
# Update Smart Link Postback (/api-reference/smart-link-postbacks/update-smart-link-postback)
Update a Smart Link postback configuration
## OpenAPI
````yaml https://app.onlyfansapi.com/scribe-docs/openapi.yaml patch /api/smart-link-postbacks/{postback_id}
openapi: 3.0.3
info:
title: OnlyFans API
description: ""
version: 1.0.0
servers:
- url: https://app.onlyfansapi.com
security:
- default: []
tags:
- name: AI Voice Messages
description: ""
- name: API Keys
description: ""
- name: Account
description: Endpoints for your linked accounts
- name: Analytics - Financial
description: APIs for retrieving financial analytics data
- name: Analytics - Summary
description: APIs for retrieving summary analytics data
- name: Banking
description: Operations related to user banking details, payout methods, legal
and tax information, and account country settings.
- name: Banned Words
description: Reference list of OnlyFans banned words used by the
`blockBannedWords` screening parameter
- name: Blocked / Restricted Users
description: APIs for listing the users an account has blocked or restricted
- name: Chargebacks
description: ""
- name: Chat Messages
description: ""
- name: Chats
description: ""
- name: Client Sessions
description: ""
- name: Connect OnlyFans Account
description: ""
- name: Data Exports
description: APIs for managing data exports
- name: Engagement / Messages
description: ""
- name: Fans
description: APIs for managing OnlyFans fans (subscribers)
- name: Fans - AI Summary
description: APIs for generating and retrieving AI-powered fan profile summaries
- name: Following
description: APIs for managing OnlyFans followings (people you're subscribed to)
- name: Free Trial Links
description: APIs for managing Free Trial Links. Revenue totals are net earnings
after refunds and chargebacks. `revenue.chargebacks` (or
`summary.chargebacks_total` in stats) is the positive cached net amount
already excluded from revenue; do not subtract it again. Spender responses
include chargebacks across all attributed periods for each fan with
positive net revenue.
- name: Giphy
description: ""
- name: Link Tags
description: APIs for managing tags on free trial links, tracking links, and Smart Links
- name: Mass Messaging
description: ""
- name: Media
description: ""
- name: Media Vault
description: ""
- name: Media Vault Lists
description: ""
- name: Notifications
description: Endpoints for managingr account notifications
- name: Payouts
description: ""
- name: Post Comments
description: ""
- name: Post Labels
description: APIs for managing your post labels
- name: Posts
description: APIs for managing OnlyFans posts
- name: Profile Content
description: Read another user's profile content using your connected OnlyFans
account. OnlyFans enforces subscription and purchase requirements; these
endpoints do not unlock content. Response samples use captured OnlyFans
payloads with anonymized IDs, text, and media URLs; OFAPI metadata values
are illustrative.
- name: Promotions
description: ""
- name: Public Profiles
description: ""
- name: Queue
description: ""
- name: Release Forms
description: APIs for managing OnlyFans release forms
- name: Saved For Later (Messages)
description: ""
- name: Saved For Later (Posts)
description: ""
- name: Settings
description: ""
- name: Shared Free Trial Links
description: APIs for Free Trial Links that other OF creators have shared with
this account. Revenue, cost, and spender data are not available for shared
links.
- name: Shared Tracking Links
description: APIs for Tracking Links (campaigns) that other OF creators have
shared with this account. Revenue, cost, and spender data are not
available for shared campaigns.
- name: Smart Link Postbacks
description: APIs for managing Smart Link postback destinations
- name: Smart Links
description: APIs for managing Smart Links (Free Trial Links and Tracking Links
with pooled inventory)
- name: Statistics
description: ""
- name: Stored Free Trial Links
description: Instant APIs for retrieving stored free trial links from the
OnlyFansAPI Cache (free, no credits used). `revenue.total` is net earnings
after refunds and chargebacks. `revenue.chargebacks` is the positive
cached net amount already excluded from that total; do not subtract it
again.
- name: Stored Shared Free Trial Links
description: Instant APIs for retrieving stored shared Free Trial Links from the
OnlyFansAPI Cache (free, no credits used)
- name: Stored Shared Tracking Links
description: Instant APIs for retrieving stored shared Tracking Links
(campaigns) from the OnlyFansAPI Cache (free, no credits used)
- name: Stored Tracking Links
description: Instant APIs for retrieving stored tracking links from the
OnlyFansAPI Cache (free, no credits used). `revenue.total` is net earnings
after refunds and chargebacks. `revenue.chargebacks` is the positive
cached net amount already excluded from that total; do not subtract it
again.
- name: Stories
description: APIs for managing OnlyFans stories
- name: Story Highlights
description: APIs for managing OnlyFans story highlights
- name: Subscription Bundles
description: ""
- name: Tracking Links
description: APIs for managing tracking links. Revenue totals are net earnings
after refunds and chargebacks. `revenue.chargebacks` (or
`summary.chargebacks_total` in stats) is the positive cached net amount
already excluded from revenue; do not subtract it again. Spender responses
include chargebacks across all attributed periods for each fan with
positive net revenue.
- name: Transactions
description: APIs for managing OnlyFans transactions
- name: Usage
description: Credit usage reporting for your team
- name: User List Collections
description: ""
- name: Users
description: APIs for fetching OnlyFans users
- name: Webhooks
description: ""
paths:
/api/smart-link-postbacks/{postback_id}:
parameters:
- in: path
name: postback_id
description: The postback ID
example: 123
required: true
schema:
type: integer
patch:
summary: Update Smart Link Postback
operationId: updateSmartLinkPostback
description: Update a Smart Link postback configuration
parameters: []
responses:
"200":
description: Success
content:
application/json:
schema:
type: object
example:
data:
id: 123
url: https://example.com/updated?click={click_id}&type={conversion_type}&ttclid={ttclid}
http_method: POST
body: '{"click_id":"{click_id}","value":"{amount_gross}"}'
headers:
- name: Authorization
value: Bearer token
smart_link_scope: campaign_specific
conversion_types:
- new_subscriber
smart_link_ids:
- 01JTESTLINK000000000000001
smart_links:
- link_ulid: 01JTESTLINK000000000000001
name: Instagram Bio Link
account_display_name: Creator Main
account_prefixed_id: acct_XXXXXXXX
traffic_source_ids: []
traffic_sources: []
latest_response: null
created_at: 2026-01-31T21:45:00+00:00
updated_at: 2026-01-31T22:00:00+00:00
_meta:
_credits:
used: 0
balance: 999999
note: Free endpoint
_cache:
is_cached: false
note: Cache disabled for this endpoint
properties:
data:
type: object
properties:
id:
type: integer
example: 123
url:
type: string
example: https://example.com/updated?click={click_id}&type={conversion_type}&ttclid={ttclid}
http_method:
type: string
example: POST
body:
type: string
example: '{"click_id":"{click_id}","value":"{amount_gross}"}'
headers:
type: array
example:
- name: Authorization
value: Bearer token
items:
type: object
properties:
name:
type: string
example: Authorization
value:
type: string
example: Bearer token
smart_link_scope:
type: string
example: campaign_specific
conversion_types:
type: array
example:
- new_subscriber
items:
type: string
smart_link_ids:
type: array
example:
- 01JTESTLINK000000000000001
items:
type: string
smart_links:
type: array
example:
- link_ulid: 01JTESTLINK000000000000001
name: Instagram Bio Link
account_display_name: Creator Main
account_prefixed_id: acct_XXXXXXXX
items:
type: object
properties:
link_ulid:
type: string
example: 01JTESTLINK000000000000001
name:
type: string
example: Instagram Bio Link
account_display_name:
type: string
example: Creator Main
account_prefixed_id:
type: string
example: acct_XXXXXXXX
traffic_source_ids:
type: array
example: []
traffic_sources:
type: array
example: []
latest_response:
type: string
example: null
nullable: true
created_at:
type: string
example: 2026-01-31T21:45:00+00:00
updated_at:
type: string
example: 2026-01-31T22:00:00+00:00
_meta:
type: object
properties:
_credits:
type: object
properties:
used:
type: integer
example: 0
balance:
type: integer
example: 999999
note:
type: string
example: Free endpoint
_cache:
type: object
properties:
is_cached:
type: boolean
example: false
note:
type: string
example: Cache disabled for this endpoint
tags:
- Smart Link Postbacks
requestBody:
required: true
content:
application/json:
schema:
type: object
properties:
url:
type: string
description: The destination URL.
example: https://example.com/postback?click={external_click_id}&type={conversion_type}
http_method:
type: string
description: HTTP method used for the postback request. Existing value is kept
when omitted.
example: POST
enum:
- GET
- POST
body:
type: string
description: Optional request body template for POST postbacks. Variables are
replaced when the postback is dispatched.
example: '{"click_id":"{click_id}","value":"{amount_gross}"}'
headers:
type: array
description: Optional request headers. Header values may include postback
variables.
example:
- name: Authorization
value: Bearer token
items:
type: object
properties:
name:
type: string
description: This field is required when headers.*.value is
present. Must match the regex
/\A[A-Za-z0-9!#$%&'*+.^_`|~-]+\z/. Must not be greater
than 100 characters.
example: udhexdgfyqgfkjcqbwnewev
nullable: true
value:
type: string
description: Must not be greater than 2000 characters.
example: hddihmaolz
nullable: true
smart_link_scope:
type: string
description: "`global` or `campaign_specific`."
example: global
enum:
- global
- campaign_specific
conversion_types:
type: array
description: One or more Smart Link conversion types that should trigger this
postback.
example:
- new_subscriber
items:
type: string
smart_link_ids:
type: array
description: Smart Link ULIDs. Required when `smart_link_scope` is
`campaign_specific`.
example:
- 01JTESTLINK000000000000001
items:
type: string
required:
- url
- smart_link_scope
- conversion_types
components:
securitySchemes:
default:
type: http
scheme: bearer
description: Get your API Key from OnlyFansAPI Console -
https://app.onlyfansapi.com/api-keys
````
# Calculate Total Transactions (/api-reference/statistics/calculate-total-transactions)
Calculate the total transactions and amounts.
## OpenAPI
````yaml https://app.onlyfansapi.com/scribe-docs/openapi.yaml get /api/{account}/statistics/total-transactions
openapi: 3.0.3
info:
title: OnlyFans API
description: ""
version: 1.0.0
servers:
- url: https://app.onlyfansapi.com
security:
- default: []
tags:
- name: AI Voice Messages
description: ""
- name: API Keys
description: ""
- name: Account
description: Endpoints for your linked accounts
- name: Analytics - Financial
description: APIs for retrieving financial analytics data
- name: Analytics - Summary
description: APIs for retrieving summary analytics data
- name: Banking
description: Operations related to user banking details, payout methods, legal
and tax information, and account country settings.
- name: Banned Words
description: Reference list of OnlyFans banned words used by the
`blockBannedWords` screening parameter
- name: Blocked / Restricted Users
description: APIs for listing the users an account has blocked or restricted
- name: Chargebacks
description: ""
- name: Chat Messages
description: ""
- name: Chats
description: ""
- name: Client Sessions
description: ""
- name: Connect OnlyFans Account
description: ""
- name: Data Exports
description: APIs for managing data exports
- name: Engagement / Messages
description: ""
- name: Fans
description: APIs for managing OnlyFans fans (subscribers)
- name: Fans - AI Summary
description: APIs for generating and retrieving AI-powered fan profile summaries
- name: Following
description: APIs for managing OnlyFans followings (people you're subscribed to)
- name: Free Trial Links
description: APIs for managing Free Trial Links. Revenue totals are net earnings
after refunds and chargebacks. `revenue.chargebacks` (or
`summary.chargebacks_total` in stats) is the positive cached net amount
already excluded from revenue; do not subtract it again. Spender responses
include chargebacks across all attributed periods for each fan with
positive net revenue.
- name: Giphy
description: ""
- name: Link Tags
description: APIs for managing tags on free trial links, tracking links, and Smart Links
- name: Mass Messaging
description: ""
- name: Media
description: ""
- name: Media Vault
description: ""
- name: Media Vault Lists
description: ""
- name: Notifications
description: Endpoints for managingr account notifications
- name: Payouts
description: ""
- name: Post Comments
description: ""
- name: Post Labels
description: APIs for managing your post labels
- name: Posts
description: APIs for managing OnlyFans posts
- name: Profile Content
description: Read another user's profile content using your connected OnlyFans
account. OnlyFans enforces subscription and purchase requirements; these
endpoints do not unlock content. Response samples use captured OnlyFans
payloads with anonymized IDs, text, and media URLs; OFAPI metadata values
are illustrative.
- name: Promotions
description: ""
- name: Public Profiles
description: ""
- name: Queue
description: ""
- name: Release Forms
description: APIs for managing OnlyFans release forms
- name: Saved For Later (Messages)
description: ""
- name: Saved For Later (Posts)
description: ""
- name: Settings
description: ""
- name: Shared Free Trial Links
description: APIs for Free Trial Links that other OF creators have shared with
this account. Revenue, cost, and spender data are not available for shared
links.
- name: Shared Tracking Links
description: APIs for Tracking Links (campaigns) that other OF creators have
shared with this account. Revenue, cost, and spender data are not
available for shared campaigns.
- name: Smart Link Postbacks
description: APIs for managing Smart Link postback destinations
- name: Smart Links
description: APIs for managing Smart Links (Free Trial Links and Tracking Links
with pooled inventory)
- name: Statistics
description: ""
- name: Stored Free Trial Links
description: Instant APIs for retrieving stored free trial links from the
OnlyFansAPI Cache (free, no credits used). `revenue.total` is net earnings
after refunds and chargebacks. `revenue.chargebacks` is the positive
cached net amount already excluded from that total; do not subtract it
again.
- name: Stored Shared Free Trial Links
description: Instant APIs for retrieving stored shared Free Trial Links from the
OnlyFansAPI Cache (free, no credits used)
- name: Stored Shared Tracking Links
description: Instant APIs for retrieving stored shared Tracking Links
(campaigns) from the OnlyFansAPI Cache (free, no credits used)
- name: Stored Tracking Links
description: Instant APIs for retrieving stored tracking links from the
OnlyFansAPI Cache (free, no credits used). `revenue.total` is net earnings
after refunds and chargebacks. `revenue.chargebacks` is the positive
cached net amount already excluded from that total; do not subtract it
again.
- name: Stories
description: APIs for managing OnlyFans stories
- name: Story Highlights
description: APIs for managing OnlyFans story highlights
- name: Subscription Bundles
description: ""
- name: Tracking Links
description: APIs for managing tracking links. Revenue totals are net earnings
after refunds and chargebacks. `revenue.chargebacks` (or
`summary.chargebacks_total` in stats) is the positive cached net amount
already excluded from revenue; do not subtract it again. Spender responses
include chargebacks across all attributed periods for each fan with
positive net revenue.
- name: Transactions
description: APIs for managing OnlyFans transactions
- name: Usage
description: Credit usage reporting for your team
- name: User List Collections
description: ""
- name: Users
description: APIs for fetching OnlyFans users
- name: Webhooks
description: ""
paths:
/api/{account}/statistics/total-transactions:
parameters:
- in: path
name: account
description: The Account ID
example: acct_XXXXXXXXXXXXXXX
required: true
schema:
type: string
get:
summary: Calculate Total Transactions
operationId: calculateTotalTransactions
description: Calculate the total transactions and amounts.
parameters:
- in: query
name: start_date
description: The start date for the period. Keep empty to calculate everything.
example: 2025-01-01 00:00:00
required: false
schema:
type: string
description: The start date for the period. Keep empty to calculate everything.
example: 2025-01-01 00:00:00
- in: query
name: end_date
description: The end date for the period. Keep empty to calculate everything.
example: 2025-03-31 23:59:59
required: false
schema:
type: string
description: The end date for the period. Keep empty to calculate everything.
example: 2025-03-31 23:59:59
responses:
"200":
description: ""
content:
application/json:
schema:
type: object
example:
total_transactions: 123
total_amount: 123.45
properties:
total_transactions:
type: integer
example: 123
total_amount:
type: number
example: 123.45
tags:
- Statistics
components:
securitySchemes:
default:
type: http
scheme: bearer
description: Get your API Key from OnlyFansAPI Console -
https://app.onlyfansapi.com/api-keys
````
# Get Earnings (/api-reference/statistics/get-earnings)
Get the earnings for a given period.
## OpenAPI
````yaml https://app.onlyfansapi.com/scribe-docs/openapi.yaml get /api/{account}/statistics/statements/earnings
openapi: 3.0.3
info:
title: OnlyFans API
description: ""
version: 1.0.0
servers:
- url: https://app.onlyfansapi.com
security:
- default: []
tags:
- name: AI Voice Messages
description: ""
- name: API Keys
description: ""
- name: Account
description: Endpoints for your linked accounts
- name: Analytics - Financial
description: APIs for retrieving financial analytics data
- name: Analytics - Summary
description: APIs for retrieving summary analytics data
- name: Banking
description: Operations related to user banking details, payout methods, legal
and tax information, and account country settings.
- name: Banned Words
description: Reference list of OnlyFans banned words used by the
`blockBannedWords` screening parameter
- name: Blocked / Restricted Users
description: APIs for listing the users an account has blocked or restricted
- name: Chargebacks
description: ""
- name: Chat Messages
description: ""
- name: Chats
description: ""
- name: Client Sessions
description: ""
- name: Connect OnlyFans Account
description: ""
- name: Data Exports
description: APIs for managing data exports
- name: Engagement / Messages
description: ""
- name: Fans
description: APIs for managing OnlyFans fans (subscribers)
- name: Fans - AI Summary
description: APIs for generating and retrieving AI-powered fan profile summaries
- name: Following
description: APIs for managing OnlyFans followings (people you're subscribed to)
- name: Free Trial Links
description: APIs for managing Free Trial Links. Revenue totals are net earnings
after refunds and chargebacks. `revenue.chargebacks` (or
`summary.chargebacks_total` in stats) is the positive cached net amount
already excluded from revenue; do not subtract it again. Spender responses
include chargebacks across all attributed periods for each fan with
positive net revenue.
- name: Giphy
description: ""
- name: Link Tags
description: APIs for managing tags on free trial links, tracking links, and Smart Links
- name: Mass Messaging
description: ""
- name: Media
description: ""
- name: Media Vault
description: ""
- name: Media Vault Lists
description: ""
- name: Notifications
description: Endpoints for managingr account notifications
- name: Payouts
description: ""
- name: Post Comments
description: ""
- name: Post Labels
description: APIs for managing your post labels
- name: Posts
description: APIs for managing OnlyFans posts
- name: Profile Content
description: Read another user's profile content using your connected OnlyFans
account. OnlyFans enforces subscription and purchase requirements; these
endpoints do not unlock content. Response samples use captured OnlyFans
payloads with anonymized IDs, text, and media URLs; OFAPI metadata values
are illustrative.
- name: Promotions
description: ""
- name: Public Profiles
description: ""
- name: Queue
description: ""
- name: Release Forms
description: APIs for managing OnlyFans release forms
- name: Saved For Later (Messages)
description: ""
- name: Saved For Later (Posts)
description: ""
- name: Settings
description: ""
- name: Shared Free Trial Links
description: APIs for Free Trial Links that other OF creators have shared with
this account. Revenue, cost, and spender data are not available for shared
links.
- name: Shared Tracking Links
description: APIs for Tracking Links (campaigns) that other OF creators have
shared with this account. Revenue, cost, and spender data are not
available for shared campaigns.
- name: Smart Link Postbacks
description: APIs for managing Smart Link postback destinations
- name: Smart Links
description: APIs for managing Smart Links (Free Trial Links and Tracking Links
with pooled inventory)
- name: Statistics
description: ""
- name: Stored Free Trial Links
description: Instant APIs for retrieving stored free trial links from the
OnlyFansAPI Cache (free, no credits used). `revenue.total` is net earnings
after refunds and chargebacks. `revenue.chargebacks` is the positive
cached net amount already excluded from that total; do not subtract it
again.
- name: Stored Shared Free Trial Links
description: Instant APIs for retrieving stored shared Free Trial Links from the
OnlyFansAPI Cache (free, no credits used)
- name: Stored Shared Tracking Links
description: Instant APIs for retrieving stored shared Tracking Links
(campaigns) from the OnlyFansAPI Cache (free, no credits used)
- name: Stored Tracking Links
description: Instant APIs for retrieving stored tracking links from the
OnlyFansAPI Cache (free, no credits used). `revenue.total` is net earnings
after refunds and chargebacks. `revenue.chargebacks` is the positive
cached net amount already excluded from that total; do not subtract it
again.
- name: Stories
description: APIs for managing OnlyFans stories
- name: Story Highlights
description: APIs for managing OnlyFans story highlights
- name: Subscription Bundles
description: ""
- name: Tracking Links
description: APIs for managing tracking links. Revenue totals are net earnings
after refunds and chargebacks. `revenue.chargebacks` (or
`summary.chargebacks_total` in stats) is the positive cached net amount
already excluded from revenue; do not subtract it again. Spender responses
include chargebacks across all attributed periods for each fan with
positive net revenue.
- name: Transactions
description: APIs for managing OnlyFans transactions
- name: Usage
description: Credit usage reporting for your team
- name: User List Collections
description: ""
- name: Users
description: APIs for fetching OnlyFans users
- name: Webhooks
description: ""
paths:
/api/{account}/statistics/statements/earnings:
parameters:
- in: path
name: account
description: The Account ID
example: acct_XXXXXXXXXXXXXXX
required: true
schema:
type: string
get:
summary: Get Earnings
operationId: getEarnings
description: Get the earnings for a given period.
parameters:
- in: query
name: start_date
description: The start date for the period.
example: 2025-01-01 00:00:00
required: true
schema:
type: string
description: The start date for the period.
example: 2025-01-01 00:00:00
- in: query
name: end_date
description: The end date for the period.
example: 2025-03-31 23:59:59
required: true
schema:
type: string
description: The end date for the period.
example: 2025-03-31 23:59:59
- in: query
name: type
description: Filter by All / Subscriptions / Tips / Posts / Messages / Streams
example: total
required: false
schema:
type: string
description: Filter by All / Subscriptions / Tips / Posts / Messages / Streams
example: total
enum:
- total
- subscribes
- tips
- post
- messages
- stream
responses:
"200":
description: ""
content:
application/json:
schema:
type: object
example:
data:
total:
delta: -6.9
total: 662086.22
gross: 827634.52
chartCount:
- date: 2025-01-01T00:00:00+00:00
count: 540
- date: 2025-01-02T00:00:00+00:00
count: 451
- date: 2025-01-03T00:00:00+00:00
count: 501
- date: 2025-01-04T00:00:00+00:00
count: 417
- date: 2025-01-05T00:00:00+00:00
count: 515
- date: 2025-01-06T00:00:00+00:00
count: 488
- date: 2025-01-07T00:00:00+00:00
count: 481
- date: 2025-01-08T00:00:00+00:00
count: 444
- date: 2025-01-09T00:00:00+00:00
count: 510
- date: 2025-01-10T00:00:00+00:00
count: 424
- date: 2025-01-11T00:00:00+00:00
count: 360
- date: 2025-01-12T00:00:00+00:00
count: 396
- date: 2025-01-13T00:00:00+00:00
count: 434
- date: 2025-01-14T00:00:00+00:00
count: 392
- date: 2025-01-15T00:00:00+00:00
count: 368
- date: 2025-01-16T00:00:00+00:00
count: 402
- date: 2025-01-17T00:00:00+00:00
count: 393
- date: 2025-01-18T00:00:00+00:00
count: 360
- date: 2025-01-19T00:00:00+00:00
count: 438
- date: 2025-01-20T00:00:00+00:00
count: 420
- date: 2025-01-21T00:00:00+00:00
count: 314
- date: 2025-01-22T00:00:00+00:00
count: 384
- date: 2025-01-23T00:00:00+00:00
count: 408
- date: 2025-01-24T00:00:00+00:00
count: 384
- date: 2025-01-25T00:00:00+00:00
count: 468
- date: 2025-01-26T00:00:00+00:00
count: 609
- date: 2025-01-27T00:00:00+00:00
count: 514
- date: 2025-01-28T00:00:00+00:00
count: 438
- date: 2025-01-29T00:00:00+00:00
count: 421
- date: 2025-01-30T00:00:00+00:00
count: 494
- date: 2025-01-31T00:00:00+00:00
count: 487
- date: 2025-02-01T00:00:00+00:00
count: 523
- date: 2025-02-02T00:00:00+00:00
count: 572
- date: 2025-02-03T00:00:00+00:00
count: 468
- date: 2025-02-04T00:00:00+00:00
count: 433
- date: 2025-02-05T00:00:00+00:00
count: 544
- date: 2025-02-06T00:00:00+00:00
count: 641
- date: 2025-02-07T00:00:00+00:00
count: 524
- date: 2025-02-08T00:00:00+00:00
count: 522
- date: 2025-02-09T00:00:00+00:00
count: 454
- date: 2025-02-10T00:00:00+00:00
count: 596
- date: 2025-02-11T00:00:00+00:00
count: 540
- date: 2025-02-12T00:00:00+00:00
count: 466
- date: 2025-02-13T00:00:00+00:00
count: 519
- date: 2025-02-14T00:00:00+00:00
count: 513
- date: 2025-02-15T00:00:00+00:00
count: 487
- date: 2025-02-16T00:00:00+00:00
count: 412
- date: 2025-02-17T00:00:00+00:00
count: 404
- date: 2025-02-18T00:00:00+00:00
count: 472
- date: 2025-02-19T00:00:00+00:00
count: 355
- date: 2025-02-20T00:00:00+00:00
count: 481
- date: 2025-02-21T00:00:00+00:00
count: 485
- date: 2025-02-22T00:00:00+00:00
count: 439
- date: 2025-02-23T00:00:00+00:00
count: 412
- date: 2025-02-24T00:00:00+00:00
count: 434
- date: 2025-02-25T00:00:00+00:00
count: 397
- date: 2025-02-26T00:00:00+00:00
count: 368
- date: 2025-02-27T00:00:00+00:00
count: 518
- date: 2025-02-28T00:00:00+00:00
count: 565
- date: 2025-03-01T00:00:00+00:00
count: 564
- date: 2025-03-02T00:00:00+00:00
count: 581
- date: 2025-03-03T00:00:00+00:00
count: 444
- date: 2025-03-04T00:00:00+00:00
count: 457
- date: 2025-03-05T00:00:00+00:00
count: 507
- date: 2025-03-06T00:00:00+00:00
count: 510
- date: 2025-03-07T00:00:00+00:00
count: 474
- date: 2025-03-08T00:00:00+00:00
count: 543
- date: 2025-03-09T00:00:00+00:00
count: 529
- date: 2025-03-10T00:00:00+00:00
count: 520
- date: 2025-03-11T00:00:00+00:00
count: 498
- date: 2025-03-12T00:00:00+00:00
count: 457
- date: 2025-03-13T00:00:00+00:00
count: 497
- date: 2025-03-14T00:00:00+00:00
count: 532
- date: 2025-03-15T00:00:00+00:00
count: 491
- date: 2025-03-16T00:00:00+00:00
count: 413
- date: 2025-03-17T00:00:00+00:00
count: 426
- date: 2025-03-18T00:00:00+00:00
count: 491
- date: 2025-03-19T00:00:00+00:00
count: 386
- date: 2025-03-20T00:00:00+00:00
count: 476
- date: 2025-03-21T00:00:00+00:00
count: 420
- date: 2025-03-22T00:00:00+00:00
count: 426
- date: 2025-03-23T00:00:00+00:00
count: 533
- date: 2025-03-24T00:00:00+00:00
count: 406
- date: 2025-03-25T00:00:00+00:00
count: 400
- date: 2025-03-26T00:00:00+00:00
count: 435
- date: 2025-03-27T00:00:00+00:00
count: 514
- date: 2025-03-28T00:00:00+00:00
count: 503
- date: 2025-03-29T00:00:00+00:00
count: 446
- date: 2025-03-30T00:00:00+00:00
count: 437
- date: 2025-03-31T00:00:00+00:00
count: 415
chartAmount:
- date: 2025-01-01T00:00:00+00:00
count: 10051.89
- date: 2025-01-02T00:00:00+00:00
count: 7044.43
- date: 2025-01-03T00:00:00+00:00
count: 9070.46
- date: 2025-01-04T00:00:00+00:00
count: 7575.49
- date: 2025-01-05T00:00:00+00:00
count: 7459.01
- date: 2025-01-06T00:00:00+00:00
count: 8472.68
- date: 2025-01-07T00:00:00+00:00
count: 6410.23
- date: 2025-01-08T00:00:00+00:00
count: 6336.6
- date: 2025-01-09T00:00:00+00:00
count: 8475.93
- date: 2025-01-10T00:00:00+00:00
count: 7673.4
- date: 2025-01-11T00:00:00+00:00
count: 7666.22
- date: 2025-01-12T00:00:00+00:00
count: 8126.65
- date: 2025-01-13T00:00:00+00:00
count: 6278.71
- date: 2025-01-14T00:00:00+00:00
count: 7210.6
- date: 2025-01-15T00:00:00+00:00
count: 4610.57
- date: 2025-01-16T00:00:00+00:00
count: 5739.87
- date: 2025-01-17T00:00:00+00:00
count: 8435.22
- date: 2025-01-18T00:00:00+00:00
count: 5237.74
- date: 2025-01-19T00:00:00+00:00
count: 7315.44
- date: 2025-01-20T00:00:00+00:00
count: 7325.59
- date: 2025-01-21T00:00:00+00:00
count: 4510.83
- date: 2025-01-22T00:00:00+00:00
count: 6901.88
- date: 2025-01-23T00:00:00+00:00
count: 5442.49
- date: 2025-01-24T00:00:00+00:00
count: 6517.01
- date: 2025-01-25T00:00:00+00:00
count: 6882.58
- date: 2025-01-26T00:00:00+00:00
count: 8778.25
- date: 2025-01-27T00:00:00+00:00
count: 7759.99
- date: 2025-01-28T00:00:00+00:00
count: 6750.44
- date: 2025-01-29T00:00:00+00:00
count: 6338.93
- date: 2025-01-30T00:00:00+00:00
count: 7249.22
- date: 2025-01-31T00:00:00+00:00
count: 6299.92
- date: 2025-02-01T00:00:00+00:00
count: 8327.3
- date: 2025-02-02T00:00:00+00:00
count: 7675.32
- date: 2025-02-03T00:00:00+00:00
count: 7153.73
- date: 2025-02-04T00:00:00+00:00
count: 6711.74
- date: 2025-02-05T00:00:00+00:00
count: 7334.76
- date: 2025-02-06T00:00:00+00:00
count: 13641.27
- date: 2025-02-07T00:00:00+00:00
count: 9280.8
- date: 2025-02-08T00:00:00+00:00
count: 7978.69
- date: 2025-02-09T00:00:00+00:00
count: 8561.71
- date: 2025-02-10T00:00:00+00:00
count: 6979.16
- date: 2025-02-11T00:00:00+00:00
count: 7040.23
- date: 2025-02-12T00:00:00+00:00
count: 6701.16
- date: 2025-02-13T00:00:00+00:00
count: 7418.89
- date: 2025-02-14T00:00:00+00:00
count: 9174.97
- date: 2025-02-15T00:00:00+00:00
count: 8956.52
- date: 2025-02-16T00:00:00+00:00
count: 6561.58
- date: 2025-02-17T00:00:00+00:00
count: 5060.88
- date: 2025-02-18T00:00:00+00:00
count: 7721.78
- date: 2025-02-19T00:00:00+00:00
count: 6096.49
- date: 2025-02-20T00:00:00+00:00
count: 7017.78
- date: 2025-02-21T00:00:00+00:00
count: 9542.37
- date: 2025-02-22T00:00:00+00:00
count: 6882.54
- date: 2025-02-23T00:00:00+00:00
count: 5805.24
- date: 2025-02-24T00:00:00+00:00
count: 6612.35
- date: 2025-02-25T00:00:00+00:00
count: 4801.5
- date: 2025-02-26T00:00:00+00:00
count: 5793.31
- date: 2025-02-27T00:00:00+00:00
count: 7420.45
- date: 2025-02-28T00:00:00+00:00
count: 7238.34
- date: 2025-03-01T00:00:00+00:00
count: 8843.12
- date: 2025-03-02T00:00:00+00:00
count: 8087.79
- date: 2025-03-03T00:00:00+00:00
count: 7389.51
- date: 2025-03-04T00:00:00+00:00
count: 5521.31
- date: 2025-03-05T00:00:00+00:00
count: 8213.56
- date: 2025-03-06T00:00:00+00:00
count: 8016.33
- date: 2025-03-07T00:00:00+00:00
count: 7856.66
- date: 2025-03-08T00:00:00+00:00
count: 7283.95
- date: 2025-03-09T00:00:00+00:00
count: 9228.49
- date: 2025-03-10T00:00:00+00:00
count: 7571.83
- date: 2025-03-11T00:00:00+00:00
count: 7476.63
- date: 2025-03-12T00:00:00+00:00
count: 6336.17
- date: 2025-03-13T00:00:00+00:00
count: 8253.78
- date: 2025-03-14T00:00:00+00:00
count: 7627.9
- date: 2025-03-15T00:00:00+00:00
count: 7304.9
- date: 2025-03-16T00:00:00+00:00
count: 7900.93
- date: 2025-03-17T00:00:00+00:00
count: 6035.48
- date: 2025-03-18T00:00:00+00:00
count: 8107.57
- date: 2025-03-19T00:00:00+00:00
count: 6584.91
- date: 2025-03-20T00:00:00+00:00
count: 7021.49
- date: 2025-03-21T00:00:00+00:00
count: 6801.75
- date: 2025-03-22T00:00:00+00:00
count: 7950.66
- date: 2025-03-23T00:00:00+00:00
count: 9653.96
- date: 2025-03-24T00:00:00+00:00
count: 6069.97
- date: 2025-03-25T00:00:00+00:00
count: 6746.01
- date: 2025-03-26T00:00:00+00:00
count: 6619.57
- date: 2025-03-27T00:00:00+00:00
count: 8570.96
- date: 2025-03-28T00:00:00+00:00
count: 8294.75
- date: 2025-03-29T00:00:00+00:00
count: 7005.74
- date: 2025-03-30T00:00:00+00:00
count: 7233.87
- date: 2025-03-31T00:00:00+00:00
count: 7037.54
_meta:
_credits:
used: 1
balance: 25579
note: Always
_cache:
is_cached: false
note: Cache disabled for this endpoint
_rate_limits:
limit_minute: 1000
limit_day: 5000
remaining_minute: 997
remaining_day: 4981
properties:
data:
type: object
properties:
total:
type: object
properties:
delta:
type: number
example: -6.9
total:
type: number
example: 662086.22
gross:
type: number
example: 827634.52
chartCount:
type: array
example:
- date: 2025-01-01T00:00:00+00:00
count: 540
- date: 2025-01-02T00:00:00+00:00
count: 451
- date: 2025-01-03T00:00:00+00:00
count: 501
- date: 2025-01-04T00:00:00+00:00
count: 417
- date: 2025-01-05T00:00:00+00:00
count: 515
- date: 2025-01-06T00:00:00+00:00
count: 488
- date: 2025-01-07T00:00:00+00:00
count: 481
- date: 2025-01-08T00:00:00+00:00
count: 444
- date: 2025-01-09T00:00:00+00:00
count: 510
- date: 2025-01-10T00:00:00+00:00
count: 424
- date: 2025-01-11T00:00:00+00:00
count: 360
- date: 2025-01-12T00:00:00+00:00
count: 396
- date: 2025-01-13T00:00:00+00:00
count: 434
- date: 2025-01-14T00:00:00+00:00
count: 392
- date: 2025-01-15T00:00:00+00:00
count: 368
- date: 2025-01-16T00:00:00+00:00
count: 402
- date: 2025-01-17T00:00:00+00:00
count: 393
- date: 2025-01-18T00:00:00+00:00
count: 360
- date: 2025-01-19T00:00:00+00:00
count: 438
- date: 2025-01-20T00:00:00+00:00
count: 420
- date: 2025-01-21T00:00:00+00:00
count: 314
- date: 2025-01-22T00:00:00+00:00
count: 384
- date: 2025-01-23T00:00:00+00:00
count: 408
- date: 2025-01-24T00:00:00+00:00
count: 384
- date: 2025-01-25T00:00:00+00:00
count: 468
- date: 2025-01-26T00:00:00+00:00
count: 609
- date: 2025-01-27T00:00:00+00:00
count: 514
- date: 2025-01-28T00:00:00+00:00
count: 438
- date: 2025-01-29T00:00:00+00:00
count: 421
- date: 2025-01-30T00:00:00+00:00
count: 494
- date: 2025-01-31T00:00:00+00:00
count: 487
- date: 2025-02-01T00:00:00+00:00
count: 523
- date: 2025-02-02T00:00:00+00:00
count: 572
- date: 2025-02-03T00:00:00+00:00
count: 468
- date: 2025-02-04T00:00:00+00:00
count: 433
- date: 2025-02-05T00:00:00+00:00
count: 544
- date: 2025-02-06T00:00:00+00:00
count: 641
- date: 2025-02-07T00:00:00+00:00
count: 524
- date: 2025-02-08T00:00:00+00:00
count: 522
- date: 2025-02-09T00:00:00+00:00
count: 454
- date: 2025-02-10T00:00:00+00:00
count: 596
- date: 2025-02-11T00:00:00+00:00
count: 540
- date: 2025-02-12T00:00:00+00:00
count: 466
- date: 2025-02-13T00:00:00+00:00
count: 519
- date: 2025-02-14T00:00:00+00:00
count: 513
- date: 2025-02-15T00:00:00+00:00
count: 487
- date: 2025-02-16T00:00:00+00:00
count: 412
- date: 2025-02-17T00:00:00+00:00
count: 404
- date: 2025-02-18T00:00:00+00:00
count: 472
- date: 2025-02-19T00:00:00+00:00
count: 355
- date: 2025-02-20T00:00:00+00:00
count: 481
- date: 2025-02-21T00:00:00+00:00
count: 485
- date: 2025-02-22T00:00:00+00:00
count: 439
- date: 2025-02-23T00:00:00+00:00
count: 412
- date: 2025-02-24T00:00:00+00:00
count: 434
- date: 2025-02-25T00:00:00+00:00
count: 397
- date: 2025-02-26T00:00:00+00:00
count: 368
- date: 2025-02-27T00:00:00+00:00
count: 518
- date: 2025-02-28T00:00:00+00:00
count: 565
- date: 2025-03-01T00:00:00+00:00
count: 564
- date: 2025-03-02T00:00:00+00:00
count: 581
- date: 2025-03-03T00:00:00+00:00
count: 444
- date: 2025-03-04T00:00:00+00:00
count: 457
- date: 2025-03-05T00:00:00+00:00
count: 507
- date: 2025-03-06T00:00:00+00:00
count: 510
- date: 2025-03-07T00:00:00+00:00
count: 474
- date: 2025-03-08T00:00:00+00:00
count: 543
- date: 2025-03-09T00:00:00+00:00
count: 529
- date: 2025-03-10T00:00:00+00:00
count: 520
- date: 2025-03-11T00:00:00+00:00
count: 498
- date: 2025-03-12T00:00:00+00:00
count: 457
- date: 2025-03-13T00:00:00+00:00
count: 497
- date: 2025-03-14T00:00:00+00:00
count: 532
- date: 2025-03-15T00:00:00+00:00
count: 491
- date: 2025-03-16T00:00:00+00:00
count: 413
- date: 2025-03-17T00:00:00+00:00
count: 426
- date: 2025-03-18T00:00:00+00:00
count: 491
- date: 2025-03-19T00:00:00+00:00
count: 386
- date: 2025-03-20T00:00:00+00:00
count: 476
- date: 2025-03-21T00:00:00+00:00
count: 420
- date: 2025-03-22T00:00:00+00:00
count: 426
- date: 2025-03-23T00:00:00+00:00
count: 533
- date: 2025-03-24T00:00:00+00:00
count: 406
- date: 2025-03-25T00:00:00+00:00
count: 400
- date: 2025-03-26T00:00:00+00:00
count: 435
- date: 2025-03-27T00:00:00+00:00
count: 514
- date: 2025-03-28T00:00:00+00:00
count: 503
- date: 2025-03-29T00:00:00+00:00
count: 446
- date: 2025-03-30T00:00:00+00:00
count: 437
- date: 2025-03-31T00:00:00+00:00
count: 415
items:
type: object
properties:
date:
type: string
example: 2025-01-01T00:00:00+00:00
count:
type: integer
example: 540
chartAmount:
type: array
example:
- date: 2025-01-01T00:00:00+00:00
count: 10051.89
- date: 2025-01-02T00:00:00+00:00
count: 7044.43
- date: 2025-01-03T00:00:00+00:00
count: 9070.46
- date: 2025-01-04T00:00:00+00:00
count: 7575.49
- date: 2025-01-05T00:00:00+00:00
count: 7459.01
- date: 2025-01-06T00:00:00+00:00
count: 8472.68
- date: 2025-01-07T00:00:00+00:00
count: 6410.23
- date: 2025-01-08T00:00:00+00:00
count: 6336.6
- date: 2025-01-09T00:00:00+00:00
count: 8475.93
- date: 2025-01-10T00:00:00+00:00
count: 7673.4
- date: 2025-01-11T00:00:00+00:00
count: 7666.22
- date: 2025-01-12T00:00:00+00:00
count: 8126.65
- date: 2025-01-13T00:00:00+00:00
count: 6278.71
- date: 2025-01-14T00:00:00+00:00
count: 7210.6
- date: 2025-01-15T00:00:00+00:00
count: 4610.57
- date: 2025-01-16T00:00:00+00:00
count: 5739.87
- date: 2025-01-17T00:00:00+00:00
count: 8435.22
- date: 2025-01-18T00:00:00+00:00
count: 5237.74
- date: 2025-01-19T00:00:00+00:00
count: 7315.44
- date: 2025-01-20T00:00:00+00:00
count: 7325.59
- date: 2025-01-21T00:00:00+00:00
count: 4510.83
- date: 2025-01-22T00:00:00+00:00
count: 6901.88
- date: 2025-01-23T00:00:00+00:00
count: 5442.49
- date: 2025-01-24T00:00:00+00:00
count: 6517.01
- date: 2025-01-25T00:00:00+00:00
count: 6882.58
- date: 2025-01-26T00:00:00+00:00
count: 8778.25
- date: 2025-01-27T00:00:00+00:00
count: 7759.99
- date: 2025-01-28T00:00:00+00:00
count: 6750.44
- date: 2025-01-29T00:00:00+00:00
count: 6338.93
- date: 2025-01-30T00:00:00+00:00
count: 7249.22
- date: 2025-01-31T00:00:00+00:00
count: 6299.92
- date: 2025-02-01T00:00:00+00:00
count: 8327.3
- date: 2025-02-02T00:00:00+00:00
count: 7675.32
- date: 2025-02-03T00:00:00+00:00
count: 7153.73
- date: 2025-02-04T00:00:00+00:00
count: 6711.74
- date: 2025-02-05T00:00:00+00:00
count: 7334.76
- date: 2025-02-06T00:00:00+00:00
count: 13641.27
- date: 2025-02-07T00:00:00+00:00
count: 9280.8
- date: 2025-02-08T00:00:00+00:00
count: 7978.69
- date: 2025-02-09T00:00:00+00:00
count: 8561.71
- date: 2025-02-10T00:00:00+00:00
count: 6979.16
- date: 2025-02-11T00:00:00+00:00
count: 7040.23
- date: 2025-02-12T00:00:00+00:00
count: 6701.16
- date: 2025-02-13T00:00:00+00:00
count: 7418.89
- date: 2025-02-14T00:00:00+00:00
count: 9174.97
- date: 2025-02-15T00:00:00+00:00
count: 8956.52
- date: 2025-02-16T00:00:00+00:00
count: 6561.58
- date: 2025-02-17T00:00:00+00:00
count: 5060.88
- date: 2025-02-18T00:00:00+00:00
count: 7721.78
- date: 2025-02-19T00:00:00+00:00
count: 6096.49
- date: 2025-02-20T00:00:00+00:00
count: 7017.78
- date: 2025-02-21T00:00:00+00:00
count: 9542.37
- date: 2025-02-22T00:00:00+00:00
count: 6882.54
- date: 2025-02-23T00:00:00+00:00
count: 5805.24
- date: 2025-02-24T00:00:00+00:00
count: 6612.35
- date: 2025-02-25T00:00:00+00:00
count: 4801.5
- date: 2025-02-26T00:00:00+00:00
count: 5793.31
- date: 2025-02-27T00:00:00+00:00
count: 7420.45
- date: 2025-02-28T00:00:00+00:00
count: 7238.34
- date: 2025-03-01T00:00:00+00:00
count: 8843.12
- date: 2025-03-02T00:00:00+00:00
count: 8087.79
- date: 2025-03-03T00:00:00+00:00
count: 7389.51
- date: 2025-03-04T00:00:00+00:00
count: 5521.31
- date: 2025-03-05T00:00:00+00:00
count: 8213.56
- date: 2025-03-06T00:00:00+00:00
count: 8016.33
- date: 2025-03-07T00:00:00+00:00
count: 7856.66
- date: 2025-03-08T00:00:00+00:00
count: 7283.95
- date: 2025-03-09T00:00:00+00:00
count: 9228.49
- date: 2025-03-10T00:00:00+00:00
count: 7571.83
- date: 2025-03-11T00:00:00+00:00
count: 7476.63
- date: 2025-03-12T00:00:00+00:00
count: 6336.17
- date: 2025-03-13T00:00:00+00:00
count: 8253.78
- date: 2025-03-14T00:00:00+00:00
count: 7627.9
- date: 2025-03-15T00:00:00+00:00
count: 7304.9
- date: 2025-03-16T00:00:00+00:00
count: 7900.93
- date: 2025-03-17T00:00:00+00:00
count: 6035.48
- date: 2025-03-18T00:00:00+00:00
count: 8107.57
- date: 2025-03-19T00:00:00+00:00
count: 6584.91
- date: 2025-03-20T00:00:00+00:00
count: 7021.49
- date: 2025-03-21T00:00:00+00:00
count: 6801.75
- date: 2025-03-22T00:00:00+00:00
count: 7950.66
- date: 2025-03-23T00:00:00+00:00
count: 9653.96
- date: 2025-03-24T00:00:00+00:00
count: 6069.97
- date: 2025-03-25T00:00:00+00:00
count: 6746.01
- date: 2025-03-26T00:00:00+00:00
count: 6619.57
- date: 2025-03-27T00:00:00+00:00
count: 8570.96
- date: 2025-03-28T00:00:00+00:00
count: 8294.75
- date: 2025-03-29T00:00:00+00:00
count: 7005.74
- date: 2025-03-30T00:00:00+00:00
count: 7233.87
- date: 2025-03-31T00:00:00+00:00
count: 7037.54
items:
type: object
properties:
date:
type: string
example: 2025-01-01T00:00:00+00:00
count:
type: number
example: 10051.89
_meta:
type: object
properties:
_credits:
type: object
properties:
used:
type: integer
example: 1
balance:
type: integer
example: 25579
note:
type: string
example: Always
_cache:
type: object
properties:
is_cached:
type: boolean
example: false
note:
type: string
example: Cache disabled for this endpoint
_rate_limits:
type: object
properties:
limit_minute:
type: integer
example: 1000
limit_day:
type: integer
example: 5000
remaining_minute:
type: integer
example: 997
remaining_day:
type: integer
example: 4981
tags:
- Statistics
components:
securitySchemes:
default:
type: http
scheme: bearer
description: Get your API Key from OnlyFansAPI Console -
https://app.onlyfansapi.com/api-keys
````
# Get Profile Visitors (/api-reference/statistics/get-profile-visitors)
Get the number of profile visitors for a given period.
## OpenAPI
````yaml https://app.onlyfansapi.com/scribe-docs/openapi.yaml get /api/{account}/statistics/reach/profile-visitors
openapi: 3.0.3
info:
title: OnlyFans API
description: ""
version: 1.0.0
servers:
- url: https://app.onlyfansapi.com
security:
- default: []
tags:
- name: AI Voice Messages
description: ""
- name: API Keys
description: ""
- name: Account
description: Endpoints for your linked accounts
- name: Analytics - Financial
description: APIs for retrieving financial analytics data
- name: Analytics - Summary
description: APIs for retrieving summary analytics data
- name: Banking
description: Operations related to user banking details, payout methods, legal
and tax information, and account country settings.
- name: Banned Words
description: Reference list of OnlyFans banned words used by the
`blockBannedWords` screening parameter
- name: Blocked / Restricted Users
description: APIs for listing the users an account has blocked or restricted
- name: Chargebacks
description: ""
- name: Chat Messages
description: ""
- name: Chats
description: ""
- name: Client Sessions
description: ""
- name: Connect OnlyFans Account
description: ""
- name: Data Exports
description: APIs for managing data exports
- name: Engagement / Messages
description: ""
- name: Fans
description: APIs for managing OnlyFans fans (subscribers)
- name: Fans - AI Summary
description: APIs for generating and retrieving AI-powered fan profile summaries
- name: Following
description: APIs for managing OnlyFans followings (people you're subscribed to)
- name: Free Trial Links
description: APIs for managing Free Trial Links. Revenue totals are net earnings
after refunds and chargebacks. `revenue.chargebacks` (or
`summary.chargebacks_total` in stats) is the positive cached net amount
already excluded from revenue; do not subtract it again. Spender responses
include chargebacks across all attributed periods for each fan with
positive net revenue.
- name: Giphy
description: ""
- name: Link Tags
description: APIs for managing tags on free trial links, tracking links, and Smart Links
- name: Mass Messaging
description: ""
- name: Media
description: ""
- name: Media Vault
description: ""
- name: Media Vault Lists
description: ""
- name: Notifications
description: Endpoints for managingr account notifications
- name: Payouts
description: ""
- name: Post Comments
description: ""
- name: Post Labels
description: APIs for managing your post labels
- name: Posts
description: APIs for managing OnlyFans posts
- name: Profile Content
description: Read another user's profile content using your connected OnlyFans
account. OnlyFans enforces subscription and purchase requirements; these
endpoints do not unlock content. Response samples use captured OnlyFans
payloads with anonymized IDs, text, and media URLs; OFAPI metadata values
are illustrative.
- name: Promotions
description: ""
- name: Public Profiles
description: ""
- name: Queue
description: ""
- name: Release Forms
description: APIs for managing OnlyFans release forms
- name: Saved For Later (Messages)
description: ""
- name: Saved For Later (Posts)
description: ""
- name: Settings
description: ""
- name: Shared Free Trial Links
description: APIs for Free Trial Links that other OF creators have shared with
this account. Revenue, cost, and spender data are not available for shared
links.
- name: Shared Tracking Links
description: APIs for Tracking Links (campaigns) that other OF creators have
shared with this account. Revenue, cost, and spender data are not
available for shared campaigns.
- name: Smart Link Postbacks
description: APIs for managing Smart Link postback destinations
- name: Smart Links
description: APIs for managing Smart Links (Free Trial Links and Tracking Links
with pooled inventory)
- name: Statistics
description: ""
- name: Stored Free Trial Links
description: Instant APIs for retrieving stored free trial links from the
OnlyFansAPI Cache (free, no credits used). `revenue.total` is net earnings
after refunds and chargebacks. `revenue.chargebacks` is the positive
cached net amount already excluded from that total; do not subtract it
again.
- name: Stored Shared Free Trial Links
description: Instant APIs for retrieving stored shared Free Trial Links from the
OnlyFansAPI Cache (free, no credits used)
- name: Stored Shared Tracking Links
description: Instant APIs for retrieving stored shared Tracking Links
(campaigns) from the OnlyFansAPI Cache (free, no credits used)
- name: Stored Tracking Links
description: Instant APIs for retrieving stored tracking links from the
OnlyFansAPI Cache (free, no credits used). `revenue.total` is net earnings
after refunds and chargebacks. `revenue.chargebacks` is the positive
cached net amount already excluded from that total; do not subtract it
again.
- name: Stories
description: APIs for managing OnlyFans stories
- name: Story Highlights
description: APIs for managing OnlyFans story highlights
- name: Subscription Bundles
description: ""
- name: Tracking Links
description: APIs for managing tracking links. Revenue totals are net earnings
after refunds and chargebacks. `revenue.chargebacks` (or
`summary.chargebacks_total` in stats) is the positive cached net amount
already excluded from revenue; do not subtract it again. Spender responses
include chargebacks across all attributed periods for each fan with
positive net revenue.
- name: Transactions
description: APIs for managing OnlyFans transactions
- name: Usage
description: Credit usage reporting for your team
- name: User List Collections
description: ""
- name: Users
description: APIs for fetching OnlyFans users
- name: Webhooks
description: ""
paths:
/api/{account}/statistics/reach/profile-visitors:
parameters:
- in: path
name: account
description: The Account ID
example: acct_XXXXXXXXXXXXXXX
required: true
schema:
type: string
get:
summary: Get Profile Visitors
operationId: getProfileVisitors
description: Get the number of profile visitors for a given period.
parameters:
- in: query
name: start_date
description: The start date for the period.
example: 2025-01-01 00:00:00
required: true
schema:
type: string
description: The start date for the period.
example: 2025-01-01 00:00:00
- in: query
name: end_date
description: The end date for the period.
example: 2025-03-31 23:59:59
required: true
schema:
type: string
description: The end date for the period.
example: 2025-03-31 23:59:59
- in: query
name: type
description: Filter all / users / guests
example: total
required: false
schema:
type: string
description: Filter all / users / guests
example: total
enum:
- total
- users
- guests
nullable: true
- in: query
name: filter
description: Optionally, filter the results by `chart` or `topCountries`. See
example responses.
example: chart
required: false
schema:
type: string
description: Optionally, filter the results by `chart` or `topCountries`. See
example responses.
example: chart
enum:
- chart
- topCountries
nullable: true
- in: query
name: limit
description: Number of results to return
example: 10
required: false
schema:
type: integer
description: Number of results to return
example: 10
nullable: true
responses:
"200":
description: ""
content:
application/json:
schema:
oneOf:
- description: No filter
type: object
example:
data:
isAvailable: true
topCountries:
hasMore: true
totals:
total: 123
guests: "123"
users: "123"
subscribers: 123
rows:
- rank: 1
countryName: Australia
countryCode: AU
viewsCount:
total: 123
guests: 123
users: 123
subscribers: 123
- rank: 2
countryName: United States
countryCode: US
viewsCount:
total: 123
guests: 123
users: 123
subscribers: 123
- rank: 3
countryName: Spain
countryCode: ES
viewsCount:
total: 123
guests: 123
users: 123
subscribers: 123
- rank: 4
countryName: United Kingdom
countryCode: GB
viewsCount:
total: 123
guests: 123
users: 123
subscribers: 123
- rank: 5
countryName: Austria
countryCode: AT
viewsCount:
total: 123
guests: 123
users: 123
subscribers: 123
- rank: 6
countryName: Norway
countryCode: NO
viewsCount:
total: 21
guests: 21
users: 0
subscribers: 0
- rank: 7
countryName: Singapore
countryCode: SG
viewsCount:
total: 123
guests: 123
users: 123
subscribers: 123
- rank: 8
countryName: Germany
countryCode: DE
viewsCount:
total: 123
guests: 123
users: 123
subscribers: 123
- rank: 9
countryName: Mexico
countryCode: MX
viewsCount:
total: 123
guests: 123
users: 123
subscribers: 123
- rank: 10
countryName: Israel
countryCode: IL
viewsCount:
total: 123
guests: 123
users: 123
subscribers: 123
- rank: 11
countryName: Others
countryCode: ""
viewsCount:
total: 123
guests: 123
users: 123
subscribers: 123
topDurationUsers:
totals:
total: 123
guests: "123"
users: "123"
subscribers: 123
chart:
visitors:
- date: 2025-01-01T00:00:00+00:00
count: 123
duration:
- date: 2025-01-01T00:00:00+00:00
count: 123
total:
current: "123"
delta: 12.3
hasStats: true
_meta:
_credits:
used: 1
balance: 999999818
note: Always
_cache:
is_cached: false
note: Cache disabled for this endpoint
_rate_limits:
limit_minute: 1000
limit_day: 50000
remaining_minute: 999
remaining_day: 49963
properties:
data:
type: object
properties:
isAvailable:
type: boolean
example: true
topCountries:
type: object
properties:
hasMore:
type: boolean
example: true
totals:
type: object
properties:
total:
type: integer
example: 123
guests:
type: string
example: "123"
users:
type: string
example: "123"
subscribers:
type: integer
example: 123
rows:
type: array
example:
- rank: 1
countryName: Australia
countryCode: AU
viewsCount:
total: 123
guests: 123
users: 123
subscribers: 123
- rank: 2
countryName: United States
countryCode: US
viewsCount:
total: 123
guests: 123
users: 123
subscribers: 123
- rank: 3
countryName: Spain
countryCode: ES
viewsCount:
total: 123
guests: 123
users: 123
subscribers: 123
- rank: 4
countryName: United Kingdom
countryCode: GB
viewsCount:
total: 123
guests: 123
users: 123
subscribers: 123
- rank: 5
countryName: Austria
countryCode: AT
viewsCount:
total: 123
guests: 123
users: 123
subscribers: 123
- rank: 6
countryName: Norway
countryCode: NO
viewsCount:
total: 21
guests: 21
users: 0
subscribers: 0
- rank: 7
countryName: Singapore
countryCode: SG
viewsCount:
total: 123
guests: 123
users: 123
subscribers: 123
- rank: 8
countryName: Germany
countryCode: DE
viewsCount:
total: 123
guests: 123
users: 123
subscribers: 123
- rank: 9
countryName: Mexico
countryCode: MX
viewsCount:
total: 123
guests: 123
users: 123
subscribers: 123
- rank: 10
countryName: Israel
countryCode: IL
viewsCount:
total: 123
guests: 123
users: 123
subscribers: 123
- rank: 11
countryName: Others
countryCode: ""
viewsCount:
total: 123
guests: 123
users: 123
subscribers: 123
items:
type: object
properties:
rank:
type: integer
example: 1
countryName:
type: string
example: Australia
countryCode:
type: string
example: AU
viewsCount:
type: object
properties:
total:
type: integer
example: 123
guests:
type: integer
example: 123
users:
type: integer
example: 123
subscribers:
type: integer
example: 123
topDurationUsers:
type: object
properties:
totals:
type: object
properties:
total:
type: integer
example: 123
guests:
type: string
example: "123"
users:
type: string
example: "123"
subscribers:
type: integer
example: 123
chart:
type: object
properties:
visitors:
type: array
example:
- date: 2025-01-01T00:00:00+00:00
count: 123
items:
type: object
properties:
date:
type: string
example: 2025-01-01T00:00:00+00:00
count:
type: integer
example: 123
duration:
type: array
example:
- date: 2025-01-01T00:00:00+00:00
count: 123
items:
type: object
properties:
date:
type: string
example: 2025-01-01T00:00:00+00:00
count:
type: integer
example: 123
total:
type: object
properties:
current:
type: string
example: "123"
delta:
type: number
example: 12.3
hasStats:
type: boolean
example: true
_meta:
type: object
properties:
_credits:
type: object
properties:
used:
type: integer
example: 1
balance:
type: integer
example: 999999818
note:
type: string
example: Always
_cache:
type: object
properties:
is_cached:
type: boolean
example: false
note:
type: string
example: Cache disabled for this endpoint
_rate_limits:
type: object
properties:
limit_minute:
type: integer
example: 1000
limit_day:
type: integer
example: 50000
remaining_minute:
type: integer
example: 999
remaining_day:
type: integer
example: 49963
- description: Chart filter
type: object
example:
data:
isAvailable: true
chart:
visitors:
- date: 2025-01-01T00:00:00+00:00
count: 123
duration:
- date: 2025-01-01T00:00:00+00:00
count: 123
total:
current: "123"
delta: 12.3
hasStats: false
_meta:
_credits:
used: 1
balance: 999999815
note: Always
_cache:
is_cached: false
note: Cache disabled for this endpoint
_rate_limits:
limit_minute: 1000
limit_day: 50000
remaining_minute: 999
remaining_day: 49960
properties:
data:
type: object
properties:
isAvailable:
type: boolean
example: true
chart:
type: object
properties:
visitors:
type: array
example:
- date: 2025-01-01T00:00:00+00:00
count: 123
items:
type: object
properties:
date:
type: string
example: 2025-01-01T00:00:00+00:00
count:
type: integer
example: 123
duration:
type: array
example:
- date: 2025-01-01T00:00:00+00:00
count: 123
items:
type: object
properties:
date:
type: string
example: 2025-01-01T00:00:00+00:00
count:
type: integer
example: 123
total:
type: object
properties:
current:
type: string
example: "123"
delta:
type: number
example: 12.3
hasStats:
type: boolean
example: false
_meta:
type: object
properties:
_credits:
type: object
properties:
used:
type: integer
example: 1
balance:
type: integer
example: 999999815
note:
type: string
example: Always
_cache:
type: object
properties:
is_cached:
type: boolean
example: false
note:
type: string
example: Cache disabled for this endpoint
_rate_limits:
type: object
properties:
limit_minute:
type: integer
example: 1000
limit_day:
type: integer
example: 50000
remaining_minute:
type: integer
example: 999
remaining_day:
type: integer
example: 49960
- description: Top countries filter
type: object
example:
data:
isAvailable: true
topCountries:
hasMore: true
totals:
total: 123
guests: "123"
users: "123"
subscribers: 123
rows:
- rank: 1
countryName: United States
countryCode: US
viewsCount:
total: 123
guests: 123
users: 123
subscribers: 123
- rank: 2
countryName: Australia
countryCode: AU
viewsCount:
total: 123
guests: 123
users: 123
subscribers: 123
- rank: 3
countryName: Canada
countryCode: CA
viewsCount:
total: 123
guests: 123
users: 123
subscribers: 123
- rank: 4
countryName: United Kingdom
countryCode: GB
viewsCount:
total: 123
guests: 123
users: 123
subscribers: 123
- rank: 5
countryName: Germany
countryCode: DE
viewsCount:
total: 123
guests: 123
users: 123
subscribers: 123
- rank: 6
countryName: Mexico
countryCode: MX
viewsCount:
total: 123
guests: 123
users: 123
subscribers: 123
- rank: 7
countryName: Dominican Republic
countryCode: DO
viewsCount:
total: 123
guests: 123
users: 123
subscribers: 123
- rank: 8
countryName: Brazil
countryCode: BR
viewsCount:
total: 123
guests: 123
users: 123
subscribers: 123
- rank: 9
countryName: Italy
countryCode: IT
viewsCount:
total: 123
guests: 123
users: 123
subscribers: 123
- rank: 10
countryName: Denmark
countryCode: DK
viewsCount:
total: 123
guests: 123
users: 123
subscribers: 123
- rank: 11
countryName: Others
countryCode: ""
viewsCount:
total: 123
guests: 123
users: 123
subscribers: 123
hasStats: true
_meta:
_credits:
used: 1
balance: 999999814
note: Always
_cache:
is_cached: false
note: Cache disabled for this endpoint
_rate_limits:
limit_minute: 1000
limit_day: 50000
remaining_minute: 998
remaining_day: 49959
properties:
data:
type: object
properties:
isAvailable:
type: boolean
example: true
topCountries:
type: object
properties:
hasMore:
type: boolean
example: true
totals:
type: object
properties:
total:
type: integer
example: 123
guests:
type: string
example: "123"
users:
type: string
example: "123"
subscribers:
type: integer
example: 123
rows:
type: array
example:
- rank: 1
countryName: United States
countryCode: US
viewsCount:
total: 123
guests: 123
users: 123
subscribers: 123
- rank: 2
countryName: Australia
countryCode: AU
viewsCount:
total: 123
guests: 123
users: 123
subscribers: 123
- rank: 3
countryName: Canada
countryCode: CA
viewsCount:
total: 123
guests: 123
users: 123
subscribers: 123
- rank: 4
countryName: United Kingdom
countryCode: GB
viewsCount:
total: 123
guests: 123
users: 123
subscribers: 123
- rank: 5
countryName: Germany
countryCode: DE
viewsCount:
total: 123
guests: 123
users: 123
subscribers: 123
- rank: 6
countryName: Mexico
countryCode: MX
viewsCount:
total: 123
guests: 123
users: 123
subscribers: 123
- rank: 7
countryName: Dominican Republic
countryCode: DO
viewsCount:
total: 123
guests: 123
users: 123
subscribers: 123
- rank: 8
countryName: Brazil
countryCode: BR
viewsCount:
total: 123
guests: 123
users: 123
subscribers: 123
- rank: 9
countryName: Italy
countryCode: IT
viewsCount:
total: 123
guests: 123
users: 123
subscribers: 123
- rank: 10
countryName: Denmark
countryCode: DK
viewsCount:
total: 123
guests: 123
users: 123
subscribers: 123
- rank: 11
countryName: Others
countryCode: ""
viewsCount:
total: 123
guests: 123
users: 123
subscribers: 123
items:
type: object
properties:
rank:
type: integer
example: 1
countryName:
type: string
example: United States
countryCode:
type: string
example: US
viewsCount:
type: object
properties:
total:
type: integer
example: 123
guests:
type: integer
example: 123
users:
type: integer
example: 123
subscribers:
type: integer
example: 123
hasStats:
type: boolean
example: true
_meta:
type: object
properties:
_credits:
type: object
properties:
used:
type: integer
example: 1
balance:
type: integer
example: 999999814
note:
type: string
example: Always
_cache:
type: object
properties:
is_cached:
type: boolean
example: false
note:
type: string
example: Cache disabled for this endpoint
_rate_limits:
type: object
properties:
limit_minute:
type: integer
example: 1000
limit_day:
type: integer
example: 50000
remaining_minute:
type: integer
example: 998
remaining_day:
type: integer
example: 49959
tags:
- Statistics
components:
securitySchemes:
default:
type: http
scheme: bearer
description: Get your API Key from OnlyFansAPI Console -
https://app.onlyfansapi.com/api-keys
````
# Get Subscriber Metrics (/api-reference/statistics/get-subscriber-metrics)
Get subscriber metrics including total, new, renewed, paid, and free subscriptions for a specified timeframe. `unknown_subscriptions` indicates deleted fan accounts.
## OpenAPI
````yaml https://app.onlyfansapi.com/scribe-docs/openapi.yaml get /api/{account}/statistics/subscriber-metrics
openapi: 3.0.3
info:
title: OnlyFans API
description: ""
version: 1.0.0
servers:
- url: https://app.onlyfansapi.com
security:
- default: []
tags:
- name: AI Voice Messages
description: ""
- name: API Keys
description: ""
- name: Account
description: Endpoints for your linked accounts
- name: Analytics - Financial
description: APIs for retrieving financial analytics data
- name: Analytics - Summary
description: APIs for retrieving summary analytics data
- name: Banking
description: Operations related to user banking details, payout methods, legal
and tax information, and account country settings.
- name: Banned Words
description: Reference list of OnlyFans banned words used by the
`blockBannedWords` screening parameter
- name: Blocked / Restricted Users
description: APIs for listing the users an account has blocked or restricted
- name: Chargebacks
description: ""
- name: Chat Messages
description: ""
- name: Chats
description: ""
- name: Client Sessions
description: ""
- name: Connect OnlyFans Account
description: ""
- name: Data Exports
description: APIs for managing data exports
- name: Engagement / Messages
description: ""
- name: Fans
description: APIs for managing OnlyFans fans (subscribers)
- name: Fans - AI Summary
description: APIs for generating and retrieving AI-powered fan profile summaries
- name: Following
description: APIs for managing OnlyFans followings (people you're subscribed to)
- name: Free Trial Links
description: APIs for managing Free Trial Links. Revenue totals are net earnings
after refunds and chargebacks. `revenue.chargebacks` (or
`summary.chargebacks_total` in stats) is the positive cached net amount
already excluded from revenue; do not subtract it again. Spender responses
include chargebacks across all attributed periods for each fan with
positive net revenue.
- name: Giphy
description: ""
- name: Link Tags
description: APIs for managing tags on free trial links, tracking links, and Smart Links
- name: Mass Messaging
description: ""
- name: Media
description: ""
- name: Media Vault
description: ""
- name: Media Vault Lists
description: ""
- name: Notifications
description: Endpoints for managingr account notifications
- name: Payouts
description: ""
- name: Post Comments
description: ""
- name: Post Labels
description: APIs for managing your post labels
- name: Posts
description: APIs for managing OnlyFans posts
- name: Profile Content
description: Read another user's profile content using your connected OnlyFans
account. OnlyFans enforces subscription and purchase requirements; these
endpoints do not unlock content. Response samples use captured OnlyFans
payloads with anonymized IDs, text, and media URLs; OFAPI metadata values
are illustrative.
- name: Promotions
description: ""
- name: Public Profiles
description: ""
- name: Queue
description: ""
- name: Release Forms
description: APIs for managing OnlyFans release forms
- name: Saved For Later (Messages)
description: ""
- name: Saved For Later (Posts)
description: ""
- name: Settings
description: ""
- name: Shared Free Trial Links
description: APIs for Free Trial Links that other OF creators have shared with
this account. Revenue, cost, and spender data are not available for shared
links.
- name: Shared Tracking Links
description: APIs for Tracking Links (campaigns) that other OF creators have
shared with this account. Revenue, cost, and spender data are not
available for shared campaigns.
- name: Smart Link Postbacks
description: APIs for managing Smart Link postback destinations
- name: Smart Links
description: APIs for managing Smart Links (Free Trial Links and Tracking Links
with pooled inventory)
- name: Statistics
description: ""
- name: Stored Free Trial Links
description: Instant APIs for retrieving stored free trial links from the
OnlyFansAPI Cache (free, no credits used). `revenue.total` is net earnings
after refunds and chargebacks. `revenue.chargebacks` is the positive
cached net amount already excluded from that total; do not subtract it
again.
- name: Stored Shared Free Trial Links
description: Instant APIs for retrieving stored shared Free Trial Links from the
OnlyFansAPI Cache (free, no credits used)
- name: Stored Shared Tracking Links
description: Instant APIs for retrieving stored shared Tracking Links
(campaigns) from the OnlyFansAPI Cache (free, no credits used)
- name: Stored Tracking Links
description: Instant APIs for retrieving stored tracking links from the
OnlyFansAPI Cache (free, no credits used). `revenue.total` is net earnings
after refunds and chargebacks. `revenue.chargebacks` is the positive
cached net amount already excluded from that total; do not subtract it
again.
- name: Stories
description: APIs for managing OnlyFans stories
- name: Story Highlights
description: APIs for managing OnlyFans story highlights
- name: Subscription Bundles
description: ""
- name: Tracking Links
description: APIs for managing tracking links. Revenue totals are net earnings
after refunds and chargebacks. `revenue.chargebacks` (or
`summary.chargebacks_total` in stats) is the positive cached net amount
already excluded from revenue; do not subtract it again. Spender responses
include chargebacks across all attributed periods for each fan with
positive net revenue.
- name: Transactions
description: APIs for managing OnlyFans transactions
- name: Usage
description: Credit usage reporting for your team
- name: User List Collections
description: ""
- name: Users
description: APIs for fetching OnlyFans users
- name: Webhooks
description: ""
paths:
/api/{account}/statistics/subscriber-metrics:
parameters:
- in: path
name: account
description: The Account ID
example: acct_XXXXXXXXXXXXXXX
required: true
schema:
type: string
get:
summary: Get Subscriber Metrics
operationId: getSubscriberMetrics
description: Get subscriber metrics including total, new, renewed, paid, and
free subscriptions for a specified timeframe. `unknown_subscriptions`
indicates deleted fan accounts.
parameters:
- in: query
name: start_date
description: The start date for the metrics.
example: 2025-01-01 00:00:00
required: true
schema:
type: string
description: The start date for the metrics.
example: 2025-01-01 00:00:00
- in: query
name: end_date
description: The end date for the metrics.
example: 2025-03-31 23:59:59
required: true
schema:
type: string
description: The end date for the metrics.
example: 2025-03-31 23:59:59
- in: query
name: detailed_type
description: Use only with `detailed=true` - otherwise, it has no effect. Filter
the subscriber statistics (default = total)
example: total
required: false
schema:
type: string
description: Use only with `detailed=true` - otherwise, it has no effect. Filter
the subscriber statistics (default = total)
example: total
enum:
- total
- renew
- new
nullable: true
- in: query
name: detailed
description: Include paid and free fan metrics. Will slow down the response
time, and might time out if timeframe is too large. Default =
`false`
example: false
required: false
schema:
type: boolean
description: Include paid and free fan metrics. Will slow down the response
time, and might time out if timeframe is too large. Default =
`false`
example: false
nullable: true
responses:
"200":
description: ""
content:
application/json:
schema:
type: object
example:
data:
total_subscriptions: 10
new_subscriptions: 5
renewed_subscriptions: 5
detailed:
paid_subscriptions: 7
free_subscriptions: 2
unknown_subscriptions: 1
_meta:
_credits:
used: 1
balance: 999999227
note: Always
_cache:
is_cached: false
note: Cache disabled for this endpoint
_rate_limits:
limit_minute: 1000
limit_day: 50000
remaining_minute: 998
remaining_day: 49952
properties:
data:
type: object
properties:
total_subscriptions:
type: integer
example: 10
new_subscriptions:
type: integer
example: 5
renewed_subscriptions:
type: integer
example: 5
detailed:
type: object
properties:
paid_subscriptions:
type: integer
example: 7
free_subscriptions:
type: integer
example: 2
unknown_subscriptions:
type: integer
example: 1
_meta:
type: object
properties:
_credits:
type: object
properties:
used:
type: integer
example: 1
balance:
type: integer
example: 999999227
note:
type: string
example: Always
_cache:
type: object
properties:
is_cached:
type: boolean
example: false
note:
type: string
example: Cache disabled for this endpoint
_rate_limits:
type: object
properties:
limit_minute:
type: integer
example: 1000
limit_day:
type: integer
example: 50000
remaining_minute:
type: integer
example: 998
remaining_day:
type: integer
example: 49952
tags:
- Statistics
components:
securitySchemes:
default:
type: http
scheme: bearer
description: Get your API Key from OnlyFansAPI Console -
https://app.onlyfansapi.com/api-keys
````
# Get Subscriber Statistics (/api-reference/statistics/get-subscriber-statistics)
Get subscriber and earning statistics for an account for a specified timeframe. Optionally, filter by all, renews, or new subscribers.
## OpenAPI
````yaml https://app.onlyfansapi.com/scribe-docs/openapi.yaml get /api/{account}/subscribers/statistics
openapi: 3.0.3
info:
title: OnlyFans API
description: ""
version: 1.0.0
servers:
- url: https://app.onlyfansapi.com
security:
- default: []
tags:
- name: AI Voice Messages
description: ""
- name: API Keys
description: ""
- name: Account
description: Endpoints for your linked accounts
- name: Analytics - Financial
description: APIs for retrieving financial analytics data
- name: Analytics - Summary
description: APIs for retrieving summary analytics data
- name: Banking
description: Operations related to user banking details, payout methods, legal
and tax information, and account country settings.
- name: Banned Words
description: Reference list of OnlyFans banned words used by the
`blockBannedWords` screening parameter
- name: Blocked / Restricted Users
description: APIs for listing the users an account has blocked or restricted
- name: Chargebacks
description: ""
- name: Chat Messages
description: ""
- name: Chats
description: ""
- name: Client Sessions
description: ""
- name: Connect OnlyFans Account
description: ""
- name: Data Exports
description: APIs for managing data exports
- name: Engagement / Messages
description: ""
- name: Fans
description: APIs for managing OnlyFans fans (subscribers)
- name: Fans - AI Summary
description: APIs for generating and retrieving AI-powered fan profile summaries
- name: Following
description: APIs for managing OnlyFans followings (people you're subscribed to)
- name: Free Trial Links
description: APIs for managing Free Trial Links. Revenue totals are net earnings
after refunds and chargebacks. `revenue.chargebacks` (or
`summary.chargebacks_total` in stats) is the positive cached net amount
already excluded from revenue; do not subtract it again. Spender responses
include chargebacks across all attributed periods for each fan with
positive net revenue.
- name: Giphy
description: ""
- name: Link Tags
description: APIs for managing tags on free trial links, tracking links, and Smart Links
- name: Mass Messaging
description: ""
- name: Media
description: ""
- name: Media Vault
description: ""
- name: Media Vault Lists
description: ""
- name: Notifications
description: Endpoints for managingr account notifications
- name: Payouts
description: ""
- name: Post Comments
description: ""
- name: Post Labels
description: APIs for managing your post labels
- name: Posts
description: APIs for managing OnlyFans posts
- name: Profile Content
description: Read another user's profile content using your connected OnlyFans
account. OnlyFans enforces subscription and purchase requirements; these
endpoints do not unlock content. Response samples use captured OnlyFans
payloads with anonymized IDs, text, and media URLs; OFAPI metadata values
are illustrative.
- name: Promotions
description: ""
- name: Public Profiles
description: ""
- name: Queue
description: ""
- name: Release Forms
description: APIs for managing OnlyFans release forms
- name: Saved For Later (Messages)
description: ""
- name: Saved For Later (Posts)
description: ""
- name: Settings
description: ""
- name: Shared Free Trial Links
description: APIs for Free Trial Links that other OF creators have shared with
this account. Revenue, cost, and spender data are not available for shared
links.
- name: Shared Tracking Links
description: APIs for Tracking Links (campaigns) that other OF creators have
shared with this account. Revenue, cost, and spender data are not
available for shared campaigns.
- name: Smart Link Postbacks
description: APIs for managing Smart Link postback destinations
- name: Smart Links
description: APIs for managing Smart Links (Free Trial Links and Tracking Links
with pooled inventory)
- name: Statistics
description: ""
- name: Stored Free Trial Links
description: Instant APIs for retrieving stored free trial links from the
OnlyFansAPI Cache (free, no credits used). `revenue.total` is net earnings
after refunds and chargebacks. `revenue.chargebacks` is the positive
cached net amount already excluded from that total; do not subtract it
again.
- name: Stored Shared Free Trial Links
description: Instant APIs for retrieving stored shared Free Trial Links from the
OnlyFansAPI Cache (free, no credits used)
- name: Stored Shared Tracking Links
description: Instant APIs for retrieving stored shared Tracking Links
(campaigns) from the OnlyFansAPI Cache (free, no credits used)
- name: Stored Tracking Links
description: Instant APIs for retrieving stored tracking links from the
OnlyFansAPI Cache (free, no credits used). `revenue.total` is net earnings
after refunds and chargebacks. `revenue.chargebacks` is the positive
cached net amount already excluded from that total; do not subtract it
again.
- name: Stories
description: APIs for managing OnlyFans stories
- name: Story Highlights
description: APIs for managing OnlyFans story highlights
- name: Subscription Bundles
description: ""
- name: Tracking Links
description: APIs for managing tracking links. Revenue totals are net earnings
after refunds and chargebacks. `revenue.chargebacks` (or
`summary.chargebacks_total` in stats) is the positive cached net amount
already excluded from revenue; do not subtract it again. Spender responses
include chargebacks across all attributed periods for each fan with
positive net revenue.
- name: Transactions
description: APIs for managing OnlyFans transactions
- name: Usage
description: Credit usage reporting for your team
- name: User List Collections
description: ""
- name: Users
description: APIs for fetching OnlyFans users
- name: Webhooks
description: ""
paths:
/api/{account}/subscribers/statistics:
parameters:
- in: path
name: account
description: The Account ID
example: acct_XXXXXXXXXXXXXXX
required: true
schema:
type: string
get:
summary: Get Subscriber Statistics
operationId: getSubscriberStatistics
description: Get subscriber and earning statistics for an account for a
specified timeframe. Optionally, filter by all, renews, or new
subscribers.
parameters:
- in: query
name: start_date
description: The start date for the period. Keep empty to calculate everything.
example: 2025-01-01 00:00:00
required: false
schema:
type: string
description: The start date for the period. Keep empty to calculate everything.
example: 2025-01-01 00:00:00
nullable: true
- in: query
name: end_date
description: The end date for the period. Keep empty to calculate everything.
example: 2025-03-31 23:59:59
required: false
schema:
type: string
description: The end date for the period. Keep empty to calculate everything.
example: 2025-03-31 23:59:59
nullable: true
- in: query
name: type
description: Filter the subscriber statistics (default = total)
example: total
required: false
schema:
type: string
description: Filter the subscriber statistics (default = total)
example: total
enum:
- total
- renew
- new
nullable: true
responses:
"200":
description: ""
content:
application/json:
schema:
type: object
example:
data:
earnings:
- date: 2025-01-01T00:00:00+00:00
count: 12.34
subscribes:
- date: 2025-01-01T00:00:00+00:00
count: 123
total: 12.34
delta: 12.3
subscribers: 123
_meta:
_credits:
used: 1
balance: 999999287
note: Always
_cache:
is_cached: false
note: Cache disabled for this endpoint
_rate_limits:
limit_minute: 1000
limit_day: 50000
remaining_minute: 998
remaining_day: 49994
properties:
data:
type: object
properties:
earnings:
type: array
example:
- date: 2025-01-01T00:00:00+00:00
count: 12.34
items:
type: object
properties:
date:
type: string
example: 2025-01-01T00:00:00+00:00
count:
type: number
example: 12.34
subscribes:
type: array
example:
- date: 2025-01-01T00:00:00+00:00
count: 123
items:
type: object
properties:
date:
type: string
example: 2025-01-01T00:00:00+00:00
count:
type: integer
example: 123
total:
type: number
example: 12.34
delta:
type: number
example: 12.3
subscribers:
type: integer
example: 123
_meta:
type: object
properties:
_credits:
type: object
properties:
used:
type: integer
example: 1
balance:
type: integer
example: 999999287
note:
type: string
example: Always
_cache:
type: object
properties:
is_cached:
type: boolean
example: false
note:
type: string
example: Cache disabled for this endpoint
_rate_limits:
type: object
properties:
limit_minute:
type: integer
example: 1000
limit_day:
type: integer
example: 50000
remaining_minute:
type: integer
example: 998
remaining_day:
type: integer
example: 49994
tags:
- Statistics
components:
securitySchemes:
default:
type: http
scheme: bearer
description: Get your API Key from OnlyFansAPI Console -
https://app.onlyfansapi.com/api-keys
````
# Statistics Overview (/api-reference/statistics/statistics-overview)
Get an overview of statistics for fans, visitors, posts, or general.
## OpenAPI
````yaml https://app.onlyfansapi.com/scribe-docs/openapi.yaml get /api/{account}/statistics/overview
openapi: 3.0.3
info:
title: OnlyFans API
description: ""
version: 1.0.0
servers:
- url: https://app.onlyfansapi.com
security:
- default: []
tags:
- name: AI Voice Messages
description: ""
- name: API Keys
description: ""
- name: Account
description: Endpoints for your linked accounts
- name: Analytics - Financial
description: APIs for retrieving financial analytics data
- name: Analytics - Summary
description: APIs for retrieving summary analytics data
- name: Banking
description: Operations related to user banking details, payout methods, legal
and tax information, and account country settings.
- name: Banned Words
description: Reference list of OnlyFans banned words used by the
`blockBannedWords` screening parameter
- name: Blocked / Restricted Users
description: APIs for listing the users an account has blocked or restricted
- name: Chargebacks
description: ""
- name: Chat Messages
description: ""
- name: Chats
description: ""
- name: Client Sessions
description: ""
- name: Connect OnlyFans Account
description: ""
- name: Data Exports
description: APIs for managing data exports
- name: Engagement / Messages
description: ""
- name: Fans
description: APIs for managing OnlyFans fans (subscribers)
- name: Fans - AI Summary
description: APIs for generating and retrieving AI-powered fan profile summaries
- name: Following
description: APIs for managing OnlyFans followings (people you're subscribed to)
- name: Free Trial Links
description: APIs for managing Free Trial Links. Revenue totals are net earnings
after refunds and chargebacks. `revenue.chargebacks` (or
`summary.chargebacks_total` in stats) is the positive cached net amount
already excluded from revenue; do not subtract it again. Spender responses
include chargebacks across all attributed periods for each fan with
positive net revenue.
- name: Giphy
description: ""
- name: Link Tags
description: APIs for managing tags on free trial links, tracking links, and Smart Links
- name: Mass Messaging
description: ""
- name: Media
description: ""
- name: Media Vault
description: ""
- name: Media Vault Lists
description: ""
- name: Notifications
description: Endpoints for managingr account notifications
- name: Payouts
description: ""
- name: Post Comments
description: ""
- name: Post Labels
description: APIs for managing your post labels
- name: Posts
description: APIs for managing OnlyFans posts
- name: Profile Content
description: Read another user's profile content using your connected OnlyFans
account. OnlyFans enforces subscription and purchase requirements; these
endpoints do not unlock content. Response samples use captured OnlyFans
payloads with anonymized IDs, text, and media URLs; OFAPI metadata values
are illustrative.
- name: Promotions
description: ""
- name: Public Profiles
description: ""
- name: Queue
description: ""
- name: Release Forms
description: APIs for managing OnlyFans release forms
- name: Saved For Later (Messages)
description: ""
- name: Saved For Later (Posts)
description: ""
- name: Settings
description: ""
- name: Shared Free Trial Links
description: APIs for Free Trial Links that other OF creators have shared with
this account. Revenue, cost, and spender data are not available for shared
links.
- name: Shared Tracking Links
description: APIs for Tracking Links (campaigns) that other OF creators have
shared with this account. Revenue, cost, and spender data are not
available for shared campaigns.
- name: Smart Link Postbacks
description: APIs for managing Smart Link postback destinations
- name: Smart Links
description: APIs for managing Smart Links (Free Trial Links and Tracking Links
with pooled inventory)
- name: Statistics
description: ""
- name: Stored Free Trial Links
description: Instant APIs for retrieving stored free trial links from the
OnlyFansAPI Cache (free, no credits used). `revenue.total` is net earnings
after refunds and chargebacks. `revenue.chargebacks` is the positive
cached net amount already excluded from that total; do not subtract it
again.
- name: Stored Shared Free Trial Links
description: Instant APIs for retrieving stored shared Free Trial Links from the
OnlyFansAPI Cache (free, no credits used)
- name: Stored Shared Tracking Links
description: Instant APIs for retrieving stored shared Tracking Links
(campaigns) from the OnlyFansAPI Cache (free, no credits used)
- name: Stored Tracking Links
description: Instant APIs for retrieving stored tracking links from the
OnlyFansAPI Cache (free, no credits used). `revenue.total` is net earnings
after refunds and chargebacks. `revenue.chargebacks` is the positive
cached net amount already excluded from that total; do not subtract it
again.
- name: Stories
description: APIs for managing OnlyFans stories
- name: Story Highlights
description: APIs for managing OnlyFans story highlights
- name: Subscription Bundles
description: ""
- name: Tracking Links
description: APIs for managing tracking links. Revenue totals are net earnings
after refunds and chargebacks. `revenue.chargebacks` (or
`summary.chargebacks_total` in stats) is the positive cached net amount
already excluded from revenue; do not subtract it again. Spender responses
include chargebacks across all attributed periods for each fan with
positive net revenue.
- name: Transactions
description: APIs for managing OnlyFans transactions
- name: Usage
description: Credit usage reporting for your team
- name: User List Collections
description: ""
- name: Users
description: APIs for fetching OnlyFans users
- name: Webhooks
description: ""
paths:
/api/{account}/statistics/overview:
parameters:
- in: path
name: account
description: The Account ID
example: acct_XXXXXXXXXXXXXXX
required: true
schema:
type: string
get:
summary: Statistics Overview
operationId: statisticsOverview
description: Get an overview of statistics for fans, visitors, posts, or general.
parameters:
- in: query
name: start_date
description: The start date for the statistics. Keep empty to retrieve from the
model's start date.
example: 2025-01-01 00:00:00
required: false
schema:
type: string
description: The start date for the statistics. Keep empty to retrieve from the
model's start date.
example: 2025-01-01 00:00:00
- in: query
name: end_date
description: The end date for the statistics. Keep empty to retrieve until now.
example: 2025-03-31 23:59:59
required: false
schema:
type: string
description: The end date for the statistics. Keep empty to retrieve until now.
example: 2025-03-31 23:59:59
- in: query
name: type
description: The type of statistics to retrieve (default = empty)
example: fans
required: false
schema:
type: string
description: The type of statistics to retrieve (default = empty)
example: fans
enum:
- fans
- visitors
- posts
- messages
nullable: true
responses:
"200":
description: ""
content:
application/json:
schema:
type: object
example:
data:
earning:
total: 123.45
gross: 123.45
delta: 1.6
posts:
hasStatistic: true
count:
total: 123
delta: 0
views:
total: 123
delta: -7.6
chartData:
- date: 2025-01-01T00:00:00+00:00
count: 123
earnings:
total: 123
gross: 123
delta: 123
streams:
hasStatistic: false
count:
total: 0m
delta: 0
views:
total: 0
delta: 0
chartData:
- date: 2025-01-01T00:00:00+00:00
count: 123
earnings:
total: 123
gross: 123
delta: 123
visitors:
hasStatistic: true
visitors:
total: 0
delta: -100
chartData:
- date: 2025-01-01T00:00:00+00:00
count: 123
earnings:
total: 123.45
gross: 123.45
delta: -10.9
subscriptions:
new:
total: 123
delta: -5.7
renew:
total: 123
delta: -17
massMessages:
hasStatistic: true
count:
total: 123
delta: 14.5
views:
total: 0
delta: 0
chartData:
- date: 2025-01-01T00:00:00+00:00
count: 123
earnings:
total: 123.45
delta: -0.1
gross: 123.45
_meta:
_credits:
used: 1
balance: 999999254
note: Always
_cache:
is_cached: false
note: Cache disabled for this endpoint
_rate_limits:
limit_minute: 1000
limit_day: 50000
remaining_minute: 999
remaining_day: 49979
properties:
data:
type: object
properties:
earning:
type: object
properties:
total:
type: number
example: 123.45
gross:
type: number
example: 123.45
delta:
type: number
example: 1.6
posts:
type: object
properties:
hasStatistic:
type: boolean
example: true
count:
type: object
properties:
total:
type: integer
example: 123
delta:
type: integer
example: 0
views:
type: object
properties:
total:
type: integer
example: 123
delta:
type: number
example: -7.6
chartData:
type: array
example:
- date: 2025-01-01T00:00:00+00:00
count: 123
items:
type: object
properties:
date:
type: string
example: 2025-01-01T00:00:00+00:00
count:
type: integer
example: 123
earnings:
type: object
properties:
total:
type: integer
example: 123
gross:
type: integer
example: 123
delta:
type: integer
example: 123
streams:
type: object
properties:
hasStatistic:
type: boolean
example: false
count:
type: object
properties:
total:
type: string
example: 0m
delta:
type: integer
example: 0
views:
type: object
properties:
total:
type: integer
example: 0
delta:
type: integer
example: 0
chartData:
type: array
example:
- date: 2025-01-01T00:00:00+00:00
count: 123
items:
type: object
properties:
date:
type: string
example: 2025-01-01T00:00:00+00:00
count:
type: integer
example: 123
earnings:
type: object
properties:
total:
type: integer
example: 123
gross:
type: integer
example: 123
delta:
type: integer
example: 123
visitors:
type: object
properties:
hasStatistic:
type: boolean
example: true
visitors:
type: object
properties:
total:
type: integer
example: 0
delta:
type: integer
example: -100
chartData:
type: array
example:
- date: 2025-01-01T00:00:00+00:00
count: 123
items:
type: object
properties:
date:
type: string
example: 2025-01-01T00:00:00+00:00
count:
type: integer
example: 123
earnings:
type: object
properties:
total:
type: number
example: 123.45
gross:
type: number
example: 123.45
delta:
type: number
example: -10.9
subscriptions:
type: object
properties:
new:
type: object
properties:
total:
type: integer
example: 123
delta:
type: number
example: -5.7
renew:
type: object
properties:
total:
type: integer
example: 123
delta:
type: integer
example: -17
massMessages:
type: object
properties:
hasStatistic:
type: boolean
example: true
count:
type: object
properties:
total:
type: integer
example: 123
delta:
type: number
example: 14.5
views:
type: object
properties:
total:
type: integer
example: 0
delta:
type: integer
example: 0
chartData:
type: array
example:
- date: 2025-01-01T00:00:00+00:00
count: 123
items:
type: object
properties:
date:
type: string
example: 2025-01-01T00:00:00+00:00
count:
type: integer
example: 123
earnings:
type: object
properties:
total:
type: number
example: 123.45
delta:
type: number
example: -0.1
gross:
type: number
example: 123.45
_meta:
type: object
properties:
_credits:
type: object
properties:
used:
type: integer
example: 1
balance:
type: integer
example: 999999254
note:
type: string
example: Always
_cache:
type: object
properties:
is_cached:
type: boolean
example: false
note:
type: string
example: Cache disabled for this endpoint
_rate_limits:
type: object
properties:
limit_minute:
type: integer
example: 1000
limit_day:
type: integer
example: 50000
remaining_minute:
type: integer
example: 999
remaining_day:
type: integer
example: 49979
tags:
- Statistics
components:
securitySchemes:
default:
type: http
scheme: bearer
description: Get your API Key from OnlyFansAPI Console -
https://app.onlyfansapi.com/api-keys
````
# [Deprecated] Scrape media from the OnlyFans CDN (/api-reference/media/deprecated-scrape-media-from-the-only-fans-cdn)
**⚠️ This is a deprecated endpoint. Please use the new "Download media from the OnlyFans CDN" endpoint!** Scrapes a `https://cdn*.onlyfans.com/*` URL *or* Vault Media ID, and uploads it to the OnlyFans API CDN, where you can view or download the file. **Max file size is 500MB**
## OpenAPI
````yaml https://app.onlyfansapi.com/scribe-docs/openapi.yaml post /api/{account}/media/scrape
openapi: 3.0.3
info:
title: OnlyFans API
description: ""
version: 1.0.0
servers:
- url: https://app.onlyfansapi.com
security:
- default: []
tags:
- name: AI Voice Messages
description: ""
- name: API Keys
description: ""
- name: Account
description: Endpoints for your linked accounts
- name: Analytics - Financial
description: APIs for retrieving financial analytics data
- name: Analytics - Summary
description: APIs for retrieving summary analytics data
- name: Banking
description: Operations related to user banking details, payout methods, legal
and tax information, and account country settings.
- name: Banned Words
description: Reference list of OnlyFans banned words used by the
`blockBannedWords` screening parameter
- name: Blocked / Restricted Users
description: APIs for listing the users an account has blocked or restricted
- name: Chargebacks
description: ""
- name: Chat Messages
description: ""
- name: Chats
description: ""
- name: Client Sessions
description: ""
- name: Connect OnlyFans Account
description: ""
- name: Data Exports
description: APIs for managing data exports
- name: Engagement / Messages
description: ""
- name: Fans
description: APIs for managing OnlyFans fans (subscribers)
- name: Fans - AI Summary
description: APIs for generating and retrieving AI-powered fan profile summaries
- name: Following
description: APIs for managing OnlyFans followings (people you're subscribed to)
- name: Free Trial Links
description: APIs for managing Free Trial Links. Revenue totals are net earnings
after refunds and chargebacks. `revenue.chargebacks` (or
`summary.chargebacks_total` in stats) is the positive cached net amount
already excluded from revenue; do not subtract it again. Spender responses
include chargebacks across all attributed periods for each fan with
positive net revenue.
- name: Giphy
description: ""
- name: Link Tags
description: APIs for managing tags on free trial links, tracking links, and Smart Links
- name: Mass Messaging
description: ""
- name: Media
description: ""
- name: Media Vault
description: ""
- name: Media Vault Lists
description: ""
- name: Notifications
description: Endpoints for managingr account notifications
- name: Payouts
description: ""
- name: Post Comments
description: ""
- name: Post Labels
description: APIs for managing your post labels
- name: Posts
description: APIs for managing OnlyFans posts
- name: Profile Content
description: Read another user's profile content using your connected OnlyFans
account. OnlyFans enforces subscription and purchase requirements; these
endpoints do not unlock content. Response samples use captured OnlyFans
payloads with anonymized IDs, text, and media URLs; OFAPI metadata values
are illustrative.
- name: Promotions
description: ""
- name: Public Profiles
description: ""
- name: Queue
description: ""
- name: Release Forms
description: APIs for managing OnlyFans release forms
- name: Saved For Later (Messages)
description: ""
- name: Saved For Later (Posts)
description: ""
- name: Settings
description: ""
- name: Shared Free Trial Links
description: APIs for Free Trial Links that other OF creators have shared with
this account. Revenue, cost, and spender data are not available for shared
links.
- name: Shared Tracking Links
description: APIs for Tracking Links (campaigns) that other OF creators have
shared with this account. Revenue, cost, and spender data are not
available for shared campaigns.
- name: Smart Link Postbacks
description: APIs for managing Smart Link postback destinations
- name: Smart Links
description: APIs for managing Smart Links (Free Trial Links and Tracking Links
with pooled inventory)
- name: Statistics
description: ""
- name: Stored Free Trial Links
description: Instant APIs for retrieving stored free trial links from the
OnlyFansAPI Cache (free, no credits used). `revenue.total` is net earnings
after refunds and chargebacks. `revenue.chargebacks` is the positive
cached net amount already excluded from that total; do not subtract it
again.
- name: Stored Shared Free Trial Links
description: Instant APIs for retrieving stored shared Free Trial Links from the
OnlyFansAPI Cache (free, no credits used)
- name: Stored Shared Tracking Links
description: Instant APIs for retrieving stored shared Tracking Links
(campaigns) from the OnlyFansAPI Cache (free, no credits used)
- name: Stored Tracking Links
description: Instant APIs for retrieving stored tracking links from the
OnlyFansAPI Cache (free, no credits used). `revenue.total` is net earnings
after refunds and chargebacks. `revenue.chargebacks` is the positive
cached net amount already excluded from that total; do not subtract it
again.
- name: Stories
description: APIs for managing OnlyFans stories
- name: Story Highlights
description: APIs for managing OnlyFans story highlights
- name: Subscription Bundles
description: ""
- name: Tracking Links
description: APIs for managing tracking links. Revenue totals are net earnings
after refunds and chargebacks. `revenue.chargebacks` (or
`summary.chargebacks_total` in stats) is the positive cached net amount
already excluded from revenue; do not subtract it again. Spender responses
include chargebacks across all attributed periods for each fan with
positive net revenue.
- name: Transactions
description: APIs for managing OnlyFans transactions
- name: Usage
description: Credit usage reporting for your team
- name: User List Collections
description: ""
- name: Users
description: APIs for fetching OnlyFans users
- name: Webhooks
description: ""
paths:
/api/{account}/media/scrape:
parameters:
- in: path
name: account
description: The Account ID
example: acct_XXXXXXXXXXXXXXX
required: true
schema:
type: string
post:
summary: "[Deprecated] Scrape media from the OnlyFans CDN"
operationId: DeprecatedScrapeMediaFromTheOnlyFansCDN
description: '**⚠️ This is a deprecated endpoint. Please use the new "Download
media from the OnlyFans CDN" endpoint!** Scrapes a
`https://cdn*.onlyfans.com/*` URL *or* Vault Media ID, and uploads it to
the OnlyFans API CDN, where you can view or download the file. **Max
file size is 500MB**'
parameters: []
responses:
"200":
description: ""
content:
application/json:
schema:
type: object
example:
temporary_url: https://ofapi-media-prod.nyc3.digitaloceanspaces.com/123/600x400_123.jpg
expiration_date: 2025-01-01T00:00:00.000000Z
properties:
temporary_url:
type: string
example: https://ofapi-media-prod.nyc3.digitaloceanspaces.com/123/600x400_123.jpg
expiration_date:
type: string
example: 2025-01-01T00:00:00.000000Z
"500":
description: The provided CDN URL is expired, invalid, or the file is not
available anymore.
content:
application/json:
schema:
type: object
example:
error: ONLYFANS_COM_ERROR
message: "OnlyFans returned an unknown error.: [403]"
description: This error happened most probably because of a bug in the
OnlyFans.com API or you sent wrong parameters (like a
non-existing user id).
onlyfans_response:
status: 403
body: null
_meta:
_credits:
used: 1
balance: 123
note: OnlyFans returned an error, but we still had to make an API request to
OnlyFans.com
_cache:
is_cached: false
note: Cache disabled for this endpoint
_rate_limits:
limit_minute: 1000
limit_day: 50000
remaining_minute: 999
remaining_day: 50000
properties:
error:
type: string
example: ONLYFANS_COM_ERROR
message:
type: string
example: "OnlyFans returned an unknown error.: [403]"
description:
type: string
example: This error happened most probably because of a bug in the OnlyFans.com
API or you sent wrong parameters (like a non-existing user
id).
onlyfans_response:
type: object
properties:
status:
type: integer
example: 403
body:
type: string
example: null
nullable: true
_meta:
type: object
properties:
_credits:
type: object
properties:
used:
type: integer
example: 1
balance:
type: integer
example: 123
note:
type: string
example: OnlyFans returned an error, but we still had to make an API request to
OnlyFans.com
_cache:
type: object
properties:
is_cached:
type: boolean
example: false
note:
type: string
example: Cache disabled for this endpoint
_rate_limits:
type: object
properties:
limit_minute:
type: integer
example: 1000
limit_day:
type: integer
example: 50000
remaining_minute:
type: integer
example: 999
remaining_day:
type: integer
example: 50000
tags:
- Media
requestBody:
required: false
content:
application/json:
schema:
type: object
properties:
url:
type: string
description: The CDN URL to scrape. **Keep in mind that these URLs expire
fast.**
example: https://cdn2.onlyfans.com/files/e/e5/123/600x400_123.jpg?Tag=2&u=123&Policy=123&Signature=signature&Key-Pair-Id=123
nullable: true
media_id:
type: integer
description: The OnlyFans Vault Media ID. **Can be used instead of the `url`.**
example: 1234567890
nullable: true
file_type:
type: string
description: The file type to scrape. Only allowed when using `media_id`.
example: full
enum:
- full
- thumb
- preview
- squarePreview
nullable: true
expiration_date:
type: string
description: The expiration date of our returned `temporary_url`. Default of 5
minutes. Must be null if `public` is true.
example: 2025-01-01 00:00:00
nullable: true
public:
type: boolean
description: Set to true if you want to have the file uploaded to our public CDN
(no signed URL needed to access). Default is false. Must be
null if `expiration_date` is set.
example: false
nullable: true
components:
securitySchemes:
default:
type: http
scheme: bearer
description: Get your API Key from OnlyFansAPI Console -
https://app.onlyfansapi.com/api-keys
````
# Download DRM-protected Media (/api-reference/media/download-drm-protected-media)
Downloads a Widevine-protected video from your own Media Vault. DRM media returns `files.full.url = null` from the Vault endpoints, so this endpoint resolves the Widevine license, decrypts the video and audio streams, and returns a playable MP4.
The response is a `302` redirect to `dl.fansapi.com`, which streams the decrypted file. Most HTTP clients follow redirects automatically (`curl` requires `-L`).
Expect roughly 8-15 seconds before the first byte arrives while the license exchange, download and decrypt complete. Cached content keys can speed up preparation, but repeated downloads are still billable. DRM downloads cost 3 credits per decimal MB of remuxed output streamed (1 MB = 1,000,000 bytes), with a minimum of 1 credit for nonempty output. Megabytes are rounded to two decimal places, multiplied by 3, then truncated to whole credits. Billing happens after streaming; interrupted downloads are charged for output already streamed, and zero-byte failures cost no download credits. Range is unsupported: the service returns 200 with Accept-Ranges: none. HEAD returns 405; it does not decrypt a file to discover its final size.
## OpenAPI
````yaml https://app.onlyfansapi.com/scribe-docs/openapi.yaml get /api/{account}/media/download/drm/{media_id}
openapi: 3.0.3
info:
title: OnlyFans API
description: ""
version: 1.0.0
servers:
- url: https://app.onlyfansapi.com
security:
- default: []
tags:
- name: AI Voice Messages
description: ""
- name: API Keys
description: ""
- name: Account
description: Endpoints for your linked accounts
- name: Analytics - Financial
description: APIs for retrieving financial analytics data
- name: Analytics - Summary
description: APIs for retrieving summary analytics data
- name: Banking
description: Operations related to user banking details, payout methods, legal
and tax information, and account country settings.
- name: Banned Words
description: Reference list of OnlyFans banned words used by the
`blockBannedWords` screening parameter
- name: Blocked / Restricted Users
description: APIs for listing the users an account has blocked or restricted
- name: Chargebacks
description: ""
- name: Chat Messages
description: ""
- name: Chats
description: ""
- name: Client Sessions
description: ""
- name: Connect OnlyFans Account
description: ""
- name: Data Exports
description: APIs for managing data exports
- name: Engagement / Messages
description: ""
- name: Fans
description: APIs for managing OnlyFans fans (subscribers)
- name: Fans - AI Summary
description: APIs for generating and retrieving AI-powered fan profile summaries
- name: Following
description: APIs for managing OnlyFans followings (people you're subscribed to)
- name: Free Trial Links
description: APIs for managing Free Trial Links. Revenue totals are net earnings
after refunds and chargebacks. `revenue.chargebacks` (or
`summary.chargebacks_total` in stats) is the positive cached net amount
already excluded from revenue; do not subtract it again. Spender responses
include chargebacks across all attributed periods for each fan with
positive net revenue.
- name: Giphy
description: ""
- name: Link Tags
description: APIs for managing tags on free trial links, tracking links, and Smart Links
- name: Mass Messaging
description: ""
- name: Media
description: ""
- name: Media Vault
description: ""
- name: Media Vault Lists
description: ""
- name: Notifications
description: Endpoints for managingr account notifications
- name: Payouts
description: ""
- name: Post Comments
description: ""
- name: Post Labels
description: APIs for managing your post labels
- name: Posts
description: APIs for managing OnlyFans posts
- name: Profile Content
description: Read another user's profile content using your connected OnlyFans
account. OnlyFans enforces subscription and purchase requirements; these
endpoints do not unlock content. Response samples use captured OnlyFans
payloads with anonymized IDs, text, and media URLs; OFAPI metadata values
are illustrative.
- name: Promotions
description: ""
- name: Public Profiles
description: ""
- name: Queue
description: ""
- name: Release Forms
description: APIs for managing OnlyFans release forms
- name: Saved For Later (Messages)
description: ""
- name: Saved For Later (Posts)
description: ""
- name: Settings
description: ""
- name: Shared Free Trial Links
description: APIs for Free Trial Links that other OF creators have shared with
this account. Revenue, cost, and spender data are not available for shared
links.
- name: Shared Tracking Links
description: APIs for Tracking Links (campaigns) that other OF creators have
shared with this account. Revenue, cost, and spender data are not
available for shared campaigns.
- name: Smart Link Postbacks
description: APIs for managing Smart Link postback destinations
- name: Smart Links
description: APIs for managing Smart Links (Free Trial Links and Tracking Links
with pooled inventory)
- name: Statistics
description: ""
- name: Stored Free Trial Links
description: Instant APIs for retrieving stored free trial links from the
OnlyFansAPI Cache (free, no credits used). `revenue.total` is net earnings
after refunds and chargebacks. `revenue.chargebacks` is the positive
cached net amount already excluded from that total; do not subtract it
again.
- name: Stored Shared Free Trial Links
description: Instant APIs for retrieving stored shared Free Trial Links from the
OnlyFansAPI Cache (free, no credits used)
- name: Stored Shared Tracking Links
description: Instant APIs for retrieving stored shared Tracking Links
(campaigns) from the OnlyFansAPI Cache (free, no credits used)
- name: Stored Tracking Links
description: Instant APIs for retrieving stored tracking links from the
OnlyFansAPI Cache (free, no credits used). `revenue.total` is net earnings
after refunds and chargebacks. `revenue.chargebacks` is the positive
cached net amount already excluded from that total; do not subtract it
again.
- name: Stories
description: APIs for managing OnlyFans stories
- name: Story Highlights
description: APIs for managing OnlyFans story highlights
- name: Subscription Bundles
description: ""
- name: Tracking Links
description: APIs for managing tracking links. Revenue totals are net earnings
after refunds and chargebacks. `revenue.chargebacks` (or
`summary.chargebacks_total` in stats) is the positive cached net amount
already excluded from revenue; do not subtract it again. Spender responses
include chargebacks across all attributed periods for each fan with
positive net revenue.
- name: Transactions
description: APIs for managing OnlyFans transactions
- name: Usage
description: Credit usage reporting for your team
- name: User List Collections
description: ""
- name: Users
description: APIs for fetching OnlyFans users
- name: Webhooks
description: ""
paths:
/api/{account}/media/download/drm/{media_id}:
parameters:
- in: path
name: account
description: The Account ID
example: acct_XXXXXXXXXXXXXXX
required: true
schema:
type: string
- in: path
name: media_id
description: The Media Vault item ID to download.
example: "2381923812"
required: true
schema:
type: string
get:
summary: Download DRM-protected Media
operationId: downloadDRMProtectedMedia
description: >-
Downloads a Widevine-protected video from your own Media Vault. DRM
media returns `files.full.url = null` from the Vault endpoints, so this
endpoint resolves the Widevine license, decrypts the video and audio
streams, and returns a playable MP4.
The response is a `302` redirect to `dl.fansapi.com`, which streams the
decrypted file. Most HTTP clients follow redirects automatically (`curl`
requires `-L`).
Expect roughly 8-15 seconds before the first byte arrives while the
license exchange, download and decrypt complete. Cached content keys can
speed up preparation, but repeated downloads are still billable. DRM
downloads cost 3 credits per decimal MB of remuxed output streamed (1 MB
= 1,000,000 bytes), with a minimum of 1 credit for nonempty output.
Megabytes are rounded to two decimal places, multiplied by 3, then
truncated to whole credits. Billing happens after streaming; interrupted
downloads are charged for output already streamed, and zero-byte
failures cost no download credits. Range is unsupported: the service
returns 200 with Accept-Ranges: none. HEAD returns 405; it does not
decrypt a file to discover its final size.
parameters: []
responses:
"302":
description: ""
content:
text/plain:
schema:
type: string
example: Y-m-d.
example: 2026-07-09
required: false
schema:
type: string
description: First day to include (`Y-m-d`, inclusive). Defaults to 29 days
before `to`. Must be a valid date in the format
Y-m-d.
example: 2026-07-09
- in: query
name: to
description: Last day to include (`Y-m-d`, inclusive). Defaults to yesterday, or
today when `include_today` is set. May not be in the future, and the
range may not exceed 366 days. Must be a valid date in the format
Y-m-d. Must be a date before or equal to
today.
example: 2026-08-06
required: false
schema:
type: string
description: Last day to include (`Y-m-d`, inclusive). Defaults to yesterday, or
today when `include_today` is set. May not be in the future, and
the range may not exceed 366 days. Must be a valid date in the
format Y-m-d. Must be a date before or equal to
today.
example: 2026-08-06
- in: query
name: group_by
description: The dimension to group usage by. Default `day`.
example: endpoint
required: false
schema:
type: string
description: The dimension to group usage by. Default `day`.
example: endpoint
enum:
- day
- account
- endpoint
- in: query
name: account_id
description: Only include usage attributable to this account. Usage that is not
tied to a single account (webhooks, data exports, media processing)
is excluded when this filter is set. Must not be greater than 255
characters.
example: acct_abc123
required: false
schema:
type: string
description: Only include usage attributable to this account. Usage that is not
tied to a single account (webhooks, data exports, media
processing) is excluded when this filter is set. Must not be
greater than 255 characters.
example: acct_abc123
- in: query
name: include_today
description: Include today, aggregated live from request logs instead of from
the nightly rollup. Today's figures are provisional and may change
until the rollup runs. Default `false`.
example: true
required: false
schema:
type: boolean
description: Include today, aggregated live from request logs instead of from
the nightly rollup. Today's figures are provisional and may change
until the rollup runs. Default `false`.
example: true
responses:
"200":
description: Success
content:
application/json:
schema:
type: object
example:
data:
from: 2026-07-09
to: 2026-08-06
group_by: endpoint
includes_today: false
totals:
credits: 18420
requests: 17650
results:
- endpoint: api/{account}/chats/{chat_id}/messages
credit_type: api_request
credits: 9200
requests: 9200
- endpoint: api/{account}/chats
credit_type: api_request
credits: 4100
requests: 4100
- endpoint: api/{account}/media/upload
credit_type: media_upload
credits: 2600
requests: 520
- endpoint: null
credit_type: webhook
credits: 1800
requests: 0
- endpoint: api/profiles/{username}
credit_type: profile_search
credits: 620
requests: 620
- endpoint: null
credit_type: data_export
credits: 100
requests: 0
- endpoint: api/{account}/me
credit_type: api_request
credits: 0
requests: 3210
_meta:
_credits:
used: 0
balance: 9500
note: Always
_cache:
is_cached: false
note: Cache disabled for this endpoint
_rate_limits:
limit_minute: 60
limit_day: null
remaining_minute: 56
remaining_day: null
notice: ""
properties:
data:
type: object
properties:
from:
type: string
example: 2026-07-09
to:
type: string
example: 2026-08-06
group_by:
type: string
example: endpoint
includes_today:
type: boolean
example: false
totals:
type: object
properties:
credits:
type: integer
example: 18420
requests:
type: integer
example: 17650
results:
type: array
example:
- endpoint: api/{account}/chats/{chat_id}/messages
credit_type: api_request
credits: 9200
requests: 9200
- endpoint: api/{account}/chats
credit_type: api_request
credits: 4100
requests: 4100
- endpoint: api/{account}/media/upload
credit_type: media_upload
credits: 2600
requests: 520
- endpoint: null
credit_type: webhook
credits: 1800
requests: 0
- endpoint: api/profiles/{username}
credit_type: profile_search
credits: 620
requests: 620
- endpoint: null
credit_type: data_export
credits: 100
requests: 0
- endpoint: api/{account}/me
credit_type: api_request
credits: 0
requests: 3210
items:
type: object
properties:
endpoint:
type: string
example: api/{account}/chats/{chat_id}/messages
credit_type:
type: string
example: api_request
credits:
type: integer
example: 9200
requests:
type: integer
example: 9200
_meta:
type: object
properties:
_credits:
type: object
properties:
used:
type: integer
example: 0
balance:
type: integer
example: 9500
note:
type: string
example: Always
_cache:
type: object
properties:
is_cached:
type: boolean
example: false
note:
type: string
example: Cache disabled for this endpoint
_rate_limits:
type: object
properties:
limit_minute:
type: integer
example: 60
limit_day:
type: string
example: null
nullable: true
remaining_minute:
type: integer
example: 56
remaining_day:
type: string
example: null
nullable: true
notice:
type: string
example: ""
tags:
- Usage
components:
securitySchemes:
default:
type: http
scheme: bearer
description: Get your API Key from OnlyFansAPI Console -
https://app.onlyfansapi.com/api-keys
````
# Block User (/api-reference/users/block-user)
Block user from accessing your profile.
## OpenAPI
````yaml https://app.onlyfansapi.com/scribe-docs/openapi.yaml post /api/{account}/users/{user_id}/block
openapi: 3.0.3
info:
title: OnlyFans API
description: ""
version: 1.0.0
servers:
- url: https://app.onlyfansapi.com
security:
- default: []
tags:
- name: AI Voice Messages
description: ""
- name: API Keys
description: ""
- name: Account
description: Endpoints for your linked accounts
- name: Analytics - Financial
description: APIs for retrieving financial analytics data
- name: Analytics - Summary
description: APIs for retrieving summary analytics data
- name: Banking
description: Operations related to user banking details, payout methods, legal
and tax information, and account country settings.
- name: Banned Words
description: Reference list of OnlyFans banned words used by the
`blockBannedWords` screening parameter
- name: Blocked / Restricted Users
description: APIs for listing the users an account has blocked or restricted
- name: Chargebacks
description: ""
- name: Chat Messages
description: ""
- name: Chats
description: ""
- name: Client Sessions
description: ""
- name: Connect OnlyFans Account
description: ""
- name: Data Exports
description: APIs for managing data exports
- name: Engagement / Messages
description: ""
- name: Fans
description: APIs for managing OnlyFans fans (subscribers)
- name: Fans - AI Summary
description: APIs for generating and retrieving AI-powered fan profile summaries
- name: Following
description: APIs for managing OnlyFans followings (people you're subscribed to)
- name: Free Trial Links
description: APIs for managing Free Trial Links. Revenue totals are net earnings
after refunds and chargebacks. `revenue.chargebacks` (or
`summary.chargebacks_total` in stats) is the positive cached net amount
already excluded from revenue; do not subtract it again. Spender responses
include chargebacks across all attributed periods for each fan with
positive net revenue.
- name: Giphy
description: ""
- name: Link Tags
description: APIs for managing tags on free trial links, tracking links, and Smart Links
- name: Mass Messaging
description: ""
- name: Media
description: ""
- name: Media Vault
description: ""
- name: Media Vault Lists
description: ""
- name: Notifications
description: Endpoints for managingr account notifications
- name: Payouts
description: ""
- name: Post Comments
description: ""
- name: Post Labels
description: APIs for managing your post labels
- name: Posts
description: APIs for managing OnlyFans posts
- name: Profile Content
description: Read another user's profile content using your connected OnlyFans
account. OnlyFans enforces subscription and purchase requirements; these
endpoints do not unlock content. Response samples use captured OnlyFans
payloads with anonymized IDs, text, and media URLs; OFAPI metadata values
are illustrative.
- name: Promotions
description: ""
- name: Public Profiles
description: ""
- name: Queue
description: ""
- name: Release Forms
description: APIs for managing OnlyFans release forms
- name: Saved For Later (Messages)
description: ""
- name: Saved For Later (Posts)
description: ""
- name: Settings
description: ""
- name: Shared Free Trial Links
description: APIs for Free Trial Links that other OF creators have shared with
this account. Revenue, cost, and spender data are not available for shared
links.
- name: Shared Tracking Links
description: APIs for Tracking Links (campaigns) that other OF creators have
shared with this account. Revenue, cost, and spender data are not
available for shared campaigns.
- name: Smart Link Postbacks
description: APIs for managing Smart Link postback destinations
- name: Smart Links
description: APIs for managing Smart Links (Free Trial Links and Tracking Links
with pooled inventory)
- name: Statistics
description: ""
- name: Stored Free Trial Links
description: Instant APIs for retrieving stored free trial links from the
OnlyFansAPI Cache (free, no credits used). `revenue.total` is net earnings
after refunds and chargebacks. `revenue.chargebacks` is the positive
cached net amount already excluded from that total; do not subtract it
again.
- name: Stored Shared Free Trial Links
description: Instant APIs for retrieving stored shared Free Trial Links from the
OnlyFansAPI Cache (free, no credits used)
- name: Stored Shared Tracking Links
description: Instant APIs for retrieving stored shared Tracking Links
(campaigns) from the OnlyFansAPI Cache (free, no credits used)
- name: Stored Tracking Links
description: Instant APIs for retrieving stored tracking links from the
OnlyFansAPI Cache (free, no credits used). `revenue.total` is net earnings
after refunds and chargebacks. `revenue.chargebacks` is the positive
cached net amount already excluded from that total; do not subtract it
again.
- name: Stories
description: APIs for managing OnlyFans stories
- name: Story Highlights
description: APIs for managing OnlyFans story highlights
- name: Subscription Bundles
description: ""
- name: Tracking Links
description: APIs for managing tracking links. Revenue totals are net earnings
after refunds and chargebacks. `revenue.chargebacks` (or
`summary.chargebacks_total` in stats) is the positive cached net amount
already excluded from revenue; do not subtract it again. Spender responses
include chargebacks across all attributed periods for each fan with
positive net revenue.
- name: Transactions
description: APIs for managing OnlyFans transactions
- name: Usage
description: Credit usage reporting for your team
- name: User List Collections
description: ""
- name: Users
description: APIs for fetching OnlyFans users
- name: Webhooks
description: ""
paths:
/api/{account}/users/{user_id}/block:
parameters:
- in: path
name: account
description: The Account ID
example: acct_XXXXXXXXXXXXXXX
required: true
schema:
type: string
- in: path
name: user_id
description: The OnlyFans ID of the user to block.
example: 123
required: true
schema:
type: string
post:
summary: Block User
operationId: blockUser
description: Block user from accessing your profile.
parameters: []
responses:
"200":
description: ""
content:
application/json:
schema:
type: object
example:
data:
view: f
avatar: https://public.onlyfans.com/files/i/i2/i25/.../123/avatar.jpg
avatarThumbs:
c50: https://thumbs.onlyfans.com/public/files/thumbs/c50/i/i2/i25/.../123/avatar.jpg
c144: https://thumbs.onlyfans.com/public/files/thumbs/c144/i/i2/i25/.../123/avatar.jpg
header: https://public.onlyfans.com/files/c/cs/cse/.../123/header_image.jpg
headerSize:
width: 4386
height: 1224
headerThumbs:
w480: https://thumbs.onlyfans.com/public/files/thumbs/w480/c/cs/cse/.../123/header_image.jpg
w760: https://thumbs.onlyfans.com/public/files/thumbs/w760/c/cs/cse/.../123/header_image.jpg
id: 123
name: name
username: username
canLookStory: true
canCommentStory: true
hasNotViewedStory: true
isVerified: true
canPayInternal: true
hasScheduledStream: false
hasStream: false
hasStories: true
tipsEnabled: true
tipsTextEnabled: true
tipsMin: 5
tipsMinInternal: 1
tipsMax: 200
canEarn: true
canAddSubscriber: true
subscribePrice: 12.99
subscriptionBundles:
- id: 123
discount: 50
duration: 3
price: 19.49
canBuy: true
displayName: ""
notice: ""
isPaywallRequired: true
isRestricted: false
canRestrict: true
subscribedBy: true
subscribedByExpire: false
subscribedByExpireDate: 2025-01-01T01:01:01+00:00
subscribedByAutoprolong: false
subscribedIsExpiredNow: false
currentSubscribePrice: 0
subscribedOn: null
subscribedOnExpiredNow: true
subscribedOnDuration: 7 days
listsStates:
- id: following
type: following
name: Following
hasUser: true
canAddUser: false
cannotAddUserReason: ALREADY_EXISTS
- id: fans
type: fans
name: Fans
hasUser: false
canAddUser: false
cannotAddUserReason: null
- id: recent
type: recent
name: Recent (last 24 hours)
hasUser: false
canAddUser: false
cannotAddUserReason: SYSTEM_LIST
- id: tagged
type: tagged
name: Tagged
hasUser: true
canAddUser: false
cannotAddUserReason: ALREADY_EXISTS
- id: friends
type: friends
name: Friends
hasUser: false
canAddUser: true
cannotAddUserReason: null
- id: muted
type: muted
name: Muted
hasUser: false
canAddUser: true
cannotAddUserReason: null
joinDate: 2025-01-01T01:01:01+00:00
isReferrerAllowed: true
about: About
isMarkdownDisabledForAbout: true
website: null
wishlist: null
location: location
postsCount: 123
archivedPostsCount: 1
privateArchivedPostsCount: 123
photosCount: 123
videosCount: 63
audiosCount: 0
mediasCount: 123
lastSeen: 2025-01-01T01:01:01+00:00
favoritesCount: 123
favoritedCount: 123
showPostsInFeed: true
canReceiveChatMessage: true
isPerformer: true
isRealPerformer: true
isSpotifyConnected: false
subscribersCount: null
hasPinnedPosts: true
hasLabels: true
canChat: true
avatarHeaderConverterUpload: true
isPrivateRestriction: false
showSubscribersCount: false
showMediaCount: true
subscribedByData:
price: 0
newPrice: 0
regularPrice: 12.99
subscribePrice: 12.99
discountPercent: 0
discountPeriod: 1
subscribeAt: 2025-01-01T01:01:01+00:00
expiredAt: 2025-01-01T01:01:01+00:00
renewedAt: null
discountFinishedAt: null
discountStartedAt: null
status: Set to Expire
isMuted: false
unsubscribeReason: No reason given
duration: 2 months
showPostsInFeed: true
subscribes:
- id: 123
userId: 123
subscriberId: 123
date: 2025-01-01T01:01:01+00:00
duration: 360
startDate: 2025-01-01T01:01:01+00:00
expireDate: 2025-01-01T01:01:01+00:00
cancelDate: null
price: 0
regularPrice: 12.99
discount: 0
earningId: 0
action: subscribe
type: trial
offerStart: 2025-01-01T01:01:01+00:00
offerEnd: null
isCurrent: true
hasActivePaidSubscriptions: false
subscribedOnData:
price: 0
newPrice: 0
regularPrice: 0
subscribePrice: 0
discountPercent: 0
discountPeriod: 1
subscribeAt: 2025-01-01T01:01:01+00:00
expiredAt: 2025-01-01T01:01:01+00:00
renewedAt: null
discountFinishedAt: null
discountStartedAt: null
status: null
isMuted: false
unsubscribeReason: No reason given
duration: 7 days
tipsSumm: 0
subscribesSumm: 0
messagesSumm: 0
postsSumm: 0
streamsSumm: 0
totalSumm: 0
subscribes: []
hasActivePaidSubscriptions: false
canCreatePromotion: true
canCreateTrial: true
isAdultContent: false
canTrialSend: false
hasLinks: false
hasFriends: false
finishedStreamsCount: 0
shouldShowFinishedStreams: false
hasSavedStreams: false
firstPublishedPostDate: 2025-01-01T01:01:01+00:00
isSpringConnected: false
isFriend: false
isBlocked: false
canReport: true
canUnsubscribe: true
isPendingAutoprolong: false
_meta:
_credits:
used: 1
balance: 999999834
note: Always
_cache:
is_cached: false
note: Cache disabled for this endpoint
_rate_limits:
limit_minute: 10000000
limit_day: 50000
remaining_minute: 9999999
remaining_day: 49992
properties:
data:
type: object
properties:
view:
type: string
example: f
avatar:
type: string
example: https://public.onlyfans.com/files/i/i2/i25/.../123/avatar.jpg
avatarThumbs:
type: object
properties:
c50:
type: string
example: https://thumbs.onlyfans.com/public/files/thumbs/c50/i/i2/i25/.../123/avatar.jpg
c144:
type: string
example: https://thumbs.onlyfans.com/public/files/thumbs/c144/i/i2/i25/.../123/avatar.jpg
header:
type: string
example: https://public.onlyfans.com/files/c/cs/cse/.../123/header_image.jpg
headerSize:
type: object
properties:
width:
type: integer
example: 4386
height:
type: integer
example: 1224
headerThumbs:
type: object
properties:
w480:
type: string
example: https://thumbs.onlyfans.com/public/files/thumbs/w480/c/cs/cse/.../123/header_image.jpg
w760:
type: string
example: https://thumbs.onlyfans.com/public/files/thumbs/w760/c/cs/cse/.../123/header_image.jpg
id:
type: integer
example: 123
name:
type: string
example: name
username:
type: string
example: username
canLookStory:
type: boolean
example: true
canCommentStory:
type: boolean
example: true
hasNotViewedStory:
type: boolean
example: true
isVerified:
type: boolean
example: true
canPayInternal:
type: boolean
example: true
hasScheduledStream:
type: boolean
example: false
hasStream:
type: boolean
example: false
hasStories:
type: boolean
example: true
tipsEnabled:
type: boolean
example: true
tipsTextEnabled:
type: boolean
example: true
tipsMin:
type: integer
example: 5
tipsMinInternal:
type: integer
example: 1
tipsMax:
type: integer
example: 200
canEarn:
type: boolean
example: true
canAddSubscriber:
type: boolean
example: true
subscribePrice:
type: number
example: 12.99
subscriptionBundles:
type: array
example:
- id: 123
discount: 50
duration: 3
price: 19.49
canBuy: true
items:
type: object
properties:
id:
type: integer
example: 123
discount:
type: integer
example: 50
duration:
type: integer
example: 3
price:
type: number
example: 19.49
canBuy:
type: boolean
example: true
displayName:
type: string
example: ""
notice:
type: string
example: ""
isPaywallRequired:
type: boolean
example: true
isRestricted:
type: boolean
example: false
canRestrict:
type: boolean
example: true
subscribedBy:
type: boolean
example: true
subscribedByExpire:
type: boolean
example: false
subscribedByExpireDate:
type: string
example: 2025-01-01T01:01:01+00:00
subscribedByAutoprolong:
type: boolean
example: false
subscribedIsExpiredNow:
type: boolean
example: false
currentSubscribePrice:
type: integer
example: 0
subscribedOn:
type: string
example: null
nullable: true
subscribedOnExpiredNow:
type: boolean
example: true
subscribedOnDuration:
type: string
example: 7 days
listsStates:
type: array
example:
- id: following
type: following
name: Following
hasUser: true
canAddUser: false
cannotAddUserReason: ALREADY_EXISTS
- id: fans
type: fans
name: Fans
hasUser: false
canAddUser: false
cannotAddUserReason: null
- id: recent
type: recent
name: Recent (last 24 hours)
hasUser: false
canAddUser: false
cannotAddUserReason: SYSTEM_LIST
- id: tagged
type: tagged
name: Tagged
hasUser: true
canAddUser: false
cannotAddUserReason: ALREADY_EXISTS
- id: friends
type: friends
name: Friends
hasUser: false
canAddUser: true
cannotAddUserReason: null
- id: muted
type: muted
name: Muted
hasUser: false
canAddUser: true
cannotAddUserReason: null
items:
type: object
properties:
id:
type: string
example: following
type:
type: string
example: following
name:
type: string
example: Following
hasUser:
type: boolean
example: true
canAddUser:
type: boolean
example: false
cannotAddUserReason:
type: string
example: ALREADY_EXISTS
joinDate:
type: string
example: 2025-01-01T01:01:01+00:00
isReferrerAllowed:
type: boolean
example: true
about:
type: string
example: About
isMarkdownDisabledForAbout:
type: boolean
example: true
website:
type: string
example: null
nullable: true
wishlist:
type: string
example: null
nullable: true
location:
type: string
example: location
postsCount:
type: integer
example: 123
archivedPostsCount:
type: integer
example: 1
privateArchivedPostsCount:
type: integer
example: 123
photosCount:
type: integer
example: 123
videosCount:
type: integer
example: 63
audiosCount:
type: integer
example: 0
mediasCount:
type: integer
example: 123
lastSeen:
type: string
example: 2025-01-01T01:01:01+00:00
favoritesCount:
type: integer
example: 123
favoritedCount:
type: integer
example: 123
showPostsInFeed:
type: boolean
example: true
canReceiveChatMessage:
type: boolean
example: true
isPerformer:
type: boolean
example: true
isRealPerformer:
type: boolean
example: true
isSpotifyConnected:
type: boolean
example: false
subscribersCount:
type: string
example: null
nullable: true
hasPinnedPosts:
type: boolean
example: true
hasLabels:
type: boolean
example: true
canChat:
type: boolean
example: true
avatarHeaderConverterUpload:
type: boolean
example: true
isPrivateRestriction:
type: boolean
example: false
showSubscribersCount:
type: boolean
example: false
showMediaCount:
type: boolean
example: true
subscribedByData:
type: object
properties:
price:
type: integer
example: 0
newPrice:
type: integer
example: 0
regularPrice:
type: number
example: 12.99
subscribePrice:
type: number
example: 12.99
discountPercent:
type: integer
example: 0
discountPeriod:
type: integer
example: 1
subscribeAt:
type: string
example: 2025-01-01T01:01:01+00:00
expiredAt:
type: string
example: 2025-01-01T01:01:01+00:00
renewedAt:
type: string
example: null
nullable: true
discountFinishedAt:
type: string
example: null
nullable: true
discountStartedAt:
type: string
example: null
nullable: true
status:
type: string
example: Set to Expire
isMuted:
type: boolean
example: false
unsubscribeReason:
type: string
example: No reason given
duration:
type: string
example: 2 months
showPostsInFeed:
type: boolean
example: true
subscribes:
type: array
example:
- id: 123
userId: 123
subscriberId: 123
date: 2025-01-01T01:01:01+00:00
duration: 360
startDate: 2025-01-01T01:01:01+00:00
expireDate: 2025-01-01T01:01:01+00:00
cancelDate: null
price: 0
regularPrice: 12.99
discount: 0
earningId: 0
action: subscribe
type: trial
offerStart: 2025-01-01T01:01:01+00:00
offerEnd: null
isCurrent: true
items:
type: object
properties:
id:
type: integer
example: 123
userId:
type: integer
example: 123
subscriberId:
type: integer
example: 123
date:
type: string
example: 2025-01-01T01:01:01+00:00
duration:
type: integer
example: 360
startDate:
type: string
example: 2025-01-01T01:01:01+00:00
expireDate:
type: string
example: 2025-01-01T01:01:01+00:00
cancelDate:
type: string
example: null
nullable: true
price:
type: integer
example: 0
regularPrice:
type: number
example: 12.99
discount:
type: integer
example: 0
earningId:
type: integer
example: 0
action:
type: string
example: subscribe
type:
type: string
example: trial
offerStart:
type: string
example: 2025-01-01T01:01:01+00:00
offerEnd:
type: string
example: null
nullable: true
isCurrent:
type: boolean
example: true
hasActivePaidSubscriptions:
type: boolean
example: false
subscribedOnData:
type: object
properties:
price:
type: integer
example: 0
newPrice:
type: integer
example: 0
regularPrice:
type: integer
example: 0
subscribePrice:
type: integer
example: 0
discountPercent:
type: integer
example: 0
discountPeriod:
type: integer
example: 1
subscribeAt:
type: string
example: 2025-01-01T01:01:01+00:00
expiredAt:
type: string
example: 2025-01-01T01:01:01+00:00
renewedAt:
type: string
example: null
nullable: true
discountFinishedAt:
type: string
example: null
nullable: true
discountStartedAt:
type: string
example: null
nullable: true
status:
type: string
example: null
nullable: true
isMuted:
type: boolean
example: false
unsubscribeReason:
type: string
example: No reason given
duration:
type: string
example: 7 days
tipsSumm:
type: integer
example: 0
subscribesSumm:
type: integer
example: 0
messagesSumm:
type: integer
example: 0
postsSumm:
type: integer
example: 0
streamsSumm:
type: integer
example: 0
totalSumm:
type: integer
example: 0
subscribes:
type: array
example: []
hasActivePaidSubscriptions:
type: boolean
example: false
canCreatePromotion:
type: boolean
example: true
canCreateTrial:
type: boolean
example: true
isAdultContent:
type: boolean
example: false
canTrialSend:
type: boolean
example: false
hasLinks:
type: boolean
example: false
hasFriends:
type: boolean
example: false
finishedStreamsCount:
type: integer
example: 0
shouldShowFinishedStreams:
type: boolean
example: false
hasSavedStreams:
type: boolean
example: false
firstPublishedPostDate:
type: string
example: 2025-01-01T01:01:01+00:00
isSpringConnected:
type: boolean
example: false
isFriend:
type: boolean
example: false
isBlocked:
type: boolean
example: false
canReport:
type: boolean
example: true
canUnsubscribe:
type: boolean
example: true
isPendingAutoprolong:
type: boolean
example: false
_meta:
type: object
properties:
_credits:
type: object
properties:
used:
type: integer
example: 1
balance:
type: integer
example: 999999834
note:
type: string
example: Always
_cache:
type: object
properties:
is_cached:
type: boolean
example: false
note:
type: string
example: Cache disabled for this endpoint
_rate_limits:
type: object
properties:
limit_minute:
type: integer
example: 10000000
limit_day:
type: integer
example: 50000
remaining_minute:
type: integer
example: 9999999
remaining_day:
type: integer
example: 49992
tags:
- Users
components:
securitySchemes:
default:
type: http
scheme: bearer
description: Get your API Key from OnlyFansAPI Console -
https://app.onlyfansapi.com/api-keys
````
# Get User Details (/api-reference/users/get-user-details)
Get OnlyFans Profile details for a given username. User details are retrieved using the current `{account}` so fields like `subscribedOnData` which include potential subscription details will be included.
## OpenAPI
````yaml https://app.onlyfansapi.com/scribe-docs/openapi.yaml get /api/{account}/users/{username}
openapi: 3.0.3
info:
title: OnlyFans API
description: ""
version: 1.0.0
servers:
- url: https://app.onlyfansapi.com
security:
- default: []
tags:
- name: AI Voice Messages
description: ""
- name: API Keys
description: ""
- name: Account
description: Endpoints for your linked accounts
- name: Analytics - Financial
description: APIs for retrieving financial analytics data
- name: Analytics - Summary
description: APIs for retrieving summary analytics data
- name: Banking
description: Operations related to user banking details, payout methods, legal
and tax information, and account country settings.
- name: Banned Words
description: Reference list of OnlyFans banned words used by the
`blockBannedWords` screening parameter
- name: Blocked / Restricted Users
description: APIs for listing the users an account has blocked or restricted
- name: Chargebacks
description: ""
- name: Chat Messages
description: ""
- name: Chats
description: ""
- name: Client Sessions
description: ""
- name: Connect OnlyFans Account
description: ""
- name: Data Exports
description: APIs for managing data exports
- name: Engagement / Messages
description: ""
- name: Fans
description: APIs for managing OnlyFans fans (subscribers)
- name: Fans - AI Summary
description: APIs for generating and retrieving AI-powered fan profile summaries
- name: Following
description: APIs for managing OnlyFans followings (people you're subscribed to)
- name: Free Trial Links
description: APIs for managing Free Trial Links. Revenue totals are net earnings
after refunds and chargebacks. `revenue.chargebacks` (or
`summary.chargebacks_total` in stats) is the positive cached net amount
already excluded from revenue; do not subtract it again. Spender responses
include chargebacks across all attributed periods for each fan with
positive net revenue.
- name: Giphy
description: ""
- name: Link Tags
description: APIs for managing tags on free trial links, tracking links, and Smart Links
- name: Mass Messaging
description: ""
- name: Media
description: ""
- name: Media Vault
description: ""
- name: Media Vault Lists
description: ""
- name: Notifications
description: Endpoints for managingr account notifications
- name: Payouts
description: ""
- name: Post Comments
description: ""
- name: Post Labels
description: APIs for managing your post labels
- name: Posts
description: APIs for managing OnlyFans posts
- name: Profile Content
description: Read another user's profile content using your connected OnlyFans
account. OnlyFans enforces subscription and purchase requirements; these
endpoints do not unlock content. Response samples use captured OnlyFans
payloads with anonymized IDs, text, and media URLs; OFAPI metadata values
are illustrative.
- name: Promotions
description: ""
- name: Public Profiles
description: ""
- name: Queue
description: ""
- name: Release Forms
description: APIs for managing OnlyFans release forms
- name: Saved For Later (Messages)
description: ""
- name: Saved For Later (Posts)
description: ""
- name: Settings
description: ""
- name: Shared Free Trial Links
description: APIs for Free Trial Links that other OF creators have shared with
this account. Revenue, cost, and spender data are not available for shared
links.
- name: Shared Tracking Links
description: APIs for Tracking Links (campaigns) that other OF creators have
shared with this account. Revenue, cost, and spender data are not
available for shared campaigns.
- name: Smart Link Postbacks
description: APIs for managing Smart Link postback destinations
- name: Smart Links
description: APIs for managing Smart Links (Free Trial Links and Tracking Links
with pooled inventory)
- name: Statistics
description: ""
- name: Stored Free Trial Links
description: Instant APIs for retrieving stored free trial links from the
OnlyFansAPI Cache (free, no credits used). `revenue.total` is net earnings
after refunds and chargebacks. `revenue.chargebacks` is the positive
cached net amount already excluded from that total; do not subtract it
again.
- name: Stored Shared Free Trial Links
description: Instant APIs for retrieving stored shared Free Trial Links from the
OnlyFansAPI Cache (free, no credits used)
- name: Stored Shared Tracking Links
description: Instant APIs for retrieving stored shared Tracking Links
(campaigns) from the OnlyFansAPI Cache (free, no credits used)
- name: Stored Tracking Links
description: Instant APIs for retrieving stored tracking links from the
OnlyFansAPI Cache (free, no credits used). `revenue.total` is net earnings
after refunds and chargebacks. `revenue.chargebacks` is the positive
cached net amount already excluded from that total; do not subtract it
again.
- name: Stories
description: APIs for managing OnlyFans stories
- name: Story Highlights
description: APIs for managing OnlyFans story highlights
- name: Subscription Bundles
description: ""
- name: Tracking Links
description: APIs for managing tracking links. Revenue totals are net earnings
after refunds and chargebacks. `revenue.chargebacks` (or
`summary.chargebacks_total` in stats) is the positive cached net amount
already excluded from revenue; do not subtract it again. Spender responses
include chargebacks across all attributed periods for each fan with
positive net revenue.
- name: Transactions
description: APIs for managing OnlyFans transactions
- name: Usage
description: Credit usage reporting for your team
- name: User List Collections
description: ""
- name: Users
description: APIs for fetching OnlyFans users
- name: Webhooks
description: ""
paths:
/api/{account}/users/{username}:
parameters:
- in: path
name: account
description: The Account ID
example: acct_XXXXXXXXXXXXXXX
required: true
schema:
type: string
- in: path
name: username
description: The OnlyFans username or numeric user ID to retrieve details for.
Display names and profile URLs are not accepted.
example: exampleuser
required: true
schema:
type: string
get:
summary: Get User Details
operationId: getUserDetails
description: Get OnlyFans Profile details for a given username. User details are
retrieved using the current `{account}` so fields like
`subscribedOnData` which include potential subscription details will be
included.
parameters: []
responses:
"200":
description: ""
content:
application/json:
schema:
type: object
example:
data:
view: f
avatar: https://public.onlyfans.com/files/i/i2/i25/.../123/avatar.jpg
avatarThumbs:
c50: https://thumbs.onlyfans.com/public/files/thumbs/c50/i/i2/i25/.../123/avatar.jpg
c144: https://thumbs.onlyfans.com/public/files/thumbs/c144/i/i2/i25/.../123/avatar.jpg
header: https://public.onlyfans.com/files/c/cs/cse/.../123/header_image.jpg
headerSize:
width: 4386
height: 1224
headerThumbs:
w480: https://thumbs.onlyfans.com/public/files/thumbs/w480/c/cs/cse/.../123/header_image.jpg
w760: https://thumbs.onlyfans.com/public/files/thumbs/w760/c/cs/cse/.../123/header_image.jpg
id: 123
name: name
username: username
canLookStory: true
canCommentStory: true
hasNotViewedStory: true
isVerified: true
canPayInternal: true
hasScheduledStream: false
hasStream: false
hasStories: true
tipsEnabled: true
tipsTextEnabled: true
tipsMin: 5
tipsMinInternal: 1
tipsMax: 200
canEarn: true
canAddSubscriber: true
subscribePrice: 12.99
subscriptionBundles:
- id: 123
discount: 50
duration: 3
price: 19.49
canBuy: true
displayName: ""
notice: ""
isPaywallRequired: true
isRestricted: false
canRestrict: true
subscribedBy: true
subscribedByExpire: false
subscribedByExpireDate: 2025-01-01T01:01:01+00:00
subscribedByAutoprolong: false
subscribedIsExpiredNow: false
currentSubscribePrice: 0
subscribedOn: null
subscribedOnExpiredNow: true
subscribedOnDuration: 7 days
listsStates:
- id: following
type: following
name: Following
hasUser: true
canAddUser: false
cannotAddUserReason: ALREADY_EXISTS
- id: fans
type: fans
name: Fans
hasUser: false
canAddUser: false
cannotAddUserReason: null
- id: recent
type: recent
name: Recent (last 24 hours)
hasUser: false
canAddUser: false
cannotAddUserReason: SYSTEM_LIST
- id: tagged
type: tagged
name: Tagged
hasUser: true
canAddUser: false
cannotAddUserReason: ALREADY_EXISTS
- id: friends
type: friends
name: Friends
hasUser: false
canAddUser: true
cannotAddUserReason: null
- id: muted
type: muted
name: Muted
hasUser: false
canAddUser: true
cannotAddUserReason: null
joinDate: 2025-01-01T01:01:01+00:00
isReferrerAllowed: true
about: About
isMarkdownDisabledForAbout: true
website: null
wishlist: null
location: location
postsCount: 123
archivedPostsCount: 1
privateArchivedPostsCount: 123
photosCount: 123
videosCount: 63
audiosCount: 0
mediasCount: 123
lastSeen: 2025-01-01T01:01:01+00:00
favoritesCount: 123
favoritedCount: 123
showPostsInFeed: true
canReceiveChatMessage: true
isPerformer: true
isRealPerformer: true
isSpotifyConnected: false
subscribersCount: null
hasPinnedPosts: true
hasLabels: true
canChat: true
avatarHeaderConverterUpload: true
isPrivateRestriction: false
showSubscribersCount: false
showMediaCount: true
subscribedByData:
price: 0
newPrice: 0
regularPrice: 12.99
subscribePrice: 12.99
discountPercent: 0
discountPeriod: 1
subscribeAt: 2025-01-01T01:01:01+00:00
expiredAt: 2025-01-01T01:01:01+00:00
renewedAt: null
discountFinishedAt: null
discountStartedAt: null
status: Set to Expire
isMuted: false
unsubscribeReason: No reason given
duration: 2 months
showPostsInFeed: true
subscribes:
- id: 123
userId: 123
subscriberId: 123
date: 2025-01-01T01:01:01+00:00
duration: 360
startDate: 2025-01-01T01:01:01+00:00
expireDate: 2025-01-01T01:01:01+00:00
cancelDate: null
price: 0
regularPrice: 12.99
discount: 0
earningId: 0
action: subscribe
type: trial
offerStart: 2025-01-01T01:01:01+00:00
offerEnd: null
isCurrent: true
hasActivePaidSubscriptions: false
subscribedOnData:
price: 0
newPrice: 0
regularPrice: 0
subscribePrice: 0
discountPercent: 0
discountPeriod: 1
subscribeAt: 2025-01-01T01:01:01+00:00
expiredAt: 2025-01-01T01:01:01+00:00
renewedAt: null
discountFinishedAt: null
discountStartedAt: null
status: null
isMuted: false
unsubscribeReason: No reason given
duration: 7 days
tipsSumm: 0
subscribesSumm: 0
messagesSumm: 0
postsSumm: 0
streamsSumm: 0
totalSumm: 0
subscribes: []
hasActivePaidSubscriptions: false
canCreatePromotion: true
canCreateTrial: true
isAdultContent: false
canTrialSend: false
hasLinks: false
hasFriends: false
finishedStreamsCount: 0
shouldShowFinishedStreams: false
hasSavedStreams: false
firstPublishedPostDate: 2025-01-01T01:01:01+00:00
isSpringConnected: false
isFriend: false
isBlocked: false
canReport: true
canUnsubscribe: true
isPendingAutoprolong: false
_meta:
_credits:
used: 1
balance: 999999834
note: Always
_cache:
is_cached: false
note: Cache disabled for this endpoint
_rate_limits:
limit_minute: 10000000
limit_day: 50000
remaining_minute: 9999999
remaining_day: 49992
properties:
data:
type: object
properties:
view:
type: string
example: f
avatar:
type: string
example: https://public.onlyfans.com/files/i/i2/i25/.../123/avatar.jpg
avatarThumbs:
type: object
properties:
c50:
type: string
example: https://thumbs.onlyfans.com/public/files/thumbs/c50/i/i2/i25/.../123/avatar.jpg
c144:
type: string
example: https://thumbs.onlyfans.com/public/files/thumbs/c144/i/i2/i25/.../123/avatar.jpg
header:
type: string
example: https://public.onlyfans.com/files/c/cs/cse/.../123/header_image.jpg
headerSize:
type: object
properties:
width:
type: integer
example: 4386
height:
type: integer
example: 1224
headerThumbs:
type: object
properties:
w480:
type: string
example: https://thumbs.onlyfans.com/public/files/thumbs/w480/c/cs/cse/.../123/header_image.jpg
w760:
type: string
example: https://thumbs.onlyfans.com/public/files/thumbs/w760/c/cs/cse/.../123/header_image.jpg
id:
type: integer
example: 123
name:
type: string
example: name
username:
type: string
example: username
canLookStory:
type: boolean
example: true
canCommentStory:
type: boolean
example: true
hasNotViewedStory:
type: boolean
example: true
isVerified:
type: boolean
example: true
canPayInternal:
type: boolean
example: true
hasScheduledStream:
type: boolean
example: false
hasStream:
type: boolean
example: false
hasStories:
type: boolean
example: true
tipsEnabled:
type: boolean
example: true
tipsTextEnabled:
type: boolean
example: true
tipsMin:
type: integer
example: 5
tipsMinInternal:
type: integer
example: 1
tipsMax:
type: integer
example: 200
canEarn:
type: boolean
example: true
canAddSubscriber:
type: boolean
example: true
subscribePrice:
type: number
example: 12.99
subscriptionBundles:
type: array
example:
- id: 123
discount: 50
duration: 3
price: 19.49
canBuy: true
items:
type: object
properties:
id:
type: integer
example: 123
discount:
type: integer
example: 50
duration:
type: integer
example: 3
price:
type: number
example: 19.49
canBuy:
type: boolean
example: true
displayName:
type: string
example: ""
notice:
type: string
example: ""
isPaywallRequired:
type: boolean
example: true
isRestricted:
type: boolean
example: false
canRestrict:
type: boolean
example: true
subscribedBy:
type: boolean
example: true
subscribedByExpire:
type: boolean
example: false
subscribedByExpireDate:
type: string
example: 2025-01-01T01:01:01+00:00
subscribedByAutoprolong:
type: boolean
example: false
subscribedIsExpiredNow:
type: boolean
example: false
currentSubscribePrice:
type: integer
example: 0
subscribedOn:
type: string
example: null
nullable: true
subscribedOnExpiredNow:
type: boolean
example: true
subscribedOnDuration:
type: string
example: 7 days
listsStates:
type: array
example:
- id: following
type: following
name: Following
hasUser: true
canAddUser: false
cannotAddUserReason: ALREADY_EXISTS
- id: fans
type: fans
name: Fans
hasUser: false
canAddUser: false
cannotAddUserReason: null
- id: recent
type: recent
name: Recent (last 24 hours)
hasUser: false
canAddUser: false
cannotAddUserReason: SYSTEM_LIST
- id: tagged
type: tagged
name: Tagged
hasUser: true
canAddUser: false
cannotAddUserReason: ALREADY_EXISTS
- id: friends
type: friends
name: Friends
hasUser: false
canAddUser: true
cannotAddUserReason: null
- id: muted
type: muted
name: Muted
hasUser: false
canAddUser: true
cannotAddUserReason: null
items:
type: object
properties:
id:
type: string
example: following
type:
type: string
example: following
name:
type: string
example: Following
hasUser:
type: boolean
example: true
canAddUser:
type: boolean
example: false
cannotAddUserReason:
type: string
example: ALREADY_EXISTS
joinDate:
type: string
example: 2025-01-01T01:01:01+00:00
isReferrerAllowed:
type: boolean
example: true
about:
type: string
example: About
isMarkdownDisabledForAbout:
type: boolean
example: true
website:
type: string
example: null
nullable: true
wishlist:
type: string
example: null
nullable: true
location:
type: string
example: location
postsCount:
type: integer
example: 123
archivedPostsCount:
type: integer
example: 1
privateArchivedPostsCount:
type: integer
example: 123
photosCount:
type: integer
example: 123
videosCount:
type: integer
example: 63
audiosCount:
type: integer
example: 0
mediasCount:
type: integer
example: 123
lastSeen:
type: string
example: 2025-01-01T01:01:01+00:00
favoritesCount:
type: integer
example: 123
favoritedCount:
type: integer
example: 123
showPostsInFeed:
type: boolean
example: true
canReceiveChatMessage:
type: boolean
example: true
isPerformer:
type: boolean
example: true
isRealPerformer:
type: boolean
example: true
isSpotifyConnected:
type: boolean
example: false
subscribersCount:
type: string
example: null
nullable: true
hasPinnedPosts:
type: boolean
example: true
hasLabels:
type: boolean
example: true
canChat:
type: boolean
example: true
avatarHeaderConverterUpload:
type: boolean
example: true
isPrivateRestriction:
type: boolean
example: false
showSubscribersCount:
type: boolean
example: false
showMediaCount:
type: boolean
example: true
subscribedByData:
type: object
properties:
price:
type: integer
example: 0
newPrice:
type: integer
example: 0
regularPrice:
type: number
example: 12.99
subscribePrice:
type: number
example: 12.99
discountPercent:
type: integer
example: 0
discountPeriod:
type: integer
example: 1
subscribeAt:
type: string
example: 2025-01-01T01:01:01+00:00
expiredAt:
type: string
example: 2025-01-01T01:01:01+00:00
renewedAt:
type: string
example: null
nullable: true
discountFinishedAt:
type: string
example: null
nullable: true
discountStartedAt:
type: string
example: null
nullable: true
status:
type: string
example: Set to Expire
isMuted:
type: boolean
example: false
unsubscribeReason:
type: string
example: No reason given
duration:
type: string
example: 2 months
showPostsInFeed:
type: boolean
example: true
subscribes:
type: array
example:
- id: 123
userId: 123
subscriberId: 123
date: 2025-01-01T01:01:01+00:00
duration: 360
startDate: 2025-01-01T01:01:01+00:00
expireDate: 2025-01-01T01:01:01+00:00
cancelDate: null
price: 0
regularPrice: 12.99
discount: 0
earningId: 0
action: subscribe
type: trial
offerStart: 2025-01-01T01:01:01+00:00
offerEnd: null
isCurrent: true
items:
type: object
properties:
id:
type: integer
example: 123
userId:
type: integer
example: 123
subscriberId:
type: integer
example: 123
date:
type: string
example: 2025-01-01T01:01:01+00:00
duration:
type: integer
example: 360
startDate:
type: string
example: 2025-01-01T01:01:01+00:00
expireDate:
type: string
example: 2025-01-01T01:01:01+00:00
cancelDate:
type: string
example: null
nullable: true
price:
type: integer
example: 0
regularPrice:
type: number
example: 12.99
discount:
type: integer
example: 0
earningId:
type: integer
example: 0
action:
type: string
example: subscribe
type:
type: string
example: trial
offerStart:
type: string
example: 2025-01-01T01:01:01+00:00
offerEnd:
type: string
example: null
nullable: true
isCurrent:
type: boolean
example: true
hasActivePaidSubscriptions:
type: boolean
example: false
subscribedOnData:
type: object
properties:
price:
type: integer
example: 0
newPrice:
type: integer
example: 0
regularPrice:
type: integer
example: 0
subscribePrice:
type: integer
example: 0
discountPercent:
type: integer
example: 0
discountPeriod:
type: integer
example: 1
subscribeAt:
type: string
example: 2025-01-01T01:01:01+00:00
expiredAt:
type: string
example: 2025-01-01T01:01:01+00:00
renewedAt:
type: string
example: null
nullable: true
discountFinishedAt:
type: string
example: null
nullable: true
discountStartedAt:
type: string
example: null
nullable: true
status:
type: string
example: null
nullable: true
isMuted:
type: boolean
example: false
unsubscribeReason:
type: string
example: No reason given
duration:
type: string
example: 7 days
tipsSumm:
type: integer
example: 0
subscribesSumm:
type: integer
example: 0
messagesSumm:
type: integer
example: 0
postsSumm:
type: integer
example: 0
streamsSumm:
type: integer
example: 0
totalSumm:
type: integer
example: 0
subscribes:
type: array
example: []
hasActivePaidSubscriptions:
type: boolean
example: false
canCreatePromotion:
type: boolean
example: true
canCreateTrial:
type: boolean
example: true
isAdultContent:
type: boolean
example: false
canTrialSend:
type: boolean
example: false
hasLinks:
type: boolean
example: false
hasFriends:
type: boolean
example: false
finishedStreamsCount:
type: integer
example: 0
shouldShowFinishedStreams:
type: boolean
example: false
hasSavedStreams:
type: boolean
example: false
firstPublishedPostDate:
type: string
example: 2025-01-01T01:01:01+00:00
isSpringConnected:
type: boolean
example: false
isFriend:
type: boolean
example: false
isBlocked:
type: boolean
example: false
canReport:
type: boolean
example: true
canUnsubscribe:
type: boolean
example: true
isPendingAutoprolong:
type: boolean
example: false
_meta:
type: object
properties:
_credits:
type: object
properties:
used:
type: integer
example: 1
balance:
type: integer
example: 999999834
note:
type: string
example: Always
_cache:
type: object
properties:
is_cached:
type: boolean
example: false
note:
type: string
example: Cache disabled for this endpoint
_rate_limits:
type: object
properties:
limit_minute:
type: integer
example: 10000000
limit_day:
type: integer
example: 50000
remaining_minute:
type: integer
example: 9999999
remaining_day:
type: integer
example: 49992
tags:
- Users
components:
securitySchemes:
default:
type: http
scheme: bearer
description: Get your API Key from OnlyFansAPI Console -
https://app.onlyfansapi.com/api-keys
````
# Mass-List User Details (/api-reference/users/mass-list-user-details)
Save on credits by getting up to 10 user details with a single request. User details are retrieved using the current `{account}` so fields like `subscribedOnData` which include potential subscription details will be included.
## OpenAPI
````yaml https://app.onlyfansapi.com/scribe-docs/openapi.yaml get /api/{account}/users/list
openapi: 3.0.3
info:
title: OnlyFans API
description: ""
version: 1.0.0
servers:
- url: https://app.onlyfansapi.com
security:
- default: []
tags:
- name: AI Voice Messages
description: ""
- name: API Keys
description: ""
- name: Account
description: Endpoints for your linked accounts
- name: Analytics - Financial
description: APIs for retrieving financial analytics data
- name: Analytics - Summary
description: APIs for retrieving summary analytics data
- name: Banking
description: Operations related to user banking details, payout methods, legal
and tax information, and account country settings.
- name: Banned Words
description: Reference list of OnlyFans banned words used by the
`blockBannedWords` screening parameter
- name: Blocked / Restricted Users
description: APIs for listing the users an account has blocked or restricted
- name: Chargebacks
description: ""
- name: Chat Messages
description: ""
- name: Chats
description: ""
- name: Client Sessions
description: ""
- name: Connect OnlyFans Account
description: ""
- name: Data Exports
description: APIs for managing data exports
- name: Engagement / Messages
description: ""
- name: Fans
description: APIs for managing OnlyFans fans (subscribers)
- name: Fans - AI Summary
description: APIs for generating and retrieving AI-powered fan profile summaries
- name: Following
description: APIs for managing OnlyFans followings (people you're subscribed to)
- name: Free Trial Links
description: APIs for managing Free Trial Links. Revenue totals are net earnings
after refunds and chargebacks. `revenue.chargebacks` (or
`summary.chargebacks_total` in stats) is the positive cached net amount
already excluded from revenue; do not subtract it again. Spender responses
include chargebacks across all attributed periods for each fan with
positive net revenue.
- name: Giphy
description: ""
- name: Link Tags
description: APIs for managing tags on free trial links, tracking links, and Smart Links
- name: Mass Messaging
description: ""
- name: Media
description: ""
- name: Media Vault
description: ""
- name: Media Vault Lists
description: ""
- name: Notifications
description: Endpoints for managingr account notifications
- name: Payouts
description: ""
- name: Post Comments
description: ""
- name: Post Labels
description: APIs for managing your post labels
- name: Posts
description: APIs for managing OnlyFans posts
- name: Profile Content
description: Read another user's profile content using your connected OnlyFans
account. OnlyFans enforces subscription and purchase requirements; these
endpoints do not unlock content. Response samples use captured OnlyFans
payloads with anonymized IDs, text, and media URLs; OFAPI metadata values
are illustrative.
- name: Promotions
description: ""
- name: Public Profiles
description: ""
- name: Queue
description: ""
- name: Release Forms
description: APIs for managing OnlyFans release forms
- name: Saved For Later (Messages)
description: ""
- name: Saved For Later (Posts)
description: ""
- name: Settings
description: ""
- name: Shared Free Trial Links
description: APIs for Free Trial Links that other OF creators have shared with
this account. Revenue, cost, and spender data are not available for shared
links.
- name: Shared Tracking Links
description: APIs for Tracking Links (campaigns) that other OF creators have
shared with this account. Revenue, cost, and spender data are not
available for shared campaigns.
- name: Smart Link Postbacks
description: APIs for managing Smart Link postback destinations
- name: Smart Links
description: APIs for managing Smart Links (Free Trial Links and Tracking Links
with pooled inventory)
- name: Statistics
description: ""
- name: Stored Free Trial Links
description: Instant APIs for retrieving stored free trial links from the
OnlyFansAPI Cache (free, no credits used). `revenue.total` is net earnings
after refunds and chargebacks. `revenue.chargebacks` is the positive
cached net amount already excluded from that total; do not subtract it
again.
- name: Stored Shared Free Trial Links
description: Instant APIs for retrieving stored shared Free Trial Links from the
OnlyFansAPI Cache (free, no credits used)
- name: Stored Shared Tracking Links
description: Instant APIs for retrieving stored shared Tracking Links
(campaigns) from the OnlyFansAPI Cache (free, no credits used)
- name: Stored Tracking Links
description: Instant APIs for retrieving stored tracking links from the
OnlyFansAPI Cache (free, no credits used). `revenue.total` is net earnings
after refunds and chargebacks. `revenue.chargebacks` is the positive
cached net amount already excluded from that total; do not subtract it
again.
- name: Stories
description: APIs for managing OnlyFans stories
- name: Story Highlights
description: APIs for managing OnlyFans story highlights
- name: Subscription Bundles
description: ""
- name: Tracking Links
description: APIs for managing tracking links. Revenue totals are net earnings
after refunds and chargebacks. `revenue.chargebacks` (or
`summary.chargebacks_total` in stats) is the positive cached net amount
already excluded from revenue; do not subtract it again. Spender responses
include chargebacks across all attributed periods for each fan with
positive net revenue.
- name: Transactions
description: APIs for managing OnlyFans transactions
- name: Usage
description: Credit usage reporting for your team
- name: User List Collections
description: ""
- name: Users
description: APIs for fetching OnlyFans users
- name: Webhooks
description: ""
paths:
/api/{account}/users/list:
parameters:
- in: path
name: account
description: The Account ID
example: acct_XXXXXXXXXXXXXXX
required: true
schema:
type: string
get:
summary: Mass-List User Details
operationId: massListUserDetails
description: Save on credits by getting up to 10 user details with a single
request. User details are retrieved using the current `{account}` so
fields like `subscribedOnData` which include potential subscription
details will be included.
parameters:
- in: query
name: ids
description: Comma-separated list of user IDs (max. 10 IDs). Must be at least 1
character.
example: 12412412,36139491,1858349
required: true
schema:
type: string
description: Comma-separated list of user IDs (max. 10 IDs). Must be at least 1
character.
example: 12412412,36139491,1858349
responses:
"200":
description: ""
content:
application/json:
schema:
type: object
example:
data:
"1000000":
view: f
avatar: https://example.com/redacted.jpg
avatarThumbs:
c50: https://example.com/redacted.jpg
c144: https://example.com/redacted.jpg
header: null
headerSize: null
headerThumbs: null
id: 1000000
name: Example User
username: example_user
canLookStory: true
canCommentStory: true
hasNotViewedStory: false
isVerified: true
canPayInternal: true
hasScheduledStream: false
hasStream: false
hasStories: false
tipsEnabled: false
tipsTextEnabled: true
tipsMin: 5
tipsMinInternal: 1
tipsMax: 200
canEarn: true
canAddSubscriber: false
subscribePrice: 0
displayName: Example User
notice: ""
isPaywallRequired: true
isActive: true
isRestricted: false
canRestrict: true
subscribedBy: true
subscribedByExpire: false
subscribedByExpireDate: 2024-01-01T00:00:00+00:00
subscribedByAutoprolong: false
subscribedIsExpiredNow: false
currentSubscribePrice: 0
subscribedOn: null
subscribedOnExpiredNow: true
subscribedOnDuration: 1 month
listsStates:
- id: redacted_id
type: muted
name: Example User
hasUser: false
canAddUser: true
cannotAddUserReason: null
- id: redacted_id
type: fans
name: Example User
hasUser: false
canAddUser: false
cannotAddUserReason: null
- id: redacted_id
type: following
name: Example User
hasUser: true
canAddUser: false
cannotAddUserReason: ALREADY_EXISTS
- id: redacted_id
type: recent
name: Example User
hasUser: false
canAddUser: false
cannotAddUserReason: SYSTEM_LIST
- id: redacted_id
type: friends
name: Example User
hasUser: false
canAddUser: true
cannotAddUserReason: null
- id: 1000000
type: custom
name: Example User
hasUser: true
canAddUser: false
cannotAddUserReason: ALREADY_EXISTS
- id: 1000000
type: custom
name: Example User
hasUser: true
canAddUser: false
cannotAddUserReason: ALREADY_EXISTS
- id: redacted_id
type: rebill_off
name: Example User
hasUser: false
canAddUser: false
cannotAddUserReason: null
- id: redacted_id
type: rebill_on
name: Example User
hasUser: false
canAddUser: false
cannotAddUserReason: null
- id: redacted_id
type: tagged
name: Example User
hasUser: false
canAddUser: false
cannotAddUserReason: SYSTEM_LIST
joinDate: 2024-01-01T00:00:00+00:00
isReferrerAllowed: true
about: ""
isMarkdownDisabledForAbout: false
website: null
wishlist: null
location: null
postsCount: 0
archivedPostsCount: 0
privateArchivedPostsCount: 0
photosCount: 0
videosCount: 0
audiosCount: 0
mediasCount: 0
lastSeen: 2024-01-01T00:00:00+00:00
favoritesCount: 0
favoritedCount: 0
showPostsInFeed: true
canReceiveChatMessage: true
isPerformer: true
isRealPerformer: true
isSpotifyConnected: false
subscribersCount: null
hasPinnedPosts: false
hasLabels: false
canChat: true
avatarHeaderConverterUpload: true
isPrivateRestriction: false
showSubscribersCount: false
showMediaCount: true
subscribedByData:
price: 0
newPrice: 0
regularPrice: 0
subscribePrice: 0
discountPercent: 0
discountPeriod: 1
subscribeAt: 2024-01-01T00:00:00+00:00
expiredAt: 2024-01-01T00:00:00+00:00
renewedAt: null
discountFinishedAt: null
discountStartedAt: null
status: Set to Expire
isMuted: false
unsubscribeReason: Redacted
duration: 6 months
showPostsInFeed: true
subscribes:
- id: 1000000
userId: 1000000
subscriberId: 1000000
date: 2024-01-01T00:00:00+00:00
duration: 3652
startDate: 2024-01-01T00:00:00+00:00
expireDate: 2024-01-01T00:00:00+00:00
cancelDate: null
price: 0
regularPrice: 0
discount: 0
earningId: 0
action: subscribe
type: regular
offerStart: null
offerEnd: null
isCurrent: true
- id: 1000000
userId: 1000000
subscriberId: 1000000
date: 2024-01-01T00:00:00+00:00
duration: 3652
startDate: 2024-01-01T00:00:00+00:00
expireDate: 2024-01-01T00:00:00+00:00
cancelDate: null
price: 0
regularPrice: 0
discount: 0
earningId: 0
action: prolong
type: regular
offerStart: null
offerEnd: null
isCurrent: true
hasActivePaidSubscriptions: false
subscribedOnData:
price: 3.9
newPrice: 12.99
regularPrice: 12.99
subscribePrice: 12.99
discountPercent: 0
discountPeriod: 1
subscribeAt: 2024-01-01T00:00:00+00:00
expiredAt: 2024-01-01T00:00:00+00:00
renewedAt: null
discountFinishedAt: null
discountStartedAt: null
status: null
isMuted: false
unsubscribeReason: Redacted
duration: 8 months
tipsSumm: 0
subscribesSumm: 0
messagesSumm: 0
postsSumm: 0
streamsSumm: 0
totalSumm: 0
subscribes: []
hasActivePaidSubscriptions: false
canCreatePromotion: false
canCreateTrial: false
isAdultContent: false
canTrialSend: true
hasLinks: false
hasFriends: true
firstPublishedPostDate: 2024-01-01T00:00:00+00:00
isSpringConnected: false
isFriend: false
isBlocked: false
canReport: true
canUnsubscribe: true
isPendingAutoprolong: false
_meta:
_credits:
used: 1
balance: 380044
note: Always
_cache:
is_cached: false
note: Cache disabled for this endpoint
_rate_limits:
limit_minute: 5000
limit_day: null
remaining_minute: 4999
remaining_day: null
notice: We have decided to remove our daily rate limits. Please remove any
references to these in your integrations.
properties:
data:
type: object
properties:
"1000000":
type: object
properties:
view:
type: string
example: f
avatar:
type: string
example: https://example.com/redacted.jpg
avatarThumbs:
type: object
properties:
c50:
type: string
example: https://example.com/redacted.jpg
c144:
type: string
example: https://example.com/redacted.jpg
header:
type: string
example: null
nullable: true
headerSize:
type: string
example: null
nullable: true
headerThumbs:
type: string
example: null
nullable: true
id:
type: integer
example: 1000000
name:
type: string
example: Example User
username:
type: string
example: example_user
canLookStory:
type: boolean
example: true
canCommentStory:
type: boolean
example: true
hasNotViewedStory:
type: boolean
example: false
isVerified:
type: boolean
example: true
canPayInternal:
type: boolean
example: true
hasScheduledStream:
type: boolean
example: false
hasStream:
type: boolean
example: false
hasStories:
type: boolean
example: false
tipsEnabled:
type: boolean
example: false
tipsTextEnabled:
type: boolean
example: true
tipsMin:
type: integer
example: 5
tipsMinInternal:
type: integer
example: 1
tipsMax:
type: integer
example: 200
canEarn:
type: boolean
example: true
canAddSubscriber:
type: boolean
example: false
subscribePrice:
type: integer
example: 0
displayName:
type: string
example: Example User
notice:
type: string
example: ""
isPaywallRequired:
type: boolean
example: true
isActive:
type: boolean
example: true
isRestricted:
type: boolean
example: false
canRestrict:
type: boolean
example: true
subscribedBy:
type: boolean
example: true
subscribedByExpire:
type: boolean
example: false
subscribedByExpireDate:
type: string
example: 2024-01-01T00:00:00+00:00
subscribedByAutoprolong:
type: boolean
example: false
subscribedIsExpiredNow:
type: boolean
example: false
currentSubscribePrice:
type: integer
example: 0
subscribedOn:
type: string
example: null
nullable: true
subscribedOnExpiredNow:
type: boolean
example: true
subscribedOnDuration:
type: string
example: 1 month
listsStates:
type: array
example:
- id: redacted_id
type: muted
name: Example User
hasUser: false
canAddUser: true
cannotAddUserReason: null
- id: redacted_id
type: fans
name: Example User
hasUser: false
canAddUser: false
cannotAddUserReason: null
- id: redacted_id
type: following
name: Example User
hasUser: true
canAddUser: false
cannotAddUserReason: ALREADY_EXISTS
- id: redacted_id
type: recent
name: Example User
hasUser: false
canAddUser: false
cannotAddUserReason: SYSTEM_LIST
- id: redacted_id
type: friends
name: Example User
hasUser: false
canAddUser: true
cannotAddUserReason: null
- id: 1000000
type: custom
name: Example User
hasUser: true
canAddUser: false
cannotAddUserReason: ALREADY_EXISTS
- id: 1000000
type: custom
name: Example User
hasUser: true
canAddUser: false
cannotAddUserReason: ALREADY_EXISTS
- id: redacted_id
type: rebill_off
name: Example User
hasUser: false
canAddUser: false
cannotAddUserReason: null
- id: redacted_id
type: rebill_on
name: Example User
hasUser: false
canAddUser: false
cannotAddUserReason: null
- id: redacted_id
type: tagged
name: Example User
hasUser: false
canAddUser: false
cannotAddUserReason: SYSTEM_LIST
items:
type: object
properties:
id:
type: string
example: redacted_id
type:
type: string
example: muted
name:
type: string
example: Example User
hasUser:
type: boolean
example: false
canAddUser:
type: boolean
example: true
cannotAddUserReason:
type: string
example: null
nullable: true
joinDate:
type: string
example: 2024-01-01T00:00:00+00:00
isReferrerAllowed:
type: boolean
example: true
about:
type: string
example: ""
isMarkdownDisabledForAbout:
type: boolean
example: false
website:
type: string
example: null
nullable: true
wishlist:
type: string
example: null
nullable: true
location:
type: string
example: null
nullable: true
postsCount:
type: integer
example: 0
archivedPostsCount:
type: integer
example: 0
privateArchivedPostsCount:
type: integer
example: 0
photosCount:
type: integer
example: 0
videosCount:
type: integer
example: 0
audiosCount:
type: integer
example: 0
mediasCount:
type: integer
example: 0
lastSeen:
type: string
example: 2024-01-01T00:00:00+00:00
favoritesCount:
type: integer
example: 0
favoritedCount:
type: integer
example: 0
showPostsInFeed:
type: boolean
example: true
canReceiveChatMessage:
type: boolean
example: true
isPerformer:
type: boolean
example: true
isRealPerformer:
type: boolean
example: true
isSpotifyConnected:
type: boolean
example: false
subscribersCount:
type: string
example: null
nullable: true
hasPinnedPosts:
type: boolean
example: false
hasLabels:
type: boolean
example: false
canChat:
type: boolean
example: true
avatarHeaderConverterUpload:
type: boolean
example: true
isPrivateRestriction:
type: boolean
example: false
showSubscribersCount:
type: boolean
example: false
showMediaCount:
type: boolean
example: true
subscribedByData:
type: object
properties:
price:
type: integer
example: 0
newPrice:
type: integer
example: 0
regularPrice:
type: integer
example: 0
subscribePrice:
type: integer
example: 0
discountPercent:
type: integer
example: 0
discountPeriod:
type: integer
example: 1
subscribeAt:
type: string
example: 2024-01-01T00:00:00+00:00
expiredAt:
type: string
example: 2024-01-01T00:00:00+00:00
renewedAt:
type: string
example: null
nullable: true
discountFinishedAt:
type: string
example: null
nullable: true
discountStartedAt:
type: string
example: null
nullable: true
status:
type: string
example: Set to Expire
isMuted:
type: boolean
example: false
unsubscribeReason:
type: string
example: Redacted
duration:
type: string
example: 6 months
showPostsInFeed:
type: boolean
example: true
subscribes:
type: array
example:
- id: 1000000
userId: 1000000
subscriberId: 1000000
date: 2024-01-01T00:00:00+00:00
duration: 3652
startDate: 2024-01-01T00:00:00+00:00
expireDate: 2024-01-01T00:00:00+00:00
cancelDate: null
price: 0
regularPrice: 0
discount: 0
earningId: 0
action: subscribe
type: regular
offerStart: null
offerEnd: null
isCurrent: true
- id: 1000000
userId: 1000000
subscriberId: 1000000
date: 2024-01-01T00:00:00+00:00
duration: 3652
startDate: 2024-01-01T00:00:00+00:00
expireDate: 2024-01-01T00:00:00+00:00
cancelDate: null
price: 0
regularPrice: 0
discount: 0
earningId: 0
action: prolong
type: regular
offerStart: null
offerEnd: null
isCurrent: true
items:
type: object
properties:
id:
type: integer
example: 1000000
userId:
type: integer
example: 1000000
subscriberId:
type: integer
example: 1000000
date:
type: string
example: 2024-01-01T00:00:00+00:00
duration:
type: integer
example: 3652
startDate:
type: string
example: 2024-01-01T00:00:00+00:00
expireDate:
type: string
example: 2024-01-01T00:00:00+00:00
cancelDate:
type: string
example: null
nullable: true
price:
type: integer
example: 0
regularPrice:
type: integer
example: 0
discount:
type: integer
example: 0
earningId:
type: integer
example: 0
action:
type: string
example: subscribe
type:
type: string
example: regular
offerStart:
type: string
example: null
nullable: true
offerEnd:
type: string
example: null
nullable: true
isCurrent:
type: boolean
example: true
hasActivePaidSubscriptions:
type: boolean
example: false
subscribedOnData:
type: object
properties:
price:
type: number
example: 3.9
newPrice:
type: number
example: 12.99
regularPrice:
type: number
example: 12.99
subscribePrice:
type: number
example: 12.99
discountPercent:
type: integer
example: 0
discountPeriod:
type: integer
example: 1
subscribeAt:
type: string
example: 2024-01-01T00:00:00+00:00
expiredAt:
type: string
example: 2024-01-01T00:00:00+00:00
renewedAt:
type: string
example: null
nullable: true
discountFinishedAt:
type: string
example: null
nullable: true
discountStartedAt:
type: string
example: null
nullable: true
status:
type: string
example: null
nullable: true
isMuted:
type: boolean
example: false
unsubscribeReason:
type: string
example: Redacted
duration:
type: string
example: 8 months
tipsSumm:
type: integer
example: 0
subscribesSumm:
type: integer
example: 0
messagesSumm:
type: integer
example: 0
postsSumm:
type: integer
example: 0
streamsSumm:
type: integer
example: 0
totalSumm:
type: integer
example: 0
subscribes:
type: array
example: []
hasActivePaidSubscriptions:
type: boolean
example: false
canCreatePromotion:
type: boolean
example: false
canCreateTrial:
type: boolean
example: false
isAdultContent:
type: boolean
example: false
canTrialSend:
type: boolean
example: true
hasLinks:
type: boolean
example: false
hasFriends:
type: boolean
example: true
firstPublishedPostDate:
type: string
example: 2024-01-01T00:00:00+00:00
isSpringConnected:
type: boolean
example: false
isFriend:
type: boolean
example: false
isBlocked:
type: boolean
example: false
canReport:
type: boolean
example: true
canUnsubscribe:
type: boolean
example: true
isPendingAutoprolong:
type: boolean
example: false
_meta:
type: object
properties:
_credits:
type: object
properties:
used:
type: integer
example: 1
balance:
type: integer
example: 380044
note:
type: string
example: Always
_cache:
type: object
properties:
is_cached:
type: boolean
example: false
note:
type: string
example: Cache disabled for this endpoint
_rate_limits:
type: object
properties:
limit_minute:
type: integer
example: 5000
limit_day:
type: string
example: null
nullable: true
remaining_minute:
type: integer
example: 4999
remaining_day:
type: string
example: null
nullable: true
notice:
type: string
example: We have decided to remove our daily rate limits. Please remove any
references to these in your integrations.
tags:
- Users
components:
securitySchemes:
default:
type: http
scheme: bearer
description: Get your API Key from OnlyFansAPI Console -
https://app.onlyfansapi.com/api-keys
````
# Restrict User (/api-reference/users/restrict-user)
Restrict a user. You will not see messages or comments from this them.
## OpenAPI
````yaml https://app.onlyfansapi.com/scribe-docs/openapi.yaml post /api/{account}/users/{user_id}/restrict
openapi: 3.0.3
info:
title: OnlyFans API
description: ""
version: 1.0.0
servers:
- url: https://app.onlyfansapi.com
security:
- default: []
tags:
- name: AI Voice Messages
description: ""
- name: API Keys
description: ""
- name: Account
description: Endpoints for your linked accounts
- name: Analytics - Financial
description: APIs for retrieving financial analytics data
- name: Analytics - Summary
description: APIs for retrieving summary analytics data
- name: Banking
description: Operations related to user banking details, payout methods, legal
and tax information, and account country settings.
- name: Banned Words
description: Reference list of OnlyFans banned words used by the
`blockBannedWords` screening parameter
- name: Blocked / Restricted Users
description: APIs for listing the users an account has blocked or restricted
- name: Chargebacks
description: ""
- name: Chat Messages
description: ""
- name: Chats
description: ""
- name: Client Sessions
description: ""
- name: Connect OnlyFans Account
description: ""
- name: Data Exports
description: APIs for managing data exports
- name: Engagement / Messages
description: ""
- name: Fans
description: APIs for managing OnlyFans fans (subscribers)
- name: Fans - AI Summary
description: APIs for generating and retrieving AI-powered fan profile summaries
- name: Following
description: APIs for managing OnlyFans followings (people you're subscribed to)
- name: Free Trial Links
description: APIs for managing Free Trial Links. Revenue totals are net earnings
after refunds and chargebacks. `revenue.chargebacks` (or
`summary.chargebacks_total` in stats) is the positive cached net amount
already excluded from revenue; do not subtract it again. Spender responses
include chargebacks across all attributed periods for each fan with
positive net revenue.
- name: Giphy
description: ""
- name: Link Tags
description: APIs for managing tags on free trial links, tracking links, and Smart Links
- name: Mass Messaging
description: ""
- name: Media
description: ""
- name: Media Vault
description: ""
- name: Media Vault Lists
description: ""
- name: Notifications
description: Endpoints for managingr account notifications
- name: Payouts
description: ""
- name: Post Comments
description: ""
- name: Post Labels
description: APIs for managing your post labels
- name: Posts
description: APIs for managing OnlyFans posts
- name: Profile Content
description: Read another user's profile content using your connected OnlyFans
account. OnlyFans enforces subscription and purchase requirements; these
endpoints do not unlock content. Response samples use captured OnlyFans
payloads with anonymized IDs, text, and media URLs; OFAPI metadata values
are illustrative.
- name: Promotions
description: ""
- name: Public Profiles
description: ""
- name: Queue
description: ""
- name: Release Forms
description: APIs for managing OnlyFans release forms
- name: Saved For Later (Messages)
description: ""
- name: Saved For Later (Posts)
description: ""
- name: Settings
description: ""
- name: Shared Free Trial Links
description: APIs for Free Trial Links that other OF creators have shared with
this account. Revenue, cost, and spender data are not available for shared
links.
- name: Shared Tracking Links
description: APIs for Tracking Links (campaigns) that other OF creators have
shared with this account. Revenue, cost, and spender data are not
available for shared campaigns.
- name: Smart Link Postbacks
description: APIs for managing Smart Link postback destinations
- name: Smart Links
description: APIs for managing Smart Links (Free Trial Links and Tracking Links
with pooled inventory)
- name: Statistics
description: ""
- name: Stored Free Trial Links
description: Instant APIs for retrieving stored free trial links from the
OnlyFansAPI Cache (free, no credits used). `revenue.total` is net earnings
after refunds and chargebacks. `revenue.chargebacks` is the positive
cached net amount already excluded from that total; do not subtract it
again.
- name: Stored Shared Free Trial Links
description: Instant APIs for retrieving stored shared Free Trial Links from the
OnlyFansAPI Cache (free, no credits used)
- name: Stored Shared Tracking Links
description: Instant APIs for retrieving stored shared Tracking Links
(campaigns) from the OnlyFansAPI Cache (free, no credits used)
- name: Stored Tracking Links
description: Instant APIs for retrieving stored tracking links from the
OnlyFansAPI Cache (free, no credits used). `revenue.total` is net earnings
after refunds and chargebacks. `revenue.chargebacks` is the positive
cached net amount already excluded from that total; do not subtract it
again.
- name: Stories
description: APIs for managing OnlyFans stories
- name: Story Highlights
description: APIs for managing OnlyFans story highlights
- name: Subscription Bundles
description: ""
- name: Tracking Links
description: APIs for managing tracking links. Revenue totals are net earnings
after refunds and chargebacks. `revenue.chargebacks` (or
`summary.chargebacks_total` in stats) is the positive cached net amount
already excluded from revenue; do not subtract it again. Spender responses
include chargebacks across all attributed periods for each fan with
positive net revenue.
- name: Transactions
description: APIs for managing OnlyFans transactions
- name: Usage
description: Credit usage reporting for your team
- name: User List Collections
description: ""
- name: Users
description: APIs for fetching OnlyFans users
- name: Webhooks
description: ""
paths:
/api/{account}/users/{user_id}/restrict:
parameters:
- in: path
name: account
description: The Account ID
example: acct_XXXXXXXXXXXXXXX
required: true
schema:
type: string
- in: path
name: user_id
description: The OnlyFans ID of the user to restrict.
example: 123
required: true
schema:
type: string
post:
summary: Restrict User
operationId: restrictUser
description: Restrict a user. You will not see messages or comments from this them.
parameters: []
responses:
"200":
description: ""
content:
application/json:
schema:
type: object
example:
data:
view: f
avatar: https://public.onlyfans.com/files/i/i2/i25/.../123/avatar.jpg
avatarThumbs:
c50: https://thumbs.onlyfans.com/public/files/thumbs/c50/i/i2/i25/.../123/avatar.jpg
c144: https://thumbs.onlyfans.com/public/files/thumbs/c144/i/i2/i25/.../123/avatar.jpg
header: https://public.onlyfans.com/files/c/cs/cse/.../123/header_image.jpg
headerSize:
width: 4386
height: 1224
headerThumbs:
w480: https://thumbs.onlyfans.com/public/files/thumbs/w480/c/cs/cse/.../123/header_image.jpg
w760: https://thumbs.onlyfans.com/public/files/thumbs/w760/c/cs/cse/.../123/header_image.jpg
id: 123
name: name
username: username
canLookStory: true
canCommentStory: true
hasNotViewedStory: true
isVerified: true
canPayInternal: true
hasScheduledStream: false
hasStream: false
hasStories: true
tipsEnabled: true
tipsTextEnabled: true
tipsMin: 5
tipsMinInternal: 1
tipsMax: 200
canEarn: true
canAddSubscriber: true
subscribePrice: 12.99
subscriptionBundles:
- id: 123
discount: 50
duration: 3
price: 19.49
canBuy: true
displayName: ""
notice: ""
isPaywallRequired: true
isRestricted: false
canRestrict: true
subscribedBy: true
subscribedByExpire: false
subscribedByExpireDate: 2025-01-01T01:01:01+00:00
subscribedByAutoprolong: false
subscribedIsExpiredNow: false
currentSubscribePrice: 0
subscribedOn: null
subscribedOnExpiredNow: true
subscribedOnDuration: 7 days
listsStates:
- id: following
type: following
name: Following
hasUser: true
canAddUser: false
cannotAddUserReason: ALREADY_EXISTS
- id: fans
type: fans
name: Fans
hasUser: false
canAddUser: false
cannotAddUserReason: null
- id: recent
type: recent
name: Recent (last 24 hours)
hasUser: false
canAddUser: false
cannotAddUserReason: SYSTEM_LIST
- id: tagged
type: tagged
name: Tagged
hasUser: true
canAddUser: false
cannotAddUserReason: ALREADY_EXISTS
- id: friends
type: friends
name: Friends
hasUser: false
canAddUser: true
cannotAddUserReason: null
- id: muted
type: muted
name: Muted
hasUser: false
canAddUser: true
cannotAddUserReason: null
joinDate: 2025-01-01T01:01:01+00:00
isReferrerAllowed: true
about: About
isMarkdownDisabledForAbout: true
website: null
wishlist: null
location: location
postsCount: 123
archivedPostsCount: 1
privateArchivedPostsCount: 123
photosCount: 123
videosCount: 63
audiosCount: 0
mediasCount: 123
lastSeen: 2025-01-01T01:01:01+00:00
favoritesCount: 123
favoritedCount: 123
showPostsInFeed: true
canReceiveChatMessage: true
isPerformer: true
isRealPerformer: true
isSpotifyConnected: false
subscribersCount: null
hasPinnedPosts: true
hasLabels: true
canChat: true
avatarHeaderConverterUpload: true
isPrivateRestriction: false
showSubscribersCount: false
showMediaCount: true
subscribedByData:
price: 0
newPrice: 0
regularPrice: 12.99
subscribePrice: 12.99
discountPercent: 0
discountPeriod: 1
subscribeAt: 2025-01-01T01:01:01+00:00
expiredAt: 2025-01-01T01:01:01+00:00
renewedAt: null
discountFinishedAt: null
discountStartedAt: null
status: Set to Expire
isMuted: false
unsubscribeReason: No reason given
duration: 2 months
showPostsInFeed: true
subscribes:
- id: 123
userId: 123
subscriberId: 123
date: 2025-01-01T01:01:01+00:00
duration: 360
startDate: 2025-01-01T01:01:01+00:00
expireDate: 2025-01-01T01:01:01+00:00
cancelDate: null
price: 0
regularPrice: 12.99
discount: 0
earningId: 0
action: subscribe
type: trial
offerStart: 2025-01-01T01:01:01+00:00
offerEnd: null
isCurrent: true
hasActivePaidSubscriptions: false
subscribedOnData:
price: 0
newPrice: 0
regularPrice: 0
subscribePrice: 0
discountPercent: 0
discountPeriod: 1
subscribeAt: 2025-01-01T01:01:01+00:00
expiredAt: 2025-01-01T01:01:01+00:00
renewedAt: null
discountFinishedAt: null
discountStartedAt: null
status: null
isMuted: false
unsubscribeReason: No reason given
duration: 7 days
tipsSumm: 0
subscribesSumm: 0
messagesSumm: 0
postsSumm: 0
streamsSumm: 0
totalSumm: 0
subscribes: []
hasActivePaidSubscriptions: false
canCreatePromotion: true
canCreateTrial: true
isAdultContent: false
canTrialSend: false
hasLinks: false
hasFriends: false
finishedStreamsCount: 0
shouldShowFinishedStreams: false
hasSavedStreams: false
firstPublishedPostDate: 2025-01-01T01:01:01+00:00
isSpringConnected: false
isFriend: false
isBlocked: false
canReport: true
canUnsubscribe: true
isPendingAutoprolong: false
_meta:
_credits:
used: 1
balance: 999999834
note: Always
_cache:
is_cached: false
note: Cache disabled for this endpoint
_rate_limits:
limit_minute: 10000000
limit_day: 50000
remaining_minute: 9999999
remaining_day: 49992
properties:
data:
type: object
properties:
view:
type: string
example: f
avatar:
type: string
example: https://public.onlyfans.com/files/i/i2/i25/.../123/avatar.jpg
avatarThumbs:
type: object
properties:
c50:
type: string
example: https://thumbs.onlyfans.com/public/files/thumbs/c50/i/i2/i25/.../123/avatar.jpg
c144:
type: string
example: https://thumbs.onlyfans.com/public/files/thumbs/c144/i/i2/i25/.../123/avatar.jpg
header:
type: string
example: https://public.onlyfans.com/files/c/cs/cse/.../123/header_image.jpg
headerSize:
type: object
properties:
width:
type: integer
example: 4386
height:
type: integer
example: 1224
headerThumbs:
type: object
properties:
w480:
type: string
example: https://thumbs.onlyfans.com/public/files/thumbs/w480/c/cs/cse/.../123/header_image.jpg
w760:
type: string
example: https://thumbs.onlyfans.com/public/files/thumbs/w760/c/cs/cse/.../123/header_image.jpg
id:
type: integer
example: 123
name:
type: string
example: name
username:
type: string
example: username
canLookStory:
type: boolean
example: true
canCommentStory:
type: boolean
example: true
hasNotViewedStory:
type: boolean
example: true
isVerified:
type: boolean
example: true
canPayInternal:
type: boolean
example: true
hasScheduledStream:
type: boolean
example: false
hasStream:
type: boolean
example: false
hasStories:
type: boolean
example: true
tipsEnabled:
type: boolean
example: true
tipsTextEnabled:
type: boolean
example: true
tipsMin:
type: integer
example: 5
tipsMinInternal:
type: integer
example: 1
tipsMax:
type: integer
example: 200
canEarn:
type: boolean
example: true
canAddSubscriber:
type: boolean
example: true
subscribePrice:
type: number
example: 12.99
subscriptionBundles:
type: array
example:
- id: 123
discount: 50
duration: 3
price: 19.49
canBuy: true
items:
type: object
properties:
id:
type: integer
example: 123
discount:
type: integer
example: 50
duration:
type: integer
example: 3
price:
type: number
example: 19.49
canBuy:
type: boolean
example: true
displayName:
type: string
example: ""
notice:
type: string
example: ""
isPaywallRequired:
type: boolean
example: true
isRestricted:
type: boolean
example: false
canRestrict:
type: boolean
example: true
subscribedBy:
type: boolean
example: true
subscribedByExpire:
type: boolean
example: false
subscribedByExpireDate:
type: string
example: 2025-01-01T01:01:01+00:00
subscribedByAutoprolong:
type: boolean
example: false
subscribedIsExpiredNow:
type: boolean
example: false
currentSubscribePrice:
type: integer
example: 0
subscribedOn:
type: string
example: null
nullable: true
subscribedOnExpiredNow:
type: boolean
example: true
subscribedOnDuration:
type: string
example: 7 days
listsStates:
type: array
example:
- id: following
type: following
name: Following
hasUser: true
canAddUser: false
cannotAddUserReason: ALREADY_EXISTS
- id: fans
type: fans
name: Fans
hasUser: false
canAddUser: false
cannotAddUserReason: null
- id: recent
type: recent
name: Recent (last 24 hours)
hasUser: false
canAddUser: false
cannotAddUserReason: SYSTEM_LIST
- id: tagged
type: tagged
name: Tagged
hasUser: true
canAddUser: false
cannotAddUserReason: ALREADY_EXISTS
- id: friends
type: friends
name: Friends
hasUser: false
canAddUser: true
cannotAddUserReason: null
- id: muted
type: muted
name: Muted
hasUser: false
canAddUser: true
cannotAddUserReason: null
items:
type: object
properties:
id:
type: string
example: following
type:
type: string
example: following
name:
type: string
example: Following
hasUser:
type: boolean
example: true
canAddUser:
type: boolean
example: false
cannotAddUserReason:
type: string
example: ALREADY_EXISTS
joinDate:
type: string
example: 2025-01-01T01:01:01+00:00
isReferrerAllowed:
type: boolean
example: true
about:
type: string
example: About
isMarkdownDisabledForAbout:
type: boolean
example: true
website:
type: string
example: null
nullable: true
wishlist:
type: string
example: null
nullable: true
location:
type: string
example: location
postsCount:
type: integer
example: 123
archivedPostsCount:
type: integer
example: 1
privateArchivedPostsCount:
type: integer
example: 123
photosCount:
type: integer
example: 123
videosCount:
type: integer
example: 63
audiosCount:
type: integer
example: 0
mediasCount:
type: integer
example: 123
lastSeen:
type: string
example: 2025-01-01T01:01:01+00:00
favoritesCount:
type: integer
example: 123
favoritedCount:
type: integer
example: 123
showPostsInFeed:
type: boolean
example: true
canReceiveChatMessage:
type: boolean
example: true
isPerformer:
type: boolean
example: true
isRealPerformer:
type: boolean
example: true
isSpotifyConnected:
type: boolean
example: false
subscribersCount:
type: string
example: null
nullable: true
hasPinnedPosts:
type: boolean
example: true
hasLabels:
type: boolean
example: true
canChat:
type: boolean
example: true
avatarHeaderConverterUpload:
type: boolean
example: true
isPrivateRestriction:
type: boolean
example: false
showSubscribersCount:
type: boolean
example: false
showMediaCount:
type: boolean
example: true
subscribedByData:
type: object
properties:
price:
type: integer
example: 0
newPrice:
type: integer
example: 0
regularPrice:
type: number
example: 12.99
subscribePrice:
type: number
example: 12.99
discountPercent:
type: integer
example: 0
discountPeriod:
type: integer
example: 1
subscribeAt:
type: string
example: 2025-01-01T01:01:01+00:00
expiredAt:
type: string
example: 2025-01-01T01:01:01+00:00
renewedAt:
type: string
example: null
nullable: true
discountFinishedAt:
type: string
example: null
nullable: true
discountStartedAt:
type: string
example: null
nullable: true
status:
type: string
example: Set to Expire
isMuted:
type: boolean
example: false
unsubscribeReason:
type: string
example: No reason given
duration:
type: string
example: 2 months
showPostsInFeed:
type: boolean
example: true
subscribes:
type: array
example:
- id: 123
userId: 123
subscriberId: 123
date: 2025-01-01T01:01:01+00:00
duration: 360
startDate: 2025-01-01T01:01:01+00:00
expireDate: 2025-01-01T01:01:01+00:00
cancelDate: null
price: 0
regularPrice: 12.99
discount: 0
earningId: 0
action: subscribe
type: trial
offerStart: 2025-01-01T01:01:01+00:00
offerEnd: null
isCurrent: true
items:
type: object
properties:
id:
type: integer
example: 123
userId:
type: integer
example: 123
subscriberId:
type: integer
example: 123
date:
type: string
example: 2025-01-01T01:01:01+00:00
duration:
type: integer
example: 360
startDate:
type: string
example: 2025-01-01T01:01:01+00:00
expireDate:
type: string
example: 2025-01-01T01:01:01+00:00
cancelDate:
type: string
example: null
nullable: true
price:
type: integer
example: 0
regularPrice:
type: number
example: 12.99
discount:
type: integer
example: 0
earningId:
type: integer
example: 0
action:
type: string
example: subscribe
type:
type: string
example: trial
offerStart:
type: string
example: 2025-01-01T01:01:01+00:00
offerEnd:
type: string
example: null
nullable: true
isCurrent:
type: boolean
example: true
hasActivePaidSubscriptions:
type: boolean
example: false
subscribedOnData:
type: object
properties:
price:
type: integer
example: 0
newPrice:
type: integer
example: 0
regularPrice:
type: integer
example: 0
subscribePrice:
type: integer
example: 0
discountPercent:
type: integer
example: 0
discountPeriod:
type: integer
example: 1
subscribeAt:
type: string
example: 2025-01-01T01:01:01+00:00
expiredAt:
type: string
example: 2025-01-01T01:01:01+00:00
renewedAt:
type: string
example: null
nullable: true
discountFinishedAt:
type: string
example: null
nullable: true
discountStartedAt:
type: string
example: null
nullable: true
status:
type: string
example: null
nullable: true
isMuted:
type: boolean
example: false
unsubscribeReason:
type: string
example: No reason given
duration:
type: string
example: 7 days
tipsSumm:
type: integer
example: 0
subscribesSumm:
type: integer
example: 0
messagesSumm:
type: integer
example: 0
postsSumm:
type: integer
example: 0
streamsSumm:
type: integer
example: 0
totalSumm:
type: integer
example: 0
subscribes:
type: array
example: []
hasActivePaidSubscriptions:
type: boolean
example: false
canCreatePromotion:
type: boolean
example: true
canCreateTrial:
type: boolean
example: true
isAdultContent:
type: boolean
example: false
canTrialSend:
type: boolean
example: false
hasLinks:
type: boolean
example: false
hasFriends:
type: boolean
example: false
finishedStreamsCount:
type: integer
example: 0
shouldShowFinishedStreams:
type: boolean
example: false
hasSavedStreams:
type: boolean
example: false
firstPublishedPostDate:
type: string
example: 2025-01-01T01:01:01+00:00
isSpringConnected:
type: boolean
example: false
isFriend:
type: boolean
example: false
isBlocked:
type: boolean
example: false
canReport:
type: boolean
example: true
canUnsubscribe:
type: boolean
example: true
isPendingAutoprolong:
type: boolean
example: false
_meta:
type: object
properties:
_credits:
type: object
properties:
used:
type: integer
example: 1
balance:
type: integer
example: 999999834
note:
type: string
example: Always
_cache:
type: object
properties:
is_cached:
type: boolean
example: false
note:
type: string
example: Cache disabled for this endpoint
_rate_limits:
type: object
properties:
limit_minute:
type: integer
example: 10000000
limit_day:
type: integer
example: 50000
remaining_minute:
type: integer
example: 9999999
remaining_day:
type: integer
example: 49992
tags:
- Users
components:
securitySchemes:
default:
type: http
scheme: bearer
description: Get your API Key from OnlyFansAPI Console -
https://app.onlyfansapi.com/api-keys
````
# Subscribe to User (/api-reference/users/subscribe-to-user)
Subscribe to a user's profile.
## OpenAPI
````yaml https://app.onlyfansapi.com/scribe-docs/openapi.yaml post /api/{account}/users/{user_id}/subscribe
openapi: 3.0.3
info:
title: OnlyFans API
description: ""
version: 1.0.0
servers:
- url: https://app.onlyfansapi.com
security:
- default: []
tags:
- name: AI Voice Messages
description: ""
- name: API Keys
description: ""
- name: Account
description: Endpoints for your linked accounts
- name: Analytics - Financial
description: APIs for retrieving financial analytics data
- name: Analytics - Summary
description: APIs for retrieving summary analytics data
- name: Banking
description: Operations related to user banking details, payout methods, legal
and tax information, and account country settings.
- name: Banned Words
description: Reference list of OnlyFans banned words used by the
`blockBannedWords` screening parameter
- name: Blocked / Restricted Users
description: APIs for listing the users an account has blocked or restricted
- name: Chargebacks
description: ""
- name: Chat Messages
description: ""
- name: Chats
description: ""
- name: Client Sessions
description: ""
- name: Connect OnlyFans Account
description: ""
- name: Data Exports
description: APIs for managing data exports
- name: Engagement / Messages
description: ""
- name: Fans
description: APIs for managing OnlyFans fans (subscribers)
- name: Fans - AI Summary
description: APIs for generating and retrieving AI-powered fan profile summaries
- name: Following
description: APIs for managing OnlyFans followings (people you're subscribed to)
- name: Free Trial Links
description: APIs for managing Free Trial Links. Revenue totals are net earnings
after refunds and chargebacks. `revenue.chargebacks` (or
`summary.chargebacks_total` in stats) is the positive cached net amount
already excluded from revenue; do not subtract it again. Spender responses
include chargebacks across all attributed periods for each fan with
positive net revenue.
- name: Giphy
description: ""
- name: Link Tags
description: APIs for managing tags on free trial links, tracking links, and Smart Links
- name: Mass Messaging
description: ""
- name: Media
description: ""
- name: Media Vault
description: ""
- name: Media Vault Lists
description: ""
- name: Notifications
description: Endpoints for managingr account notifications
- name: Payouts
description: ""
- name: Post Comments
description: ""
- name: Post Labels
description: APIs for managing your post labels
- name: Posts
description: APIs for managing OnlyFans posts
- name: Profile Content
description: Read another user's profile content using your connected OnlyFans
account. OnlyFans enforces subscription and purchase requirements; these
endpoints do not unlock content. Response samples use captured OnlyFans
payloads with anonymized IDs, text, and media URLs; OFAPI metadata values
are illustrative.
- name: Promotions
description: ""
- name: Public Profiles
description: ""
- name: Queue
description: ""
- name: Release Forms
description: APIs for managing OnlyFans release forms
- name: Saved For Later (Messages)
description: ""
- name: Saved For Later (Posts)
description: ""
- name: Settings
description: ""
- name: Shared Free Trial Links
description: APIs for Free Trial Links that other OF creators have shared with
this account. Revenue, cost, and spender data are not available for shared
links.
- name: Shared Tracking Links
description: APIs for Tracking Links (campaigns) that other OF creators have
shared with this account. Revenue, cost, and spender data are not
available for shared campaigns.
- name: Smart Link Postbacks
description: APIs for managing Smart Link postback destinations
- name: Smart Links
description: APIs for managing Smart Links (Free Trial Links and Tracking Links
with pooled inventory)
- name: Statistics
description: ""
- name: Stored Free Trial Links
description: Instant APIs for retrieving stored free trial links from the
OnlyFansAPI Cache (free, no credits used). `revenue.total` is net earnings
after refunds and chargebacks. `revenue.chargebacks` is the positive
cached net amount already excluded from that total; do not subtract it
again.
- name: Stored Shared Free Trial Links
description: Instant APIs for retrieving stored shared Free Trial Links from the
OnlyFansAPI Cache (free, no credits used)
- name: Stored Shared Tracking Links
description: Instant APIs for retrieving stored shared Tracking Links
(campaigns) from the OnlyFansAPI Cache (free, no credits used)
- name: Stored Tracking Links
description: Instant APIs for retrieving stored tracking links from the
OnlyFansAPI Cache (free, no credits used). `revenue.total` is net earnings
after refunds and chargebacks. `revenue.chargebacks` is the positive
cached net amount already excluded from that total; do not subtract it
again.
- name: Stories
description: APIs for managing OnlyFans stories
- name: Story Highlights
description: APIs for managing OnlyFans story highlights
- name: Subscription Bundles
description: ""
- name: Tracking Links
description: APIs for managing tracking links. Revenue totals are net earnings
after refunds and chargebacks. `revenue.chargebacks` (or
`summary.chargebacks_total` in stats) is the positive cached net amount
already excluded from revenue; do not subtract it again. Spender responses
include chargebacks across all attributed periods for each fan with
positive net revenue.
- name: Transactions
description: APIs for managing OnlyFans transactions
- name: Usage
description: Credit usage reporting for your team
- name: User List Collections
description: ""
- name: Users
description: APIs for fetching OnlyFans users
- name: Webhooks
description: ""
paths:
/api/{account}/users/{user_id}/subscribe:
parameters:
- in: path
name: account
description: The Account ID
example: acct_XXXXXXXXXXXXXXX
required: true
schema:
type: string
- in: path
name: user_id
description: The OnlyFans ID of the user to subscribe to.
example: 123
required: true
schema:
type: string
post:
summary: Subscribe to User
operationId: subscribeToUser
description: Subscribe to a user's profile.
parameters: []
responses:
"200":
description: ""
content:
application/json:
schema:
type: object
example:
data:
view: f
avatar: https://public.onlyfans.com/files/i/i2/i25/.../123/avatar.jpg
avatarThumbs:
c50: https://thumbs.onlyfans.com/public/files/thumbs/c50/i/i2/i25/.../123/avatar.jpg
c144: https://thumbs.onlyfans.com/public/files/thumbs/c144/i/i2/i25/.../123/avatar.jpg
header: https://public.onlyfans.com/files/c/cs/cse/.../123/header_image.jpg
headerSize:
width: 3840
height: 1197
headerThumbs:
w480: https://thumbs.onlyfans.com/public/files/thumbs/w480/c/cs/cse/.../123/header_image.jpg
w760: https://thumbs.onlyfans.com/public/files/thumbs/w760/c/cs/cse/.../123/header_image.jpg
id: 123
name: name
username: username
canLookStory: true
canCommentStory: true
hasNotViewedStory: true
isVerified: true
canPayInternal: true
hasScheduledStream: false
hasStream: false
hasStories: true
tipsEnabled: true
tipsTextEnabled: true
tipsMin: 5
tipsMinInternal: 1
tipsMax: 200
canEarn: true
canAddSubscriber: false
subscribePrice: 0
isPaywallRequired: true
isActive: true
isRestricted: false
canRestrict: true
subscribedBy: true
subscribedByExpire: false
subscribedByExpireDate: 2025-01-01T01:01:01+00:00
subscribedByAutoprolong: true
subscribedIsExpiredNow: false
currentSubscribePrice: 0
subscribedOn: false
subscribedOnExpiredNow: null
subscribedOnDuration: null
listsStates:
- id: following
type: following
name: Following
hasUser: true
canAddUser: false
cannotAddUserReason: ALREADY_EXISTS
- id: fans
type: fans
name: Fans
hasUser: false
canAddUser: false
cannotAddUserReason: null
- id: rebill_off
type: rebill_off
name: Renew Off
hasUser: false
canAddUser: false
cannotAddUserReason: null
- id: rebill_on
type: rebill_on
name: Renew On
hasUser: false
canAddUser: false
cannotAddUserReason: null
- id: recent
type: recent
name: Recent (last 24 hours)
hasUser: false
canAddUser: false
cannotAddUserReason: SYSTEM_LIST
- id: tagged
type: tagged
name: Tagged
hasUser: false
canAddUser: false
cannotAddUserReason: SYSTEM_LIST
- id: friends
type: friends
name: Friends
hasUser: false
canAddUser: true
cannotAddUserReason: null
- id: muted
type: muted
name: Muted
hasUser: false
canAddUser: true
cannotAddUserReason: null
canReport: true
canReceiveChatMessage: true
hideChat: false
lastSeen: 2025-01-01T01:01:01+00:00
isPerformer: true
isRealPerformer: true
subscribedByData:
price: 0
newPrice: 0
regularPrice: 0
subscribePrice: 0
discountPercent: 0
discountPeriod: 1
subscribeAt: 2025-01-01T01:01:01+00:00
expiredAt: 2025-01-01T01:01:01+00:00
renewedAt: 2025-01-01T01:01:01+00:00
discountFinishedAt: null
discountStartedAt: null
status: null
isMuted: false
unsubscribeReason: No reason given
duration: ""
showPostsInFeed: true
subscribes:
- id: 123
userId: 123
subscriberId: 123
date: 2025-01-01T01:01:01+00:00
duration: 3652
startDate: 2025-01-01T01:01:01+00:00
expireDate: 2025-01-01T01:01:01+00:00
cancelDate: null
price: 0
regularPrice: 0
discount: 0
earningId: 0
action: subscribe
type: regular
offerStart: null
offerEnd: null
isCurrent: true
hasActivePaidSubscriptions: false
subscribedOnData: null
canTrialSend: false
isBlocked: false
canUnsubscribe: true
isPendingAutoprolong: false
_meta:
_credits:
used: 1
balance: 999999834
note: Always
_cache:
is_cached: false
note: Cache disabled for this endpoint
_rate_limits:
limit_minute: 1000
limit_day: 50000
remaining_minute: 999
remaining_day: 49971
properties:
data:
type: object
properties:
view:
type: string
example: f
avatar:
type: string
example: https://public.onlyfans.com/files/i/i2/i25/.../123/avatar.jpg
avatarThumbs:
type: object
properties:
c50:
type: string
example: https://thumbs.onlyfans.com/public/files/thumbs/c50/i/i2/i25/.../123/avatar.jpg
c144:
type: string
example: https://thumbs.onlyfans.com/public/files/thumbs/c144/i/i2/i25/.../123/avatar.jpg
header:
type: string
example: https://public.onlyfans.com/files/c/cs/cse/.../123/header_image.jpg
headerSize:
type: object
properties:
width:
type: integer
example: 3840
height:
type: integer
example: 1197
headerThumbs:
type: object
properties:
w480:
type: string
example: https://thumbs.onlyfans.com/public/files/thumbs/w480/c/cs/cse/.../123/header_image.jpg
w760:
type: string
example: https://thumbs.onlyfans.com/public/files/thumbs/w760/c/cs/cse/.../123/header_image.jpg
id:
type: integer
example: 123
name:
type: string
example: name
username:
type: string
example: username
canLookStory:
type: boolean
example: true
canCommentStory:
type: boolean
example: true
hasNotViewedStory:
type: boolean
example: true
isVerified:
type: boolean
example: true
canPayInternal:
type: boolean
example: true
hasScheduledStream:
type: boolean
example: false
hasStream:
type: boolean
example: false
hasStories:
type: boolean
example: true
tipsEnabled:
type: boolean
example: true
tipsTextEnabled:
type: boolean
example: true
tipsMin:
type: integer
example: 5
tipsMinInternal:
type: integer
example: 1
tipsMax:
type: integer
example: 200
canEarn:
type: boolean
example: true
canAddSubscriber:
type: boolean
example: false
subscribePrice:
type: integer
example: 0
isPaywallRequired:
type: boolean
example: true
isActive:
type: boolean
example: true
isRestricted:
type: boolean
example: false
canRestrict:
type: boolean
example: true
subscribedBy:
type: boolean
example: true
subscribedByExpire:
type: boolean
example: false
subscribedByExpireDate:
type: string
example: 2025-01-01T01:01:01+00:00
subscribedByAutoprolong:
type: boolean
example: true
subscribedIsExpiredNow:
type: boolean
example: false
currentSubscribePrice:
type: integer
example: 0
subscribedOn:
type: boolean
example: false
subscribedOnExpiredNow:
type: string
example: null
nullable: true
subscribedOnDuration:
type: string
example: null
nullable: true
listsStates:
type: array
example:
- id: following
type: following
name: Following
hasUser: true
canAddUser: false
cannotAddUserReason: ALREADY_EXISTS
- id: fans
type: fans
name: Fans
hasUser: false
canAddUser: false
cannotAddUserReason: null
- id: rebill_off
type: rebill_off
name: Renew Off
hasUser: false
canAddUser: false
cannotAddUserReason: null
- id: rebill_on
type: rebill_on
name: Renew On
hasUser: false
canAddUser: false
cannotAddUserReason: null
- id: recent
type: recent
name: Recent (last 24 hours)
hasUser: false
canAddUser: false
cannotAddUserReason: SYSTEM_LIST
- id: tagged
type: tagged
name: Tagged
hasUser: false
canAddUser: false
cannotAddUserReason: SYSTEM_LIST
- id: friends
type: friends
name: Friends
hasUser: false
canAddUser: true
cannotAddUserReason: null
- id: muted
type: muted
name: Muted
hasUser: false
canAddUser: true
cannotAddUserReason: null
items:
type: object
properties:
id:
type: string
example: following
type:
type: string
example: following
name:
type: string
example: Following
hasUser:
type: boolean
example: true
canAddUser:
type: boolean
example: false
cannotAddUserReason:
type: string
example: ALREADY_EXISTS
canReport:
type: boolean
example: true
canReceiveChatMessage:
type: boolean
example: true
hideChat:
type: boolean
example: false
lastSeen:
type: string
example: 2025-01-01T01:01:01+00:00
isPerformer:
type: boolean
example: true
isRealPerformer:
type: boolean
example: true
subscribedByData:
type: object
properties:
price:
type: integer
example: 0
newPrice:
type: integer
example: 0
regularPrice:
type: integer
example: 0
subscribePrice:
type: integer
example: 0
discountPercent:
type: integer
example: 0
discountPeriod:
type: integer
example: 1
subscribeAt:
type: string
example: 2025-01-01T01:01:01+00:00
expiredAt:
type: string
example: 2025-01-01T01:01:01+00:00
renewedAt:
type: string
example: 2025-01-01T01:01:01+00:00
discountFinishedAt:
type: string
example: null
nullable: true
discountStartedAt:
type: string
example: null
nullable: true
status:
type: string
example: null
nullable: true
isMuted:
type: boolean
example: false
unsubscribeReason:
type: string
example: No reason given
duration:
type: string
example: ""
showPostsInFeed:
type: boolean
example: true
subscribes:
type: array
example:
- id: 123
userId: 123
subscriberId: 123
date: 2025-01-01T01:01:01+00:00
duration: 3652
startDate: 2025-01-01T01:01:01+00:00
expireDate: 2025-01-01T01:01:01+00:00
cancelDate: null
price: 0
regularPrice: 0
discount: 0
earningId: 0
action: subscribe
type: regular
offerStart: null
offerEnd: null
isCurrent: true
items:
type: object
properties:
id:
type: integer
example: 123
userId:
type: integer
example: 123
subscriberId:
type: integer
example: 123
date:
type: string
example: 2025-01-01T01:01:01+00:00
duration:
type: integer
example: 3652
startDate:
type: string
example: 2025-01-01T01:01:01+00:00
expireDate:
type: string
example: 2025-01-01T01:01:01+00:00
cancelDate:
type: string
example: null
nullable: true
price:
type: integer
example: 0
regularPrice:
type: integer
example: 0
discount:
type: integer
example: 0
earningId:
type: integer
example: 0
action:
type: string
example: subscribe
type:
type: string
example: regular
offerStart:
type: string
example: null
nullable: true
offerEnd:
type: string
example: null
nullable: true
isCurrent:
type: boolean
example: true
hasActivePaidSubscriptions:
type: boolean
example: false
subscribedOnData:
type: string
example: null
nullable: true
canTrialSend:
type: boolean
example: false
isBlocked:
type: boolean
example: false
canUnsubscribe:
type: boolean
example: true
isPendingAutoprolong:
type: boolean
example: false
_meta:
type: object
properties:
_credits:
type: object
properties:
used:
type: integer
example: 1
balance:
type: integer
example: 999999834
note:
type: string
example: Always
_cache:
type: object
properties:
is_cached:
type: boolean
example: false
note:
type: string
example: Cache disabled for this endpoint
_rate_limits:
type: object
properties:
limit_minute:
type: integer
example: 1000
limit_day:
type: integer
example: 50000
remaining_minute:
type: integer
example: 999
remaining_day:
type: integer
example: 49971
tags:
- Users
components:
securitySchemes:
default:
type: http
scheme: bearer
description: Get your API Key from OnlyFansAPI Console -
https://app.onlyfansapi.com/api-keys
````
# Unblock User (/api-reference/users/unblock-user)
Unblock a previously blocked user.
## OpenAPI
````yaml https://app.onlyfansapi.com/scribe-docs/openapi.yaml delete /api/{account}/users/{user_id}/block
openapi: 3.0.3
info:
title: OnlyFans API
description: ""
version: 1.0.0
servers:
- url: https://app.onlyfansapi.com
security:
- default: []
tags:
- name: AI Voice Messages
description: ""
- name: API Keys
description: ""
- name: Account
description: Endpoints for your linked accounts
- name: Analytics - Financial
description: APIs for retrieving financial analytics data
- name: Analytics - Summary
description: APIs for retrieving summary analytics data
- name: Banking
description: Operations related to user banking details, payout methods, legal
and tax information, and account country settings.
- name: Banned Words
description: Reference list of OnlyFans banned words used by the
`blockBannedWords` screening parameter
- name: Blocked / Restricted Users
description: APIs for listing the users an account has blocked or restricted
- name: Chargebacks
description: ""
- name: Chat Messages
description: ""
- name: Chats
description: ""
- name: Client Sessions
description: ""
- name: Connect OnlyFans Account
description: ""
- name: Data Exports
description: APIs for managing data exports
- name: Engagement / Messages
description: ""
- name: Fans
description: APIs for managing OnlyFans fans (subscribers)
- name: Fans - AI Summary
description: APIs for generating and retrieving AI-powered fan profile summaries
- name: Following
description: APIs for managing OnlyFans followings (people you're subscribed to)
- name: Free Trial Links
description: APIs for managing Free Trial Links. Revenue totals are net earnings
after refunds and chargebacks. `revenue.chargebacks` (or
`summary.chargebacks_total` in stats) is the positive cached net amount
already excluded from revenue; do not subtract it again. Spender responses
include chargebacks across all attributed periods for each fan with
positive net revenue.
- name: Giphy
description: ""
- name: Link Tags
description: APIs for managing tags on free trial links, tracking links, and Smart Links
- name: Mass Messaging
description: ""
- name: Media
description: ""
- name: Media Vault
description: ""
- name: Media Vault Lists
description: ""
- name: Notifications
description: Endpoints for managingr account notifications
- name: Payouts
description: ""
- name: Post Comments
description: ""
- name: Post Labels
description: APIs for managing your post labels
- name: Posts
description: APIs for managing OnlyFans posts
- name: Profile Content
description: Read another user's profile content using your connected OnlyFans
account. OnlyFans enforces subscription and purchase requirements; these
endpoints do not unlock content. Response samples use captured OnlyFans
payloads with anonymized IDs, text, and media URLs; OFAPI metadata values
are illustrative.
- name: Promotions
description: ""
- name: Public Profiles
description: ""
- name: Queue
description: ""
- name: Release Forms
description: APIs for managing OnlyFans release forms
- name: Saved For Later (Messages)
description: ""
- name: Saved For Later (Posts)
description: ""
- name: Settings
description: ""
- name: Shared Free Trial Links
description: APIs for Free Trial Links that other OF creators have shared with
this account. Revenue, cost, and spender data are not available for shared
links.
- name: Shared Tracking Links
description: APIs for Tracking Links (campaigns) that other OF creators have
shared with this account. Revenue, cost, and spender data are not
available for shared campaigns.
- name: Smart Link Postbacks
description: APIs for managing Smart Link postback destinations
- name: Smart Links
description: APIs for managing Smart Links (Free Trial Links and Tracking Links
with pooled inventory)
- name: Statistics
description: ""
- name: Stored Free Trial Links
description: Instant APIs for retrieving stored free trial links from the
OnlyFansAPI Cache (free, no credits used). `revenue.total` is net earnings
after refunds and chargebacks. `revenue.chargebacks` is the positive
cached net amount already excluded from that total; do not subtract it
again.
- name: Stored Shared Free Trial Links
description: Instant APIs for retrieving stored shared Free Trial Links from the
OnlyFansAPI Cache (free, no credits used)
- name: Stored Shared Tracking Links
description: Instant APIs for retrieving stored shared Tracking Links
(campaigns) from the OnlyFansAPI Cache (free, no credits used)
- name: Stored Tracking Links
description: Instant APIs for retrieving stored tracking links from the
OnlyFansAPI Cache (free, no credits used). `revenue.total` is net earnings
after refunds and chargebacks. `revenue.chargebacks` is the positive
cached net amount already excluded from that total; do not subtract it
again.
- name: Stories
description: APIs for managing OnlyFans stories
- name: Story Highlights
description: APIs for managing OnlyFans story highlights
- name: Subscription Bundles
description: ""
- name: Tracking Links
description: APIs for managing tracking links. Revenue totals are net earnings
after refunds and chargebacks. `revenue.chargebacks` (or
`summary.chargebacks_total` in stats) is the positive cached net amount
already excluded from revenue; do not subtract it again. Spender responses
include chargebacks across all attributed periods for each fan with
positive net revenue.
- name: Transactions
description: APIs for managing OnlyFans transactions
- name: Usage
description: Credit usage reporting for your team
- name: User List Collections
description: ""
- name: Users
description: APIs for fetching OnlyFans users
- name: Webhooks
description: ""
paths:
/api/{account}/users/{user_id}/block:
parameters:
- in: path
name: account
description: The Account ID
example: acct_XXXXXXXXXXXXXXX
required: true
schema:
type: string
- in: path
name: user_id
description: The OnlyFans ID of the user to block.
example: 123
required: true
schema:
type: string
delete:
summary: Unblock User
operationId: unblockUser
description: Unblock a previously blocked user.
parameters: []
responses:
"200":
description: ""
content:
application/json:
schema:
type: object
example:
data:
view: f
avatar: https://public.onlyfans.com/files/i/i2/i25/.../123/avatar.jpg
avatarThumbs:
c50: https://thumbs.onlyfans.com/public/files/thumbs/c50/i/i2/i25/.../123/avatar.jpg
c144: https://thumbs.onlyfans.com/public/files/thumbs/c144/i/i2/i25/.../123/avatar.jpg
header: https://public.onlyfans.com/files/c/cs/cse/.../123/header_image.jpg
headerSize:
width: 4386
height: 1224
headerThumbs:
w480: https://thumbs.onlyfans.com/public/files/thumbs/w480/c/cs/cse/.../123/header_image.jpg
w760: https://thumbs.onlyfans.com/public/files/thumbs/w760/c/cs/cse/.../123/header_image.jpg
id: 123
name: name
username: username
canLookStory: true
canCommentStory: true
hasNotViewedStory: true
isVerified: true
canPayInternal: true
hasScheduledStream: false
hasStream: false
hasStories: true
tipsEnabled: true
tipsTextEnabled: true
tipsMin: 5
tipsMinInternal: 1
tipsMax: 200
canEarn: true
canAddSubscriber: true
subscribePrice: 12.99
subscriptionBundles:
- id: 123
discount: 50
duration: 3
price: 19.49
canBuy: true
displayName: ""
notice: ""
isPaywallRequired: true
isRestricted: false
canRestrict: true
subscribedBy: true
subscribedByExpire: false
subscribedByExpireDate: 2025-01-01T01:01:01+00:00
subscribedByAutoprolong: false
subscribedIsExpiredNow: false
currentSubscribePrice: 0
subscribedOn: null
subscribedOnExpiredNow: true
subscribedOnDuration: 7 days
listsStates:
- id: following
type: following
name: Following
hasUser: true
canAddUser: false
cannotAddUserReason: ALREADY_EXISTS
- id: fans
type: fans
name: Fans
hasUser: false
canAddUser: false
cannotAddUserReason: null
- id: recent
type: recent
name: Recent (last 24 hours)
hasUser: false
canAddUser: false
cannotAddUserReason: SYSTEM_LIST
- id: tagged
type: tagged
name: Tagged
hasUser: true
canAddUser: false
cannotAddUserReason: ALREADY_EXISTS
- id: friends
type: friends
name: Friends
hasUser: false
canAddUser: true
cannotAddUserReason: null
- id: muted
type: muted
name: Muted
hasUser: false
canAddUser: true
cannotAddUserReason: null
joinDate: 2025-01-01T01:01:01+00:00
isReferrerAllowed: true
about: About
isMarkdownDisabledForAbout: true
website: null
wishlist: null
location: location
postsCount: 123
archivedPostsCount: 1
privateArchivedPostsCount: 123
photosCount: 123
videosCount: 63
audiosCount: 0
mediasCount: 123
lastSeen: 2025-01-01T01:01:01+00:00
favoritesCount: 123
favoritedCount: 123
showPostsInFeed: true
canReceiveChatMessage: true
isPerformer: true
isRealPerformer: true
isSpotifyConnected: false
subscribersCount: null
hasPinnedPosts: true
hasLabels: true
canChat: true
avatarHeaderConverterUpload: true
isPrivateRestriction: false
showSubscribersCount: false
showMediaCount: true
subscribedByData:
price: 0
newPrice: 0
regularPrice: 12.99
subscribePrice: 12.99
discountPercent: 0
discountPeriod: 1
subscribeAt: 2025-01-01T01:01:01+00:00
expiredAt: 2025-01-01T01:01:01+00:00
renewedAt: null
discountFinishedAt: null
discountStartedAt: null
status: Set to Expire
isMuted: false
unsubscribeReason: No reason given
duration: 2 months
showPostsInFeed: true
subscribes:
- id: 123
userId: 123
subscriberId: 123
date: 2025-01-01T01:01:01+00:00
duration: 360
startDate: 2025-01-01T01:01:01+00:00
expireDate: 2025-01-01T01:01:01+00:00
cancelDate: null
price: 0
regularPrice: 12.99
discount: 0
earningId: 0
action: subscribe
type: trial
offerStart: 2025-01-01T01:01:01+00:00
offerEnd: null
isCurrent: true
hasActivePaidSubscriptions: false
subscribedOnData:
price: 0
newPrice: 0
regularPrice: 0
subscribePrice: 0
discountPercent: 0
discountPeriod: 1
subscribeAt: 2025-01-01T01:01:01+00:00
expiredAt: 2025-01-01T01:01:01+00:00
renewedAt: null
discountFinishedAt: null
discountStartedAt: null
status: null
isMuted: false
unsubscribeReason: No reason given
duration: 7 days
tipsSumm: 0
subscribesSumm: 0
messagesSumm: 0
postsSumm: 0
streamsSumm: 0
totalSumm: 0
subscribes: []
hasActivePaidSubscriptions: false
canCreatePromotion: true
canCreateTrial: true
isAdultContent: false
canTrialSend: false
hasLinks: false
hasFriends: false
finishedStreamsCount: 0
shouldShowFinishedStreams: false
hasSavedStreams: false
firstPublishedPostDate: 2025-01-01T01:01:01+00:00
isSpringConnected: false
isFriend: false
isBlocked: false
canReport: true
canUnsubscribe: true
isPendingAutoprolong: false
_meta:
_credits:
used: 1
balance: 999999834
note: Always
_cache:
is_cached: false
note: Cache disabled for this endpoint
_rate_limits:
limit_minute: 10000000
limit_day: 50000
remaining_minute: 9999999
remaining_day: 49992
properties:
data:
type: object
properties:
view:
type: string
example: f
avatar:
type: string
example: https://public.onlyfans.com/files/i/i2/i25/.../123/avatar.jpg
avatarThumbs:
type: object
properties:
c50:
type: string
example: https://thumbs.onlyfans.com/public/files/thumbs/c50/i/i2/i25/.../123/avatar.jpg
c144:
type: string
example: https://thumbs.onlyfans.com/public/files/thumbs/c144/i/i2/i25/.../123/avatar.jpg
header:
type: string
example: https://public.onlyfans.com/files/c/cs/cse/.../123/header_image.jpg
headerSize:
type: object
properties:
width:
type: integer
example: 4386
height:
type: integer
example: 1224
headerThumbs:
type: object
properties:
w480:
type: string
example: https://thumbs.onlyfans.com/public/files/thumbs/w480/c/cs/cse/.../123/header_image.jpg
w760:
type: string
example: https://thumbs.onlyfans.com/public/files/thumbs/w760/c/cs/cse/.../123/header_image.jpg
id:
type: integer
example: 123
name:
type: string
example: name
username:
type: string
example: username
canLookStory:
type: boolean
example: true
canCommentStory:
type: boolean
example: true
hasNotViewedStory:
type: boolean
example: true
isVerified:
type: boolean
example: true
canPayInternal:
type: boolean
example: true
hasScheduledStream:
type: boolean
example: false
hasStream:
type: boolean
example: false
hasStories:
type: boolean
example: true
tipsEnabled:
type: boolean
example: true
tipsTextEnabled:
type: boolean
example: true
tipsMin:
type: integer
example: 5
tipsMinInternal:
type: integer
example: 1
tipsMax:
type: integer
example: 200
canEarn:
type: boolean
example: true
canAddSubscriber:
type: boolean
example: true
subscribePrice:
type: number
example: 12.99
subscriptionBundles:
type: array
example:
- id: 123
discount: 50
duration: 3
price: 19.49
canBuy: true
items:
type: object
properties:
id:
type: integer
example: 123
discount:
type: integer
example: 50
duration:
type: integer
example: 3
price:
type: number
example: 19.49
canBuy:
type: boolean
example: true
displayName:
type: string
example: ""
notice:
type: string
example: ""
isPaywallRequired:
type: boolean
example: true
isRestricted:
type: boolean
example: false
canRestrict:
type: boolean
example: true
subscribedBy:
type: boolean
example: true
subscribedByExpire:
type: boolean
example: false
subscribedByExpireDate:
type: string
example: 2025-01-01T01:01:01+00:00
subscribedByAutoprolong:
type: boolean
example: false
subscribedIsExpiredNow:
type: boolean
example: false
currentSubscribePrice:
type: integer
example: 0
subscribedOn:
type: string
example: null
nullable: true
subscribedOnExpiredNow:
type: boolean
example: true
subscribedOnDuration:
type: string
example: 7 days
listsStates:
type: array
example:
- id: following
type: following
name: Following
hasUser: true
canAddUser: false
cannotAddUserReason: ALREADY_EXISTS
- id: fans
type: fans
name: Fans
hasUser: false
canAddUser: false
cannotAddUserReason: null
- id: recent
type: recent
name: Recent (last 24 hours)
hasUser: false
canAddUser: false
cannotAddUserReason: SYSTEM_LIST
- id: tagged
type: tagged
name: Tagged
hasUser: true
canAddUser: false
cannotAddUserReason: ALREADY_EXISTS
- id: friends
type: friends
name: Friends
hasUser: false
canAddUser: true
cannotAddUserReason: null
- id: muted
type: muted
name: Muted
hasUser: false
canAddUser: true
cannotAddUserReason: null
items:
type: object
properties:
id:
type: string
example: following
type:
type: string
example: following
name:
type: string
example: Following
hasUser:
type: boolean
example: true
canAddUser:
type: boolean
example: false
cannotAddUserReason:
type: string
example: ALREADY_EXISTS
joinDate:
type: string
example: 2025-01-01T01:01:01+00:00
isReferrerAllowed:
type: boolean
example: true
about:
type: string
example: About
isMarkdownDisabledForAbout:
type: boolean
example: true
website:
type: string
example: null
nullable: true
wishlist:
type: string
example: null
nullable: true
location:
type: string
example: location
postsCount:
type: integer
example: 123
archivedPostsCount:
type: integer
example: 1
privateArchivedPostsCount:
type: integer
example: 123
photosCount:
type: integer
example: 123
videosCount:
type: integer
example: 63
audiosCount:
type: integer
example: 0
mediasCount:
type: integer
example: 123
lastSeen:
type: string
example: 2025-01-01T01:01:01+00:00
favoritesCount:
type: integer
example: 123
favoritedCount:
type: integer
example: 123
showPostsInFeed:
type: boolean
example: true
canReceiveChatMessage:
type: boolean
example: true
isPerformer:
type: boolean
example: true
isRealPerformer:
type: boolean
example: true
isSpotifyConnected:
type: boolean
example: false
subscribersCount:
type: string
example: null
nullable: true
hasPinnedPosts:
type: boolean
example: true
hasLabels:
type: boolean
example: true
canChat:
type: boolean
example: true
avatarHeaderConverterUpload:
type: boolean
example: true
isPrivateRestriction:
type: boolean
example: false
showSubscribersCount:
type: boolean
example: false
showMediaCount:
type: boolean
example: true
subscribedByData:
type: object
properties:
price:
type: integer
example: 0
newPrice:
type: integer
example: 0
regularPrice:
type: number
example: 12.99
subscribePrice:
type: number
example: 12.99
discountPercent:
type: integer
example: 0
discountPeriod:
type: integer
example: 1
subscribeAt:
type: string
example: 2025-01-01T01:01:01+00:00
expiredAt:
type: string
example: 2025-01-01T01:01:01+00:00
renewedAt:
type: string
example: null
nullable: true
discountFinishedAt:
type: string
example: null
nullable: true
discountStartedAt:
type: string
example: null
nullable: true
status:
type: string
example: Set to Expire
isMuted:
type: boolean
example: false
unsubscribeReason:
type: string
example: No reason given
duration:
type: string
example: 2 months
showPostsInFeed:
type: boolean
example: true
subscribes:
type: array
example:
- id: 123
userId: 123
subscriberId: 123
date: 2025-01-01T01:01:01+00:00
duration: 360
startDate: 2025-01-01T01:01:01+00:00
expireDate: 2025-01-01T01:01:01+00:00
cancelDate: null
price: 0
regularPrice: 12.99
discount: 0
earningId: 0
action: subscribe
type: trial
offerStart: 2025-01-01T01:01:01+00:00
offerEnd: null
isCurrent: true
items:
type: object
properties:
id:
type: integer
example: 123
userId:
type: integer
example: 123
subscriberId:
type: integer
example: 123
date:
type: string
example: 2025-01-01T01:01:01+00:00
duration:
type: integer
example: 360
startDate:
type: string
example: 2025-01-01T01:01:01+00:00
expireDate:
type: string
example: 2025-01-01T01:01:01+00:00
cancelDate:
type: string
example: null
nullable: true
price:
type: integer
example: 0
regularPrice:
type: number
example: 12.99
discount:
type: integer
example: 0
earningId:
type: integer
example: 0
action:
type: string
example: subscribe
type:
type: string
example: trial
offerStart:
type: string
example: 2025-01-01T01:01:01+00:00
offerEnd:
type: string
example: null
nullable: true
isCurrent:
type: boolean
example: true
hasActivePaidSubscriptions:
type: boolean
example: false
subscribedOnData:
type: object
properties:
price:
type: integer
example: 0
newPrice:
type: integer
example: 0
regularPrice:
type: integer
example: 0
subscribePrice:
type: integer
example: 0
discountPercent:
type: integer
example: 0
discountPeriod:
type: integer
example: 1
subscribeAt:
type: string
example: 2025-01-01T01:01:01+00:00
expiredAt:
type: string
example: 2025-01-01T01:01:01+00:00
renewedAt:
type: string
example: null
nullable: true
discountFinishedAt:
type: string
example: null
nullable: true
discountStartedAt:
type: string
example: null
nullable: true
status:
type: string
example: null
nullable: true
isMuted:
type: boolean
example: false
unsubscribeReason:
type: string
example: No reason given
duration:
type: string
example: 7 days
tipsSumm:
type: integer
example: 0
subscribesSumm:
type: integer
example: 0
messagesSumm:
type: integer
example: 0
postsSumm:
type: integer
example: 0
streamsSumm:
type: integer
example: 0
totalSumm:
type: integer
example: 0
subscribes:
type: array
example: []
hasActivePaidSubscriptions:
type: boolean
example: false
canCreatePromotion:
type: boolean
example: true
canCreateTrial:
type: boolean
example: true
isAdultContent:
type: boolean
example: false
canTrialSend:
type: boolean
example: false
hasLinks:
type: boolean
example: false
hasFriends:
type: boolean
example: false
finishedStreamsCount:
type: integer
example: 0
shouldShowFinishedStreams:
type: boolean
example: false
hasSavedStreams:
type: boolean
example: false
firstPublishedPostDate:
type: string
example: 2025-01-01T01:01:01+00:00
isSpringConnected:
type: boolean
example: false
isFriend:
type: boolean
example: false
isBlocked:
type: boolean
example: false
canReport:
type: boolean
example: true
canUnsubscribe:
type: boolean
example: true
isPendingAutoprolong:
type: boolean
example: false
_meta:
type: object
properties:
_credits:
type: object
properties:
used:
type: integer
example: 1
balance:
type: integer
example: 999999834
note:
type: string
example: Always
_cache:
type: object
properties:
is_cached:
type: boolean
example: false
note:
type: string
example: Cache disabled for this endpoint
_rate_limits:
type: object
properties:
limit_minute:
type: integer
example: 10000000
limit_day:
type: integer
example: 50000
remaining_minute:
type: integer
example: 9999999
remaining_day:
type: integer
example: 49992
tags:
- Users
components:
securitySchemes:
default:
type: http
scheme: bearer
description: Get your API Key from OnlyFansAPI Console -
https://app.onlyfansapi.com/api-keys
````
# Unrestrict User (/api-reference/users/unrestrict-user)
Unrestrict a previously restricted user. You will start seeing messages and comments from them again.
## OpenAPI
````yaml https://app.onlyfansapi.com/scribe-docs/openapi.yaml delete /api/{account}/users/{user_id}/restrict
openapi: 3.0.3
info:
title: OnlyFans API
description: ""
version: 1.0.0
servers:
- url: https://app.onlyfansapi.com
security:
- default: []
tags:
- name: AI Voice Messages
description: ""
- name: API Keys
description: ""
- name: Account
description: Endpoints for your linked accounts
- name: Analytics - Financial
description: APIs for retrieving financial analytics data
- name: Analytics - Summary
description: APIs for retrieving summary analytics data
- name: Banking
description: Operations related to user banking details, payout methods, legal
and tax information, and account country settings.
- name: Banned Words
description: Reference list of OnlyFans banned words used by the
`blockBannedWords` screening parameter
- name: Blocked / Restricted Users
description: APIs for listing the users an account has blocked or restricted
- name: Chargebacks
description: ""
- name: Chat Messages
description: ""
- name: Chats
description: ""
- name: Client Sessions
description: ""
- name: Connect OnlyFans Account
description: ""
- name: Data Exports
description: APIs for managing data exports
- name: Engagement / Messages
description: ""
- name: Fans
description: APIs for managing OnlyFans fans (subscribers)
- name: Fans - AI Summary
description: APIs for generating and retrieving AI-powered fan profile summaries
- name: Following
description: APIs for managing OnlyFans followings (people you're subscribed to)
- name: Free Trial Links
description: APIs for managing Free Trial Links. Revenue totals are net earnings
after refunds and chargebacks. `revenue.chargebacks` (or
`summary.chargebacks_total` in stats) is the positive cached net amount
already excluded from revenue; do not subtract it again. Spender responses
include chargebacks across all attributed periods for each fan with
positive net revenue.
- name: Giphy
description: ""
- name: Link Tags
description: APIs for managing tags on free trial links, tracking links, and Smart Links
- name: Mass Messaging
description: ""
- name: Media
description: ""
- name: Media Vault
description: ""
- name: Media Vault Lists
description: ""
- name: Notifications
description: Endpoints for managingr account notifications
- name: Payouts
description: ""
- name: Post Comments
description: ""
- name: Post Labels
description: APIs for managing your post labels
- name: Posts
description: APIs for managing OnlyFans posts
- name: Profile Content
description: Read another user's profile content using your connected OnlyFans
account. OnlyFans enforces subscription and purchase requirements; these
endpoints do not unlock content. Response samples use captured OnlyFans
payloads with anonymized IDs, text, and media URLs; OFAPI metadata values
are illustrative.
- name: Promotions
description: ""
- name: Public Profiles
description: ""
- name: Queue
description: ""
- name: Release Forms
description: APIs for managing OnlyFans release forms
- name: Saved For Later (Messages)
description: ""
- name: Saved For Later (Posts)
description: ""
- name: Settings
description: ""
- name: Shared Free Trial Links
description: APIs for Free Trial Links that other OF creators have shared with
this account. Revenue, cost, and spender data are not available for shared
links.
- name: Shared Tracking Links
description: APIs for Tracking Links (campaigns) that other OF creators have
shared with this account. Revenue, cost, and spender data are not
available for shared campaigns.
- name: Smart Link Postbacks
description: APIs for managing Smart Link postback destinations
- name: Smart Links
description: APIs for managing Smart Links (Free Trial Links and Tracking Links
with pooled inventory)
- name: Statistics
description: ""
- name: Stored Free Trial Links
description: Instant APIs for retrieving stored free trial links from the
OnlyFansAPI Cache (free, no credits used). `revenue.total` is net earnings
after refunds and chargebacks. `revenue.chargebacks` is the positive
cached net amount already excluded from that total; do not subtract it
again.
- name: Stored Shared Free Trial Links
description: Instant APIs for retrieving stored shared Free Trial Links from the
OnlyFansAPI Cache (free, no credits used)
- name: Stored Shared Tracking Links
description: Instant APIs for retrieving stored shared Tracking Links
(campaigns) from the OnlyFansAPI Cache (free, no credits used)
- name: Stored Tracking Links
description: Instant APIs for retrieving stored tracking links from the
OnlyFansAPI Cache (free, no credits used). `revenue.total` is net earnings
after refunds and chargebacks. `revenue.chargebacks` is the positive
cached net amount already excluded from that total; do not subtract it
again.
- name: Stories
description: APIs for managing OnlyFans stories
- name: Story Highlights
description: APIs for managing OnlyFans story highlights
- name: Subscription Bundles
description: ""
- name: Tracking Links
description: APIs for managing tracking links. Revenue totals are net earnings
after refunds and chargebacks. `revenue.chargebacks` (or
`summary.chargebacks_total` in stats) is the positive cached net amount
already excluded from revenue; do not subtract it again. Spender responses
include chargebacks across all attributed periods for each fan with
positive net revenue.
- name: Transactions
description: APIs for managing OnlyFans transactions
- name: Usage
description: Credit usage reporting for your team
- name: User List Collections
description: ""
- name: Users
description: APIs for fetching OnlyFans users
- name: Webhooks
description: ""
paths:
/api/{account}/users/{user_id}/restrict:
parameters:
- in: path
name: account
description: The Account ID
example: acct_XXXXXXXXXXXXXXX
required: true
schema:
type: string
- in: path
name: user_id
description: The OnlyFans ID of the user to restrict.
example: 123
required: true
schema:
type: string
delete:
summary: Unrestrict User
operationId: unrestrictUser
description: Unrestrict a previously restricted user. You will start seeing
messages and comments from them again.
parameters: []
responses:
"200":
description: ""
content:
application/json:
schema:
type: object
example:
data:
view: f
avatar: https://public.onlyfans.com/files/i/i2/i25/.../123/avatar.jpg
avatarThumbs:
c50: https://thumbs.onlyfans.com/public/files/thumbs/c50/i/i2/i25/.../123/avatar.jpg
c144: https://thumbs.onlyfans.com/public/files/thumbs/c144/i/i2/i25/.../123/avatar.jpg
header: https://public.onlyfans.com/files/c/cs/cse/.../123/header_image.jpg
headerSize:
width: 4386
height: 1224
headerThumbs:
w480: https://thumbs.onlyfans.com/public/files/thumbs/w480/c/cs/cse/.../123/header_image.jpg
w760: https://thumbs.onlyfans.com/public/files/thumbs/w760/c/cs/cse/.../123/header_image.jpg
id: 123
name: name
username: username
canLookStory: true
canCommentStory: true
hasNotViewedStory: true
isVerified: true
canPayInternal: true
hasScheduledStream: false
hasStream: false
hasStories: true
tipsEnabled: true
tipsTextEnabled: true
tipsMin: 5
tipsMinInternal: 1
tipsMax: 200
canEarn: true
canAddSubscriber: true
subscribePrice: 12.99
subscriptionBundles:
- id: 123
discount: 50
duration: 3
price: 19.49
canBuy: true
displayName: ""
notice: ""
isPaywallRequired: true
isRestricted: false
canRestrict: true
subscribedBy: true
subscribedByExpire: false
subscribedByExpireDate: 2025-01-01T01:01:01+00:00
subscribedByAutoprolong: false
subscribedIsExpiredNow: false
currentSubscribePrice: 0
subscribedOn: null
subscribedOnExpiredNow: true
subscribedOnDuration: 7 days
listsStates:
- id: following
type: following
name: Following
hasUser: true
canAddUser: false
cannotAddUserReason: ALREADY_EXISTS
- id: fans
type: fans
name: Fans
hasUser: false
canAddUser: false
cannotAddUserReason: null
- id: recent
type: recent
name: Recent (last 24 hours)
hasUser: false
canAddUser: false
cannotAddUserReason: SYSTEM_LIST
- id: tagged
type: tagged
name: Tagged
hasUser: true
canAddUser: false
cannotAddUserReason: ALREADY_EXISTS
- id: friends
type: friends
name: Friends
hasUser: false
canAddUser: true
cannotAddUserReason: null
- id: muted
type: muted
name: Muted
hasUser: false
canAddUser: true
cannotAddUserReason: null
joinDate: 2025-01-01T01:01:01+00:00
isReferrerAllowed: true
about: About
isMarkdownDisabledForAbout: true
website: null
wishlist: null
location: location
postsCount: 123
archivedPostsCount: 1
privateArchivedPostsCount: 123
photosCount: 123
videosCount: 63
audiosCount: 0
mediasCount: 123
lastSeen: 2025-01-01T01:01:01+00:00
favoritesCount: 123
favoritedCount: 123
showPostsInFeed: true
canReceiveChatMessage: true
isPerformer: true
isRealPerformer: true
isSpotifyConnected: false
subscribersCount: null
hasPinnedPosts: true
hasLabels: true
canChat: true
avatarHeaderConverterUpload: true
isPrivateRestriction: false
showSubscribersCount: false
showMediaCount: true
subscribedByData:
price: 0
newPrice: 0
regularPrice: 12.99
subscribePrice: 12.99
discountPercent: 0
discountPeriod: 1
subscribeAt: 2025-01-01T01:01:01+00:00
expiredAt: 2025-01-01T01:01:01+00:00
renewedAt: null
discountFinishedAt: null
discountStartedAt: null
status: Set to Expire
isMuted: false
unsubscribeReason: No reason given
duration: 2 months
showPostsInFeed: true
subscribes:
- id: 123
userId: 123
subscriberId: 123
date: 2025-01-01T01:01:01+00:00
duration: 360
startDate: 2025-01-01T01:01:01+00:00
expireDate: 2025-01-01T01:01:01+00:00
cancelDate: null
price: 0
regularPrice: 12.99
discount: 0
earningId: 0
action: subscribe
type: trial
offerStart: 2025-01-01T01:01:01+00:00
offerEnd: null
isCurrent: true
hasActivePaidSubscriptions: false
subscribedOnData:
price: 0
newPrice: 0
regularPrice: 0
subscribePrice: 0
discountPercent: 0
discountPeriod: 1
subscribeAt: 2025-01-01T01:01:01+00:00
expiredAt: 2025-01-01T01:01:01+00:00
renewedAt: null
discountFinishedAt: null
discountStartedAt: null
status: null
isMuted: false
unsubscribeReason: No reason given
duration: 7 days
tipsSumm: 0
subscribesSumm: 0
messagesSumm: 0
postsSumm: 0
streamsSumm: 0
totalSumm: 0
subscribes: []
hasActivePaidSubscriptions: false
canCreatePromotion: true
canCreateTrial: true
isAdultContent: false
canTrialSend: false
hasLinks: false
hasFriends: false
finishedStreamsCount: 0
shouldShowFinishedStreams: false
hasSavedStreams: false
firstPublishedPostDate: 2025-01-01T01:01:01+00:00
isSpringConnected: false
isFriend: false
isBlocked: false
canReport: true
canUnsubscribe: true
isPendingAutoprolong: false
_meta:
_credits:
used: 1
balance: 999999834
note: Always
_cache:
is_cached: false
note: Cache disabled for this endpoint
_rate_limits:
limit_minute: 10000000
limit_day: 50000
remaining_minute: 9999999
remaining_day: 49992
properties:
data:
type: object
properties:
view:
type: string
example: f
avatar:
type: string
example: https://public.onlyfans.com/files/i/i2/i25/.../123/avatar.jpg
avatarThumbs:
type: object
properties:
c50:
type: string
example: https://thumbs.onlyfans.com/public/files/thumbs/c50/i/i2/i25/.../123/avatar.jpg
c144:
type: string
example: https://thumbs.onlyfans.com/public/files/thumbs/c144/i/i2/i25/.../123/avatar.jpg
header:
type: string
example: https://public.onlyfans.com/files/c/cs/cse/.../123/header_image.jpg
headerSize:
type: object
properties:
width:
type: integer
example: 4386
height:
type: integer
example: 1224
headerThumbs:
type: object
properties:
w480:
type: string
example: https://thumbs.onlyfans.com/public/files/thumbs/w480/c/cs/cse/.../123/header_image.jpg
w760:
type: string
example: https://thumbs.onlyfans.com/public/files/thumbs/w760/c/cs/cse/.../123/header_image.jpg
id:
type: integer
example: 123
name:
type: string
example: name
username:
type: string
example: username
canLookStory:
type: boolean
example: true
canCommentStory:
type: boolean
example: true
hasNotViewedStory:
type: boolean
example: true
isVerified:
type: boolean
example: true
canPayInternal:
type: boolean
example: true
hasScheduledStream:
type: boolean
example: false
hasStream:
type: boolean
example: false
hasStories:
type: boolean
example: true
tipsEnabled:
type: boolean
example: true
tipsTextEnabled:
type: boolean
example: true
tipsMin:
type: integer
example: 5
tipsMinInternal:
type: integer
example: 1
tipsMax:
type: integer
example: 200
canEarn:
type: boolean
example: true
canAddSubscriber:
type: boolean
example: true
subscribePrice:
type: number
example: 12.99
subscriptionBundles:
type: array
example:
- id: 123
discount: 50
duration: 3
price: 19.49
canBuy: true
items:
type: object
properties:
id:
type: integer
example: 123
discount:
type: integer
example: 50
duration:
type: integer
example: 3
price:
type: number
example: 19.49
canBuy:
type: boolean
example: true
displayName:
type: string
example: ""
notice:
type: string
example: ""
isPaywallRequired:
type: boolean
example: true
isRestricted:
type: boolean
example: false
canRestrict:
type: boolean
example: true
subscribedBy:
type: boolean
example: true
subscribedByExpire:
type: boolean
example: false
subscribedByExpireDate:
type: string
example: 2025-01-01T01:01:01+00:00
subscribedByAutoprolong:
type: boolean
example: false
subscribedIsExpiredNow:
type: boolean
example: false
currentSubscribePrice:
type: integer
example: 0
subscribedOn:
type: string
example: null
nullable: true
subscribedOnExpiredNow:
type: boolean
example: true
subscribedOnDuration:
type: string
example: 7 days
listsStates:
type: array
example:
- id: following
type: following
name: Following
hasUser: true
canAddUser: false
cannotAddUserReason: ALREADY_EXISTS
- id: fans
type: fans
name: Fans
hasUser: false
canAddUser: false
cannotAddUserReason: null
- id: recent
type: recent
name: Recent (last 24 hours)
hasUser: false
canAddUser: false
cannotAddUserReason: SYSTEM_LIST
- id: tagged
type: tagged
name: Tagged
hasUser: true
canAddUser: false
cannotAddUserReason: ALREADY_EXISTS
- id: friends
type: friends
name: Friends
hasUser: false
canAddUser: true
cannotAddUserReason: null
- id: muted
type: muted
name: Muted
hasUser: false
canAddUser: true
cannotAddUserReason: null
items:
type: object
properties:
id:
type: string
example: following
type:
type: string
example: following
name:
type: string
example: Following
hasUser:
type: boolean
example: true
canAddUser:
type: boolean
example: false
cannotAddUserReason:
type: string
example: ALREADY_EXISTS
joinDate:
type: string
example: 2025-01-01T01:01:01+00:00
isReferrerAllowed:
type: boolean
example: true
about:
type: string
example: About
isMarkdownDisabledForAbout:
type: boolean
example: true
website:
type: string
example: null
nullable: true
wishlist:
type: string
example: null
nullable: true
location:
type: string
example: location
postsCount:
type: integer
example: 123
archivedPostsCount:
type: integer
example: 1
privateArchivedPostsCount:
type: integer
example: 123
photosCount:
type: integer
example: 123
videosCount:
type: integer
example: 63
audiosCount:
type: integer
example: 0
mediasCount:
type: integer
example: 123
lastSeen:
type: string
example: 2025-01-01T01:01:01+00:00
favoritesCount:
type: integer
example: 123
favoritedCount:
type: integer
example: 123
showPostsInFeed:
type: boolean
example: true
canReceiveChatMessage:
type: boolean
example: true
isPerformer:
type: boolean
example: true
isRealPerformer:
type: boolean
example: true
isSpotifyConnected:
type: boolean
example: false
subscribersCount:
type: string
example: null
nullable: true
hasPinnedPosts:
type: boolean
example: true
hasLabels:
type: boolean
example: true
canChat:
type: boolean
example: true
avatarHeaderConverterUpload:
type: boolean
example: true
isPrivateRestriction:
type: boolean
example: false
showSubscribersCount:
type: boolean
example: false
showMediaCount:
type: boolean
example: true
subscribedByData:
type: object
properties:
price:
type: integer
example: 0
newPrice:
type: integer
example: 0
regularPrice:
type: number
example: 12.99
subscribePrice:
type: number
example: 12.99
discountPercent:
type: integer
example: 0
discountPeriod:
type: integer
example: 1
subscribeAt:
type: string
example: 2025-01-01T01:01:01+00:00
expiredAt:
type: string
example: 2025-01-01T01:01:01+00:00
renewedAt:
type: string
example: null
nullable: true
discountFinishedAt:
type: string
example: null
nullable: true
discountStartedAt:
type: string
example: null
nullable: true
status:
type: string
example: Set to Expire
isMuted:
type: boolean
example: false
unsubscribeReason:
type: string
example: No reason given
duration:
type: string
example: 2 months
showPostsInFeed:
type: boolean
example: true
subscribes:
type: array
example:
- id: 123
userId: 123
subscriberId: 123
date: 2025-01-01T01:01:01+00:00
duration: 360
startDate: 2025-01-01T01:01:01+00:00
expireDate: 2025-01-01T01:01:01+00:00
cancelDate: null
price: 0
regularPrice: 12.99
discount: 0
earningId: 0
action: subscribe
type: trial
offerStart: 2025-01-01T01:01:01+00:00
offerEnd: null
isCurrent: true
items:
type: object
properties:
id:
type: integer
example: 123
userId:
type: integer
example: 123
subscriberId:
type: integer
example: 123
date:
type: string
example: 2025-01-01T01:01:01+00:00
duration:
type: integer
example: 360
startDate:
type: string
example: 2025-01-01T01:01:01+00:00
expireDate:
type: string
example: 2025-01-01T01:01:01+00:00
cancelDate:
type: string
example: null
nullable: true
price:
type: integer
example: 0
regularPrice:
type: number
example: 12.99
discount:
type: integer
example: 0
earningId:
type: integer
example: 0
action:
type: string
example: subscribe
type:
type: string
example: trial
offerStart:
type: string
example: 2025-01-01T01:01:01+00:00
offerEnd:
type: string
example: null
nullable: true
isCurrent:
type: boolean
example: true
hasActivePaidSubscriptions:
type: boolean
example: false
subscribedOnData:
type: object
properties:
price:
type: integer
example: 0
newPrice:
type: integer
example: 0
regularPrice:
type: integer
example: 0
subscribePrice:
type: integer
example: 0
discountPercent:
type: integer
example: 0
discountPeriod:
type: integer
example: 1
subscribeAt:
type: string
example: 2025-01-01T01:01:01+00:00
expiredAt:
type: string
example: 2025-01-01T01:01:01+00:00
renewedAt:
type: string
example: null
nullable: true
discountFinishedAt:
type: string
example: null
nullable: true
discountStartedAt:
type: string
example: null
nullable: true
status:
type: string
example: null
nullable: true
isMuted:
type: boolean
example: false
unsubscribeReason:
type: string
example: No reason given
duration:
type: string
example: 7 days
tipsSumm:
type: integer
example: 0
subscribesSumm:
type: integer
example: 0
messagesSumm:
type: integer
example: 0
postsSumm:
type: integer
example: 0
streamsSumm:
type: integer
example: 0
totalSumm:
type: integer
example: 0
subscribes:
type: array
example: []
hasActivePaidSubscriptions:
type: boolean
example: false
canCreatePromotion:
type: boolean
example: true
canCreateTrial:
type: boolean
example: true
isAdultContent:
type: boolean
example: false
canTrialSend:
type: boolean
example: false
hasLinks:
type: boolean
example: false
hasFriends:
type: boolean
example: false
finishedStreamsCount:
type: integer
example: 0
shouldShowFinishedStreams:
type: boolean
example: false
hasSavedStreams:
type: boolean
example: false
firstPublishedPostDate:
type: string
example: 2025-01-01T01:01:01+00:00
isSpringConnected:
type: boolean
example: false
isFriend:
type: boolean
example: false
isBlocked:
type: boolean
example: false
canReport:
type: boolean
example: true
canUnsubscribe:
type: boolean
example: true
isPendingAutoprolong:
type: boolean
example: false
_meta:
type: object
properties:
_credits:
type: object
properties:
used:
type: integer
example: 1
balance:
type: integer
example: 999999834
note:
type: string
example: Always
_cache:
type: object
properties:
is_cached:
type: boolean
example: false
note:
type: string
example: Cache disabled for this endpoint
_rate_limits:
type: object
properties:
limit_minute:
type: integer
example: 10000000
limit_day:
type: integer
example: 50000
remaining_minute:
type: integer
example: 9999999
remaining_day:
type: integer
example: 49992
tags:
- Users
components:
securitySchemes:
default:
type: http
scheme: bearer
description: Get your API Key from OnlyFansAPI Console -
https://app.onlyfansapi.com/api-keys
````
# Unsubscribe from User (/api-reference/users/unsubscribe-from-user)
Unsubscribe from a user's profile.
## OpenAPI
````yaml https://app.onlyfansapi.com/scribe-docs/openapi.yaml delete /api/{account}/users/{user_id}/subscribe
openapi: 3.0.3
info:
title: OnlyFans API
description: ""
version: 1.0.0
servers:
- url: https://app.onlyfansapi.com
security:
- default: []
tags:
- name: AI Voice Messages
description: ""
- name: API Keys
description: ""
- name: Account
description: Endpoints for your linked accounts
- name: Analytics - Financial
description: APIs for retrieving financial analytics data
- name: Analytics - Summary
description: APIs for retrieving summary analytics data
- name: Banking
description: Operations related to user banking details, payout methods, legal
and tax information, and account country settings.
- name: Banned Words
description: Reference list of OnlyFans banned words used by the
`blockBannedWords` screening parameter
- name: Blocked / Restricted Users
description: APIs for listing the users an account has blocked or restricted
- name: Chargebacks
description: ""
- name: Chat Messages
description: ""
- name: Chats
description: ""
- name: Client Sessions
description: ""
- name: Connect OnlyFans Account
description: ""
- name: Data Exports
description: APIs for managing data exports
- name: Engagement / Messages
description: ""
- name: Fans
description: APIs for managing OnlyFans fans (subscribers)
- name: Fans - AI Summary
description: APIs for generating and retrieving AI-powered fan profile summaries
- name: Following
description: APIs for managing OnlyFans followings (people you're subscribed to)
- name: Free Trial Links
description: APIs for managing Free Trial Links. Revenue totals are net earnings
after refunds and chargebacks. `revenue.chargebacks` (or
`summary.chargebacks_total` in stats) is the positive cached net amount
already excluded from revenue; do not subtract it again. Spender responses
include chargebacks across all attributed periods for each fan with
positive net revenue.
- name: Giphy
description: ""
- name: Link Tags
description: APIs for managing tags on free trial links, tracking links, and Smart Links
- name: Mass Messaging
description: ""
- name: Media
description: ""
- name: Media Vault
description: ""
- name: Media Vault Lists
description: ""
- name: Notifications
description: Endpoints for managingr account notifications
- name: Payouts
description: ""
- name: Post Comments
description: ""
- name: Post Labels
description: APIs for managing your post labels
- name: Posts
description: APIs for managing OnlyFans posts
- name: Profile Content
description: Read another user's profile content using your connected OnlyFans
account. OnlyFans enforces subscription and purchase requirements; these
endpoints do not unlock content. Response samples use captured OnlyFans
payloads with anonymized IDs, text, and media URLs; OFAPI metadata values
are illustrative.
- name: Promotions
description: ""
- name: Public Profiles
description: ""
- name: Queue
description: ""
- name: Release Forms
description: APIs for managing OnlyFans release forms
- name: Saved For Later (Messages)
description: ""
- name: Saved For Later (Posts)
description: ""
- name: Settings
description: ""
- name: Shared Free Trial Links
description: APIs for Free Trial Links that other OF creators have shared with
this account. Revenue, cost, and spender data are not available for shared
links.
- name: Shared Tracking Links
description: APIs for Tracking Links (campaigns) that other OF creators have
shared with this account. Revenue, cost, and spender data are not
available for shared campaigns.
- name: Smart Link Postbacks
description: APIs for managing Smart Link postback destinations
- name: Smart Links
description: APIs for managing Smart Links (Free Trial Links and Tracking Links
with pooled inventory)
- name: Statistics
description: ""
- name: Stored Free Trial Links
description: Instant APIs for retrieving stored free trial links from the
OnlyFansAPI Cache (free, no credits used). `revenue.total` is net earnings
after refunds and chargebacks. `revenue.chargebacks` is the positive
cached net amount already excluded from that total; do not subtract it
again.
- name: Stored Shared Free Trial Links
description: Instant APIs for retrieving stored shared Free Trial Links from the
OnlyFansAPI Cache (free, no credits used)
- name: Stored Shared Tracking Links
description: Instant APIs for retrieving stored shared Tracking Links
(campaigns) from the OnlyFansAPI Cache (free, no credits used)
- name: Stored Tracking Links
description: Instant APIs for retrieving stored tracking links from the
OnlyFansAPI Cache (free, no credits used). `revenue.total` is net earnings
after refunds and chargebacks. `revenue.chargebacks` is the positive
cached net amount already excluded from that total; do not subtract it
again.
- name: Stories
description: APIs for managing OnlyFans stories
- name: Story Highlights
description: APIs for managing OnlyFans story highlights
- name: Subscription Bundles
description: ""
- name: Tracking Links
description: APIs for managing tracking links. Revenue totals are net earnings
after refunds and chargebacks. `revenue.chargebacks` (or
`summary.chargebacks_total` in stats) is the positive cached net amount
already excluded from revenue; do not subtract it again. Spender responses
include chargebacks across all attributed periods for each fan with
positive net revenue.
- name: Transactions
description: APIs for managing OnlyFans transactions
- name: Usage
description: Credit usage reporting for your team
- name: User List Collections
description: ""
- name: Users
description: APIs for fetching OnlyFans users
- name: Webhooks
description: ""
paths:
/api/{account}/users/{user_id}/subscribe:
parameters:
- in: path
name: account
description: The Account ID
example: acct_XXXXXXXXXXXXXXX
required: true
schema:
type: string
- in: path
name: user_id
description: The OnlyFans ID of the user to subscribe to.
example: 123
required: true
schema:
type: string
delete:
summary: Unsubscribe from User
operationId: unsubscribeFromUser
description: Unsubscribe from a user's profile.
parameters: []
responses:
"200":
description: ""
content:
application/json:
schema:
type: object
example:
data:
success: true
message: Unsubscribed
_meta:
_credits:
used: 1
balance: 999999
note: Always
_cache:
is_cached: false
note: Cache disabled for this endpoint
properties:
data:
type: object
properties:
success:
type: boolean
example: true
message:
type: string
example: Unsubscribed
_meta:
type: object
properties:
_credits:
type: object
properties:
used:
type: integer
example: 1
balance:
type: integer
example: 999999
note:
type: string
example: Always
_cache:
type: object
properties:
is_cached:
type: boolean
example: false
note:
type: string
example: Cache disabled for this endpoint
tags:
- Users
requestBody:
required: true
content:
application/json:
schema:
type: object
properties:
reason:
type: string
description: "Reason for unsubscribing. Valid options: `1,2,3,4,5`. Leave empty
for `No specific reason`."
example: null
required:
- reason
components:
securitySchemes:
default:
type: http
scheme: bearer
description: Get your API Key from OnlyFansAPI Console -
https://app.onlyfansapi.com/api-keys
````
# Add Tracking Link Tags (/api-reference/tracking-links/add-tracking-link-tags)
Add tags to a specific tracking link. Existing tags are preserved. This is a free endpoint.
## OpenAPI
````yaml https://app.onlyfansapi.com/scribe-docs/openapi.yaml post /api/{account}/tracking-links/{tracking_link_id}/tags
openapi: 3.0.3
info:
title: OnlyFans API
description: ""
version: 1.0.0
servers:
- url: https://app.onlyfansapi.com
security:
- default: []
tags:
- name: AI Voice Messages
description: ""
- name: API Keys
description: ""
- name: Account
description: Endpoints for your linked accounts
- name: Analytics - Financial
description: APIs for retrieving financial analytics data
- name: Analytics - Summary
description: APIs for retrieving summary analytics data
- name: Banking
description: Operations related to user banking details, payout methods, legal
and tax information, and account country settings.
- name: Banned Words
description: Reference list of OnlyFans banned words used by the
`blockBannedWords` screening parameter
- name: Blocked / Restricted Users
description: APIs for listing the users an account has blocked or restricted
- name: Chargebacks
description: ""
- name: Chat Messages
description: ""
- name: Chats
description: ""
- name: Client Sessions
description: ""
- name: Connect OnlyFans Account
description: ""
- name: Data Exports
description: APIs for managing data exports
- name: Engagement / Messages
description: ""
- name: Fans
description: APIs for managing OnlyFans fans (subscribers)
- name: Fans - AI Summary
description: APIs for generating and retrieving AI-powered fan profile summaries
- name: Following
description: APIs for managing OnlyFans followings (people you're subscribed to)
- name: Free Trial Links
description: APIs for managing Free Trial Links. Revenue totals are net earnings
after refunds and chargebacks. `revenue.chargebacks` (or
`summary.chargebacks_total` in stats) is the positive cached net amount
already excluded from revenue; do not subtract it again. Spender responses
include chargebacks across all attributed periods for each fan with
positive net revenue.
- name: Giphy
description: ""
- name: Link Tags
description: APIs for managing tags on free trial links, tracking links, and Smart Links
- name: Mass Messaging
description: ""
- name: Media
description: ""
- name: Media Vault
description: ""
- name: Media Vault Lists
description: ""
- name: Notifications
description: Endpoints for managingr account notifications
- name: Payouts
description: ""
- name: Post Comments
description: ""
- name: Post Labels
description: APIs for managing your post labels
- name: Posts
description: APIs for managing OnlyFans posts
- name: Profile Content
description: Read another user's profile content using your connected OnlyFans
account. OnlyFans enforces subscription and purchase requirements; these
endpoints do not unlock content. Response samples use captured OnlyFans
payloads with anonymized IDs, text, and media URLs; OFAPI metadata values
are illustrative.
- name: Promotions
description: ""
- name: Public Profiles
description: ""
- name: Queue
description: ""
- name: Release Forms
description: APIs for managing OnlyFans release forms
- name: Saved For Later (Messages)
description: ""
- name: Saved For Later (Posts)
description: ""
- name: Settings
description: ""
- name: Shared Free Trial Links
description: APIs for Free Trial Links that other OF creators have shared with
this account. Revenue, cost, and spender data are not available for shared
links.
- name: Shared Tracking Links
description: APIs for Tracking Links (campaigns) that other OF creators have
shared with this account. Revenue, cost, and spender data are not
available for shared campaigns.
- name: Smart Link Postbacks
description: APIs for managing Smart Link postback destinations
- name: Smart Links
description: APIs for managing Smart Links (Free Trial Links and Tracking Links
with pooled inventory)
- name: Statistics
description: ""
- name: Stored Free Trial Links
description: Instant APIs for retrieving stored free trial links from the
OnlyFansAPI Cache (free, no credits used). `revenue.total` is net earnings
after refunds and chargebacks. `revenue.chargebacks` is the positive
cached net amount already excluded from that total; do not subtract it
again.
- name: Stored Shared Free Trial Links
description: Instant APIs for retrieving stored shared Free Trial Links from the
OnlyFansAPI Cache (free, no credits used)
- name: Stored Shared Tracking Links
description: Instant APIs for retrieving stored shared Tracking Links
(campaigns) from the OnlyFansAPI Cache (free, no credits used)
- name: Stored Tracking Links
description: Instant APIs for retrieving stored tracking links from the
OnlyFansAPI Cache (free, no credits used). `revenue.total` is net earnings
after refunds and chargebacks. `revenue.chargebacks` is the positive
cached net amount already excluded from that total; do not subtract it
again.
- name: Stories
description: APIs for managing OnlyFans stories
- name: Story Highlights
description: APIs for managing OnlyFans story highlights
- name: Subscription Bundles
description: ""
- name: Tracking Links
description: APIs for managing tracking links. Revenue totals are net earnings
after refunds and chargebacks. `revenue.chargebacks` (or
`summary.chargebacks_total` in stats) is the positive cached net amount
already excluded from revenue; do not subtract it again. Spender responses
include chargebacks across all attributed periods for each fan with
positive net revenue.
- name: Transactions
description: APIs for managing OnlyFans transactions
- name: Usage
description: Credit usage reporting for your team
- name: User List Collections
description: ""
- name: Users
description: APIs for fetching OnlyFans users
- name: Webhooks
description: ""
paths:
/api/{account}/tracking-links/{tracking_link_id}/tags:
parameters:
- in: path
name: account
description: The Account ID
example: acct_XXXXXXXXXXXXXXX
required: true
schema:
type: string
- in: path
name: tracking_link_id
description: The ID of the tracking link
example: 123456789
required: true
schema:
type: integer
post:
summary: Add Tracking Link Tags
operationId: addTrackingLinkTags
description: Add tags to a specific tracking link. Existing tags are preserved.
This is a free endpoint.
parameters: []
responses:
"200":
description: Success
content:
application/json:
schema:
type: object
example:
data:
tags:
- Instagram
- Twitter
- TikTok
_meta:
_credits:
used: 0
balance: 9529
note: Free endpoint
_cache:
is_cached: false
note: Cache disabled for this endpoint
_rate_limits:
limit_minute: 5000
limit_day: null
remaining_minute: 4999
remaining_day: null
properties:
data:
type: object
properties:
tags:
type: array
example:
- Instagram
- Twitter
- TikTok
items:
type: string
_meta:
type: object
properties:
_credits:
type: object
properties:
used:
type: integer
example: 0
balance:
type: integer
example: 9529
note:
type: string
example: Free endpoint
_cache:
type: object
properties:
is_cached:
type: boolean
example: false
note:
type: string
example: Cache disabled for this endpoint
_rate_limits:
type: object
properties:
limit_minute:
type: integer
example: 5000
limit_day:
type: string
example: null
nullable: true
remaining_minute:
type: integer
example: 4999
remaining_day:
type: string
example: null
nullable: true
tags:
- Tracking Links
requestBody:
required: true
content:
application/json:
schema:
type: object
properties:
tags:
type: array
description: Array of tag names to add to the tracking link.
example: '["Instagram", "Twitter"]'
items:
type: string
required:
- tags
components:
securitySchemes:
default:
type: http
scheme: bearer
description: Get your API Key from OnlyFansAPI Console -
https://app.onlyfansapi.com/api-keys
````
# Create Tracking Link (/api-reference/tracking-links/create-tracking-link)
Create a new Tracking Link for the account
## OpenAPI
````yaml https://app.onlyfansapi.com/scribe-docs/openapi.yaml post /api/{account}/tracking-links
openapi: 3.0.3
info:
title: OnlyFans API
description: ""
version: 1.0.0
servers:
- url: https://app.onlyfansapi.com
security:
- default: []
tags:
- name: AI Voice Messages
description: ""
- name: API Keys
description: ""
- name: Account
description: Endpoints for your linked accounts
- name: Analytics - Financial
description: APIs for retrieving financial analytics data
- name: Analytics - Summary
description: APIs for retrieving summary analytics data
- name: Banking
description: Operations related to user banking details, payout methods, legal
and tax information, and account country settings.
- name: Banned Words
description: Reference list of OnlyFans banned words used by the
`blockBannedWords` screening parameter
- name: Blocked / Restricted Users
description: APIs for listing the users an account has blocked or restricted
- name: Chargebacks
description: ""
- name: Chat Messages
description: ""
- name: Chats
description: ""
- name: Client Sessions
description: ""
- name: Connect OnlyFans Account
description: ""
- name: Data Exports
description: APIs for managing data exports
- name: Engagement / Messages
description: ""
- name: Fans
description: APIs for managing OnlyFans fans (subscribers)
- name: Fans - AI Summary
description: APIs for generating and retrieving AI-powered fan profile summaries
- name: Following
description: APIs for managing OnlyFans followings (people you're subscribed to)
- name: Free Trial Links
description: APIs for managing Free Trial Links. Revenue totals are net earnings
after refunds and chargebacks. `revenue.chargebacks` (or
`summary.chargebacks_total` in stats) is the positive cached net amount
already excluded from revenue; do not subtract it again. Spender responses
include chargebacks across all attributed periods for each fan with
positive net revenue.
- name: Giphy
description: ""
- name: Link Tags
description: APIs for managing tags on free trial links, tracking links, and Smart Links
- name: Mass Messaging
description: ""
- name: Media
description: ""
- name: Media Vault
description: ""
- name: Media Vault Lists
description: ""
- name: Notifications
description: Endpoints for managingr account notifications
- name: Payouts
description: ""
- name: Post Comments
description: ""
- name: Post Labels
description: APIs for managing your post labels
- name: Posts
description: APIs for managing OnlyFans posts
- name: Profile Content
description: Read another user's profile content using your connected OnlyFans
account. OnlyFans enforces subscription and purchase requirements; these
endpoints do not unlock content. Response samples use captured OnlyFans
payloads with anonymized IDs, text, and media URLs; OFAPI metadata values
are illustrative.
- name: Promotions
description: ""
- name: Public Profiles
description: ""
- name: Queue
description: ""
- name: Release Forms
description: APIs for managing OnlyFans release forms
- name: Saved For Later (Messages)
description: ""
- name: Saved For Later (Posts)
description: ""
- name: Settings
description: ""
- name: Shared Free Trial Links
description: APIs for Free Trial Links that other OF creators have shared with
this account. Revenue, cost, and spender data are not available for shared
links.
- name: Shared Tracking Links
description: APIs for Tracking Links (campaigns) that other OF creators have
shared with this account. Revenue, cost, and spender data are not
available for shared campaigns.
- name: Smart Link Postbacks
description: APIs for managing Smart Link postback destinations
- name: Smart Links
description: APIs for managing Smart Links (Free Trial Links and Tracking Links
with pooled inventory)
- name: Statistics
description: ""
- name: Stored Free Trial Links
description: Instant APIs for retrieving stored free trial links from the
OnlyFansAPI Cache (free, no credits used). `revenue.total` is net earnings
after refunds and chargebacks. `revenue.chargebacks` is the positive
cached net amount already excluded from that total; do not subtract it
again.
- name: Stored Shared Free Trial Links
description: Instant APIs for retrieving stored shared Free Trial Links from the
OnlyFansAPI Cache (free, no credits used)
- name: Stored Shared Tracking Links
description: Instant APIs for retrieving stored shared Tracking Links
(campaigns) from the OnlyFansAPI Cache (free, no credits used)
- name: Stored Tracking Links
description: Instant APIs for retrieving stored tracking links from the
OnlyFansAPI Cache (free, no credits used). `revenue.total` is net earnings
after refunds and chargebacks. `revenue.chargebacks` is the positive
cached net amount already excluded from that total; do not subtract it
again.
- name: Stories
description: APIs for managing OnlyFans stories
- name: Story Highlights
description: APIs for managing OnlyFans story highlights
- name: Subscription Bundles
description: ""
- name: Tracking Links
description: APIs for managing tracking links. Revenue totals are net earnings
after refunds and chargebacks. `revenue.chargebacks` (or
`summary.chargebacks_total` in stats) is the positive cached net amount
already excluded from revenue; do not subtract it again. Spender responses
include chargebacks across all attributed periods for each fan with
positive net revenue.
- name: Transactions
description: APIs for managing OnlyFans transactions
- name: Usage
description: Credit usage reporting for your team
- name: User List Collections
description: ""
- name: Users
description: APIs for fetching OnlyFans users
- name: Webhooks
description: ""
paths:
/api/{account}/tracking-links:
parameters:
- in: path
name: account
description: The Account ID
example: acct_XXXXXXXXXXXXXXX
required: true
schema:
type: string
post:
summary: Create Tracking Link
operationId: createTrackingLink
description: Create a new Tracking Link for the account
parameters: []
responses:
"200":
description: Success
content:
application/json:
schema:
type: object
example:
data:
- id: 123
countSubscribers: 0
countTransitions: 0
campaignCode: 123
campaignName: foobar
createdAt: 2025-01-01T00:00:00+00:00
endDate: null
_meta:
_credits:
used: 1
balance: 999999985
note: Always
_cache:
is_cached: false
note: Cache disabled for this endpoint
_rate_limits:
limit_minute: 10000000
limit_day: 50000
remaining_minute: 9999998
remaining_day: 49988
properties:
data:
type: array
example:
- id: 123
countSubscribers: 0
countTransitions: 0
campaignCode: 123
campaignName: foobar
createdAt: 2025-01-01T00:00:00+00:00
endDate: null
items:
type: object
properties:
id:
type: integer
example: 123
countSubscribers:
type: integer
example: 0
countTransitions:
type: integer
example: 0
campaignCode:
type: integer
example: 123
campaignName:
type: string
example: foobar
createdAt:
type: string
example: 2025-01-01T00:00:00+00:00
endDate:
type: string
example: null
nullable: true
_meta:
type: object
properties:
_credits:
type: object
properties:
used:
type: integer
example: 1
balance:
type: integer
example: 999999985
note:
type: string
example: Always
_cache:
type: object
properties:
is_cached:
type: boolean
example: false
note:
type: string
example: Cache disabled for this endpoint
_rate_limits:
type: object
properties:
limit_minute:
type: integer
example: 10000000
limit_day:
type: integer
example: 50000
remaining_minute:
type: integer
example: 9999998
remaining_day:
type: integer
example: 49988
tags:
- Tracking Links
requestBody:
required: true
content:
application/json:
schema:
type: object
properties:
tags:
type: array
description: Array of tag names to add to the tracking link.
example: '["Instagram", "Twitter"]'
items:
type: string
name:
type: string
description: The name of the Tracking Link
example: Twitter bio
required:
- name
components:
securitySchemes:
default:
type: http
scheme: bearer
description: Get your API Key from OnlyFansAPI Console -
https://app.onlyfansapi.com/api-keys
````
# Delete Tracking Link (/api-reference/tracking-links/delete-tracking-link)
Delete a Tracking Link
## OpenAPI
````yaml https://app.onlyfansapi.com/scribe-docs/openapi.yaml delete /api/{account}/tracking-links/{tracking_link_id}
openapi: 3.0.3
info:
title: OnlyFans API
description: ""
version: 1.0.0
servers:
- url: https://app.onlyfansapi.com
security:
- default: []
tags:
- name: AI Voice Messages
description: ""
- name: API Keys
description: ""
- name: Account
description: Endpoints for your linked accounts
- name: Analytics - Financial
description: APIs for retrieving financial analytics data
- name: Analytics - Summary
description: APIs for retrieving summary analytics data
- name: Banking
description: Operations related to user banking details, payout methods, legal
and tax information, and account country settings.
- name: Banned Words
description: Reference list of OnlyFans banned words used by the
`blockBannedWords` screening parameter
- name: Blocked / Restricted Users
description: APIs for listing the users an account has blocked or restricted
- name: Chargebacks
description: ""
- name: Chat Messages
description: ""
- name: Chats
description: ""
- name: Client Sessions
description: ""
- name: Connect OnlyFans Account
description: ""
- name: Data Exports
description: APIs for managing data exports
- name: Engagement / Messages
description: ""
- name: Fans
description: APIs for managing OnlyFans fans (subscribers)
- name: Fans - AI Summary
description: APIs for generating and retrieving AI-powered fan profile summaries
- name: Following
description: APIs for managing OnlyFans followings (people you're subscribed to)
- name: Free Trial Links
description: APIs for managing Free Trial Links. Revenue totals are net earnings
after refunds and chargebacks. `revenue.chargebacks` (or
`summary.chargebacks_total` in stats) is the positive cached net amount
already excluded from revenue; do not subtract it again. Spender responses
include chargebacks across all attributed periods for each fan with
positive net revenue.
- name: Giphy
description: ""
- name: Link Tags
description: APIs for managing tags on free trial links, tracking links, and Smart Links
- name: Mass Messaging
description: ""
- name: Media
description: ""
- name: Media Vault
description: ""
- name: Media Vault Lists
description: ""
- name: Notifications
description: Endpoints for managingr account notifications
- name: Payouts
description: ""
- name: Post Comments
description: ""
- name: Post Labels
description: APIs for managing your post labels
- name: Posts
description: APIs for managing OnlyFans posts
- name: Profile Content
description: Read another user's profile content using your connected OnlyFans
account. OnlyFans enforces subscription and purchase requirements; these
endpoints do not unlock content. Response samples use captured OnlyFans
payloads with anonymized IDs, text, and media URLs; OFAPI metadata values
are illustrative.
- name: Promotions
description: ""
- name: Public Profiles
description: ""
- name: Queue
description: ""
- name: Release Forms
description: APIs for managing OnlyFans release forms
- name: Saved For Later (Messages)
description: ""
- name: Saved For Later (Posts)
description: ""
- name: Settings
description: ""
- name: Shared Free Trial Links
description: APIs for Free Trial Links that other OF creators have shared with
this account. Revenue, cost, and spender data are not available for shared
links.
- name: Shared Tracking Links
description: APIs for Tracking Links (campaigns) that other OF creators have
shared with this account. Revenue, cost, and spender data are not
available for shared campaigns.
- name: Smart Link Postbacks
description: APIs for managing Smart Link postback destinations
- name: Smart Links
description: APIs for managing Smart Links (Free Trial Links and Tracking Links
with pooled inventory)
- name: Statistics
description: ""
- name: Stored Free Trial Links
description: Instant APIs for retrieving stored free trial links from the
OnlyFansAPI Cache (free, no credits used). `revenue.total` is net earnings
after refunds and chargebacks. `revenue.chargebacks` is the positive
cached net amount already excluded from that total; do not subtract it
again.
- name: Stored Shared Free Trial Links
description: Instant APIs for retrieving stored shared Free Trial Links from the
OnlyFansAPI Cache (free, no credits used)
- name: Stored Shared Tracking Links
description: Instant APIs for retrieving stored shared Tracking Links
(campaigns) from the OnlyFansAPI Cache (free, no credits used)
- name: Stored Tracking Links
description: Instant APIs for retrieving stored tracking links from the
OnlyFansAPI Cache (free, no credits used). `revenue.total` is net earnings
after refunds and chargebacks. `revenue.chargebacks` is the positive
cached net amount already excluded from that total; do not subtract it
again.
- name: Stories
description: APIs for managing OnlyFans stories
- name: Story Highlights
description: APIs for managing OnlyFans story highlights
- name: Subscription Bundles
description: ""
- name: Tracking Links
description: APIs for managing tracking links. Revenue totals are net earnings
after refunds and chargebacks. `revenue.chargebacks` (or
`summary.chargebacks_total` in stats) is the positive cached net amount
already excluded from revenue; do not subtract it again. Spender responses
include chargebacks across all attributed periods for each fan with
positive net revenue.
- name: Transactions
description: APIs for managing OnlyFans transactions
- name: Usage
description: Credit usage reporting for your team
- name: User List Collections
description: ""
- name: Users
description: APIs for fetching OnlyFans users
- name: Webhooks
description: ""
paths:
/api/{account}/tracking-links/{tracking_link_id}:
parameters:
- in: path
name: account
description: The Account ID
example: acct_XXXXXXXXXXXXXXX
required: true
schema:
type: string
- in: path
name: tracking_link_id
description: The ID of the tracking link.
example: at
required: true
schema:
type: string
delete:
summary: Delete Tracking Link
operationId: deleteTrackingLink
description: Delete a Tracking Link
parameters: []
responses:
"200":
description: Success
content:
application/json:
schema:
type: object
example:
data:
success: true
_meta:
_credits:
used: 1
balance: 999999986
note: Always
_cache:
is_cached: false
note: Cache disabled for this endpoint
_rate_limits:
limit_minute: 10000000
limit_day: 50000
remaining_minute: 9999997
remaining_day: 49990
properties:
data:
type: object
properties:
success:
type: boolean
example: true
_meta:
type: object
properties:
_credits:
type: object
properties:
used:
type: integer
example: 1
balance:
type: integer
example: 999999986
note:
type: string
example: Always
_cache:
type: object
properties:
is_cached:
type: boolean
example: false
note:
type: string
example: Cache disabled for this endpoint
_rate_limits:
type: object
properties:
limit_minute:
type: integer
example: 10000000
limit_day:
type: integer
example: 50000
remaining_minute:
type: integer
example: 9999997
remaining_day:
type: integer
example: 49990
tags:
- Tracking Links
components:
securitySchemes:
default:
type: http
scheme: bearer
description: Get your API Key from OnlyFansAPI Console -
https://app.onlyfansapi.com/api-keys
````
# Get Tracking Link Cohort ARPS (/api-reference/tracking-links/get-tracking-link-cohort-arps)
Get per-link time-to-profit cohort ARPS windows for a specific Tracking Link
## OpenAPI
````yaml https://app.onlyfansapi.com/scribe-docs/openapi.yaml get /api/{account}/tracking-links/{tracking_link_id}/cohort-arps
openapi: 3.0.3
info:
title: OnlyFans API
description: ""
version: 1.0.0
servers:
- url: https://app.onlyfansapi.com
security:
- default: []
tags:
- name: AI Voice Messages
description: ""
- name: API Keys
description: ""
- name: Account
description: Endpoints for your linked accounts
- name: Analytics - Financial
description: APIs for retrieving financial analytics data
- name: Analytics - Summary
description: APIs for retrieving summary analytics data
- name: Banking
description: Operations related to user banking details, payout methods, legal
and tax information, and account country settings.
- name: Banned Words
description: Reference list of OnlyFans banned words used by the
`blockBannedWords` screening parameter
- name: Blocked / Restricted Users
description: APIs for listing the users an account has blocked or restricted
- name: Chargebacks
description: ""
- name: Chat Messages
description: ""
- name: Chats
description: ""
- name: Client Sessions
description: ""
- name: Connect OnlyFans Account
description: ""
- name: Data Exports
description: APIs for managing data exports
- name: Engagement / Messages
description: ""
- name: Fans
description: APIs for managing OnlyFans fans (subscribers)
- name: Fans - AI Summary
description: APIs for generating and retrieving AI-powered fan profile summaries
- name: Following
description: APIs for managing OnlyFans followings (people you're subscribed to)
- name: Free Trial Links
description: APIs for managing Free Trial Links. Revenue totals are net earnings
after refunds and chargebacks. `revenue.chargebacks` (or
`summary.chargebacks_total` in stats) is the positive cached net amount
already excluded from revenue; do not subtract it again. Spender responses
include chargebacks across all attributed periods for each fan with
positive net revenue.
- name: Giphy
description: ""
- name: Link Tags
description: APIs for managing tags on free trial links, tracking links, and Smart Links
- name: Mass Messaging
description: ""
- name: Media
description: ""
- name: Media Vault
description: ""
- name: Media Vault Lists
description: ""
- name: Notifications
description: Endpoints for managingr account notifications
- name: Payouts
description: ""
- name: Post Comments
description: ""
- name: Post Labels
description: APIs for managing your post labels
- name: Posts
description: APIs for managing OnlyFans posts
- name: Profile Content
description: Read another user's profile content using your connected OnlyFans
account. OnlyFans enforces subscription and purchase requirements; these
endpoints do not unlock content. Response samples use captured OnlyFans
payloads with anonymized IDs, text, and media URLs; OFAPI metadata values
are illustrative.
- name: Promotions
description: ""
- name: Public Profiles
description: ""
- name: Queue
description: ""
- name: Release Forms
description: APIs for managing OnlyFans release forms
- name: Saved For Later (Messages)
description: ""
- name: Saved For Later (Posts)
description: ""
- name: Settings
description: ""
- name: Shared Free Trial Links
description: APIs for Free Trial Links that other OF creators have shared with
this account. Revenue, cost, and spender data are not available for shared
links.
- name: Shared Tracking Links
description: APIs for Tracking Links (campaigns) that other OF creators have
shared with this account. Revenue, cost, and spender data are not
available for shared campaigns.
- name: Smart Link Postbacks
description: APIs for managing Smart Link postback destinations
- name: Smart Links
description: APIs for managing Smart Links (Free Trial Links and Tracking Links
with pooled inventory)
- name: Statistics
description: ""
- name: Stored Free Trial Links
description: Instant APIs for retrieving stored free trial links from the
OnlyFansAPI Cache (free, no credits used). `revenue.total` is net earnings
after refunds and chargebacks. `revenue.chargebacks` is the positive
cached net amount already excluded from that total; do not subtract it
again.
- name: Stored Shared Free Trial Links
description: Instant APIs for retrieving stored shared Free Trial Links from the
OnlyFansAPI Cache (free, no credits used)
- name: Stored Shared Tracking Links
description: Instant APIs for retrieving stored shared Tracking Links
(campaigns) from the OnlyFansAPI Cache (free, no credits used)
- name: Stored Tracking Links
description: Instant APIs for retrieving stored tracking links from the
OnlyFansAPI Cache (free, no credits used). `revenue.total` is net earnings
after refunds and chargebacks. `revenue.chargebacks` is the positive
cached net amount already excluded from that total; do not subtract it
again.
- name: Stories
description: APIs for managing OnlyFans stories
- name: Story Highlights
description: APIs for managing OnlyFans story highlights
- name: Subscription Bundles
description: ""
- name: Tracking Links
description: APIs for managing tracking links. Revenue totals are net earnings
after refunds and chargebacks. `revenue.chargebacks` (or
`summary.chargebacks_total` in stats) is the positive cached net amount
already excluded from revenue; do not subtract it again. Spender responses
include chargebacks across all attributed periods for each fan with
positive net revenue.
- name: Transactions
description: APIs for managing OnlyFans transactions
- name: Usage
description: Credit usage reporting for your team
- name: User List Collections
description: ""
- name: Users
description: APIs for fetching OnlyFans users
- name: Webhooks
description: ""
paths:
/api/{account}/tracking-links/{tracking_link_id}/cohort-arps:
parameters:
- in: path
name: account
description: The Account ID
example: acct_XXXXXXXXXXXXXXX
required: true
schema:
type: string
- in: path
name: tracking_link_id
description: The ID of the tracking link.
example: aliquid
required: true
schema:
type: string
get:
summary: Get Tracking Link Cohort ARPS
operationId: getTrackingLinkCohortARPS
description: Get per-link time-to-profit cohort ARPS windows for a specific
Tracking Link
parameters:
- in: query
name: acquisition_start
description: Optional acquisition range start date
example: 2026-01-01T00:00:00Z
required: false
schema:
type: string
description: Optional acquisition range start date
example: 2026-01-01T00:00:00Z
- in: query
name: acquisition_end
description: Optional acquisition range end date
example: 2026-01-31T23:59:59Z
required: false
schema:
type: string
description: Optional acquisition range end date
example: 2026-01-31T23:59:59Z
- in: query
name: revenue_basis
description: Revenue basis. Defaults to `net`.
example: net
required: false
schema:
type: string
description: Revenue basis. Defaults to `net`.
example: net
enum:
- net
- gross
responses:
"401":
description: ""
content:
application/json:
schema:
type: object
example:
error: Unauthorized. Go to https://app.onlyfansapi.com/api-keys to get your API
key.
properties:
error:
type: string
example: Unauthorized. Go to https://app.onlyfansapi.com/api-keys to get your
API key.
tags:
- Tracking Links
components:
securitySchemes:
default:
type: http
scheme: bearer
description: Get your API Key from OnlyFansAPI Console -
https://app.onlyfansapi.com/api-keys
````
# Get Tracking Link Stats (/api-reference/tracking-links/get-tracking-link-stats)
Get dashboard-style summary plus daily and monthly metrics for a specific Tracking Link.
gif is present. Must be at
least 1 character.
example: jgftlqyfqswzrziaekytznemxsriulqptmqqlszqcsnunerfvqyyyfevylkgjfxvaznhltbwarubxecofdbp
format:
type: string
description: This field is required when gif is present.
example: GIF
enum:
- GIF
- WEBP
url:
type: string
description: This field is required when gif is present. Must be a
valid URL.
example: http://frami.com/dicta-necessitatibus-iste-cupiditate-quibusdam-eum-atque-velit.html
width:
type: integer
description: This field is required when gif is present. Must be at
least 1.
example: 42
height:
type: integer
description: This field is required when gif is present. Must be at
least 1.
example: 9
title:
type: string
description: ""
example: non
nullable: true
templateUuid:
type: string
description: ""
example: null
components:
securitySchemes:
default:
type: http
scheme: bearer
description: Get your API Key from OnlyFansAPI Console -
https://app.onlyfansapi.com/api-keys
````
# Get Chat (/api-reference/fanvue/chats/get-chat)
Get a single chat by the fan's user UUID: its read state, mute state, unread count and last message. Proxies Fanvue's `GET /v1/chats/{userUuid}`.
## OpenAPI
````yaml https://app.onlyfansapi.com/scribe-fanvue-docs/openapi.yaml get /api/fanvue/{fanvueAccount}/chats/{userUuid}
openapi: 3.0.3
info:
title: Fanvue API Documentation
description: ""
version: 1.0.0
servers:
- url: https://app.onlyfansapi.com
security:
- default: []
tags:
- name: Account
description: Endpoints for your connected Fanvue accounts
- name: Chat Messages
description: Endpoints for the messages inside a Fanvue chat.
- name: Chats
description: Endpoints for a Fanvue creator's inbox. A chat is identified by the
fan's user UUID.
- name: Fans
description: "Endpoints for the fans of a Fanvue creator: subscribers,
followers, smart lists and per-fan insights."
- name: Fanvue Account
description: Endpoints for the connected Fanvue creator itself.
- name: Insights
description: "Revenue and growth reporting for a Fanvue creator: per-transaction
earnings, the aggregated earnings summary, the subscriber trend and top
spenders."
- name: Profiles
description: Public Fanvue creator profiles, readable without connecting the creator.
paths:
/api/fanvue/{fanvueAccount}/chats/{userUuid}:
parameters:
- in: path
name: fanvueAccount
description: The Fanvue Account ID
example: fanvue_acct_XXXXXXXXXXXXXXX
required: true
schema:
type: string
- in: path
name: userUuid
description: The fan's Fanvue user UUID. Chats are keyed by the counterpart, so
this is also the chat id.
example: f47ac10b-58cc-4372-a567-0e02b2c3d479
required: true
schema:
type: string
get:
summary: Get Chat
operationId: getChat
description: "Get a single chat by the fan's user UUID: its read state, mute
state, unread count and last message. Proxies Fanvue's `GET
/v1/chats/{userUuid}`."
parameters: []
responses:
"200":
description: Success
content:
application/json:
schema:
type: object
example:
data:
createdAt: 2026-09-22T10:29:07.400Z
lastMessageAt: 2026-09-22T10:46:04.712Z
isRead: true
unreadMessagesCount: 0
isMuted: false
user:
uuid: f47ac10b-58cc-4372-a567-0e02b2c3d479
handle: sarah-jones
displayName: Sarah Jones
nickname: null
isTopSpender: false
avatarUrl: null
registeredAt: 2026-09-21T12:05:33.176Z
lastMessage:
sentAt: 2026-09-22T10:46:04.712Z
text: See you tonight!
hasMedia: false
hasGif: false
type: SINGLE_RECIPIENT
mediaType: null
uuid: 3b1f0a6c-92f1-4a58-9d0e-7c4b2a5f8d33
senderUuid: 3bbe6394-2830-4646-a8ba-4a0a05426947
senderRole: CREATOR
sentByUserId: null
status: Read
_meta:
_credits:
used: 1
balance: 10055811
note: Always
_cache:
is_cached: false
note: Cache disabled for this endpoint
_rate_limits:
limit_minute: 5000
limit_day: null
remaining_minute: 4999
remaining_day: null
notice: We have decided to remove our daily rate limits. Please remove any
references to these in your integrations.
properties:
data:
type: object
properties:
createdAt:
type: string
example: 2026-09-22T10:29:07.400Z
lastMessageAt:
type: string
example: 2026-09-22T10:46:04.712Z
isRead:
type: boolean
example: true
unreadMessagesCount:
type: integer
example: 0
isMuted:
type: boolean
example: false
user:
type: object
properties:
uuid:
type: string
example: f47ac10b-58cc-4372-a567-0e02b2c3d479
handle:
type: string
example: sarah-jones
displayName:
type: string
example: Sarah Jones
nickname:
type: string
example: null
nullable: true
isTopSpender:
type: boolean
example: false
avatarUrl:
type: string
example: null
nullable: true
registeredAt:
type: string
example: 2026-09-21T12:05:33.176Z
lastMessage:
type: object
properties:
sentAt:
type: string
example: 2026-09-22T10:46:04.712Z
text:
type: string
example: See you tonight!
hasMedia:
type: boolean
example: false
hasGif:
type: boolean
example: false
type:
type: string
example: SINGLE_RECIPIENT
mediaType:
type: string
example: null
nullable: true
uuid:
type: string
example: 3b1f0a6c-92f1-4a58-9d0e-7c4b2a5f8d33
senderUuid:
type: string
example: 3bbe6394-2830-4646-a8ba-4a0a05426947
senderRole:
type: string
example: CREATOR
sentByUserId:
type: string
example: null
nullable: true
status:
type: string
example: Read
_meta:
type: object
properties:
_credits:
type: object
properties:
used:
type: integer
example: 1
balance:
type: integer
example: 10055811
note:
type: string
example: Always
_cache:
type: object
properties:
is_cached:
type: boolean
example: false
note:
type: string
example: Cache disabled for this endpoint
_rate_limits:
type: object
properties:
limit_minute:
type: integer
example: 5000
limit_day:
type: string
example: null
nullable: true
remaining_minute:
type: integer
example: 4999
remaining_day:
type: string
example: null
nullable: true
notice:
type: string
example: We have decided to remove our daily rate limits. Please remove any
references to these in your integrations.
tags:
- Chats
components:
securitySchemes:
default:
type: http
scheme: bearer
description: Get your API Key from OnlyFansAPI Console -
https://app.onlyfansapi.com/api-keys
````
# List Chats (/api-reference/fanvue/chats/list-chats)
List the creator's chats. Proxies Fanvue's `GET /v1/chats` and returns its body unchanged, including the `nextCursor` to page with and the `total` where Fanvue computes one.
## OpenAPI
````yaml https://app.onlyfansapi.com/scribe-fanvue-docs/openapi.yaml get /api/fanvue/{fanvueAccount}/chats
openapi: 3.0.3
info:
title: Fanvue API Documentation
description: ""
version: 1.0.0
servers:
- url: https://app.onlyfansapi.com
security:
- default: []
tags:
- name: Account
description: Endpoints for your connected Fanvue accounts
- name: Chat Messages
description: Endpoints for the messages inside a Fanvue chat.
- name: Chats
description: Endpoints for a Fanvue creator's inbox. A chat is identified by the
fan's user UUID.
- name: Fans
description: "Endpoints for the fans of a Fanvue creator: subscribers,
followers, smart lists and per-fan insights."
- name: Fanvue Account
description: Endpoints for the connected Fanvue creator itself.
- name: Insights
description: "Revenue and growth reporting for a Fanvue creator: per-transaction
earnings, the aggregated earnings summary, the subscriber trend and top
spenders."
- name: Profiles
description: Public Fanvue creator profiles, readable without connecting the creator.
paths:
/api/fanvue/{fanvueAccount}/chats:
parameters:
- in: path
name: fanvueAccount
description: The Fanvue Account ID
example: fanvue_acct_XXXXXXXXXXXXXXX
required: true
schema:
type: string
get:
summary: List Chats
operationId: listChats
description: List the creator's chats. Proxies Fanvue's `GET /v1/chats` and
returns its body unchanged, including the `nextCursor` to page with and
the `total` where Fanvue computes one.
parameters:
- in: query
name: cursor
description: Opaque pagination cursor from a previous response's `nextCursor`.
example: eyJ2IjoxfQ
required: false
schema:
type: string
description: Opaque pagination cursor from a previous response's `nextCursor`.
example: eyJ2IjoxfQ
- in: query
name: size
description: Number of chats to return (1 - 50). Default = 15
example: 15
required: false
schema:
type: integer
description: Number of chats to return (1 - 50). Default = 15
example: 15
- in: query
name: filter
description: "Filters to apply: `unread`, `subscribers`, `followers`, `online`,
`recent_subscribers`, `not_answered`, `spent_more_than_50`,
`on_free_trial`, `has_tipped`, `spenders`, `exclude_creators`,
`subscribed_to`, `not_muted`, `muted`, `archived`."
example:
- unread
required: false
schema:
type: array
description: "Filters to apply: `unread`, `subscribers`, `followers`, `online`,
`recent_subscribers`, `not_answered`, `spent_more_than_50`,
`on_free_trial`, `has_tipped`, `spenders`, `exclude_creators`,
`subscribed_to`, `not_muted`, `muted`, `archived`."
example:
- unread
items:
type: string
- in: query
name: smartListIds
description: "Fanvue smart list ids to filter by: `subscribers`,
`auto_renewing`, `non_renewing`, `followers`,
`free_trial_subscribers`, `expired_subscribers`,
`spent_more_than_50`, `muted`, `creators`."
example:
- subscribers
required: false
schema:
type: array
description: "Fanvue smart list ids to filter by: `subscribers`,
`auto_renewing`, `non_renewing`, `followers`,
`free_trial_subscribers`, `expired_subscribers`,
`spent_more_than_50`, `muted`, `creators`."
example:
- subscribers
items:
type: string
- in: query
name: userUuids
description: Restrict the list to these fan user UUIDs.
example:
- f47ac10b-58cc-4372-a567-0e02b2c3d479
required: false
schema:
type: array
description: Restrict the list to these fan user UUIDs.
example:
- f47ac10b-58cc-4372-a567-0e02b2c3d479
items:
type: string
- in: query
name: customListId
description: Filter chats by a Fanvue custom list UUID.
example: 9c1f5f22-1c3e-4b2a-8a0f-2b6c5d4e3f21
required: false
schema:
type: string
description: Filter chats by a Fanvue custom list UUID.
example: 9c1f5f22-1c3e-4b2a-8a0f-2b6c5d4e3f21
- in: query
name: search
description: Search term matched against the fan's name or handle (max 100
characters).
example: jane
required: false
schema:
type: string
description: Search term matched against the fan's name or handle (max 100
characters).
example: jane
- in: query
name: sortBy
description: "Sort order: `most_recent_messages`, `online_now` or
`most_unanswered_chats`."
example: most_recent_messages
required: false
schema:
type: string
description: "Sort order: `most_recent_messages`, `online_now` or
`most_unanswered_chats`."
example: most_recent_messages
- in: query
name: sortDirection
description: "Sort direction: `asc` or `desc`."
example: desc
required: false
schema:
type: string
description: "Sort direction: `asc` or `desc`."
example: desc
responses:
"200":
description: Success
content:
application/json:
schema:
type: object
example:
data:
data:
- createdAt: 2026-09-22T10:29:07.400Z
lastMessageAt: 2026-09-22T10:46:04.712Z
isRead: true
unreadMessagesCount: 0
isMuted: false
user:
uuid: f47ac10b-58cc-4372-a567-0e02b2c3d479
handle: sarah-jones
displayName: Sarah Jones
nickname: null
isTopSpender: false
avatarUrl: null
registeredAt: 2026-09-21T12:05:33.176Z
lastMessage:
sentAt: 2026-09-22T10:46:04.712Z
text: See you tonight!
hasMedia: false
hasGif: false
type: SINGLE_RECIPIENT
mediaType: null
uuid: 3b1f0a6c-92f1-4a58-9d0e-7c4b2a5f8d33
senderUuid: 3bbe6394-2830-4646-a8ba-4a0a05426947
senderRole: CREATOR
sentByUserId: null
status: Read
online: true
lastSeenAt: 2026-09-22T11:23:37.916Z
isCreator: false
customLists: []
nextCursor: null
total: null
_meta:
_credits:
used: 1
balance: 10055811
note: Always
_cache:
is_cached: false
note: Cache disabled for this endpoint
_rate_limits:
limit_minute: 5000
limit_day: null
remaining_minute: 4999
remaining_day: null
notice: We have decided to remove our daily rate limits. Please remove any
references to these in your integrations.
properties:
data:
type: object
properties:
data:
type: array
example:
- createdAt: 2026-09-22T10:29:07.400Z
lastMessageAt: 2026-09-22T10:46:04.712Z
isRead: true
unreadMessagesCount: 0
isMuted: false
user:
uuid: f47ac10b-58cc-4372-a567-0e02b2c3d479
handle: sarah-jones
displayName: Sarah Jones
nickname: null
isTopSpender: false
avatarUrl: null
registeredAt: 2026-09-21T12:05:33.176Z
lastMessage:
sentAt: 2026-09-22T10:46:04.712Z
text: See you tonight!
hasMedia: false
hasGif: false
type: SINGLE_RECIPIENT
mediaType: null
uuid: 3b1f0a6c-92f1-4a58-9d0e-7c4b2a5f8d33
senderUuid: 3bbe6394-2830-4646-a8ba-4a0a05426947
senderRole: CREATOR
sentByUserId: null
status: Read
online: true
lastSeenAt: 2026-09-22T11:23:37.916Z
isCreator: false
customLists: []
items:
type: object
properties:
createdAt:
type: string
example: 2026-09-22T10:29:07.400Z
lastMessageAt:
type: string
example: 2026-09-22T10:46:04.712Z
isRead:
type: boolean
example: true
unreadMessagesCount:
type: integer
example: 0
isMuted:
type: boolean
example: false
user:
type: object
properties:
uuid:
type: string
example: f47ac10b-58cc-4372-a567-0e02b2c3d479
handle:
type: string
example: sarah-jones
displayName:
type: string
example: Sarah Jones
nickname:
type: string
example: null
nullable: true
isTopSpender:
type: boolean
example: false
avatarUrl:
type: string
example: null
nullable: true
registeredAt:
type: string
example: 2026-09-21T12:05:33.176Z
lastMessage:
type: object
properties:
sentAt:
type: string
example: 2026-09-22T10:46:04.712Z
text:
type: string
example: See you tonight!
hasMedia:
type: boolean
example: false
hasGif:
type: boolean
example: false
type:
type: string
example: SINGLE_RECIPIENT
mediaType:
type: string
example: null
nullable: true
uuid:
type: string
example: 3b1f0a6c-92f1-4a58-9d0e-7c4b2a5f8d33
senderUuid:
type: string
example: 3bbe6394-2830-4646-a8ba-4a0a05426947
senderRole:
type: string
example: CREATOR
sentByUserId:
type: string
example: null
nullable: true
status:
type: string
example: Read
online:
type: boolean
example: true
lastSeenAt:
type: string
example: 2026-09-22T11:23:37.916Z
isCreator:
type: boolean
example: false
customLists:
type: array
example: []
nextCursor:
type: string
example: null
nullable: true
total:
type: string
example: null
nullable: true
_meta:
type: object
properties:
_credits:
type: object
properties:
used:
type: integer
example: 1
balance:
type: integer
example: 10055811
note:
type: string
example: Always
_cache:
type: object
properties:
is_cached:
type: boolean
example: false
note:
type: string
example: Cache disabled for this endpoint
_rate_limits:
type: object
properties:
limit_minute:
type: integer
example: 5000
limit_day:
type: string
example: null
nullable: true
remaining_minute:
type: integer
example: 4999
remaining_day:
type: string
example: null
nullable: true
notice:
type: string
example: We have decided to remove our daily rate limits. Please remove any
references to these in your integrations.
tags:
- Chats
components:
securitySchemes:
default:
type: http
scheme: bearer
description: Get your API Key from OnlyFansAPI Console -
https://app.onlyfansapi.com/api-keys
````
# Mark Chat as Read (/api-reference/fanvue/chats/mark-chat-as-read)
Mark the whole conversation as read, so inbox state stays consistent when messages are handled outside Fanvue's UI. Proxies Fanvue's `PATCH /v1/chats/{userUuid}` with `isRead`, which answers no content.
## OpenAPI
````yaml https://app.onlyfansapi.com/scribe-fanvue-docs/openapi.yaml post /api/fanvue/{fanvueAccount}/chats/{userUuid}/read
openapi: 3.0.3
info:
title: Fanvue API Documentation
description: ""
version: 1.0.0
servers:
- url: https://app.onlyfansapi.com
security:
- default: []
tags:
- name: Account
description: Endpoints for your connected Fanvue accounts
- name: Chat Messages
description: Endpoints for the messages inside a Fanvue chat.
- name: Chats
description: Endpoints for a Fanvue creator's inbox. A chat is identified by the
fan's user UUID.
- name: Fans
description: "Endpoints for the fans of a Fanvue creator: subscribers,
followers, smart lists and per-fan insights."
- name: Fanvue Account
description: Endpoints for the connected Fanvue creator itself.
- name: Insights
description: "Revenue and growth reporting for a Fanvue creator: per-transaction
earnings, the aggregated earnings summary, the subscriber trend and top
spenders."
- name: Profiles
description: Public Fanvue creator profiles, readable without connecting the creator.
paths:
/api/fanvue/{fanvueAccount}/chats/{userUuid}/read:
parameters:
- in: path
name: fanvueAccount
description: The Fanvue Account ID
example: fanvue_acct_XXXXXXXXXXXXXXX
required: true
schema:
type: string
- in: path
name: userUuid
description: The fan's Fanvue user UUID.
example: f47ac10b-58cc-4372-a567-0e02b2c3d479
required: true
schema:
type: string
post:
summary: Mark Chat as Read
operationId: markChatAsRead
description: Mark the whole conversation as read, so inbox state stays
consistent when messages are handled outside Fanvue's UI. Proxies
Fanvue's `PATCH /v1/chats/{userUuid}` with `isRead`, which answers no
content.
parameters: []
responses:
"200":
description: Success
content:
application/json:
schema:
type: object
example:
data: null
_meta:
_credits:
used: 1
balance: 10055811
note: Always
_cache:
is_cached: false
note: Cache disabled for this endpoint
_rate_limits:
limit_minute: 5000
limit_day: null
remaining_minute: 4999
remaining_day: null
notice: We have decided to remove our daily rate limits. Please remove any
references to these in your integrations.
properties:
data:
type: string
example: null
nullable: true
_meta:
type: object
properties:
_credits:
type: object
properties:
used:
type: integer
example: 1
balance:
type: integer
example: 10055811
note:
type: string
example: Always
_cache:
type: object
properties:
is_cached:
type: boolean
example: false
note:
type: string
example: Cache disabled for this endpoint
_rate_limits:
type: object
properties:
limit_minute:
type: integer
example: 5000
limit_day:
type: string
example: null
nullable: true
remaining_minute:
type: integer
example: 4999
remaining_day:
type: string
example: null
nullable: true
notice:
type: string
example: We have decided to remove our daily rate limits. Please remove any
references to these in your integrations.
tags:
- Chats
components:
securitySchemes:
default:
type: http
scheme: bearer
description: Get your API Key from OnlyFansAPI Console -
https://app.onlyfansapi.com/api-keys
````
# Send Typing Indicator (/api-reference/fanvue/chats/send-typing-indicator)
Show the fan that the creator is typing. Proxies Fanvue's `POST /v1/chats/{userUuid}/typing`.
## OpenAPI
````yaml https://app.onlyfansapi.com/scribe-fanvue-docs/openapi.yaml post /api/fanvue/{fanvueAccount}/chats/{userUuid}/typing
openapi: 3.0.3
info:
title: Fanvue API Documentation
description: ""
version: 1.0.0
servers:
- url: https://app.onlyfansapi.com
security:
- default: []
tags:
- name: Account
description: Endpoints for your connected Fanvue accounts
- name: Chat Messages
description: Endpoints for the messages inside a Fanvue chat.
- name: Chats
description: Endpoints for a Fanvue creator's inbox. A chat is identified by the
fan's user UUID.
- name: Fans
description: "Endpoints for the fans of a Fanvue creator: subscribers,
followers, smart lists and per-fan insights."
- name: Fanvue Account
description: Endpoints for the connected Fanvue creator itself.
- name: Insights
description: "Revenue and growth reporting for a Fanvue creator: per-transaction
earnings, the aggregated earnings summary, the subscriber trend and top
spenders."
- name: Profiles
description: Public Fanvue creator profiles, readable without connecting the creator.
paths:
/api/fanvue/{fanvueAccount}/chats/{userUuid}/typing:
parameters:
- in: path
name: fanvueAccount
description: The Fanvue Account ID
example: fanvue_acct_XXXXXXXXXXXXXXX
required: true
schema:
type: string
- in: path
name: userUuid
description: The fan's Fanvue user UUID.
example: f47ac10b-58cc-4372-a567-0e02b2c3d479
required: true
schema:
type: string
post:
summary: Send Typing Indicator
operationId: sendTypingIndicator
description: Show the fan that the creator is typing. Proxies Fanvue's `POST
/v1/chats/{userUuid}/typing`.
parameters: []
responses:
"200":
description: Success
content:
application/json:
schema:
type: object
example:
data:
success: true
_meta:
_credits:
used: 1
balance: 10055811
note: Always
_cache:
is_cached: false
note: Cache disabled for this endpoint
_rate_limits:
limit_minute: 5000
limit_day: null
remaining_minute: 4999
remaining_day: null
notice: We have decided to remove our daily rate limits. Please remove any
references to these in your integrations.
properties:
data:
type: object
properties:
success:
type: boolean
example: true
_meta:
type: object
properties:
_credits:
type: object
properties:
used:
type: integer
example: 1
balance:
type: integer
example: 10055811
note:
type: string
example: Always
_cache:
type: object
properties:
is_cached:
type: boolean
example: false
note:
type: string
example: Cache disabled for this endpoint
_rate_limits:
type: object
properties:
limit_minute:
type: integer
example: 5000
limit_day:
type: string
example: null
nullable: true
remaining_minute:
type: integer
example: 4999
remaining_day:
type: string
example: null
nullable: true
notice:
type: string
example: We have decided to remove our daily rate limits. Please remove any
references to these in your integrations.
tags:
- Chats
requestBody:
required: false
content:
application/json:
schema:
type: object
properties:
isTyping:
type: boolean
description: Whether the creator is currently typing (true) or has stopped
(false). Default = true
example: true
components:
securitySchemes:
default:
type: http
scheme: bearer
description: Get your API Key from OnlyFansAPI Console -
https://app.onlyfansapi.com/api-keys
````
# Get Me (/api-reference/fanvue/fanvue-account/get-me)
Get the connected creator's own Fanvue account view: profile, account status, subscription price, all-time earnings, available balance, last payout and fan counts. Money is in USD cents. Proxies Fanvue's `GET /v1/users/account` and returns its body unchanged.
## OpenAPI
````yaml https://app.onlyfansapi.com/scribe-fanvue-docs/openapi.yaml get /api/fanvue/{fanvueAccount}/me
openapi: 3.0.3
info:
title: Fanvue API Documentation
description: ""
version: 1.0.0
servers:
- url: https://app.onlyfansapi.com
security:
- default: []
tags:
- name: Account
description: Endpoints for your connected Fanvue accounts
- name: Chat Messages
description: Endpoints for the messages inside a Fanvue chat.
- name: Chats
description: Endpoints for a Fanvue creator's inbox. A chat is identified by the
fan's user UUID.
- name: Fans
description: "Endpoints for the fans of a Fanvue creator: subscribers,
followers, smart lists and per-fan insights."
- name: Fanvue Account
description: Endpoints for the connected Fanvue creator itself.
- name: Insights
description: "Revenue and growth reporting for a Fanvue creator: per-transaction
earnings, the aggregated earnings summary, the subscriber trend and top
spenders."
- name: Profiles
description: Public Fanvue creator profiles, readable without connecting the creator.
paths:
/api/fanvue/{fanvueAccount}/me:
parameters:
- in: path
name: fanvueAccount
description: The Fanvue Account ID
example: fanvue_acct_XXXXXXXXXXXXXXX
required: true
schema:
type: string
get:
summary: Get Me
operationId: getMe
description: "Get the connected creator's own Fanvue account view: profile,
account status, subscription price, all-time earnings, available
balance, last payout and fan counts. Money is in USD cents. Proxies
Fanvue's `GET /v1/users/account` and returns its body unchanged."
parameters: []
responses:
"200":
description: Success
content:
application/json:
schema:
type: object
example:
data:
uuid: 3bbe6394-2830-4646-a8ba-4a0a05426947
email: jane@example.com
handle: jane
displayName: Jane Doe
isCreator: true
createdAt: 2026-09-19T12:43:38.832Z
updatedAt: 2026-09-21T12:07:16.445Z
avatarUrl: null
bannerUrl: null
bio: ""
likesCount: 0
contentCounts:
imageCount: 0
videoCount: 0
audioCount: 0
postCount: 0
payToViewPostCount: 0
isAiCreator: false
account:
status: active
subscriptionPrice: 399
earnings:
total: 339
availableBalance: 0
lastPayoutAt: null
fans:
followers: 0
subscribers: 1
_meta:
_credits:
used: 1
balance: 10055811
note: Always
_cache:
is_cached: false
note: Cache disabled for this endpoint
_rate_limits:
limit_minute: 5000
limit_day: null
remaining_minute: 4999
remaining_day: null
notice: We have decided to remove our daily rate limits. Please remove any
references to these in your integrations.
properties:
data:
type: object
properties:
uuid:
type: string
example: 3bbe6394-2830-4646-a8ba-4a0a05426947
email:
type: string
example: jane@example.com
handle:
type: string
example: jane
displayName:
type: string
example: Jane Doe
isCreator:
type: boolean
example: true
createdAt:
type: string
example: 2026-09-19T12:43:38.832Z
updatedAt:
type: string
example: 2026-09-21T12:07:16.445Z
avatarUrl:
type: string
example: null
nullable: true
bannerUrl:
type: string
example: null
nullable: true
bio:
type: string
example: ""
likesCount:
type: integer
example: 0
contentCounts:
type: object
properties:
imageCount:
type: integer
example: 0
videoCount:
type: integer
example: 0
audioCount:
type: integer
example: 0
postCount:
type: integer
example: 0
payToViewPostCount:
type: integer
example: 0
isAiCreator:
type: boolean
example: false
account:
type: object
properties:
status:
type: string
example: active
subscriptionPrice:
type: integer
example: 399
earnings:
type: object
properties:
total:
type: integer
example: 339
availableBalance:
type: integer
example: 0
lastPayoutAt:
type: string
example: null
nullable: true
fans:
type: object
properties:
followers:
type: integer
example: 0
subscribers:
type: integer
example: 1
_meta:
type: object
properties:
_credits:
type: object
properties:
used:
type: integer
example: 1
balance:
type: integer
example: 10055811
note:
type: string
example: Always
_cache:
type: object
properties:
is_cached:
type: boolean
example: false
note:
type: string
example: Cache disabled for this endpoint
_rate_limits:
type: object
properties:
limit_minute:
type: integer
example: 5000
limit_day:
type: string
example: null
nullable: true
remaining_minute:
type: integer
example: 4999
remaining_day:
type: string
example: null
nullable: true
notice:
type: string
example: We have decided to remove our daily rate limits. Please remove any
references to these in your integrations.
tags:
- Fanvue Account
components:
securitySchemes:
default:
type: http
scheme: bearer
description: Get your API Key from OnlyFansAPI Console -
https://app.onlyfansapi.com/api-keys
````
# Get Earnings Summary (/api-reference/fanvue/insights/get-earnings-summary)
Get the creator's earnings pre-aggregated into all-time and this-month totals, a month-over-month comparison, source and type breakdowns, a chart series and averages by weekday and hour, so a dashboard does not have to sum transactions itself. Proxies Fanvue's `GET /v1/insights/earnings/summary`.
Money is in USD cents, paired as `gross` (pre-fee) and `net` (the creator's cut). Refunds and chargebacks are left out of both rather than subtracted, so these figures do not reconcile against List Earnings, which carries the reversals. `averageByDayOfWeek` (1 = Monday) and `averageByHourOfDay` are gross-only.
Referral, affiliate and giveaway earnings are creator rewards no fan paid for, and they land in `breakdownBySource.referrals` and `breakdownBySource.other`.
Fanvue caches this response for up to 10 minutes per creator and parameter set, so a figure can lag a payment that has already settled.
## OpenAPI
````yaml https://app.onlyfansapi.com/scribe-fanvue-docs/openapi.yaml get /api/fanvue/{fanvueAccount}/insights/earnings/summary
openapi: 3.0.3
info:
title: Fanvue API Documentation
description: ""
version: 1.0.0
servers:
- url: https://app.onlyfansapi.com
security:
- default: []
tags:
- name: Account
description: Endpoints for your connected Fanvue accounts
- name: Chat Messages
description: Endpoints for the messages inside a Fanvue chat.
- name: Chats
description: Endpoints for a Fanvue creator's inbox. A chat is identified by the
fan's user UUID.
- name: Fans
description: "Endpoints for the fans of a Fanvue creator: subscribers,
followers, smart lists and per-fan insights."
- name: Fanvue Account
description: Endpoints for the connected Fanvue creator itself.
- name: Insights
description: "Revenue and growth reporting for a Fanvue creator: per-transaction
earnings, the aggregated earnings summary, the subscriber trend and top
spenders."
- name: Profiles
description: Public Fanvue creator profiles, readable without connecting the creator.
paths:
/api/fanvue/{fanvueAccount}/insights/earnings/summary:
parameters:
- in: path
name: fanvueAccount
description: The Fanvue Account ID
example: fanvue_acct_XXXXXXXXXXXXXXX
required: true
schema:
type: string
get:
summary: Get Earnings Summary
operationId: getEarningsSummary
description: >-
Get the creator's earnings pre-aggregated into all-time and this-month
totals, a month-over-month comparison, source and type breakdowns, a
chart series and averages by weekday and hour, so a dashboard does not
have to sum transactions itself. Proxies Fanvue's `GET
/v1/insights/earnings/summary`.
Money is in USD cents, paired as `gross` (pre-fee) and `net` (the
creator's cut). Refunds and chargebacks are left out of both rather than
subtracted, so these figures do not reconcile against List Earnings,
which carries the reversals. `averageByDayOfWeek` (1 = Monday) and
`averageByHourOfDay` are gross-only.
Referral, affiliate and giveaway earnings are creator rewards no fan
paid for, and they land in `breakdownBySource.referrals` and
`breakdownBySource.other`.
Fanvue caches this response for up to 10 minutes per creator and
parameter set, so a figure can lag a payment that has already settled.
parameters:
- in: query
name: startDate
description: Only include earnings on or after this ISO 8601 datetime.
example: 2026-03-01T00:00:00Z
required: false
schema:
type: string
description: Only include earnings on or after this ISO 8601 datetime.
example: 2026-03-01T00:00:00Z
- in: query
name: endDate
description: Only include earnings before this ISO 8601 datetime (non-inclusive).
example: 2026-04-01T00:00:00Z
required: false
schema:
type: string
description: Only include earnings before this ISO 8601 datetime
(non-inclusive).
example: 2026-04-01T00:00:00Z
- in: query
name: granularity
description: "Bucket size for the `overTime` series: `day` or `week`. Default =
`day`"
example: day
required: false
schema:
type: string
description: "Bucket size for the `overTime` series: `day` or `week`. Default =
`day`"
example: day
- in: query
name: timezone
description: IANA timezone used for period grouping and month boundaries.
Default = `UTC`
example: Europe/London
required: false
schema:
type: string
description: IANA timezone used for period grouping and month boundaries.
Default = `UTC`
example: Europe/London
responses:
"200":
description: Success
content:
application/json:
schema:
type: object
example:
data:
totals:
allTime:
gross: 399
net: 339
thisMonth:
gross: 399
net: 339
previousMonthGross: 0
previousMonthNet: 0
grossChangePercentage: null
netChangePercentage: null
breakdownBySource:
subs:
gross: 399
net: 339
messages:
gross: 0
net: 0
posts:
gross: 0
net: 0
tips:
gross: 0
net: 0
referrals:
gross: 0
net: 0
renewals:
gross: 0
net: 0
other:
gross: 0
net: 0
earningsByType:
renewals:
gross: 0
net: 0
messages:
gross: 0
net: 0
tips:
gross: 0
net: 0
subs:
gross: 399
net: 339
overTime:
- periodStart: 2026-09-22T00:00:00.000Z
gross: 399
net: 339
averageByDayOfWeek:
"1": 0
"2": 399
"3": 0
"4": 0
"5": 0
"6": 0
"7": 0
averageByHourOfDay:
- 0
- 0
- 0
- 0
- 0
- 0
- 0
- 0
- 0
- 0
- 399
- 0
- 0
- 0
- 0
- 0
- 0
- 0
- 0
- 0
- 0
- 0
- 0
- 0
period:
startDate: 2026-09-01T00:00:00.000Z
endDate: 2026-10-01T00:00:00.000Z
granularity: day
timezone: UTC
_meta:
_credits:
used: 1
balance: 10055811
note: Always
_cache:
is_cached: false
note: Cache disabled for this endpoint
_rate_limits:
limit_minute: 5000
limit_day: null
remaining_minute: 4999
remaining_day: null
notice: We have decided to remove our daily rate limits. Please remove any
references to these in your integrations.
properties:
data:
type: object
properties:
totals:
type: object
properties:
allTime:
type: object
properties:
gross:
type: integer
example: 399
net:
type: integer
example: 339
thisMonth:
type: object
properties:
gross:
type: integer
example: 399
net:
type: integer
example: 339
previousMonthGross:
type: integer
example: 0
previousMonthNet:
type: integer
example: 0
grossChangePercentage:
type: string
example: null
nullable: true
netChangePercentage:
type: string
example: null
nullable: true
breakdownBySource:
type: object
properties:
subs:
type: object
properties:
gross:
type: integer
example: 399
net:
type: integer
example: 339
messages:
type: object
properties:
gross:
type: integer
example: 0
net:
type: integer
example: 0
posts:
type: object
properties:
gross:
type: integer
example: 0
net:
type: integer
example: 0
tips:
type: object
properties:
gross:
type: integer
example: 0
net:
type: integer
example: 0
referrals:
type: object
properties:
gross:
type: integer
example: 0
net:
type: integer
example: 0
renewals:
type: object
properties:
gross:
type: integer
example: 0
net:
type: integer
example: 0
other:
type: object
properties:
gross:
type: integer
example: 0
net:
type: integer
example: 0
earningsByType:
type: object
properties:
renewals:
type: object
properties:
gross:
type: integer
example: 0
net:
type: integer
example: 0
messages:
type: object
properties:
gross:
type: integer
example: 0
net:
type: integer
example: 0
tips:
type: object
properties:
gross:
type: integer
example: 0
net:
type: integer
example: 0
subs:
type: object
properties:
gross:
type: integer
example: 399
net:
type: integer
example: 339
overTime:
type: array
example:
- periodStart: 2026-09-22T00:00:00.000Z
gross: 399
net: 339
items:
type: object
properties:
periodStart:
type: string
example: 2026-09-22T00:00:00.000Z
gross:
type: integer
example: 399
net:
type: integer
example: 339
averageByDayOfWeek:
type: object
properties:
"1":
type: integer
example: 0
"2":
type: integer
example: 399
"3":
type: integer
example: 0
"4":
type: integer
example: 0
"5":
type: integer
example: 0
"6":
type: integer
example: 0
"7":
type: integer
example: 0
averageByHourOfDay:
type: array
example:
- 0
- 0
- 0
- 0
- 0
- 0
- 0
- 0
- 0
- 0
- 399
- 0
- 0
- 0
- 0
- 0
- 0
- 0
- 0
- 0
- 0
- 0
- 0
- 0
items:
type: integer
period:
type: object
properties:
startDate:
type: string
example: 2026-09-01T00:00:00.000Z
endDate:
type: string
example: 2026-10-01T00:00:00.000Z
granularity:
type: string
example: day
timezone:
type: string
example: UTC
_meta:
type: object
properties:
_credits:
type: object
properties:
used:
type: integer
example: 1
balance:
type: integer
example: 10055811
note:
type: string
example: Always
_cache:
type: object
properties:
is_cached:
type: boolean
example: false
note:
type: string
example: Cache disabled for this endpoint
_rate_limits:
type: object
properties:
limit_minute:
type: integer
example: 5000
limit_day:
type: string
example: null
nullable: true
remaining_minute:
type: integer
example: 4999
remaining_day:
type: string
example: null
nullable: true
notice:
type: string
example: We have decided to remove our daily rate limits. Please remove any
references to these in your integrations.
tags:
- Insights
components:
securitySchemes:
default:
type: http
scheme: bearer
description: Get your API Key from OnlyFansAPI Console -
https://app.onlyfansapi.com/api-keys
````
# Get Subscriber Trend (/api-reference/fanvue/insights/get-subscriber-trend)
Get the creator's subscriber events bucketed over time, so growth and churn can be charted. Proxies Fanvue's `GET /v1/insights/subscribers`.
This is an analytics time series, not a current audience count: `total` is the cumulative net change since the start of the requested range, not the number of subscribers the creator has. Use List Smart Lists for a live audience.
`newSubscribersCount` counts subscription starts rather than distinct people, so a returning fan is counted again. It also includes free trials, starts later refunded or charged back, and fans later banned or deleted, which is why it usually runs higher than the "New" figure on the creator's own Insights dashboard.
Buckets are always UTC calendar days. The offsets on `startDate` and `endDate` pick the window, but they do not move the bucket boundaries, and there is no timezone parameter here.
## OpenAPI
````yaml https://app.onlyfansapi.com/scribe-fanvue-docs/openapi.yaml get /api/fanvue/{fanvueAccount}/insights/subscribers
openapi: 3.0.3
info:
title: Fanvue API Documentation
description: ""
version: 1.0.0
servers:
- url: https://app.onlyfansapi.com
security:
- default: []
tags:
- name: Account
description: Endpoints for your connected Fanvue accounts
- name: Chat Messages
description: Endpoints for the messages inside a Fanvue chat.
- name: Chats
description: Endpoints for a Fanvue creator's inbox. A chat is identified by the
fan's user UUID.
- name: Fans
description: "Endpoints for the fans of a Fanvue creator: subscribers,
followers, smart lists and per-fan insights."
- name: Fanvue Account
description: Endpoints for the connected Fanvue creator itself.
- name: Insights
description: "Revenue and growth reporting for a Fanvue creator: per-transaction
earnings, the aggregated earnings summary, the subscriber trend and top
spenders."
- name: Profiles
description: Public Fanvue creator profiles, readable without connecting the creator.
paths:
/api/fanvue/{fanvueAccount}/insights/subscribers:
parameters:
- in: path
name: fanvueAccount
description: The Fanvue Account ID
example: fanvue_acct_XXXXXXXXXXXXXXX
required: true
schema:
type: string
get:
summary: Get Subscriber Trend
operationId: getSubscriberTrend
description: >-
Get the creator's subscriber events bucketed over time, so growth and
churn can be charted. Proxies Fanvue's `GET /v1/insights/subscribers`.
This is an analytics time series, not a current audience count: `total`
is the cumulative net change since the start of the requested range, not
the number of subscribers the creator has. Use List Smart Lists for a
live audience.
`newSubscribersCount` counts subscription starts rather than distinct
people, so a returning fan is counted again. It also includes free
trials, starts later refunded or charged back, and fans later banned or
deleted, which is why it usually runs higher than the "New" figure on
the creator's own Insights dashboard.
Buckets are always UTC calendar days. The offsets on `startDate` and
`endDate` pick the window, but they do not move the bucket boundaries,
and there is no timezone parameter here.
parameters:
- in: query
name: cursor
description: Opaque pagination cursor from a previous response's `nextCursor`.
example: eyJ2IjoxfQ
required: false
schema:
type: string
description: Opaque pagination cursor from a previous response's `nextCursor`.
example: eyJ2IjoxfQ
- in: query
name: size
description: Number of buckets to return (1 - 50). Default = 20
example: 20
required: false
schema:
type: integer
description: Number of buckets to return (1 - 50). Default = 20
example: 20
- in: query
name: startDate
description: Only include events on or after this ISO 8601 datetime.
example: 2026-01-01T00:00:00Z
required: false
schema:
type: string
description: Only include events on or after this ISO 8601 datetime.
example: 2026-01-01T00:00:00Z
- in: query
name: endDate
description: Only include events before this ISO 8601 datetime (non-inclusive).
example: 2026-02-01T00:00:00Z
required: false
schema:
type: string
description: Only include events before this ISO 8601 datetime (non-inclusive).
example: 2026-02-01T00:00:00Z
responses:
"200":
description: Success
content:
application/json:
schema:
type: object
example:
data:
data:
- date: 2026-01-15T00:00:00.000Z
total: 56
newSubscribersCount: 45
cancelledSubscribersCount: 12
- date: 2026-01-14T00:00:00.000Z
total: 23
newSubscribersCount: 38
cancelledSubscribersCount: 15
nextCursor: eyJ2IjoyfQ
_meta:
_credits:
used: 1
balance: 10055811
note: Always
_cache:
is_cached: false
note: Cache disabled for this endpoint
_rate_limits:
limit_minute: 5000
limit_day: null
remaining_minute: 4999
remaining_day: null
notice: We have decided to remove our daily rate limits. Please remove any
references to these in your integrations.
properties:
data:
type: object
properties:
data:
type: array
example:
- date: 2026-01-15T00:00:00.000Z
total: 56
newSubscribersCount: 45
cancelledSubscribersCount: 12
- date: 2026-01-14T00:00:00.000Z
total: 23
newSubscribersCount: 38
cancelledSubscribersCount: 15
items:
type: object
properties:
date:
type: string
example: 2026-01-15T00:00:00.000Z
total:
type: integer
example: 56
newSubscribersCount:
type: integer
example: 45
cancelledSubscribersCount:
type: integer
example: 12
nextCursor:
type: string
example: eyJ2IjoyfQ
_meta:
type: object
properties:
_credits:
type: object
properties:
used:
type: integer
example: 1
balance:
type: integer
example: 10055811
note:
type: string
example: Always
_cache:
type: object
properties:
is_cached:
type: boolean
example: false
note:
type: string
example: Cache disabled for this endpoint
_rate_limits:
type: object
properties:
limit_minute:
type: integer
example: 5000
limit_day:
type: string
example: null
nullable: true
remaining_minute:
type: integer
example: 4999
remaining_day:
type: string
example: null
nullable: true
notice:
type: string
example: We have decided to remove our daily rate limits. Please remove any
references to these in your integrations.
tags:
- Insights
components:
securitySchemes:
default:
type: http
scheme: bearer
description: Get your API Key from OnlyFansAPI Console -
https://app.onlyfansapi.com/api-keys
````
# List Earnings (/api-reference/fanvue/insights/list-earnings)
List the creator's transactions over a date range, each with the fan who paid, so revenue can be reconciled row by row. Proxies Fanvue's `GET /v1/insights/earnings`.
Money is in USD cents. `gross` is pre-fee, `net` is the creator's cut after Fanvue's fees, and `currency` only records what the fan originally paid in: both amounts are already converted. Refunds and chargebacks come back as their own rows with negative amounts and a `reversedTransactionOrderId` pointing at the transaction they reverse, so the original row is never rewritten.
`user` is null on rows no fan paid for, which is the normal case for `referral`, `affiliate` and `giveaway`.
## OpenAPI
````yaml https://app.onlyfansapi.com/scribe-fanvue-docs/openapi.yaml get /api/fanvue/{fanvueAccount}/insights/earnings
openapi: 3.0.3
info:
title: Fanvue API Documentation
description: ""
version: 1.0.0
servers:
- url: https://app.onlyfansapi.com
security:
- default: []
tags:
- name: Account
description: Endpoints for your connected Fanvue accounts
- name: Chat Messages
description: Endpoints for the messages inside a Fanvue chat.
- name: Chats
description: Endpoints for a Fanvue creator's inbox. A chat is identified by the
fan's user UUID.
- name: Fans
description: "Endpoints for the fans of a Fanvue creator: subscribers,
followers, smart lists and per-fan insights."
- name: Fanvue Account
description: Endpoints for the connected Fanvue creator itself.
- name: Insights
description: "Revenue and growth reporting for a Fanvue creator: per-transaction
earnings, the aggregated earnings summary, the subscriber trend and top
spenders."
- name: Profiles
description: Public Fanvue creator profiles, readable without connecting the creator.
paths:
/api/fanvue/{fanvueAccount}/insights/earnings:
parameters:
- in: path
name: fanvueAccount
description: The Fanvue Account ID
example: fanvue_acct_XXXXXXXXXXXXXXX
required: true
schema:
type: string
get:
summary: List Earnings
operationId: listEarnings
description: >-
List the creator's transactions over a date range, each with the fan who
paid, so revenue can be reconciled row by row. Proxies Fanvue's `GET
/v1/insights/earnings`.
Money is in USD cents. `gross` is pre-fee, `net` is the creator's cut
after Fanvue's fees, and `currency` only records what the fan originally
paid in: both amounts are already converted. Refunds and chargebacks
come back as their own rows with negative amounts and a
`reversedTransactionOrderId` pointing at the transaction they reverse,
so the original row is never rewritten.
`user` is null on rows no fan paid for, which is the normal case for
`referral`, `affiliate` and `giveaway`.
parameters:
- in: query
name: cursor
description: Opaque pagination cursor from a previous response's `nextCursor`.
example: eyJ2IjoxfQ
required: false
schema:
type: string
description: Opaque pagination cursor from a previous response's `nextCursor`.
example: eyJ2IjoxfQ
- in: query
name: size
description: Number of transactions to return (1 - 50). Default = 20
example: 20
required: false
schema:
type: integer
description: Number of transactions to return (1 - 50). Default = 20
example: 20
- in: query
name: startDate
description: Only include transactions on or after this ISO 8601 datetime.
example: 2026-01-01T00:00:00Z
required: false
schema:
type: string
description: Only include transactions on or after this ISO 8601 datetime.
example: 2026-01-01T00:00:00Z
- in: query
name: endDate
description: Only include transactions before this ISO 8601 datetime
(non-inclusive).
example: 2026-09-01T00:00:00Z
required: false
schema:
type: string
description: Only include transactions before this ISO 8601 datetime
(non-inclusive).
example: 2026-09-01T00:00:00Z
- in: query
name: source
description: "Restrict to these earning sources: `all`, `affiliate`, `appStore`,
`checkoutLink`, `fanExperience`, `mediaLink`, `message`, `post`,
`referral`, `renewal`, `subscription`, `tip`, `giveaway`, `refund`,
`chargeback`. Default = all. Note that every recurring charge after
the first bills as `renewal`, whether it started as a subscription,
a checkout link or a fan experience; an app store charge is the one
exception and stays `appStore`."
example:
- tip
- message
required: false
schema:
type: array
description: "Restrict to these earning sources: `all`, `affiliate`, `appStore`,
`checkoutLink`, `fanExperience`, `mediaLink`, `message`, `post`,
`referral`, `renewal`, `subscription`, `tip`, `giveaway`,
`refund`, `chargeback`. Default = all. Note that every recurring
charge after the first bills as `renewal`, whether it started as a
subscription, a checkout link or a fan experience; an app store
charge is the one exception and stays `appStore`."
example:
- tip
- message
items:
type: string
- in: query
name: transactionOrderIds
description: Return only these transaction order ids (max 100), to re-check
known transactions for a status change. Combines with the other
filters and still paginates.
example:
- FV-ORDER-123
required: false
schema:
type: array
description: Return only these transaction order ids (max 100), to re-check
known transactions for a status change. Combines with the other
filters and still paginates.
example:
- FV-ORDER-123
items:
type: string
responses:
"200":
description: Success
content:
application/json:
schema:
type: object
example:
data:
data:
- date: 2026-09-22T10:29:07.224Z
gross: 399
net: 339
currency: null
source: subscription
transactionOrderId: FVE-20260922-41280
transactionOrderStatus: pendingBalance
user:
uuid: f47ac10b-58cc-4372-a567-0e02b2c3d479
handle: sarah-jones
displayName: Sarah Jones
nickname: null
isTopSpender: false
- date: 2026-09-21T14:02:55.118Z
gross: -399
net: -339
currency: null
source: refund
transactionOrderId: FVE-20260921-40118
transactionOrderStatus: availableForPayout
reversedTransactionOrderId: FVE-20260921-40117
user:
uuid: 6ba7b810-9dad-11d1-80b4-00c04fd430c8
handle: mike-smith
displayName: Mike Smith
nickname: null
isTopSpender: false
nextCursor: null
_meta:
_credits:
used: 1
balance: 10055811
note: Always
_cache:
is_cached: false
note: Cache disabled for this endpoint
_rate_limits:
limit_minute: 5000
limit_day: null
remaining_minute: 4999
remaining_day: null
notice: We have decided to remove our daily rate limits. Please remove any
references to these in your integrations.
properties:
data:
type: object
properties:
data:
type: array
example:
- date: 2026-09-22T10:29:07.224Z
gross: 399
net: 339
currency: null
source: subscription
transactionOrderId: FVE-20260922-41280
transactionOrderStatus: pendingBalance
user:
uuid: f47ac10b-58cc-4372-a567-0e02b2c3d479
handle: sarah-jones
displayName: Sarah Jones
nickname: null
isTopSpender: false
- date: 2026-09-21T14:02:55.118Z
gross: -399
net: -339
currency: null
source: refund
transactionOrderId: FVE-20260921-40118
transactionOrderStatus: availableForPayout
reversedTransactionOrderId: FVE-20260921-40117
user:
uuid: 6ba7b810-9dad-11d1-80b4-00c04fd430c8
handle: mike-smith
displayName: Mike Smith
nickname: null
isTopSpender: false
items:
type: object
properties:
date:
type: string
example: 2026-09-22T10:29:07.224Z
gross:
type: integer
example: 399
net:
type: integer
example: 339
currency:
type: string
example: null
nullable: true
source:
type: string
example: subscription
transactionOrderId:
type: string
example: FVE-20260922-41280
transactionOrderStatus:
type: string
example: pendingBalance
user:
type: object
properties:
uuid:
type: string
example: f47ac10b-58cc-4372-a567-0e02b2c3d479
handle:
type: string
example: sarah-jones
displayName:
type: string
example: Sarah Jones
nickname:
type: string
example: null
nullable: true
isTopSpender:
type: boolean
example: false
nextCursor:
type: string
example: null
nullable: true
_meta:
type: object
properties:
_credits:
type: object
properties:
used:
type: integer
example: 1
balance:
type: integer
example: 10055811
note:
type: string
example: Always
_cache:
type: object
properties:
is_cached:
type: boolean
example: false
note:
type: string
example: Cache disabled for this endpoint
_rate_limits:
type: object
properties:
limit_minute:
type: integer
example: 5000
limit_day:
type: string
example: null
nullable: true
remaining_minute:
type: integer
example: 4999
remaining_day:
type: string
example: null
nullable: true
notice:
type: string
example: We have decided to remove our daily rate limits. Please remove any
references to these in your integrations.
tags:
- Insights
components:
securitySchemes:
default:
type: http
scheme: bearer
description: Get your API Key from OnlyFansAPI Console -
https://app.onlyfansapi.com/api-keys
````
# List Top Spenders (/api-reference/fanvue/insights/list-top-spenders)
List the creator's highest-spending fans over a date range, with their gross and net totals in USD cents and how many messages they exchanged. Proxies Fanvue's `GET /v1/insights/top-spenders`.
The date range is part of the ordering, so the cursor carries it: once `cursor` is supplied, `startDate` and `endDate` are ignored and the walk continues over the range the first page used. Start a new walk without a cursor to change the range.
Totals are a snapshot taken when the walk starts, which is what keeps fans from moving between pages. A payment that lands mid-walk is counted on no page of it; start a new walk to pick it up. A fan can occasionally appear twice, so de-duplicate on `user.uuid`.
## OpenAPI
````yaml https://app.onlyfansapi.com/scribe-fanvue-docs/openapi.yaml get /api/fanvue/{fanvueAccount}/insights/top-spenders
openapi: 3.0.3
info:
title: Fanvue API Documentation
description: ""
version: 1.0.0
servers:
- url: https://app.onlyfansapi.com
security:
- default: []
tags:
- name: Account
description: Endpoints for your connected Fanvue accounts
- name: Chat Messages
description: Endpoints for the messages inside a Fanvue chat.
- name: Chats
description: Endpoints for a Fanvue creator's inbox. A chat is identified by the
fan's user UUID.
- name: Fans
description: "Endpoints for the fans of a Fanvue creator: subscribers,
followers, smart lists and per-fan insights."
- name: Fanvue Account
description: Endpoints for the connected Fanvue creator itself.
- name: Insights
description: "Revenue and growth reporting for a Fanvue creator: per-transaction
earnings, the aggregated earnings summary, the subscriber trend and top
spenders."
- name: Profiles
description: Public Fanvue creator profiles, readable without connecting the creator.
paths:
/api/fanvue/{fanvueAccount}/insights/top-spenders:
parameters:
- in: path
name: fanvueAccount
description: The Fanvue Account ID
example: fanvue_acct_XXXXXXXXXXXXXXX
required: true
schema:
type: string
get:
summary: List Top Spenders
operationId: listTopSpenders
description: >-
List the creator's highest-spending fans over a date range, with their
gross and net totals in USD cents and how many messages they exchanged.
Proxies Fanvue's `GET /v1/insights/top-spenders`.
The date range is part of the ordering, so the cursor carries it: once
`cursor` is supplied, `startDate` and `endDate` are ignored and the walk
continues over the range the first page used. Start a new walk without a
cursor to change the range.
Totals are a snapshot taken when the walk starts, which is what keeps
fans from moving between pages. A payment that lands mid-walk is counted
on no page of it; start a new walk to pick it up. A fan can occasionally
appear twice, so de-duplicate on `user.uuid`.
parameters:
- in: query
name: startDate
description: Only count spending on or after this ISO 8601 datetime. Ignored
when `cursor` is given.
example: 2026-01-01T00:00:00Z
required: false
schema:
type: string
description: Only count spending on or after this ISO 8601 datetime. Ignored
when `cursor` is given.
example: 2026-01-01T00:00:00Z
- in: query
name: endDate
description: Only count spending before this ISO 8601 datetime (non-inclusive).
Ignored when `cursor` is given.
example: 2026-02-01T00:00:00Z
required: false
schema:
type: string
description: Only count spending before this ISO 8601 datetime (non-inclusive).
Ignored when `cursor` is given.
example: 2026-02-01T00:00:00Z
- in: query
name: cursor
description: Opaque pagination cursor from a previous response's `nextCursor`.
example: eyJ2IjoxfQ
required: false
schema:
type: string
description: Opaque pagination cursor from a previous response's `nextCursor`.
example: eyJ2IjoxfQ
- in: query
name: size
description: Number of fans to return (1 - 50). Default = 15
example: 15
required: false
schema:
type: integer
description: Number of fans to return (1 - 50). Default = 15
example: 15
responses:
"200":
description: Success
content:
application/json:
schema:
type: object
example:
data:
data:
- gross: 15000
net: 12750
messages: 342
user:
uuid: f47ac10b-58cc-4372-a567-0e02b2c3d479
handle: sarah-jones
displayName: Sarah Jones
nickname: SarahK
isTopSpender: true
avatarUrl: https://media.fanvue.com/avatars/example-avatar.jpg
registeredAt: 2024-01-10T12:00:00.000Z
nextCursor: null
total: null
_meta:
_credits:
used: 1
balance: 10055811
note: Always
_cache:
is_cached: false
note: Cache disabled for this endpoint
_rate_limits:
limit_minute: 5000
limit_day: null
remaining_minute: 4999
remaining_day: null
notice: We have decided to remove our daily rate limits. Please remove any
references to these in your integrations.
properties:
data:
type: object
properties:
data:
type: array
example:
- gross: 15000
net: 12750
messages: 342
user:
uuid: f47ac10b-58cc-4372-a567-0e02b2c3d479
handle: sarah-jones
displayName: Sarah Jones
nickname: SarahK
isTopSpender: true
avatarUrl: https://media.fanvue.com/avatars/example-avatar.jpg
registeredAt: 2024-01-10T12:00:00.000Z
items:
type: object
properties:
gross:
type: integer
example: 15000
net:
type: integer
example: 12750
messages:
type: integer
example: 342
user:
type: object
properties:
uuid:
type: string
example: f47ac10b-58cc-4372-a567-0e02b2c3d479
handle:
type: string
example: sarah-jones
displayName:
type: string
example: Sarah Jones
nickname:
type: string
example: SarahK
isTopSpender:
type: boolean
example: true
avatarUrl:
type: string
example: https://media.fanvue.com/avatars/example-avatar.jpg
registeredAt:
type: string
example: 2024-01-10T12:00:00.000Z
nextCursor:
type: string
example: null
nullable: true
total:
type: string
example: null
nullable: true
_meta:
type: object
properties:
_credits:
type: object
properties:
used:
type: integer
example: 1
balance:
type: integer
example: 10055811
note:
type: string
example: Always
_cache:
type: object
properties:
is_cached:
type: boolean
example: false
note:
type: string
example: Cache disabled for this endpoint
_rate_limits:
type: object
properties:
limit_minute:
type: integer
example: 5000
limit_day:
type: string
example: null
nullable: true
remaining_minute:
type: integer
example: 4999
remaining_day:
type: string
example: null
nullable: true
notice:
type: string
example: We have decided to remove our daily rate limits. Please remove any
references to these in your integrations.
tags:
- Insights
components:
securitySchemes:
default:
type: http
scheme: bearer
description: Get your API Key from OnlyFansAPI Console -
https://app.onlyfansapi.com/api-keys
````
# Get Public Profile (/api-reference/fanvue/profiles/get-public-profile)
Look up any Fanvue creator's public profile by handle, as fanvue.com serves it to a signed-out visitor. No connected account is needed.
**Unofficial:** Fanvue publishes no API for this. It reads the website's own internal endpoint, so the response shape can change without notice and is not covered by Fanvue's API versioning. Handles are case-sensitive, and an unknown one answers 404.
Read `subscription_price`, which is USD cents. `subscriptionDisplayPrice` is a localised string Fanvue formats from the calling server's location rather than yours, so it carries whatever currency our egress resolves to and is not useful to an integrator.
## OpenAPI
````yaml https://app.onlyfansapi.com/scribe-fanvue-docs/openapi.yaml get /api/fanvue/profiles/{handle}
openapi: 3.0.3
info:
title: Fanvue API Documentation
description: ""
version: 1.0.0
servers:
- url: https://app.onlyfansapi.com
security:
- default: []
tags:
- name: Account
description: Endpoints for your connected Fanvue accounts
- name: Chat Messages
description: Endpoints for the messages inside a Fanvue chat.
- name: Chats
description: Endpoints for a Fanvue creator's inbox. A chat is identified by the
fan's user UUID.
- name: Fans
description: "Endpoints for the fans of a Fanvue creator: subscribers,
followers, smart lists and per-fan insights."
- name: Fanvue Account
description: Endpoints for the connected Fanvue creator itself.
- name: Insights
description: "Revenue and growth reporting for a Fanvue creator: per-transaction
earnings, the aggregated earnings summary, the subscriber trend and top
spenders."
- name: Profiles
description: Public Fanvue creator profiles, readable without connecting the creator.
paths:
/api/fanvue/profiles/{handle}:
parameters:
- in: path
name: handle
description: The Fanvue handle, exactly as it appears in the profile URL.
example: jane
required: true
schema:
type: string
get:
summary: Get Public Profile
operationId: getPublicProfile
description: >-
Look up any Fanvue creator's public profile by handle, as fanvue.com
serves it to a signed-out visitor. No connected account is needed.
**Unofficial:** Fanvue publishes no API for this. It reads the website's
own internal endpoint, so the response shape can change without notice
and is not covered by Fanvue's API versioning. Handles are
case-sensitive, and an unknown one answers 404.
Read `subscription_price`, which is USD cents.
`subscriptionDisplayPrice` is a localised string Fanvue formats from the
calling server's location rather than yours, so it carries whatever
currency our egress resolves to and is not useful to an integrator.
parameters: []
responses:
"200":
description: Success
content:
application/json:
schema:
type: object
example:
data:
agg_like_count: 0
banned_from_site: false
bio: null
creator_settings:
is_sfw_creator: false
is_ai_creator: false
is_payment_age_estimation_required: null
disable_posts_comments: false
enable_blur_preview: true
enable_follow_for_free: true
enable_intro_video: false
gender: null
hide_media: false
is_creator: true
is_demo_account: null
is_profile_hidden: false
is_seo_indexable: false
subscription_price: 399
temporarily_suspended: false
user_input_location: null
is_banner_picture_processing: false
is_profile_picture_processing: false
has_elevenlabs_voice_id: false
subscriptionDisplayPrice: man.6.78
subscription_bundles: []
is_sfw_discovery_enabled: true
nickname: null
intro_video: null
content_collections: null
is_ambassador: false
show_verified_badge: false
uuid: 3bbe6394-2830-4646-a8ba-4a0a05426947
displayName: Jane Doe
handle: jane
avatarUri: null
avatarUriSm: null
avatarUriXs: null
banner_uri: null
banner_url_md: null
_meta:
_credits:
used: 1
balance: 10055811
note: You used ?fresh=true to make a fresh request
_cache:
is_cached: false
note: You used ?fresh=true to bypass the cache
_rate_limits:
limit_minute: 5000
limit_day: null
remaining_minute: 4999
remaining_day: null
notice: We have decided to remove our daily rate limits. Please remove any
references to these in your integrations.
properties:
data:
type: object
properties:
agg_like_count:
type: integer
example: 0
banned_from_site:
type: boolean
example: false
bio:
type: string
example: null
nullable: true
creator_settings:
type: object
properties:
is_sfw_creator:
type: boolean
example: false
is_ai_creator:
type: boolean
example: false
is_payment_age_estimation_required:
type: string
example: null
nullable: true
disable_posts_comments:
type: boolean
example: false
enable_blur_preview:
type: boolean
example: true
enable_follow_for_free:
type: boolean
example: true
enable_intro_video:
type: boolean
example: false
gender:
type: string
example: null
nullable: true
hide_media:
type: boolean
example: false
is_creator:
type: boolean
example: true
is_demo_account:
type: string
example: null
nullable: true
is_profile_hidden:
type: boolean
example: false
is_seo_indexable:
type: boolean
example: false
subscription_price:
type: integer
example: 399
temporarily_suspended:
type: boolean
example: false
user_input_location:
type: string
example: null
nullable: true
is_banner_picture_processing:
type: boolean
example: false
is_profile_picture_processing:
type: boolean
example: false
has_elevenlabs_voice_id:
type: boolean
example: false
subscriptionDisplayPrice:
type: string
example: man.6.78
subscription_bundles:
type: array
example: []
is_sfw_discovery_enabled:
type: boolean
example: true
nickname:
type: string
example: null
nullable: true
intro_video:
type: string
example: null
nullable: true
content_collections:
type: string
example: null
nullable: true
is_ambassador:
type: boolean
example: false
show_verified_badge:
type: boolean
example: false
uuid:
type: string
example: 3bbe6394-2830-4646-a8ba-4a0a05426947
displayName:
type: string
example: Jane Doe
handle:
type: string
example: jane
avatarUri:
type: string
example: null
nullable: true
avatarUriSm:
type: string
example: null
nullable: true
avatarUriXs:
type: string
example: null
nullable: true
banner_uri:
type: string
example: null
nullable: true
banner_url_md:
type: string
example: null
nullable: true
_meta:
type: object
properties:
_credits:
type: object
properties:
used:
type: integer
example: 1
balance:
type: integer
example: 10055811
note:
type: string
example: You used ?fresh=true to make a fresh request
_cache:
type: object
properties:
is_cached:
type: boolean
example: false
note:
type: string
example: You used ?fresh=true to bypass the cache
_rate_limits:
type: object
properties:
limit_minute:
type: integer
example: 5000
limit_day:
type: string
example: null
nullable: true
remaining_minute:
type: integer
example: 4999
remaining_day:
type: string
example: null
nullable: true
notice:
type: string
example: We have decided to remove our daily rate limits. Please remove any
references to these in your integrations.
tags:
- Profiles
components:
securitySchemes:
default:
type: http
scheme: bearer
description: Get your API Key from OnlyFansAPI Console -
https://app.onlyfansapi.com/api-keys
````
# Check Online Status (/api-reference/fanvue/fans/check-online-status)
Check whether a set of fans is online in one call, so a chat list can be decorated without a request per fan. Proxies Fanvue's `POST /v1/chats/statuses`, which accepts up to 100 UUIDs and reports fans who hide their online visibility as offline with no last seen timestamp. Fanvue rate limits this endpoint at 80 requests per 60 seconds rather than the usual 200.
## OpenAPI
````yaml https://app.onlyfansapi.com/scribe-fanvue-docs/openapi.yaml post /api/fanvue/{fanvueAccount}/fans/online-status
openapi: 3.0.3
info:
title: Fanvue API Documentation
description: ""
version: 1.0.0
servers:
- url: https://app.onlyfansapi.com
security:
- default: []
tags:
- name: Account
description: Endpoints for your connected Fanvue accounts
- name: Chat Messages
description: Endpoints for the messages inside a Fanvue chat.
- name: Chats
description: Endpoints for a Fanvue creator's inbox. A chat is identified by the
fan's user UUID.
- name: Fans
description: "Endpoints for the fans of a Fanvue creator: subscribers,
followers, smart lists and per-fan insights."
- name: Fanvue Account
description: Endpoints for the connected Fanvue creator itself.
- name: Insights
description: "Revenue and growth reporting for a Fanvue creator: per-transaction
earnings, the aggregated earnings summary, the subscriber trend and top
spenders."
- name: Profiles
description: Public Fanvue creator profiles, readable without connecting the creator.
paths:
/api/fanvue/{fanvueAccount}/fans/online-status:
parameters:
- in: path
name: fanvueAccount
description: The Fanvue Account ID
example: fanvue_acct_XXXXXXXXXXXXXXX
required: true
schema:
type: string
post:
summary: Check Online Status
operationId: checkOnlineStatus
description: Check whether a set of fans is online in one call, so a chat list
can be decorated without a request per fan. Proxies Fanvue's `POST
/v1/chats/statuses`, which accepts up to 100 UUIDs and reports fans who
hide their online visibility as offline with no last seen timestamp.
Fanvue rate limits this endpoint at 80 requests per 60 seconds rather
than the usual 200.
parameters: []
responses:
"200":
description: Success
content:
application/json:
schema:
type: object
example:
data:
f47ac10b-58cc-4372-a567-0e02b2c3d479:
isOnline: false
lastSeenAt: 2026-09-22T10:38:48.809Z
6ba7b810-9dad-11d1-80b4-00c04fd430c8:
isOnline: false
lastSeenAt: null
_meta:
_credits:
used: 1
balance: 10055811
note: Always
_cache:
is_cached: false
note: Cache disabled for this endpoint
_rate_limits:
limit_minute: 5000
limit_day: null
remaining_minute: 4999
remaining_day: null
notice: We have decided to remove our daily rate limits. Please remove any
references to these in your integrations.
properties:
data:
type: object
properties:
f47ac10b-58cc-4372-a567-0e02b2c3d479:
type: object
properties:
isOnline:
type: boolean
example: false
lastSeenAt:
type: string
example: 2026-09-22T10:38:48.809Z
6ba7b810-9dad-11d1-80b4-00c04fd430c8:
type: object
properties:
isOnline:
type: boolean
example: false
lastSeenAt:
type: string
example: null
nullable: true
_meta:
type: object
properties:
_credits:
type: object
properties:
used:
type: integer
example: 1
balance:
type: integer
example: 10055811
note:
type: string
example: Always
_cache:
type: object
properties:
is_cached:
type: boolean
example: false
note:
type: string
example: Cache disabled for this endpoint
_rate_limits:
type: object
properties:
limit_minute:
type: integer
example: 5000
limit_day:
type: string
example: null
nullable: true
remaining_minute:
type: integer
example: 4999
remaining_day:
type: string
example: null
nullable: true
notice:
type: string
example: We have decided to remove our daily rate limits. Please remove any
references to these in your integrations.
tags:
- Fans
requestBody:
required: true
content:
application/json:
schema:
type: object
properties:
userUuids:
type: array
description: The fan user UUIDs to check (1 - 100).
example:
- f47ac10b-58cc-4372-a567-0e02b2c3d479
items:
type: string
required:
- userUuids
components:
securitySchemes:
default:
type: http
scheme: bearer
description: Get your API Key from OnlyFansAPI Console -
https://app.onlyfansapi.com/api-keys
````
# Get Fan Insights (/api-reference/fanvue/fans/get-fan-insights)
Get one fan's relationship with the creator: their status, what they have spent and how, and their subscription renewal. Proxies Fanvue's `GET /v1/insights/fans/{userUuid}`.
Every money figure comes gross and net, net meaning refunded and charged-back purchases removed. `spending.total.total` has always been net of reversals, so the gross per-source figures can add up to more than it and the gap is exactly the reversals.
## OpenAPI
````yaml https://app.onlyfansapi.com/scribe-fanvue-docs/openapi.yaml get /api/fanvue/{fanvueAccount}/fans/{userUuid}/insights
openapi: 3.0.3
info:
title: Fanvue API Documentation
description: ""
version: 1.0.0
servers:
- url: https://app.onlyfansapi.com
security:
- default: []
tags:
- name: Account
description: Endpoints for your connected Fanvue accounts
- name: Chat Messages
description: Endpoints for the messages inside a Fanvue chat.
- name: Chats
description: Endpoints for a Fanvue creator's inbox. A chat is identified by the
fan's user UUID.
- name: Fans
description: "Endpoints for the fans of a Fanvue creator: subscribers,
followers, smart lists and per-fan insights."
- name: Fanvue Account
description: Endpoints for the connected Fanvue creator itself.
- name: Insights
description: "Revenue and growth reporting for a Fanvue creator: per-transaction
earnings, the aggregated earnings summary, the subscriber trend and top
spenders."
- name: Profiles
description: Public Fanvue creator profiles, readable without connecting the creator.
paths:
/api/fanvue/{fanvueAccount}/fans/{userUuid}/insights:
parameters:
- in: path
name: fanvueAccount
description: The Fanvue Account ID
example: fanvue_acct_XXXXXXXXXXXXXXX
required: true
schema:
type: string
- in: path
name: userUuid
description: The fan's Fanvue user UUID.
example: f47ac10b-58cc-4372-a567-0e02b2c3d479
required: true
schema:
type: string
get:
summary: Get Fan Insights
operationId: getFanInsights
description: >-
Get one fan's relationship with the creator: their status, what they
have spent and how, and their subscription renewal. Proxies Fanvue's
`GET /v1/insights/fans/{userUuid}`.
Every money figure comes gross and net, net meaning refunded and
charged-back purchases removed. `spending.total.total` has always been
net of reversals, so the gross per-source figures can add up to more
than it and the gap is exactly the reversals.
parameters: []
responses:
"200":
description: Success
content:
application/json:
schema:
type: object
example:
data:
status: subscriber
spending:
lastPurchaseAt: 2026-09-22T10:29:07.224Z
lastValidPurchaseAt: 2026-09-22T10:29:07.224Z
total:
gross: 536
total: 536
netTotal: 536
maxSinglePayment:
gross: 536
total: 536
sources:
subscription:
gross: 536
total: 536
netTotal: 536
count: 1
netCount: 1
average: 536
netAverage: 536
subscription:
createdAt: 2026-09-22T10:29:07.224Z
renewsAt: 2026-10-22T10:28:59.873Z
autoRenewalEnabled: true
_meta:
_credits:
used: 1
balance: 10055811
note: Always
_cache:
is_cached: false
note: Cache disabled for this endpoint
_rate_limits:
limit_minute: 5000
limit_day: null
remaining_minute: 4999
remaining_day: null
notice: We have decided to remove our daily rate limits. Please remove any
references to these in your integrations.
properties:
data:
type: object
properties:
status:
type: string
example: subscriber
spending:
type: object
properties:
lastPurchaseAt:
type: string
example: 2026-09-22T10:29:07.224Z
lastValidPurchaseAt:
type: string
example: 2026-09-22T10:29:07.224Z
total:
type: object
properties:
gross:
type: integer
example: 536
total:
type: integer
example: 536
netTotal:
type: integer
example: 536
maxSinglePayment:
type: object
properties:
gross:
type: integer
example: 536
total:
type: integer
example: 536
sources:
type: object
properties:
subscription:
type: object
properties:
gross:
type: integer
example: 536
total:
type: integer
example: 536
netTotal:
type: integer
example: 536
count:
type: integer
example: 1
netCount:
type: integer
example: 1
average:
type: integer
example: 536
netAverage:
type: integer
example: 536
subscription:
type: object
properties:
createdAt:
type: string
example: 2026-09-22T10:29:07.224Z
renewsAt:
type: string
example: 2026-10-22T10:28:59.873Z
autoRenewalEnabled:
type: boolean
example: true
_meta:
type: object
properties:
_credits:
type: object
properties:
used:
type: integer
example: 1
balance:
type: integer
example: 10055811
note:
type: string
example: Always
_cache:
type: object
properties:
is_cached:
type: boolean
example: false
note:
type: string
example: Cache disabled for this endpoint
_rate_limits:
type: object
properties:
limit_minute:
type: integer
example: 5000
limit_day:
type: string
example: null
nullable: true
remaining_minute:
type: integer
example: 4999
remaining_day:
type: string
example: null
nullable: true
notice:
type: string
example: We have decided to remove our daily rate limits. Please remove any
references to these in your integrations.
tags:
- Fans
components:
securitySchemes:
default:
type: http
scheme: bearer
description: Get your API Key from OnlyFansAPI Console -
https://app.onlyfansapi.com/api-keys
````
# Get Subscriber (/api-reference/fanvue/fans/get-subscriber)
Get one subscriber and their subscription details by user UUID. Proxies Fanvue's `GET /v1/subscribers/{userUuid}`, which answers 404 when the user is not a subscriber.
## OpenAPI
````yaml https://app.onlyfansapi.com/scribe-fanvue-docs/openapi.yaml get /api/fanvue/{fanvueAccount}/fans/subscribers/{userUuid}
openapi: 3.0.3
info:
title: Fanvue API Documentation
description: ""
version: 1.0.0
servers:
- url: https://app.onlyfansapi.com
security:
- default: []
tags:
- name: Account
description: Endpoints for your connected Fanvue accounts
- name: Chat Messages
description: Endpoints for the messages inside a Fanvue chat.
- name: Chats
description: Endpoints for a Fanvue creator's inbox. A chat is identified by the
fan's user UUID.
- name: Fans
description: "Endpoints for the fans of a Fanvue creator: subscribers,
followers, smart lists and per-fan insights."
- name: Fanvue Account
description: Endpoints for the connected Fanvue creator itself.
- name: Insights
description: "Revenue and growth reporting for a Fanvue creator: per-transaction
earnings, the aggregated earnings summary, the subscriber trend and top
spenders."
- name: Profiles
description: Public Fanvue creator profiles, readable without connecting the creator.
paths:
/api/fanvue/{fanvueAccount}/fans/subscribers/{userUuid}:
parameters:
- in: path
name: fanvueAccount
description: The Fanvue Account ID
example: fanvue_acct_XXXXXXXXXXXXXXX
required: true
schema:
type: string
- in: path
name: userUuid
description: The fan's Fanvue user UUID.
example: f47ac10b-58cc-4372-a567-0e02b2c3d479
required: true
schema:
type: string
get:
summary: Get Subscriber
operationId: getSubscriber
description: Get one subscriber and their subscription details by user UUID.
Proxies Fanvue's `GET /v1/subscribers/{userUuid}`, which answers 404
when the user is not a subscriber.
parameters: []
responses:
"200":
description: Success
content:
application/json:
schema:
type: object
example:
data:
uuid: f47ac10b-58cc-4372-a567-0e02b2c3d479
handle: sarah-jones
displayName: Sarah Jones
nickname: null
isTopSpender: false
avatarUrl: null
registeredAt: 2026-09-21T12:05:33.176Z
subscription:
status: active
price: 399
amountPaid: 399
currentPeriodStart: 2026-09-22T10:29:07.224Z
currentPeriodEnd: 2026-10-22T10:28:59.873Z
autoRenewalEnabled: true
firstSubscribedAt: 2026-09-22T10:29:07.474Z
_meta:
_credits:
used: 1
balance: 10055811
note: Always
_cache:
is_cached: false
note: Cache disabled for this endpoint
_rate_limits:
limit_minute: 5000
limit_day: null
remaining_minute: 4999
remaining_day: null
notice: We have decided to remove our daily rate limits. Please remove any
references to these in your integrations.
properties:
data:
type: object
properties:
uuid:
type: string
example: f47ac10b-58cc-4372-a567-0e02b2c3d479
handle:
type: string
example: sarah-jones
displayName:
type: string
example: Sarah Jones
nickname:
type: string
example: null
nullable: true
isTopSpender:
type: boolean
example: false
avatarUrl:
type: string
example: null
nullable: true
registeredAt:
type: string
example: 2026-09-21T12:05:33.176Z
subscription:
type: object
properties:
status:
type: string
example: active
price:
type: integer
example: 399
amountPaid:
type: integer
example: 399
currentPeriodStart:
type: string
example: 2026-09-22T10:29:07.224Z
currentPeriodEnd:
type: string
example: 2026-10-22T10:28:59.873Z
autoRenewalEnabled:
type: boolean
example: true
firstSubscribedAt:
type: string
example: 2026-09-22T10:29:07.474Z
_meta:
type: object
properties:
_credits:
type: object
properties:
used:
type: integer
example: 1
balance:
type: integer
example: 10055811
note:
type: string
example: Always
_cache:
type: object
properties:
is_cached:
type: boolean
example: false
note:
type: string
example: Cache disabled for this endpoint
_rate_limits:
type: object
properties:
limit_minute:
type: integer
example: 5000
limit_day:
type: string
example: null
nullable: true
remaining_minute:
type: integer
example: 4999
remaining_day:
type: string
example: null
nullable: true
notice:
type: string
example: We have decided to remove our daily rate limits. Please remove any
references to these in your integrations.
tags:
- Fans
components:
securitySchemes:
default:
type: http
scheme: bearer
description: Get your API Key from OnlyFansAPI Console -
https://app.onlyfansapi.com/api-keys
````
# List Expiring Subscribers (/api-reference/fanvue/fans/list-expiring-subscribers)
List the subscribers whose subscription lapses inside a window and who have auto-renew switched off, so a win-back can be sent before they go. Ordered soonest to lapse first.
Fanvue has no endpoint for this and no server-side filter that answers it. The `non_renewing` smart list is the closest thing and is not the same question: it means auto-renew is off whenever the period ends, and its members carry no subscription dates to narrow with. So this endpoint pages `GET /v1/subscribers` and filters on `subscription.currentPeriodEnd` and `subscription.autoRenewalEnabled`, which is the derivation List Subscribers describes, done here instead of in your code.
**This costs more than one credit.** One page of 50 subscribers is one request Fanvue answers and one credit, the same rule as every other endpoint, and one call walks up to 20 pages, or fewer if Fanvue is slow and the walk passes 20 seconds. `_meta._credits.used` reports what a call actually cost. Because the cost is not known until the walk finishes, the balance check up front is against the worst case, so a balance under 20 is refused even when the call would have cost less.
**A page can come back empty with a `nextCursor` set.** The caps are on subscribers scanned and time spent, not on matches found, so an empty `data` with a cursor means "nothing matched so far, keep going" rather than "no expiring subscribers". Follow `nextCursor` until it is `null`, exactly as with the other list endpoints. Each item is a subscriber object in the same shape List Subscribers returns.
## OpenAPI
````yaml https://app.onlyfansapi.com/scribe-fanvue-docs/openapi.yaml get /api/fanvue/{fanvueAccount}/fans/expiring
openapi: 3.0.3
info:
title: Fanvue API Documentation
description: ""
version: 1.0.0
servers:
- url: https://app.onlyfansapi.com
security:
- default: []
tags:
- name: Account
description: Endpoints for your connected Fanvue accounts
- name: Chat Messages
description: Endpoints for the messages inside a Fanvue chat.
- name: Chats
description: Endpoints for a Fanvue creator's inbox. A chat is identified by the
fan's user UUID.
- name: Fans
description: "Endpoints for the fans of a Fanvue creator: subscribers,
followers, smart lists and per-fan insights."
- name: Fanvue Account
description: Endpoints for the connected Fanvue creator itself.
- name: Insights
description: "Revenue and growth reporting for a Fanvue creator: per-transaction
earnings, the aggregated earnings summary, the subscriber trend and top
spenders."
- name: Profiles
description: Public Fanvue creator profiles, readable without connecting the creator.
paths:
/api/fanvue/{fanvueAccount}/fans/expiring:
parameters:
- in: path
name: fanvueAccount
description: The Fanvue Account ID
example: fanvue_acct_XXXXXXXXXXXXXXX
required: true
schema:
type: string
get:
summary: List Expiring Subscribers
operationId: listExpiringSubscribers
description: >-
List the subscribers whose subscription lapses inside a window and who
have auto-renew switched off, so a win-back can be sent before they go.
Ordered soonest to lapse first.
Fanvue has no endpoint for this and no server-side filter that answers
it. The `non_renewing` smart list is the closest thing and is not the
same question: it means auto-renew is off whenever the period ends, and
its members carry no subscription dates to narrow with. So this endpoint
pages `GET /v1/subscribers` and filters on
`subscription.currentPeriodEnd` and `subscription.autoRenewalEnabled`,
which is the derivation List Subscribers describes, done here instead of
in your code.
**This costs more than one credit.** One page of 50 subscribers is one
request Fanvue answers and one credit, the same rule as every other
endpoint, and one call walks up to 20 pages, or fewer if Fanvue is slow
and the walk passes 20 seconds. `_meta._credits.used` reports what a
call actually cost. Because the cost is not known until the walk
finishes, the balance check up front is against the worst case, so a
balance under 20 is refused even when the call would have cost less.
**A page can come back empty with a `nextCursor` set.** The caps are on
subscribers scanned and time spent, not on matches found, so an empty
`data` with a cursor means "nothing matched so far, keep going" rather
than "no expiring subscribers". Follow `nextCursor` until it is `null`,
exactly as with the other list endpoints. Each item is a subscriber
object in the same shape List Subscribers returns.
parameters:
- in: query
name: withinDays
description: Include subscriptions ending within this many days (1 - 90).
Default = 7
example: 7
required: false
schema:
type: integer
description: Include subscriptions ending within this many days (1 - 90).
Default = 7
example: 7
- in: query
name: cursor
description: Opaque pagination cursor from a previous response's `nextCursor`,
to carry on scanning where the last call stopped.
example: eyJ2IjoxfQ
required: false
schema:
type: string
description: Opaque pagination cursor from a previous response's `nextCursor`,
to carry on scanning where the last call stopped.
example: eyJ2IjoxfQ
responses:
"200":
description: Success
content:
application/json:
schema:
type: object
example:
data:
data:
- uuid: f47ac10b-58cc-4372-a567-0e02b2c3d479
handle: sarah-jones
displayName: Sarah Jones
nickname: null
isTopSpender: false
avatarUrl: null
registeredAt: 2026-09-21T12:05:33.176Z
subscription:
status: active
price: 399
amountPaid: 399
currentPeriodStart: 2026-08-24T10:29:07.224Z
currentPeriodEnd: 2026-09-24T10:28:59.873Z
autoRenewalEnabled: false
firstSubscribedAt: 2026-07-24T10:29:07.474Z
- uuid: 6ba7b810-9dad-11d1-80b4-00c04fd430c8
handle: mike-smith
displayName: Mike Smith
nickname: null
isTopSpender: false
avatarUrl: null
registeredAt: 2026-05-02T09:15:00.000Z
subscription:
status: active
price: 999
amountPaid: 999
currentPeriodStart: 2026-08-27T08:11:42.005Z
currentPeriodEnd: 2026-09-27T08:11:42.005Z
autoRenewalEnabled: false
firstSubscribedAt: 2026-05-27T08:11:42.005Z
nextCursor: null
_meta:
_credits:
used: 3
balance: 10055811
note: Always
_cache:
is_cached: false
note: Cache disabled for this endpoint
_rate_limits:
limit_minute: 5000
limit_day: null
remaining_minute: 4999
remaining_day: null
notice: We have decided to remove our daily rate limits. Please remove any
references to these in your integrations.
properties:
data:
type: object
properties:
data:
type: array
example:
- uuid: f47ac10b-58cc-4372-a567-0e02b2c3d479
handle: sarah-jones
displayName: Sarah Jones
nickname: null
isTopSpender: false
avatarUrl: null
registeredAt: 2026-09-21T12:05:33.176Z
subscription:
status: active
price: 399
amountPaid: 399
currentPeriodStart: 2026-08-24T10:29:07.224Z
currentPeriodEnd: 2026-09-24T10:28:59.873Z
autoRenewalEnabled: false
firstSubscribedAt: 2026-07-24T10:29:07.474Z
- uuid: 6ba7b810-9dad-11d1-80b4-00c04fd430c8
handle: mike-smith
displayName: Mike Smith
nickname: null
isTopSpender: false
avatarUrl: null
registeredAt: 2026-05-02T09:15:00.000Z
subscription:
status: active
price: 999
amountPaid: 999
currentPeriodStart: 2026-08-27T08:11:42.005Z
currentPeriodEnd: 2026-09-27T08:11:42.005Z
autoRenewalEnabled: false
firstSubscribedAt: 2026-05-27T08:11:42.005Z
items:
type: object
properties:
uuid:
type: string
example: f47ac10b-58cc-4372-a567-0e02b2c3d479
handle:
type: string
example: sarah-jones
displayName:
type: string
example: Sarah Jones
nickname:
type: string
example: null
nullable: true
isTopSpender:
type: boolean
example: false
avatarUrl:
type: string
example: null
nullable: true
registeredAt:
type: string
example: 2026-09-21T12:05:33.176Z
subscription:
type: object
properties:
status:
type: string
example: active
price:
type: integer
example: 399
amountPaid:
type: integer
example: 399
currentPeriodStart:
type: string
example: 2026-08-24T10:29:07.224Z
currentPeriodEnd:
type: string
example: 2026-09-24T10:28:59.873Z
autoRenewalEnabled:
type: boolean
example: false
firstSubscribedAt:
type: string
example: 2026-07-24T10:29:07.474Z
nextCursor:
type: string
example: null
nullable: true
_meta:
type: object
properties:
_credits:
type: object
properties:
used:
type: integer
example: 3
balance:
type: integer
example: 10055811
note:
type: string
example: Always
_cache:
type: object
properties:
is_cached:
type: boolean
example: false
note:
type: string
example: Cache disabled for this endpoint
_rate_limits:
type: object
properties:
limit_minute:
type: integer
example: 5000
limit_day:
type: string
example: null
nullable: true
remaining_minute:
type: integer
example: 4999
remaining_day:
type: string
example: null
nullable: true
notice:
type: string
example: We have decided to remove our daily rate limits. Please remove any
references to these in your integrations.
tags:
- Fans
requestBody:
required: false
content:
application/json:
schema:
type: object
properties:
withinDays:
type: integer
description: Must be at least 1. Must not be greater than 90.
example: 7
cursor:
type: string
description: ""
example: velit
components:
securitySchemes:
default:
type: http
scheme: bearer
description: Get your API Key from OnlyFansAPI Console -
https://app.onlyfansapi.com/api-keys
````
# List Followers (/api-reference/fanvue/fans/list-followers)
List the users following the creator, most recently followed first. A fan who follows and subscribes appears here as well as in the subscribers list, so de-duplicate on `uuid` if you merge the two. Proxies Fanvue's `GET /v1/followers`.
## OpenAPI
````yaml https://app.onlyfansapi.com/scribe-fanvue-docs/openapi.yaml get /api/fanvue/{fanvueAccount}/fans/followers
openapi: 3.0.3
info:
title: Fanvue API Documentation
description: ""
version: 1.0.0
servers:
- url: https://app.onlyfansapi.com
security:
- default: []
tags:
- name: Account
description: Endpoints for your connected Fanvue accounts
- name: Chat Messages
description: Endpoints for the messages inside a Fanvue chat.
- name: Chats
description: Endpoints for a Fanvue creator's inbox. A chat is identified by the
fan's user UUID.
- name: Fans
description: "Endpoints for the fans of a Fanvue creator: subscribers,
followers, smart lists and per-fan insights."
- name: Fanvue Account
description: Endpoints for the connected Fanvue creator itself.
- name: Insights
description: "Revenue and growth reporting for a Fanvue creator: per-transaction
earnings, the aggregated earnings summary, the subscriber trend and top
spenders."
- name: Profiles
description: Public Fanvue creator profiles, readable without connecting the creator.
paths:
/api/fanvue/{fanvueAccount}/fans/followers:
parameters:
- in: path
name: fanvueAccount
description: The Fanvue Account ID
example: fanvue_acct_XXXXXXXXXXXXXXX
required: true
schema:
type: string
get:
summary: List Followers
operationId: listFollowers
description: List the users following the creator, most recently followed first.
A fan who follows and subscribes appears here as well as in the
subscribers list, so de-duplicate on `uuid` if you merge the two.
Proxies Fanvue's `GET /v1/followers`.
parameters:
- in: query
name: cursor
description: Opaque pagination cursor from a previous response's `nextCursor`.
example: eyJ2IjoxfQ
required: false
schema:
type: string
description: Opaque pagination cursor from a previous response's `nextCursor`.
example: eyJ2IjoxfQ
- in: query
name: size
description: Number of followers to return (1 - 50). Default = 15
example: 15
required: false
schema:
type: integer
description: Number of followers to return (1 - 50). Default = 15
example: 15
responses:
"200":
description: Success
content:
application/json:
schema:
type: object
example:
data:
data:
- uuid: f47ac10b-58cc-4372-a567-0e02b2c3d479
handle: sarah-jones
displayName: Sarah Jones
nickname: SarahK
isTopSpender: true
avatarUrl: https://media.fanvue.com/avatars/example-avatar.jpg
registeredAt: 2024-01-10T12:00:00.000Z
nextCursor: eyJ2IjoyfQ
_meta:
_credits:
used: 1
balance: 10055811
note: Always
_cache:
is_cached: false
note: Cache disabled for this endpoint
_rate_limits:
limit_minute: 5000
limit_day: null
remaining_minute: 4999
remaining_day: null
notice: We have decided to remove our daily rate limits. Please remove any
references to these in your integrations.
properties:
data:
type: object
properties:
data:
type: array
example:
- uuid: f47ac10b-58cc-4372-a567-0e02b2c3d479
handle: sarah-jones
displayName: Sarah Jones
nickname: SarahK
isTopSpender: true
avatarUrl: https://media.fanvue.com/avatars/example-avatar.jpg
registeredAt: 2024-01-10T12:00:00.000Z
items:
type: object
properties:
uuid:
type: string
example: f47ac10b-58cc-4372-a567-0e02b2c3d479
handle:
type: string
example: sarah-jones
displayName:
type: string
example: Sarah Jones
nickname:
type: string
example: SarahK
isTopSpender:
type: boolean
example: true
avatarUrl:
type: string
example: https://media.fanvue.com/avatars/example-avatar.jpg
registeredAt:
type: string
example: 2024-01-10T12:00:00.000Z
nextCursor:
type: string
example: eyJ2IjoyfQ
_meta:
type: object
properties:
_credits:
type: object
properties:
used:
type: integer
example: 1
balance:
type: integer
example: 10055811
note:
type: string
example: Always
_cache:
type: object
properties:
is_cached:
type: boolean
example: false
note:
type: string
example: Cache disabled for this endpoint
_rate_limits:
type: object
properties:
limit_minute:
type: integer
example: 5000
limit_day:
type: string
example: null
nullable: true
remaining_minute:
type: integer
example: 4999
remaining_day:
type: string
example: null
nullable: true
notice:
type: string
example: We have decided to remove our daily rate limits. Please remove any
references to these in your integrations.
tags:
- Fans
components:
securitySchemes:
default:
type: http
scheme: bearer
description: Get your API Key from OnlyFansAPI Console -
https://app.onlyfansapi.com/api-keys
````
# List Online Fans (/api-reference/fanvue/fans/list-online-fans)
List the fans who are online right now, so chatters can prioritise them. Proxies Fanvue's `GET /v1/chats` with `filter=online`, so the entries are chats rather than bare users and carry the same shape as List Chats.
## OpenAPI
````yaml https://app.onlyfansapi.com/scribe-fanvue-docs/openapi.yaml get /api/fanvue/{fanvueAccount}/fans/online
openapi: 3.0.3
info:
title: Fanvue API Documentation
description: ""
version: 1.0.0
servers:
- url: https://app.onlyfansapi.com
security:
- default: []
tags:
- name: Account
description: Endpoints for your connected Fanvue accounts
- name: Chat Messages
description: Endpoints for the messages inside a Fanvue chat.
- name: Chats
description: Endpoints for a Fanvue creator's inbox. A chat is identified by the
fan's user UUID.
- name: Fans
description: "Endpoints for the fans of a Fanvue creator: subscribers,
followers, smart lists and per-fan insights."
- name: Fanvue Account
description: Endpoints for the connected Fanvue creator itself.
- name: Insights
description: "Revenue and growth reporting for a Fanvue creator: per-transaction
earnings, the aggregated earnings summary, the subscriber trend and top
spenders."
- name: Profiles
description: Public Fanvue creator profiles, readable without connecting the creator.
paths:
/api/fanvue/{fanvueAccount}/fans/online:
parameters:
- in: path
name: fanvueAccount
description: The Fanvue Account ID
example: fanvue_acct_XXXXXXXXXXXXXXX
required: true
schema:
type: string
get:
summary: List Online Fans
operationId: listOnlineFans
description: List the fans who are online right now, so chatters can prioritise
them. Proxies Fanvue's `GET /v1/chats` with `filter=online`, so the
entries are chats rather than bare users and carry the same shape as
List Chats.
parameters:
- in: query
name: cursor
description: Opaque pagination cursor from a previous response's `nextCursor`.
example: eyJ2IjoxfQ
required: false
schema:
type: string
description: Opaque pagination cursor from a previous response's `nextCursor`.
example: eyJ2IjoxfQ
- in: query
name: size
description: Number of chats to return (1 - 50). Default = 15
example: 15
required: false
schema:
type: integer
description: Number of chats to return (1 - 50). Default = 15
example: 15
responses:
"200":
description: Success
content:
application/json:
schema:
type: object
example:
data:
data:
- createdAt: 2026-09-22T10:29:07.400Z
lastMessageAt: 2026-09-22T10:46:04.712Z
isRead: true
unreadMessagesCount: 0
isMuted: false
user:
uuid: f47ac10b-58cc-4372-a567-0e02b2c3d479
handle: sarah-jones
displayName: Sarah Jones
nickname: null
isTopSpender: false
avatarUrl: null
registeredAt: 2026-09-21T12:05:33.176Z
lastMessage:
sentAt: 2026-09-22T10:46:04.712Z
text: See you tonight!
hasMedia: false
hasGif: false
type: SINGLE_RECIPIENT
mediaType: null
uuid: 3b1f0a6c-92f1-4a58-9d0e-7c4b2a5f8d33
senderUuid: 3bbe6394-2830-4646-a8ba-4a0a05426947
senderRole: CREATOR
sentByUserId: null
status: Read
online: true
lastSeenAt: 2026-09-22T11:23:37.916Z
isCreator: false
customLists: []
nextCursor: null
total: null
_meta:
_credits:
used: 1
balance: 10055811
note: Always
_cache:
is_cached: false
note: Cache disabled for this endpoint
_rate_limits:
limit_minute: 5000
limit_day: null
remaining_minute: 4999
remaining_day: null
notice: We have decided to remove our daily rate limits. Please remove any
references to these in your integrations.
properties:
data:
type: object
properties:
data:
type: array
example:
- createdAt: 2026-09-22T10:29:07.400Z
lastMessageAt: 2026-09-22T10:46:04.712Z
isRead: true
unreadMessagesCount: 0
isMuted: false
user:
uuid: f47ac10b-58cc-4372-a567-0e02b2c3d479
handle: sarah-jones
displayName: Sarah Jones
nickname: null
isTopSpender: false
avatarUrl: null
registeredAt: 2026-09-21T12:05:33.176Z
lastMessage:
sentAt: 2026-09-22T10:46:04.712Z
text: See you tonight!
hasMedia: false
hasGif: false
type: SINGLE_RECIPIENT
mediaType: null
uuid: 3b1f0a6c-92f1-4a58-9d0e-7c4b2a5f8d33
senderUuid: 3bbe6394-2830-4646-a8ba-4a0a05426947
senderRole: CREATOR
sentByUserId: null
status: Read
online: true
lastSeenAt: 2026-09-22T11:23:37.916Z
isCreator: false
customLists: []
items:
type: object
properties:
createdAt:
type: string
example: 2026-09-22T10:29:07.400Z
lastMessageAt:
type: string
example: 2026-09-22T10:46:04.712Z
isRead:
type: boolean
example: true
unreadMessagesCount:
type: integer
example: 0
isMuted:
type: boolean
example: false
user:
type: object
properties:
uuid:
type: string
example: f47ac10b-58cc-4372-a567-0e02b2c3d479
handle:
type: string
example: sarah-jones
displayName:
type: string
example: Sarah Jones
nickname:
type: string
example: null
nullable: true
isTopSpender:
type: boolean
example: false
avatarUrl:
type: string
example: null
nullable: true
registeredAt:
type: string
example: 2026-09-21T12:05:33.176Z
lastMessage:
type: object
properties:
sentAt:
type: string
example: 2026-09-22T10:46:04.712Z
text:
type: string
example: See you tonight!
hasMedia:
type: boolean
example: false
hasGif:
type: boolean
example: false
type:
type: string
example: SINGLE_RECIPIENT
mediaType:
type: string
example: null
nullable: true
uuid:
type: string
example: 3b1f0a6c-92f1-4a58-9d0e-7c4b2a5f8d33
senderUuid:
type: string
example: 3bbe6394-2830-4646-a8ba-4a0a05426947
senderRole:
type: string
example: CREATOR
sentByUserId:
type: string
example: null
nullable: true
status:
type: string
example: Read
online:
type: boolean
example: true
lastSeenAt:
type: string
example: 2026-09-22T11:23:37.916Z
isCreator:
type: boolean
example: false
customLists:
type: array
example: []
nextCursor:
type: string
example: null
nullable: true
total:
type: string
example: null
nullable: true
_meta:
type: object
properties:
_credits:
type: object
properties:
used:
type: integer
example: 1
balance:
type: integer
example: 10055811
note:
type: string
example: Always
_cache:
type: object
properties:
is_cached:
type: boolean
example: false
note:
type: string
example: Cache disabled for this endpoint
_rate_limits:
type: object
properties:
limit_minute:
type: integer
example: 5000
limit_day:
type: string
example: null
nullable: true
remaining_minute:
type: integer
example: 4999
remaining_day:
type: string
example: null
nullable: true
notice:
type: string
example: We have decided to remove our daily rate limits. Please remove any
references to these in your integrations.
tags:
- Fans
components:
securitySchemes:
default:
type: http
scheme: bearer
description: Get your API Key from OnlyFansAPI Console -
https://app.onlyfansapi.com/api-keys
````
# List Smart List Members (/api-reference/fanvue/fans/list-smart-list-members)
List the fans in one smart list, filtered by Fanvue to the ones this creator can contact. Proxies Fanvue's `GET /v1/chats/lists/smart/{uuid}`. Keep `size` constant for the whole walk; `total` is not computed for this list and is always `null`.
## OpenAPI
````yaml https://app.onlyfansapi.com/scribe-fanvue-docs/openapi.yaml get /api/fanvue/{fanvueAccount}/fans/lists/{smart}
openapi: 3.0.3
info:
title: Fanvue API Documentation
description: ""
version: 1.0.0
servers:
- url: https://app.onlyfansapi.com
security:
- default: []
tags:
- name: Account
description: Endpoints for your connected Fanvue accounts
- name: Chat Messages
description: Endpoints for the messages inside a Fanvue chat.
- name: Chats
description: Endpoints for a Fanvue creator's inbox. A chat is identified by the
fan's user UUID.
- name: Fans
description: "Endpoints for the fans of a Fanvue creator: subscribers,
followers, smart lists and per-fan insights."
- name: Fanvue Account
description: Endpoints for the connected Fanvue creator itself.
- name: Insights
description: "Revenue and growth reporting for a Fanvue creator: per-transaction
earnings, the aggregated earnings summary, the subscriber trend and top
spenders."
- name: Profiles
description: Public Fanvue creator profiles, readable without connecting the creator.
paths:
/api/fanvue/{fanvueAccount}/fans/lists/{smart}:
parameters:
- in: path
name: fanvueAccount
description: The Fanvue Account ID
example: fanvue_acct_XXXXXXXXXXXXXXX
required: true
schema:
type: string
- in: path
name: smart
description: "The smart list id: `subscribers`, `auto_renewing`, `non_renewing`,
`followers`, `free_trial_subscribers`, `expired_subscribers`,
`spent_more_than_50`, `muted` or `creators`. Any other value is a
404."
example: expired_subscribers
required: true
schema:
type: string
get:
summary: List Smart List Members
operationId: listSmartListMembers
description: List the fans in one smart list, filtered by Fanvue to the ones
this creator can contact. Proxies Fanvue's `GET
/v1/chats/lists/smart/{uuid}`. Keep `size` constant for the whole walk;
`total` is not computed for this list and is always `null`.
parameters:
- in: query
name: cursor
description: Opaque pagination cursor from a previous response's `nextCursor`.
example: eyJ2IjoxfQ
required: false
schema:
type: string
description: Opaque pagination cursor from a previous response's `nextCursor`.
example: eyJ2IjoxfQ
- in: query
name: size
description: Number of members to return (1 - 50). Default = 15
example: 15
required: false
schema:
type: integer
description: Number of members to return (1 - 50). Default = 15
example: 15
responses:
"200":
description: Success
content:
application/json:
schema:
type: object
example:
data:
data:
- uuid: f47ac10b-58cc-4372-a567-0e02b2c3d479
displayName: Sarah Jones
handle: sarah-jones
isCreator: false
nextCursor: null
total: null
_meta:
_credits:
used: 1
balance: 10055811
note: Always
_cache:
is_cached: false
note: Cache disabled for this endpoint
_rate_limits:
limit_minute: 5000
limit_day: null
remaining_minute: 4999
remaining_day: null
notice: We have decided to remove our daily rate limits. Please remove any
references to these in your integrations.
properties:
data:
type: object
properties:
data:
type: array
example:
- uuid: f47ac10b-58cc-4372-a567-0e02b2c3d479
displayName: Sarah Jones
handle: sarah-jones
isCreator: false
items:
type: object
properties:
uuid:
type: string
example: f47ac10b-58cc-4372-a567-0e02b2c3d479
displayName:
type: string
example: Sarah Jones
handle:
type: string
example: sarah-jones
isCreator:
type: boolean
example: false
nextCursor:
type: string
example: null
nullable: true
total:
type: string
example: null
nullable: true
_meta:
type: object
properties:
_credits:
type: object
properties:
used:
type: integer
example: 1
balance:
type: integer
example: 10055811
note:
type: string
example: Always
_cache:
type: object
properties:
is_cached:
type: boolean
example: false
note:
type: string
example: Cache disabled for this endpoint
_rate_limits:
type: object
properties:
limit_minute:
type: integer
example: 5000
limit_day:
type: string
example: null
nullable: true
remaining_minute:
type: integer
example: 4999
remaining_day:
type: string
example: null
nullable: true
notice:
type: string
example: We have decided to remove our daily rate limits. Please remove any
references to these in your integrations.
tags:
- Fans
components:
securitySchemes:
default:
type: http
scheme: bearer
description: Get your API Key from OnlyFansAPI Console -
https://app.onlyfansapi.com/api-keys
````
# List Smart Lists (/api-reference/fanvue/fans/list-smart-lists)
List Fanvue's smart lists with their member counts. Smart lists are audience segments Fanvue computes and keeps up to date itself, so there is nothing to create or maintain. Proxies Fanvue's `GET /v1/chats/lists/smart`.
## OpenAPI
````yaml https://app.onlyfansapi.com/scribe-fanvue-docs/openapi.yaml get /api/fanvue/{fanvueAccount}/fans/lists
openapi: 3.0.3
info:
title: Fanvue API Documentation
description: ""
version: 1.0.0
servers:
- url: https://app.onlyfansapi.com
security:
- default: []
tags:
- name: Account
description: Endpoints for your connected Fanvue accounts
- name: Chat Messages
description: Endpoints for the messages inside a Fanvue chat.
- name: Chats
description: Endpoints for a Fanvue creator's inbox. A chat is identified by the
fan's user UUID.
- name: Fans
description: "Endpoints for the fans of a Fanvue creator: subscribers,
followers, smart lists and per-fan insights."
- name: Fanvue Account
description: Endpoints for the connected Fanvue creator itself.
- name: Insights
description: "Revenue and growth reporting for a Fanvue creator: per-transaction
earnings, the aggregated earnings summary, the subscriber trend and top
spenders."
- name: Profiles
description: Public Fanvue creator profiles, readable without connecting the creator.
paths:
/api/fanvue/{fanvueAccount}/fans/lists:
parameters:
- in: path
name: fanvueAccount
description: The Fanvue Account ID
example: fanvue_acct_XXXXXXXXXXXXXXX
required: true
schema:
type: string
get:
summary: List Smart Lists
operationId: listSmartLists
description: List Fanvue's smart lists with their member counts. Smart lists are
audience segments Fanvue computes and keeps up to date itself, so there
is nothing to create or maintain. Proxies Fanvue's `GET
/v1/chats/lists/smart`.
parameters: []
responses:
"200":
description: Success
content:
application/json:
schema:
type: object
example:
data:
- uuid: subscribers
name: Subscribers
count: 1
- uuid: auto_renewing
name: Auto-renewing
count: 1
- uuid: non_renewing
name: Non-renewing
count: 0
- uuid: followers
name: Followers
count: 0
- uuid: free_trial_subscribers
name: Free trial subscribers
count: 0
- uuid: expired_subscribers
name: Expired subscribers
count: 0
- uuid: spent_more_than_50
name: Spent more than $50
count: 0
- uuid: muted
name: Muted
count: 0
- uuid: creators
name: Creators
count: 0
_meta:
_credits:
used: 1
balance: 10055811
note: Always
_cache:
is_cached: false
note: Cache disabled for this endpoint
_rate_limits:
limit_minute: 5000
limit_day: null
remaining_minute: 4999
remaining_day: null
notice: We have decided to remove our daily rate limits. Please remove any
references to these in your integrations.
properties:
data:
type: array
example:
- uuid: subscribers
name: Subscribers
count: 1
- uuid: auto_renewing
name: Auto-renewing
count: 1
- uuid: non_renewing
name: Non-renewing
count: 0
- uuid: followers
name: Followers
count: 0
- uuid: free_trial_subscribers
name: Free trial subscribers
count: 0
- uuid: expired_subscribers
name: Expired subscribers
count: 0
- uuid: spent_more_than_50
name: Spent more than $50
count: 0
- uuid: muted
name: Muted
count: 0
- uuid: creators
name: Creators
count: 0
items:
type: object
properties:
uuid:
type: string
example: subscribers
name:
type: string
example: Subscribers
count:
type: integer
example: 1
_meta:
type: object
properties:
_credits:
type: object
properties:
used:
type: integer
example: 1
balance:
type: integer
example: 10055811
note:
type: string
example: Always
_cache:
type: object
properties:
is_cached:
type: boolean
example: false
note:
type: string
example: Cache disabled for this endpoint
_rate_limits:
type: object
properties:
limit_minute:
type: integer
example: 5000
limit_day:
type: string
example: null
nullable: true
remaining_minute:
type: integer
example: 4999
remaining_day:
type: string
example: null
nullable: true
notice:
type: string
example: We have decided to remove our daily rate limits. Please remove any
references to these in your integrations.
tags:
- Fans
components:
securitySchemes:
default:
type: http
scheme: bearer
description: Get your API Key from OnlyFansAPI Console -
https://app.onlyfansapi.com/api-keys
````
# List Subscribers (/api-reference/fanvue/fans/list-subscribers)
List the users holding a subscription to the creator, with each subscription's status, price in USD cents, current period end and auto-renew flag. For the subscribers about to lapse, use List Expiring Subscribers rather than paging this endpoint and filtering on `subscription.currentPeriodEnd` and `subscription.autoRenewalEnabled` yourself.
Proxies Fanvue's `GET /v1/subscribers` and returns its body unchanged. The `nextCursor` carries the sort and date range the first page was cut under, so later pages need nothing but the cursor.
## OpenAPI
````yaml https://app.onlyfansapi.com/scribe-fanvue-docs/openapi.yaml get /api/fanvue/{fanvueAccount}/fans/subscribers
openapi: 3.0.3
info:
title: Fanvue API Documentation
description: ""
version: 1.0.0
servers:
- url: https://app.onlyfansapi.com
security:
- default: []
tags:
- name: Account
description: Endpoints for your connected Fanvue accounts
- name: Chat Messages
description: Endpoints for the messages inside a Fanvue chat.
- name: Chats
description: Endpoints for a Fanvue creator's inbox. A chat is identified by the
fan's user UUID.
- name: Fans
description: "Endpoints for the fans of a Fanvue creator: subscribers,
followers, smart lists and per-fan insights."
- name: Fanvue Account
description: Endpoints for the connected Fanvue creator itself.
- name: Insights
description: "Revenue and growth reporting for a Fanvue creator: per-transaction
earnings, the aggregated earnings summary, the subscriber trend and top
spenders."
- name: Profiles
description: Public Fanvue creator profiles, readable without connecting the creator.
paths:
/api/fanvue/{fanvueAccount}/fans/subscribers:
parameters:
- in: path
name: fanvueAccount
description: The Fanvue Account ID
example: fanvue_acct_XXXXXXXXXXXXXXX
required: true
schema:
type: string
get:
summary: List Subscribers
operationId: listSubscribers
description: >-
List the users holding a subscription to the creator, with each
subscription's status, price in USD cents, current period end and
auto-renew flag. For the subscribers about to lapse, use List Expiring
Subscribers rather than paging this endpoint and filtering on
`subscription.currentPeriodEnd` and `subscription.autoRenewalEnabled`
yourself.
Proxies Fanvue's `GET /v1/subscribers` and returns its body unchanged.
The `nextCursor` carries the sort and date range the first page was cut
under, so later pages need nothing but the cursor.
parameters:
- in: query
name: cursor
description: Opaque pagination cursor from a previous response's `nextCursor`.
example: eyJ2IjoxfQ
required: false
schema:
type: string
description: Opaque pagination cursor from a previous response's `nextCursor`.
example: eyJ2IjoxfQ
- in: query
name: size
description: Number of subscribers to return (1 - 50). Default = 15
example: 15
required: false
schema:
type: integer
description: Number of subscribers to return (1 - 50). Default = 15
example: 15
- in: query
name: sortField
description: "Field to sort by: `name` or `subscribedAt`. Default =
`subscribedAt`"
example: subscribedAt
required: false
schema:
type: string
description: "Field to sort by: `name` or `subscribedAt`. Default =
`subscribedAt`"
example: subscribedAt
- in: query
name: sortDirection
description: "Sort direction: `asc` or `desc`. Default = `desc` for
`subscribedAt`, `asc` for `name`"
example: desc
required: false
schema:
type: string
description: "Sort direction: `asc` or `desc`. Default = `desc` for
`subscribedAt`, `asc` for `name`"
example: desc
- in: query
name: startDate
description: Only include subscriptions started on or after this ISO 8601
datetime.
example: 2026-01-01T00:00:00Z
required: false
schema:
type: string
description: Only include subscriptions started on or after this ISO 8601
datetime.
example: 2026-01-01T00:00:00Z
- in: query
name: endDate
description: Only include subscriptions started before this ISO 8601 datetime
(non-inclusive).
example: 2026-09-01T00:00:00Z
required: false
schema:
type: string
description: Only include subscriptions started before this ISO 8601 datetime
(non-inclusive).
example: 2026-09-01T00:00:00Z
responses:
"200":
description: Success
content:
application/json:
schema:
type: object
example:
data:
data:
- uuid: f47ac10b-58cc-4372-a567-0e02b2c3d479
handle: sarah-jones
displayName: Sarah Jones
nickname: null
isTopSpender: false
avatarUrl: null
registeredAt: 2026-09-21T12:05:33.176Z
subscription:
status: active
price: 399
amountPaid: 399
currentPeriodStart: 2026-09-22T10:29:07.224Z
currentPeriodEnd: 2026-10-22T10:28:59.873Z
autoRenewalEnabled: true
firstSubscribedAt: 2026-09-22T10:29:07.474Z
nextCursor: null
_meta:
_credits:
used: 1
balance: 10055811
note: Always
_cache:
is_cached: false
note: Cache disabled for this endpoint
_rate_limits:
limit_minute: 5000
limit_day: null
remaining_minute: 4999
remaining_day: null
notice: We have decided to remove our daily rate limits. Please remove any
references to these in your integrations.
properties:
data:
type: object
properties:
data:
type: array
example:
- uuid: f47ac10b-58cc-4372-a567-0e02b2c3d479
handle: sarah-jones
displayName: Sarah Jones
nickname: null
isTopSpender: false
avatarUrl: null
registeredAt: 2026-09-21T12:05:33.176Z
subscription:
status: active
price: 399
amountPaid: 399
currentPeriodStart: 2026-09-22T10:29:07.224Z
currentPeriodEnd: 2026-10-22T10:28:59.873Z
autoRenewalEnabled: true
firstSubscribedAt: 2026-09-22T10:29:07.474Z
items:
type: object
properties:
uuid:
type: string
example: f47ac10b-58cc-4372-a567-0e02b2c3d479
handle:
type: string
example: sarah-jones
displayName:
type: string
example: Sarah Jones
nickname:
type: string
example: null
nullable: true
isTopSpender:
type: boolean
example: false
avatarUrl:
type: string
example: null
nullable: true
registeredAt:
type: string
example: 2026-09-21T12:05:33.176Z
subscription:
type: object
properties:
status:
type: string
example: active
price:
type: integer
example: 399
amountPaid:
type: integer
example: 399
currentPeriodStart:
type: string
example: 2026-09-22T10:29:07.224Z
currentPeriodEnd:
type: string
example: 2026-10-22T10:28:59.873Z
autoRenewalEnabled:
type: boolean
example: true
firstSubscribedAt:
type: string
example: 2026-09-22T10:29:07.474Z
nextCursor:
type: string
example: null
nullable: true
_meta:
type: object
properties:
_credits:
type: object
properties:
used:
type: integer
example: 1
balance:
type: integer
example: 10055811
note:
type: string
example: Always
_cache:
type: object
properties:
is_cached:
type: boolean
example: false
note:
type: string
example: Cache disabled for this endpoint
_rate_limits:
type: object
properties:
limit_minute:
type: integer
example: 5000
limit_day:
type: string
example: null
nullable: true
remaining_minute:
type: integer
example: 4999
remaining_day:
type: string
example: null
nullable: true
notice:
type: string
example: We have decided to remove our daily rate limits. Please remove any
references to these in your integrations.
tags:
- Fans
components:
securitySchemes:
default:
type: http
scheme: bearer
description: Get your API Key from OnlyFansAPI Console -
https://app.onlyfansapi.com/api-keys
````
# Example scenarios (/integrations/make/example-scenarios)
import {ArrowLeftRightIcon, LinkIcon} from "lucide-react";